Last Seen Blogs


Text
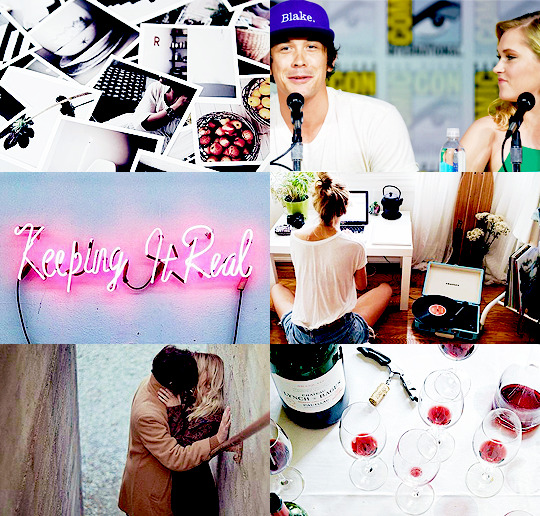
how to create aesthetic graphics
(a tutorial by rihleymatthews)

so, many people requested me a tutorial on these (x and x) graphics, and since they are not hard at all to create, i decided to try explaining to you guys how they come to life.
WARNING: this is a long and detailed tutorial. Please keep in mind I tried to show all the tricks I normally use for these graphics, so some steps are optional or extra.
you’ll need:
basic to medium photoshop knowledge (such as cropping, blending and shadowing)
a concept (a tv show, a character, something you can pick objects to represent them or their porsonality)
patience, a lot of patience.
Keep reading
5K notes
·
View notes
Photo

So, some of you guys asked me how i made this graphic, i decided to make a tutorial that will teach you how to make it. It’s really easy and will take you not more than ten minutes!
If this Tutorial was helpfull please reblog/like it!
Keep reading
37 notes
·
View notes
Photo


Gif tips + UMPlayer download + How to make gifs tutorial + My saving settings
Programs used: UMPlayer and Photoshop.
This tutorial is available in Portuguese and English.
By remondpsds - Please like or reblog.
So here are my tips:
Choose a video with 720p or more.
Apply a good action (I recommend these: (x) and (x)).
Choose a good scene.
Put a good time (Like 0,06seg)
Keep reading
196 notes
·
View notes
Note
how did you color this post?/post/141418772093/make-me-choose-anonymous-asked-lydia-martin-or
how to go from this:

to this:
Keep reading
267 notes
·
View notes
Text
☆ — ( & promo graphic tutorial !
as requested by @theprincessladyswan and a few others, i, SHEILA, shall be doing a simple promo graphic via photoshop CC 2014 (also known as CS6). please reblog and/or like if you found this useful and/or helpful. this by no means is the correct way to make graphics, this is just how i tend to go about making my graphics. i will also be making a banner tutorial in the near future so be on the lookout for that as well. any questions, concerns, etc. that you may have, please come and IM/inbox me on @brckeglass. (you can message me on here as well, just make sure to put ‘sheila’ so i know its for me!) hope you enjoyed this tutorial babes!
Keep reading
103 notes
·
View notes
Text
vibrant gifs - coloring tutorial
Final result:

Keep reading
1K notes
·
View notes
Photo


Hi, everyone! Although I wasn’t 100% satisfied with this graphic–it’s definitely not one of my most inspired–I think it’s a pretty good illustration of the kind of stuff I’ve got in my Bag of Photoshop Tricks, since I used all my standard techniques here! I didn’t think it merited a full tutorial, so I thought I’d go with a process gif instead.
Some stuff that might be noteworthy, if you’re interested:
I use reversed, black-to-transparent reflected and radial gradients to create a spotlight effect on the focal point of my image. I discuss using these kinds of gradients in this tutorial.
Putting down some kind of brush behind the main figure of the graphic (in this case Cate Blanchett) helps fill the empty, dark space, direct attention to the figure, and create an area of lighter color for the brushes/textures/etc. I add later to “hook onto,” in a manner of speaking–otherwise, they would not be as visible.
Several of the textures I add are not textures, but actually paintings in the public domain. Breakfast with a Lobster by Willem Claeszoon Heda is rotated and set to Soft Light, creating some interesting, abstract shapes. The Bull by Paulus Potter is blurred and set to Soft Light, adding color and light to the image. The painting that is most visible is Gerrit Adriaenz. Berkheyde’s The Great Market in Haarlem, which provides the building you see in the splash of color.
The texture I feel really brings the whole image together is one from Texture Pack 18 by sirius-sdz on Deviantart. It adds a kind of metallic feeling to the graphic, as well as a sensation of brushstrokes and movement.
Hope this was useful, to anyone interested! If you have any questions, of course, please let me know!
46 notes
·
View notes
Photo

Made by hopepastel.
Tutorial in english and portuguese.
Do not pass this tutorial, please.
Give like/reblog if it’s useful.
Keep reading
28 notes
·
View notes
Note
hiya! have you ever thought about doing a tutorial on how you made your header? x thank you for reading this anyway!
this is literally sOOOOO LATE but here’s a tutorial on how to make my former header:
(fam the quality so low, but if you click here, you’ll see it in higher quality lmao!!)
the tutorial starts underneath the cut!
Keep reading
32 notes
·
View notes
Note
I'm not sure if you've been asked this before, but how do you make your fic aesthetics? They're beautiful! As is your writing :)
Aww, thank you, that’s so nice of you to say! I’ve had a few asks about this before so I think it’s probably time to post up a step-by-step tutorial on how I make these aesthetics. (please be patient with me though, I suck at explaining lmao)
How To Make One Of These A-Ok Aesthetics:
Keep reading
40 notes
·
View notes
Photo
This livejournal community have helped me multiple times and have very good and detailed tutorials made by the incredible livejournal icon and graphic makers so I decided to create a tumblr post to share their work with the tumblrverse.
Some of the tutorials featured:
A guide to complex icons
Painting on a tiny canvas
Text guide
A guide to: Selective coloring
A guide to: Close crops
Blending guide
How to Channel mixer
Complex compositions
Lighting and coloring guide
Banner & Header making
Vibrant coloring guide
Sharpening guide
Keep reading
254 notes
·
View notes
Photo


how to get a smooth and crisp image without Topaz Labs using Photoshop.
disclaimer: this can have more of a subtle effect; this smart sharpen technique works great on gifs as well.
Assuming you have done all of your editing and flattened (or merged) all of the layers into one, duplicate the background layer.
With the duplicated layer selected, go to filter > noise > reduce noise… And input these settings:
Strength: 10
Preserve Details: 10 — 20 (usually kept at 20)
Reduce Color Noise: 0
Sharpen Details: 0
Lower the opacity (beside the blend mode drop down) anywhere between 70% and 80%; on higher quality images, I will lower the opacity to 70.
On the background layer (the one directly below the duplicate), go to filter > sharpen > smart sharpen… And input these settings:
Amount: 500
Radius: 0.2
Remove: Lens Blur
More Accurate
71 notes
·
View notes
Note
Hi, Taylor! Do you know of any good tutorials for how to make headers/banners for themes?
I would definitely check these links out.
#01: Header Tutorial by completeresources
#02: Fansite Header Tutorial by thosetutorials
#03: Header Tutorial by ritassists
#04: Simple Fansite Header Tutorial by lysdia
#05: Header Tutorial by sapphireroleplays
#06: Header Image by fy-gimp
#07: Simple Header Tutorial by completeresources

17 notes
·
View notes
Photo
But I didn’t see
That the joke was on me
#movie: the killing joke#c: the joker#c: batman#fandom: batman#actor: mark hamill#⚔┇❛ ᴋᴇᴇᴘᴇʀ ᴏғ ᴛʜᴇ ǫᴜᴇᴜᴇ ❜ (queued.)
1K notes
·
View notes
Photo

hi there! since i wasn’t able to write a useful css tutorial (;A; sorry everyone), here is the second tutorial for my follower giveaway – another photoshop tutorial, but hopefully still useful!
please note, this tutorial assumes experience with any version of photoshop. i am using photoshop cc. this tutorial is very image-heavy.
let’s get started!
Keep reading
354 notes
·
View notes
Photo

THEME #47 / ALL-IN-ONE THEME BY EVILQUEENEDTHEMES.
[► how to install my themes ◄]
FEATURES & OPTIONS
• • • IMAGES:
245px width sidebar image and “about me” image.
225x125px images tab 6 / networks images (i included 10 images by default)
• • • FEATURES:
all-in-one theme including: ask/faq, navigation, about and networks tabs.
500px posts.
navigation topbar.
4 extra links on the sidebar (dropdown menu).
like and reblog buttons.
scroll to top button (size is editable on the customization page).
regular, small or hover tumblr controls.
as usual, colorized scrollbar (+ on click) and selection.
• • • OPTIONS: (things you can enable/disable/edit on the customization page)
all tabs (except tab 2 /ask - faq).
the sidebar extra links (dropdown menu).
the hover and/or small tumblr controls.
sidebar, post, updates and “small” fonts.
sidebar, post and “small” fonts ans sizes.
the navigation subtitles.
the search box.
• • • CREDIT:
all-in-one base code by @neonbikethemes
like & reblog button tutorial by @solitudethemes
tumblr controls by @shythemes
hide stuff tutorial by @lmthemes
navigation icons [here].
Please like/reblog if you’re using the theme, thank you :)
This theme is an all-in-one theme which means the differents tabs are editable on the html (just like custom pages), so you might need some basic html knowledge.
Before asking anything, PLEASE check out the customization page AND the code carefully, take some time to figure where things are, how to show/hide and customize them. I tired to indicate everything on the code to make it easier for you to use.
!!! For tab 2 - ask/faq, you’ll have to enter your blog url (without http://www and without .tumblr.com - so basically for me it would be evilqueenedthemes) on the customization page for your askbox and submit box to work.
► STATIC PREVIEW: (1) (2) + see blogroll on my main blog
► [ C O D E ]
2K notes
·
View notes
Photo


#actor: keith richards#musician: keith richards#fandom: potc#movie: potc: at worlds end#c: edward teague
200 notes
·
View notes