
I post 94% bnha ¦ random drabbles ¦ traditional sketches ¦ digital art if there's a chance | and MEMES |
Don't wanna be here? Send us removal request.
Statistics
We looked inside some of the posts by alerttheasthma and here's what we found interesting.
Average Info
Notes Per Post
146K
Likes Per Post
93K
Reblog Per Post
54K
Reply Per Post
72
Time Between Posts
2 months
Number of Posts By Type
Photo
3
Note
3
Text
11
Last Seen Tumblr Blogs


Fun Fact
Tumblr was created by web developers David Karp and Marco Arment.
Photo


PNG Opacity Tutorial! (Click on the images)
This art trick works really well on tumblr because transparent areas default to white until selected (except for dark mode, rip). Unfortunately this trick doesn’t work on Twitter >:/ Something I learned while making this was that .png’s hate hard edges! Putting a soft blur around text and hard lines will help prevent it from showing those little artifact borders and spoiling your surprise!
8K notes
·
View notes
Photo


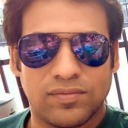
As promised, here is a very brief overview of transparency art! Thank you all for your interest! Note: the images are transparent too!
Below the cut I included a sort of walkthrough of one of my transparency pieces!
Firstly, thank you for your interest! I will give a walkthrough of this piece here!

As a short disclaimers, I just want to say that this is my way of doing it, and there are many other ways different artists may make works as well, and all ways are correct! I’m just showing you how I do it!
Secondly, I’m specifically talking about photoshop CC, which is the program I am using. The concept itself is the same, but how to implement these features may vary program to program.
Lastly, I still consider myself sort of a beginner, as I have not done transparency arts for that long, and I still have a lot to learn, so take these tips and walkthrough with a pinch of salt!
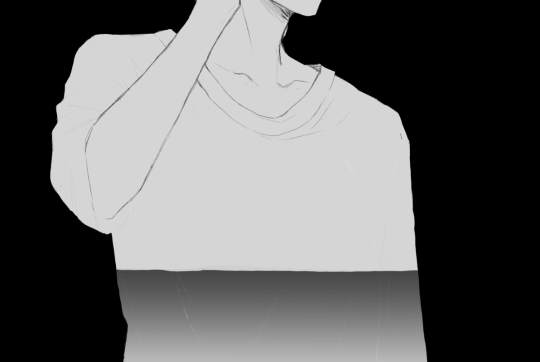
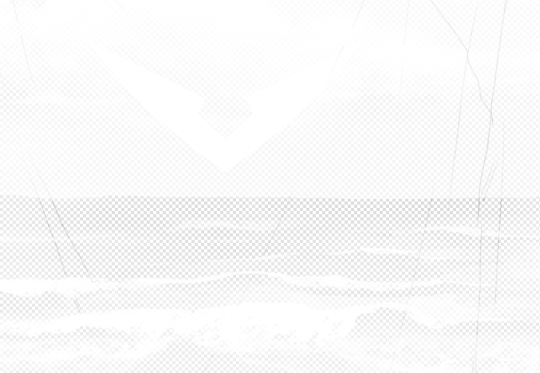
When deciding what to make, I wanted to go with the concept of a background inside someone, and the idea of the ocean and Lance hearing it through a shell kind of came to me.
I first started with the lineart of Lance! It was initially drawn on white:

Then, I made a pure black background layer on top of the white background layer. That would be to see the white! Following that, I solid colored lance with pure white. It’s helpful to make the background color semi transparent so you can see both the black lineart and white.

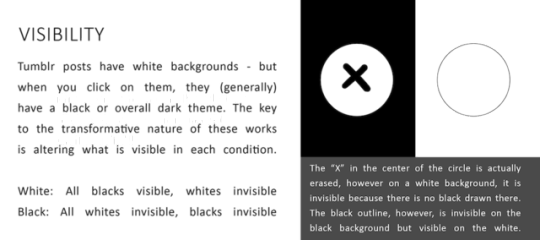
The use of layer masks was key to making these kinds of transparency works. They allow shades from black to white to be drawn ‘normally’ on the mask and translate them into levels of opacity!
In this image, for demonstration, I made a bunch of rectangles on a mask layer over the plain white layer. The rectangles were drawn with different shades, but because they were on a layer mask, that translated those shades to opacities. White = completely solid Black = completely transparent
Using layer mask, I made the gradient for the ocean.
The next was drawing the ocean and sky. I made these with pure white at different opacities. I tended to alter the opacity of the brush a lot to achieve the different variations of white. These were done on many white layers on top of one another.
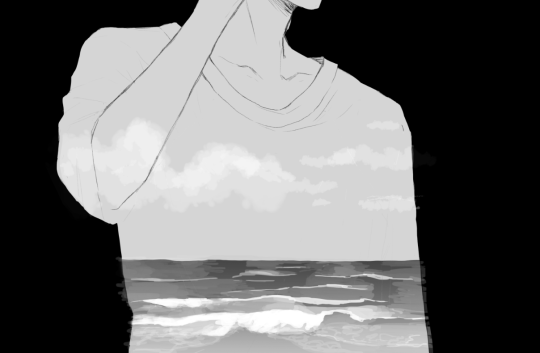
I continued doing this and layering whites on top of one another until it resembled an ocean, then went back to the original white layer and added shadows using layer masks again! I repeated switching between layer masks and drawing on top with white these until they look satisfactory!
I also used the voltron symbol and colored it pure white and added it in! Along with stars and other sources of light! I used a blurry brush with a low opacity for the ‘glow’ around the clouds and the icon!

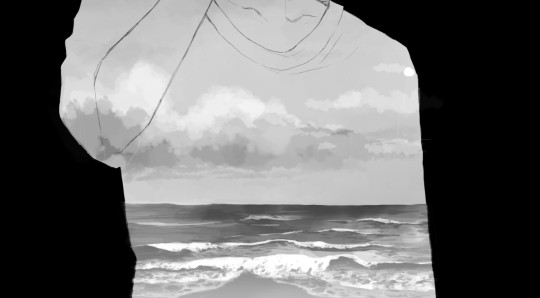
Lastly, I opened Lance’s eyes! They were ‘drawn’ just by erasing the bottom white layer with the pencil tool I used for the lineart, but they could have also theoretically been done using layer masks too.

And he is done!
Important: When saving the image, ensure you are saving it in a format that preserves opacity! For example, in photoshop I save it as a .png file! Make sure that you get rid of the background so you are left with nothing there!
On photoshop it looks like this:
I hope this was helpful! Depending on the type of art, the techniques used in transparency works may vary! Sometimes I use mostly just solid erasing rather than layer masks, other times, like this, I use a lot of masks and layers. Often if you are doing works with gradients, varying levels of grey, shade and smaller details, masks are better, while for the type of “disappearing/changing” parts of linearts, erasing is better. This is only one way of doing it - the potential in this kind of art is endless!
I hope this reads okay, and if you have any other questions, you can always message me! If you got through this long walkthrough, thank you very much for reading!
If you are interested in seeing more transparency works, I made a blog dedicated to them @transparent-art and if you make transparency works, show me, I’d love to see them! (I love this type of art so much!) Have fun experimenting!
8K notes
·
View notes
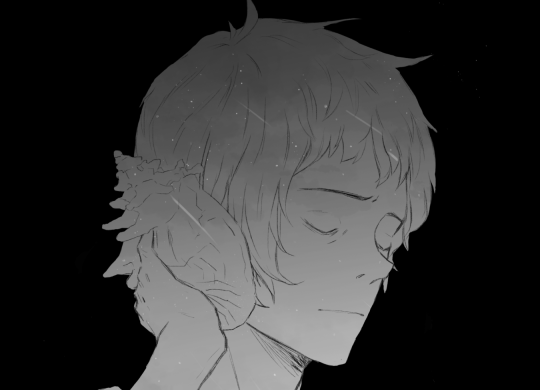
Note
WOAH THAT LAST ART WAS SO GOOD?? I WAS EMOTIONAL how do you even make all the shades??? it's sorcery right. sorcery and good art skills
Omg the secret is a lot of deleting, a lot of layers and a lot of internal screaming!
I have to admit, I do use Photoshop CC, which has a lot of features that make this kind of art ‘easier’. Such as layers and different ways to do opacity (both changing brush opacity and layer opacity, although these were also available on SAI).
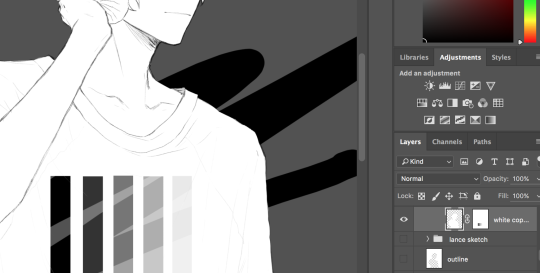
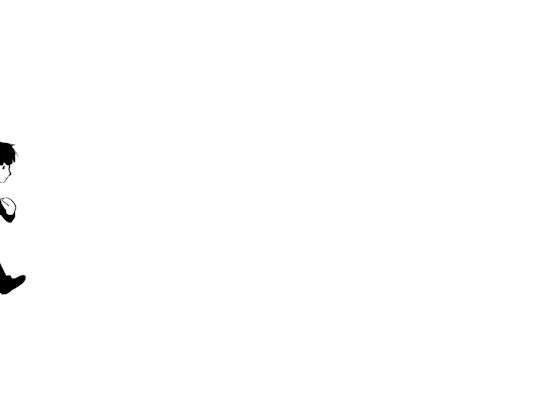
For this image specifically, it was made of predominantly 2 sections: the background/surroundings, and Lance. The background was only one layer of white, made with the gradient tool. Lance was made up of around 9 layers of white.

I filled his outline him with a solid white, then brought the opacity way down to almost 5%, and then copied this layer over it. Then I would erase one ‘shape’, for example, his shoestraps, which were going to be the darkest color. It was painstaking, but then I repeated it until I had him all colored!

Then I combined them all into one layer, and used layer masks to add extra shading, ‘shadows’ and gradients, without physically drawing darker shadows. What the masks do is change degrees of transparency!
I did the same concept for the background as well!
I’m not sure if you wanted such a long-winded answer but that’s basically how I did it! It’s the first time I tried, and I might find an easier/faster way of doing it in the future, but for now, that’s about the best I can do!
Thank you so much for your interest! I hope this was helpful in any way!
430 notes
·
View notes
Note
WHATS THAT SORCERY WITH THE TRANSPARENT PICTURE???
Omg I love when people discover transparents for the first time! I explain it better/more in depth in a tutorial I made here!

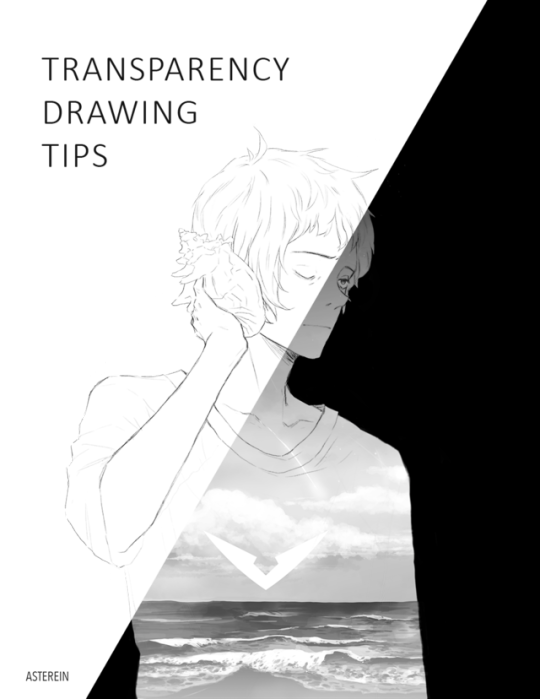
But the short version is that I draw with layers of varying opacities, and in the case of this drawing, only black and white! It looks different depending on if there’s a black background or not! When images are presented on tumblr, they are on a white background, but when you click on them, they are put on a black (mobile) or very dark (desktop) background!
So here, Left is a black background and Right is a white background!

This is what the image looks like showing where its transparent!
I hope this makes sense! I have a tag dedicated to explaining transparents/more examples if you are interested! They tend to be my inktober challenge!
677 notes
·
View notes
Photo
Thank you for finding me. CLICK THE GIF, it is transparent!
14K notes
·
View notes
Text
Some Photoshop Tips
I’ve been getting quite a few asks about the process for the patterns in my stylized artworks, so I decided to put together a couple of tips regarding them.
Firstly, what you need are
— CUSTOM BRUSHES —
Most of the patterns I use are custom brushes I made, such as those:
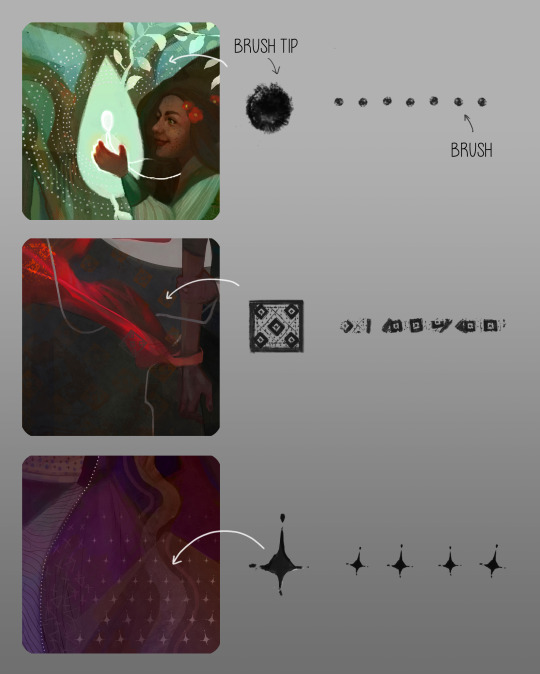
For the longest time I was convinced making brushes must be super extra complicated. I was super extra wrong. All you need to start is a transparent canvas (2500px x 2500px max):
This will be your brush tip. When you’re satisfied how it looks, click Ctrl+A to select the whole canvas and go to ‘define brush preset’ under the edit menu
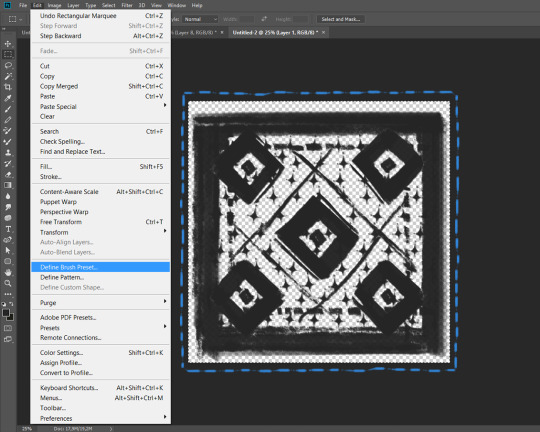
You will be asked to name your new glorious creation. Choose something that describes it well, so you can easily find it between all the ‘asfsfgdgd’ brushes you’ve created to be only used once

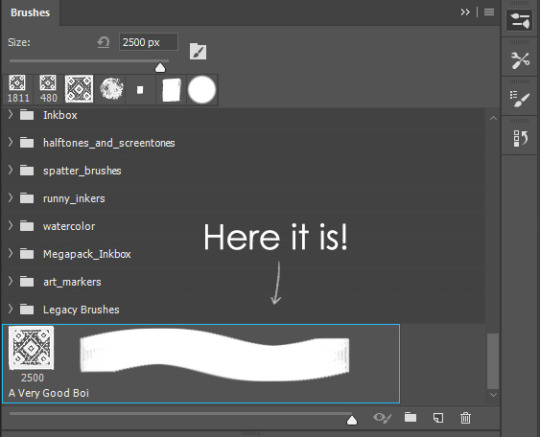
This is it. Look at it, you have just created a photoshop brush. First time i did I felt like I was cheated my whole life. IT’S SO EASY WHY HASN’T ANYONE TOLD ME
Time to edit the Good Boi to be more random, so it can be used as a Cool Fancy Pattern. Go into brush settings and change whatever you’d like. Here’s a list of what I do for patterns:
- under Shape Dynamics, I increase Size Jitter and Angle jitter by 5%-15%
- under Brush Tip Shape, I increase spacing by a shitload. Sometimes it’s like 150%, the point is to get the initial brush tip we painted to be visible.
- If I want it to look random and noisy, I enable the Dual Brush option, which acts like another brush was put on top of the one we’ve created. You can adjust all of the Dual Brush options (Size, Spacing, Scatter, Count) as you wish to get a very nice random brush to smear on your backgrounds

The result is as above. You can follow the same steps to create whatever brush you need: evenly spaced dots that look like you painted them by hand, geometric pattern to fill the background, a line of perfectly drawn XDs and so on.
BUT WAIT, THERE’S MORE
— PATHS —
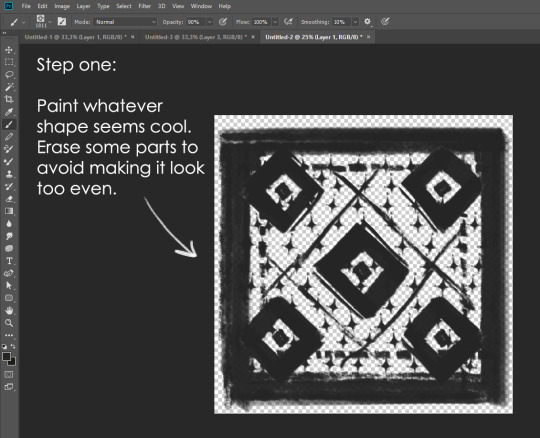
But what if you want to get lots of circles made of tiny dots? Or you need rows of triangles for your cool background? Photoshop can do all of that for you, thanks to the magic of paths.
Typically, paths window can be found right next to Layers:

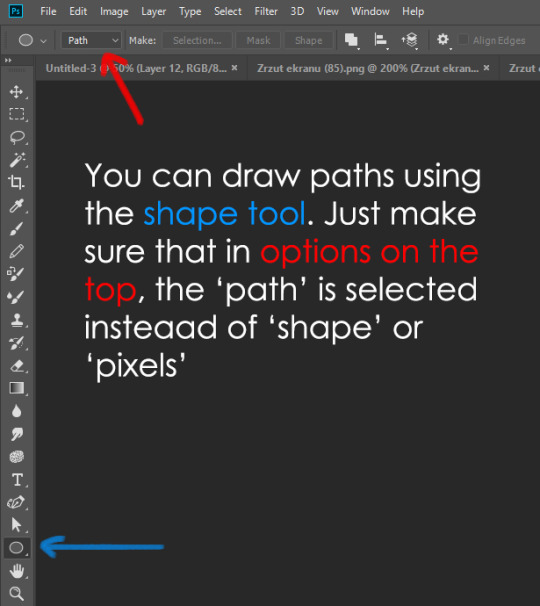
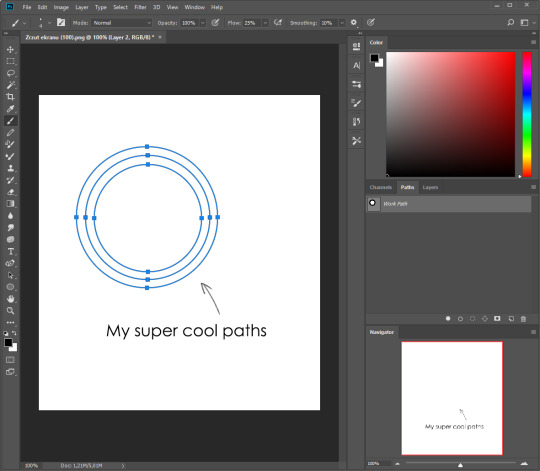
Draw whatever path you want, the Shape Tool has quite a bit of options. Remember, paths are completely different from brush strokes and they won’t show up in the navigator. To move a path around, click A to enable path selection tool. You can use Ctrl+T to transform it, and if you move a path while pressing Alt it will be duplicated.
Now, pick a brush you wish really was in place of that path you’ve drawn and go to layers, then choose the layer you want it to be drawn on. Then, click this tiny circle under the Paths window:

Then witness the magic of photoshop doing the drawing for you while you wonder how tf have you managed to forget about this option for the past 2 years
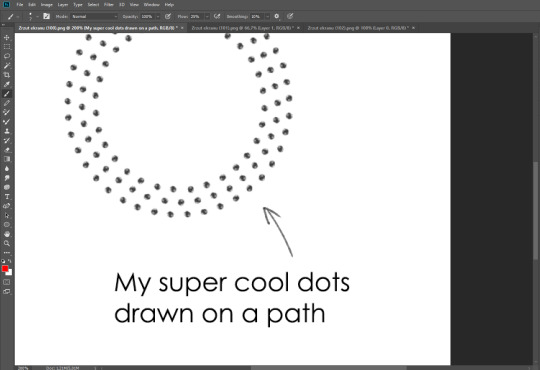
You can combine special brushes and paths for all sorts of cool effects. I mostly use them in backgrounds for my cards, but you can do whatever you want with them.
I hope that answers the questions for all of the people who were sending me inquires about the patterns. If you have any questions regarding this or any other Photoshop matter feel free to message me, I’m always up for complaining about how great and terrible Photoshop is C’:
93K notes
·
View notes


Text

Let's go 10
#haikyuu fanart#HQ!!#haikyuu#kiyoomi sakusa#sakusa kiyoomi#Sakusa#itachiyama#Itachiyama academy#volleyball#mineartt
23 notes
·
View notes
Text

Long hair
#mha ochako#uraraka ochako#ochaco#uraraka ochacho#bnha#art#boku no hero art#boku hero no academia#fanart#boku no hero academia#bnha fanart#mineartt
9 notes
·
View notes
Text
I'm late!! To greet the fire dad. But here have a todo fam in a slice of life series. Touya take the picture now 🎉🎉

#bnha#boku no hero academia#my hero academia#mha#mineartt#art#bnha fanart#fanart#doodle#fuyumi todoroki#todoroki fuyumi#mha hawks#bnha fuyumi#endeavor#hawks#enji todoroki#todoroki endeavor#todoroki enji#todoroki shouto#shoto todoroki#rei todoroki#todoroki rei#natsuo todoroki#todoroki natsuo#todoroki touya
79 notes
·
View notes
Text

What if they switched kids to know their capability of being a guardian. Are the kids comfortable with a different care taker?
It's said that Mandalay likes to nap.
I tried making it a cartoonic style.
#bnha#boku no hero academia#my hero academia#mha#bnha fanart#fanart#aizawa shota#bnha aizawa#aizawa shouta#aizawa sensei#eraserhead#shino sosaki#mandalay#mandalay bnha#eri bnha#eri#mineartt
11 notes
·
View notes
Text
Heads up! New kind of bot!!
Checking my followers today, I found what appears to be your run off the mill "Jocelyn 27 pictures" bot.
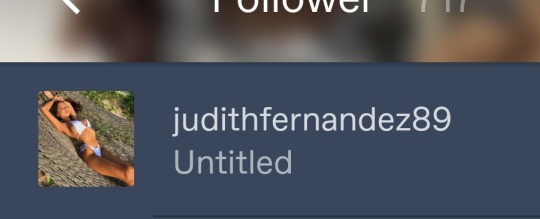
But when I went to their blog to report and block them (and report and block all the other asshole bots i see on their page), the page looked like this:

Ok this is the attempt to appear like a nsfw blog. However, in reality a nsfw blog has a pixelized icon:
and the page looks like this:

DO NOT CLICK ON THE "YES I'M 18+". I HAVE NO IDEA WHERE THE LINK WILL TAKE YOU BUT CHANCES ARE IT'S NOT A PLACE WHERE YOU AND YOUR DEVICE ARE SAFE.
REPORT AND BLOCK AT SIGHT.
@staff @support
TAKE. FUCKING. ACTION.
20K notes
·
View notes
Text

Tenko Shimura
If they were happy for him
#bnha#boku no hero academia#my hero academia#mha#bnha fanart#fanart#doodle#art#shimura tenko#shigaraki tomura#bnha tomura#kotaro shimura#hana shimura#nana shimura#mama shimura#shimura#shimura family#monchan#monchan bnha#mineartt#bnha manga spoilers#bnha manga#bnha chapter 235 spoilers
793 notes
·
View notes
Text

Another ms paint thing
Why is no one talking about iicha
#bnha#boku no hero academia#my hero academia#mha#art#bnha fanart#fanart#ms paint#uraraka ochako#ochaco#mha ochako#iida tenya#iidaraka#iidachako#mineartt
34 notes
·
View notes
Text

F: "Good morning everyone! I'm cooking breakfast. Any request?"
N: Fuyumi-neesan :'O
S: I can smell soba
H: OMG FUYUMI <3 IWANT U OFC BUT CHICKEN WILL DO. OMG MARRY ME PLEASE XOXO
N&S:....
(Todoroki bro's unite to destroy a bird.)
H: FUYUMI HELP ME PLEASE! AAUWAA
F:....
Huwumi.
#bnha#boku no hero academia#my hero academia#mha#art#bnha fanart#fanart#doodle#fuyumi todoroki#todoroki fuyumi#mha hawks#bnha fuyumi#huwumi#natsuo todoroki#todoroki natsuo#shoto todoroki#todoroki shouto#mineartt#my art
83 notes
·
View notes
Text

So, I was rewatching bnha season 2 and I notice how Kaminari's back hair was like

LIKE GUYS UHMM ARE U SURE THIS IS HIM....
I thought it's some color error or maybe character error but the bag.

This is the front look, that's wild hair we got there. You're turning into your bro
#bnha#boku no hero academia#my hero academia#mha#class 1a#denki kaminari#aizawa shota#mina ashido#koji koda#tsuyu asui#izuku midoriya#sero hanta#mineta minoru#ojirou mashirao
4 notes
·
View notes