
Don't wanna be here? Send us removal request.
Statistics
We looked inside some of the posts by alexbiomonteanimationblog and here's what we found interesting.
Average Info
Notes Per Post
1
Likes Per Post
1
Reblog Per Post
0
Reply Per Post
0
Time Between Posts
18 hours
Number of Posts By Type
Text
2
Last Seen Tumblr Blogs


Fun Fact
Tumblr has a 66 index score for customer satisfaction in the US.
Text
Task 2: Christmas Animation
The following animation and it's prerequisite work was done using:
Hardware: An Ipad (7th Gen) and an Apple Pencil (First Gen)
Software: Procreate + Procreate Dreams (12 FPS)
Pre-Production:
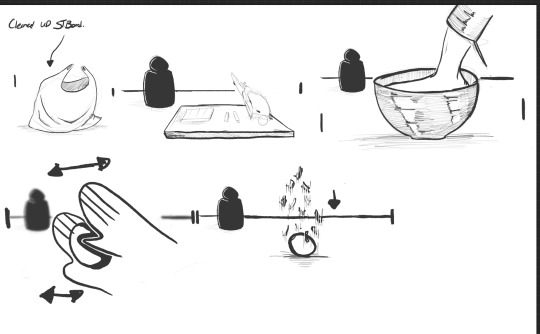
I first started off with brainstorming session to decide what I wanted my animation to be about. Due to the fact that I was watching a TV Show named "The Bear" and reading a comic named "Dungeon Meshi", Both being about Food and cooking, I was inspired to make the animation about the process of making a particular Christmas dish. I had to choose a dish that had steps that were easily recognizable and simple enough so as to fit within a 20 second animation. In the end I decided to go with "Coconut/ chocolate Balls". I Wrote down the Steps to making the dish and picked out which of the steps that were the most important and Visually Interesting. In the end I ended up choosing:
The Chopping of the Ingredients
The Pouring of the condensed Milk
The Shaping of the Balls
The Spreading of the coconut Shavings
After I decided which Steps i needed to animate, I story boarded the animation.
My first Draft featured a static shot throughout, only showing the hands of the chef as they went through each of the steps:
I didn't like this Idea however and decided to do to switch the idea to one that had featured a wider variety of shots, showing the chefs full body.
After finalizing the storyboards I did a reference sheet for the character with help of a classmate, Some aspects of the design changed during production of the animation as deemed fit but the basic gist of the character remained the same:

Production:
I first started off with rough sketches for the key frames to get the posing and positioning of the elements correct , Afterwards I went in with the in-betweens to get the motion right whilst still in the rough sketch style. I separated each cut into layers, and then separated each element of each cut into their own. For cuts that featured the full body I drew the body once without the moving limb, and added the moving limb on a different layer so i didn't have to redraw the entire body on each frame. I did the same thing for objects that were moving such as the bowl and the can of condensed milk.
(Side Note: For Each Layer I used a different colour to make them easier to separate) I used a mixture of animating on 1's, 2's, and 3's though I mainly animated on 2's, only switching out to 1's for especially fast movements (Such as the knife chopping) and switching out for 3's to hold on a frame longer than usual.
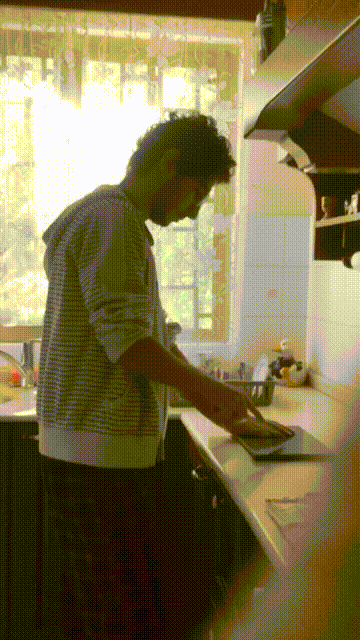
I Used online videos for reference for certain movements and recorded myself for some that I could not find online (Example shown Below:)
In the end I ended up with a Rough Animatic of the final Piece:

After I was happy with the overall feel of the animation, I Started Cleaning up Each Frame, Adding clean outlines, adding details (Such as faces and clothing) and adding values. In the End the finished Result came out as such:
Final-Thoughts:
Overall I feel quite mixed with the final result. I am proud of being able to finish this animation and having it resemble my original plan and I am quite proud of some cuts that appear on it, yet the overall quality jumps around with some cuts being vastly better than others. This was due to poor planning and thus time constraints, which gives the final animation a lack-luster/Rushed feel which I am not quite proud of. This feel is contributed also due to the lack of background and/or any background imagery. To sum it up, Whilst I am proud of having finished my first ever "full-length" animation, I feel like I could've done more.
1 note
·
View note
Text
Task 1: Animation Tests
The following 10 animation Test were done using :
Hardware: An Ipad (7th Gen) and an Apple Pencil (First Gen)
Software: Rough Animator. (12 FPS)
Test 1: Bouncing Ball
For my first try at the test I set up guidelines by drawing the arcs that the ball was going to bounce in, so that the trajectory stays consistent throughout the animation. Along with this I marked the peak and trough of each Arc and set guidelines for the height of the ball so that it's size stays consistent. after that however I animated "Straight-Ahead" and messed around with different timings and spacing until I got the the result shown below:

Here I experimented with some of the principles of animation for the first time!
I implemented squash and stretch here to give the ball a sense of speed and weight, stretching the ball on the fall and rise of each arc ( when it was at its fastest point) and squashing it when it hit the ground to give it some weight as seen in the diagram below:

Using Ease in/Ease out was also a big turning point in making the motion feel right, Adding more frames and reducing the spacing between each frame as the ball reached the peak of the arc (Easing In) and reducing them as it fell and thus increasing the spacing also (Easing Out), as shown below:

For my second try at the test I tried to chart a rough timing sheet, and just tweak it at the end depending on what felt right.
Test 2: Box rotation (Vertical and Horizontal):
For this Test I made a guide so as to keep the position and guide consistent, after that slowly switched the color of the front of the box to make the illusion of it rotating and finally added ease ins and ease outs to the movement up to the rotations

Test 3: Box rotation (Horizontal):
For this task I Drew a guide so as to keep the size of the box and position of the rotation anchor consistent. After this I drew the box and different angles whilst keeping track of the spacing so that the speed would stay consistent, this left me with the final result.

Test 4: Box Movement:
For this Tasks I used: Eases Ins: At each rise of the box to give a sense of gravity. Holding A frame: To give a sense of anticipation Squash and stretch: To give the box a sense of weight.
This give me the finished result.

Test 5: Planet Rotation (Front View):
For this animation increased the size of the planet as it orbited close to the camera, and decrease the size as it went away + hid the planet as it went behind the sun to give the illusion of it doing so which gave me the following result:

Test 6 & 7: Planet Rotation (Slow & Fast):
For this test I simply increased the spacing of the moon rotation to make it go faster and and decreased the spacing to make it go slower:
Slow Version:

Fast Version:

Test 8: Robot Face:
For this Test I worked in layers, slowly building up the pieces that made up the robot face, Starting with the Head:

Then the eyes:

And finally the irises:

Test 9: Walk Cycle:
For the Final Test I followed a guide Made by Dong Chang (sourced from a video made by the very same person:

After I set up a guide to keep the height of the character consistent, I drew the key poses (Contact, Down , Pass, Up and Contact(2)), and after I was happy with them I slowly started to add in between until I was happy with the timing and overall motion of the cycle. I hadn't drawn the arms at this point, so after being happy with the motion of the legs/body/head I added the arms with another layer where I got the finished Result:

0 notes