
Don't wanna be here? Send us removal request.
Statistics
We looked inside some of the posts by apjt and here's what we found interesting.
Average Info
Notes Per Post
3
Likes Per Post
3
Reblog Per Post
0
Reply Per Post
0
Time Between Posts
2 days
Number of Posts By Type
Photo
12
Text
5
Last Seen Tumblr Blogs


Fun Fact
Tumblr has a 66 index score for customer satisfaction in the US.
Photo
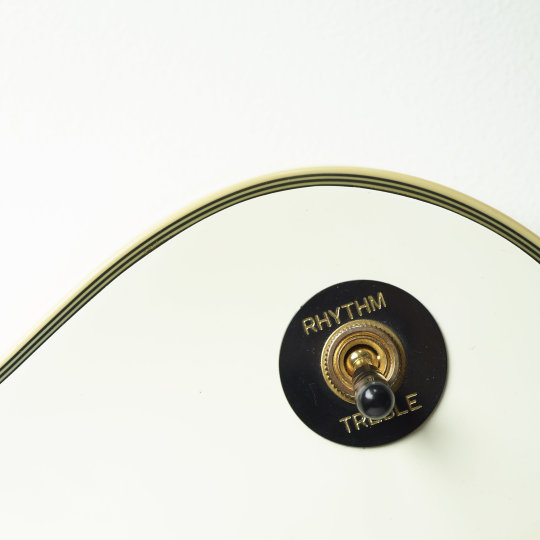

Here is the final shot and the final edit for my album cover. I have edited the image so that the whites are increased on the guitar. I also erased the background and replaced it with a clean white background on photoshop. I chose this shot as I liked the way that the cover is split by the edge of the guitar and either side (background and guitar) are very similar in colour; which is the effect I wanted. I made up the name of the band and album and fitted the text around the edge of the guitar.
0 notes
Photo


I have chosen my final image for the album cover. Before I start cropping it and editing the images I wanted to photoshop out some of the dust and marks on the guitar. As you can see from the first two images I have taken away all of the dust, marks and scratches from the black area. On the 3rd and 4th images you can see that I have cleaned up the text ‘Rhythm’ so that some of the light areas are taken away.
0 notes
Photo


I have taken the photos for my album cover shoot. I have print screened a few of the images that are in the library of photos. The first set of images is taken of the guitar with the second lighting setup with the key light on the boom stand. I took a number of shots of the whole guitar on the stand and also laying down. I moved the light around sometimes to have it more front on facing the guitar. I used the 80mm lens for when I was taking images of the whole guitar. When I wanted to zoom in I used the 120mm macro lens, which allowed me to get great detail up close. I also took photos of my vinyl, using the macro lens again. I zoomed right in so I could see the grain of the vinyl. The lighting on the vinyl I believe looks great as well.
0 notes
Photo


I have three ideas of different lighting setups that I could try when photographing my guitar and vinyls. The first setup has the key light on one side with a black polly close to the other side. This will create shadow on one side of the guitar and may look interesting on different areas of the guitar. The second setup has the key light on a boom stand above the guitar. I could use this setup if I want to have even light around the guitar; it will cast a shadow onto the backdrop if the guitar is standing up. However if it is laying on the backdrop there will be minimal shadows. The third diagram is a simple lighting setup that has the key light on one side and the fill in the other. This will create even light across the guitar but still leaving shadows that might look interesting.
0 notes
Photo


I have chosen to photograph my electric guitar for the album cover shoot. I believe the guitar will look nice against a white background. I would like to photograph the guitar as a whole but also to concentrate on certain areas. I like the first image because of the contrast between the black background and the colour of the guitar. I think something like this would be nice with a white guitar against a white background. The other two images are more examples of other areas of the guitar I could photograph.
I also have an idea of photographing one of my vinyls inside the sleeve. I have an idea where I could do a never ending picture of a vinyl inside a vinyl inside a vinyl etc... It’s hard to explain but I will have to just create it.
0 notes
Text
Music Items I Own
For my album cover I would like to shoot some music equipment, this will allow me to photograph some still life that could go into my portfolio. I have made a list of music equipment I have in my flat that I could use in the shoot.
I have one of my electric guitars, an Epiphone Les Paul Custom. The guitar would look great in the studio and has a lot of fine detail. I could use the phase one’s macro lens to focus on particular areas of the guitar. The guitar would also be easy to transport to the studio at uni.

The next guitar I could use is an Acoustic/Electric guitar made by Crafter. This guitar doesn't have as many interesting features at the electric; it’s more of a simple guitar. This guitar could look nice against a black background!

The next items I have is my vinyl player, amp and 2 speakers. This could be an interesting thing to photograph in the studio. However transporting it would be hard.

The next items are my vinyls, I have a large collection so would have a lot of choice to pick from. The macro lens could come in useful with the vinyls as well. I could get really close up and photograph the grove of the vinyls.

1 note
·
View note
Text
Album Cover
For the next task I have been commissioned by a record company to create an album cover for one of their artists. The subject matter for the cover is up to me, but I want it to potentially reflect the band I choose. For the shoot I will use a Phase One which will give me a huge amount of detail. I will use props in my album cover I just need to choose how and what I want to shoot.
0 notes
Text
PPR Notes
I have had my PPR with my lecturer, Julian. We spoke about areas of the industry I am interested in and the paths I would like to follow after University. Two areas of photography that I love are Landscapes (my biggest passion) and still life. With these two areas I would love to become an advertising photographer. Saying this I am still interested in other areas such as portraiture, food, architecture and more. We also spoke about work experience. I am currently on an Internship with Timur Celikdag http://www.timur-celikdag.com and it is going very very well. On all of his shoots I am 3rd assistant and I have learnt a great deal in his office and on set. I would love to start assisting landscape photographer, but many of them like working alone and don't want assistants or interns. There is a photography workshop I want to do in Iceland but it is very expensive. Julian recommended doing the Light and Land workshop in the UK first, with some called David Ward. I need to start looking at Landscape Photographers and still life photographers and getting in contact with them to see if I can assist them. At the moment I will stay on my internship but I can still try and assist other photographers.
Notes:
Areas Of The Media:
Advertising photography - specialising in 2 things (landscapes and still life) and having experience in other things.
Light and land workshop DON’T do one with Charlie David ward workshop DO HIM
Mention Julian (that I know him)
Joe Cornish Photographer - Landscape
Hit List ADVERTISING PHOTOGRAPHERS: —Locate Productions (Find Photographers That Work With)
1 note
·
View note
Photo


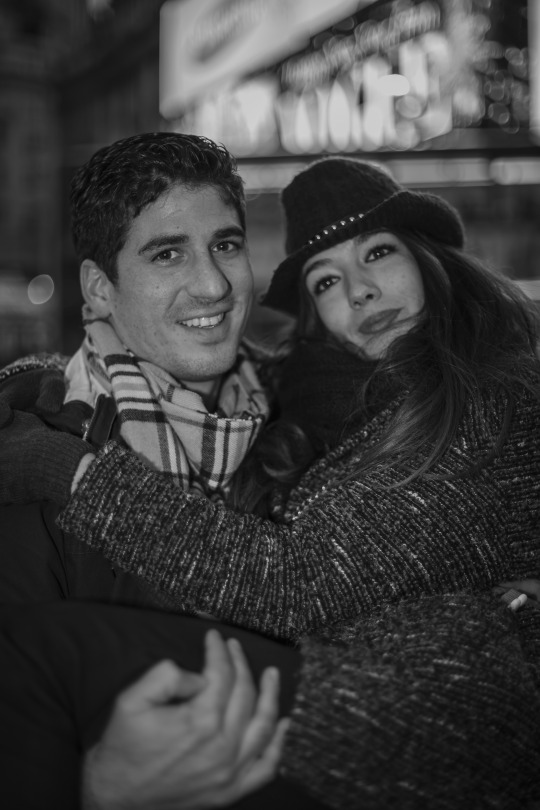
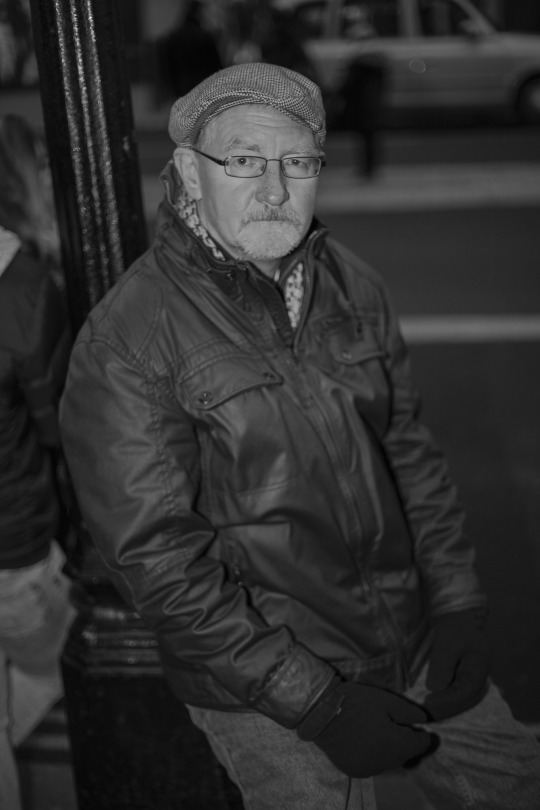
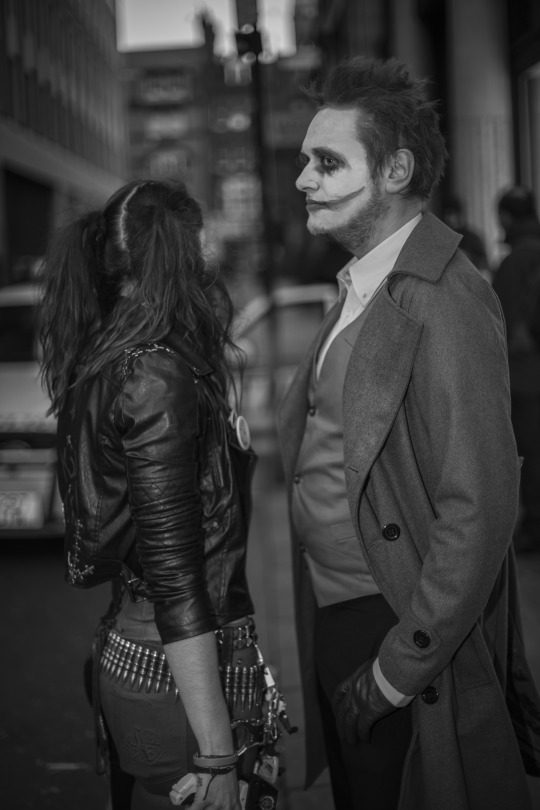
These are the 3 adjustments I made to my 3 portraits. The 1st on is for the couple, the 2nd is for the man and the 3rd is for the joker and girl. I have made all of the images B&W as well as I feel it adds more character to the images.
For the first image I lowered the highlights as the lights in the background were too harsh. I have increased the shadow to 14 which actually takes away some of the shadow in the image. I have decreased the whites to show more of the images and increased the blacks, which makes the image slightly brighter.
For the second image I have again decreased the highlights to bring out more of the surroundings. I have decreased the shadows which enhances them and adds more shadow to the image. I have decreased the whites as it was too light. The blacks have been increased to bring out some of the dark areas.
For the third image I decreased the highlights so that his face wasn't too burnt out. I increased the shadows as there were some dark areas in between them both. The whites have also been decreased to bring out some of the background. The blacks have also been increased to lighten up the image as well.
All edits are very similar, this is because the lighting condition was very similar in each image. It was an overcast day so the sun didn't come out and brighten the surroundings at all.
0 notes
Photo
Here are my final shots for this task. The shoot went well I believe and I am happy with the final shots.
The first image was taken around Piccadilly Circus. A couple was having there photo taken by a family member or friend. I decided to but in a take photos of them instead, with their permission of course. He lifted her up and I got this shot. The light source with just above my left shoulder. I like the way the lights shine in the background behind their heads.
The second image was taken at a bus stop on Shaftesbury Avenue. A man was wrapped up (even though it wasn't that cold) waiting for his bus. He was standing there but I asked him to lean against the lamp post, he sat on it but that was good enough. I was standing up and the light source was by my left waist. This photo looks very natural, it was getting dark but I believe that the image is well lit.
My final image featuring the fancy dress couple was taken on Oxford Street. I asked them if I could photograph them and the agreed and faced the camera and started smiling. I didn't like the posing so I asked them to look at each other and talk. I wasn't happy with the images I was getting as they were mid conversation and the mouths were open. Suddenly they had a pause and I got this shot. It almost looks as if they have just had an argument, which I like! She is looking away but the guy has a miserable face on with the Joker paint. The light source was by my left shin facing upwards towards them. The light bounces nicely off of the white face paint, I was worried that his face might burn out with the flash. This is my favourite shot, because of the costumes and the overall scene.
0 notes
Text
Shoot Day
Today is the day that I am going to go and shoot my 3 portraits. I have all the kit for the shoot ready and charged up. I am taking my Canon 6d, 50mm lens and Elinchrom Ranger Hybrid. I don't normally use a 50mm lens, I mostly use my 24-105mm. I feel that the 50mm lens will help though as it has a low aperture of f1.4. I will have an assistant with me as well to hold the flash for me while i shoot, there is again no need for a stand as the flash head is small enough to hold; thus being easier to move around. I will start by going to Oxford Street and walking up and down. I will then walking down Regents Street to Piccadilly Circus; finally I will walk up Shaftesbury Avenue to Dean Street.
0 notes
Photo

For the portrait task I will again use the Elinchrom Ranger Hybrid. The reason I chose the Hybrid version again is because of its built in wireless function. This will really benefit me when shooting on the street as I won't have another wire trailing around. On the street with the public walking around this will make a difference as I don't want people tripping over the thin cable. The weather is also getting temperamental so if it does rain I will still be fine as the Ranger is watertight so can handle bad weather.
0 notes
Photo


There are 3 areas in London that I would like to go for my portrait task. Oxford Street-Tottenham Court Road, Dean Street and Piccadilly Circus. These 3 areas are renowned for having a lot of people there. The areas are different as well, especially Dean Street which is a trendy part of Soho. Oxford Street is busy and a long stretch of road that I’ll be able to walk up and down. Piccadilly Circus always has people as well looking at the lights and statue. I would like to have plenty of light so that I don't have to bump the ISO up and so that I have some fill for the flash; if I just use the flash when it’s dark it will look to harsh.
0 notes
Text
Mixed Lighting Portrait Task
For our next task we have to take 3 portraits of 3 separate subjects. This time we can take them where ever we want, we don't have to stay by the Thames. 1 or more of the shots have to feature 2 people as well. I will need to decide where I want to shoot before hand however I won't plan who I will shoot; I will shoot people as I see them on the street.
0 notes
Photo


Here is the final retouched and edited version of my cover shot. I have added the olive to the olive oil splash using Photoshop. I added a small amount of blur to the olive as it has a small layer of oil in front of it so I didn't think it should be as sharp.
The Phase One was on a tripod with an 80mm lens. I used an ISO of 100, 1/500s shutter and na aperture of f/22. This allowed me to capture the splash.
With my final image, I added it to the BBC Food template that was provided for the brief. I moved it until it fitted into the text of the cover. I feel that the text on the cover wraps around the splash well and frames the content.
1 note
·
View note
Photo

One area of Capture One that will come useful with shooting covers is the Overlay feature. It allows you, while shooting and tethered, to overlay an image on top of the images you are shooting. For the food magazine cover shoot I used the BBC Food template to see how the image looked in the frame of the template. This feature can be useful shooting a number of different subjects, whether shooting still life, portraits, landscapes etc...
0 notes
Photo


I have had my food magazine shoot with the phase one camera. I used an olive to drop into the olive oil to create as splash. Unfortunately the olive wasn't heavy enough to create a splash so I used a grape instead, that another team member had. This created a desirable splash and the image I liked the most was the one above. The grape created a circular splash with drips flying out of the dish. Because I used a grape I need to replace it with an olive using photoshop. The olive has to have the same lighting on it so that the composite looks realistic; therefor I have also taken a picture of the olive in the same place.
Capture One lets you edit photos in Photoshop without exporting them, click file>edit in> then choose Photoshop. The image will then open in Photoshop, when saved it will save in Capture One. With the picture of the olive I have used the Quick Selection Tool to select the olive, I then added a mask to the selection to discard the rest of the image. With the splash and grape I have used the Clone Stamp Tool to erase the grape. I will then add the olive to the splash image on a new layer. I will show the final image on my next post.
0 notes