
Don't wanna be here? Send us removal request.
Statistics
We looked inside some of the posts by apsetup and here's what we found interesting.
Average Info
Notes Per Post
1
Likes Per Post
1
Reblog Per Post
0
Reply Per Post
0
Time Between Posts
8 days
Number of Posts By Type
Text
4
Last Seen Tumblr Blogs


Fun Fact
In 2020, 27% of US Tumblr users had an annual household income of over $100,000.
Text
Unlocking Seamless Connectivity: A Comprehensive Guide to netfun wifi extender setup
Introduction:
Welcome to the ultimate guide for netfun wifi extender setup. In the digital age, a robust Wi-Fi connection is essential. This article delves into the intricacies of setting up a NetFun WiFi extender, ensuring you make the most of your internet connection. Let's embark on this journey to eliminate dead spots and elevate your connectivity.
Understanding the Basics
Setting up a NetFun WiFi extender involves several steps, each crucial for a seamless experience.
What is netfun wifi extender setup?
NetFun WiFi extender setup is the process of expanding your Wi-Fi coverage by installing a NetFun extender. It's designed to eliminate dead zones and boost signal strength in hard-to-reach areas.
Why opt for netfun wifi extender setup?
Discover the benefits of extending your Wi-Fi range. From improved streaming quality to enhanced online gaming experiences, a NetFun extender ensures a reliable connection throughout your space.
Preparing for Installation
Before diving into the installation process, let's get everything ready.
Gathering Essentials for netfun wifi extender setup
Ensure a smooth setup by collecting the necessary items. From the NetFun extender to a reliable internet connection, we've got you covered.
Optimizing Placement for netfun wifi extender setup
Choosing the right location for your extender is crucial. Learn about ideal placements to maximize signal coverage and eliminate dead zones effectively.
Step-by-Step Installation Guide
Now that you're prepared, let's dive into the installation process.
Connecting the NetFun Extender
Unbox your NetFun extender and follow our detailed guide to establish a secure connection. Experience a hassle-free setup with our expert tips.
Configuring netfun wifi extender setup Settings
Explore the settings of netfun wifi extender setup to customize your Wi-Fi network further. Personalize your experience for optimal performance.
Troubleshooting and FAQs
Encountered an issue during netfun wifi extender setup? We've got solutions.
Common Issues in netfun wifi extender setup
Address common problems users face during installation. From connectivity issues to configuration glitches, find solutions to ensure a smooth process.
FAQs for netfun-wifi-extender-setup/
Q: How long does netfun wifi extender setup take?
A: The setup usually takes around 15-20 minutes, depending on your familiarity with the process.
Q: Can I use multiple NetFun extenders for broader coverage?
A: Yes, you can extend your coverage by adding multiple NetFun extenders strategically placed within your space.
Q: What should I do if the signal strength is still weak after setup?
A: Try repositioning the extender or check for interference from other devices. Adjustments in placement often resolve signal strength issues.
Q: Is netfun-wifi-extender-setup/ compatible with all routers?
A: NetFun extenders are compatible with most routers. However, it's advisable to check compatibility before purchasing.
Q: Can I secure my extended network with a password?
A: Absolutely. During the setup process, you'll have the option to secure your extended network with a password for added security.
Q: Are firmware updates necessary for optimal performance?
A: Yes, regularly updating your NetFun extender's firmware ensures you benefit from the latest features and improvements.
Conclusion
Congratulations! You've successfully navigated the netfun wifi extender setup process. Enjoy seamless connectivity, bid farewell to dead zones, and elevate your internet experience. For further assistance, refer to our FAQs or seek professional help.Unlocking Seamless Connectivity: A Comprehensive Guide to netfun wifi extender setup
0 notes
Text

The Wavlink powerline setup functions as a WiFi extender kit designed to enhance the performance of your existing router. Whether in a spacious home or a multi-story office, it effectively extends router signals to every corner. To make the most of this service, it’s crucial to understand its configuration and other essential aspects. Familiarize yourself with these points for optimal use.
0 notes
Text
Understanding Wavlink Halo Setup
Wavlink Halo Setup is a powerful and versatile wireless router that offers top-notch performance and extensive coverage. Setting up your Wavlink Halo is a straightforward process that begins with connecting the router to your modem and powering it on. Once the router is connected, you can access its web-based setup page by typing the default IP address into a web browser. From there, you can customize your network settings, including security protocols and wireless network names. It’s essential to follow the setup process meticulously to ensure a seamless and secure connection.

Embracing Firmware Updates for Optimal Performance
Firmware updates are pivotal for keeping your Wavlink Halo functioning at its best. These updates often include bug fixes, security enhancements, and new features that can improve the overall performance and stability of your router. To update your Wavlink Halo firmware, you can navigate to the router’s web interface and check for any available updates in the firmware section. It’s imperative to adhere to a regular firmware update schedule to safeguard your network from potential vulnerabilities and ensure optimal performance.
Performing a Factory Reset for Troubleshooting
In the event of persistent network issues or the need to revert to the router’s default settings, a factory reset may be necessary. Performing a factory reset on your Wavlink Halo router entails pressing and holding the reset button for a specific duration, usually indicated in the router’s user manual. Following a factory reset, the router will revert to its initial configuration, allowing you to start anew with the setup process and troubleshoot any persistent issues effectively.
Addressing Common Issues and Troubleshooting Tips

Unveiling the Features of Wavlink Halo
The Wavlink Halo router boasts an array of features designed to deliver exceptional performance and versatility. Its dual-band technology enables simultaneous usage of both 2.4GHz and 5GHz frequencies, catering to a wide spectrum of network requirements.
Moreover, the router’s advanced security protocols and parental control features empower users to prioritize network security and regulate access effectively. With its robust performance and user-friendly interface, the Wavlink Halo router is a compelling choice for individuals seeking a reliable and high-performance networking solution.
In conclusion, mastering the setup, firmware updates, factory reset, and troubleshooting tips for your Wavlink Halo router is essential for ensuring a seamless and optimal networking experience. By familiarizing yourself with these fundamental aspects and leveraging the router’s impressive features, you can harness the full potential of your Wavlink Halo and enjoy a robust and secure network environment
0 notes
Text
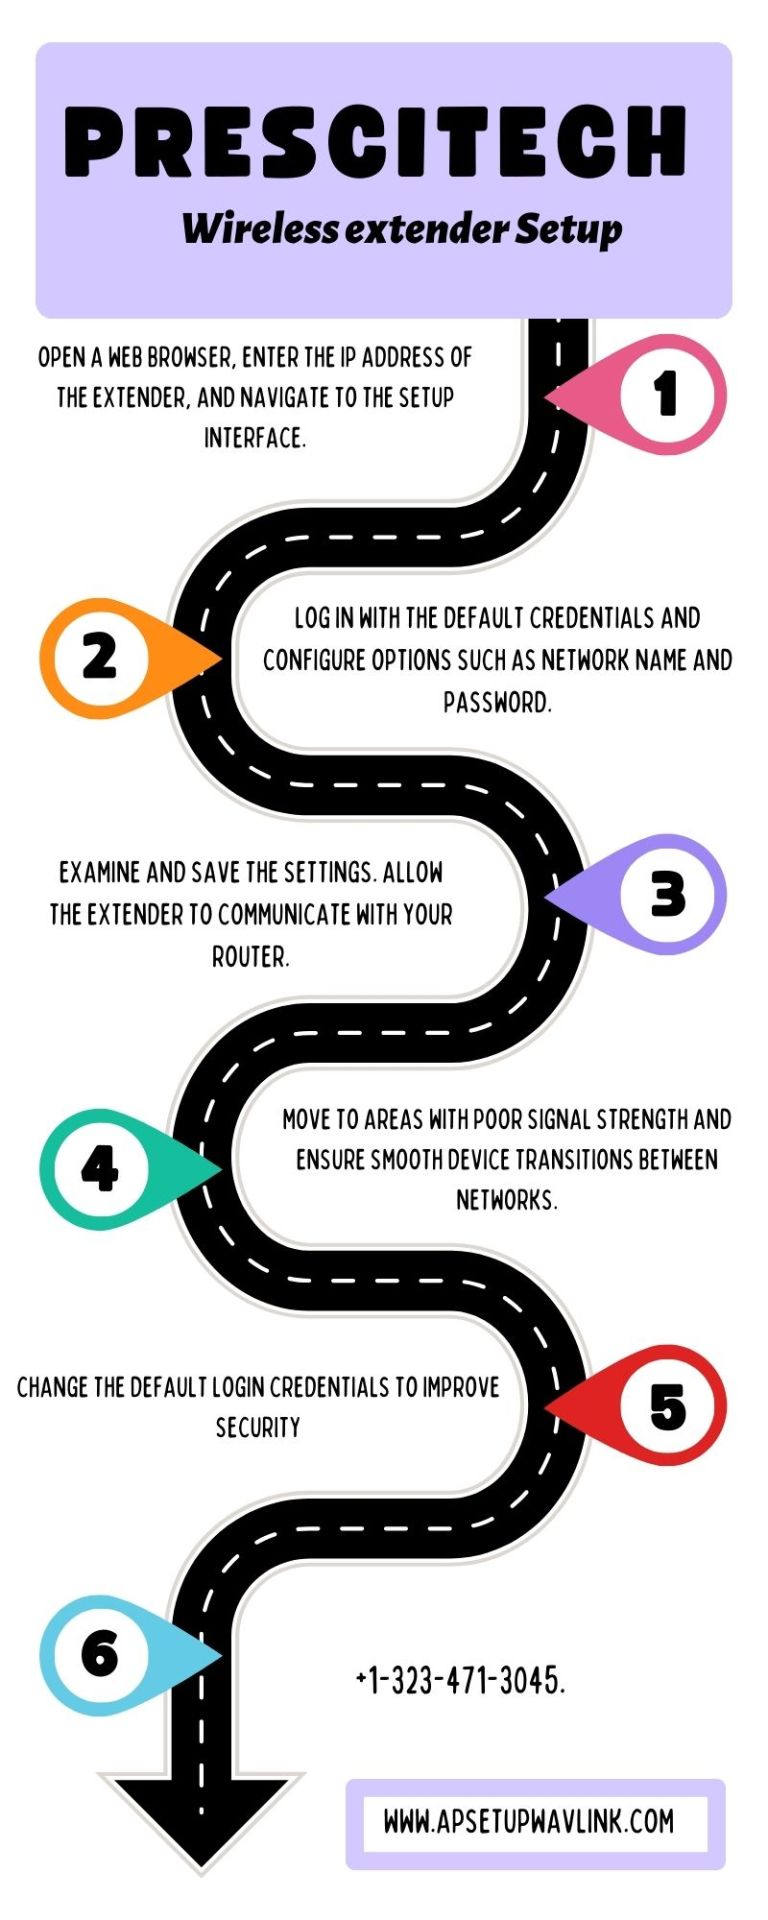
A Prescitech wireless extender setup, also known as a Wi-Fi extender or range extender, is a device that can help you extend the range of your existing Wi-Fi network. It works by receiving the signal from your existing router and then rebroadcasting it, creating a new network with better coverage. This can be helpful if you have dead zones in your home or if you want to improve the Wi-Fi signal in certain areas
1 note
·
View note