
Don't wanna be here? Send us removal request.
Statistics
We looked inside some of the posts by apurplekitkat and here's what we found interesting.
Average Info
Notes Per Post
1M
Likes Per Post
610K
Reblog Per Post
442K
Reply Per Post
1K
Time Between Posts
16 days
Number of Posts By Type
Text
13
Photo
4
Last Seen Tumblr Blogs


Fun Fact
The average Tumblr user visits about 67 pages every month.
Text
Digital Stamp Making Tutorial
Hello, and welcome to the long-awaited(at least on my part) digital stamp-making tutorial from neosprites! I’d like to preface that I learned what I was doing from this tutorial so it may be a bit redundant, but if anything I get a bit more specific. Thank you so much to @graphic--horde for your work, it changed me as a graphic maker. This is gunna be a long post so feel free to bookmark it for later. Now, onto the show!

The frame I will be using for this tutorial (which is the frame I use on 99.9% of my stamps) I found from the above linked post, which I believe is from a creator that OP lost track of. Its inner dimensions are 94x50 pixels and its outer dimensions are 99x56 pixels. Here it is!

Find your material! - I recommend using websites like Tumblr and searching with the “GIF” filter only on, or alternatives such as Giphy or Tenor. Your browser may let you directly save the .gif file; if not and you are noticing it restricts you to save it as a .webp file you can try an extension like “Save webp as PNG or JPEG” (for Firefox but I image other browsers have similar functions, but I really recommend you switch to Firefox). To use this you will right click on your source .gif like normal but instead of clicking on “Save image as…” click “Save webP as…” and then click “GIF”. You should be redirected to the website ezgif.com where we will actually be doing all of our editing! Here’s the .gif we’ll be working with.

Convert to GIF (optional) - if you used the extension from the above step you should already be ready to click the blue “Convert to GIF” button. If not, go ahead and open ezgif.com and click on “webP” and then “WebP to GIF”; then convert to a gif with the blue button.

Resize the GIF - now that we have a gif ready to edit, let’s make it the right size. The easiest method I have found is to change it directly to the frame’s inner dimensions, 94x50 pixels. [EDIT: Make sure in the aspect ratio drop drop menu you select "stretch to fit" and not "center and crop to fit" like I did in the photo example.] Click “resize” and then type [94] in for the width and [50] for the height. Next press the blue “resize image” button.


Add the frame - next click “overlay” then click the thin blue button that says “Extend canvas size(use if overlay exceeds GIF sizes)”. This will give us some extra room to add the frame onto the design. Next click “Browse…” and find the frame you have saved onto your device, then click the blue “Upload image” button.


After that it’s going to be misaligned, that’s normal! It will say you have the option to drag it into place, but don’t bother. That’s one of the reasons my old stamps look wack, it’s just harder to do. Instead type [44] in for the Left box and [22] in for the Right box. It took me a while to figure out these dimensions to be honest, and I’ve only tested it with this frame so I don't know if it works with others. Then click the blue “Generate image” button.


Crop the transparent edges - click on “crop”. You will have the option to check a box that says “trim transparent pixels around the image” however, I don’t recommend this as it tends to crop a few of the frame’s pixels with it sometimes. Next, set the Left position to [44] and the Right position to [22]. For the other dimensions we will use the outer dimensions of the frame which are 99x56 pixels, this will trim everything except the tiny spaces in between the stamp frame’s spikes. Type the width as [99] and the height as [56] and click the tiny blue button that says “set”. After that click the blue “Crop image” button.


Save and use! - all that's left is to click “save” and upload the graphic to your liking. (best seen on dark mode obviously)

If you’d like to tag me in stamps you’ve made using my tutorial I would love to see them, but it’s not required!! Make sure to always give credit for pictures/gifs when you can and try not to make stuff out of personal/fan art. Thank you to the person in my inbox who requested this tutorial, I had been meaning to for a while but it was just the kick I needed. :)
443 notes
·
View notes
Text


Wanted to draw everybody at least once so the gang is all here🙌
2K notes
·
View notes
Text
Writing Tips
Punctuating Dialogue
✧
➸ “This is a sentence.”
➸ “This is a sentence with a dialogue tag at the end,” she said.
➸ “This,” he said, “is a sentence split by a dialogue tag.”
➸ “This is a sentence,” she said. “This is a new sentence. New sentences are capitalized.”
➸ “This is a sentence followed by an action.” He stood. “They are separate sentences because he did not speak by standing.”
➸ She said, “Use a comma to introduce dialogue. The quote is capitalized when the dialogue tag is at the beginning.”
➸ “Use a comma when a dialogue tag follows a quote,” he said.
“Unless there is a question mark?” she asked.
“Or an exclamation point!” he answered. “The dialogue tag still remains uncapitalized because it’s not truly the end of the sentence.”
➸ “Periods and commas should be inside closing quotations.”
➸ “Hey!” she shouted, “Sometimes exclamation points are inside quotations.”
However, if it’s not dialogue exclamation points can also be “outside”!
➸ “Does this apply to question marks too?” he asked.
If it’s not dialogue, can question marks be “outside”? (Yes, they can.)
➸ “This applies to dashes too. Inside quotations dashes typically express—“
“Interruption” — but there are situations dashes may be outside.
➸ “You’ll notice that exclamation marks, question marks, and dashes do not have a comma after them. Ellipses don’t have a comma after them either…” she said.
➸ “My teacher said, ‘Use single quotation marks when quoting within dialogue.’”
➸ “Use paragraph breaks to indicate a new speaker,” he said.
“The readers will know it’s someone else speaking.”
➸ “If it’s the same speaker but different paragraph, keep the closing quotation off.
“This shows it’s the same character continuing to speak.”
123K notes
·
View notes

Photo
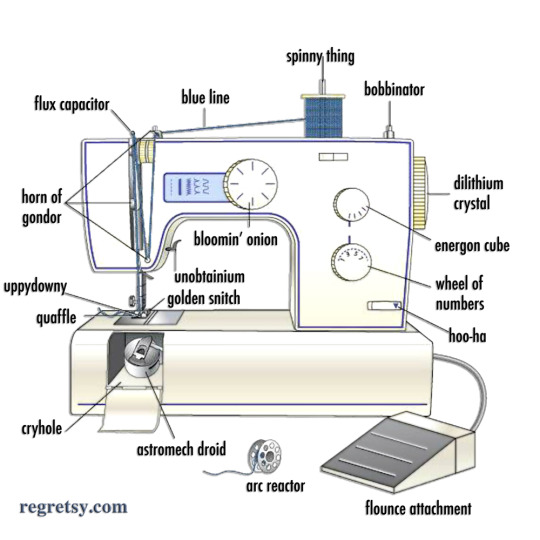
omG I SEARCHED GOOGLE FOR A SEWING MACHINE DIAGRAM AND THIS CAME UP I CAN’T STOP LAUGHING
97K notes
·
View notes
Text
Ackles Ass Equation analysis
So I’m a bit confused here. This equation doesn’t actually match the picture?
I found this:
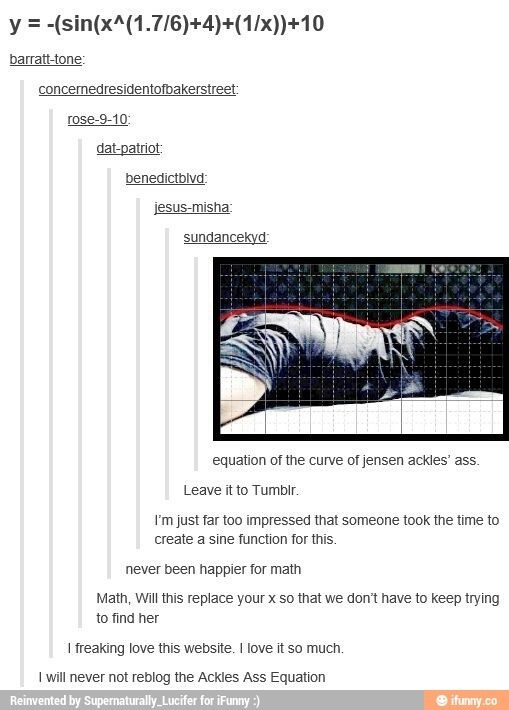
For context, I’m a maths nerd. And as soon as I saw this little fandom phenomenon, I had to check it out. So I popped over to Desmos, and typed it in. But the given equation: y = -(sin(x^(1.7/6)+4)+(1/x))+10 (for 1<x<12) doesn’t give the curve as shown? It’s actually a pretty straight looking line?

I tried widening and shortening the window. I tried radians and degrees. Nothing worked. @vincent–van–ghoul also talks about this in their Ackles Ass Equation 2.0 peer-reviewed post.
Then I saw it. This post gives a picture of the equation, but without most of the parentheses.
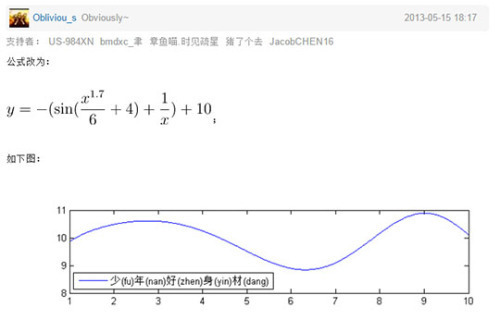
And there it is! The answer! A most unfortunate one to anybody who tattooed this on their bodies or something.
The equation, as passed around, looks like this: y = -(sin(x^(1.7/6)+4)+(1/x))+10 (for 1<x<12). I know all those parentheses are gross, but it translates over to this:
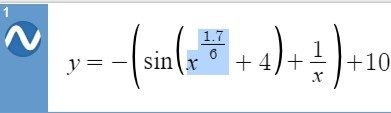
But the pictured graph comes from this equation:
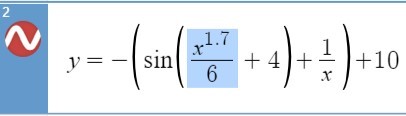
Somehow, parentheses got added to the equation as it got passed around, which puts the 6 up into the exponent.
So, the parentheses version of the equation should look like this: y = -(sin(x^1.7/6+4)+(1/x))+10. Due to order of operations, you could just drop the parentheses around the (1.7/6), or you could move them to be around just the (1.7) or the (x^1.7). As long as the 6 is not in the exponent.
And then you get this:
The famous curve is pictured in red. The graph for the famous equation is pictured in blue for contrast.
Thanks for coming to my Ted Talk, I guess?
611 notes
·
View notes
Text

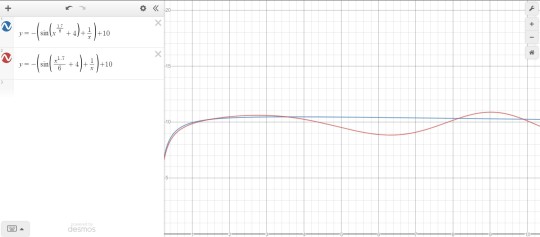
I've never had much trouble drawing Shadow's shoes, so here! Maybe this'll help someone 👍
14K notes
·
View notes


Text
Honestly the whole “Megatron and Optimus used to have a deep and intimate friendship that was tragically torn apart by their inability to reconcile their differences in their responses to injustice” thing that’s become common in Transformers media is really good and adds a lot of needed nuance…
but honestly, you’ll never top G1 where Megatron simply said fuck this one dock worker in particular and then they didn’t stop punching each other for 4 million years
4K notes
·
View notes
Text
I dunno if anyone ever noticed this or commented on it but
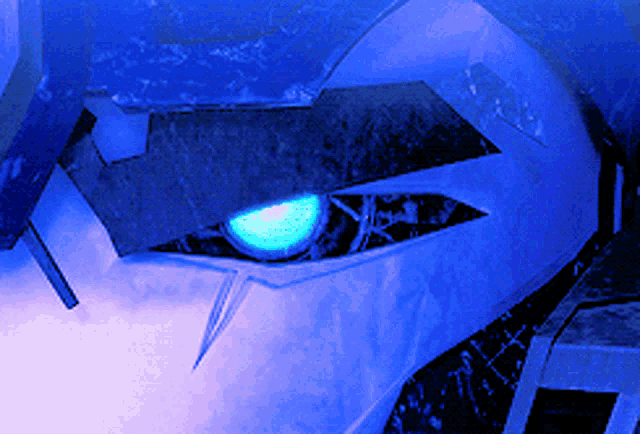
The way Optimus' eyes are rendered and textured in TFP, always reminded me of tear tracks? The etchings underneath.
Like this gentle man, who so badly wanted peace above all else, had cried so many tears till he had none, that they were now marked forever on his face.
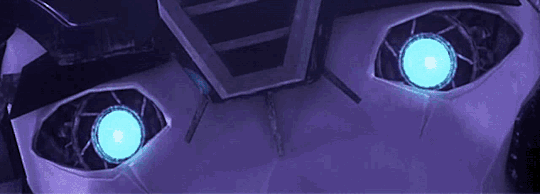
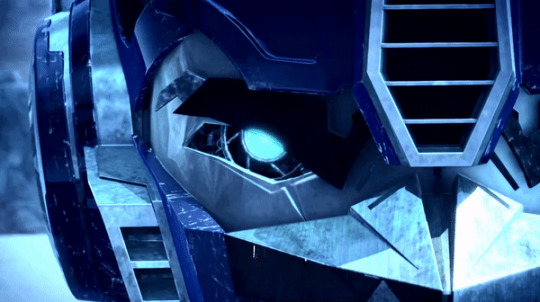
Edit: Megatron also has these tears too
3K notes
·
View notes
Text

posting this to tumblr cause the parkciv fandom needs to see this (commenter cooked)
714 notes
·
View notes
Photo

A scandelous rumer is about on the Lost Light!
An homage to Norman Rockwell’s “The Gossips”
11K notes
·
View notes


Photo

Everyone’s great great great great grand dad.
My Patreon!
5K notes
·
View notes
Text
billford animatic i made to the song 'confrontation'! ^^
59K notes
·
View notes