
Don't wanna be here? Send us removal request.
Statistics
We looked inside some of the posts by arecipes and here's what we found interesting.
Average Info
Notes Per Post
229
Likes Per Post
174
Reblog Per Post
53
Reply Per Post
2
Time Between Posts
8 days
Number of Posts By Type
Text
17
Last Seen Tumblr Blogs


Fun Fact
The KCSC sent more than 20K requests to delete posts related to prostitution and porn to Tumblr from January to June 2017.
Text

Brownie Truffles – Rich, Fudgy, and Dipped in Chocolate! 🍫✨ These Brownie Truffles are the ultimate bite-sized indulgence! Made with crumbled brownies, rolled into decadent truffle balls, and coated in smooth melted chocolate, they’re the perfect treat for parties, holidays, or whenever you need a chocolate fix. Add sprinkles, crushed nuts, or a drizzle of white chocolate for a beautiful finishing touch!
#BrownieTruffles#ChocolateTruffles#FudgyGoodness#EasyDessertRecipes#HomemadeTruffles#BiteSizedTreats#ChocolateLovers#PartyDesserts#HolidayBaking#food#food and drink#healthy food#recipe#recipes#chocolate#baking#bread#cooking#dessert
1 note
·
View note
Text

#food#food and drink#healthy food#recipe#recipes#chocolate#baking#bread#cooking#dessert#red velvet cookie
1 note
·
View note
Text
#food#food and drink#healthy food#recipe#recipes#chocolate#baking#bread#cooking#dessert#cookies#brownies
1 note
·
View note
Text
Easy Chocolate Chip Cookies

Classic, soft, and chewy chocolate chip cookies made with simple ingredients and minimal effort! These timeless treats are loaded with gooey chocolate chips, perfectly golden edges, and a tender center. Whether you're a baking beginner or a cookie connoisseur, this foolproof recipe is your go-to for a quick, delicious dessert. Perfect with a glass of milk or straight out of the oven! 🍪🥛
1 note
·
View note
Text
Bright, zesty, and bursting with fresh lemon flavor, these easy lemon cookies are a delightful treat for any occasion! Soft, chewy, and lightly glazed, they’re the perfect balance of sweet and tangy. Made with simple ingredients, these cookies come together in no time, making them ideal for a quick baking project. Perfect for spring, summer, or whenever you need a little sunshine in your day! 🍋✨
1 note
·
View note
Text
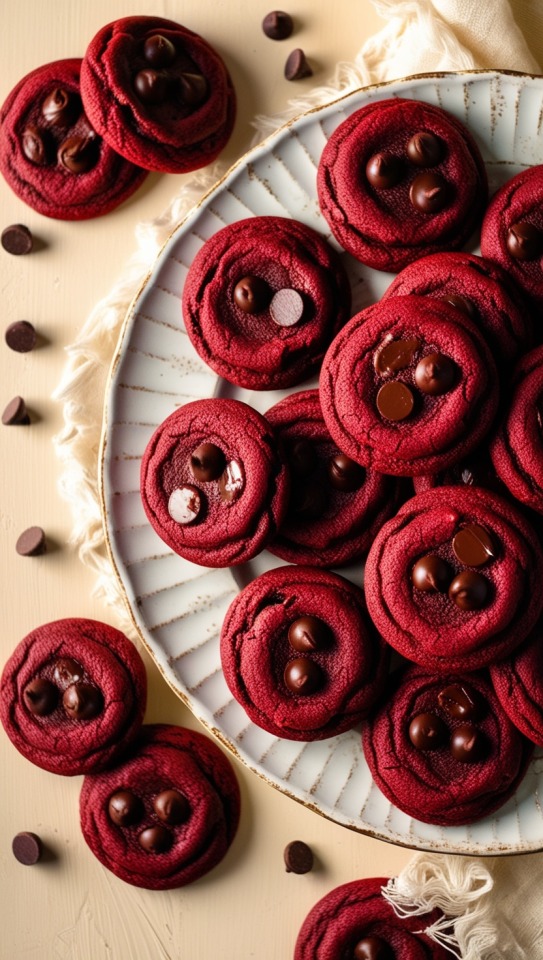
Red Velvet Chocolate Chip Cookies Indulge in the perfect blend of rich red velvet flavor and gooey chocolate chips with these soft, chewy cookies. Vibrant red dough with a hint of cocoa is loaded with melty chocolate chips, creating a treat that’s as beautiful as it is delicious. Perfect for holidays, parties, or anytime you crave a sweet, colorful bite! 🍪❤️
1 note
·
View note
Text

Nutella Cheesecake: The Ultimate Indulgence for Chocolate Lovers
If you’re a fan of rich, creamy desserts, then this Nutella Cheesecake is a must-try! Combining the velvety smoothness of classic cheesecake with the indulgent flavor of Nutella, this dessert is a chocolate lover's dream. With its luscious texture and hazelnut-chocolate goodness, Nutella cheesecake is the perfect treat for special occasions, gatherings, or whenever you want to impress your guests with a decadent dessert.
10 notes
·
View notes
Text

Looking for a simple yet delicious treat to make this holiday season? Peppermint Oreo Balls are the perfect choice! These no-bake delights combine the rich taste of Oreo cookies with a refreshing hint of peppermint, all covered in a smooth chocolate shell. With just a few ingredients, you can create a festive dessert that’s great for gifting, parties, or simply indulging at home.
In this article, we’ll guide you through the step-by-step process of making these delicious peppermint Oreo balls, along with some tips and variations to make them even more special.
Why You’ll Love Peppermint Oreo Balls
Peppermint Oreo Balls are incredibly easy to make, yet they look and taste like a gourmet treat. The combination of crushed Oreos, cream cheese, and peppermint creates a rich, creamy filling, while the chocolate coating adds a satisfying crunch. The hint of peppermint adds a refreshing twist, making these treats perfect for the holiday season. Best of all, they’re no-bake, which means you can whip them up in no time!
Ingredients for Peppermint Oreo Balls
Here’s what you’ll need to make these festive peppermint Oreo balls:
1 package (14 oz) Oreo cookies (crushed)
1 (8 oz) package cream cheese (softened)
1/2 teaspoon peppermint extract
12 oz white chocolate or semi-sweet chocolate (melted)
Crushed candy canes or peppermint candies (for garnish)
Step-by-Step Recipe for Peppermint Oreo Balls
Step 1: Crush the Oreos
Place the Oreo cookies in a food processor and pulse until they form fine crumbs. If you don’t have a food processor, you can put the cookies in a resealable plastic bag and crush them with a rolling pin.
Step 2: Mix with Cream Cheese and Peppermint Extract
In a large mixing bowl, combine the crushed Oreos with the softened cream cheese and peppermint extract. Mix until the ingredients are fully combined and the mixture is smooth. The dough should have a thick, sticky consistency.
Step 3: Form the Oreo Balls
Using a small cookie scoop or spoon, scoop out small portions of the mixture and roll them into 1-inch balls. Place the balls on a baking sheet lined with parchment paper. Once all the balls are formed, refrigerate them for about 20-30 minutes to firm up.
Step 4: Dip in Chocolate
Melt the white or semi-sweet chocolate in a microwave-safe bowl, stirring every 30 seconds until smooth. Using a fork or dipping tool, dip each Oreo ball into the melted chocolate, making sure it's fully coated. Allow any excess chocolate to drip off before placing the ball back on the parchment-lined baking sheet.
Step 5: Garnish and Set
While the chocolate coating is still wet, sprinkle the tops of the Oreo balls with crushed candy canes or peppermint candies. This adds a festive touch and a bit of extra peppermint flavor. Let the chocolate set completely by placing the Oreo balls in the refrigerator for at least 15 minutes.
Tips for Making the Best Peppermint Oreo Balls
Chill the dough: Make sure to chill the Oreo balls before dipping them in chocolate. This helps them hold their shape and makes them easier to work with.
Use high-quality chocolate: For the best flavor and texture, use high-quality melting chocolate or chocolate chips. White chocolate, dark chocolate, or semi-sweet chocolate all work well for this recipe.
Add food coloring: If you want to make these treats even more festive, add a few drops of red or green food coloring to the white chocolate for a fun holiday look.
Peppermint variation: If you love an extra peppermint kick, you can also add crushed candy canes to the Oreo mixture itself for more texture and flavor.
Store properly: Store these peppermint Oreo balls in an airtight container in the refrigerator. They will keep fresh for up to a week, making them a perfect make-ahead treat.
Why This Recipe Works
The combination of Oreo cookies and peppermint extract creates a delightful balance of rich chocolate flavor and refreshing mint. The cream cheese binds the ingredients together, giving the filling a smooth, truffle-like texture. The chocolate coating adds a satisfying crunch, while the crushed candy canes on top provide a festive touch and an extra burst of peppermint flavor. This simple recipe delivers maximum taste with minimal effort.
Serving Suggestions for Peppermint Oreo Balls
For holiday gatherings: Serve these Oreo balls as part of your dessert spread at holiday parties. They’re easy to grab and eat, making them a hit at any event.
As gifts: Package these treats in a festive box or tin for a homemade gift that’s sure to delight friends and family.
With hot drinks: Enjoy these peppermint Oreo balls with a cup of hot chocolate, coffee, or tea for a cozy, indulgent treat.
Conclusion
Peppermint Oreo Balls are the perfect no-bake treat to celebrate the holiday season. With their rich Oreo filling, creamy chocolate coating, and refreshing peppermint flavor, they’re sure to become a favorite dessert for your family and friends. Whether you’re making them for a festive gathering or giving them as gifts, these easy-to-make treats are guaranteed to impress.
5 notes
·
View notes
Text
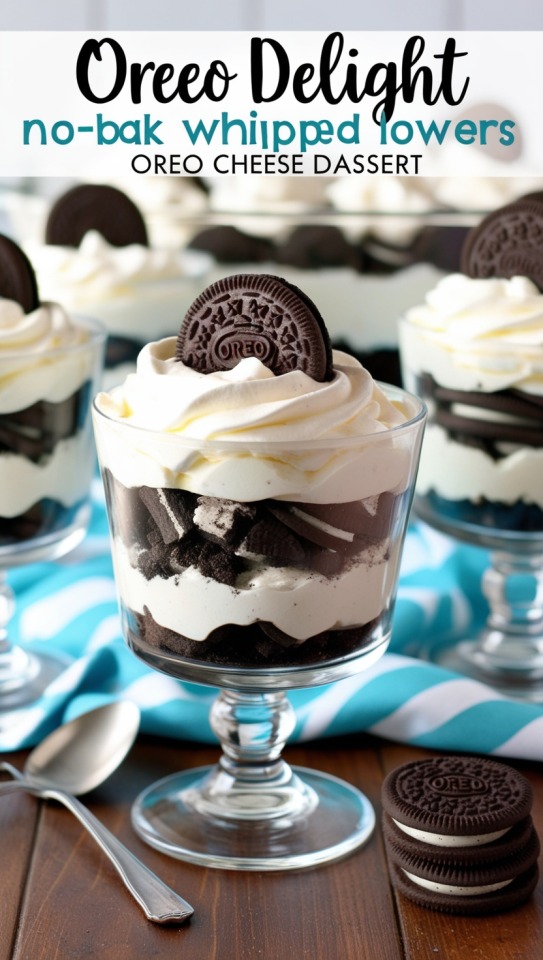
Oreo Delight Recipe: A Creamy, No-Bake Dessert Everyone Will Love
Looking for an easy, crowd-pleasing dessert? Oreo Delight is a no-bake treat that’s perfect for any occasion. With layers of crushed Oreo cookies, fluffy cream cheese filling, and creamy pudding, this dessert is rich, indulgent, and incredibly simple to make. Oreo Delight is a hit with kids and adults alike, making it ideal for parties, potlucks, or as a weeknight indulgence.
In this article, we'll share the step-by-step process for creating this delicious dessert, along with tips and variations to customize it to your taste.
Why You’ll Love Oreo Delight
Oreo Delight is the ultimate no-bake dessert, combining the best flavors and textures—crunchy Oreo cookies, a light and creamy cheesecake-like filling, and smooth pudding. It’s a layered dessert that looks impressive but takes only minutes to assemble. Because it requires no baking, it’s perfect for warm days or when you need a dessert in a hurry. Plus, it can easily be made ahead of time, making it a go-to choice for entertaining.
Ingredients for Oreo Delight
To make this rich and creamy Oreo Delight, you’ll need:
1 package (14 oz) Oreo cookies (crushed, about 36 cookies)
1/2 cup butter (melted)
1 (8 oz) package cream cheese (softened)
1 cup powdered sugar
1 (12 oz) container whipped topping (such as Cool Whip, divided)
2 packages (3.4 oz each) instant chocolate pudding mix
3 1/4 cups cold milk
Optional toppings:ᅠCrushed Oreos, chocolate chips, chocolate drizzle
Step-by-Step Recipe for Oreo Delight
Step 1: Create the Oreo Crust
Start by crushing the Oreo cookies. You can do this by placing the cookies in a resealable plastic bag and crushing them with a rolling pin, or by pulsing them in a food processor until fine crumbs form. Set aside about 1/4 cup of the crushed Oreos for topping.
In a medium bowl, mix the remaining Oreo crumbs with the melted butter until well combined. Press the mixture into the bottom of a 9x13-inch baking dish to form a crust. Place the dish in the refrigerator to set while you prepare the other layers.
Step 2: Make the Cream Cheese Layer
In a large mixing bowl, beat the softened cream cheese and powdered sugar together until smooth and creamy. Gently fold in 1 cup of whipped topping until the mixture is light and fluffy.
Spread this cream cheese layer evenly over the chilled Oreo crust. Return the dish to the refrigerator while you prepare the next layer.
Step 3: Prepare the Pudding Layer
In another mixing bowl, whisk together the instant chocolate pudding mix and cold milk for about 2 minutes, or until the pudding thickens. Allow the pudding to sit for a few minutes to set fully.
Once the pudding is set, spread it evenly over the cream cheese layer.
Step 4: Add the Whipped Topping
Spread the remaining whipped topping over the pudding layer, making sure to cover the entire surface of the dessert.
Step 5: Garnish and Chill
Sprinkle the reserved crushed Oreos over the top of the whipped topping for a decorative and crunchy finish. You can also add mini chocolate chips or drizzle melted chocolate on top if you want extra indulgence.
Chill the Oreo Delight in the refrigerator for at least 4 hours, or overnight if possible, to allow the layers to set and the flavors to meld together.
Tips for Making the Best Oreo Delight
Chill for better texture: Allowing the dessert to chill for several hours (or overnight) helps the layers set and ensures the flavors blend together perfectly.
Use a hand mixer: For a smooth cream cheese layer, use a hand mixer or stand mixer to beat the cream cheese and powdered sugar together until there are no lumps.
Try different flavors:ᅠWhile chocolate pudding is classic for Oreo Delight, you can experiment with other pudding flavors like vanilla, cheesecake, or even peanut butter.
Customize the toppings:ᅠAdd more texture and flavor by topping the dessert with a variety of garnishes such as caramel drizzle, chopped nuts, or sprinkles.
Make it ahead:ᅠOreo Delight can be made a day in advance, making it perfect for gatherings when you need to prep a dessert ahead of time.
Why This Recipe Works
The layers of this Oreo Delight create a balanced dessert that hits all the right notes—sweet, creamy, crunchy, and chocolatey. The buttery Oreo crust adds a crunchy base, while the cream cheese layer adds a tangy creaminess that pairs perfectly with the rich chocolate pudding. The whipped topping gives it a light, airy finish, making the dessert rich but not overly heavy. The contrast of textures and flavors makes each bite a delightful experience.
Serving Suggestions for Oreo Delight
For gatherings: Oreo Delight is a fantastic dessert for potlucks, parties, or family gatherings. It’s easy to transport and can be made in a large batch.
As a holiday treat: This dessert is a great addition to holiday dessert tables. Add festive toppings like crushed peppermint or colored sprinkles for a seasonal touch.
For special occasions: Oreo Delight is a fun and indulgent treat for birthdays, celebrations, or just a weekend indulgence. Its no-bake simplicity makes it a stress-free option.
Conclusion
Oreo Delight is the ultimate no-bake dessert for anyone who loves rich, creamy, and chocolatey treats. With layers of Oreo crumbs, cream cheese filling, and chocolate pudding, it’s an indulgent yet easy-to-make dessert that’s perfect for any occasion. Whether you’re preparing it for a party or as a special treat for your family, Oreo Delight is sure to become a favorite.
10 notes
·
View notes
Text

Easy Caramel Peanut Clusters Recipe
If you’re looking for a quick, indulgent treat that combines rich caramel with the crunch of peanuts and the smoothness of chocolate, Caramel Peanut Clusters are the perfect solution. These bite-sized delights are made with just a few simple ingredients but pack a big punch in flavor. They offer the ideal balance of sweet, salty, and crunchy textures, making them a favorite for anyone who loves decadent desserts.
Whether you’re making them as a treat for yourself, a holiday gift, or a dessert for a gathering, these clusters are easy to make and guaranteed to satisfy.
Why You’ll Love This Caramel Peanut Clusters Recipe
Caramel Peanut Clusters are a classic candy treat that combines everything we love about indulgent snacks—rich, gooey caramel, roasted peanuts, and creamy chocolate. Not only are they delicious, but they’re also incredibly simple to prepare. With just a few steps and minimal ingredients, you’ll have a batch of these tasty clusters ready in no time.
Plus, they’re versatile! You can make a big batch and store them for later, give them as homemade gifts, or enjoy them as a quick snack when your sweet tooth strikes.
Ingredients for Caramel Peanut Clusters
Here’s what you’ll need to make a batch of these irresistible clusters:
2 cups roasted, salted peanuts
1 package (11 oz) caramels (unwrapped)
2 tablespoons heavy cream
1 1/2 cups semi-sweet chocolate chips
1 tablespoon coconut oil (optional, for smoother chocolate)
Step-by-Step Recipe for Caramel Peanut Clusters
Step 1: Melt the Caramels
In a medium saucepan, combine the unwrapped caramels and heavy cream. Cook over low heat, stirring frequently, until the caramels are completely melted and smooth. Be sure to stir constantly to prevent the caramel from burning.
Step 2: Add the Peanuts
Once the caramel mixture is smooth and melted, remove the saucepan from heat and stir in the roasted, salted peanuts. Mix until all the peanuts are evenly coated with the caramel.
Step 3: Form the Clusters
Line a baking sheet with parchment paper. Using a spoon or small cookie scoop, drop spoonfuls of the peanut-caramel mixture onto the prepared baking sheet, forming small clusters. You should be able to make about 15-20 clusters, depending on the size.
Allow the clusters to cool at room temperature until the caramel sets. You can also speed up the process by placing the baking sheet in the refrigerator for about 15-20 minutes.
Step 4: Melt the Chocolate
While the clusters are cooling, melt the semi-sweet chocolate chips. You can do this using a double boiler or the microwave. If using the microwave, heat the chocolate chips in 30-second intervals, stirring after each interval until smooth. If desired, stir in the coconut oil for a shinier, smoother chocolate coating.
Step 5: Coat the Clusters
Once the caramel peanut clusters have cooled and set, dip each one into the melted chocolate, ensuring that they are fully coated. You can use a fork or spoon to help coat each cluster and transfer them back to the parchment-lined baking sheet.
Step 6: Let the Chocolate Set
After coating the clusters in chocolate, allow them to cool and harden. You can leave them at room temperature or speed up the process by placing them in the fridge for about 15 minutes.
Tips for Making the Best Caramel Peanut Clusters
Use high-quality chocolate: For the best flavor, choose a good-quality semi-sweet or dark chocolate. You can also use milk chocolate if you prefer a sweeter taste.
Be patient with the caramel: Melt the caramels slowly over low heat to avoid burning or seizing. If your caramel starts to harden while forming clusters, just gently reheat it over low heat.
Customize with different nuts: While peanuts are traditional, you can switch things up by using other nuts like almonds, pecans, or cashews.
Add a sprinkle of sea salt: For an extra layer of flavor, sprinkle a pinch of sea salt over the chocolate before it sets. This enhances the sweet and salty contrast.
Store properly:ᅠStore your caramel peanut clusters in an airtight container at room temperature or in the fridge. They will keep for up to a week, making them a great make-ahead treat.
Why This Recipe Works
This recipe works because it combines classic ingredients that complement each other perfectly—salty roasted peanuts, rich caramel, and smooth chocolate. The texture of the crunchy peanuts, the chewiness of the caramel, and the creamy chocolate coating make every bite a delightful experience. Plus, the simplicity of this recipe means you can make a large batch without a lot of fuss, making it ideal for entertaining or gifting.
Serving Suggestions for Caramel Peanut Clusters
For parties: Serve these clusters as part of a dessert tray or candy buffet. They’re easy to grab and enjoy, making them perfect for gatherings.
As a gift: Wrap the clusters in a festive box or bag for a homemade gift that’s sure to impress friends and family.
As a snack: Keep a batch of these clusters on hand for a quick and satisfying snack when you’re craving something sweet and salty.
Conclusion
Caramel Peanut Clusters are a simple yet decadent treat that’s perfect for satisfying your sweet tooth. With just a handful of ingredients and easy steps, you can create a dessert that’s both indulgent and impressive. Whether you’re making them for a party, as a gift, or just for yourself, these clusters are a guaranteed hit.
5 notes
·
View notes
Text

Oreo Cheesecake Dessert Shooters Recipe
Looking for a fun, easy-to-make dessert that’s sure to impress at your next gathering? Oreo Cheesecake Dessert Shooters are the perfect bite-sized indulgence. These mini desserts combine the rich, creamy flavor of cheesecake with the irresistible crunch of Oreo cookies, served in elegant shooter glasses for a show-stopping presentation. Ideal for parties, these dessert shooters are not only delicious but also a crowd-pleaser.
In this article, we’ll walk you through a simple yet indulgent Oreo cheesecake dessert shooter recipe, along with tips for making this dessert extra special.
Why You’ll Love Oreo Cheesecake Dessert Shooters
These Oreo cheesecake dessert shooters are a dream for anyone who loves the classic cookies-and-cream combo. They’re the perfect balance of creamy cheesecake filling and crunchy cookie crumbs, layered beautifully in mini glasses. Plus, they’re easy to make ahead of time, which makes them an excellent choice for parties, gatherings, or even a special night in. Each individual portion is as satisfying as it is visually appealing, making these shooters both elegant and practical for entertaining.
Ingredients for Oreo Cheesecake Dessert Shooters
To make these delicious shooters, you’ll need the following ingredients:
1 package of Oreo cookies (crushed, about 24 cookies)
1 (8-ounce) package of cream cheese (softened)
1/2 cup powdered sugar
1 teaspoon vanilla extract
1 1/2 cups heavy whipping cream
1/4 cup sugar (for whipping cream)
Optional toppings:ᅠExtra Oreo crumbs, whipped cream, or mini chocolate chips
Step-by-Step Recipe for Oreo Cheesecake Dessert Shooters
Step 1: Prepare the Oreo Crumbs
Place the Oreo cookies in a food processor and pulse until they form fine crumbs. If you don’t have a food processor, place the cookies in a resealable plastic bag and crush them using a rolling pin. Reserve about 1/4 cup of the Oreo crumbs for topping, and set the rest aside for the base layer.
Step 2: Make the Whipped Cream
In a large bowl, beat the heavy whipping cream with 1/4 cup of sugar until stiff peaks form. Set aside half of the whipped cream to top the shooters later, and fold the other half into the cheesecake filling for extra creaminess.
Step 3: Prepare the Cheesecake Filling
In a separate bowl, beat the softened cream cheese, powdered sugar, and vanilla extract until smooth and creamy. Gently fold in the whipped cream you prepared in Step 2 to create a light, fluffy cheesecake mixture.
Step 4: Assemble the Dessert Shooters
Start by spooning a layer of crushed Oreo crumbs into the bottom of each shooter glass. Next, pipe or spoon a layer of the cheesecake filling on top of the crumbs. Continue layering with more Oreo crumbs and cheesecake filling until the glasses are full, finishing with a final layer of whipped cream or Oreo crumbs on top.
Step 5: Chill and Serve
Refrigerate the dessert shooters for at least 1 hour to allow the flavors to meld and the cheesecake filling to set. Before serving, garnish the shooters with a sprinkle of reserved Oreo crumbs, a dollop of whipped cream, or mini chocolate chips for extra flair.
Tips for Making the Best Oreo Cheesecake Dessert Shooters
Use a piping bag: For a cleaner presentation, use a piping bag (or a resealable plastic bag with the corner cut off) to layer the cheesecake filling into the glasses.
Make ahead: These shooters can be made ahead of time, which is perfect for parties. Prepare them a day in advance and store them in the fridge until you’re ready to serve.
Mini Oreo garnish: For an extra cute touch, garnish each shooter with a mini Oreo cookie on top right before serving.
Glass size: Use small shooter or shot glasses for an elegant presentation. If you don’t have shooter glasses, small mason jars or even dessert cups will work just as well.
Why This Recipe Works
The contrast between the smooth, creamy cheesecake filling and the crunchy Oreo crumbs makes these dessert shooters irresistible. The whipped cream adds lightness to the cheesecake mixture, while the crushed Oreos offer a satisfying texture in every bite. The bite-sized portions make them perfect for serving at parties, and the layers look stunning in clear glasses. Plus, the recipe is easy to customize with different toppings or mix-ins, making it a versatile option for any occasion.
Serving Suggestions for Oreo Cheesecake Dessert Shooters
At parties or gatherings:ᅠThese mini desserts are perfect for parties, weddings, or baby showers. Their small size and individual servings make them easy for guests to enjoy.
For a romantic dinner:ᅠServe these shooters at the end of a special dinner for a decadent, yet light, dessert.
As a make-ahead treat: If you want to prepare a dessert in advance for a busy week or event, these shooters store well in the fridge for up to two days, making them a convenient option.
Conclusion
Oreo Cheesecake Dessert Shooters are the perfect combination of creamy, rich cheesecake and crunchy Oreo cookie goodness, served in a fun and elegant presentation. Whether you’re hosting a party or simply looking for a delightful treat, these mini dessert shooters are guaranteed to impress. With easy preparation and the option to customize toppings, this dessert is a show-stopper that’s sure to become a favorite.
6 notes
·
View notes
Text

Classic Chicken Salad Recipe
5 notes
·
View notes
Text

Easy Banana Bread Recipe
There’s nothing quite as comforting as a freshly baked loaf of banana bread. Whether enjoyed as a quick breakfast, a snack with a cup of coffee, or even a dessert, this moist and flavorful treat is a crowd-pleaser. With just the right balance of sweetness and the rich taste of ripe bananas, banana bread is also a versatile recipe that can be easily customized to suit your preferences.
In this article, we’ll guide you through the steps to make the perfect banana bread, while also sharing tips and tricks for making it your own.
Why You’ll Love This Banana Bread Recipe
This banana bread recipe is simple, delicious, and adaptable. Made with basic pantry ingredients, it’s a great way to use up overripe bananas, turning them into a moist, flavorful loaf that everyone will love. Plus, banana bread can be easily customized—whether you want to add chocolate chips, nuts, or even a swirl of cinnamon.
The best part? Banana bread is incredibly easy to make. Even if you’re a beginner in the kitchen, you’ll find that this recipe comes together quickly with minimal fuss, delivering excellent results every time.
Ingredients for Classic Banana Bread
Here are the basic ingredients you’ll need to make a loaf of banana bread:
3 ripe bananas (mashed)
1/2 cup unsalted butter (melted)
3/4 cup sugar
2 large eggs
1 teaspoon vanilla extract
1 1/2 cups all-purpose flour
1 teaspoon baking soda
1/2 teaspoon salt
1/2 teaspoon cinnamonᅠ(optional, for added warmth)
1/2 cup chopped nuts or chocolate chipsᅠ(optional)
Step-by-Step Banana Bread Recipe
Step 1: Preheat the Oven
Preheat your oven to 350ᄚF (175ᄚC). Grease a 9x5-inch loaf pan or line it with parchment paper for easy removal.
Step 2: Mix the Wet Ingredients
In a large mixing bowl, mash the ripe bananas with a fork or potato masher until smooth. Stir in the melted butter until well combined. Add the sugar, eggs, and vanilla extract, and mix until the ingredients are fully incorporated.
Step 3: Combine the Dry Ingredients
In a separate bowl, whisk together the flour, baking soda, salt, and cinnamon (if using). Gradually add the dry ingredients to the wet ingredients, stirring until just combined. Be careful not to overmix, as this can result in a tougher texture.
Step 4: Fold in Mix-ins
If you’re adding any mix-ins like chopped nuts or chocolate chips, gently fold them into the batter.
Step 5: Bake the Banana Bread
Pour the batter into the prepared loaf pan and smooth the top with a spatula. Bake in the preheated oven for 55-65 minutes, or until a toothpick inserted into the center comes out clean or with a few moist crumbs.
Step 6: Cool and Serve
Allow the banana bread to cool in the pan for 10 minutes, then transfer it to a wire rack to cool completely before slicing and serving.
Tips for Making the Best Banana Bread
Use very ripe bananas: The riper the bananas, the better the flavor. Bananas that are heavily speckled or even black on the outside are ideal for this recipe.
Don’t overmix the batter: Stirring too much can develop the gluten in the flour, leading to a dense, rubbery loaf. Mix until the ingredients are just combined for the best texture.
Customize your mix-ins:ᅠBanana bread is incredibly versatile, so feel free to add whatever you like. Chocolate chips, walnuts, pecans, or even a swirl of peanut butter can take your banana bread to the next level.
Test for doneness: Every oven is different, so check your banana bread around the 55-minute mark. Insert a toothpick into the center—if it comes out clean or with just a few moist crumbs, it’s ready.
Storage tips: Banana bread can be stored in an airtight container at room temperature for up to 3 days. You can also freeze it for longer storage—just wrap it tightly in plastic wrap and aluminum foil before freezing.
Why This Recipe Works
The combination of ripe bananas, melted butter, and a balance of dry ingredients creates a loaf that is perfectly moist and flavorful. The bananas provide natural sweetness, while the butter ensures a tender crumb. The addition of eggs gives structure to the bread, and a touch of vanilla rounds out the flavors. The option to include mix-ins like chocolate chips or nuts makes this banana bread both flexible and customizable to your taste.
Serving Suggestions for Banana Bread
For breakfast: Serve a warm slice of banana bread with a pat of butter or cream cheese for a simple yet satisfying breakfast.
With coffee or tea: Banana bread pairs wonderfully with a hot cup of coffee or tea, making it a perfect mid-morning or afternoon snack.
As dessert: For a more indulgent treat, enjoy banana bread with a scoop of vanilla ice cream or drizzle it with a bit of caramel sauce.
Conclusion
Banana bread is a classic recipe that’s beloved for its moist texture, sweet flavor, and versatility. Whether you’re making it as a snack, breakfast, or dessert, this easy-to-follow recipe delivers delicious results every time. With just a few ingredients and minimal effort, you can whip up a loaf of homemade banana bread that’s sure to become a favorite in your household.
#food#food and drink#healthy food#recipe#recipes#chocolate#baking#bread#cooking#dessert#banana bread
13 notes
·
View notes
Text

Which is the best food in the world?
Determining the "best" food in the world is highly subjective and varies based on personal tastes, cultural backgrounds, and experiences. However, some dishes are often celebrated globally for their flavors and popularity:
Pizza (Italy): A versatile dish with endless toppings, loved for its crispy crust and melty cheese.
Sushi (Japan): Delicate and artfully presented, sushi combines fresh fish, rice, and various accompaniments.
Biryaniᅠ(India): A fragrant rice dish with spices, meat, and vegetables, loved for its complexity of flavors.
Tacosᅠ(Mexico): A versatile street food that can be filled with a variety of ingredients, from meats to veggies.
Pastaᅠ(Italy): With countless shapes and sauces, pasta is comfort food enjoyed worldwide.
Dim Sumᅠ(China): A variety of small dishes, perfect for sharing, including dumplings, buns, and rolls.
Ramen (Japan): A flavorful noodle soup with rich broth, topped with ingredients like pork, eggs, and greens.
Curry (India and beyond): A wide range of spicy and aromatic dishes that vary by region, often served with rice or bread.
Baklava (Middle East): A sweet pastry made of layers of filo dough, nuts, and honey, beloved for its rich flavor.
Chocolate (various origins): A beloved treat that can be enjoyed in many forms, from bars to desserts.
Ultimately, the best food is the one that brings you joy and comfort! What’s your favorite?
18 notes
·
View notes
Text
3-Ingredient Nutella Truffles ✨
#food#food and drink#recipe#healthy food#recipes#baking#chocolate#bread#cooking#dessert#foodie#easyrecipes#tasty#homemade#cheflife#foodlovers#yum#foodbloggers#RecipeOfTheDay#foodblogger#FoodFreedom#FoodieBeauty#foodphotography#foodspot#easrecipe#deliciousrecipes#cookingathome
3 notes
·
View notes
Text

Lemon Cheesecake Recipe 🍋
Creamy and rich, this Lemon Cheesecake has a cookie crust and is topped with a tart lemon curd. If you are a lemon lover, this will be your favorite cheesecake recipe!
I have waxed poetic about my love of lemon for years and years now. If I had my choice between lemon or chocolate, I would choose lemon every time. Sweet or savory – lemon is just my favorite.
So I think I don’t even have to tell you about my love for this Lemon Cheesecake. I first posted this cheesecake back in 2008, then again in 2014. And yes – it totally deserves to be updated yet again.
This Lemon Cheesecake starts off with an animal cracker base versus a graham cracker base. And while I do think a graham cracker crust would be delicious, this animal cracker base totally sets this cheesecake apart from others. That is followed by a creamy lemon cheesecake. Once the cheesecake is baked and cooled, you add a homemade lemon curd to the top. Seriously – all of your lemon dreams coming true.
This cheesecake recipe is the perfect mix of sweet and tart and creamy. It’s perfect for entertaining, and perfect for holidays. I’m not kidding when I say this will be a new favorite – just read some of the comments below and you’ll see many others that agree with me!!
Ingredients
For the Crust:
Like I said above, the crust of this cheesecake is made with animal crackers instead of graham crackers. I really love this crust because it compliments the lemon well. You’ll need 5 ounces of the crackers, sugar, and melted butter. If you prefer a graham cracker crust, you can use that instead.
For the Cheesecake:
The cheesecake is made from lots of cream cheese, eggs, sugar, lemon zest and juice, vanilla, salt, and cream. I would not suggest using low fat ingredients here. You’ll want fresh squeezed lemon juice, so don’t use the juice from a jar.
For the Lemon Curd:
The recipe for this topping is a little different from my go-to lemon curd (which would also work) but I think this version is perfect for this cheesecake. You’ll need lemon juice (again – use freshly squeezed), eggs and an egg yolk, sugar, butter, cream, vanilla and salt.
How to Make a Lemon Cheesecake
Start with your crust: Process the animal crackers in a food processor until you have fine crumbs. If you don’t have a food processor, you can crush the crackers in a bag, but you probably won’t be able to get them as fine. Add the sugar to the mixture, then stream in the butter.
Press the crumbs into the bottom of a 9-inch springform pan. I have tried putting the crumbs halfway up the sides, but I didn’t like the texture, so now I just keep them just on the bottom. Bake this for 13-15 minutes, then remove it from the oven and let it cool.
Once the crust is cool, you will wrap your pan. Scroll down below for a few different methods to do this.
Next we are onto the filling. Get the food processor out again and pulse part of the sugar with the lemon zest. If you don’t have a food processor, use your fingers to rub the sugar and zest together. Stir in the rest of the sugar.
In a stand mixer, or with a hand mixer, beat the cream cheese for a few seconds. Then add in the lemon sugar, and beat until smooth. Add the eggs, lemon juice, vanilla, and salt and mix to combine.
Give the batter one last stir on the sides and the bottom of the bowl to make sure everything has been incorporated.
Pour this into the crust. Now this goes into the oven to bake until it is just slightly jiggly in the middle, but the surface is no longer shiny. Turn the oven off and prop the door open with a towel or a wooden spoon and let the cheesecake sit in the oven to gradually cool for 1 hour.
While the cheesecake is baking, make your lemon curd. Heat the lemon juice until it is warm. In another bowl, whisk the eggs and egg yolk with the sugar. Then whisk the warm lemon juice into the egg mixture. (Make sure to whisk constantly so that you don’t scramble your eggs and end up with clumps.) Pour this mixture back into the pan, and cook, stirring constantly, until the mixture is thick enough to coat the back of a spoon.
Remove it from the heat and whisk in the butter, cream, vanilla, and salt.
Refrigerate this until you need it.
Remove the cheesecake from the oven and run a knife around the edge. Let the cake sit at room temperature for 2 hours to cool completely.
Once cool, top the cheesecake with the lemon curd, then refrigerate for a minimum of 5 hours, but 24 hours is even better!
How to Create a Leak-Proof Water Bath for Cheesecake
I am a firm believer in a water bath. Not only is it the best way to avoid cracks in your cheesecake, but it helps to give you the best texture.
But I know many people curse them because sometimes water can leak in and ruin your whole cheesecake.
I have learned 2 different techniques to help you avoid that!
The first is to use the wide heavy duty foil. Normal foil is 12″ wide, while the wide heavy duty foil is 18″ wide. The 18 inches makes it so that you only have to use one sheet which means the water doesn’t have anywhere to sneak in.
The second technique, shown above, is actually something that I learned from one of you! Wrap your springform pan in a slow cooker liner, then add the foil to the outside of that to hold the bag in place. I was worried about oven temperatures at first, but the slow cooker bags are safe up to 400ᄎF. And it worked like a charm!
A few more tips when it comes to water baths:
Be careful when adding the water. You will need a baking dish or roasting pan that fits your springform pan and is at least 2 inches in depth. Even if you think you can walk the pan with the cheesecake and water in it to the oven without spilling or splashing, I still recommend taking the cheesecake and placing it in the baking dish, placing that in the oven and then carefully adding hot water to the dish.
If you are scared of the water bath or if you are too afraid of the water seeping into your cheesecake, I have heard of others who have had luck placing a pan of water on the rack under the cheesecake. I still think the actual water bath makes for a better cheesecake, but this method is a good alternate.
Tips and Tricks
Make sure all of your ingredients are at room temperature.
If your lemons are hard, you can roll them on a countertop, pressing them with the heel of your hand to loosen them up. Or pop them into the microwave for a few seconds.
Always zest the lemon before you juice it. It’s not easy to zest a lemon that has already been juiced!
The cheesecake needs to be fully chilled before serving.
Storing, Freezing, and Making Ahead
FREEZE: I have not personally ever frozen cheesecake, but research says it can be done. You’ll want to wrap it in both plastic wrap and foil, and then freeze it for only up to a month.
STORE: Store any leftovers in the refrigerator for up to 5 days. Keep it covered so that it will not dry out. The crust will get soggier the longer you keep it, but it will still be good.
MAKE AHEAD: I love that this cheesecake can be made ahead of time, which makes it perfect for holidays. It is actually best when it has been in the refrigerator for a day, so it’s ideal to make it ahead! The original recipe says you can make it up to one day in advance, but I have successfully made it 2 days in advance without any issues.
#food#food and drink#healthy food#recipe#recipes#usa#usa news#usa politics#team usa#usagi tsukino#united states#georgia#america#americans#alabama#quotes#queer#quoteoftheday#queer nsft#queue#art#cats#fashion#animals#video#black and white#arknights#this is what makes us girls#writers on tumblr#writing
9 notes
·
View notes
Text
The best mini cheesecakes ever 😍
#food#food and drink#healthy food#recipe#recipes#foodporn#foodpics#chocolate#ice cream#foodie#food photography#baking#bread#cooking#dessert#sandwich
139 notes
·
View notes