
Don't wanna be here? Send us removal request.
Statistics
We looked inside some of the posts by assethunter537 and here's what we found interesting.
Average Info
Notes Per Post
2
Likes Per Post
2
Reblog Per Post
0
Reply Per Post
0
Time Between Posts
6 days
Number of Posts By Type
Text
8
Last Seen Tumblr Blogs


Fun Fact
Tumblr has 16.74 million mobile monthly users in the US.
Text
Dualshock 4 Games


For years, the PC gaming world has been dominated by a single gamepad: the Xbox 360 controller. There have always been competitors out there, but the Xbox 360 was the king of the castle. But ever since the PS4 was released, gamers have started using the DualShock 4 controller to play more and more PC games. What kind of advantages does the DS4 have over the Xbox One controller and other gamepads? Well, it’s got a trackpad for one. It’s also not an Xbox controller – which, let’s be honest, is the first and most important advantage for many people. Here’s what you need to know about using the DualShock 4 controller to play games on your PC:
DualShock 4 works with PS5, but not PS5 games By Cian Maher 3 August 2020 13:39 GMT While you’ll be able to connect a DualShock 4 controller to the PS5, it won’t be compatible with next-gen games.
The reason why it doesn't work in Windows 10 Store games (UWP) is because the Dual Shock 4 isn't a Xinput device and therefore Windows itself won't see it as such. Steam has built in support for all sorts of controllers and can provide Xinput from its own software. That's why it works in Steam but not Win 10 games. When you enter a ps5 game using dualshock 4, you will get a notification that you have to use dualsense. What I did was connected ps4 to ps5 via remote play. And then using remote play with dualshock 4 started astro's playroom expecting the same thing happening. But it just let me play the game. A group for gamers who use the Dualshock 4, or Playstation 4 controller, to play games on their PC. Feel free to discuss connection/mapping, gameplay techniques, and more. RECOMMENDED: DS4 Tool This tool, created by InhexSTER and based on a tool made by Scarlet.Crush, allows seamless emulation of an Xbox 360 controller, enables the touch pad and other features, and allows additional.
Sony has never released official PC drivers for the DualShock
First, it’s important to note that Sony does not officially endorse using your DS4 as a PC controller. Unlike Microsoft, Sony has never released PC drivers for the DS4. I don’t know why Outlook 2008 for mac download. they’ve never released those drivers. It seems like it would be an easy way to make a lot of fans happy. Sony actually promised to release PC drivers a while ago, but still hasn’t made good on that promise. But fortunately, the community has developed a better solution.
Dualshock 4 Gamecube Shell

How to use the DualShock 4 controller on your PC
What you need: -Windows 8, Windows 8/8.1, Vista SP1 or XP SP1 -.NET 3.5 or .NET 4.0 (these come bundled with the installer) -C++ Common runtime libraries (also bundled with installer) -USB 2.0 port somewhere on your computer -SC Virtual Bus Drivers (also bundled with installer) -Bluetooth 2.1+EDR minimum (Windows BT stack), which is only required if you want to use your controller wirelessly Download the installer Download the latest version of the DualShock 4 installer files from here (it’s updated on a regular basis) Watch the video There are a number of installation guides all across the internet, but some are better than others. I liked the video below, which walks you through the process in five minutes. Configure controller You may have to individually configure the controller for some games. But most games should work perfectly fine. Games tend to recognize the controller just like they would recognize a 360 controller. Even on new games like Shadows of Mordor, this method worked for me.
Any advantages?
At this point, you may be wondering if there are any actual advantages to using a DualShock 4 controller on your PC instead of an Xbox One/360 controller. Well, both controllers are very similar. But the DualShock 4 does come with a few advantages, including: -The DS4 has a trackpad, which works well using the installer tool featured above. You can use the trackpad as a mousepad, which means you can easily navigate your desktop without putting down your controller. -You can hook your PC up to your living room TV and play superior PC games from the comfort of your couch
What about disadvantages?
Ultimately, these benefits come at a cost: the DS4 controller tends to be slightly more finicky than the Xbox controller and you may have to do some additional configuring in certain games. The other main disadvantage is that your brain will need to mentally “translate” Xbox 360 controller requests when they appear on screen. If Call of Duty asks you to press the blue “X” button to kill someone, you’ll need to press the purple square button.
Dualshock 4 Gamestop Used

This isn’t nearly as difficult as it might sound. Download qt creator for mac. It might take a few minutes to get used to, but if you’re familiar with both controller layouts, it won’t be a problem.

Consider donating $2
Dualshock 4 Controller Games

Dualshock 4 Gamestop
The installer tool is free. But developing software like this takes a lot of time and effort. If this method works for you, consider donating to the original developer. He suggests an amount of $2, in which case your forum account gets upgraded. But I’m sure whatever you can give is greatly appreciated. You can view donation details here. Obviously, setting up a DualShock 4 controller on your computer isn’t nearly as easy as plugging in an Xbox One controller. But if you really don’t like the Xbox controller design and have grown up with the DS4 design, then this is the best way to get that controller on PC.
0 notes
Text
Kodi Addons No Folder

In this guide, I have discussed how to install Venom addon on Kodi. Venom is an amazing Kodi addon for streaming Movies and TV shows in HD.
Kodi Addons No Folder Free
Kodi Addons No Folder Available
Some of the menu you will find under this addon are Movies, TV Shows, New Movies, and New Episodes. This addon works with Trakt as well for viewing high quality streaming links.
⚠️ Streaming free content through third party Kodi builds and addons like Venom is very risky and it sometimes get users in trouble with the law. This is due to streaming the pirated, copyrighted, or censored content through these addons. So, it is a wise choice to use a VPN Service with Kodi.
A VPN helps you be anonymous online from hackers, phishers, spammers, and even from ISPs and let you stream geo-restricted content even through torrent links.
At the Kodi Home screen, click the “ Add-ons ” menu from the left side menu. Click the open box icon at the top of the menu bar. Select “ Install from Zip File ���. Select the repository you just added above. It will be displayed as “ Lazy Kodi ” or any other name you typed. Select ZIPS KODIBAE.zip. 10 Best Kodi Kids Addons List for your HTPC; Kodi Folder Structure. Now that you know where Kodi app data is stored, here is a quick primer on Kodi folder structure. Kodi data folder typically contains the following 6 folders: addons - This is the Kodi addon directory. So any addon you install will be downloaded here. Now when I go to the folders, movies for example, the folders are empty. I set to show the scan in Kodi and can see it scans tons of movies. The music works as expected but any of the video folders are empty. Not even sure where to begin as I have tried resetting it up and it does nothing.
How to Install Venom on Kodi
Venom Addon Repository
In the world of Kodi addons, old repositories abandoned and expires sometimes while new repositories replace their place. Even sometimes you have to wait a bit for the new working repository to replace already broken or outdated repository.
You’ll always find the latest and working repository for Venom addon here. We check for these repositories frequently and update them accordingly.
Kodi Venom Repo Name: Venom Repo
Kodi Venom Repo URL: https://123venom.github.io/
How to Install Venom Addon on Kodi Leia & Krypton (Version 17 or Higher)
1. Open Kodi media player and go to the Settings
2. Select System option
3. Click on Add-ons and then enable Unknown Sources
4. Click Yes when the message prompts
5. Now go one step back to the Settings menu and then click on File Manager
6. Double click on Add Source
7. A box will open, so click None
8. Now enter URL https://123venom.github.io/ and click OK
9. Enter the name i.e. Venom Repo and click OK to close the box
10. Go one step back to the Settings menu and then click on Add-ons
11. Select Install from Zip File
12. A box will open where you will need to click on Venom Repo

13. Now select repository.venom-1.14.zip and wait till installation completed
14. Once installed, click on Install from Repository
Kodi Addons No Folder Free
15. Find and click on Venom Repository
16. Now select Video Add-ons and then click on Venom
17. Press Install
18. Click OK
How to Install Venom Kodi Addon on Jarvis (Version 16 or Lower)
Open Kodi.
Go to the System.
FileManager.
Double Click on Addsource.
Click ‘None’ > Enter https://123venom.github.io/ > Click Done.
Name it Venom Repo > Click Done > Click OK.
Go back to homescreen > Click System.
Click on Add–ons > Install from zip file
Select Venom Repo >Click repository.venom-1.14.zip > Wait for a few moments.
Click Install from repository > Venom Repository > Venom > Install > Wait again for the notification.
How to Get a VPN Protection on Kodi (49% Off Coupon)
Before you start streaming from the Venom Kodi addon, you must be using a secure VPN to stay away from your ISP tracking. The number one recommended VPN for Kodi users is ExpressVPN. You can use it on 5 devices simultaneously.
You can get ExpressVPN at US $6.67/mo (49% Off) for 12 months Plan with additional 3 months free.
Here is how to install ExpressVPN on Kodi media player.
Sign up for a ExpressVPN account and download its app on your device
Run the app and sign in with your credentials
Connect to the fastest server and start streaming videos on Kodi

Get ExpressVPN30-Day Money-Back Guarantee
Venom Kodi Addon (Direct Installation Method)
Venom Kodi add-on has another installation method that requires you to download the Venom Repository zip file directly on Kodi. This method can cut off the initial 3 steps as highlighted in the Kodi Krypton setup above. Here are the steps below:
Download the Venom Zip File and save it on your system.
Launch Kodi> Click on Add-ons tab > Select Box-icon> Then Install from Zip File.
When the box appears, you need to upload the downloaded Zip File> The installation will start.
Now click on Install from Repository option >Venom Repository>Video Add-ons>Venom> Then Install.
How to Install Venom on Kodi Fire TV Stick
Other than Amazon Firestick apps, Venom is one famous addon for FireStick. To directly install Venom on Fire TV Stick, it is necessary that you install ES File Explorer and then install the zip file.
To install ES File Explorer, follow the steps outlined below:
Go to Fire Stick Home Screen > Click on Settings > Select System > Developer Option > Turn ON Apps from Unknown Sources and ADB Debugging option.
A box will pop-up to declare warning, select OK
Now follow the same steps mentioned earlier in this guide
A lot of users face errors like no stream available on Venom while watching it on Fire Stick. However, the best way to fix this error is by installing the best vpn for fire stick.
Kodi Venom Not Working / Errors / Fixes
If you’re facing Kodi not working issues regularly and haven’t got a working solution yet, then we highly recommend you to check our guide on “8 Common Fixes for Kodi Not Working Errors“.
Kodi Venom Installation Failed
This error is prompted due to many reasons including failure of the internet and shutting down of the repository. If you had previously installed a repository that is currently been shut down, you might see the add-ons listed on its add-on section. However, when you proceed for the installation, it prompts ‘Installation Failed’ error.
Check your internet connection before proceeding towards installing Venom, otherwise the installation would fail again. Another technique that resolves the problem is to check for the repository that is currently working and hasn’t been shut down.
Venom Error Check Log
While trying to install an add-on you might have encountered this error. This error appears if there are some files missing in the add-on repository from which you are trying to install the add-on. Another reason behind this error is having a filled up cache or back-end data.
You can fix this error by first trying to clear cache on Kodi. If cache clearing helps then the repository is fine. Otherwise, try to use a different and reliable repository for installing the add-on. The add-on repository we have mentioned on our blog is tried and tested.
Kodi Venom No Stream Available
Recently an error has been popping up on Kodi while using Venom stating, ‘No streams Available’. This means that either the stream you’re looking for is new and not yet available or either it is too old to grab.
As for the add-on, Venom might not be able to catch any stream from the provider. The reason may be because of your network connectivity, firewall, or your cache.
Well, this error can easily be fixed. Follow the following steps to fix this error:
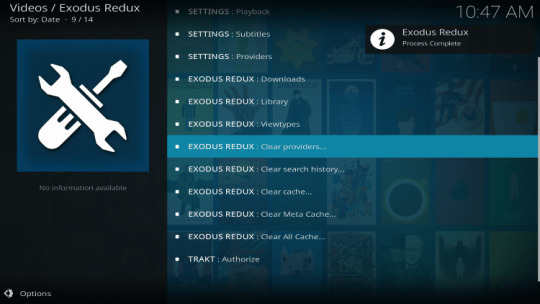
Go to the Main Menu> Open Tools.
Click on Clear Providers> Click yes> A notification stating ‘Process complete’ will pop-up.
Now click on Clear Cache> Click yes > A notification stating ‘Process complete’ will pop-up.
Click on General > Go to Providers Timeout> Decrease it to 20> Click OK.
Again click on General> Click on Playback from the left-hand menu> Turn off Hosters with Captchas> Click OK.
Now select Subtitles from the Tools menu> Enable Subtitles> Click OK.
If you have an unstable or slow internet connection then,
Go to Tools Menu> Select General> Click on Playback from the left-hand menu> Go to Max quality> Decrease the video quality for the better streaming experience.

Venom Failed to Install Dependency Error
Kodi Addons No Folder Available
Venom add-on is available on many repositories, but there are only a few where it actually works. There are repositories where you install Venom add-on but it gives an error ‘Failed to Install Dependency’.
As a result, you are unable to install Venom on Kodi ending up Kodi Venom not working. Some of the add-ons contain Trojan viruses and you may accidentally install them through these repositories which is a bigger risk.
To fix this problem, you can install Venom from the official repository which is safer than any other repositories.
Venom Can’t Connect to the Server
This is a rare error and does not occur usually but if it does, it means that either it is your internet connection that is unstable or the repository source has been moved to a new URL.
First, check the repository URL and see if it is online or not. Secondly, Check your internet connection and make sure that your network connection is stable. If the error persists, try installing the add-on from a different repository.
Venom Could Not Connect to Repository Error
This error occurs while trying to install the add-on and this might be because of a broken source link or the repository source that you have added might be incorrect.
Check the repository source link that you have entered in the file Manager and verify whether the add-on repository is working or not. If the repository is down then search for and add an alternate repository source.
Venom Addon Review
Venom is all times favorite addon of Kodi users just like Seren. It is poprlar for high quality content it offers to Kodi users.
How to Activate Real-Debrid on Venom
Open Kodi > Go to Settings > Click on Systemsettings > Change the Basic menu to Advanced.
Click on Add–ons tab from the left-hand menu > Click on Manage dependencies > Click on URLResolver from the list > Click Configure.
Click on UniversalResolvers > Choose Real-Debrid > Click Priority> Set the value to 90 > Click Done> Click OK
Click Configure > Select Universal Resolvers > Go to Real-Debrid section > Click on (Re)Authorize My Account > sign in to your debrid account.
Enter the code that you see on your screen at this https://real-debrid.com/device > Now click Continue, Real Debrid has been installed.
How to Setup Trakt.tv in Venom
Open Venom Kodi add-on
Click on Tools > Click on Settings: Accounts
Click on Trakt from the list > A window will popup showing a URL and Pin code.
Enter the PIN code > AuthorizeTrakt.
How to Update Venom on Kodi
Although Kodi updates addons automatically, however you can manually update addons to watch the latest content. Here is how you can update an addon on Kodi.
Go to the Add-ons tab >Video add-ons
Right click on the Venom addon >Information
Click on Update> Select the latest Version available
How to Uninstall Venom Addon on Kodi
Uninstalling an addon in Kodi is a simple 3 steps process. If you’re familiar with the Kodi environment, You can easily navigate and perform different actions on Kodi including uninstalling an addon.
Go to the Add-ons tab >Video add-ons
Right click on the Venom addon >Information
Click on Uninstall> Yes > Yes
Venom Addon Alternatives for Kodi
Venom Addon for Kodi: FAQs
❓ Will I Need a VPN for Venom Addon on Kodi?
Using a VPN with Kodi addons is not necessary but it is highly recommended. Venom just like other third party addons sources free content from the web which is sometimes pirated and cause copyright issues. So, you should remain on safe side by using a VPN if you’re from the country which has strong Internet surveillance and related law.
Moreover, a VPN let you access blocked content which you can’t stream otherwise.
❓ Can Venom Addon be Installed on Fire TV Stick?
Yes, Venom addon can easily be installed on Fire TV devices. We have discussed this above in detail. Refer to the section “How to Install Venom on Kodi Fire TV Stick” above for instructions.
❓ What’s the difference between a Kodi Addon and a Build?
A Kodi addon is a piece of code compiled for a specific function to perform on Kodi. There are addons for Video, Music, Programs etc. Whereas a build is a more complex code, written with a lot of addons, skins, wizards, and additional functions to give Kodi users a visual all in one platform for their Kodi entertainment.
❓ Is Venom Addon Legal?
Using Venom addon on Kodi is legal itself but you have to make sure the content you’re watching through Venom is not pirated or censored. As these addons get links from the web and there is a chance that these web sources may hosting copyrighted content which is not allowed to distribute freely. Always use a VPN with third party addons to remain on a safe side.
❓ What is the Best Addon for Firestick?
Venom is a good addon that is available for Kodi users. There are some alternatives to this that we have discussed above. However Kodi Covenant, Exodus V8, Exodus Redux, Magic Dragon, The Crew, and Seren 2.0 are some of the best addons working right now.
Adding Things Up
Venom Kodi addon is definitely one of the best working Kodi addons due to its decent and user-friendly interface. I tried this addon on both windows and FireStick and it worked pretty well on both of them.
You can always rely on this Kodi addon in terms of content availability and quality. Even the performance of this addon is remarkable as it does not crash or lag at all. It also have an auto-play feature that pulls the best stream for your desired content.
Using a secure VPN service with the Venom addon is highly recommended for safe unrestricted entertainment. It keeps your identity hidden from online threats and even from your ISP and helps you access geo-restricted content in your country even through torrent links.
Repository:Zach Morris Add-ons
Install Guide via Fusion Installer
Select the Add-ons tab from the vertical menu bar within Kodi.
Click on the little open box icon at the top left corner of the Add-ons interface.
Choose the Install from zip file function.
Select the fusionco server from the listing.
Open the kodi-repos folder.
Select the english folder, or international for foreign language addons.
Select the addon developer's repository: repository.zachmorris-1.0.0.zip
Wait a second for the repository to download.
Select the Install from repository function at this point.
Choose the repository you just installed: Zach Morris Add-ons
Select the repository add-ons category.
Select the addon you wish to install: Zach Morris Add-ons
Click on the Install button at the lower right corner of the screen.
If prompted, select the latest version from the listing.
If prompted, press the OK button to accept necessary dependencies.
Wait a few seconds for the addon and its dependencies to download.
Install Guide via Git Browser
Click on the Add-ons tab from the vertical menu bar within Kodi.
Select the Program add-ons category.
Launch the Git Browser tool from the right side of the screen.
Select the Search by GitHub Username option.
Click on the *** New Search *** function.
Using the on-screen keyboard, enter the addon developer's GitHub username: zachmorris
Press the OK button on the right side of the keyboard.
Click on the corresponding repository ZIP file at the top of the listing, in order to facilitate automated addon updates in the future: repository.zachmorris-1.0.0.zip
Press the Install button when prompted.
Wait a few seconds for the process to complete.
Press the Continue button when prompted to proceed.
Click on the addon ZIP file you wish to install: repository.zachmorris-1.0.0.zip
Press the Install button to proceed.
Wait a few seconds for the addon and dependencies to install.
When prompted, press the Restart button to finalize installation.
0 notes
Text
Latest Adobe Reader El Capitan

Latest Adobe Reader El Capitan Free
Latest Adobe Reader El Capitan Download
Adobe Reader El Capitan
Latest Adobe Reader 10
Latest Adobe Reader El Capitan Version
Oct 01, 2015 El Capitan and Adobe software. Adobe Creative Cloud, current versions: The most recent versions cannot be used on Mac OS X 10.11 El Capitan. As of 2019, the only versions of Creative Cloud applications available for installation are the current version and one previous major version, and those won’t work because support for Mac OS X 10.11 El. Latest Adobe Reader for viewing reports adobe.com. Adobe Acrobat Reader (Version 3.0 or higher). Mac OS X 10.11 El Capitan; Mac OS 10.12 Sierra; IMPORTANT. An Adobe product icon (or logo or signature) is a design or image that is associated with and identifies a specific Adobe product or service. Adobe does not normally allow the use of its product icons by third parties in their products or related materials of any kind, except under a prior written license or equivalent authorization from Adobe.
Latest Adobe Reader El Capitan Free
Adobe and Apple have worked closely together to test Adobe Creative Cloud applications for reliability, performance, and user experience when installed on Intel-based systems running Mac OS X El Capitan (version 10.11). The latest versions of all Creative Cloud products are compatible.
We are aware of some issues that users may experience after upgrading to OS X El Capitan (10.11). We are working hard to resolve these issues in a forthcoming release and we currently recommend users upgrade to the latest version of OS X (10.11.1) or remain on OS X 10.10.x.
Learn more:
If you encounter any issues, report them on our bug reporting form.
Customers are encouraged to check plug-in compatibility by contacting the plug-in vendor before upgrading to OS X El Capitan. For third-party products, contact the manufacturer for guidance.
Adobe offers support to customers running OS X El Capitan in accordance with our standard customer support policies. Visit the support page for additional information about our support programs.
Yes. If a full version of a product is compatible with OS X El Capitan, then the trial version of that product is compatible as well. Any known issues described in this document also apply to the trial versions.
Hello all,
Generally, I use Preview to read PDFs. However, the particular one I'm trying to read is encrypted and, apparently, can only be read with Adobe Reader.
The trouble is, after opening the PDF, I can't find a text area with which to interact. Sometimes, if I'm lucky, Voice Over will start to read the PDF contents as soon as I open the file. However, this seems to be completely random and if I move away from the text area for any reason, there doesn't seem to be a means of finding it again. As I understand, I should be able to navigate to, and interact with, an element containing the file path, after which I should be able to read the text.
I have tried using various Reading Orders in the Accessibility Setup Assistant within Adobe Reader, and have also tried hiding the various panes in case they were somehow interfering with Voice Over performance.
I am using the latest version of El Capitan, 10.11.5, and Adobe Reader 2015.016.20041. Perhaps the latter is out of date?
Over a year ago, I did manage to have it working of sorts, with different documents, but can't remember how I did it. I suspect that it may have something to do with selecting the 'Zoom' button which used to be near to the 'Minimise' and 'Close' buttons, but this is no longer present to my knowledge. The Fullscreen button didn't help.
Latest Adobe Reader El Capitan Download
I have tried a couple of PDFs which used to work and now I am unable to read them. As such, I'm thinking that it may be an error in my Adobe Reader settings which is causing this.
Adobe Reader El Capitan

All of the PDFs which I've tried are untagged, but the Accessibility Setup Assistant used to be able to fix that for me.

Does anyone have any advice?
Latest Adobe Reader 10
Thanks and regards,
Latest Adobe Reader El Capitan Version
Sam.
0 notes
Text
Java Download For Mac 10.9 5

Java 6 Mac Os X Download
Java
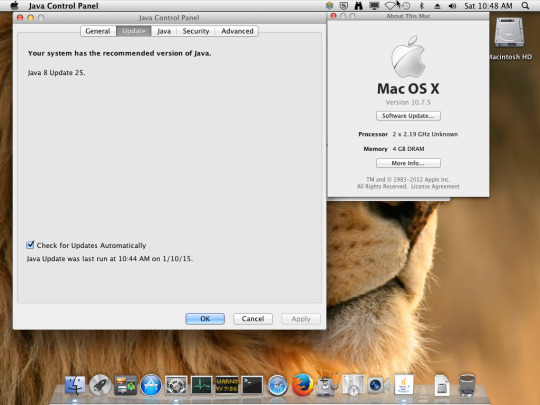
The new Mavericks (10.9) showed me the 'Requesting install', but nothing happened. The solution was to manually download and install the official Java package for OS X, which is in Java for OS X 2013-005. Update: As mentioned in the comments below, there is a newer version of this same package: Java for OS X 2014-001. Java for OS X 2014-001 (Correcting dead line above).
The remote Mac OS X host is running a version of Java for Mac OS X 10.5 that is missing Update 9. As such, it is affected by several security vulnerabilities, the most serious of which may allow an untrusted Java applet to execute arbitrary code with the privileges of the current user outside the Java sandbox.
Java SE 5.0 Downloads. Go to the Oracle Java Archive page. Download qt creator for mac. Thank you for downloading this release of the Java TM Platform, Standard Edition Development Kit (JDK TM).The JDK is a development environment for building applications, applets, and components using the Java programming language.

Pick a software title..to downgrade to the version you love!
Java 6 Mac Os X Download
Opera Latest Version
Opera 11.60
Released:
Dec 6, 2011
Size:
13.56 MB
Downloads:
847
Rating:
Tested: Free from spyware, adware and viruses
Opera Popular Version
Opera 9.62
Released:
Feb 24, 2011
Size:
13.46 MB
Downloads:
2,686
Rating:
Tested: Free from spyware, adware and viruses
Select Version of Opera to Download for FREE!
Software VersionRelease DateSizeOpera 5.0Feb 24, 20112.00 MBOpera 6.0Feb 24, 20114.92 MBOpera 6.02Feb 24, 20113.42 MBOpera 6.03Feb 24, 20113.42 MBOpera 7.50Feb 24, 20114.15 MBOpera 7.51Feb 24, 20114.16 MBOpera 7.52Feb 24, 20114.19 MBOpera 7.53Feb 24, 20114.20 MBOpera 7.54Feb 24, 20114.19 MBOpera 8.01Feb 24, 20115.55 MBOpera 8.52Feb 24, 20113.60 MBOpera 8.54Feb 24, 20115.45 MBOpera 9.01Feb 24, 20116.27 MBOpera 9.02Feb 24, 201113.11 MBOpera 9.10Feb 24, 201113.20 MBOpera 9.20Feb 24, 201111.29 MBOpera 9.21Feb 24, 201111.29 MBOpera 9.22Feb 24, 201111.29 MBOpera 9.27Feb 24, 201111.31 MBOpera 9.50Feb 24, 201115.55 MBOpera 9.51Feb 24, 201115.57 MBOpera 9.52Feb 24, 201114.43 MBOpera 9.60Feb 24, 201113.46 MBOpera 9.61Feb 24, 201113.46 MBOpera 9.62Feb 24, 201113.46 MBOpera 9.63Dec 15, 200813.46 MBOpera 9.64Mar 2, 200913.47 MBOpera 10.00Sep 1, 200916.34 MBOpera 10.01Oct 27, 200916.35 MBOpera 10.10Nov 26, 200919.80 MBOpera 10.52Apr 26, 201023.49 MBOpera 10.53Apr 29, 201023.49 MBOpera 10.54Jun 20, 201023.49 MBOpera 10.60Jul 2, 201022.66 MBOpera 10.61Aug 11, 201022.68 MBOpera 10.62Sep 8, 201022.70 MBOpera 10.63Oct 11, 201022.73 MBOpera 11.00Dec 15, 201013.18 MBOpera 11.01Jan 26, 201113.18 MBOpera 11.10Apr 11, 201113.43 MBOpera 11.11May 17, 201113.37 MBOpera 11.50Jun 27, 201113.72 MBOpera 11.51Aug 31, 201113.73 MBOpera 11.52Oct 19, 201113.08 MBOpera 11.60Dec 6, 201113.56 MB

Do you have software version that is not currently listed?
Upload it now and get rewarded!
Need a software version that is not currently listed?
Make a software request now!
Opera Description
Opera is a cross platform web browser and Internet suite. It includes a variety of programs to accomplish common Internet tasks such as web browsing, IRC, email, and more. Features of the browser include tabbed browsing, an integrated download manager, and built-in privacy and anti-phishing utilities. Opera was originally trialware, but starting with version 5.0 became advertisement supported. Begining with version 8.5, the browser became free with revenue coming from Google advertising revenue, as it is the default search engine. Outlook 2008 for mac download.
Other Internet Software
Opera Comments
Java
Please enable JavaScript to view the comments powered by Disqus.blog comments powered by Disqus
0 notes
Text
Microsoft Office For Mac 2011 Download Online

Office 2011 For Mac Download
Microsoft Office 2011 Download Free
Microsoft Office Free Download Mac
Microsoft Office Mac 2011 Download
Our software library provides a free download of Microsoft Office 2011 14.7.7 for Mac. This Mac download was checked by our built-in antivirus and was rated as malware free. The latest installation package takes up 113.6 MB on disk. Microsoft Office 2011 for Mac lies within Productivity Tools, more precisely Office Tools. Download the installation file by clicking on the link below, save it to your computer. After download finishes, locate the file Office-Mac2011.dmg and double click on the file. The file will extract and launch the installer automatically. Get Free Microsoft Office Mac 2011 is somewhat limited as compared to Microsoft Office 2010 on the Windows platform. So, there is no support for right-to-left languages, like Hebrew and Arabic, or no support for.ODF file format. Download free Microsoft Office 2011 for macOS - Mac Informer Microsoft Office 2011 for Mac The first variant of Mac OS X.
Make your Mac invincible
Get Setapp, a toolkit with fixes for all Mac problems
Since its initial release nearly 30 years ago, Microsoft Office has become one of the world’s most popular productivity suites. With programs like Word and Excel for Mac, it’s no wonder that the MS Office suite is a must-download on any computer.
Microsoft Office for Mac 2019 includes the most modern versions of Word, Excel, Powerpoint, Outlook, and OneNote. These apps are all available for download at the Mac App Store. Alternatively, with Office 365 for Mac, you can work online or offline and collaborate with others in real time, which is especially useful for any kind of team work.
Get a perfect alternative for MS tools on Mac
Try Setapp, an all-in-one toolkit that covers apps substituting Microsoft’s Visio, Project, and Publisher. All in a single spot on your Mac.
If you’ve been asking yourself questions like “what is Office 365 for Mac” and “how much is Microsoft Office?” — the guide below will help dispel your confusion. Besides, do you know how you can download Microsoft Office?
How To Download And Install MS Office For Mac
As mentioned above, Microsoft Office suite and all of its apps — Word, Excel, Powerpoint, Outlook, OneNote, and OneDrive — are now available at the Mac App Store. This makes it easier than ever to get the most current versions of MS Office for Mac (note that you’ll need an Office 365 subscription to use these apps). There is also a Microsoft Office trial available that allows you to use Office 365 free for one month.
To buy Microsoft Office outright, visit office.com. At the Office home page, select Install Office. Then follow the instructions for the installer file that has been downloaded to your computer.
System requirements to download Microsoft Office
Before downloading Office for Mac, make sure you have the fitting system requirements that allow for the best experience with Microsoft apps. For example, Microsoft Office suite always supports the latest three versions of macOS. Currently, it’s 10.14, 10.13, and 10.12.
As new versions of macOS are released, Microsoft shifts its support to the newest ones. While your Office apps might still work on older unsupported versions of macOS, you won’t be able to get security or feature updates.
To run Microsoft Office at the moment, you’ll need macOS 10.12 (Sierra), 4 GB RAM and 10 GB of available disk space.
The difference between Office 2019 and Office 365 for Mac
You can still buy Microsoft Office without getting into a subscription. The downside is not getting continuous feature updates, which will in turn be bundled altogether in the following year’s release.
Office 365, on the other hand, is based purely on a subscription model and powered by Microsoft’s cloud service. It frequently receives updates and provides full access to the whole suite of services.
How much is Microsoft Office?
As MS Office for Mac is available in two versions — a one-time payment and subscription — there are two prices. If you want to buy a license for Office Home and Student 2019 for Mac, which includes Word, Excel, PowerPoint, and OneNote, it will cost you $149.99. If you’d like to use Microsoft Office Outlook, you’ll need to purchase the Office Home and Business 2019 for Mac at $249.99.
For the subscription model, Microsoft Office 365 for Mac, you pay a month-by-month or yearly fee. Download qt creator for mac. And as new versions are introduced, you automatically get them as part of your subscription. Office 365 for Home costs $99.99 a year or $9.99 a month.
What about MS Office vs. iWork
Apple’s free iWork has a great price advantage over the MS Office suite, but is it better than all the Microsoft’s popular productivity apps?

iWork includes Keynote, Pages, and Numbers, but is generally best suited for smaller businesses or home use. Additionally, if you already use Microsoft Office extensively at home or work, being able to switch between Macs and PCs gives Microsoft Office Suite a big plus.
Microsoft Office is known for having a slight edge for ease-of-use and is packed with more features. The latest version of the suite also looks brand new compared to iWork’s currently outdated version. As Microsoft Office continues to learn the macOS, it continues to grow.

MS Office Touch Bar features
Trackpad and Touch Bar, unique to MacBooks, have made great new features available on Office for Mac.
In Microsoft Word for Mac, you can use the Touch Bar to insert hyperlinks, comments, or photos right in the text editor. It’s especially great when you’re working in Word Focus Mode without access to the controls on the screen.
Outlook 2008 for mac download. In Excel for Mac, using the equal sign on your keyboard will launch most recently used commands on the Touch Bar. Then you can select a range of commands or perform specific actions.
In Microsoft Office Outlook, Touch Bar makes recent files appear when you’re composing an email. From here, you can attach relevant files with a single tap. In Outlook’s Today view, you can use the Touch Bar to get a quick look at your daily calendar events or launch a Skype call.

During slideshow presentations in Powerpoint, you can use the Touch Bar to view specific controls. The function integrates slide thumbnails and includes a timer to make moving through your presentation on time a snap.
Great Substitutes For MS Project, Visio, And Publisher
If you’ve used MS Office tools on Windows before, you may have noticed that some of them aren’t available on Mac, specifically Microsoft Project, Visio, and Publisher.
Office 2011 For Mac Download
The good news is you can easily substitute lacking MS Office apps with Setapp.
Take care of your publishing needs
With Microsoft Publisher for Mac currently unavailable, you need an app that is easy to use but, at the same time, delivers professional results when you’re looking to put together greeting cards or self-publish a magazine. Enter Swift Publisher.
Swift Publisher has a robust set of design tools that allow you to apply gradients, draw freehand shapes, and control different aspects of your design layout at once. The app also features an extensive graphic library with over 2,000 pieces of clip art and 100 image masks.
Make publishing easy with Swift Publisher’s support for exports to a variety of digital formats, including social media. You’ll find that quickly Microsoft Publisher for Mac will become a thing of the past.
The best alternative to Microsoft Visio
With the need to create flowcharts, diagrams, and organizational tables for your projects, you may miss Microsoft Visio. Fear not. You can easily brainstorm and create long-term plans with iThoughtsX instead. Even better, you’ll never lose important information with its built-in cloud integration.
iThoughtsX lets you visualize an idea, track to-dos along with deadlines, and check on the team's progress. You don’t have to interrupt your workflow at all, as this app supports multiple file formats that can store your ideas in .rtf, .txt, Microsoft Word (.docx), .csv, MindGenius (.mgmx), MindNode (.mindnode), .opml, and more.
Plan projects with Merlin Project Express
Merlin Project Express will help you plan both home and professional projects. It’s a great solution for managing budgets and resources available for any endeavour.
Just like Microsoft Project for Mac, Merlin Project Express lets you create tasks, manage dependencies, and track progress with ease. You can also come up with project templates to streamline your workflow, set daily goals, and visualize the timeline. Consolidate all information in one place with project info at hand by attaching emails, images, costs, and notes.
Microsoft Office 2011 Download Free
Best of all, three substitute apps: Swift Publisher, iThoughtsX, and Merlin Project Express are available on Setapp, a platform of more than 150 Mac apps and utilities that you can use at home and work to improve all aspects of interacting with your Mac. Get yourself a perfect complement to your Microsoft Office suite purchase and try Setapp free for seven days. Working smart doesn’t have to feel like a trade-off.
Setapp lives on Mac and iOS. Please come back from another device.
Meantime, prepare for all the awesome things you can do with Setapp.
Read on
Microsoft Office Free Download Mac
Sign Up
Setapp uses cookies to personalize your experience on our website. By continuing to use this site, you agree to our cookie policy.
Microsoft Office Mac 2011 Download
0 notes
Text
Kerio For Mac Free Download

Download Kerio Maker For Pc
Download Kerio 64
Kerio Connect Download

Kerio Connect Client. Windows (32-bit) 59 MB: DOWNLOAD: Windows (64-bit) 69 MB: DOWNLOAD: macOS: 55 MB: DOWNLOAD: MSI for GPO (Active Directory) - Windows 32-bit: 59 MB: DOWNLOAD: MSI for GPO (Active Directory) - Windows 64-bit: 69 MB: DOWNLOAD. Free shipping and returns on 'Just Free Vpn Down And Kerio Vpn Free Download For Mac Online Wholesale' for you buy it today! Find more Low Price and More Promotion for Just Free Vpn Down And Kerio Vpn Free Download For Mac Online Check Price This will be Just Free Vpn Down And Kerio Vpn Free Download For Mac Sale Brand New for the favorite.
Download
If your download is not starting, click here.
Thank you for downloading Kerio VPN Client for Mac from our software library
This application is distributed free of charge. The package you are about to download is authentic and was not repacked or modified in any way by us. The software is periodically scanned by our antivirus system. We also encourage you to check the files with your own antivirus before launching the installation. You are downloading Kerio VPN Client for Mac, version 8.3.2.
Qt Creator is an open source and multi-platform IDE (integrated development environment) created to provide developers with all the tools needed to build various types of mobile and desktop based software solutions with the help of the Qt framework. User-friendly and clean styled interface. Download qt creator for mac. The Qt Creator official download site is When you go to this site, it should detect that your computer is running MacOS and recommend the installer 'Qt Online Installer for Mac OS'. Click the green 'Download' button to download the installer. 5) Run the Qt Creator installer. Download a free trial of the Qt framework, tools for desktop and embedded development, plus other enterprise add-ons. Existing customers. Find them in the Qt account licensing portal or through the Maintenance tool in your Qt installation directory.
Kerio VPN Client antivirus report

Download Kerio Maker For Pc
This download is virus-free.This file was last analysed by Free Download Manager Lib 3 days ago.

Often downloaded with
Download Kerio 64
Kerio OperatorKerio Operator is a VoIP-based phone system that provides powerful yet..$330DOWNLOAD
VPN Server Pro ClientVPN Server Pro is a professional data protection tool. The application protects..$8.21DOWNLOAD
Kerio Connect Download
Kerio WinRoute Firewall Administration
Network Tools Outlook 2008 for mac download.
0 notes
Text
Download Qt Creator For Mac

Download
If your download is not starting, click here.
Thank you for downloading Qt Creator from our software library
Qt Creator 4.13.2 for macOS (194 MB) (info) The source code is available as a zip (62 MB) (Info) or a tar.gz (49 MB) (Info). Or visit the repository at code.qt.io. Be sure to check if Qt is supported on your platform and read the installation notes that are located in the Qt Documentation.
Index of /archive/qt. Name Last modified Size Metadata; Parent Directory - 5.15/ 09-Sep-2020 07:30 - 5.14/.
Parent Directory - submodules/ 30-May-2017 10:05 - single/ 30-May-2017 10:02 - qt-opensource-windows-x86-pdb-files-5.9.0.zip: 30-May-2017 09:25.
The software is periodically scanned by our antivirus system. We also encourage you to check the files with your own antivirus before launching the installation. The download is provided as is, with no modifications or changes made on our side. You are downloading Qt Creator, version 5.13.0.
Qt Creator For Mac Download
Qt Creator antivirus report
This download is virus-free.This file was last analysed by Free Download Manager Lib 37 days ago.
KASPERSKY
MCAFEE
AVIRA
WebAdvisor
Often downloaded with
Qt Eclipse IntegrationNokia offers a seamless integration of Qt development tools for the Eclipse...DOWNLOAD
Qt OpenSourceQt OpenSource let you create rich, touch enabled UIs and applications quickly....DOWNLOAD
Qt-based Multimedia PlayerQt-based Multimedia Player is an audio player written with the help of the Qt...DOWNLOAD
QT Index SwapperThis AIR-based application, QT Index Swapper, performs the index swapping for...DOWNLOAD
Qt LinguistQt provides excellent support for translating applications into local...DOWNLOAD
This tutorial requires Qt Creator to be installed — you can download it free from the Qt website. Go to https://www.qt.io/download and download the Qt package. You can opt to install only Creator during the installation.
Open up Qt Creator and you will be presented with the main window. The designer is available via the tab on the left hand side. However, to activate this you first need to start creating a .ui file.
To create a .ui file go to File -> New File or Project... In the window that appears select Qt under Files and Classes on the left, then select Qt Designer Form on the right. You'll notice the icon has 'ui' on it, showing the type of file you're creating.
In the next step you'll be asked what type of widget you want to create. If you are starting an application then Main Window is the right choice. However, you can also create .ui files for dialog boxes, forms and custom compound widgets.
Next choose a filename and save folder for your file. Save your .ui file with the same name as the class you'll be creating, just to make make subsequent commands simpler.
Finally, you can choose to add the file to your version control system if you're using one. Feel free to skip this step — it doesn't affect your UI.

Laying out your Main Window
You'll be presented with your newly created main window in the UI designer. There isn't much to see to begin with, just a grey working area representing the window, together with the beginnings of a window menu bar.
You can resize the window by clicking the window and dragging the blue handles on each corner.
The first step in building an application is to add some widgets to your window. In our first applications we learnt that to set the central widget for a QMainWindow we need to use .setCentralWidget(). We also saw that to add multiple widgets with a layout, we need an intermediary QWidget to apply the layout to, rather than adding the layout to the window directly.
Qt Creator takes care of this for you automatically, although it's not particularly obvious about it.

To add multiple widgets to the main window with a layout, first drag your widgets onto the QMainWindow. Here we're dragging 3 labels. It doesn't matter where you drop them.
We've created 2 widgets by dragging them onto the window, made them children of that window. We can now apply a layout.
Find the QMainWindow in the right hand panel (it should be right at the top). Underneath you see centralwidget representing the window's central widget. The icon for the central widget show the current layout applied. Initially it has a red circle-cross through it, showing that there is no layout active.
Right click on the QMainWindow object, and find 'Layout' in the resulting dropdown.
Next you'll see a list of layouts which you can apply to the window. Select Lay Out Horizontally and the layout will be applied to the widget.
The selected layout is applied to the the centralwidget of the QMainWindow and the widgets are added the layout, being laid out depending on the selected layout. Note that in Qt Creator you can actually drag and re-order the widgets within the layout, or select a different layout, as you like. This makes it especially nice to prototyping and trying out things.
Using your generated .ui file
We've created a very simple UI. The next step is to get this into Python and use it to construct a working application.
First save your .ui file — by default it will save at the location you chosen while creating it, although you can choose another location if you like.

The .ui file is in XML format. To use our UI from Python we have two alternative methods available —
load into into a class using the .loadUI() method
convert it to Python using the pyuic5 tool.
These two approaches are covered below. Personally I prefer to convert the UI to a Python file to keep things similar from a programming & packaging point of view.
Loading the .ui file directly
To load .ui files we can use the uic module included with PyQt5, specifically the uic.loadUI()method. This takes the filename of a UI file and loads it creating a fully-functional PyQt5 object.
For PySide2 you can use a QUiLoader instance and call the loader.load() method to accomplish the same thing.
PyQt5
PySide2
As the uid.loadUI() method turns an instance object you cannot attach custom __init__() code. You can however handle this through a custom setup function
To load a UI from the __init__ block of an existing widget (e.g. a QMainWindow) you can use uic.loadUI(filename, self) for PyQt5.
The PySide2 loader does not support this approach — the second parameter is for the parent widget of the widget you're creating. This prevents you adding custom code to the initialization of the widget, but you can work around this with a separate init function.
Converting your .ui file to Python
To generate a Python output file run pyuic5 from the command line, passing the .ui file and the target file for output, with a -o parameter. The following will generate a Python file named MainWindow.py which contains our created UI.
bash
If you're using PyQt4 the tool is named `pyuic4`, but is otherwise completely identical.
Qt Creator For Mac
You can open the resulting MainWindow.py file in an editor to take a look, although you should not edit this file. The power of using Qt Creator is being able to edit, tweak and update your application while you develop. Any changes made to this file will be lost when you update it. However, you can override and tweak anything you like when you import and use the file in your applications.
Qt Designer For Mac
Importing the resulting Python file works as for any other. You can import your class as follows. The pyuic5 tool appends Ui_ to the name of the object defined in Qt Creator, and it is this object you want to import.
To create the main window in your application, create a class as normal but subclassing from both QMainWindow and your imported Ui_MainWindow class. Finally, call self.setupUi(self) from within the __init__ to trigger the setup of the interface.
Qt Creator Linux Download
python
This produces exactly the same result as before.
That's it. Your window is now fully set up. Since the use of a .ui file abstracts out the UI-specific code, you can use this same pattern to load any interface you design.
Mac Install Qt
Adding application logic
You can interact with widgets created through Qt Creator just as you would those created with code. To make things simpler uic adds all child widgets to the window object by their id name as specified in Qt Creator. We'll cover how to work with these in the next part.
0 notes
Text
Outlook 2008 For Mac Download

Download Office 2008 For Mac
New Outlook Mac
Microsoft Outlook 2008 For Mac Free Download
Outlook For Mac Free Download
Outlook On Mac
We all know the Microsoft Office software suite is a much in demand tool suite that is used by many companies worldwide. The problem with the software is that it wasn’t adaptive by many operating systems that were present in the modern-day techno world. There are two main operating systems that we look forward to, one is the Microsoft Windows and the Mac OS.
The Microsoft office had a lot of new versions and the Mac version was created and released specially for the Mac-based user systems. There were a lot of significant changes that were available on the Microsoft office 2008 after the 2007 version. The users were exposed to a lot of other improvements in the office 2008 for mac systems.
A.pst file is the data file used by Outlook for Windows to archive your email messages, contacts, calendar items, tasks, and notes. Import the.pst file in order to transfer messages from a Windows-based computer to Outlook 2016 for Mac or Outlook 2019 for Mac.
Office 2008 for MAC cant download!!! 'Microsoft Office 2008 for Mac cannot be installed on this disk. A newer version of Office 2008 is already installed.'
To uninstall Office for Mac 2011 move the applications to the Trash.Once you've removed everything, empty the Trash and restart your Mac to complete the process. Before you remove Office for Mac 2011, quit all Office applications and make sure there's nothing in Trash that you want to keep. Leave Office applications closed while you go through this process. The latest version of Microsoft Office 2008 is 14.1 on Mac Informer. It is a perfect match for Office in the Productivity category. The app is developed by Microsoft and its user rating is 3.9 out of 5. Microsoft Outlook 16.42 for Mac is available as a free download on our application library. This Mac download was checked by our antivirus and was rated as safe. The software is included in Developer Tools. The size of the latest downloadable installer is 773 MB. This Mac application is an intellectual property of Microsoft Corporation.
License Free Trial
File Size 527MB
OS Mac OS
Language Multilingual
Developer Microsoft
Overview Microsoft office 2008 for Mac
The Microsoft office 2008 version for Mac systems had a lot of significant updates in terms of the user adaptability and credibility. There was also a significant improvement in terms of aesthetic detailing that made the system even easier to the eye.
They have added a lot of significant detailing in the icons to make sure that it doesn’t look out of the crowd inside a Mac-based operating system. The amount of effort the system had to put was significantly less and seamless operation was pretty easy with the same.
Features Microsoft office 2008 for Mac
The Microsoft office 2008 edition for Mac systems had a great advantage that the features that were added along with the Mac version seamlessly worked with any type of Mac systems and did not require special needs to work the software through.
The package that was released along with the Mac version included Entourage, word, excel, and PowerPoint. All these tools made a significant difference with their release making the office 2008 version much more adaptive to Mac OS X.
Word 2008
The Microsoft word 2008 for Mac edition had a lot of significant features that made the system much easy for documenting. The biggest highlight is that it has a lot of advanced features like auto line drafting and automatic text wrapping that will make the situation much easier and fast. There are also various tools like the text highlighting and updated text and font styles that were added into the software to make sure that there are no problems when it comes to drafting your word document.
There were also some features where the sharing option and drafting the word document into PDF and XPS formats are available to ensure that the software is highly compatible with other similar documenting software as well.
Also Read:-Microsoft Office 2019 for Mac free download
Entourage 2008
The Entourage is a personal mail and personal manager software that was released by Microsoft for the Mac users. The biggest highlights with the entourage are that it provided a great deal of personal expertise for the users and they didn’t have to rely upon third-party applications to get the same done. There are also various methods that were adopted by the entourage to ensure that the users did not have to break their heads around to understand the Entourage software.
There are also various methodologies In which the Entourage is getting the bigger deal in personal information management as most of the data is synced with your Microsoft account and that means that there are a lot of ways in which you can get the job done.
Excel 2008
Data management sheet software Excel has got a significant number of updates in the same upon its release for the Mac versions. Some of the features like using the system to get the job done and also to make sure that the data that you handle using the system is kept under a constant phase. The drafting tools and editing tools for the Mac version makes it more user-friendly and drastically improves efficiency in the ways in which it operates.
Excel also has added improvements in terms of sharing and printing with the mac version of the software which was a primary source of concern for the users. The excel also had updated with regard to user interface and definite amount of user interaction to make sure that it is flexible software for the user to use.
PowerPoint 2008
Download Office 2008 For Mac
The PowerPoint 2008 didn’t have much of significant updates but had some stability improvements and also added a motion graphics integrated into the slides that made the slides much more attractive and classier. There were also various updates in terms of editing that will definitely create a difference in the ways that you create presentations.
New Outlook Mac
Microsoft office 2008 system requirements for Mac
Mac OS x 10.14 and above compatible system.
500 MHz fast processor.
520 MB RAM requirement.
1.5 GB of HDD space.
Download the Microsoft Office 2008 for mac
You can download the installer file for the Microsoft office 2008 for mac by accessing the link given below. Also, make sure that you have met the minimum requirements of the system before you proceed with the download.
Download Microsoft Office 2008 for Mac full version - ISORIVER
The Microsoft office 2008 had a lot of new versions and the Mac version was created and released specially for the Mac-based user systems.
Price Currency: USD
Operating System: Mac OS
Application Category: Office Suite
Download
Microsoft Outlook 2008 For Mac Free Download
The program can not be downloaded: the download link is not available.External download links have become invalid for an unknown reason.Sorry, but we cannot ensure safeness of third party websites.
Outlook For Mac Free Download
Often downloaded with
Templates Center for Microsoft OfficeThis app provides you with easy-to-use templates. From a simple resume to a...DOWNLOAD
Mail+ for Outlook & Microsoft Office 365Mail for Outlook & Microsoft Office 365 gives you fast and instant access to...$2.99DOWNLOAD
Microsoft SQL Server 2008 Data Mining Add-Ins for Office 2007
Outlook On Mac
Database Tools
2 notes
·
View notes