
Don't wanna be here? Send us removal request.
Statistics
We looked inside some of the posts by basictechstuff-blog and here's what we found interesting.
Average Info
Notes Per Post
1
Likes Per Post
1
Reblog Per Post
0
Reply Per Post
0
Time Between Posts
24 hours
Number of Posts By Type
Text
9
Last Seen Tumblr Blogs


Fun Fact
The average Tumblr user visits about 67 pages every month.
Text
Evernote handwriting to text- Reviewing the options


The Evernote handwriting to text features is the perfect tool to connect old-school handwriting with the modern style typing things down. Typing for countless hours on your computer and swiping across the virtual keyboard on your iPad is convenient. However, there is nothing that even comes close to the satisfaction of writing things down with hand. While writing by hand may have scientific benefits behind it, going paperless is the best way to keep your written work safe and portable. Since Evernote is in the business of helping users write down and manage their work, Evernote's handwriting to text features are no surprise. Evernote takes the centuries-old concept of writing things down with hand and adds the beauty of modern technology to it. Whether it is converting handwritten content to text, designed Stylus pen, or specialized Moleskine notebooks, Evernote has everything you need to stay tech-savvy without giving up the classic pen and paper.
Sketching and handwriting notes on iPad

The much-anticipated update in 2015 brought necessary note-taking features to Evernote for iOS, which were primarily marketed for iPad users. When you open the Evernote app on your iPhone/iPad, you will be able to view a pen icon, which gives you access to a panel of writing tools. You can use a pen, highlighter, eraser, and a selection tool to either create a new handwritten note or edit a previously saved note. While the writing and highlight feature is common among note-taking apps, what makes Evernote stand out is the ability to use the selection tool to move around parts of the note and even resize them. The entire experience is phenomenal when it comes to using the Evernote handwriting to text features on the iPad Pro with the Apple Pencil. Since the iPad Pro comes with the pressure-sensitive 3D Touch, creating handwritten notes seems a lot more "realistic" and immersive.

There are plenty of other popular sketching apps compared to Evernote, so why would you choose it over the others? The simple reason is that since you can create and save notes directly in the Evernote app, you can make use of its OCR technology right away. Optical Character Recognition enables you to search for notes, even if they are saved as handwritten text in the Evernote app.
Using Evernote Notebooks by Moleskine

Evernote has partnered with Moleskine to take Evernote's handwriting to the text above and beyond other alternatives. Moleskine has designed notebooks in multiple sizes and paper patterns, which double up as the perfect business notebooks, sketchbooks, and journals. Apart from the digitally optimized paper, these Evernote Notebooks come with Smart Stickers for adding a specific tag to the notes when they are saved with the Evernote app. The Evernote camera, which can also be used to capture handwritten notes on ordinary paper, works exceptionally well with Moleskine's Evernote Notebooks.

There is a unique feature in the Evernote Business Notebook for iPad, which allows you to share only a selected portion of the handwritten note. By checking the box on the top-right corner of the notebook, you can automatically set reminders to share the note later. You can find more information in the official guide for Evernote Notebooks by Moleskine.
Penultimate and Evernote Jot Script

Penultimate was the biggest competitor to Evernote handwriting to text features, before it was acquired by the latter. Evernote has also joined hands with Adonit, the manufacturer of specialized handwriting styluses to create Jot Script Evernote Edition stylus. The combination of these two gives you the power to go paperless without losing the pure, authentic pleasure of handwritten notes. Download the Penultimate app for iPad, pop out the Jot Script stylus, and enjoy creating handwritten notes and beautiful sketches. With different typographical variants, detailed editing options, and seamless paper feel with the Jot Script brings traditional handwriting experience to the iPad. Since Penultimate is owned by Evernote, you get the same OCR technology to browse through all your handwritten documents with ease.
Evernote handwriting to text with WritePad

WritePad is the ultimate handwriting to text recognition app, which has existed for almost as long as Evernote has. Although this app has not been created or owned by Evernote, it comes with seamless syncing with Evernote and is also compatible with any stylus pen. You can start off writing on a new document page or an existing one, and soon as you lift your finger or the stylus from the screen, the app will convert your handwriting into digital text. Although you need to write horizontally for the Evernote OCR technology to work, you don't even have to write in the same line for WritePad to recognize your handwriting.

WritePad comes with built-in spellcheck and dictionary to crosscheck the converted words and will also suggest spelling corrections and synonyms. Moreover, the app comes with a set of finger gestures to perform actions like spell check, keyboard, scroll up and down, undo, and copy. There is a whole lot more to WritePad, with automatic syncing, enhanced handwriting recognition, shorthand toolbar, and a whole lot more. To help you know more about the Penultimate app by Evernote, check out this video tutorial down below: https://www.youtube.com/watch?v=WkGJUVFstqQ Read the full article
0 notes
Text
Whatsapp vs. Telegram vs. Signal
Let's put to test the battle between Whatsapp vs. Telegram vs. Signal and find out who beats the other in the race a social media countdown! We live in a world where hackers are plentiful, and the all-powerful NSA watches over us like the Eye of Sauron. With a breach of privacy being a genuine threat, opting for the most secure instant messaging service is always a smart choice. Leading the market by serving more than a billion users worldwide, WhatsApp has emerged as a secure choice for messaging ever since its end-to-end encryption service was commissioned. However, the Facebook-owned app service is being given a run for its money with competitors like Telegram and Signal, who reportedly take the privacy factor a step forward. Considering all the good, the bad, and ugly factors into consideration, here is a Whatsapp vs. Telegram vs. Signal showdown to find out the best.
The User Experience- Whatsapp vs. Telegram vs. Signal
Starting with WhatsApp, the service has been around for eight years and has the largest social media company funding its development. Over the years, WhatsApp has improved its messaging service by bringing in voice calling and has also added video calling to its arsenal very recently. In comparison, Telegram (despite being around for more than three years) mostly continues to be a messaging-only service with some neat media sharing features. While Signal has managed to add voice calling to its messaging app, the sheer backing that WhatsApp has in terms of user loyalty and support puts it at the top of the food chain.
The Security Factor

Just a couple of years ago as WhatsApp was furiously pushed forward by Facebook, the app started offering end-to-end encryption (which is surprisingly supported by Signal Protocol) to security-centric users. However, this feature primarily provides nothing more than a false sense of security, as the app can still keep a tab on all of your metadata. Read More: WhatsApp Encryption Backdoor Warning While Telegram does offer a private mode to keep your conversations secure, the app has been reportedly known to meddle with the user’s address book, leak a fair amount of metadata, and also infamously used by some gnarly people (terrorists!), which does not precisely shout safety.

In this particular category, Signal thrives by being open-source software and is entirely funded by donors, which makes it free from greedy advertisement money. Moreover, Signal offers powerful end-to-end encryption along with zero metadata collection and keeping all of your conversation data of its cloud servers.
The Final Verdict
The competition the best instant messenger for mobile devices is a tough one since all the three contenders have something unique to offer. In terms of sheer users, Telegram and Signal don’t even come close to WhatsApp even if their market share was to be combined. Telegram did have a great start a few years back, but the amount of controversy around its very own MTProto encryption and shady users has put a dent in its reputation. However, you don’t have to be the most downloaded messenger app to be the best one, especially when it comes to security. Despite being all by itself and entirely funded by user donations and grants, Signal stands as the most secure messaging app out of the bunch.

When putting Whatsapp vs. Telegram vs. Signal against each other, which one rises as the champion for you? Do share your thoughts on what makes an instant messenger “the best” in the comments section below. Guide to Android Rooting and all you need to know Download WhatsApp Messenger Download Telegram Download Signal Private Messenger Read the full article
0 notes
Text
Save GTA 5 game on PC, Xbox, and PlayStation


Is it having trouble managing your GTA 5 saved data? Here’s an explicit guide on how to save GTA 5 on PC, Xbox, and PlayStation. Grand Theft Auto 5 is famous not just for its immersive story, brilliantly themed gameplay, but for its personalization features as well. One such feature of this fantastic Open-World game is the ability to save game progress in multiple ways without any hassle. If you own GTA 5 on PC, Xbox (One, 360), and PlayStation (4, 3), you can learn how to save on GTA 5 and never lose track of your progress. It is also important to remember that you cannot save your progress in the game when you are performing a mission. Moreover, this guide will also help you understand how to save cheats in GTA 5, so let’s get started!
Part 1: How to save GTA 5 by using a safe house

When playing GTA 5 regularly, you don’t need to save in-game progress every time you want to exit the game. However, if you’re going to be extra careful with your progress, head over to your home. The greenhouse icon on the map highlights your character’s safe house, so put down a marker and drive there. All three protagonists – Michael, Trevor, and Franklin have their very own houses, so you can use any character to understand how to save on GTA 5. Once you are at the house, walk your character to the bedroom and make it stand right next to the bed. You will be prompted to save game progress, so press the Right Key on the D-pad to make your player go to sleep.

The game will automatically save and take up a slot it the storage menu right next to the Auto-save slot. Now, To add naturalistic gameplay, the game will fast-forward 6 hours when you make your character go to sleep on the bed. You can then go to Start-> Game-> Load Game and select the saved game slot to load it.
Part 2: How to save GTA 5 with the Quick Save feature
While fast-forwarding 6 hours is a useful feature, sometimes you want to keep your current progress and exit the game quickly. This is the very reason Rockstar Games has introduced the Quick Save feature as an app on each of the character’s smartphones. With the help of Quick Save, you can save GTA 5 progress within seconds, without having to drive back to your safe house.

Whether you’re playing with Franklin, Michael or Trevor, pop out your smartphone by pressing the Up button on the D-pad and navigate to the Cloud-shaped icon on the screen. Press the Quick Save button to create a saved game slot. What makes Quick Save better is the fact that you can use it to save your progress from anywhere in the game. For instance, if you use Quick Save while driving a car, the game will bring you back to the same location in the same car and at the same time when you load it.
Part 3: How to save cheats in GTA 5
Cheatcodes have been an essential part of the gameplay in the entire Grand Theft Auto franchise, and GTA 5 is no exception. With the help of the two methods on how to save GTA 5, you can also save cheat codes in GTA 5 without any extra effort. Activate a cheat code when playing GTA 5 with any of the three characters, head over to your safe house, or pull out your phone to save game progress. Along with your stats, the game will also save the cheat codes that you have entered before saving the game.

Note: Every time you activate and try to save cheats in GTA 5, the game automatically disables your Achievements. You can enable achievements by deleting the cheat codes by merely entering the cheat code again to disable them. Were you able to understand how to save GTA 5 and how to save cheats in the game? If you need a better understanding of the steps, check out the quick video tutorial down below: https://www.youtube.com/watch?v=yBIbMvvlsYE Download Free GTA 5 for PC HERE! Read the full article
0 notes
Text
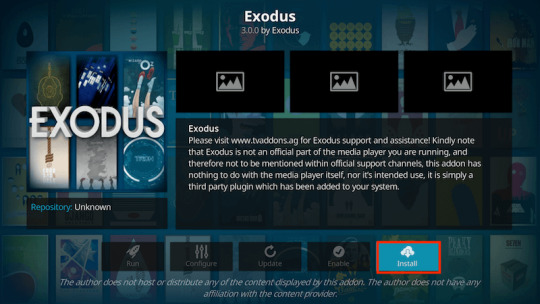
How to Download and Watch Free Movies with Exodus

Are you looking for a way to download and watch free movies with Exodus, the most popular Kodi plugin? This quick and detailed guide on how to install the Exodus add-on is just what you need the get started. What started as a solid attempt by the Xbox community to create a media player has today turned into Kodi. Possibly the most influential media streaming network available today, you can install the Kodi media player on almost any device there is. But did you know that Kodi add-ons such as Exodus can help you watch all the movies and TV shows your heart desires?
How to download and Watch Free Movies with Exodus
Being an add-on for the program Kodi, you need to have the all-powerful media player installed in the first place. If this is the first time you have heard of Kodi and need help installing it to your device, check out the guide below. How to Update XBMC – Your Guide to Kodi You can use our guide to Install/Update Kodi on your Windows PC, Mac, and Apple TV as well. Once you have installed Kodi on your device and everything configured start following the steps given below.
Enable Unknown Sources
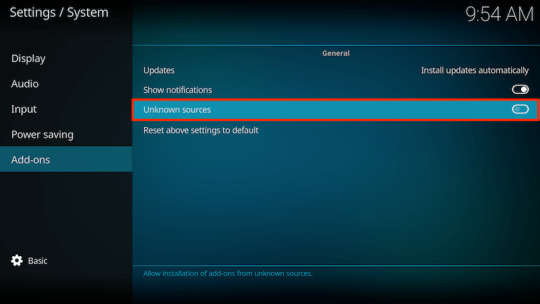
Exodus is essentially an unofficial add-on for Kodi, and therefore it cannot be installed directly to the media player. Much similar to installing.APK files to Android devices, you will need to enable “Unknown Sources” from the Settings to install Exodus on Kodi.
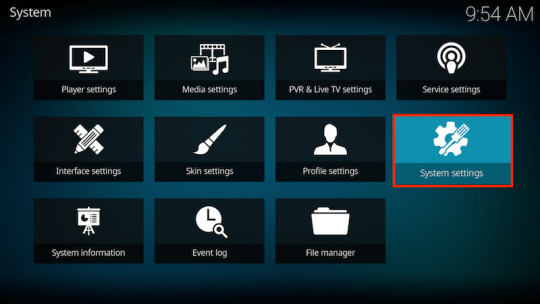
From the home screen, tap on the gear-shaped Settings icon on the top-left corner of the screen. You will be able to see the Settings menu, so go ahead and select System Settings and “Add-ons” from the sidebar. Here, you will be able to see the “Unknown sources” option, so go ahead and press the toggle switch right next to it. Now you can go on to add the Exodus and get one step closer to enjoying free movies and TV shows.
Install Exodus on Kodi
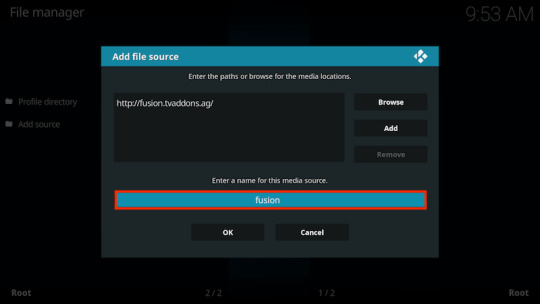
Go back to the Settings menu from the home screen and navigate to the File Manager window. As seen in the image below, you can now press the “Add Source” button and select “” from the window that pops up.
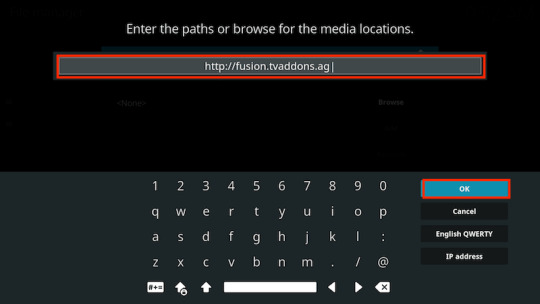
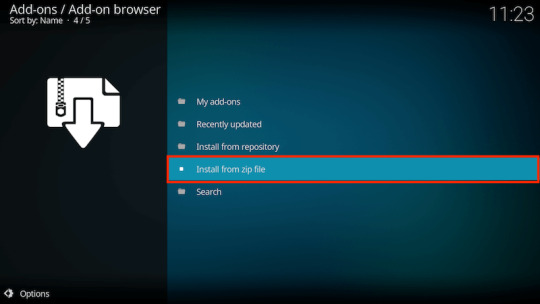
Carefully copy the following URL into the empty bracket “http://fusion.tvaddons.ag” and press “OK.” Now select the empty box under the URL and enter “fusion” as the name for the URL source and press “OK” to confirm. Go back to the main screen and now access the “Add-ons” menu on the sidebar. Press the first icon from the left side on the sidebar and select “Install from zip file” from the next screen.
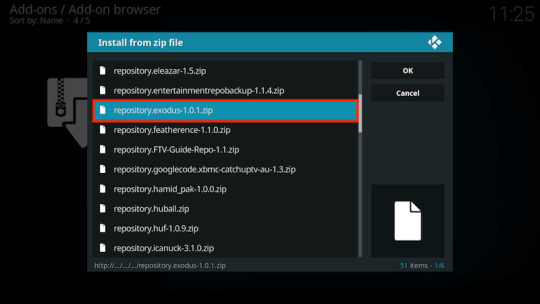
On the pop-up window, go ahead and select fusion->kodi-repos->English->repository.exodus.x.x.x.zip, and press the “OK” button to install the add-on. Wait until you see the “Add-on enabled” notification from Kodi and then you can go back to the previous menu.
Now go ahead and select “Install from repository” and select Exodus Repository-> Video add-ons-> Exodus-> Install. Once the process is complete, you will able to see the “Add-on enabled” notification on the top-right corner of the screen, confirming all your hard work.
That’s it! You have successfully installed one of the best Kodi plugins, so go ahead and watch movies for free with Exodus. Were you able to install the add-on correctly with this tutorial? Do share your thoughts on it in the comments section down below. To also check out on how to access blocked websites in India click here! Read the full article
0 notes
Text
DuckDuckGo vs. Google- Why you Should be Using it

For as long as most of the world can remember, Google has been the all-powerful internet search engine. Let's try to compare DuckDuckGo vs. Google. While there has been a weak line of competition to the search engine monster in the form of Bing and Yahoo Search, none of them has stepped up to the mantle quite like the newcomer DuckDuckGo has. The relatively new entry to the arena of search engines dominated by Google, DuckDuckGo was founded in 2008 and has been on a rapid growth path ever since. Once a name only whispered by anti-Google users who were tormented by the unreasonable search rules Google sets, DuckDuckGo now enjoys the endorsement of big names such as the New York Times and even made it to the top 50 sites on TIME Magazine.
DuckDuckGo does Privacy better than Google

From the perspective of a user who is concerned about how Google uses your data to target advertisements and moderate your searching habits, DuckDuckGo seems like a gentle relief. The main goal behind the working of DuckDuckGo is that it does not save on your search activities or track your IP address. Taking the Google Search app for Android and the DuckDuckGo app as an example, the difference in the available privacy settings is surprising. While Google sticks to no more than a couple of privacy filters options, its competitor trumps it by offering half a dozen features related to JavaScript, Cookies, Saved Recents, and more!
DuckDuckGo vs. Google privacy settings are astoundingly different

Moreover, the desktop version of the DuckDuckGo search engine takes privacy one step further with options to prevent sharing your search data with the websites you visit. Coming to customization, DDG lets you go all out with themes, change different appearance elements, hence focusing on user-experience rather than grabbing all your data to make some sweet advertisement money.
DuckDuckGo gives you “!bang” for your buck

Since every website today has a search engine built into it, wouldn’t it be great if you could search directly for a particular keyword right from your search engine? Well, DuckDuckGo has you covered with a highly popular feature called “!bang”. Type in the exclamation mark in the URL of the search engine, and you will see all the !bangs pop up. For instance, if you want to look up a toaster on Amazon, type in “!a toaster” and the page will take you directly to the search results for a toaster in Amazon.
If DuckDuckGo is so great, why isn’t everyone using it?
One of the main reasons people find it harder and harder to let go of Google is the sheer convenience it provides. With the deep-rooted integration between Google Search and Android OS, it is impossible for users to abandon the world’s largest search engine. However, the average user has a good reason not to make the switch, as some embedded features like semantic search, social media integration, and “smart searching” technology are something DDG does not have. While the browser had come a long way, with a 75 percent increase in user base in 2015, Google has the leverage of several years of research and development over DuckDuckGo. While DuckDuckGo can do well by itself even with the steady growth it has been experiencing, Google is known for crushing its competition. Not only is it harder to set DuckDuckGo as your default search engine in Google-owned Chrome browser, but Google is also known to suppress organic searches related to DDG. So here's the best comparison between DuckDuckGo vs. Google. We could see the rise of DuckDuckGo as a mainstream search engine when people have finally had it with Google barging into their privacy. However, for now, DDG continues to be the “user first” search engine that keeps your data out of reach with absolute confidentiality and a fair amount of personalized customization options. Read the full article
0 notes
Text
Guide to Android Rooting - All You Need to Know

Whether you’ve been an Android user for a decade now or just moved on shortly from the iPhone team, you’ve probably heard the phrase “Android rooting” thrown around. The internet is crowded with all sorts of information on rooting your Android device, and since the practice has been around for years now, you ought to learn about it too. Here's a guide to Android Rooting and all you need to know about it.
What is rooting all about?
In its essence, Android is based on the Linux operating system, which is where the process of rooting has been borrowed. The way the Android OS is designed, it gives permissions to individual apps to run and modify system files that are installed on your phone. However, when a user is granted root permission, i.e., Superuser, the user can bypass the OS restrictions and pretty much add, modify, replace, or even delete any files installed on the Android device. Rooting your Android gives you the ability to access any function of the phone without supervision, and remove any system files at your discretion.
Should I root my Android device?
There’s no single answer to whether you should root your Android device or not, even though most users, when given a chance, would do it. While some people feel that they deserve to enjoy the “unleashed” version of Android, that is the guide to android rooting it provides, and others stay cautious due to the security risks it poses. Pros: Rooting your Android enables you to remove bloatware such as system-installed apps and other apps from your network carrier that you otherwise cannot uninstall. You get the ability to run specialized apps and services that are incompatible on your Android device and even block pesky advertisements. Rooting opens the doors to the world of custom ROMs, which brings a whole new set of customization features and performance enhancements. Several apps that only work with rooted devices can help you improve the battery life, clear up local storage, and even overclock the CPU for added optimization. Cons: Rooting your phone automatically forfeits your device of its manufacturer warranty. However, you can always unroot your device and claim the warranty if need be. The process of rooting an Android requires flashing specific files that can potentially brick your smartphone. It is vital always to fetch the root files from a reliable source. The problem with rooted Android devices is that you will most likely have issues installing the OTA updates rolled out by your device manufacturer.
Preparing for Android Rooting
Now that you’ve weighed the benefits and disadvantages of rooting your Android device, here’s how you can get started with the process. To flash the right files that allow you to add superuser permission to your device, you will either need to make use of the Android SDK or unlock the bootloader of your device. Since the Android SDK application is too large and wastes your bandwidth, a talented XDA user has developed the Minimal ADB and Fastboot tool. This tool helps you flash the root files to your Android phone or tablet without the need to download the bulky Android SDK software.

Unlocking the bootloader of your Android device is also a necessary step before rooting, and this step can vary depending on your device manufacturer. While you might be able to unlock the bootloader using the Minimal ADB and Fastboot tool, other Android OEMs allow you to unlock the bootloader through their online system. Unlocking HTC bootloaderUnlocking LG bootloaderUnlocking Sony bootloaderUnlocking Huawei bootloaderUnlocking Motorola bootloader Once you have opened the bootloader of your Android device, your manufacturer warranty is void. However, you’re now just one step away from enjoying the limitless features that rooting has to offer. Since there are more than 12,000 different Android devices, there is no traditional method for rooting that works for all. The best way to root your Android the standard form is by putting the XDA Developers forum to good use. All you need to do is jump over to the XDA Developers forum website and search for the model of your Android device.

There’s a slim chance that your Android device won’t already be covered on the XDA forum, and with thousands of users to help you at every step along the way, follow the available guides. Root Android using third-party apps Since rooting Android has become increasingly popular and equally painful with Google’s security updates, a decent number of services have begun offering one-click root solutions. Most of these commercial rooting services are available for free in the form of PC software or Android apps and aim to help you root without any of the technical hassles. KingRootOne-Click RootKingo Root For those who can’t be bothered with the difficulty of the traditional method and Guide to Android rooting device, these commercial rooting apps are the simplest way to go forward. There are plenty of theories that suggest that these rooting services may contain malicious data and may even steal the personal data stored on your phone. However, if you’ve read the details carefully and wish to proceed further, here’s how you can use one of these commercial rooting apps – KingRoot.
Note: Before you begin the rooting process, make sure that you’ve created a backup of all the essential data on your phone. You must also ensure that the device has at least 50% of the battery charge before you begin rooting.
Step 1: Download KingRoot
KingRoot software is available for rooting Android in the form of an app as well as software for the Windows PC platform. However, KingRoot is not available on the Google Play Store, so if you wish to root your Android directly using the mobile app, you will need to download the APK file.
Download KingRoot.APK Download KingRoot for Windows
Step 2: Install the KingRoot app on your Android
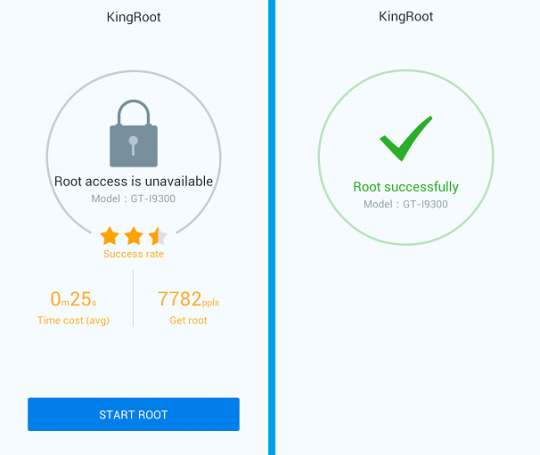
If you choose to root your Android using the KingRoot mobile app, you will need to install the APK. File first. To do so, you will first need to enable “Unknown Sources” from the Developer Options in the Settings. If you don’t have the Developers Options, show up in the Settings menu here’s how you can enable it. Go to Settings – About and tap of the Build Number tab seven times until you see the “Congratulations! You’re now a developer” message pop up. You will now be able to see the Developer Options tab at the bottom of the Settings menu, so open it and press the toggle switch right next to “Unknown Sources.”Once you have the Unknown Sources option enabled, head over to the location where you have downloaded the KingRoot.APK file and install it. Now that you have the KingRoot app installed, launch the app and press the “Start Root” button to begin the rooting process.
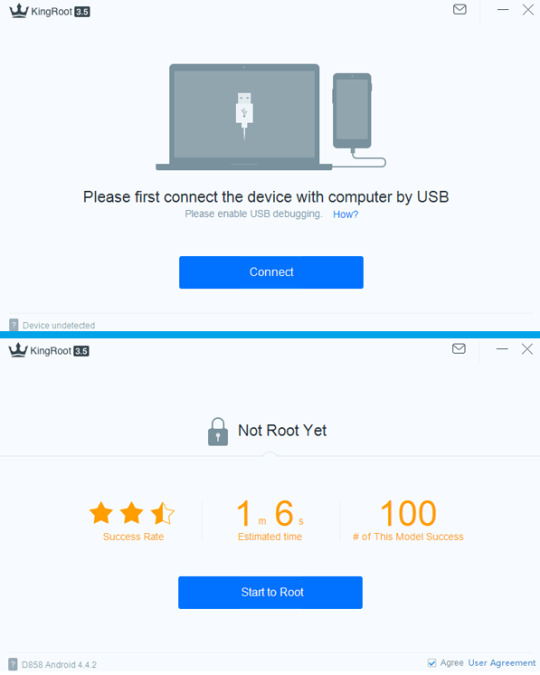
Similarly, once you have downloaded the KingRoot software on your computer, launch it and connect your Android device using a USB cable. Once the phone is detected, press the “Start to Root” button, and the entire process will begin. The rooting process should not take more than a couple of minutes, during which the phone will reboot multiple times, so do not disconnect it. Hope this article serves you with a good Guide to Android Rooting. Read the full article
0 notes
Text
Want to Install Opera free VPN?

Are you tired of your internet service provider blocking all of your favorite websites? Its time you broke the internet barriers with this guide to install Opera free VPN right now. In a world where Google has dominated the world of search engines and brought the same to its Chrome web browser, surviving has been tough on web browsers. While giants like Netscape and Apple’s Safari have struggled to stay relevant, the Opera browser has remained consistent through the ages by being flexible to its very core.

From offering a completely integrated mobile browsing experience to creating a data-friendly version of their browser – Opera has always had something to offer to mobile users. With the Opera 40 stable version of the browser, the company has brought in a highly acclaimed Opera free VPN as well. If you’re not as tech-savvy as you’d hope to be, us getting all excited about Opera free VPN may seem a bit absurd. Here’s why you should be using Opera free VPN right now and be as enthusiastic as we are about it:
Reasons you should Install Opera Free VPN
While releasing the free VPN service for iOS devices first, the free VPN service from Opera has finally caught up with Android devices. While VPN services aren’t a rarity, finding a free and unlimited VPN service from a reputed brand in the tech industry like Opera is undoubtedly a beautiful sight to behold.
Access to all restricted content
When your ISP or the government decides to block online content, it’s not just the malicious websites or websites with inappropriate content that get blocked. Moreover, public networks like your university or college Wi-Fi network restricts content even from services like Pandora and Spotify (which means no music to listen to on campus grounds).

Opera free VPN services enable you to gain access to the internet the way it is intended to, with no bars holding you back. Whether it is your quest to watch Netflix USA from your hometown in India, or you wish to gain access to regular websites that your oppressive national cyber laws have restricted, Opera’s free and unlimited service is here for you.
Say goodbye to pesky adverts
For someone who knows enough about VPN services already may know that Opera isn’t the first one to provide a free VPN service on the internet. Even if you sift through the internet for VPN services that don’t restrict your usage based on megabytes, the number of free VPN services is limited to a few.

This is where Opera swoops in to save the day with its state of the art VPN services powered by SurfEasy, which keeps the ad-tracking features of web browsers at bay. Rather than bothering you with products from Amazon or ad banners on a flight booking you recently looked up, Opera free VPN keeps your browsing experience private.
How to get Opera Free VPN on Desktop
To begin using the Opera free VPN on your computer and bypass the geographical and ISP restrictions, you don’t need to install a third-party service. You can start using the unlimited VPN right from the Opera browser, or download the latest version using the link below. Download Opera Brower for Desktop After updating your Opera web browser or installing the latest version of the application, open it to enable the VPN service. Head over to the Privacy->Security tab on your Windows PC and Preferences->Privacy & Security on your Mac to explore the VPN settings.

Right on top of the screen page, you will be able to see the VPN option with some points on what the feature is useful for. Click on the empty checkbox right next to “Enable VPN,” and you are all set to go ahead and unleash your browsing experience. As seen in the picture below, you will be able to view the VPN button right next to the browser URL bar. Voila! You now have the powerful and unlimited Opera free VPN service enabled on your browser at your disposal. Apart from choosing the virtual location that you want to select for browsing anonymously, Opera also gives you direct insight on how much data has been transferred this month with the browser.
How to get Opera free VPN on Android and iOS
The process of installing Opera free VPN on Android and iOS is as simple as clicking a button and opening the app. Unlike the Opera desktop version, you cannot have the VPN add-on as an extension but needs to be added to the mobile device with the official Opera Free VPN app. Download Opera Free VPN for Android Download Opera Free VPN for iOS Once you have the app installed on your respective smartphone, open it up and go through the beginner tutorial to find out more about the app. Hit the “Connect” button on the main screen, after which you will have to grant the app VPN permission.

Once you do that, the device will be connected to the best server based on your region within a minute. However, you can tap on “Change Region” and select the country that you want to browse virtually from (Canada, Germany, Netherlands, Singapore, and the United States). The app comes with a “Guardian” feature that blocks ad trackers automatically. Although it is activated by default, you can choose to deactivate it (but why would you?). So what are your thoughts after using the fantastic Opera Free VPN service on your desktop and mobile device? Do you love it as much as millions of other users, or would you rather depend on the more premium choices out there? Do let us know in the comments below. Read the full article
0 notes
Text
How to Browse Blocked Sites in India

Are you tired of finding a solution on how to browse blocked sites in India, but came up empty? This tutorial is just what you need to bypass the blockade. With a population of more than a billion, India is home to millions of people who connect to the World Wide Web every day. To uphold their cyber laws, the Indian Government recently banned hundreds of websites altogether. While some of these websites are involved with pornography and online piracy, not all of them are harmful.

For instance, services like AdFly and Google URL Shortening Service is also blocked by the Indian authorities for a majority of users. If you are among those who have been affected by this extensive ban and need a working method on how to browse blocked sites in India, follow the guide below.
How to Browse Blocked Sites in India
Method 1: Use Google DNS to Unblock Websites One of the safest ways to combat website blocking is by changing the DNS address of your computer to the Google Public DNS IP addresses. Not only is the Google Public DNS a safe way to browse the internet, but it also ensures dedicated speed regardless of the website.

1. From the desktop of your computer, navigate to the "Control Panel." 2. In the Control Panel, locate and click on "Network and Sharing Center," and then click on "Change adapter settings" tab. 3. Now go ahead and select the type of connection for which you want to configure the Google Public DNS. For instance: To change settings for an Ethernet connection, right-click the "Local Area Connection" tab and click on 'properties.'To change settings for a wireless connection, right-click the "Wireless Network Connection" tab, and click on "Properties." If you are being prompted for the administrator password or confirmation, type the password or provide confirmation and continue. 4. Select the "Networking" tab from the pop-up window. Under the "This connection uses the following items" tab, select "Internet Protocol Version 4 (TCP/IPv4)" or "Internet Protocol Version 6 (TCP/IPv6)" and then click on "Properties." 5. Click the "Advanced" tab and then select the "DNS" tab. If there are any DNS server IP addresses already listed in the fields, write them down somewhere for future reference, and remove them from the window. 6. Click "OK" and then select the "Use the following DNS server addresses" tab. If there are any IP addresses already listed in the "Preferred DNS server" or "Alternate DNS server" tabs, make sure to write them down for future reference.

7. Now go ahead and replace the addresses with the following IP addresses of the Google DNS servers: For IPv4: 8.8.8.8 or 8.8.4.4.For IPv6: 2001:4860:4860::8888 and/or 2001:4860:4860::8844

8. You can now exit the Control Panel, restart your computer and check if the websites have been successfully unblocked. Method 2: Use a VPN (Virtual Private Network) While using the Google Public DNS is a viable method on how to browse blocked sites in India, it does not work every time. For instance, if your connection is bound to a fixed DNS address, you will not be able to browse the internet by altering it. This is where the technology of virtual private networks or VPN comes in to save the day. By using a reliable VPN, you can virtually change your IP address, thus allowing your devices to visit the websites that are blocked for the Indian IP addresses.

1. Begin by downloading a reputed VPN service provider such as Hola Free VPN Proxy. This particular service is free to use and available as an app for Android and as an extension for the Google Chrome web browser. Download Hola Free VPN Proxy Android App Download Hola Free VPN Proxy Chrome Extension 2. You can also jump over to the Settings in Google Chrome and enable the extension manually if required. Once you have enabled the extension on Google Chrome, you will be able to see the Hola extension next to your URL bar. 3. Now go ahead and open any of the websites that have been blocked by your ISP under the directive of the Indian authorities. Now tap on the Hola icon on the top-right corner and change your region from India to the United States or any other.

4. The VPN service will now create a fake IP address and allow you to browse the blocked website without any problem whatsoever. Were you finally able to access all the websites that had previously been blocked by your ISP? If you need more assistance on how to browse blocked sites in India, check out the video tutorial given below: https://www.youtube.com/watch?v=xdQkPVL2ERg Read the full article
0 notes
Text
How to Browse Unlimited with Etisalat
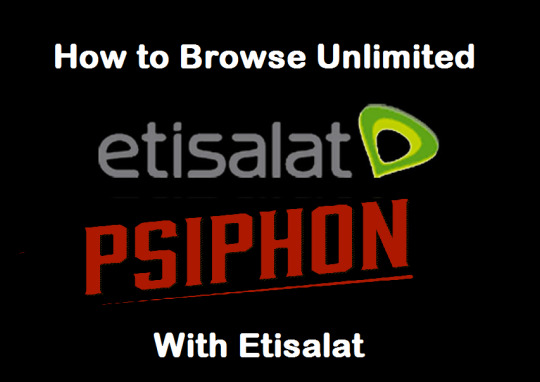
Are you in search of a way on how to browse unlimited with Etisalat? Well, you’ve come to the right place! Trying to find a workout for free internet is a popular trend in countries where a monthly data plan can cost a small fortune. One such region is Nigeria, where the tech-savvy people are always looking to learn a new way on how to browse unlimited with Etisalat. While Etisalat is the leading network carrier of the U.A.E., it also has an active user-base in Nigeria.
One sure-shot way of browsing unlimited internet with Etisalat is using a nifty tool called Psiphon. However, it is crucial to note that you will need an Android device to learn how to browse unlimited with Etisalat. Follow the step by step guide given below to unleash the networking power of Etisalat.
Step 1: How to Subscribe to Etisalat BlackBerry Internet Service
The unlimited internet plans available on Etisalat for Nigerian users are far too expensive, so we have a workaround for you. By using Etisalat BlackBerry Internet Service (BIS), you can enjoy unlimited internet at a fraction of the price. But how do you make Etisalat BIS work on any non-BlackBerry phone? Begin by activating the desired internet plan and follow the next steps to make it work on your Android device. Etisalat offers BlackBerry Internet Service plans called Bblite, allowing you to subscribe to their unlimited internet service on a daily, weekly, and monthly basis: Monthly Etisalat BIS Plan - *599*2# (Costs NGN 1000)Weekly Etisalat BIS Plan - *599*2*1# (Costs NGN 350)Daily Etisalat BIS Plan - *599*2*2# (Costs NGN 70) Open the dialer on your Android device, type in the code for the internet plan you need. Continue to follow from the on-screen instructions until you receive the confirmation SMS that the Etisalat BIS plan has been activated.
Step 2: Configure the Internet Settings on the Phone
Once you have activated the required BlackBerry Internet Service plan on your Android device, it is time to tweak the settings. By configuring the A.P.N. settings, you can go ahead and use BlackBerry-only internet service from Etisalat on any Android device.
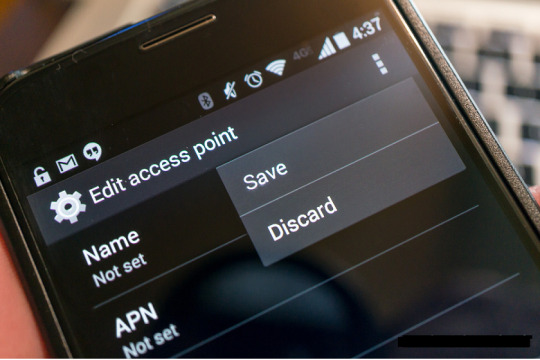
So head over to the Settings app on your Android device, find the Mobile Networks option, and create a new A.P.N. Make sure that you use the details given below to create the new A.P.N. settings on your Android device. A.P.N.: blackberryx.net APN TYPE: default, supl PROXY: 127.0.0.1 PORT: 8080 Don’t worry about the rest of the entries in the A.P.N. settings tab and go ahead to save the newly created setting as your default A.P.N.
Step 3: Download and Configure the Psiphon App
While you are almost ready to understand how to browse unlimited with Etisalat, the work isn’t done just yet. Since BlackBerry service restricts you to a pre-set number of web portals, you need a tool such as Psiphon to unleash the full network capabilities. To begin, you will need to download the Psiphon Pro app that is available on the Google Play Store for free. Download the app using the link given here, or download Psiphon Pro. A.P.K. file manually from the link provided below.

Download Psiphon Pro. A.P.K. Directly

Scroll down to find the option “Remove Port” and enable it using the checkbox, and select “Reverse Proxy from the “Proxy Type” menu.Now head over to the “Proxy Server” menu and insert “mobile.etisalat.com.ng%2F%[email protected]” in the empty field and save it. Now scroll down to find “Real Proxy Type” and select “Inject” before finally saving the settings you have just entered.Once the settings are saved, a pop-up window will ask you whether you wish to “Tunnel Whole Device,” so go ahead and tap on it.Once you have all of this configured, slide the screen and head over to the Options Menu.Tap on “Select Region” and leave it as default for optimal results, and then scroll down to find the Proxy Settings. Check the box that reads “Connect through an HTTP Proxy” and insert HOST ADDRESS: 91.189.9.38 and PORT: 3128.

With these settings configured, you can now head back to the main screen of the Psiphon app and hit the “Start” button. Once you confirm the action, it should take around 5-10 minutes for the server to connect. You can then go ahead and minimize the Psiphon app and enjoy unlimited data on Etisalat at a fraction of the cost. Make sure to check out the tutorial video given down below if you need more help with how to browse unlimited with Etisalat. https://www.youtube.com/watch?v=2IciNKeT9Rs Read the full article
1 note
·
View note