
3D Printing, Mini painting, Prop Design, Cosplay, and Gaming
Don't wanna be here? Send us removal request.
Statistics
We looked inside some of the posts by blackfangworkshop and here's what we found interesting.
Average Info
Notes Per Post
1
Likes Per Post
1
Reblog Per Post
0
Reply Per Post
0
Time Between Posts
13 days
Number of Posts By Type
Text
2
Last Seen Tumblr Blogs


Fun Fact
Tumblr’s reach among the 26-to-35-year-olds in the US is 11%.
Text
SCP MTF Monster Hunter Badgers
Part 2
Welcome to part two of my blog on the creation of Silverfang. In this post I will be going over the details of how I put together the vest and the rest of the costume as well as the nerf rifle and the plan for the future.
The Clothing
The clothing aspect of this costume was a bit easy as most of the pouches and gear was purchased on Amazon, 511 Tactical, 3d printed, or already had. Some of the stuff I had came form the previous years version of this costume, that being the pants and the under shirt. the next thing I had to looking to was the plate carrier. I had looked online at many of them but always cam back to 511 Tactical. I have had luck with several of there other products so I decided to go with their TacTec Plate Carrier. It was the closes to what I wanted his vest to look like and it had enough attachment points on both back in front to set up the look I was going for. I then decided that I needed to add hydration to this costume as it was all black at this point, so I brought Convertible Hydration Carrier and a 3 litter hydropack to add to the costume. This was all brought at 511 Tactical. The last things i had to buy was the patches and the pouches. Most of the patches and all the pouches and holster had come from Amazon, but the the "Do not pet" leather patch and the badger one was purchased at 511 Tactical.
The Rifle
As I was working on the costume I had came back to a project known as Project FDL. It was on that I had followed many years ago and been wanting to make one so with this costume I decided to finally make one. I settled on going with a full auto/full length dart setup with a longer barrel and larger more powerful battery. I end up do the full print in black and then detail in by hand all the gold and it took me almost 2 weeks to print this. I also had to do some custom cowlings and for grip. I added the fangs to the top cowling on both sides.

In the pic you would see that there was a bit if fur on the stock but in the end it was removed. The stock was a pair of finds on thingiverse. it is a combo of the Nerf stock extender by Egghebrecht and the butt form the Nerf Rapidstrike Stock with Battery Compartment by tungstenexe. I later found the FDL3 Tacticool Shorty Kit by Lyza on printables witch i modded to work with the full length setup I am using.
The Future of Silverfang
I plan to add many features to the costume and have all ready started this process with some new gold paint and metal plats.


I also plan on updating the eyes so that I can setup independent colors. I will use ElectroMage's Pixleblaze and their WS2811 Breakout boards as I already have LEDS. I have since decided to add the Yeethammer by Spyr on printables.
Links
More Links to come
0 notes
Text
SCP MTF Monster Hunter Badgers
Part 1

Welcome to the Workshop Chronicles. I am writing this to chronicle projects that are being worked by myself. My first entry is that of SCP MTF Monster Hunter Badgers - Silverfang. you will find all links used for this project in the links section.
BACKGROUND STORY
Please meet Silverfang. He is a MTF member that is part of the multiverse cannon and hails from universe 8093 were he is a wolf cyborg that works for the SCP of that universe. In universe 8093 he and his kind are not known as what the prime universe calls SCP-3312 but is a skilled monster hunter and tracker and is the leader of MTF Monster Hunters and is currently on loan to the White Rabbits for training them in the skills need to track and capture terastal creatures creatures.
HISTORY OF THE PROJECT
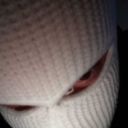
This costume had started out when I came across Panzerwolf 2017 by bjornalbihn over on thingiverse. I was planing on doing this version but a few days later the designer posted Panzerwolf 2023 and that was the one that I settled on doing. I currently work at my local community college's Prototype Design Lab with is also open to the public, We have access to several Bambu Labs P1Ps 3d printers. I when with it to print the mask for this costume. I went an scaled it up by 20.46% to get the final size. I the worked on how a wanted the the filter system to look.
At first I went with a slim profile. This was acomplashed with the use of the Side filter addons that was also done by bjornalbihn.

The above pic shows the variation with the slim profile filters. I thought it looked good but felt it might look better with actual filters so I decided to do some custom 3M filters.


At first I decided to first go with a dual 3M filters. I wild need to use an adapter that would allow me to go from a NATO 40mm tread to 3M Bayonet, this was also found on thingiverse from the creator agapeingenium. The NATO 40 mm connector was part of the Side filter addons done by bjornalbihn. In the above pics you also see at this point I have added the LED to the eyes of the mask and have them showing reds only . Also at this point I had done all the paint work on it. The colors that I used areas follows :
Chin, Teeth, Nose and Brow Army panter Drake's Tooth (Skeleton bone in the fanatic line) Rest Of Mask Top Layer Mission Model Chrome Molotow Liquid Chrome MId Layers Mission Model Gunmetal Low Layers Mission Model Cold Rolled Steel Protective Coat Rustoleum gloss clear (10 coats)


In the end I ended up with the result of a left side 3M filter and PanzerWolf filter addon #02 on the right as and exhaust as well as I paintine the upper canines in Gunmetal.
I also 3d printed the carbine (There will be a blog post on this project)
There will be a second part to this Blog
1 note
·
View note