
Don't wanna be here? Send us removal request.
Statistics
We looked inside some of the posts by blog-o-roosh and here's what we found interesting.
Average Info
Notes Per Post
0
Likes Per Post
0
Reblog Per Post
0
Reply Per Post
0
Time Between Posts
3 days
Number of Posts By Type
Text
17
Last Seen Tumblr Blogs


Fun Fact
Tumblr has 411 employees.
Text
Research Blog 3: Texturing
I have found a tutorial by Ryan King Art which could be used to texture my buildings make them appear more detailed, as well as add some additional colour and dimension.
youtube
The YouTube channel Silver Punk creates quick tutorials which break down the process of creating various types of materials in Blender. Since I will mostly be creating metallic textures, these are some of the tutorials I will refer to:
youtube
youtube
I have also researched methods of creating the edge wear effect to my models, which would also serve to make them appear more worn and well-used.
youtube
youtube
Once the textures are complete, I will need "bake" them, which will simplify the process of transporting my models from Blender to Unreal Engine, which will hopefully benefit performance.
To help me figure out this process I will consult these tutorials:
youtube
youtube
Sources:
Batista, K. (2024) How to Easily Create Procedural Edge Wear in Blender, YouTube. Available at: https://www.youtube.com/watch?v=VvifA9DKk5U (Accessed: 24 June 2025).
Blender Secrets (2022) Blender Secrets - Substance Painter-like Edge Wear Effects, YouTube. Available at: https://www.youtube.com/watch?v=6ZOQxVYWLyg (Accessed: 24 June 2025).
Proffitt, K. (2024) How To Easily Bake Textures in Blender (and why), YouTube. Available at: https://www.youtube.com/watch?v=JE2Zmy088zc (Accessed: 24 June 2025).
Ryan King Art (2022) Procedural Sci-Fi Panels Material (Blender Tutorial), YouTube. Available at: https://youtu.be/KbNPddQbaDo (Accessed: 24 June 2025).
SILVER PUNK (no date) Metal material in Blender, YouTube. Available at: https://www.youtube.com/watch?v=q-bWV52Scus (Accessed: 24 June 2025).
SILVER PUNK (no date) Rusty metal material in Blender, YouTube. Available at: https://www.youtube.com/watch?v=40_YW4w0_78 (Accessed: 24 June 2025).
Wallace, L. (2024) How to Bake Procedural Materials into PBR Textures | Blender Tutorial, YouTube. Available at: https://www.youtube.com/watch?v=jULJT3dq0eU (Accessed: 24 June 2025).
0 notes
Text
Modelling Process: Procedural Buildings
To create the rest of the buildings, I used a slightly different method of modelling using Geometry Nodes.
At the beginning of the process, I created a silhouette by subdividing a cube and using the sculpting tool to transform it into a shape that I thought worked the best.


I then used a modifier called Remesh, which transformed the model back into a more blocky shape.

Once the modifier was applied, I manually made some adjustments to the shape and added some customised details.

As seen below, my plan was to construct my other buildings from parts taken from my initial model.

This was where the Geometry Nodes came into play, as my intention was to randomise the process so the parts would automatically be projected onto the structure. Through this process, I hoped to spend less time manually adjusting every aspect of my model.

However, after applying the parts, I still needed to make some manual adjustments as, some details were either too sparse, too crowded or unclear. To be in line with more modern building standards, I also wanted to add significantly more windows.

I was cautious about making sure there would be no issues when transporting the model into the Unreal Engine. To alleviate this issue, I spent the next few days going through each model to spread out details more evenly and remove unnecessary parts which were obscured by other elements, too subtle to be noticed or made the model look overly complex.
At the end of the process, I had five default building types, which could be reused, reoriented, and combined in different ways.

0 notes
Text
Modelling Process: Upper City
Buildings
This blog mainly focuses on my process of creating buildings for the upper city.
This is the first time I have made architecture of this scale and attempted to create a skyscraper-like building model that looks futuristic, yet familiar and functional, has proved to be a challenge.
I tried to start with planning out the shape and combining simple cubes to establish its basic silhouette.

After I was happy with the shape, it was time to begin adding more practical elements, and open outdoor spaces, such as balconies with doors and overhangs.

Then came the challenge of adding windows. Most modern skyscrapers use a significant amount of glass, however, I wanted windows which traced the shape of lines and curves around the model. For the purpose of demonstrating where the windows are, I gave them a bright white texture, this will be changed later on to make their function more clear.

Once I was happy with the windows, I decided to add panel lines, which would break up the surface and make it look more interesting; this process took the most time and made the model more complex.

While I am happy with the result, the time it took to achieve could have been made more efficient.
In order to find a way to make more buildings at a faster rate, one of the strategies I have come up with involves breaking up the model into separate parts, which can be recombined in different arrangements, similar to Lego.
Since the buildings have different details on each side, some buildings can be duplicated in the final environment and rotated to a different angle. This would reduce the quantity of buildings that I need to create.
Bridges
I also created bridges which could establish connected paths between buildings. I first started with the basic ground level and added edge barriers to prevent players from falling off the sides.

I then started experimenting with how I could make the shape of the bridge more interesting. After looking at a couple of reference images, I decided that the best course of action was to create an outer edge which is more curved while the inner edge is more angular and straight.

To add interest, I again broke up the shape with indents and more panel lines on the outside. The sides of the path were also lined with lights for illumination, and metal grates, which I imagined might serve a practical function as a drainage system when raining. I was quite happy with this addition, as it had a functional purpose which also made the overall model more interesting.

0 notes
Text
Research Blog 2: Modelling Techniques
Max Hay A 3D artist who specialises in creating large scale urban environments. On his YouTube channel he provides many tips and tutorials which make modelling cities and architecture easier, as well as breakdowns of how his process of creating certain renders.
youtube
youtube
I decided to revisit Michael Yoshimura and found some work in progress images which clearly illustrated the process of creating one of his building models.
The image below shows how he starts with simple shapes then gradually adds more detail.

I have also been interested in utilising procedural generation to add some variation to my building designs using the geometry nodes system. This is the main tutorial I will be following to guide me through this process.
youtube
Sources:
CG Geek (2023) How to Create Sci-Fi Buildings in 5 Minutes, YouTube. Available at: https://www.youtube.com/watch?v=c0rb7Ea9oFY (Accessed: 15 June 2025).
Hay, M. (2025) How I made this brutalist render in blender, YouTube. Available at: https://youtu.be/_oeif8YMlNg (Accessed: 15 June 2025).
Hay, M. (2022) How To Create Amazing Cityscapes In Blender, YouTube. Available at: https://youtu.be/IX2gOPm5YIA (Accessed: 15 June 2025).
Yoshimura, M. (no date) Konbini, MYoshimura. Available at: https://myoshimura.format.com/konbini (Accessed: 15 June 2025).
0 notes
Text
Modelling Process: Power production facility
I created some unique assets for the power production level of my city environment. Since the theme at this level is more industrial to fit the aesthetic of a power station, these mainly included pipes, suspended walkways and spherical reactor bulbs.
Reactor Bulbs
The reactors were more simple to make, as all I needed to create them was a sphere shape, with some basic panel lines to break up the object, a ring around the centre to add some dimension and a pipe which attaches to the ceiling of my environment.


Creating Walkway
Creating the walkways involved a mostly simple process. To fit the industrial theme, I kept the design more angular.

I also added skeletal-looking side railings and frequent panel lines along the paths.


Creating Pipes
The most complicated part in creating this environment was designing the pipes. Firstly, I needed to come up with several variations of shapes and sizes which could be mixed and matched. I also created a connector piece, which could make combining the pipes easier and more seamless.

Then came the process of adding more complex details to the pipes themselves. I decided to use two concept art images for Ghost in the Shell 2 as inspiration. These details I added included control panels, buttons and external plating. While this took a long time, the pipes ultimately looked much more interesting than just simple tubes.


These were the images I referred to during the making process:


Source:
Bettridge, T. (2016) Anime architecture: How ghost in the Shell was built, 032c. Available at: https://032c.com/magazine/anime-architecture-ghost-shell-built (Accessed: 29 April 2025).
0 notes
Text
Modelling Process: Robots Part 2
Compared to the last Blog, I ensured I documented the entire process of creating a model from start to finish, which in this instance requires beginning with a basic cube shape. The main body of the model is quite boxy, so it was quite simple to create. using a Subdivision modifier to increase the level of detail.

The more difficult part was adding the correct shaping for the struts of the propellers, as this was not clearly represented in my drawing. I wanted to ensure that they were not too thick and bulky, but were sturdy enough to seem feasible.

The wiper on the front was more difficult than I expected to represent in a 3D model and new adjustments were needed for the size, shape and how far it extended from the main body. As with the other robot models, there was also the process of ensuring there was the correct amount of clearance, in order for the “wiper” to move up and down.

The method through which the rings, around the propellers, connected to the main body were also not very clear in my drawing, so I searched online for a couple of reference images to provide examples of how the supports could be structured. I ultimately settled on a hybrid between two different images. During this part of the process, I needed to work out the spacing of each propeller to avoid them colliding. To solve this problem, I decided to elongate the body lengthwise, while making the overall profile slightly narrower.

Another difficult part of the process was modelling the propeller blades. Some of the images I found online had propeller shapes, which were difficult to interpret as some of them were straight, while others were more twisted. I decided to use the image above as my main source of reference, while also giving each propeller a fourth blade, to match my design sketch.

The hose situated at the bottom of the robot was the easiest aspect to model, as it was essentially a tube with a few ridges and a cone-shaped nozzle at the end. Compared to my sketch, the hose had a much smaller profile to fit in the gap between the front wiper and the main body of the robot. If time permits, I may go back and adjust the shape and size of the hose, in order to be closer to my reference images.

Overall, I like the final result as it looks similar to the real-life examples, but with more sleek curves, making the design feel more futuristic. This design does not feature many panel lines, so textures will play a more important role in the final model.
Since I am not an Engineer, the mechanics of how the robot would function in real life might not be realistic. However, I feel I have added enough propellers of an adequate size, for it to look reasonable as a flying robot, which is the main advantage of my project, being entirely virtual. The only feature I did not add was landing gear, but my personal justification for this is some type of retractable system which could be added later. This may not be entirely necessary, as these robots would most likely only be seen flying in the final experience.
0 notes
Text
Progress Review Blog 1
My plan did not take into account the time it would take to get acquire approval for my project planning folder. As a result, I am about two days behind on my plan. Luckily I have been making use of my contingency time and I am almost up to date.
Sunday will be my last day of contingency to finish the remaining robot models. Since I tacked the most difficult model first, the remaining robots will be significantly easier to complete in time.
Since the planning folder is no longer a factor affecting my production process from this point onwards, I should be back on track with my plan and do not think any changes are required.
With two less environments to focus on thanks to the most recent changes to the project deliverables, I feel more optimistic about my ability to complete everything in time.
0 notes
Text
Research Blog 1
With the changes that have occurred in my project plan within the last week of working on my Planning Folder, I now plan to implement an opening text crawl to the beginning of my experience.
As the player is put in the perspective of a robot, this needs to look computerised and mechanical. For this blog I wanted to look at some sources of inspiration which could inform the creation of the opening text crawl and activation sequence.
Star Wars Star Wars features among the most famous examples of introductory sequences in the form of the opening crawl which is unique due to the perspective of the text gradually scrolling away from the player and disappearing into the horizon.

Iron Man In the Iron Man movies and other MCU films featuring the character, many shots are situated inside the helmet of the Iron Man suit where a heads-up display (HUD) can be seen.


The Matrix This movie series in particular takes significant aesthetic inspiration from a computer terminal and has the distinct visual of downward-scrolling green code. This is also known as 'Digital Rain'.


Terminator Throughout the movie series, some shots are set in the first person perspective of the titular terminator. These scenes often have a red color hue overlaid over the environment, with several flashing computerised words and displays.


Sources:
BruceKenobi (2019) All Iron Man HUD Scenes (up to Endgame), YouTube. Available at: https://www.youtube.com/watch?v=E7-o6a0OUHY (Accessed: 07 June 2025).
Fabricius, M. (2020) Terminator Vision, YouTube. Available at: https://www.youtube.com/watch?v=v0vbTHd04gE (Accessed: 07 June 2025).
Nordine, M. (2017) ‘the Matrix’ code’s hidden meaning has been revealed, and there’s Something fishy about it, IndieWire. Available at: https://www.indiewire.com/features/general/the-matrix-code-digital-rain-meaning-1201891684/ (Accessed: 07 June 2025).
Legendary Movie Scenes (2020) Wake Up | Neo Room Computer Hacking | Follow the White Rabbit - Matrix (1999) - Movie Clip HD Scene, YouTube. Available at: https://www.youtube.com/watch?v=8wU8k2kDaTo (Accessed: 07 June 2025).
Snellgrove, C. (2023) Star wars is finally bringing back one of its most iconic visuals, GIANT FREAKIN ROBOT. Available at: https://www.giantfreakinrobot.com/ent/star-wars-iconic-visuals.html (Accessed: 07 June 2025).
0 notes
Text
Modelling Process: Robots Part 1
As per my time plan, I have began working on the models for my robot characters. Since this will be the most complicated and most heavily featured character, I decided to begin with the Manager Robot.
I initially forgot to take screenshots at the beginning of the process, so I will need to remember to take more consistent screenshots in future parts of my production.
Particular adjustments were needed when translating the design from the 2D drawing to the 3D model. This was mainly to add more clearance to areas such as the neck and arms so they can be posed and animated without the parts colliding and clipping through each other.
However I do not think these changes compromised the overall design. I am particularly happy with the result of sections such as the robot's hands as seen in the screenshots below.


0 notes
Text
Final Project: Last Render

Looking back at my storyboard I decided that I needed to introduce a middle stage between the lowest and highest levels of the city. For this area I wanted to lean into the neon aesthetic that is most commonly associated with Cyberpunk.
My justification with the darkness of the environment was that this are is at a level where a majority of sunlight cannot reach, leaving the billboards and holographic figures as the main sources of light. The floating shapes are intended to be a placeholder for where the holographic figures would be.
I also decided to make use of fog effects to add some atmosphere to the environment and emphasise the scale of the buildings.
0 notes
Text
Final Project: City Design Reflection
My main goal with these sketches was to give a better idea of what the environments could potentially look like, without the need to fully complete them.
I thought the best way I could achieve this was tracing over the renders I made for the storyboard a few days ago. My logic was that this would be a significantly easier method of ensuring the details I'm drawing have the correct perspective.
While working on these sketches, I discovered that Paint Tool SAI, the drawing program I was using has a perspective ruler tool, so this did not become as major of a problem as I initially anticipated.
Looking at the final results I feel like these should be put into the storyboard instead of the renders I made. However because I have more storyboard renders then drawings, I might keep the order they way it is.
0 notes
Text
Final Project: City Design Testing 4

Using another previous render as a base, I wanted to more clearly illustrate my imagination of what the upper section of the city could look like, specifically the arrangements of windows and lights. The idea is that the placement of windows carves polygonal paths into the buildings.
Alongside adding light strips to the underside of the bridges and the edges of the pathways I also added more details such as balconies and building openings. I feel like this is makes the environment feel more lived in. Perhaps these areas could serve as apartments of living spaces.
The main inspiration I used for this sketch were these city renders by Michael Yoshimura:


Source:
Yoshimura, M. (no date) Work, MYoshimura. Available at: https://myoshimura.format.com/cyberpunk (Accessed: 30 April 2025).
0 notes
Text
Final Project: City Design Testing 3
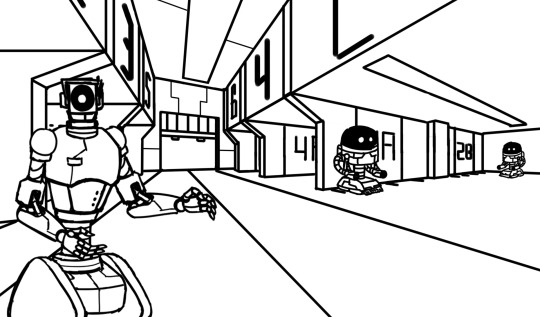
I decided to further develop the aesthetics of the room to add more interest. The first major improvement I made was raising the height of the roof to make space for signs which indicate different zones the robots are assigned to. I also split each zone into sections A and B to make them more organised.
Lines on the floor indicate spots where robots can "park" and await their instructions.
I wanted to add a couple of robots into the scene to add some interest, including the manager robot at the front leading the user through the environment. However I was limited in where I could place the robots, as they needed to match the perspective of my scene.
Compared to the original layout I created (as seen below) I think this was a significant improvement.

0 notes
Text
Final Project: City Design Testing 2
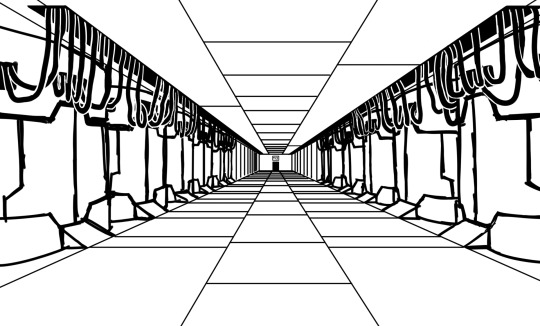
This design shows how the charging pods in the beginning section of the experience might look like. These are based on the same inspiration from the previous blog post but I tried to take more personal creative liberties with the design.
I particularly wanted to emphasise the wires connecting the openings in the ceiling to the charging pods, as I thought this could add more detail and visual interest to the environment. Since most of my cleaning robot designs use treads to move around, I included ramps which would pave their exit from the pods.
Perhaps the main path in the center of the room could function as a moving conveyor belt. This could make the environment in the final experience feel more dynamic.
0 notes
Text
Final Project: City Design Testing 1

Using my storyboard render as a base, I decided to sketch my idea of how the low level city environment could look.
In my research I found the aesthetic of suspended walkways interesting and have decided to incorporate this into my design. This way you can see the entire diameter of the reactor bulbs and creates space for me to add more pipes.
After looking at 'Tanque de tormentas' by Nieves de la Fuente, I was unsure of I could make this seem more futuristic. To understand how this could look, I found inspiration in a series of concept sketches created by Takashi Watabe for the sequel to the original Ghost in the Shell movie:


From these sketches you can see much more clearly where I have been inspired.
Sources:
Bettridge, T. (2016) Anime architecture: How ghost in the Shell was built, 032c. Available at: https://032c.com/magazine/anime-architecture-ghost-shell-built (Accessed: 29 April 2025).
Fuente, N. de la (no date) Tanque de tormentas, Nieves de la Fuente. Available at: https://www.nievesdelafuente.es/tanque-de-tormentas/eoh68dykou3ku8yfn7t1a1r5udpaeo (Accessed: 30 April 2025).
0 notes
Text
Final Project: Time Planning
There was a lecture a few weeks focused around Gantt Charts, and learned some interesting backstory on how they were developed. Towards the end of this lecture, we had a brief exercise where we attempting to create our own.
Because I have experience with creating Gantt Charts for two previous proposals in my Undergraduate degree, I already understand how they function and how to make them. This made the exercise more straight forward.
When adding the time plan to my proposal, I mostly kept the tasks the same, as I was already satisfied with how they were arranged. I mainly worked on the timing periods of each task, as this was the only area of the Gantt chart which was left incomplete during the exercise.
I feel like the timings I have proposed are reasonable and achievable. The main challenge I can see going forward will be actually following the plan I have set out.
0 notes
Text
Final Project: Technical Specifications
I feel that this project is the last major opportunity for me to develop my skills in 3D Modelling, Design, and Animation. Because of this, I want to take advantage of the knowledge I have gained this year in software such as Blender and Unreal Engine.
Following my work on the Interdisciplinary module, I also plan to take advantage of my more developed knowledge of animating in Blender, together with better understanding how to transport animations across to Unreal Engine.
Now I own a Meta Quest headset, I have a more reliable means of testing and tailoring the experience to work specifically with Meta’s hardware.
Through this Master’s course, I began learning how to use Houdini software for the first time. I have seen videos online showcasing users who have used Houdini’s procedural modelling features to generate buildings and other architecture. I might research how this could potentially be incorporated into this project.
At the end of this project, I want to have a fully packaged .exe file. This would allow me to remove the experience from the confines of my computer onto my headset, which would eliminate the need for a connection cable. If this is successful, it would be a massive improvement over my final project from the Undergraduate course, as this is a result I have had difficulty producing in the past.
0 notes