
Don't wanna be here? Send us removal request.
Statistics
We looked inside some of the posts by callumreyesfutureworks2 and here's what we found interesting.
Average Info
Notes Per Post
0
Likes Per Post
0
Reblog Per Post
0
Reply Per Post
0
Time Between Posts
3 days
Number of Posts By Type
Text
8
Photo
1
Last Seen Tumblr Blogs


Fun Fact
Tumblr Inc. is funded by 13 investors.
Text
Final Level Screenshots
Re-post of some of the final screenshots from my level as the original post seems to have vanished.


0 notes
Text
XB 2001 Level Work In Progress

I have almost finished plotting out the pristine version of the level. After importing all my models and textures I began to create the layout that I had designed in my level maps. The 6 main objects the player will need to find and place correctly have all been positioned in a way I feel aids the flow of the level and also demonstrates my understanding of level design.
One example is where and how I have positioned the chess piece the player must find and place on the chessboard. I placed the chess piece on top of two books that are positioned sideways. These are the only two books that can be found sideways in the bookcases within the level. I did this to draw the players eye towards the location. The uniqueness of their positions will catch the players attention and likely draw the player over, where they can find the chess piece. To guide the players eyes even more, I placed the other books on the bookshelf in a way that would lead the players eyes right towards the location of the chess piece. I placed the books so they would begin in the highest and most rightward position on the bookshelf with the books gradually leading to the lowest and most leftward place on the bookshelf, where the chess piece is located on top of the two sideways books.

I have positioned all the lights in the pristine level to what I thought was effective. I want the pristine version to be brightly lit whereas the decayed version will be a lot darker but lighting will play a key role in identifying to the player points of interest etc.
I have also created the matinees for the walls of the hidden rooms. There are no matinees needed for the hidden rooms in the decayed version as all the hidden rooms are accessible to the player.

I have now almost completed the decayed version of the level. The decayed version is symmetrical to the pristine one aside from the missing objects that have been placed in the correct position. I have placed lightsources in positions that are of key interest to the player.
Now that both versions are almost finished I have set the target points for the player to spawn at when they switch between the two versions. I positioned the target points near the table on which the chest is positioned. I did this so that when the player first starts the game they are likely to spot the disappearing of the chest. This will then introduce the player to the main mechanics of the game.

I have now successfully programmed the mechanics for the game. I did this by creating actors for both the items that need picking up and also for the location they will need to be placed. When the player finds the actor and presses E to pick it up the actor is destroyed. When the player eventually finds the spot where the object needs to be placed and interacts with it, a static mesh actor (no blueprints) will appear. This is done by using the arrow inside unreal. I had to line up the arrow so the objects looked correct.
0 notes
Text
XB 2001 Reflective Blog Post
Blueprinting isn’t a strong point of mine and therefore I tend to keep my mechanics somewhat simple and focus more on level design. I really enjoy using lighting to set mood or atmosphere so in this assignment I decided I would try and use lighting as a main tool to draw, guide and lead the player and try and broaden my skill and effectiveness when it comes to the use of lighting.
My main mechanic involves the player being able to switch between the past and the present, effectively changing between a decayed and a pristine level. The decayed version of the level is where I was able to use lighting to the greatest affect. I used lighting to highlight areas of interest for the player. There were 2 types of things the player would be looking for in the decayed version of the level a) required location points for items and b) areas where items are missing. To differentiate these I made the lights highlighting areas where items were missing more dim. this resulted in the places where items needed to be placed being more noticeable whilst still retaining the ability of the dimmer lights to draw the players eye and inform them of areas they should investigate in the pristine version.
From feedback I have received I feel that my use of lighting was not only effective in terms of guiding, leading and drawing the attention of the player but also visually effective too, which I personally find important. I am pleased that people really liked my use of lighting and the complements I received gave me motivation. With me focusing mainly on level design/ lighting it was important to me that I performed well in the aspects or at least learn new stills.
I find my game interesting and I am happy with the way it turned out considering my uncomfortable feelings towards blueprinting. The mechanics will be simple for some people but it was definitely a difficult challenge for me to get the level working. However after experimenting using various methods I was able to get my mechanics working. I have learnt some new skills within unreal and have definitely improved my understanding of the software.
What didn’t go well
Unfortunately this year has been a tough one for me. A persistent and non-improving nerve issue in my arms has had a big effect on my productivity and ability to work for extended periods. This has been very frustrating for me and has resulted in me not being able to produce the quality/quantity of work I wanted generate. Although I am happy with my level I did have bigger initial plans for it but the nerve issue and emotional stresses had a big impact on my work. The thought of potentially being stuck with the nerve issue, and with my Grandad being very ill and hospitalised frequently, it really affected me mentally and had a negative impact on my work.
However I tried to push through the best I could. Ultimately I am pleased with my level and I am glad I have learnt new things in relation to blueprinting. I would have liked to have been able to include some of my original ideas but due to the circumstances I have mentioned, I simply didn’t have the time to do it effectively.
0 notes
Text
Evaluative Report XB2178
Due to medical issues of myself and emotional stresses because of prolonged illness of a very close family member, my work has suffered this year. My productivity has been reduced by a nerve issue in my arms and the emotional stress from worrying about this and the health of a family member that is very close to me. These problems have resulted in me not being able to produce the level of work that I know I am capable of and it is something that I am frustrated and saddened by.
However the main aim of this project for me was to learn how to use substance painter in order to increase my texturing ability and thus gain experience in the PBR workflow. In terms of this I have met the aim I was hoping to achieve. I am now able to work within substance painter and create textures that I would not have known how to produce prior to this assignment. Working with things like ambient occlusion maps and generating roughness maps etc. My ability in terms of creating textures has improved by a very significant margin when I compare my work from this assignment and assignments from last year. This is something I am very happy about and it is motivating to see how I am improving. As I said previously, it is just frustrating that I have been held back by various things during this assignment.
I was really excited to start this assignment and set my aims pretty high, which I felt I could reach. In my project plan I had noted that the nerve issue I was experiencing could become a potential risk if it became worse. However I didn’t think it would be the case. Unfortunately a short time after, the issue got worse and began to have a big impact on my productivity, affecting all my assignments. Additionally the repeated illness and hospitalisation of my family member for extended periods of time really took a toll psychologically on me.
Although I am pleased with my new texturing skills I wish I could have produced a more detailed environment in terms of models. It is very frustrating to me when I consider what I was hoping to achieve, of which I believe I could have achieved if it wasn’t for external circumstances.
If I were to do the assignment again (without the negative factors I have mentioned) I would have liked to have produced a more detailed environment. Quite a few of the models I produced were challenging for me but I would have liked to have made more, including subtle details to make the environment feel more alive. I am sure if it wasn’t for my arms and the illness of my family member I could have made a detailed and impressive environment. Because of these negative issues I had to change the environment I was intending to create. This was because the original environment I was making would not have looked good in the end due to my inhibited productivity.
Overall I am pleased I have achieved my main aim of learning how to effectively use substance painter. However I am frustrated and saddened that my work was negatively affected by my circumstance during the assignment.
0 notes
Text
XB2178 Production

The above screenshot is what I had been working on in the initial weeks of this assignment. However my nerve issue in my arms has got worse and is impacting my ability to work at a good speed. Because of this I felt that what I was hoping to create would be too much and the end result wouldn’t be good. Because of this I changed the environment I was going to produce in the hope that the end result would be better.

Here is the finished model for the small arch building. It was a challenge for me to make it all one, connected, object. However I managed to achieve this using multicut and connecting the vertices. The curved arched pillar was difficult too but I completed it using extrude and vertex manipulation. In order to make the arch symmetrical I had to line up the verts using snapping and then by manipulating the vertices that were parallel to each other. I am glad I managed to make this a single model.

This is the model for one of the larger arch buildings that will flank the sides of the large entrance buildings. Like the small arch structure previous, it was a challenge to create. The was mainly because of the curved pillar-like arch. I used what I learnt from creating the small arch model to create this piece. I had to use a similar technique of snapping vertices then manipulating the ones that were parallel to each over.

This model is to be used along side the main entrance buildings. For this reason I could delete the faces from the side of the model because they wouldn’t be seen. This would allow me to have more room on the texture map for the parts that would be on display. I used mainly extrusion to create this model, aside from the arch. Again I created the arch by using multi-cut and vertex manipulation. It is important that I connect the vertices to prevent the creation of 5 sided faces for example.

This is one of the main entrance buildings I created. I also created another one with a different, smaller, archway. This model was a challenge when I was initially trying to figure out how I would create it. With a process of trial and error using extrude and multicut I was able to generate the shape I wanted. Again this assignment was useful in pushing me to create models that were made from a singular object, rather than having multiple objects making up the model. I feel that my modelling has improved in this respect during this assignment.

These are the doors I created for the two types of small archways that are present in the other models. The doors fit the archways due to me snapping the vertices to the correct height of the arches.

This is the central decoration piece that I have created. There are two steps that lead to a indented central area which I plan to feature dirt and soil via texturing. My main aim of this assignment is to improve my texturing ability and learn the software, substance painter.

I edited one of my previous models to create a new model that could be used elsewhere and also that matched the reference images I was working with.
0 notes

Text
XB2002- Downloaded Images
Here are the images which I downloaded from google images and used in the creation of some of my models.


I downloaded and used this image in my alphas within Substance painter to create height decals on some of my models.
Hammer


I downloaded and used both of these images on my hammer model. They are located on opposite sides in a central position on the hammer head.
0 notes
Text
Route To Industry
The role in the games industry which I hope to achieve is that of a 3D environment artist. I have always been amazed and inspired by the whole new worlds and environments that can be created by the medium of games. Ever since I have been playing games, the environments within have been a keen focal point of my attention. It is a very frequent occurrence for me to be playing a game only to spend long periods of time simply observing and inspecting the environments when I should really be completing an objective. However the inspiration and motivation I get from well made environments in games is a welcome distraction.
I hope to use this assignment to find out what I need to do to achieve my goal of being a 3D environment artist in the games industry relating to both indie and AAA development. I will focus mainly on the type of skills I will need to be successful and also what my portfolio should include to best demonstrate my abilities and attract possible employers.
My first avenue of research involved looking into the online portfolios of 3D environment artists in the games industry. The reasons for me doing this was to:
- Get a feel and understanding of how successful artists present their work. How important is good presentation in relevance to attracting, impressing and holding viewers
-What type of works should I be including in my portfolio? Should I show a range of works consisting of different styles or should my portfolio be more focused?
-What software and skills are the people I am aspiring to be like showing?
With these questions and research aims I started to view portfolios.
The first portfolio I viewed was by Clinton Crumpler: http://www.clintoncrumpler.com/
Upon loading up his website/portfolio I was instantly drawn in. Not only from the glimpses of beautifully rendered examples of his work, but also by the professional and aesthetically pleasing layout and presentation.

The majority of the page is taken up by a variety of Mr Crumplers work which, when clicked, takes you to more of his work related to that specific project. The work on his home page instantly draws your eye and quickly demonstrates his experience and skill set. The render and image quality is very high and the layout is symmetrical. This symmetrical layout was something I found visually pleasing and I suspect that doing this could possibly convey, subconsciously, the notion that Mr Crumpler is professional and organised. The ordered presentation of his work certainly gave me this impression.
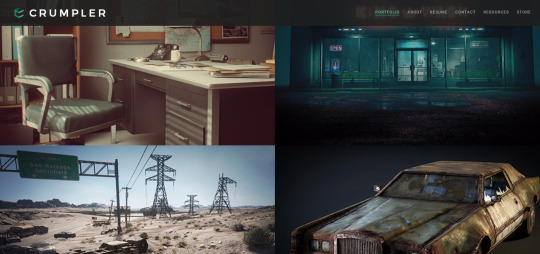
The next thing I noticed was the variety of work Mr Crumpler presented. From the homepage you can see that he has the ability to produce assets of different types from landscape to props, to buildings and vehicles. Although it is clear Mr Crumpler mainly works in producing realistic looking/ life-like assets his presented work isn’t repetitive.

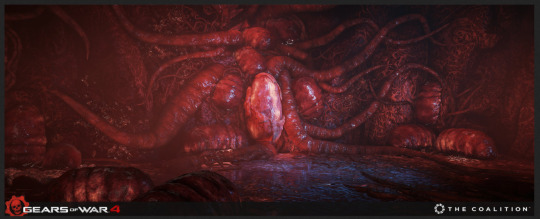
Although the visual style isn’t too varied, in terms of realistic looking assets, Mr Crumpler displays his ability to create high quality work for different themes. The main example that demonstrated this was his work on Gears of War 4 and the “Swarm” assets from said game. Yes, the graphic style was realistic looking, but Mr Crumpler demonstrated his ability to generate very high quality ORGANIC environments, showing his skill set is not limited to the artificial/ man made.
I found this interesting as what it meant to me was that even if I wanted to specialise and focus on a particular art style -at present time I am mainly inspired and motivated by graphically realistic environments in games. Not to say I don’t take inspiration from more stylised games- it doesn’t mean I cant show variety in my work. Seeing this work by Mr Crumper has made me want to start learning the techniques to create this type of organic environment assets.
With Mr Crumpler working on a AAA game like Gears of War 4 I wanted to find out the role he had in the production and therefore the additional skills aside from modelling and texturing I may need to know or could benefit from knowing if I were to aim to be an environment artist on a AAA title.
Mr Crumpler notes “ My primary roles were creation of all the materials, meshes, textures, and some effects for the pods, tendrils, skins, decals, goo, and crystals. I also worked with other teams to establish spline setup, blueprint creation and usage, bio-luminescent lighting, explosion effects, and other aspects of swarm integration and look development for the game.”
This enlightened me as it showed that simply being able to create a model and texture it too a high standard may not be enough. I will likely be required to, or at least benefit from, having skills in these other areas. Although this is a relatively daunting thing to think about, I am glad that I know what may be required of me and I can begin to learn these types of extra skills. This is definitely something that will impact my route to industry in terms of the heights I can reach, I feel.
I began to research information about what the role of being a 3D environment artist might be like on a day to day basis. I found Tanner Kalstroms’ article called “So you want to be an environment artist?” to be a useful read.
https://www.gametextures.com/so-you-want-to-be-an-environment-artist/
It begins by showing how the working life of a environment artist can be a long and demanding one, especially during crunch time. Long hours and little sleep can be expected when deadlines approach. However Tanner goes on to explain that these times are always bad “ Sure, the video-game industry can have some darkness, some bad PR about “crunch time”, but don’t let that fool you. It’s not always bad, in fact, most of the time it’s the complete opposite. Being an Environment Artist can be a treat. You get creative freedom, you get to indulge yourself, experiment, and try new things every single day”. This was something I was pleased to read as creative freedom, even if limited, is something important to me as one of my biggest desires in terms of working in the industry is to be able see my own work and influence on a game that is played by multitudes of people.

The first skill Tanner speaks about being beneficial and somewhat required for environment artists was confidence. Tanner makes it clear that it is not only important for you to have confidence in your work but also in yourself to speak your mind when you think a decision isn’t correct. This had an impact on me. I am a confident person but sometimes I will refrain from pointing out flaws I see in other peoples design decisions because I don’t want to hurt their feelings. However this made me realise that it is likely for the best of the team and the project to speak my mind when I see something wrong, even if I myself turn out to be incorrect.
Tanner then went onto talk about concept art and how the common lack of it means that I as an environment artist will have to source my own inspiration and ideas for a variety of sources.
“What does this mean to you? Well, you have to be prepared. There are going to be moments where you’re faced with a task and you have no direction aside from a vague “Make something cool.” from your director. This is that moment when you have to turn to your resources, be comfortable searching the Googs, looking through art books (Which you probably should start collecting as soon as possible), and looking through concept art online. You will need to compile this information, you will need to make it into meaningful direction for yourself.”
This information was important to me as sometimes, although I like being able to add my own creativity to my work, when there is no direction uncertainty sets in and my work can take a hit. This is due to me questioning myself whether my design choices are correct. However after reading the article I now know this is something I will have to improve or become more used to.
Tanner closes this part of the article with this “ it’s important that you know that video-game art is not all copying concept art verbatim. It requires you to build, and it requires you as an artist to be at the top of your art-game. This goes right back to the matter of confidence above.” This is something that will stay with me.

Tanner then spoke about the importance of interaction with other artist you work with and learning from them. Those who are not prepared to learn from others will fall behind over time. Learning from others in your studio is something likely to enable a lengthy career.
I started to read the comments on the article and somebody asked about how should an aspiring artist build their portfolio. This was a question I was wondering myself. Tanner had responded to the comment and mentioned the monthly noob challenge by Polycount. I had never heard of this before so I went to check it out.
The mothly noob challenge features a challenge for artist to create a 3D environment, based off of concepts provided, within a one month time frame. Those that partake then post their results at the end of the time frame and can compare and receive feedback with and from others.

This is something I think I will definitely start to take part in. Not only will it boost my portfolio but it will also challenge me to create scenes that I might choose to avoid if I was given the opportunity. This will surely increase my skills as a 3D artist and also prepare me for situations where I have to model something out of my comfort zone.
Towards the close of Tanners article they make a point about the importance of pride in ones work. Tanner makes a statement that I will bear in mind “ people who make those one extra steps happen are the ones that get noticed, and those little details that a prideful worker, and an average worker make are what set exceptional apart from extraordinary.”
One of biggest statements that stood out to me was “ As a company-runner, and person who helps lead artists I’ve learned that I’m looking for the type of pride in regards to ones work. I can’t stand artists who don’t take pride in their work, who turn in things they’re not proud of; who do not take the extra mile.” This stood out to me because it gives a good insight of what people are looking for when it comes to artist and that I should always be proud of my work, and if I am not then I should improve it.

Looking at Job
I then decided to look at job advertisements online to try and get an understanding of some of the key skills and requirements the role of 3D environment artist frequently demands.
Average salary: £30,000
This was the first job i looked at :https://www.totaljobs.com/job/artist/creative-personnel-job68721553?WT.mc_id=A_RE_IDPPC_MP0_ORG_0
This advertisement was for a AAA studio working on a high end console game which required an environment artist.
The salary stated was £160 per day.
The advertisement then listed the responsibilities you would undertake and desired skills the company would like you to possess.
Taken from the advertisement-
Your duties will include:
Create outstanding Environment artwork that sets a high quality bar for the rest of the team.
Help others to consistently reach that bar by mentoring and guiding more junior or less experienced colleagues.
Contribute to the set-up of suitable pipelines and workflows, including prototyping, documenting processes and helping to specify, test and drive to quality tools created by the Technical Art and Engineering teams.
This made it clear that this position was not for inexperienced artists. It was interesting to see the extra roles that more senior artists have to take on. You are to lead by example and motivate the more junior artists.
General Competencies:
Experience with cutting-edge techniques and technology related to environment art and a strong desire to stay ahead of the game.
Able to proactively self-organise and prioritise work for yourself and others.
Able to contribute to guiding and mentoring groups of junior artists, contractors, and outsourcers.
Excellent communication skills.
The first requirement of this ties into previous points made by Tanner I feel. It is important that you have the desire and motivation if you want to succeed in this role.
The second requirement of being self-organised also ties into points made by Tanner. Whereas Tanners example of concept art not always being given was more specific, I feel this shows that you need good initiative and the ability to work by yourself in this role.
Again communication skills are needed.
Artistic Competencies:
Accomplished at all aspects of environment creation, including sculpting, modelling, surfacing, texturing, with decent drawing skills and a good artistic eye for colour, value, tone, silhouette, etc.
Accomplished at scene building, with a focus on composition and an understanding of how this fits with game design.
Able to contribute to the stylistic development of the environment elements
Comfortable working in a variety of art styles.
This section was interesting as it was focused on the artistic requirements the artist must have. This job seemed to mainly focus on the modelling and texturing of components of the environments. One thing that stood out to me was the desire for the artist to be comfortable in a variety of art styles. This strengthens my motivation to take part in the monthly noob challenge.
Technical Competencies:
Understanding of tools, techniques, best practices and technical limitations related to real-time environment creation.
Able to contribute to the technical design of systems, to work closely with the Technical Art and Animation teams to arrive at elegant tools and solutions.
Comfortable at all stages of game development, from concept through pre-production to production.
Comfortable working with (and around) bespoke, in-development tool sets as well as with more mature engines and pipelines.
This was probably the main part of the job requirements that stood out to me. The technical competencies are something I definitely need to work on in order to better my job prospects.
A Specific Company
One of my favourite games for its environment is Dishonored. I spent many hours in this game just looking around at the environments and seeing how their designers and creators brought this games universe to life. I felt like the environment was real and lived in and the atmosphere was palpable. Ever since playing Dishonored it has become one of my biggest inspirations for 3D environment art. Although the art style is not something I tend to go for when creating my scenes, it has inspired me to try my hand at creating a scene with a similar art style.

Arkane studios is the developer behind the game and for this reason I decided to see if they had any job advertisements going for the 3D environment role. I did this as a potential dream goal job experiment to see what type of requirements I would have to fill to be a 3D environment artist for the company.
Arkane Studios listed the following requirements
Requirements
• 5+ years’ experience modeling 3D objects and generating textures
• Deep knowledge of Maya, Photoshop and other asset creation tools (ZBrush highly recommended)
• Exceptional texture creation ability; hand-painted textures is a plus
• Good analytic eye for volumes, shapes, proportions, detail distribution, color and materials composition
• Able to work from photo reference or concept art when available, as well as ability to provide their own
• Able to work within poly and texture budgets
• Strong English communication skills (verbal and written)
• Candidates must submit an online portfolio
The first thing that stood out was the 5 years minimum industry experience. This wasn’t a surprise but it was good to know the time frame I would be looking at before I could get a role in a AAA company of Arkane Studios’ stature.
Again the need to provide or source your own reference material shows up.
Finally “candidates must submit an online portfolio” this affirms to me the need to have a strong portfolio.
Conclusion
So what is my route to industry?
My first goal is to develop my portfolio with the aim to try to create my own website to display my work. I want to take key strong points I felt were present in Clinton Crumplers portfolio.I plan to develop my portfolio by participating in things like Polycounts monthly noob challenge. Part of this is also developing my skills in software such as substance designer.
Another thing I need to take time to learn is the technical side of 3D environment art. Things like particle systems etc.
I also wish to take part in more social meetups and events to get to know and network with other people within the industry. I have yet to have gone to a Manchester Gamers Unite meetup and I think that will be a good start.
In terms of actually getting into the industry I plan on potentially starting a small company with some friends in order to get some experience and also for the creative freedom that could come with that. However if that doesn’t work out or my mind changes over the coming year I will likely try to get freelance work whilst applying for junior environment artist roles.
I would also like to take part in game jams depending on how things turn out.
0 notes
Text
XB2002 Blog
For assignment one I decided that i would make a telescope. The idea of modelling a telescope came to me due to my interest in pirates and the lore and myths surround them. Telescopes are something often associated with pirates and so I decided to make one. However once I began my research I started to like the appearance of old fixed, mechanical, telescopes. My initial idea of a pirate themed telescope changed to creating one of the mechanical telescopes.
I felt that their silhouettes were more interesting and I wanted the challenge of trying to produce one with the limited polys I had available.
Creating the model
I started to create the model by first creating a cylinder . I then used extrudes and edge loops to generate the shape of the telescope.

Looking at images from my research I liked the appearance of the extra lens that was present on top of the main telescope in some of the examples. I decided I would incopporate this into my model.

To achieve this I created a secoond cylinder and matched up the various edges to the main telescope. I then used extruding and the bridge tool to connect the two pieces of geometry.

I was also attempting to create a base and a hinge system that would allow the telescope to be moved up and do and also rotate.

After I had created the main portion of the telescope I felt that the model wasn’t very visually interesting and it had also taken a good portion of my poly budget. For this reason I decided to start making the model again but make the acctual telescope part simpler whilst making the mechanical structure more complex.

I created a new simple telescope shape which left me with a good amount of polys to use on the other parts of the model.


An image from my research really stood out to me and so i began to create a version of that telescope. Its silhouette was quite eye-catching and I knew it would be more impressive than the model I had created so far.


I used pipes, extruding and bridging to generate most of the mechanical parts. This process took me some time and I have since learnt of a way to achieve the same outcome in a faster time, I am pleased with how the model turned out however, regardless.

I completed the model and cleaned up the models topology. I also removed any geometry that wasnt needed in order to reduce the poly count.

I am pleased with the way the model turned out and I feel that its silhouette is interesting which I am happy about.
The decision to have a more basic telescope component but a more detailed stand and mechanical structure, was a good one I feel. The stand created more of a challenge and that is something I have benefitted from in terms of developing new skills and learning new techniques.

In order to achieve the texture I used multiple brushes inside photoshop with varying colours and opacities. It was a trial and error process to get the surface texture that I was aiming for.
To save polys I decided i would create the appearance of the screwheads through texturing. I did this by making the area underneath the circle darker and the top part lighter.
Duplicated components were overlayed on the UV map to save space.
Assignment 2 Next Gen Asset
At the start of this assignment I decided to make a replica of Tiger 2 tank which served during WW2. I researched blueprints of the tank so I would be able to create an accurate model to the best of my ability and poly budget.

I created the model but before I started the process of texturing I decided to do something different. Although I was pleased with the model, I felt because of the poly limit it wasnt the best for demonstrating my new knowledge of PBR. I felt that a simpler or more focussed asset would be better for this.

Research
After I decided I wanted to make a new model I began to think of what I could do. I quickly decided to do a weapon as it was something that I hadnt had any experience making and I thought it would be interesting.
Military history is one of my biggest interest and passions so I had good background knowledge of weapons from various eras, including how these weapons were constructed. I considered making a historically accurate melee weapon but I decided that I wanted to have more freedom to be creative. Therefore I decided that I would make a Sci-fi/ fictional hammer.
I began to research sci-fi hammers as it was something that I hadn’t encountered much in the games I play.
Creating the Model
I first started creating the handle for the model. I had yet to decide if the hammer was to be one or two handed. I began to generate different versions whilst trying to make sure each one was visually interesting. Eventually I decided that I would make the weapon two handed and started experimentng with the various handles I had already made.

The handles were all made from a simple cylinder which I then altered using various tools, mainly extrude and bridge.


I had created a shape for the handle that I was quite happy with so I began work on the Hammer head. Although I was making a fantasy hammer I did want to make sure that the proportions weren’t too extreme.

I generated a base shape that I was happy with, always bearing in mind that I wanted the hammer to have an interesting silhouette.

I used soft select to add the appearance of damage to certain edges of the hammer head and I was happy with the end result.

I then started to add details to the hammer head for a more interesting appearance and also for subtle framing of decals that I intended to implement later on when texturing.

I worked more on the hammer head adding spikes and other features to increase the visual impact and also make the silhouette more interesting. I was influenced by medieval halberds in terms of the core layout of the hammer head.

Whilst making the hammer head I was constantly bearing in mind my plans for the texture of the model and the idea I had for the final outcome.
At this stage the head was coming together and I was happy with the way it looked.

I was using the bevel tool in many parts of the object to remove sharp right-angles and give the model a more realistic appearance.
The model was almost complete but I still wanted to add more details and alter some aspects that were not sitting right with me in terms of form.

I worked on the rear of the hammer head making indents and making the area more visually interesting.

One part of the model I decided to alter was on the handle. The central piece which connect the bottom and top part of the hanfdle was too big I felt. I experimented with different shapes and sizes until I created something I was really happy with. This alteration is something I am glad I did as it was playing on my mind for quite some time.
Once I was happy with the model I generated the differences between the low and high poly versions. I needed to remove some indents on the low poly model and I also added nail heads to the high poly model.

Creating the Material
This was my first experience using substance painter and following the PBR workflow. I was really looking forward to learning this new method of texturing.
It took some practice to understand the software but after a while I became pretty confident with using it.

After baking my model I started to learn how to use things like AO maps to generate effects in specific places. Making substances like dirt appear in more logical places for example.
To create the hammers core material I started off with a base colour of black and then proceeded to use generators and masks to create my desired appearance. Channels like height/ roughness were intergral in making the base material look the way I was intending it to.

Once the base material was finished I began to add things like decals, markings and damage.

I wanted the hammer to be themed around, and take influence from, Anglo-Saxon and Norse cultures. I started to research the symbols and writings of these cultures so I had a better understanding of what I could place on the model. Firstly I downloaded some symbols from google and used them on the model. I had to make them suitable for alpha use first however. When implementing these I altered the roughness on them so they would shine when light hit them.

I then recreated runes in photoshop and made them suitable for alpha use. My research meant that I could make the runes spell out actual Anglo-Saxon/ Norse words (or at least a translation). These runes I indented in the model using height adjustment and roughness altering.

The next step to completeing the model was to add emmisive details. This is something I wanted to do becasue of inspiration form research and also because it was something I had never done before and had no experience with.

I chose the colour green as I felt it reflected the cultures I was taking inspiration from and to me it also gave a sense of magic that I was aiming for with this fantasy hammer.

The center of the hammers handle features an inscription in runes that I added. The hammer head also features runes relating to the names of gods and thrases.
Assignment 3 Modular modelling
Research
For this assignment I wanted to create assets influenced by stately homes in this country. I wanted to make the modular assets that would allow me to create a level that could be either large or small. I planned to use the assets I created in this assignment for my level in the Games Development unit. So my main focus was to create assets that could be used to create a central library room with two other adjacent rooms.
I began to research stately homes and these are some of the images that stood out to me.


I began to develop the models for the walls. This involved a base wall model which I then created various assets for that would add details and would also serve as connector points for the ceiling asset I planned to make. I made wall trims for the top and the bottom of the wall and also made corner pieces to allow for the walls to be modular and connect together. The corner peices of the wall trim were a challenge to create but I eventually managed to combine two seperate wall trim models via bridging and edge and vertex manipulation.


The next set of models I created were to do with the bookcase. I made the bookcase model so that it would be as wide as a wall piece. This would aid modularity in terms of space used. I mainly used exrtude and edge loops to create this asset along with edge manipualtion. I then created a simple model for a shelf seperate from the bookcase model. This would allow for each bookcase to be more unique. Then I created two book models of different sizes that would be used in the bookcase. I made these using extrude from an initial basic square shape.


I kept the ceiling and floor models simple as I would use textures to do most of the work in terms of visuals. However the challenge was making these assets the correct size and make them able to connect with their adjacent assets correctly.


Next I began to model the chairs. I created one of the chairs as a complete object and two other chairs as objects made up of seperate objects. I did this so that some of the components could be used with other models in the level.
The singular object chair was a challenge to get correct. Extrude and bridge were the most used tools along with edge manipulation to get the desired curves.


I then started work on the tables. I made the components of most of the tables seperate objects so they could be interchanged with each other.
The main challenge was making sure the tables looked balanced and were also the correct size in relation to each other and also in relation to the character model.
Bridging and extruding were used again. I also beveled certain edges when I felt it relevant.


I started to create objects that could be used to add decoration to the level. Objects included candlesticks, ceramic pots, small boxes, clocks, table books and paintings.


There were some key objects that I needed to make that included a large mirror, a door, a small stand a fireplace.


needed to make a chessboard and chess pieces. First I made a small table for the chessboard to go on. I then made the chess board.
Once these two objects were done I then began to make the individual chess pieces. This was a challenge as I wanted to keep them as low poly as possible whilst still making the different pieces easily identifiable.
Overwall I am very pleased with the way the chess piece assets turned out.
Texturing the models
I started to take my models into substance painter after I had unwrapped them. I created two verisons of almost all models. A clean version and a decayed version. I used different techniques to achieve the final outcomes of the models utilizing different tools like smart materials and generators.
0 notes