
Don't wanna be here? Send us removal request.
Statistics
We looked inside some of the posts by cecilia5191505-blog and here's what we found interesting.
Average Info
Notes Per Post
19
Likes Per Post
1
Reblog Per Post
0
Reply Per Post
18
Time Between Posts
5 days
Number of Posts By Type
Text
14
Last Seen Tumblr Blogs


Fun Fact
Tumblr’s reach among the 26-to-35-year-olds in the US is 11%.
Text
Course Reflection
Overall, this course has taught me a lot of stuffs I did not know a single thing about like photography, photo editing, and rendering. Not only that but it also increases my skills in a lot of things. I made a lot of new friends through this course which is really nice and some helped me doing few exercises. I’d like to personally thank Will, Max, and Rob for guiding me throughout the whole process of finishing this course. Without the help of you guys I would not be able to complete this course!
0 notes
Text
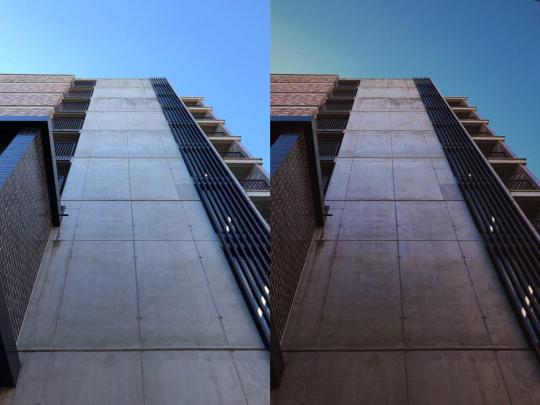
Week 11 - Product photography
Outdoor - Natural Lighting (Bright)
I really like the set up of this picture, the natural lighting really helps enhance the different tones and shadows of the sculpture. It’s really nice to be able to see the highlights with the help of the sun light.

Outdoor - Natural Lighting (Cloudy)
In this picture, the clouds were blocking the sun so it was less sunny and we can clearly see how much difference a sun light can make. This picture has less exposure and tint whereas the colours in first picture with the bright natural sunshine are really pigmented.

Indoor - 2 Lights
In this picture, my group used 2 lights one on the bottom left and one on the top right. Although the colours aren’t really pigmented. The shadows and the highlights are as powerful as the ones in the first picture. It really shows that with the help of lights your picture can turn out to be so much better.

0 notes
Text
Week 10 - Photographic Essay
In this week’s studio, we were tasked to take pictures of something from the built environment, a portrait, something from natural environment, and an interesting detail. I honestly don’t have any experience in photography and I rarely take good pictures of anything ever so this was quite challenging for me.
Capturing the built environment
In the first and second picture, I took the pictures of Quad and Colombo House building because I thought the colour of the building and the sky works really well together since blue and orange are complimentary colours which makes it a very nice picture. The second one is a picture of Colombo house as well that I took. I really find the symmetrical windows interesting.


Natural Environment
In my opinion, this picture brings tranquillity as it really resembles natural environment. The way the sun light shines through the statues is really interesting and the tree in the back really supports the whole environment.

Portrait
I took this picture of a kid which was really cute. However, I don’t really understand how to take a portrait picture so the focus in this picture is kind of nowhere to be found although I intend it to be the little kid.

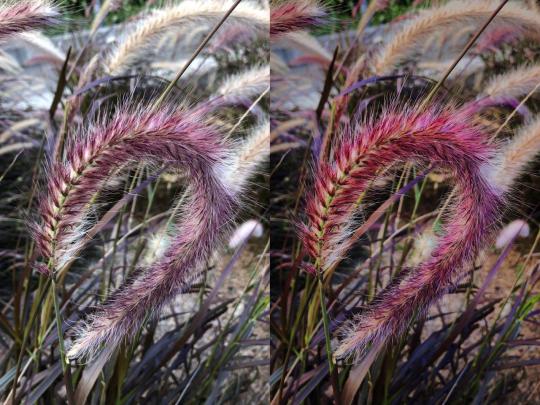
An interesting detail
This is a photo of a plant that is spread along the outside of the university terraces. I took a close up picture of one of them because I find that the details to the leaves are really interesting. I played with the exposure and tint of the picture so the colours are more bright and it pops out more.
1 note
·
View note
Text
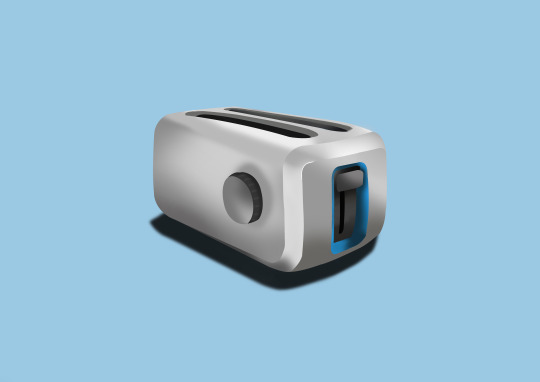
Project 2 - Toaster
Checkpoint
Moodboard 1 - Consumer Products

Moodboard 2 - Rendering Visuals
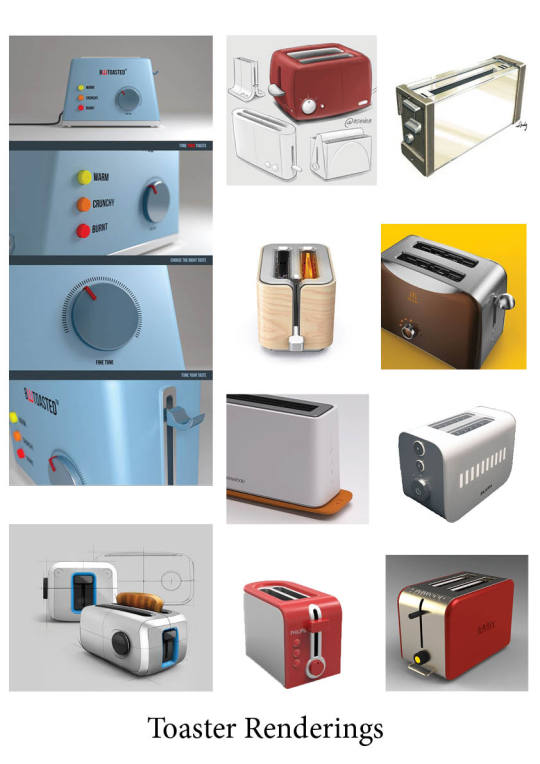
Moodboard 3 - Material Finish & Lighting

Toaster Rendering
1 note
·
View note
Text
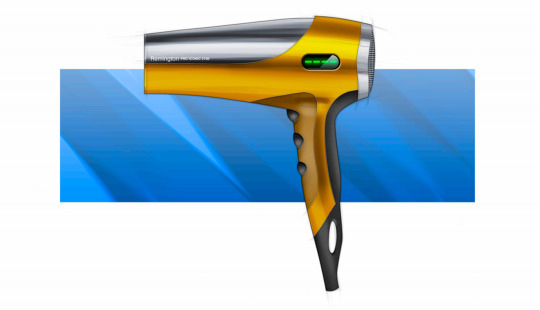
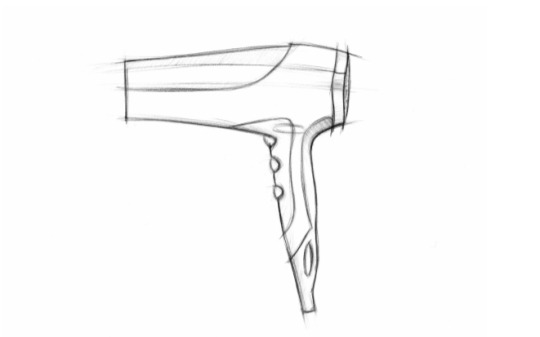
Week 8-9: Hairdryer Rendering
In this week’s studio, I was tasked to render a sketch of a hairdryer using Photoshop. I have studied pretty much the basics of Photoshop about a year ago so I was pretty confident about doing this exercise.
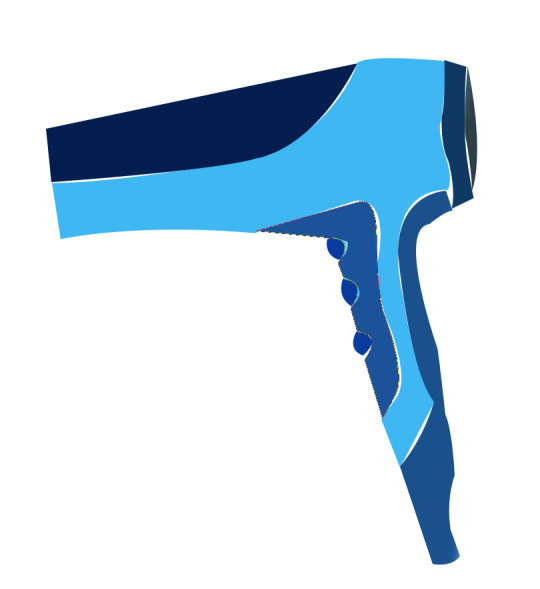
Getting started
First, I had to layout the page by scaling, moving, and rotating the sketch so that it is composed appropriately on the page. After that I had to de-saturate the image by changing the tones and levels of the image. I went through this part without any difficulties since it is part of the basic things I know how to do in Photoshop.
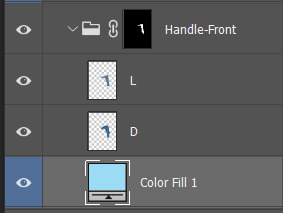
Paths and Layers
Second, I had to make paths within different layers for the parts of the hairdryer. To do this, I need the pen tool which I am familiar with already as well. Using the pen tool can make accurate selecting of the different parts of the hairdryer.
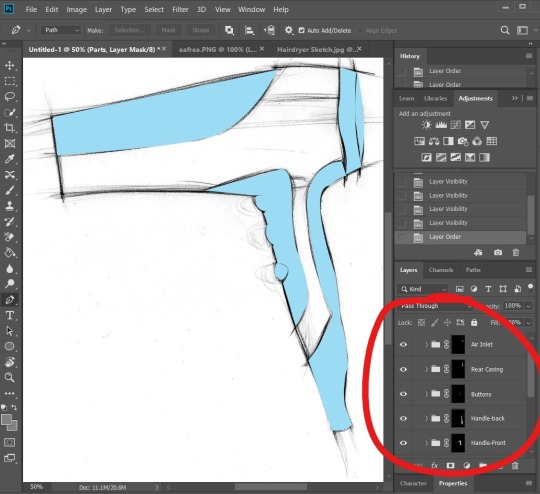
Colouring
After creating the paths, for each part I need to turn it into dashed line in which I use the selection option so that I can fill it with colour (Edit > Fill). Then, I have also set two layers, one with the ‘Overlay’ mode and one with the ‘Multiply’ mode in each part of the hairdryer so that I could blend between two colours to create shades and highlights to the render.
Rendering
The final step of this exercise is to render the hairdryer by using the brush tool to add shadows, highlights, and shades so that the photo will look more realistic. I had difficulties in doing this part since I need to pick the correct colour or else the rendering will turn out weird. Not only that, but controlling the mouse in creating the highlights is pretty challenging since I have to be steady. But then, I found out that using the brush tool while holding the shift button helps you create straight lines which makes it easier to do the highlight. Doing this part, I had help from a friend who is more advanced that me in understanding colours so thanks to him I get to finish this exercise in time.
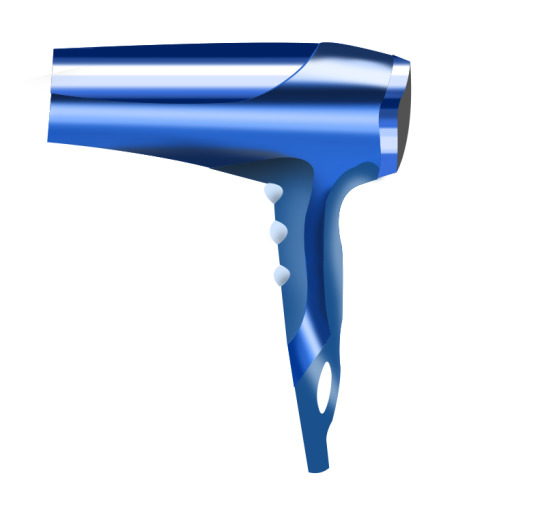
Reflection
Although I had a few knowledge of basic Photoshop, doing this exercise has helped me learn a lot of new things. Some parts are really stressful but overall it is a fun exercise. I am truly pleased with the outcome of my rendering. I will definitely use the techniques above to practice more renderings.
0 notes
Text
Week 7: Sketching Drills
In this week’s studio, we did several exercise to help with our drawing techniques. The exercise help us draw straight lines, circles, ellipses, perspectives without the help of any drawing tools.
Straight Lines
Drawing straight lines without the help of any rulers is really hard. Out of the whole A2 page, only several lines that I drew are nearly straight. Since the paper is A2 size, it is extra challenging because we have to draw longer lines whereas if we use smaller sized paper it will be less difficult. I repeated the drawing for four times. The second time drawing it, Will told me to focus on the weight I put on my hand and the way I hold my pencil.
Join the dots
Joining dots to form straight lines is harder than I thought it would be. I remember doing this kind of exercise a lot when I was younger so I thought it wouldn’t be that hard. But, turns out its also a challenging one in a fun way.
Circles and Ellipses
Next, for this one we have to draw circles all over the page. I really struggled trying to draw perfect circles. As I kept drawing more circles, I guess I slowly got better at drawing it and finally got a more round circle and less oval. Then, I started drawing ellipses inside the circles so that it will look like spheres.
Ellipses in perspective
Then, we were told to draw ellipses in perspective. I started by drawing a cube in perspective then draw the ellipse inside the cube. I actually find it quite hard to draw the ellipse since I need to follow the lines within the cube.
After drawing the perspective in the middle of the paper. Will asked me to explore the drawing in several angles either from right side or left side of the paper. I ended up trying to draw from both sides and had difficulties trying to draw them accurately.
Shading & Tone - Flat surfaces
After that, I had to draw a circle, triangle, and square then shade all of them. I had difficulties since I don’t really know a thing about shading. But, Will taught me which directions to start to shade each shapes and it really help me.
Shading & Tone - 3D form
Lastly, we were asked to draw our own water bottle using every technique that we learned in this exercise. My water bottle has a cylinder shape so it is not that difficult for me to draw it. The difficulty that I find is only the shading part since I am not really good at it, but overall I’m pretty satisfied with the result of my drawing
0 notes
Text
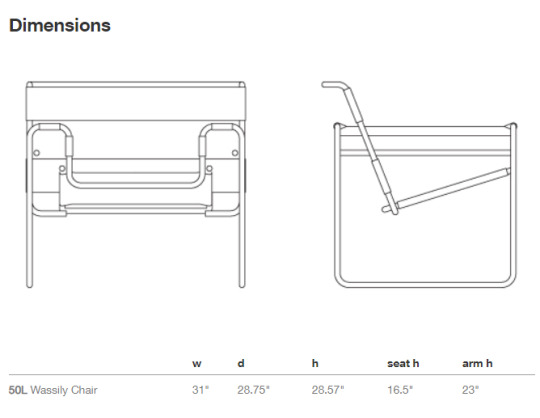
Week 6: Sketching Perspective with Grids
This week we get to do a 2 perspective drawing of the Wassily chair by Marcel Breuer.
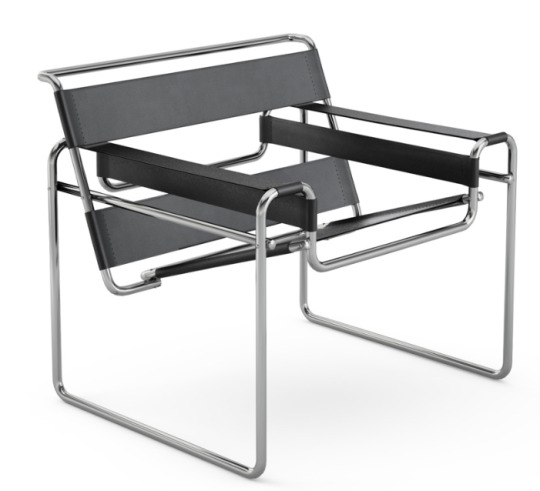
Getting started
I was honestly having difficulties trying to draw it with the grids and the points since I don’t really know where to start. But then, I started converting the dimensions by dividing the numbers with 15 so it could fit the drawing in the a2 paper.
Drawing the cube
Then, I started by drawing the horizontal line, ground line and picture plane so that could draw the cube. By connecting the vanishing points and the station points I could start picturing how drawing the cube will go and where will it be placed at.


Drawing the chair
At first, I was truly confused on where to start drawing because I wasn’t sure on where to put the chair inside the box. Then, Will told me to use the grid system so that I could know the exact points of the chair. I started with the top left part of the chair, sideways, then to the bottom. It took quite a long time to sketch the chair but eventually I got it done.

Reflection
Drawing the chair in grid system inside a cube was really challenging, it took me nearly 30 mins just to figure out where and how to start drawing. Luckily, I get to finish the chair in time. This exercise really increase my skills in drawing 2 point perspective and 3d objects.
3 notes
·
View notes
Text
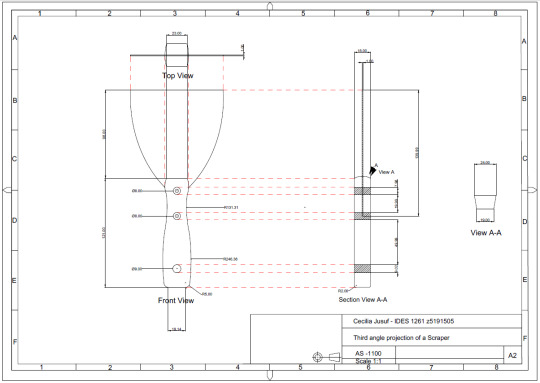
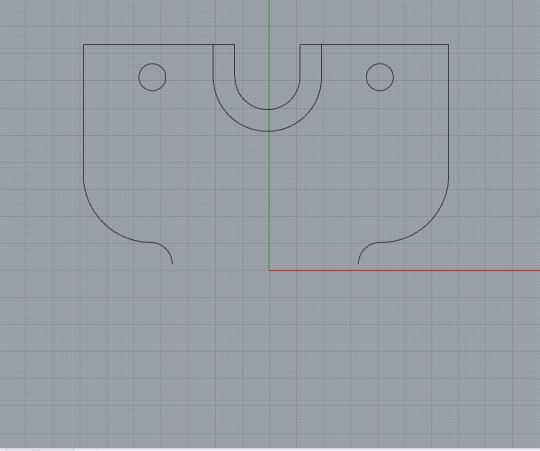
Week 5: Drawing with CAD II
Introduction
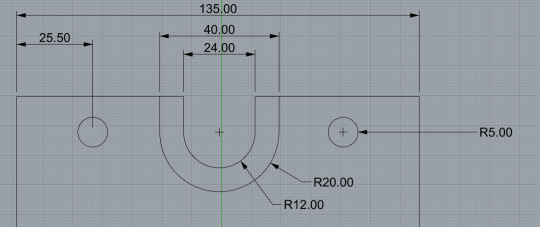
This week, we continue to draw with the software Rhino. We were given an isometric view of a pivot bearing and we had to draw the orthogonal views of it. I was easy to visualise the front view, yet I find it kind of difficult to visualise it from the top and side view at first. However, with the help of my friends, I was able to find the top and side view.

Getting started
I started with the upper part of the front view. It was easy at first since the measurements could be clearly seen in the drawing. However, I was stuck halfway through since I could not figure out the measurement of the lines on the side of the circle.
Middle part
It slowed me down trying to find the right measurements to it, but I finally figured it out by subtracting and adding measurements here and there. Then, I realised that I drew the curve on the middle part incorrectly but I managed to fix it before continuing to the bottom view. The rest process of the drawing went smoothly especially drawing the top view since I only had to project the front view.
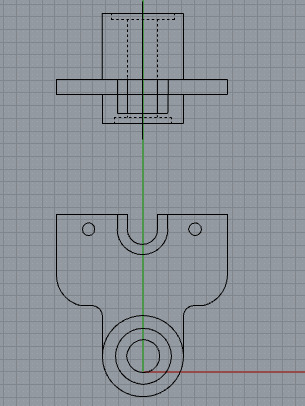
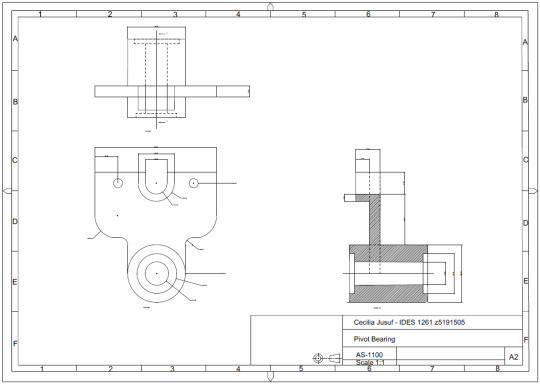
Hatching
Then, drawing the section A-A part went pretty smoothly as well until I can’t figure out how to draw/put the lines on the cut part of the object. But then, I learned the hatch feature in this exercise and it really helps seeing the section view better.
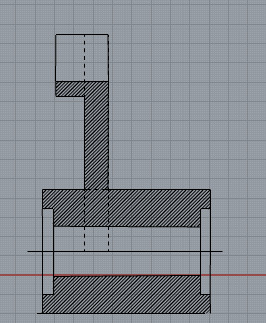
Dimensions
We also recently started to put dimensions on our drawing. It is truly easy since the software will literally put on the correct dimensions. The only struggle was they do not have the feature for us to automatically put on the A view label with the arrow on so I had to find it in the tool.

Reflection
I am pretty satisfied with the end result of my drawing. Using softwares like Rhino makes engineering drawing so much easier and neater since I could be sloppy at times.
3 notes
·
View notes
Text
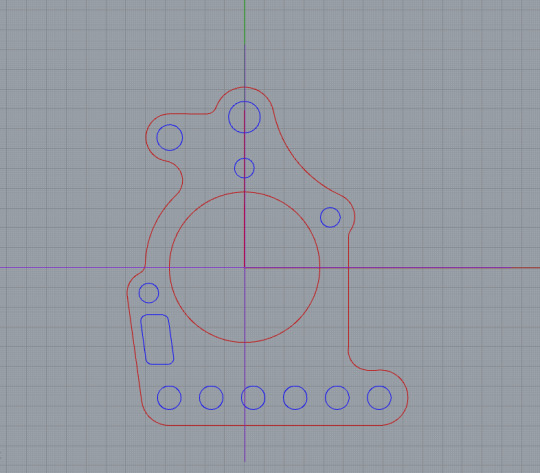
Week 4: Exercise – Drawing with CAD
Introduction
This week, we started using a computer software called Rhino for engineering drawing. I have had a few experiences with SolidWorks but I had a hard time trying to use Rhino since it is more complex. In the lecture, Will told my colour group how to use tools such as fillet, rotate, offset, and array which was very useful.
Getting started
We worked in a group for this exercise which was a very useful thing especially when my group comes from different colour group so we could help each other easily from the different skills each of us was taught. We started drawing all of the big circles to locate the placement of the small circles inside the shape.
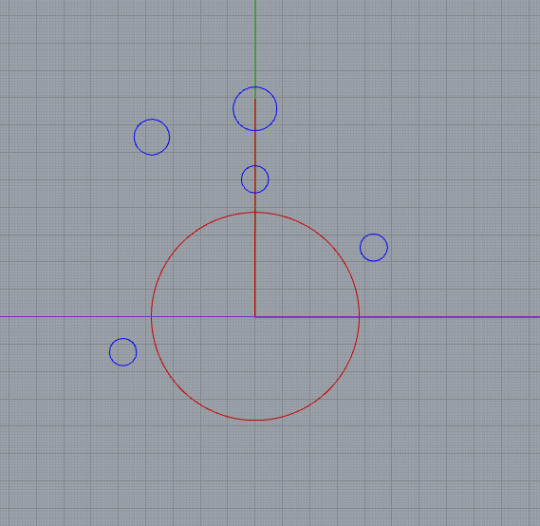
Tools to draw
Then, we started drawing the curves and straight lines along the outline of the outer shape. I learnt to use many tools from the line and circle tool. For instance, the “circle: tangent, tangent, radius” tool which helped me create a circle from the radius of a significant circle. From there, I would have to trim some parts of the circle that I don’t need by using the Trim tool for it to create a curve.
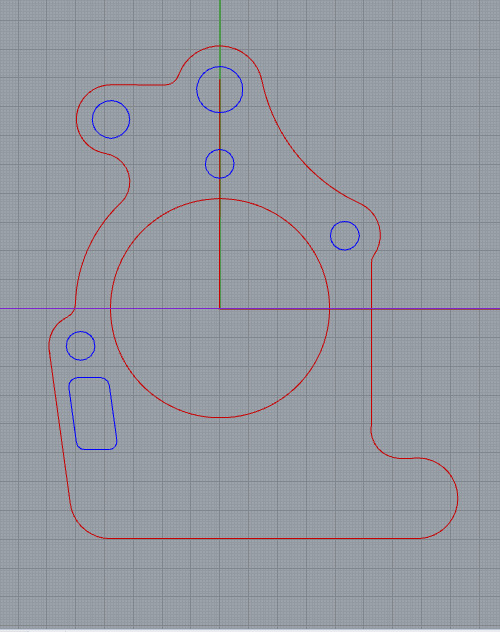
Then lastly, I had difficulties drawing the 5 circles on the bottom of the shape. But, my group helped me in drawing them symmetrically in one line. Having to finish the whole shape itself was really satisfying I got to admit. I was having several difficulties but as I said, working on this exercise in a group was really useful.
Reflection
Drawing this was kind of a hassle for me since it is my very first time using Rhino to do an engineering drawing. But I am glad that I had my group with me, working with them helped me learn a lot more other features.
1 note
·
View note
Text
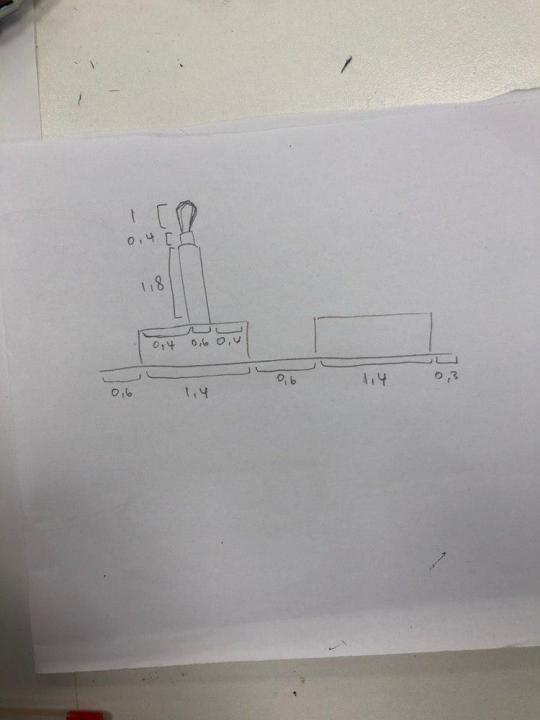
Week 3: Technical Drawing a Tapered Block
Getting started
When planning on the layout of the drawing, I was first confused since the sizes of the left and right side are different. Some people said there’s a slope on it but some said it does not. But from what I see the front side of the picture looks like this.

And so I asked Robert to make sure that it is the correct shape to draw and he said it is correct.
So then the outcome of the drawing turns out to be like this:

Auxiliary and Section view
I had no difficulty in drawing the top and front view of the shape. However, drawing the partial auxiliary view and the section A-A was pretty hard to me. Then, when I finally figured out how to draw them, I realised that I ran out of space to draw the partial auxiliary view. I used A3 paper and I should have used an A2 size paper.
Reflection
Overall, drawing this tapered block is a unique experience since you really have to know how to see it from certain perspective without knowing any signs about which way does it go, is it a slope, does it go downwards or upwards, etc.
1 note
·
View note
Text
Week 2: Technical Drawing a Small Object
Getting started
For this technical drawing, I choose an earphone jack adaptor. Firstly, I have measured all of the sizes. It was kind of hard to measure the sizes because I was only using a ruler and the object itself has a plenty of complex shapes that should be measured by a caliper rather than a ruler.
Paper placement problems
However when I finished drawing the front side I realised that I was not placing it properly on the paper. It was right on the middle of the paper which is wrong because then there wouldn’t be enough space to draw other views of the adaptor. So then Will, helped me planned the correct placement of the jack adaptor.

It was reckless of me to not plan the layout properly and so I had to re-do everything from the beginning. The drawing turned out to be like this:

Reflection
Well, I was not satisfied as it is pretty messy without the exact sizes and few dirty marks around the paper. So, I re-draw it again at home with the right measurements using my vernier caliper. It turned out to be so much better than before. The only thing missing is the border which I forgot to put and just remembered right after I finish. However, I am satisfied with the result as it is much more neat and clean.

3 notes
·
View notes
Text
Week 1: Technical Drawing Experience
Getting started
On this week, I get to do an engineering drawing for the first time using the right equipment.
The first drawing is this star:
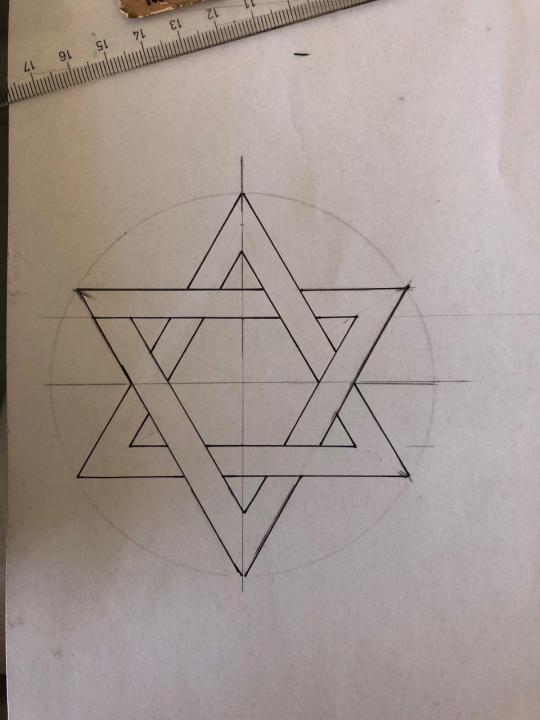
T-square
Halfway through drawing it, Rob made me realise that my paper was not aligned properly because I did not use the T-Square beforehand. So, I had to re-do it again which was time consuming since I had to start from the beginning. But, I have learned so many technical drawing aspects from this exercise and pretty satisfied with my outcome.
The second drawing is this wheel-like shape:

Having difficulties
I find this exercise less challenging to the first one since the size of the radius and diameters are clearly shown. The tricky part is drawing the edges of the curves since it is so small. I did not have enough time to trace the drawing since I was rushing to get it done. Therefore, I am not that satisfied with the outcome of the drawing since it is messier than the first one.
The third is to make this shape out of a drawing of triangles combined:

I had difficulty in drawing the piece since I was not sure where to start. I drew the grid incorrectly at first, which cause my shape to be inconsistent. However, with the help of my friends, I was able to understand the correct way to draw the grid with the right measurements and angles.
Reflection
Overall it was a fun experience yet stressful since I had to figure out everything and the shapes had to be perfectly drawn.
4 notes
·
View notes
Text
Hi!
My name’s Cecilia and I come from Indonesia to study here! I choose to study Industrial Design because I am interested in creating influential products for the world.
2 notes
·
View notes