A virtual cookbook that is roughly focused around inexpensive/easy recipes. For more info, visit the about page.
Don't wanna be here? Send us removal request.
Statistics
We looked inside some of the posts by clayscookbook and here's what we found interesting.
Average Info
Notes Per Post
44
Likes Per Post
26
Reblog Per Post
18
Reply Per Post
0
Time Between Posts
17 days
Number of Posts By Type
Text
16
Last Seen Tumblr Blogs


Fun Fact
Women make up for the other 50% of Tumblr’s audience.
Text
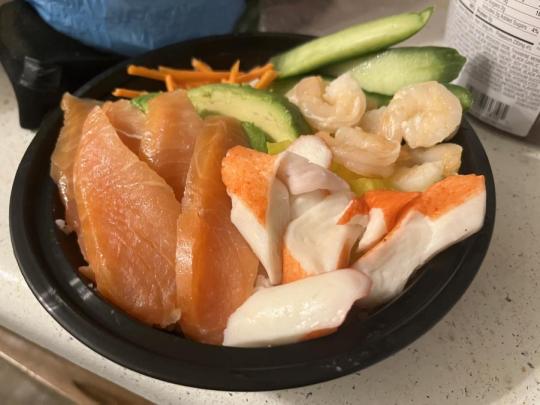
Supermarket Poke Bowls
For reference, it's been months since I wrote a recipe. This recipe has, by default, no raw fish, but you are welcome to prepare raw fish at your own risk to add. It also has rice, so I don't know if it's gluten-free. This is ultimately a modular recipe, so you can change out anything you like for other items, but this is my recommendation. Some items might be less accessible at an average supermarket, I'll mark them with an asterisk (*) to indicate them. Ingredients: Cooled/Leftover Sushi Rice* or white rice (short or medium grain) Cucumber Carrot (You can use shredded carrot if you don't wanna cut your own) Half an Avocado Pre-cooked tail-off frozen shrimp Smoked salmon (most packages at the store are pre-cut) Imitation Crab Meat (I used flake shape but stick/"leg" shape works too with some cutting) Optional: Pickled Daikon Radish* (there's not really any good replacements, but it's also an acquired taste in my experience. It's really sweet.) Optional: Nori* (Like the little snack seaweed stuff, seasalt flavour is probably the best in my opinion.) Optional: Toasted sesame seeds Optional: Sriracha* (I hear there's some kind of shortage? If you know any alternatives you can use that, but vinegar-based western hotsauce is not a good substitute here. You can also just not use it if you don't want spicy.) Optional: Japanese mayo* (Regular mayo also not a good substitute, but my local supermarket carries it at a cheap price recently) Sushi rice addendum: Sushi rice is of course the uncooked sushi rice, the water needed to cook it, and then cooking sake, rice vinegar, and mirin. I don't know the exact amounts you want for these things; for 2 cups raw rice i used 2.5 cups water and 1/3rd cup cooking sake, 1/3rd cup rice vinegar, and I think 1-1/3d cup mirin. (You can sub out any of these ingredients for equal parts the other ingredient, except maybe using all rice vinegar or all cooking sake.) I set it to boil, and once it reached a boil turned the heat off for 1 minute, then simmered it for 20 minutes. Then I folded in the mixture and let it cool- then I made sushi rolls with it, and used the leftovers for the poke bowl. TLDR: Cook rice as per instructions and if you have the stuff you can make it sticky rice by adding specific stuff to it. There are other alternative sticky rice mixes you can use on the internet too.
Equipment: Whatever you need to cook the rice (Rice cooker? Tall pot and stovetop?) A spoon or rice paddle Cutting board Paring knife/kitchen knife (Multiple, really) Spoon for avocado Bowl to serve in Instructions: Prepare rice as necessary (see above Sticky rice addendum) Cut cucumber in half or quarters length, then cut into thin paddle-like shapes (or just cut into julienne slivers, or however else you want to cut it)
Cut avocado in half, starting by stabbing it next to the stem and pressing the knife around in a circle around the pit. Then twist the hemispheres apart and remove the pit by chopping it with your knife to get it stuck on the knife. Afterward, remove the flesh from the skin with a spoon and place the flesh cavity-side down. Cut the flesh length-wise into slices. Cut the carrot into julienne slices or shred as needed; if you bought pre-shredded you can skip this step
If you have pickled daikon, cut it into roughly centimeter size cubes.
Thaw the frozen shrimp in the microwave for 15 to 60 seconds based on your microwave and the frozenness of your shrimp. Just cook until no longer frozen; maybe just in 15 second intervals. You don't want them to be hot, though.
Do any more additional preparation as necessary, such as cutting imitation crab sticks.
Add rice to the bottom of your bowl, enough to cover the bottom with at least half an inch thickness
Add your vegetables to your bowl starting with the cucumber at the 12 o clock position, and your carrot at 11 o clock, and avocado between them and yourself. Add the daikon if you have it at the 2 o clock position. at 1 o clock add the thawed shrimp, then add your smoked salmon at the 7 o clock spot, probably overtop the avocado. Then add the imitation crab at the remaining space.
From here, you can optionally drizzle the mayo and sriracha, shred the nori sheets up with your hands and place it in the center, then add sesame seeds.
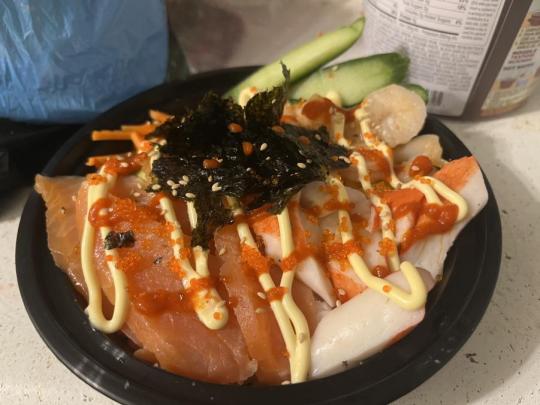
Note: this photo features an additional ingredient that is not easily found, tobiko (fish eggs). It's a raw fish ingredient and I don't actually count it as a necessary part of the recipe, just decoration.
#recipe#modular recipe#cookbook#cooking#idk what else to tag this with#its not really sushi#poke bowls are popular ish now right#oh whatever#i felt proud of myself so i wanted to put this up here
3 notes
·
View notes
Text
Instant Ramen Soups
No full recipe today, just some pointers on how to make good soup out of instant ramen. These aren't focused on authenticity or anything, I mean, it's instant noodles.
Adding soy sauce to your instant ramen soup broth if it's too bland is always a safe bet. Don't go insane, just a little bit at all really helps enrich the stock with umami and salty flavours.
Try to keep a handle on exactly how many powder seasonings you add in; at a certain point they might not all dissolve and leave some grainy mush at the bottom of the soup.
Curry powder, if you use a small* amount, works awesome to just richen up the broth and make it pop.
The amount of curry powder you should be adding to a soup to make it curry flavoured is always just a little more than 'looks right'. At least, all three members of my family agree this.
Do not be afraid to add canned meat/veg, or even chop up and add fresh meat/veg to the soup. Also hard/soft boiled egg or even just slapping a fried egg on top. I also like just throwing a microwaved chicken patty that I've cut up on top like it's chicken katsu.
If you want to, you can make your ramen in a bowl with a kettle instead of by stovetop. I reccomend letting it sit a little longer than on stovetop though.
Chives are a good substitute to try if you dislike green onion. They're related, but not identical in flavour or texture.
Sriracha is a good option for spice but can also add a dimension of richness if you just add a tiny squirt of it.
If you can get your hands on it, wakame is an excellent addition to throw in as the pot starts boiling. Usually sold at asian markets.
Hondashi seasoning is a fish-based product you can add if you want to make a seafood based ramen, made out of the bonito fish frequently. Don't add too much, though. Very fishy taste. (Unless you want it to be very fishy, in which case, do.)
Bonito flake is also good for fish flavour, but the flakes can get clumpy or even plasticky if you add too much. You can also just boil them separately and strain them out.
Konbu is similar to the bonito flake thing, except you're expected to take the konbu out on all occasions, not just some. You can usually take the konbu sheet aside after using it to make broth and dry it and then turn it into a rice topping though.
3 notes
·
View notes
Text
Milk Pudding
A Korean dessert treat that is easy to make and requires very little thought and only a modest amount of effort. Simply multiply ingredients if you want to make a larger quantity. Also, yeah, this recipe actually requires precise measurements but you literally need only the bare minimum to make this one.
Ingredients: 200ml of milk 3tbs sugar or sweetener Pinch of salt 2tbs corn starch or potato starch Possibly some vegetable/olive oil (small amount) Optional: You can add cocoa powder or chocolate syrup/caramel syrup on top, if you want. Coffee flavouring syrup isn’t too bad to add in either.
Equipments: Fridge Stovetop Shallow saucepan, medium to large size Hand whisk (NO MACHINE WHISK) Rubber Spatula Measuring cup and measuring spoons Nice container to store inside (tupperware or casserole tray are my reccomendations but anything large enough will do) Plate(s) to serve
Instructions: Pour milk into saucepan, then add the sugar and pinch of salt. Whisk the sugar and salt in so it is smooth with no lumps. Then, add the starch in and whisk it in so it is smoothly added, make sure none sticks to the bottom. It may be easier to introduce the starch in separate parts. Put the saucepan on the burner on low heat, no more than a simmering temperature. (It’s a 3 on my stove.) Stir gently and continuously with the spatula, big circles around the outside, then small circles in the inside, and then outside again until it begins to slowly thicken and clump up. As it begins to clump up, you’ll have to stir more vigorously, make sure you get the still liquid parts towards the center by pushing the gel-like clumps around. Once the whole amount is reasonably gelatinous, take it off the heat and prepare a container to place it inside. You might want to lightly oil the sides and bottom of the container so it will not stick so bad when it comes time to serve. Use the spatula to transfer the pudding inside the container and THUMP IT against the counter to get air bubbles out of the bottom and smooth the top side out as much as you can. Put in the fridge for 3 hours or overnight. Open the tupperware, and flip it upside down to empty it out of the tupperware and put it on a plate. From there, you can cut it into 4ths or 6ths, add your extras like cocoa powder or caramel, or whatever else other preparations (or none of that) and serve.
#recipe#easy recipe#cooking#cookbook#milk#i saw this one on youtube and i cant find the vid anymore#so i had to save this for posterity#this is the only one we measure on#because otherwise the mixture won't be right#modular recipe#honestly with how cheap and easy this one is i made it constantly when i first learned how to make it#the fact you can make it with artificial sweetener means even my diabetic father can eat it
4 notes
·
View notes
Text
Homemade Mozzarella Sticks
These are cheap but they are a little difficult to make. They’re also a comfort food and less expensive than going out to get mozzarella sticks. They’re easier to make if you have an air-fryer, but otherwise I recommend to pan-fry them. This recipe is a little difficult, but people deserve to know you can just make these yourself for super cheap!!!
Ingredients: String Cheese Mozzarella Egg Milk Bread Crumbs All-purpose flour Butter spray OR Vegetable Oil (Depending on method) Spaghetti sauce or Marinara Sauce Italian Seasoning
Equipments: Cutting board Several bowls Knife Fork Bowl/Small Casserole container to hold sticks Airfryer (OR Stovetop and tall skillet and METAL tongs) Fridge/freezer
Instructions: Depending on preference, cut the length of the string cheese; for standard length mozzarella sticks, just cutting 1/5th of the end off is fine, and will provide you with little tiny mozzarella bites too. Set the cheese sticks aside and flour the cutting board up. Mix up 1 or 2 eggs with a tiny splash of milk and thoroughly beat it either with fork or whisk until the egg wash is mostly homogenous. Add breadcrumbs and Italian seasoning to a bowl. Prepare your storage container. Roll sticks and bits of cheese in flour. Make sure to thoroughly cover every surface. Place in egg wash and thoroughly bathe with egg wash. You do not want bald spots. Roll in bread crumbs until it is breaded. Then add an extra layer of egg wash, and an extra layer of bread crumbs. Yes, I did just tell you to do two layers of breading. It’s important. If it’s too thin it just oozes everywhere and you have hollow breading. I am not playing around. Place each breaded stick in the bowl or casserole container for the next step. Once all your sticks are prepared, place them in the fridge or freezer and leave it until the breading firms up and won’t just come off on your fingers, so anywhere from 15 minutes to an hour. Once it is prepped, prepare your frying method of choice: For air-fryers, lay the sticks on the rack and then butter-spray them. I know air-fryers say you don’t need oil but it will help make it look prettier and taste better. For the stovetop method, pour a decent amount of vegetable oil into the pan and bring it to a medium heat. It should not be bubbling or smoking visibly until after you add the sticks. Use tongs to place the sticks into the oil, let them fry for a handful of seconds, flip them, let them fry, and then remove them from the pan onto a serving plate. The little bites are roughly the same but you can probably use a metal spoon with holes in it to remove them from the oil easier. Serve with a small amount of tomato-based sauce for dipping :)
#recipe#cooking#cookbook#mozzarella sticks#airfryer#this one is not easy so i will not tag it easy recipe#honestly tagging this one is kind of rough#breadcrumbs
4 notes
·
View notes
Text
Pizza Bagels (Large Size)
Ingredients: 2 Plain Bagels Couple of large spoonfuls Hunt’s Pasta Sauce can OR Pizza Sauce Shredded Mozzarella (or substitute for other cheeses) Pepperoni or ham or other desired pizza topping
Equipment: Toaster-oven/Air Frier Toaster-oven tray Oven Mitts Tablespoon Serving Plate Notes: You can probably make this in the oven but I am personally allergic to the oven. The heat/time should still probably be 400°F and the time should probably still be like 12 minutes or less.
Instructions: Split the bagels in two halves (they usually can be split by hand since they’re frequently sold pre-cut) Place the halves inside-up on the tray so the top surface is flat. Spoon up the sauce onto the bagels and spread evenly. Don’t spread it too thin either, be generous. Sprinkle the cheese on top rather generously. Add your toppings and add a few extra bits of cheese on top to help hold them down. Place the tray inside the toaster oven at 400°F for somewhere from 9 to 12 minutes (Times will vary by device.) One the time is over, remove the tray from the oven and carefully transfer the bagels onto a plate to enjoy.
#recipe#cooking#cookbook#bagels#pasta sauce#pizza bagels#easy recipe#modular recipe#I own an oven but I refuse to use it I will not lie to you. the air frier we own currently works perfectly for this and just fucking pizza
3 notes
·
View notes
Text
Mea'baw Sub
Also known as "It's a Fuckin' Meatball Sub" or like, maybe mini-meatball-subs. You can use the pasta sauce from recipes like the Broke Spaghetti. This one's easy to make and even easier to eat.
Ingredients: 6 to 12 frozen meatballs Hotdog Buns (2 or 3) Couple of large spoonfuls of Pasta Sauce can OR Pizza Sauce Shredded Mozzarella (or substitute for other cheeses)
Equipment: Microwave Microwave-safe bowl Microwave-safe plate Tablespoon
Instructions: Microwave meatballs as instructed on package ( usually 1 minute/6 meatballs) While meatballs microwave, open hotdog buns and place them on the plate opening-side up. You should be able to fit 3 to 4 meatballs per bun, so plan accordingly. Once the meatballs are done, carefully put the meatballs in the buns. Be careful not to burn your fingers. Scoop up spoonfuls of sauce and generously pour them over the meatballs, staying inside the bun as much as possible. Be careful not to drown the subs or the bread may fall apart. Once you’ve added the sauce to your own contentment, add the cheese on top to your own taste. Then, microwave the whole plate for 15 seconds. This will make the sauce warm and the cheese just a little melty.
5 notes
·
View notes
Text
Curry Gravy on Rice
This one will be a lot of “follow package instructions” but sometimes cheap food be that way. You can reduce the gravy amount if you think it is too much.
Ingredients: Country Gravy Mix (however much is needed for a cup of gravy) 3 tsp of Curry Powder 1 cup instant rice from box 1 cup water Some more water for the gravy 2 freezer chicken patties (or any other solid substitute)
Equipment: Stovetop Microwave A Bowl Sauce pan Measuring spoons for the rice and the gravy
Instructions: Cook the chicken patties as directed by the packaging and set them aside. Put 1 cup water and 1 cup instant rice inside of a bowl and microwave for 5 minutes. Let sit without stirring, and cover with something solid like a paper plate or a pan lid. Follow the instructions on the label for the country gravy. Make sure you make enough. Add the 3 teaspoons of curry powder to the gravy as soon as it is done and stir very thoroughly. While the gravy is setting, take the time to slice the chicken patty up into pleasantly sized chunks. (I like to do it 0.75 inch strips) Uncover the rice, and set the chicken patty bits on top of it. Pour the gravy overtop and serve.
I always get the gravy REALLY thick with this, but it usually works out fine even if the gravy is basically just short of like, cake batter thickness. Godspeed to ye.
#recipe#cooking#cookbook#instant rice#instant gravy#chicken patty#easy recipe#modular recipe#its just rice sauce and meat you cant go wrong. you can even add veggies if u want.
2 notes
·
View notes
Text
"Nothin'"
Okay, realistically these are a variant of bologna roll ups. But my family just calls them that.
For clarification, my mother was making these in the kitchen for her lonesome self once, and my curious and hungry father asked her what she was making. Her answer, desiring to keep the roll ups to herself, was "Nothin'."
Multiply this recipe as needed without consequence, but this is the reccomended 'small snack' serving size. This recipe is just posted so that it is visible as something you can pick.
Ingredients: 3 slices of ham (or other sandwich meat of your choice) 3 dill pickles (you can substitute pickle spears, or baby pickles, too) Some cream cheese spread 3 Toothpicks
Instructions: Lay the ham slices down flat. Spread cream cheese spread on the ham so it covers most of the ham with a thin layer, but not so thin that the ham can be seen underneath. (It can be thinner on the edges, though.) Place the pickles off-center on the ham Roll the ham around the pickle pierce each nothin' with a toothpick to prevent them from falling apart eat the yummy nothin'.
#recipe#cooking#cookbook#modular recipe#easy recipe#also a delicious snack#too much exposition ngl#forgive me
2 notes
·
View notes
Text
Creamy Spicy Noodles
This is one of my first forays into just messing around in the kitchen to see what works. It's a recipe I'm really proud of to this day, but not all of the ingredients are as common as other recipes'. I'll be putting substitutions that work alright in as well.
Ingredients: Ramen package (Set aside seasoning) Water for noodles Sriracha Sriracha Mayo Soy Sauce Egg Vegetarian Mushroom-flavoured Stirfry Sauce [Substitution: Oyster Sauce] Garlic Powder Onion Powder Dark chili powder Black pepper Tomato Chicken Bouillon (Knorr Brand is the most common) Dried Cayenne pepper (whole) [Substitution: dried pepper flakes] Optional: Canned mushrooms, chicken patty, or other pre-cooked minimally-seasoned meats or veggies to add in to make it yummy.
Equipment: Stovetop Chopsticks for cooking Tall soup pot Small bowl Bowl and utensils to eat with
Instructions: Put water in pot and bring to a boil. While the water is coming to a boil, mix the dry seasonings in a bowl. If you managed to get a dried cayenne pepper, cut that up inside the bowl first and discard the stem-- leave the seeds in. Once water is boiling, add the brick of ramen and cook the noodles to a suitable level of softness. Drain the noodles, then put them back in the pot, and take it off the heat. Add the mushroom stirfry sauce, first, in a moderately large amount. Begin stirring as you add in the rest of the sauces. Then around 2tbsp of sriracha mayo or just however much looks like enough by eye. Pour in a small amount of plain sriracha, roughly 1tbsp. Then add the soy sauce as desired. Crack in one whole raw egg (1 egg/serving. If you’re making 2 servings. Use 2 eggs.) Stir in the egg to make it consistently mixed in and then put the pot on at medium-low heat. Add your dry seasonings and stir them in thoroughly. Let the sauce get to the point it is slightly bubbling and has become creamy and slightly thick. Serve and eat.
#recipe#cooking#cookbook#ramen noodles#soy sauce#honestly this one's rough but i love it too much not to post.
3 notes
·
View notes
Text
Soysauce Sesame Stir Fry Noodles
This recipe was developed by my boyfriend, who I love dearly. But more importantly, I love his cooking too.
Ingredients: Ramen package Water to boil ramen soy sauce sesame oil egg butter spray other seasonings, as desired (we reccomend stuff like beef/chicken bouillon, curry powder, sesame seed, etc.)
Equipment: Stovetop Microwave Medium-sized frying pan (with sloped-but-kinda-tall sides preferably) 1 Bowl
Instructions: Crush the noodles in the unopened package thoroughly. Add the noodles to the bowl, and pour just enough water to cover the noodles. Microwave the noodles for 5 minutes or until they're cooked but not too soft. There shouldn't be much water left once it's done cooking. Place the noodles in the fridge, unaltered to cool for now. Add butter spray and a small amount (!!) of sesame oil, as well as enough soy sauce to cover the bottom of the pan and set it to medium heat so it begins sizzling. Add the ramen seasoning packet and whatever additional seasoning you'd like to add to the sizzling mixture right away and do it quickly, and stir it in. Once the mixture is sizzling, get the noodles out of the fridge and add them to the pan, stirring them to prevent sticking, burning, and to mix the flavour in. If needed, add more soy sauce to make sure the noodles are adequately flavoured. Once the noodles are mostly settled, make a small hole in the center of the noodles in the pan. Crack an egg into the empty crater and then scramble the egg into the noodles. Once the egg looks all cooked into the noodles, serve the dish in the bowl you microwaved the noodles in originally. Post script: You can also make something similar by replacing the noodles for instant rice.
#recipe#cooking#cookbook#ramen noodles#soy sauce#easy recipe#modular recipe#just fuck it up add any kind of flavouring you like
2 notes
·
View notes
Text
Cheesy Shrimp Ramen
Meant to emulate the cheesy shrimp ramen cup noodles I had as a kid but like. without the dried peas and carrots. Meant to come out a little watery but you can adjust the recipe to make the cheese thicker, but it makes it taste sticky I find.
Ingredients: 1 Ramen Packet (Shrimp or Chicken flavour, but either works) Water for the soup Some Frozen pre-shelled precooked shrimp (They sell these at every walmart i've been to so...) Velveeta Cheese in either block or bag form (Other brands of soft cheese stuff works too but I don't know of any?) Dried chives or green onions For thicker sauce, you can drain water and/or add milk.
Equipment: Stovetop Microwave Microwave-safe bowl Spoon or chopsticks
Instructions: Boil water with noodles in the pot and cook to desired texture. Once there, shut off the stove but leave it on the burner. It will still be hot. Drain noodles partially, leave more than half of the water. Add roughly 1-1/2 tablespoon of the cheese, if it's the bag you won't be using the whole bag for a single serving. Stir the pot while it's still on residual heat to melt the cheese into the water. In the meanwhile of all of this, microwave the shrimp in a bowl until they're no longer frozen. They'll be really hot and sitting in hot water, either fish them out with chopsticks, or, if you think the soup could use thinning, you can toss it in with the water. Add chives to taste and serve.
2 notes
·
View notes
Text
Ramen Sandwiches
Another recipe from my father. I love these. Makes 2 sandwiches. YMMV on if the 2 sandwiches are individual servings or a whole serving.
Incredients: 1 Chicken Flavour Instant Ramen Package Water for noodles 4 Slices of your bread of choice (I recommend wheat) Optional: Butter/Mayonnaise
Equipment: Stovetop 1 Medium or small pot Spoon or chopsticks Strainer Plate Butter Knife (Optional)
Instructions: Fill pot with water, add noodles. Set to boil. Once noodles are desired softness (5-8 minutes time roughly), drain them and take them off heat. Add seasoning packet to the noodles, mix in. (If you have any spare packets of seasoning or any other seasoning you like, you can add it too.) Optional: You can add mayonnaise inside the noodles too if you want them to hold together better. Set your bread up on the plate, butter/mayo as desired. Divvy most of the ramen up inside the sandwiches. If there's too much for the sandwiches, you can just leave the remainder on the plate and eat it on its own. Close your sandwiches and enjoy your 100% carbohydrate meal.
#recipe#cooking#cookbook#ramen noodles#bread#one pot meal#one pot recipes#we do not cook healthy food here
2 notes
·
View notes
Text
Broke Spaghetti
I also call it Broke Bitch Spaghetti but it's just pasta sauce on ramen noodles. Spaghetti noodles are too high-maintenance. This is like, just throw it all into one pan and go.
Ingredients: 1 Instant Ramen Package/serving Water to boil noodles Your Preferred Pasta Sauce (Reccomendation: 1/3rd Hunt's Pasta Sauce can/serving) Salt Optional: Microwaveable Frozen Meatballs Optional: Roughly 1/2 Teaspoon Sriracha (Possibly less) Optional: Onion Powder Optional: Parsley Seasoning/Italian Seasoning
Equipment: Stovetop 1 Medium or small pot Strainer Bowl or Plate to Serve Fork Possibly tupperware for sauce leftovers Possibly a Microwave
Instructions: Set the water to boil, and add salt as preferred. While you're waiting you can optionally begin preparing the meatballs or whatever else Once water is boiling, cook noodles for 3-5 minutes, or until desired softness. Once cooked, drain the noodles. If making a single portion, transfer drained noodles into the bowl you'll be eating from, along with any solids you're adding. Otherwise, just keep them in the pot for now. Add enough pasta sauce to adequately cover the noodles to your liking, mixing it as needed, and serve. Optionally, add the sriracha/seasonings in before serving to make a richer or somewhat zesty pasta sauce.
As a cautionary note: Do not add sriracha to the sauce before you add the sauce to the noodles, especially if you're going to store some sauce for later. Refrigerating stuff with hotsauce in it makes it substantially spicier. The reason you can store remaining sauce is for using it in other recipes, such as meatball subs or pizza bread.
#recipe#cooking#cookbook#ramen noodles#spaghetti sauce#one pot meal#one pot recipes#you can alter this one a lot and it probably will turn out good. the sriracha/seasonings are just my personal reccomendation.#modular recipe#i used to set aside the seasoning packet for this one for other recipes but honestly i reccomend using it to make it richer in flavour
3 notes
·
View notes
Text
Cream of Mushroom Ramen
Sorry to preface a recipe with a ramble about my life story at the start, but I'll keep it brief in this post and every post after. This is a recipe my father taught me. It's easy, it's filling, it's good for the soul. It's one of my favourites to this day so it's going to have to be my first entry, obviously.
Ingredients: 1 Chicken flavored Instant Ramen Noodle package (brick, not cup) However much water is suitable for the ramen 1 Cream of Mushroom soup can Season Salt Ground black pepper (Optional)
Equipment: Stovetop (1 burner) 1 medium/small soup pot 1 Strainer 1 Rubber Spatula (Optional) 1 Bowl/Spoon to serve
Instructions: Fill the pot with water. Break the brick of ramen up inside of the plastic container, at least in fourths, but you can also just pulverize it if you like. This makes it easier to stir. Place the ramen inside the water and place on stove. Bring water to a boil and cook until desired softness (or for like 7 minutes, roughly, if you've set it on high.) Once the noodles are soft, the water should be cloudy and starchy. Drain the noodles of all water. If making multiple portions, return the noodles to the pot. If only making one portion, simply transfer them to the dish you’re eating out of. Open the can of soup. Do not alter it in any way no matter what the can says. Put contents of can into the bowl on top of the ramen. Optionally, Open the seasoning packet and pour in with the soup and noodles. You can also set the packet aside for another recipe. Add seasoning salt to taste, and a little bit of black pepper if you'd like. Stir thoroughly— it may require a lot of effort. Use stirring techniques like folding to ensure all of the noodles get the soup on them. It should be a rich, creamy dish with thick sauce (soup) on it.
#recipe#cooking#cookbook#ramen noodles#cream of mushroom#season salt#I do not measure#measuring is for cops#one pot meal#one pot recipes
5 notes
·
View notes
Text
About this project
This cook book has changed names, titles, whatever, a bunch of times. It originally started as a google doc to aggregate my misc. recipes I used to teach a friend of mine.
This isn't an overly sophisticated cook book. The name "Wally World Cookbook" is specifically to refer to the fact that most items on it are common enough to find at even Wal-Mart, and typically inexpensive. Not everything will be precisely within those restrictions, but most things are.
It's meant to be accessible, but some recipes may include equipment you don't have, like an air frier/toaster oven. You can typically get by with a normal oven in these cases by adjusting the times, but I don't have experience with it.
These recipes were originally made by an autistic person (the author) for another autistic person (the author's friend) so they also typically are pretty flexible for changing as you like.
I'll probably make a page/post about what the most common ingredients of recipes are, or update this post here, or something. Until then, I'll post some recipes.
#about#this post will probably periodically get edited#i intend to make this the pinned post#blog introduction#idk what to tag this lol#cookbook
1 note
·
View note