Text
upgrade your life by taking note of the objects you use most and slowly replace them with the most beautiful and high-quality versions of those things you can find.
9K notes
·
View notes
Text
Elizabethan Jewelry Chains
Let’s talk Elizabethan shiny things!


Left: Portrait of a Nobelwoman in a cartwheel ruff, attributed to John Bettes the Younger, 1585 Right: Portrait of a Lady Aged 21, Unknown Artist, c.1590
Specifically, I want to talk about jewelry chains. They were often worn just like necklaces, but they were also draped around the shoulders or draped in loops at the front of the bodice. They could be extremely long – one found in the Cheapside Hoard was 8 feet long!
These chains are featured heavily in portraiture from the 16th and 17th centuries, and thanks to the Cheapside Hoard, we have quite a few extant examples of these jewelry chains.
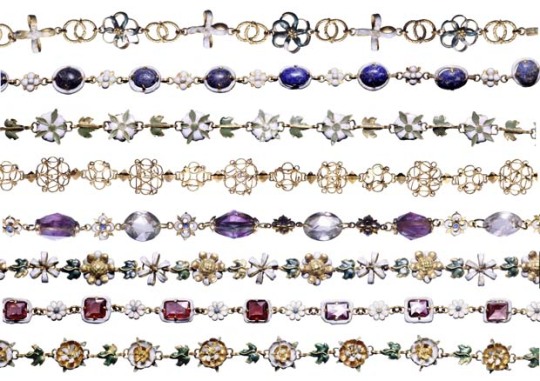
The Cheapside Hoard was found during the demolition of a house near St. Paul’s Cathedral, back in 1912. As they broke through the floorboards of the house and into the much older basement, they discovered a cache of over 500 pieces of late Elizabethan and early Stuart-era jewelry. The jewels featured emeralds from Columbia, diamonds and rubies from India and Burma, ancient Egyptian and Byzantine jewels and coins, as well as delicate gold and enamelwork crafted by the goldsmiths in London. At the time, Cheapside was London’s main shopping center and the home to the majority of the goldsmiths. It’s thought that the hoard was buried to keep it safe, possibly during the English Civil War.
I set out on a hunt to find jewelry bits that resembled the links we see in the Cheapside Hoard pieces. Amazingly, I came across some suitable pieces on AliExpress!


Left: Chain from AliExpress Right: Detail of Cheapside Hoard chain, Museum of London
I didn’t set out to copy any one chain from the Hoard, but instead used the shapes and sizes of those chains to help guide me while I was buying my bits and pieces.
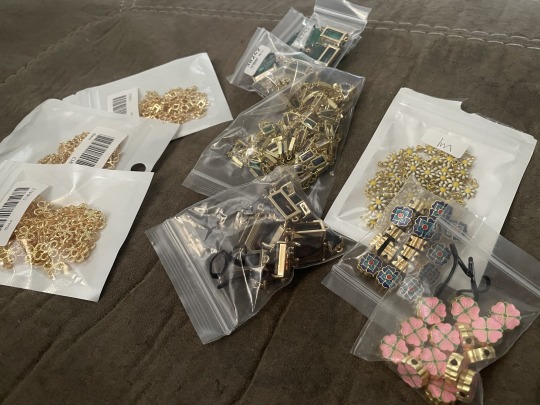
Finding the suitable pieces was really the most difficult part of making these chains. Once everything arrived, assembly was quick and simple.

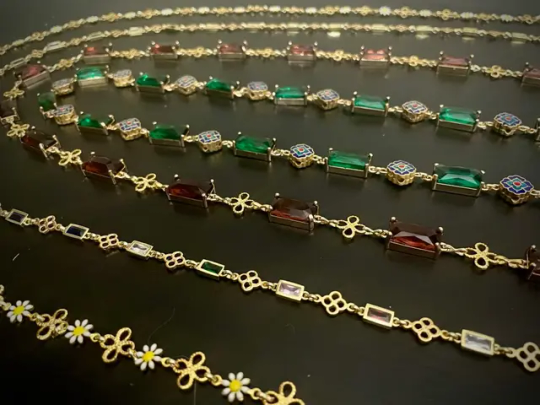
I ended up with quite a variety of finished chains. None of them are as long as their cousins in the museums, but I think they’re a good start to my Elizabethan jewelry collection, and will definitely grace the front of many a bodice at future events.


Bibliography:
Cheapside Hoard Chains, London Museum —Enameled Chain of Flowers, Bows, and Leaves https://www.londonmuseum.org.uk/collections/v/object-119591/enamelled-chain-of-flowers-bows-and-leaves/ —Enameled Floral Chain https://www.londonmuseum.org.uk/collections/v/object-119585/enamelled-floral-chain/ —Diamond and Enamel Chain https://www.londonmuseum.org.uk/collections/v/object-119584/diamond-and-enamel-chain/
Cheapside Hoard Chian, V&A Museum —Chain, 1590-1620 https://collections.vam.ac.uk/item/O74076/cheapside-hoard-chain-unknown/
Forsyth, H. (2013). London’s Lost Jewels: The Cheapside Hoard. Philip Wilson Publishers.
Wheeler, R. M. (1928). The Cheapside Hoard of Elizabethan and Jacobean Jewelry. Antiquity: A Review of World Archaeology, 2(8). https://www.cambridge.org/core/journals/antiquity/article/abs/the-cheapside-hoard-of-elizabethan-and-jacobean-jewellery-by-r-e-mortimer-wheeler-london-museum-catalogues-no-2-1928-1s/1E585E583A88D8B55DB29EE30B85D79E
Ganoksin. (2016, October 19). The Cheapside Hoard – Ganoksin jewelry making community. https://www.ganoksin.com/article/the-cheapside-hoard/
Hackenbroch, Y. (1941). A jewelled necklace in the British Museum. The Antiquaries Journal, 21(4), 342–344. https://doi.org/10.1017/s0003581500048381 https://www.cambridge.org/core/journals/antiquaries-journal/article/abs/jewelled-necklace-in-the-british-museum/965C70079702E42C7096519CBF7A8470
#costuming#finished project#historical costuming#historical costume#17th century#16th century#sca#elizabethan era#jacobean#jewelry
14 notes
·
View notes
Text
Black & Gold 1870s Natural Form Dress

Quite possibly my most sparkly dress to date! I had plans to attend a Victorian weekend at the end of February, which included a Saturday night ball. Having precisely zero ballgowns, and wanting to go 1870s natural form for the event I started digging around for inspiration and fabrics.
I ended up staring at a gold and white dress from The Age of Innocence film, and in my head it slowly transformed into a gold and black gown. I purchased a length of African George fabric, which is similar to sari fabric and has an embroidered hem, and a silk chiffon shot with a metallic pinstripe, and used some black taffeta and plain black satin from the stash to help supplement.
I started with a fairly simple skirt pattern from Peterson’s Magazine. This skirt comes from the 1877 edition of Peterson’s Magazine.


The initial draft was fine, but it seemed a bit slim over my very voluminous petticoat, so I compared the two patterns and ended up adding a few more inches to the center front and center back in order to fluff up the body of the skirt.


Once I was happy with the pattern, I cut the fashion skirt out of black taffeta, and the lining out of silver taffeta. Since I was flatlining the skirt, they would be treated as one layer while I worked.
I wanted to work out how the fan pleats worked in the back of the skirt, so I assembled the back panels first and futzed around with the pleats until I was able to make them work.

Then I went back and worked on the front of the skirt. I assembled the two front skirt panels, but left the skirt back on its own for the time being since it would be easier to embellish the front and back separately before sewing them together.
Before I began embellishing the front of the skirt, I added a 6-inch wide hem facing, which I stiffened with a layer of tarlatan. I wanted this so the ruffles at the hem would get a bit of support.
Then I moved on to making the ruffles for the front of the skirt. The plan was for one ruffle in black taffeta, edged with gold ribbon, and a wider ruffle of the metallic chiffon, also edged with ribbon.
The taffeta ruffle was first. The strips were cut, assembled, and hemmed, and then a 1/4-inch wide gold ribbon was stitched down along one edge.

Once all the pleats were in place, the strip was sewn onto the front of the skirt, and I moved on to making the chiffon ruffle. Because the chiffon was so slippery, I decided to give the entire length of fabric a light starch bath before even cutting anything out. It gave the fabric a bit more of a crisp hand, and kept the chiffon from creeping all over the place while I tried to work with it.
From there, it was basically the same process as before, except with way more spraying and pressing and pinning. The chiffon was very springy and didn’t want to hold a crisp pleat, and the ruffle was several inches wider than my pleating board, which required more steps to get the top and bottom edges to press cleanly. Eventually, though, I was able to get some nice, crisp, flat pleats into the chiffon.


Finally, I could start on the apron front. I cut a wide piece of my George fabric and draped it over the front of the skirt. I played with the positioning of some pleats to just give it a little bit of volume toward the bottom, and stitched those in place by hand once I was happy with how they looked. Then I cut two panels of the embroidered selvedge and used them as hip pieces that would frame the front panel.

Then it was time to return to the back of the skirt. The back panel finally got its hem facing, and then I started on the ruffles. The plan here was for two of the ribbon-edge taffeta ruffles, with a pouf of the embroidered satin up top, opening up in a fan that would end at the top edge of the hem pleats. So, more taffeta ruffles were made. Since the train is quite long, this ate up quite a bit of fabric!

To make the embroidered section of the skirt fan, I used the Peterson’s skirt pattern again, but I flipped it so the straight edge was against the finished hem of the fabric, and the curved edge was at the top. I also folded the pattern so that it was a good foot shorter, so it would lay right at the top of the ruffles and not obscure them.

I was a little stumped on what to do for the top half of the skirt back for a while. I didn’t have a lot of my embroidered satin left, and what I did have was in long, narrow cuts. I decided to make use of the remaining scalloped edge, and cut two 35-inch long pieces, which I pinned to the side-back seams and then pleated into a rounded shape. I had one 28-inch length piece left, which had no embroidered edges, so I placed that panel in the middle to give some additional fullness to the bustle pouf. It all turned out to be just enough fabric to make the back pouf, and I was very pleased with how it ended up looking.

At this point everything was just pinned together, so the next step was actually to carefully stitch this entire concoction together, which I did mostly by hand. Last but not least was to install a placket and waistband. Instead of going into the center back like I usually do, I put the placket/skirt opening on one of the side seams so it wouldn’t interfere with the bustle pouf in the back. The top edge of the back pouf extends a couple of inches over the placket and attaches with a snap, completely hiding the skirt opening.


I had been working on the skirt every spare moment hoping to give myself plenty of time to work on the bodice, but I still ended up in a time crunch, with only two weeks before the event to put something together. I decided that I wasn’t going to drape my own pattern, since that would require multiple fittings to get it just right, and instead decided to use Truly Victorian’s TV416, and just make a plain black satin bodice straight from the package. I did one mockup to adjust for size, since I know from experience that their patterns are always very wide in the shoulders and long in the waist on me, and then I dove in and began cutting out my final bodice.
I didn’t have any of the embroidered satin left which I could have finagled to give me plain bodice pieces, but I did have a bolt of black satin in my stash, so that’s what I ended up using. The two black colors are not quite a match, but luckily they’re close enough that it’s not super noticeable.
Even though it was a quick and plain bodice, I still wanted to construct and finish it well. There’s boning on the front darts, and I finished the top and bottom edges with a piped facing. I didn’t want to spend time making separate piping, so I sewed one edge of the facing in, placed some yarn between the facing and the seam allowance, and then stitched in the ditch to create the piping. And it worked well! Then I turned under the raw edge of the facing and hand-stitched it to the lining.

I did the bulk of the work on the bodice in the week leading up to the event, but, as is tradition, I was working on it at the last minute in the hotel room. I had to attach all the hooks for the closure and make all the thread bars, and I was sewing right up until about 10 minutes before we had to get ready and go!

But the dress was a success! I wore it to dinner and to the ball, where it performed beautifully while dancing.


205 notes
·
View notes
Photo

The Párisi Udvar in Budapest, Hungary. Arcade/department store/ galleria built 1907-1913, in a mix of styles- venetian gothic, orientalism, jugendstil, renaissance.
28K notes
·
View notes
Text
Lok’Tar Ogar
(As usual, all the names have been changed to protect people’s privacy. LONG POST so press “J” to skip or start scrolling because I can’t make cuts work for Moblie, sorry.)
Back in 2004 I went to a cousin’s wedding and my mom got into Fandom.
Ruth, my Mom’s-college-roommate’s-daughter was getting married to a man of mixed reputability in what had been for several months had been the primary sitcom of the family- mushroom vs. champagne draperies, the bride wanted a small ceremony and the mother of the groom wanted to invite every business contact she had, and then there was the problem of the Rabbis- Ruth’s rabbi had mostly retired but had promised to marry her in her youth, David’s had promised the same and the current Rabbi of Ruth’s synagogue wanted in too, so they agreed to be married by all three Rabbis. Furthermore, any Jewish wedding requires a Chuppah- a canopy under which the ceremony takes place. Mom agreed to make one for Ruth and David’s wedding, (MUSHROOM-colored of course, not champagne) and escort it there personally as we were attending the ceremonies.
Alas, the wedding was in Columbus, a terrible place.
Southeast Ohio is generally a rather nice place- on the far northern end of the appalachia it has lovely rolling hills of deep hardwood forests, a spectacular zoo and many other things a scientifically inclined teenager might enjoy but I was not going to those, I was going to a Wedding, where I had been guilted into being a flower girl on account of being the youngest available cousin, along with my sister. I spent most of the drive from Colorado in a state of spectacular teenage misery, which was almost entirely obliterated when we got to the hotel.
The guests of the Hotel consisted thusly:
My family (4)
A small herd of fancy-suited businessmen there for some obscure finance meeting (30ish)
A jolly and boisterous horde of Gamers, Cosplayers, Geeks and Freaks present for the World Of Warcraft convention immediately across the street (several hundred)
I didn’t actually know a damn thing about WoW, other than it was something my geekier friends in middle school played, and that it had elves with ridiculous eyebrows, but I know how to make friends with the kind of people who wear nothing but bodypaint and prosthetic ears in public and started talking to the gang of Blood Elves at the breakfast bar while the businessmen huddled together at their table like a group of musk oxen forming up against a pack of wolves.
Eventually mom wandered over and joined in the conversation- after years of making Halloween costumes, stage props, miscellaneous fabric constructions like the Chuppah and so forth, she’d gained an extensive knowledge of what fiber can be made to do, but wanted to know what marvelous things these people were doing with plastics. She hit it off particularly well with the Troll over his teeth, and they decided to confide in her.
“Hey, here’s a fun thing to do-” Said the blood elf, before trotting over to the edge of the mezzanine overlooking the lobby.
“LOK’TAR OGAR!” she bellowed as loudly as her tiny, corseted frame could manage. “FOR THE HORDE!!!” Roared back several dozen Warcrafters, shaking their con-safe weaponry and causing several of the businessmen to duck for cover.
“Yeah, if you need anything, just yell that.” she nodded, before we parted ways.
Later that night, Mom slipped in the shower and sprained her ankle, which resulted in a moderately panicked but ultimately boring visit to a clinic to get it X-ray’d and acquire a wheelchair. The next morning, however, we had to proceed to the wedding, and discovered that the elevator was out of service.
A Chuppah, if you’re not familiar with one, is roughly the same dimensions and weight as those pop-up tents they use at gentrified outdoor craft fairs, or about 9 feet long and close to 60lbs when folded up. This one was closer to 100 once all the memorial images and sentimental fabrics and special tent poles had been added on. Mom was stuck in the wheelchair, Dad was in a state of near panic at Mom being injured and also having to be somewhere On Time, and my sister and I were liquefying in the summer heat and the bride-mandated mushroom-colored seven goddamn layers of itchy-ass tulle flower girl dresses, barely able to lift the chuppah between us.
In short stairs were not happening and three quarters of us were about to riot but Mom is definitely the smart person in the family because she remembered-
“LOK’TAR OGAR!!”
“FOR THE HORDE!!”
“I NEED SOME HELP!”
Instantly the cosplayers from the night before were there, along with a dozen more. Two beefy trolls carried Mom down the stairs and clean out to the parking garage, someone else got the chuppah, and the Blood elf managed to get concierge to bring our car around to the curb with our destination already programmed into the (VERY PRIMITIVE) gps. I thought my dad was going to cry with relief.
“So [Gallus].” Mom asked me on the way to the wedding. “People who like videogames. Do they all have Magic Words?”
“Yeah most of them have some kind of phrase like ‘may the force be with you’ or ‘live long and prosper’. Why?”
She just nodded, storing that fact away for later.
The wedding turned out to be an event in and of itself- The mother of the bride fainted when they kissed, the rabbis nearly got into a fistfight, the mother of the groom fell off the chair and needed stitches, uncle Larry tore his pants on the dance floor then elected to remove them and keep dancing- and I managed to forget entirely about Mom’s question.
*
Last year, we were doing theater set-in at the same time the local theater and culture complex was hosting the small city convention. It was July, hotter than satan’s own asshole, and the stage pieces were too large for both of our 5’2-and-under asses to move.
I came back out from wresting a Magic tree into the complex to find mom squinting calculatingly at a group of Marvel cosplayers.
“What are their Magic Words?”
“Huh?”
“The words you say when you want to summon them- ‘Use the Force’ or something?”
I blinked a few times, as my heat stroke-addled brain translated that. “…Avengers Assemble?”
“HEY AVENGERS!” Hollered Mom. “ASSEMBLE!!”
INSTANTLY, an Iron Man and three Captains America sprinted over.
“What can we do Ma’am?” asked one of the captains, sticking rigorously to character.
“We need help moving these set pieces in and you have muscles.” she explained, and without question everyone pitched in to move a magical forest, the front half of a castle and a dragon’s cave into the Children’s Theater backstage. The Iron Man politely answered questions about painting metallics on Cardboard for her and all three Captains America lines up and saluted her upon emptying the truck.
“You’re dangerous.” I teased her as they returned to Con.
“Tell me more Magic Words- I need that tall one in purple to help with the lights.” she said, gesturing to a Waluigi that was about to become familiar with the Children’s Theater Lighting System.
_________________________________
(If you enjoyed this story, please consider supporting me on Ko-Fi or Patreon where you can pre-order my upcoming Family Lore illustrated Anthology. Thank you.)
17K notes
·
View notes
Text
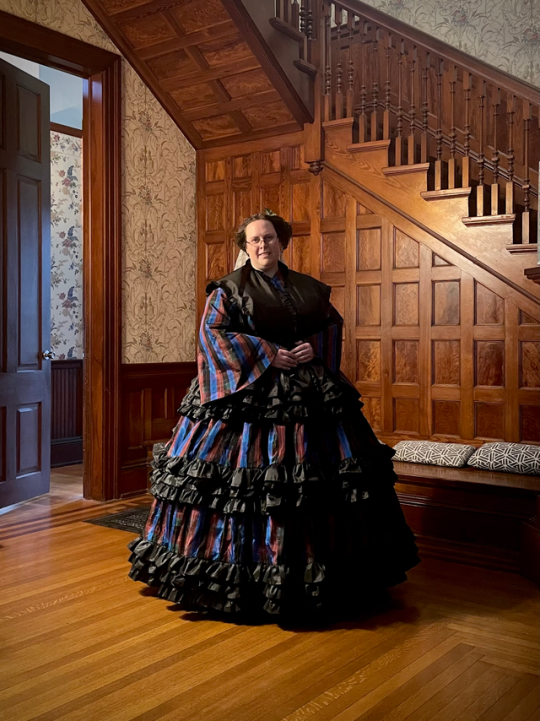
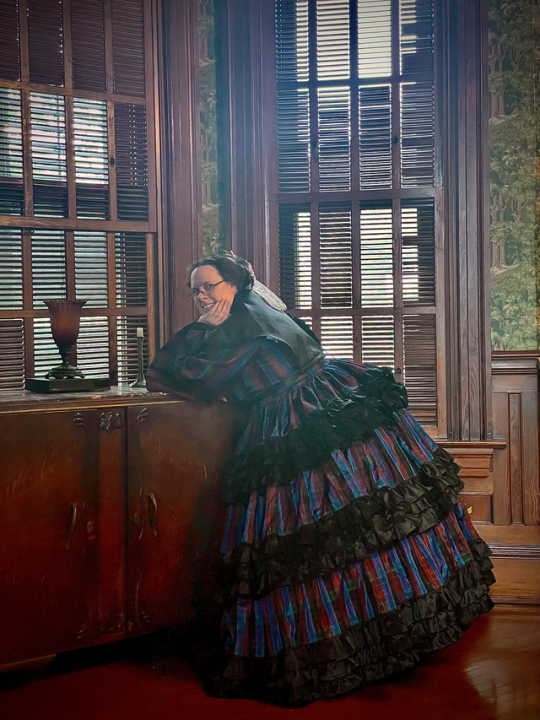
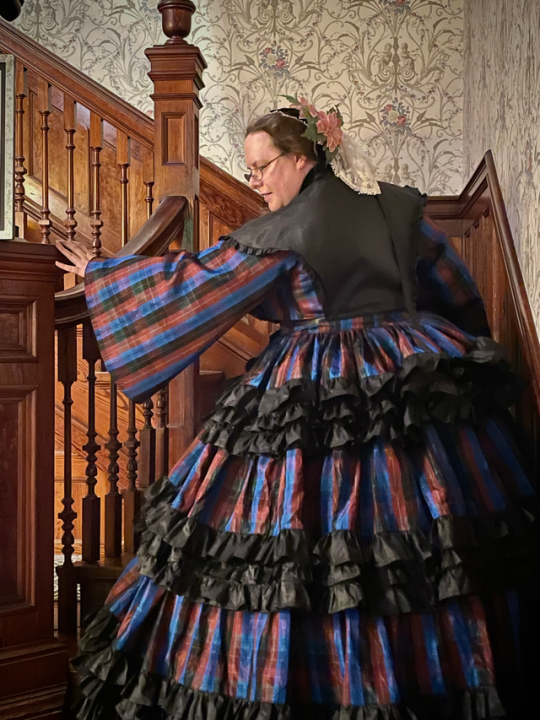
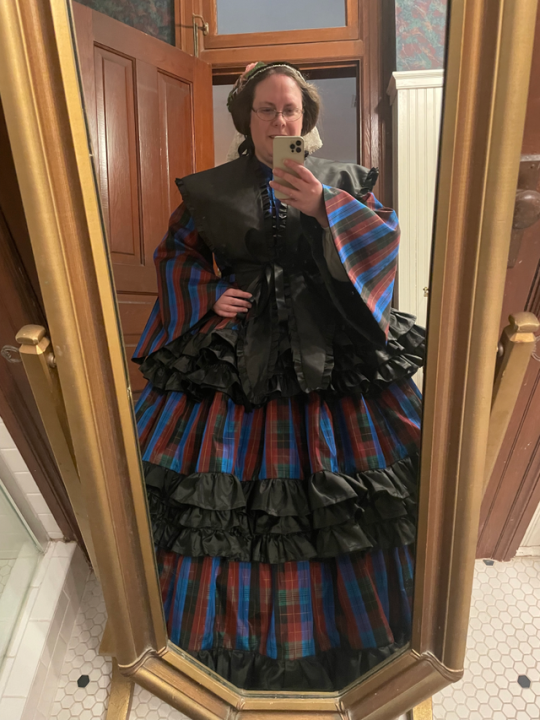
This project is finally finished! I started this dress back in July '24, thinking that I had plenty of time to finish it before my trip to Dickens on the Strand in December. Of course, I grossly underestimated my ability to get distracted, so I was, as is tradition, finishing this dress up in the hotel room the first night of the event. But hey, at least it was finished!
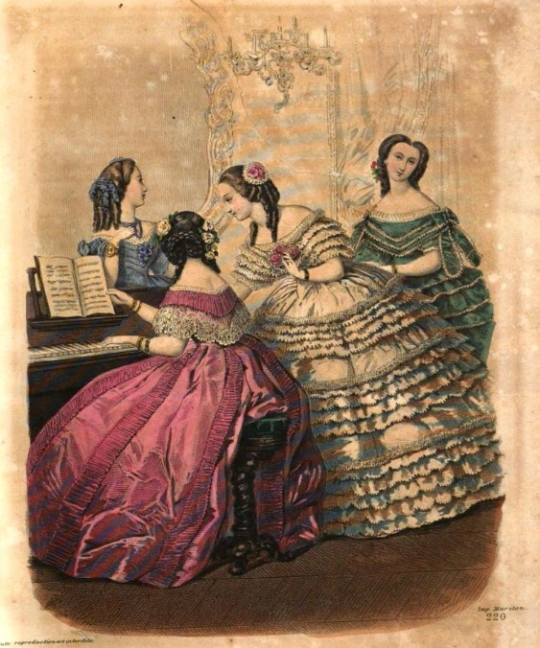
Things started with the skirt, which was based off several designs I kept seeing in 1850s fashion plates that have tiered skirts with ruffles on them. I had always slated that amazing plaid fabric for something mid-Victorian, and the ruffles seemed like a good way to accent such a busy fabric, and to help keep fabric usage down, as I only had 9 yards of the plaid.
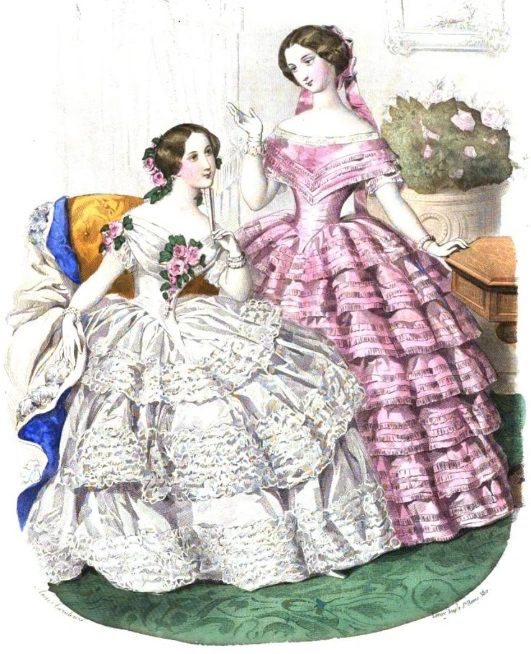
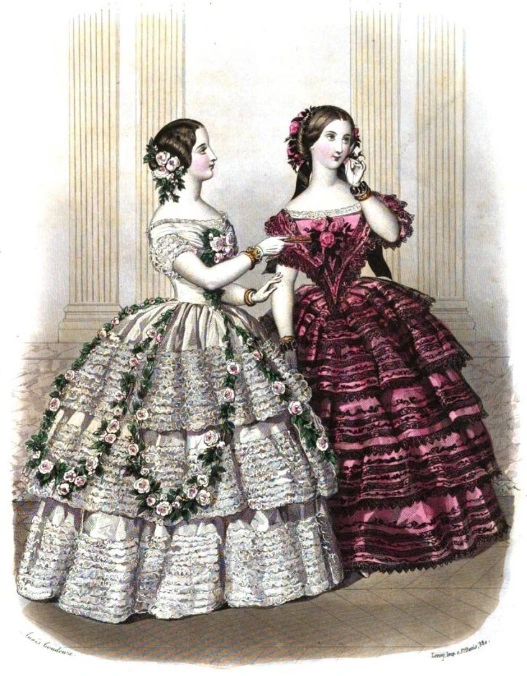
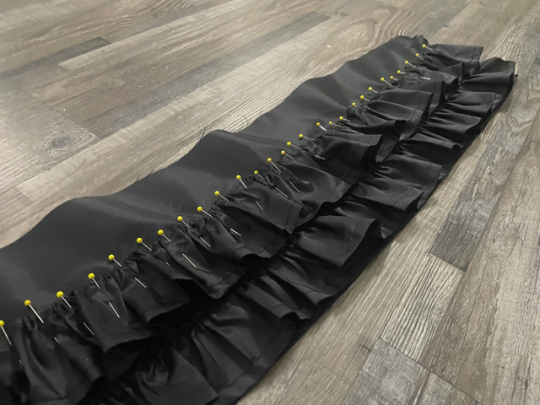
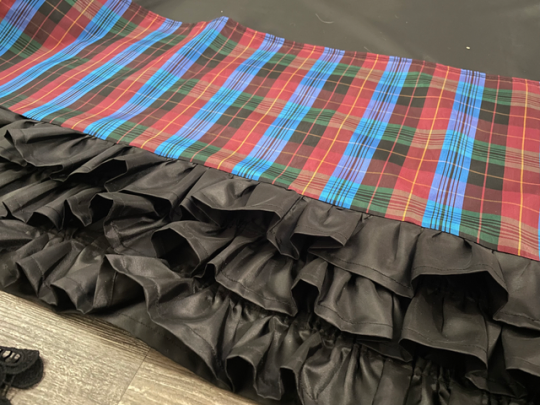
The ruffles were attached to a plain black panel, which was then attached to a plaid panel, which was gathered onto the skirt base, which was also made of plain black taffeta.
I hadn't decided on a bodice design when I first started, and when it came time to make it I was definitely in a time crunch, so it's pretty much a straight make of Truly Victorian's TV440. The front closes with hooks and thread bars, but I ended up making it slightly too small, which led to gapping over the bust. I didn't have time to fully address this before the event, so I made a fichu in black taffeta that I could wear to cover it.
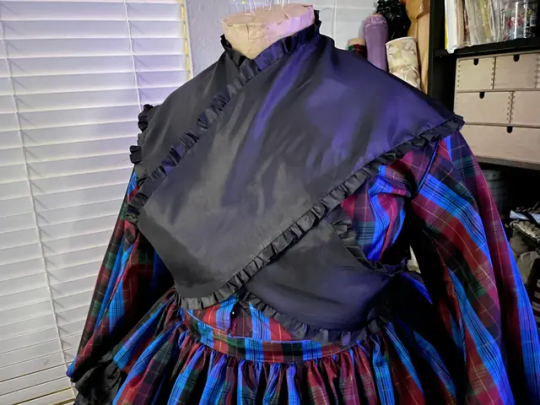
To make the fishu, I traced the back bodice pattern onto the fabric, then just drew in the tails in chalk. I mocked it up in cotton first, and then cut it out in taffeta. If I were to do it again, I would remember to put the taffeta on the bias so it would stretch over my bust correctly. The taffeta was also super slippery on top of the bodice, which was also taffeta, so even though I intended to wear it like a sontag, as seen above, I ended up wearing it with the tails down in front.
The undersleeves were finished in the hotel room just before my first event. You can't really see them in any of the pictures, but they definitely helped make the outfit feel complete, and I didn't have my naked forearms flapping around for all the world to see!
There's a much more in-depth writeup on my main costuming blog, including a lot of skirt math!
#sewing#costuming#finished project#historical costuming#1850s fashion#1850s dress#historical costume#historical fashion
113 notes
·
View notes
Text
Victorian painting of a 17th century scene, with excellent seasonal vibes

Laura Theresa Alma-Tadema (English, 1852-1909)
At the Doorway
334 notes
·
View notes
Text
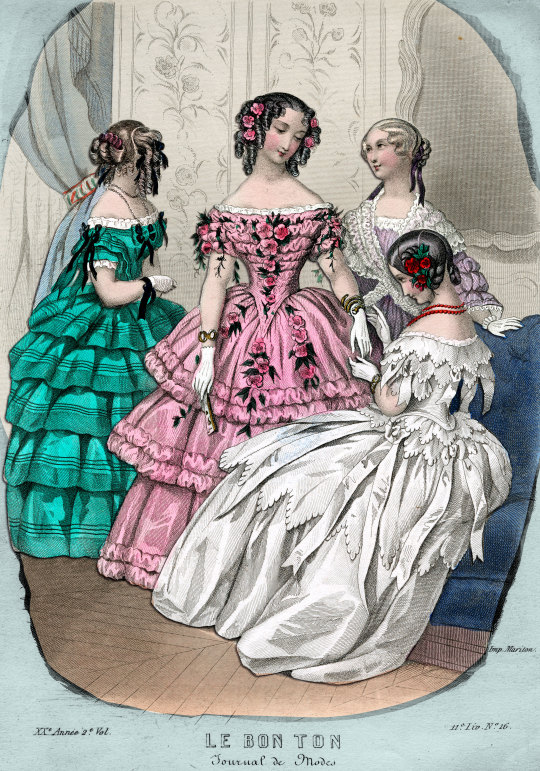
Le Bon Ton, Journal de modes. September 1854, v. 37, plate 7. Digital Collections of the Los Angeles Public Library
102 notes
·
View notes
Photo
Stripes, my beloved, I see you there.

Revue de la Mode, Gazette de la Famille, dimanche 26 septembre 1886, 15e Année, No. 769
Print maker: A. Chaillot; Printer: P. Faivre; Paris
Collection of the Rijksmuseum, Netherlands
Keep reading
84 notes
·
View notes
Text
Wake up babe a new open access review about Ice Age fashion just dropped.
Paleolithic eyed needles and the evolution of dress (Science Advances 28 June 2024)
This article uses the spread of bone awls and needles to trace the evolution of clothing from simple, minimally protective coverings to finely tailored, insulating garments across the geography of the Last Glacial Maximum. Not surprisingly, needle use is associated with cold climates and the need for warm, fitted clothing. But the wide variation in needle size, including very small ones for fine, delicate work, along with frequent discovery of shell and bone beads showing use wear consistent with rubbing against clothing, shows the evolution of clothing into dress. Bodily adornment transitioned to clothing to mark identity and status.

Fig. 4. Puncture marks consistent with leather hole punching on a bone fragment at Canyars, Catalonia, dated to 39,600 cal B.P. Scale bars, 1 cm. Photos: L. Doyon, F. d’Errico.

Fig. 5. Morphological variation in the size and shape of Late Pleistocene eyed needles. Scale bar, 1 cm. Modified from d’Errico et al.

Fig. 2. Nassarius kraussianu shell beads from Blombos Cave Still Bay layers, southern Africa, dated to approximately 73,000 to 70,000 years ago. Arrows indicate use-wear facets. Photos: F. d’Errico [modified after d’Errico et al.]
4K notes
·
View notes
Text
For those interested in Victorian menswear, be sure to check out The Gazette of Fashion and Cutting Room Companion. It was a 19th century periodical that is geared toward tailors and is focused almost exclusively on menswear. Every volume is stuffed full of patterns, and the articles talk about trends in cut, style, and color each season. It's a fantastic resource and almost no one knows about it.
I've included a link to one of them (1870), but there are multiple volumes available for free on Google Books.
Really says something about the dire state of offerings for men interested in sewing their own clothes that even searching things like "interesting men's clothing patterns" brings up articles with links to four or five whole websites that primarily offer admittedly nice but practically identical patterns for making button-ups and work pants and maybe a varsity/bomber jacket if you're lucky.
(Branching out into historical costuming for everyday wear is like your one shot at variation, and even then, the ratio of men's to women's patterns on every website is frustrating to say the least.)
Patternmakers as a trans man I am begging you. Give me a little more to work with here.
21K notes
·
View notes
Text
A New Crinoline and 1850s Petticoats
Finally getting around to posting about my new 1850s undies! I finished them last winter, but Life happened, so here I am, a year and a half later.
Anyway, I finished a new crinoline and basic cotton petticoat first. The crinoline was made by first making the lower section out of cotton muslin, and attaching twill tape at even intervals. I then made each bone individually, the casing made from twill tape, then the boning threaded through, and then the bone stitched closed at the needed circumference. I played around with the size of each bone before I stitched it to the tapes to get the overall shape that I wanted.
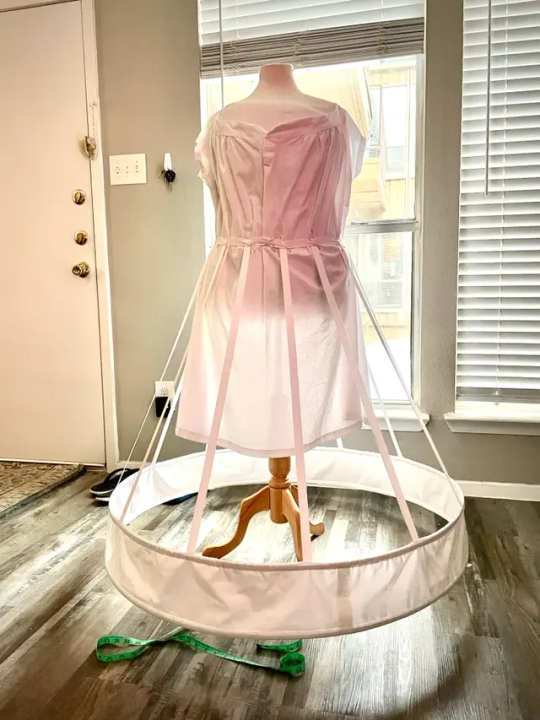
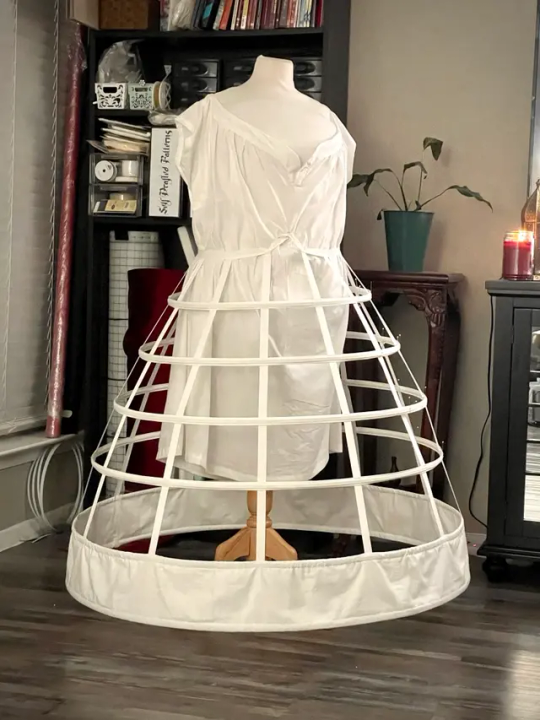
To go over it, I made my standard cotton petticoat with a single flounce.
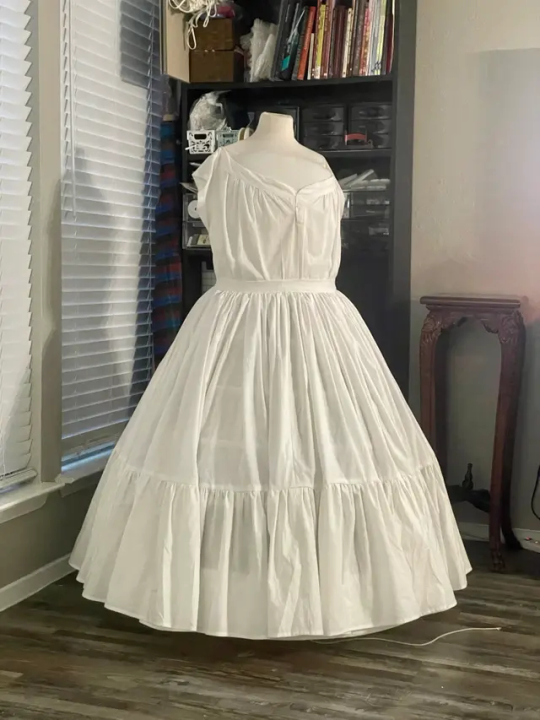
Then I actually got around to reading period descriptions and suggestions for petticoats in fashion magazines of the time, and found that they frequently recommended petticoats made of grosgrain fabric, with three flounces from the knee to the hem. So, I searched the internet and finally found some grosgrain fabric, which I had to order from Greece. (Spoiler alert - grosgrain and faille are pretty much indistinguishable, which I wish I'd known before because faille is way easier to find.)
Anyway, the construction of the petticoat was not difficult, but the grosgrain fabric was a nightmare. It frayed at the slightest touch, exploding into a thousand tiny shards. My serger was garbage and not working, so I used a side cutter presser foot instead, which sort of acts as a serger. It definitely helped, but by the time I discovered said presser foot, I was already so over this project that I threw it in the naughty corner for months because I couldn't stand to work on it anymore. I finally dug it out a few months later and finished it up.
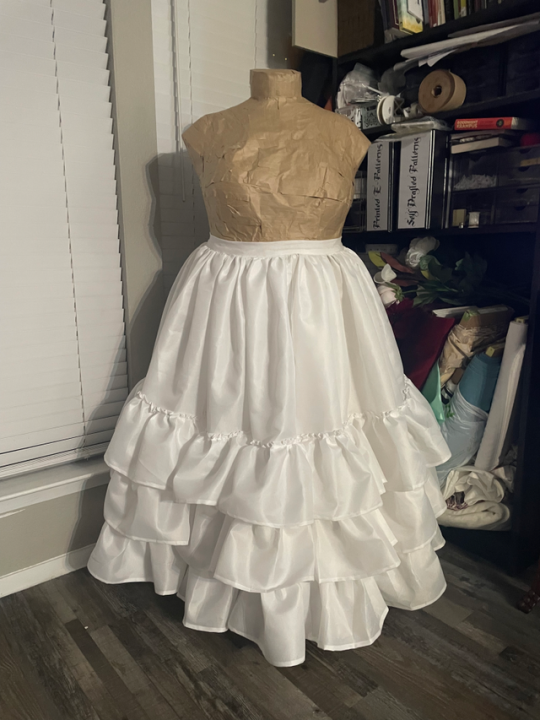
I have to say, it does give an enormous amount of floof, but I would never, ever recommend making one to anyone else. It was a nightmare from start to finish.
There's a more detailed writeup with more of my petticoat research and in-progress photos on my main blog, so please do check it out!
#1850s#costuming#finished project#sewing#historical costuming#nightmare project#never doing that again
25 notes
·
View notes
Text
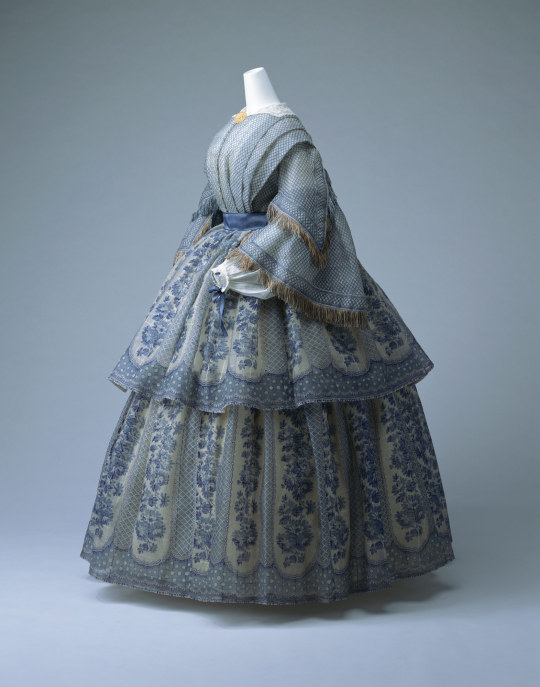
Day Dress
c.1855
England
This type of widely protruding skirt that appeared around the middle of the 19th century came to be known later under the name of the "crinoline style." As can be seen with this dress, large design motifs proved immensely effective on these voluminous skirts. The border pattern here is wood-block printed and repeats every 20.6 cm. Compared to small-scale designs, large patterns require a solid technique to avoid misalignment of the print colors. Considering that this mixed fabric of silk and wool is a material hard to print on, this dress with its bright and cheerful colors is a particularly fine example on how much cloth printing techniques had evolved.
The Kyoto Costume Institute
4K notes
·
View notes
Text
Hello, yes, it's me with three 1850s transformation gowns, a wrapper, and all the accessories for them, all needed just five months from now.
“How’s your WIP going?”

"Have you made any progress?”

“How close are you to being done?”

73K notes
·
View notes
Text
The stripes! Why are stripes always *so* good? ♥

Le Follet, 1855, No. 1971 : Chapeaux Mme Naudé (…), anonymous, after Anaïs Colin-Toudouze, 1855 (x)
61 notes
·
View notes
Photo
Hello, Stripes, you have my attention. ♥

La Mode: revue du monde élégant. Troisième année. Juillet. 1831. Paris. Pl. 166. Robes de Mousseline blanche et mousseline à raies brochées, façon de Melle Palmire. Coiffures de M. Hypolite — Bijoux de Chauffert, Palais royal. Bibliothèque nationale de France
297 notes
·
View notes
Text


I never did update when this got finished last summer, did I?
Happy with how it turned out, even if it does take some serious hairpin architecture to construct a bun that'll hold the hat steady - it's a little heavier (and a lot more ready to blow around in the wind) than anticipated.
4K notes
·
View notes