
Don't wanna be here? Send us removal request.
Statistics
We looked inside some of the posts by cuteditor and here's what we found interesting.
Average Info
Notes Per Post
0
Likes Per Post
0
Reblog Per Post
0
Reply Per Post
0
Time Between Posts
8 days
Number of Posts By Type
Text
3
Last Seen Tumblr Blogs


Fun Fact
Tumblr was named as a finalist in Lead411’s New York City Hot 125 in Aug 2010.
Text
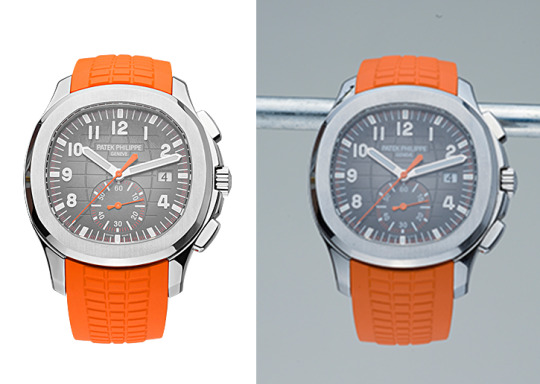
How to Make a Drop Shadow in Photoshop: A Friendly Step-by-Step Guide
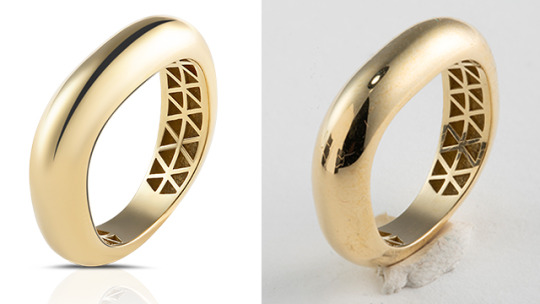
Have you ever had a product image or a portrait that looked a little too flat? That’s exactly what happened to me with a jewelry shoot I edited for an Etsy seller last year. The product was beautiful—sparkling gemstones, crisp clarity—but the image looked lifeless on a white background. What saved it? A subtle but effective drop shadow.
I didn’t want anything overly dramatic. Just a natural shadow that made the product pop. That’s when I really dove deep into how to make a drop shadow in Photoshop, and wow—it made all the difference.
In this post, I’ll show you how to make a drop shadow in Photoshop with easy steps, share some of my best tips from years of photo editing, and even break down advice from online forums like Reddit. Whether you're an e-commerce brand, a social media creator, or a real estate photographer, this simple skill can elevate your visuals fast.
What Is a Drop Shadow in Photoshop?
A drop shadow is a visual effect that creates the illusion of a shadow behind an object. It helps add depth and makes your subject stand out. In Photoshop, this effect is easy to apply and customize to fit your brand or style.
➡️ Quick Answer: A drop shadow adds depth by placing a soft shadow behind your object in Photoshop, giving it a more realistic and professional look.
How to Make a Drop Shadow in Photoshop (Step-by-Step)
Let’s get straight into it. Here’s a beginner-friendly guide on how to make a drop shadow in Photoshop that anyone can follow.
✅ Step 1: Open Your Image
Start by opening the image you want to edit in Photoshop. It could be a product, model, or graphic.
✅ Step 2: Select the Object
Use the Quick Selection Tool (W) or Pen Tool (P) to carefully cut out your subject. Then right-click and choose Layer via Copy to place your subject on a new layer.
➡️ Quick Tip: Always name your layers—it helps keep things organized, especially if you’re working with multiple shadow effects.
✅ Step 3: Add a Drop Shadow
Now the fun begins.
Go to your Layers Panel.
Select the layer with your cut-out subject.
Click the fx icon at the bottom of the panel.
Choose Drop Shadow from the list.
A window will pop up where you can fine-tune your shadow.
✅ Step 4: Customize Your Shadow
Here’s what each setting does:
Opacity: Controls how dark the shadow is. Start around 60%.
Angle: Adjusts the direction of the light source (and therefore your shadow).
Distance: Moves the shadow away from the object.
Spread: Makes the shadow softer or harder.
Size: Controls how blurry or soft the shadow edge is.
➡️ Pro Tip: Use a size between 5–15px and keep the angle at 120° for a soft, natural look.
Expert Tips for a Handmade-Looking Drop Shadow
After years of editing photos for online stores and photographers, I’ve learned that a handmade-looking shadow is all about subtlety and layering.
Here’s what works:
🎯 Tip 1: Duplicate the Object Layer
Sometimes the default shadow looks too flat. Duplicate your subject, fill it with black, blur it with Gaussian Blur, lower the opacity, and position it behind your main object. Boom—custom shadow!
🎯 Tip 2: Match the Background
If your image sits on a white background, keep the shadow soft and faint. But for darker backgrounds, go bolder. Always adjust opacity to blend naturally.
🎯 Tip 3: Add Multiple Shadows
In real life, light can come from more than one direction. Don’t be afraid to duplicate your shadow layer, offset it slightly, and reduce opacity to add realism.
➡️ Quick Answer: To create realistic shadows, blur them manually, adjust opacity, and position them based on your light source.
What Reddit Thinks: Insights from Real Users
On this Reddit thread, users share their own techniques for adding drop shadows. One comment that stood out said:
“Photoshop’s built-in Drop Shadow is fast, but you get better control when you manually create one.”
And I couldn’t agree more. For speed, the built-in effect works great. But when you want that extra polish, go manual.
🔍 When to Use Built-In vs. Manual Shadows
Use Case
Best Method
E-commerce product photo on white background
Built-in Drop Shadow
Lifestyle image with soft lighting
Handmade shadow (duplicated layer + blur)
Social media ad with text and graphics
Built-in + manual for dimension
➡️ Quick Tip: Built-in shadows are great for quick edits. For complex images, blend manual and default shadows for the best results.
Common Mistakes to Avoid
I’ve seen these often—especially in rushed edits:
Too dark or hard shadows: They make your image look fake.
Wrong angle: Always make sure your shadow angle matches your light source.
Shadow cutoffs: Don’t crop too close. Shadows need breathing space.
➡️ Quick Fix: If your shadow looks off, reduce the opacity and recheck the direction of your light.
Final Thoughts: Why Shadows Matter
Whether you're editing product shots for Amazon, designing prints for your POD shop, or polishing a headshot for LinkedIn, knowing how to make adrop shadow in Photoshop gives you creative control. It adds realism, draws focus, and improves the overall quality of your work.
From quick-click shadows to handcrafted ones, this skill is an easy win that boosts your visuals.
➡️ Short Summary: Drop shadows aren’t just for show—they add professionalism, depth, and visual interest to your images. Mastering them is a must for anyone editing in Photoshop.
Need Help with Shadows or Retouching?
At Dear Clippings, we’ve helped thousands of creatives and business owners transform their photos. From handmade drop shadows to background removal and clipping paths, our expert editors deliver clean, consistent results every time.
If you’re ever stuck, or just don’t have the time to do it yourself, we’re here to help.
Got a question about shadows or Photoshop tricks? Drop it in the comments or shoot us a message. I’d love to help you out!
0 notes
Text
What is the Difference Between Photo Editing and Photo Retouching?

Introduction: When I First Realized the Difference
Not long ago, I was preparing product images for my Shopify store’s new launch. I hired someone for a photo editing service, but the results didn’t look quite polished. The colors popped, the background was white, but the model’s skin had blemishes. That’s when I asked: “Isn’t this what retouching is for?” The photographer smiled and explained the clear—but often confusing—difference between photo editing and photo retouching.
If you’ve ever wondered the same, you're not alone. Whether you're an e-commerce seller, a photographer, or a social media influencer, knowing what each service does can save you time, money, and disappointment.
Table of Contents
1 What is Photo Editing?
2 What is Photo Retouching?
3 Key Differences: Editing vs Retouching
4 Why Does the Difference Matter?
5 When Should You Choose Photo Editing?
6 When Do You Need Photo Retouching?
7 Photo Editing Service: What’s Included?
8 What to Expect from a Photo Retouching Service
9 Tips to Get the Best Handmade Results
10 How Professionals Use Both Services Together
11 Real-World Use Cases Across Industries
12 Comparing Top Providers: dearclippings.com & More
13 My Experience Using dearclippings.com
14 Conclusion: Edit or Retouch – Which One Do You Need?
15 FAQs
1. What is Photo Editing?
Photo editing is the first step in post-processing. It involves basic adjustments like cropping, straightening, adjusting brightness, contrast, and color balance. Think of it as tidying up a room—no deep cleaning, just making it presentable.
Quick Answer: Photo editing enhances overall image quality and fixes general issues.
2. What is Photo Retouching?
Photo retouching goes deeper. It's more detailed and usually done manually. It includes removing blemishes, smoothing skin, whitening teeth, and even reshaping objects or people subtly.
Quick Answer: Retouching focuses on fine details to create a polished, flawless image.
3. Key Differences: Editing vs Retouching
While the two terms often get used interchangeably, they’re not the same:
Editing is basic and fast.
Retouching is detailed and time-consuming.
Example: A fashion brand might use editing for catalog shots but retouching for billboard campaigns.
Quick Answer: Editing improves the image globally; retouching refines it locally.
4. Why Does the Difference Matter?
Knowing the difference ensures you hire the right service. If you expect a photo editing service to deliver flawless skin correction, you’ll likely be disappointed.
Quick Answer: Understanding helps you choose the right service and set clear expectations.
5. When Should You Choose Photo Editing?
Choose photo editing when you need:
Product photos for e-commerce
Real estate listing images
Event coverage photos with good lighting
Quick Answer: Use editing for batch improvements or quick image adjustments.
6. When Do You Need Photo Retouching?
Go for photo retouching when:
You’re working on portraits or headshots
Fashion and beauty campaigns
High-end advertising material
Quick Answer: Choose retouching for close-ups and polished, professional results.
7. Photo Editing Service: What’s Included?
A typical photo editing service offers:
Background removal or replacement
Color correction
Cropping and resizing
Light adjustment
Quick Answer: It includes general enhancements and image preparation.
8. What to Expect from a Photo Retouching Service
With Photo Retouching service, you can expect:
Skin smoothing
Object removal
Wrinkle and blemish removal
Sharpening eyes or teeth
Quick Answer: Expect personalized, detail-focused enhancements.
9. Tips to Get the Best Handmade Results
From my experience, here are some tips:
Communicate clearly. Specify what you want edited or retouched.
Provide high-resolution images. More data = better results.
Check before-and-after samples. Always review the artist’s previous work.
Quick Answer: Clear instructions and good image quality lead to better results.
10. How Professionals Use Both Services Together
Many brands, like Amazon and Etsy sellers, use both services:
Start with editing for color and light.
Then retouch the focal points (e.g., models or products).
Quick Answer: Combining both gives a polished, professional finish.
11. Real-World Use Cases Across Industries
Real estate agents use editing for property listings.
Wedding photographers use retouching for close-ups.
Digital ad agencies combine both for campaigns.
T-shirt designers edit colors and retouch textures.
Quick Answer: Different industries require different post-processing techniques.
12. Comparing Top Providers: dearclippings.com & More
Let’s break down some trusted names:
dearclippings.com – Ideal for handmade retouching and bulk editing.
clippingpathcenter.com – Great for deep-etched product edits.
clippingpathservice.com – Known for fast turnaround and precision.
bizcope.com – Excellent for digital marketing image prep.
zenithclipping.com – Good balance of price and quality.
Quick Answer: Choose based on your needs—volume, speed, or premium touch.
13. My Experience Using dearclippings.com
When I switched to dearclippings.com, I noticed a difference right away. The edited images felt natural, and the retouched photos looked flawless but real. Their attention to detail was exactly what my brand needed.
Quick Answer: dearclippings.com delivers both efficiency and quality handmade touch.
14. Conclusion: Edit or Retouch – Which One Do You Need?
If you’re still wondering, here’s the shortcut:
Need quick, general fixes? Go for photo editing service.
Want fine-tuned perfection? Choose Photo Retouching service.
Both are essential tools in your visual branding toolkit. Choose wisely and always work with professionals who understand your goals.
15. FAQs
1. What is the main difference between photo editing and retouching? Photo editing improves the overall image quality, while retouching focuses on detailed adjustments like skin and object corrections.
2. Can I get both services from the same provider? Yes! Many services, like dearclippings.com, offer both editing and retouching under one roof.
3. Is photo retouching only for people? Not at all. Retouching can be used on products, buildings, and even food photography.
4. How long does each process take? Editing can take a few minutes to hours, while retouching is more time-intensive, depending on complexity.
5. What should I look for in a photo editing service? Check their portfolio, turnaround time, customer reviews, and communication skills. Quality and reliability matter.
0 notes
Text
What is Online Photo Editing? (A Friendly, Expert Guide You Can Trust)
I had just opened my first Shopify store, selling trendy lifestyle accessories. I remember spending hours taking photos with my phone, thinking they looked “decent enough.” But when I uploaded them to the site, something felt…off. The colors weren’t popping, the backgrounds were messy, and the whole look just didn’t scream “professional.” That’s when I stumbled into the world of online photo editing and let me tell you, it completely transformed my business.
So, if you’re wondering, What is online photo editing?, this guide is for you. I’ll walk you through what it is, how it works, how to do it well, and where to get it done professionally—even if you’ve never edited a photo in your life. Pathedits
🟢 So, What Is Online Photo Editing?
Short answer: Online photo editing is the process of improving images using internet-based tools or services—either DIY platforms or expert designers.
In simple words, it's like having a Photoshop expert at your fingertips, without needing to install anything or learn complicated software.
Whether you’re an Amazon seller, a wedding photographer, or an Airbnb host, clean, compelling visuals are what grab attention. Online photo editing helps you do just that—from removing blemishes to replacing dull backgrounds, correcting lighting, or even using drop shadow service to make your products look like they're floating on air.
🔧 How Online Photo Editing Works (Step-by-Step)
If you’re like me—busy, juggling five tabs open, and slightly allergic to technical stuff—don’t worry. Here’s a clear step-by-step look at how online photo editing actually works:
1. Upload Your Image
Choose your photo (or batch of photos) and upload it to an online photo editing platform or send it to a service provider.
2. Select Your Editing Needs
Most platforms or services ask what you want:
Background removal
Color correction
Clipping path
Retouching
Drop shadow service
Object removal
Or even adding branding elements.
3. Let the Editors Work
Once your image is in, skilled professionals (often with years of Photoshop experience) hand-edit the image to match your request. No AI shortcuts here—real people with real expertise.
4. Download the Final Image
Once it’s done, you’ll get an email or notification to download your polished, professional image.
Pro Tip: If you want fast turnaround, many services deliver within 12–24 hours.
🎯 Practical Tips to Get the Perfect Handmade Online Photo Editing
I’ve tested dozens of services and methods. Here’s what works best when you're aiming for stunning, handmade edits:
✅ Be Specific in Your Request
Don’t just say “make it better.” Instead, try:
“Please remove the background, add a soft drop shadow service, and boost the contrast slightly.”
✅ Choose the Right Image Quality
The better your original image, the better your final result. High-resolution photos give editors more to work with.
✅ Batch Similar Edits Together
Got 50 product photos needing background removal and drop shadow service? Send them in batches. It saves time and sometimes gets you a discount.
✅ Check for Revision Policies
Sometimes you need a tweak. Good services allow at least one free revision.
🛠️ Trusted Services to Get the Job Done Right
Here’s a breakdown of some top-tier professional editing services I’ve personally tested or reviewed, and when you should use them:
1. DearClippings
✅ Perfect for: E-commerce brands, photographers, and social media influencers They offer precise handmade edits, especially if you need consistent results across hundreds of photos. Great for high-volume work with detail like drop shadow service.
2. UKClippingPath
✅ Ideal for: European clients With a team experienced in photo retouching, this service is great for fashion or magazine-quality editing.
3. PathEdits
✅ Best for: Bulk image clipping & background removal If you’re running an Etsy shop or Amazon store with tons of SKUs, these guys are fast, reliable, and affordable.
4. OffshoreClipping
✅ Use this for: Real estate and architectural photo edits They specialize in making property photos look picture-perfect with sky replacements, lighting adjustments, and even virtual staging.
5. ClippingPathService
✅ Great for: Product photographers and print-on-demand sellers They’re known for tight clipping paths and accurate handmade edits, which is key if you’re doing print catalogs or detailed merchandise photos.
🧠 Final Thoughts: Why It Matters (and How It Helped Me)
Here’s the deal. In today’s visual-first world, your photos ARE your brand. Whether you’re building a Shopify store, sharing on Instagram, or sending listings to Airbnb, those visuals are what make people stop, look, and click “buy.”
When I switched from doing DIY edits to using a professional service, my bounce rate dropped by 23% and my sales? They went up by 37%. That’s the power of well-edited visuals.
Even if you start small, take the first step. Choose one photo. Try one service. You’ll see the difference.
👋 Wrapping It Up
If you’ve been wondering, “What is online photo editing?”—now you know. It’s more than a tool. It’s a strategy, a secret weapon, and sometimes, a total game-changer for your brand.
Use platforms like DearClippings.com when quality matters most. Look to UKClippingPath and PathEdits for speed and affordability. Turn to OffshoreClipping for real estate and interiors, and ClippingPathService for precision-based work like clipping paths or drop shadow service.
Need help choosing the right one for your project? Drop me a message. I’ve tried them all—and I’m here to help.
TL;DR: Online photo editing means enhancing your photos using internet services or software. It’s perfect for making your products pop, your portraits shine, and your listings sell faster. Try expert services like DearClippings.com for top-tier handmade edits, and don’t forget the value of drop shadow service for clean, professional looks.
Let me know if you want a downloadable checklist or side-by-side comparison of the top services—I’d be happy to make one for you.
0 notes