
"You develop an instant global consciousness, a people orientation, an intense dissatisfaction with the state of the world and a compulsion to do something about it. From out there on the moon, international politics look so petty. You want to grab a politician by the scruff of the neck and drag him a quarter of a million miles out and say, 'Look at that, you son of a bitch.'" -Apollo 14 astronaut Edgar Mitchell
Don't wanna be here? Send us removal request.
Statistics
We looked inside some of the posts by dinomightofficial and here's what we found interesting.
Average Info
Notes Per Post
7
Likes Per Post
7
Reblog Per Post
0
Reply Per Post
0
Time Between Posts
21 days
Number of Posts By Type
Text
17
Last Seen Tumblr Blogs


Fun Fact
Users from the US are the majority of Tumblr visitors.
Text
Industrial Design - Day 1.
13/08/2020
Design brief:
Create a product of your choice.
The design of the product must consist of:
- Rendering of 1 page
- Sketches of 2 pages
- Illustration of product being used
- Landing Page on personal Website
Inspiration:
- Why do you want to design this thing?
- How do you want people to feel when they use your product?
- How will the material inspire the form?
- MATERIALS?
- How is the essence of the design maintained throughout the process?
Don’t memo ideas, Sketch it!
1 note
·
View note
Text
Studio VI - Index
29/10/2019
COLLABORATION WITH RUSH:
Understanding RUSH
Creative Design Planning
The Lotus Blossom Exercise
Presentation | Scale Mock Up | Integration
Iteration 1.0
Iteration 1.6
BECOMING FLIP MATRIX:
Presentation to RUSH and its consequences.
Feedback plan and next steps
Prototyping Mechanism
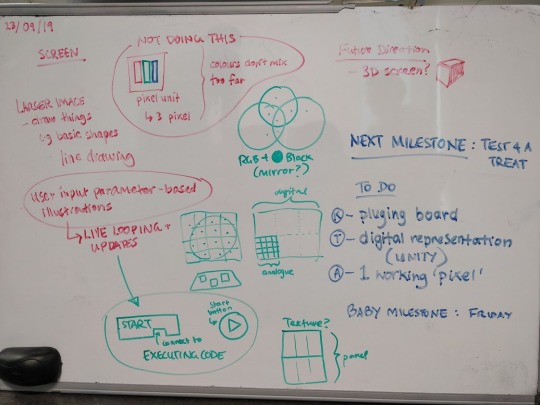
Test for a Treat / Future Direction
Iteration 2
The Motor Dillema
Iteration 3 - Incomplete from here onwards
Final Construction Begins
Final Construction Continues
Cradle Assembly and Finishing Final Construction
FLIP MATRIX Reflection and Final Outcome
0 notes
Text
FLIP MATRIX Reflection and Final Outcome
29/10/2019
Overall I am very proud of what we were able to achieve in such a short time space considering that we only diverged from RUSH Digital into what is now known as Flip Matrix at around week 7-8. In that short time span our group work proved to be admirable, efficient and effective. We were able to look into many precedents that aided in the final product and is something that I believe we all feel proud to present to the public. Though as the creators of the project we understand the most that there are many many things that we wish could have turned out better and or had initially a different purpose than to what it turned out to be. We were able to compromise in the most sensible ways and trouble shoot the many issues we had to encounter throughout the production.
Though I was not very pleased with the outcomes of collaborating with RUSH Digital as they were very unresponsive, lacked in feedback and did not seem to fully understand what THEY wanted from us. However, that being said I agree with my group that if it hadn’t been for the experiences and things we had researched whilst with RUSH that we would not have realized Flip Matrix as a project that stands now.
As my contributions to the group has primarily been physical, I have been somewhat absent in the coding side of things in which I have always had a keen interest to learn and upskill in. However, I understand that it was something we could probably ill afford for the limited time that we had left and that my skills were best utilized in doing what I am good at which is fabrication and testing. If were to be involved in coding our progress would have most likely slowed as I would have needed to learn too many things for anything to be done efficiently.
I also understand that Flip Matrix is a project with a lot of potential and the larger overarching concept is much bigger than what we have created and that we ended up with is merely a proof of concept that could be adapted and worked on further to realize its true potential to excite students to pursue STEAM education.
0 notes
Text
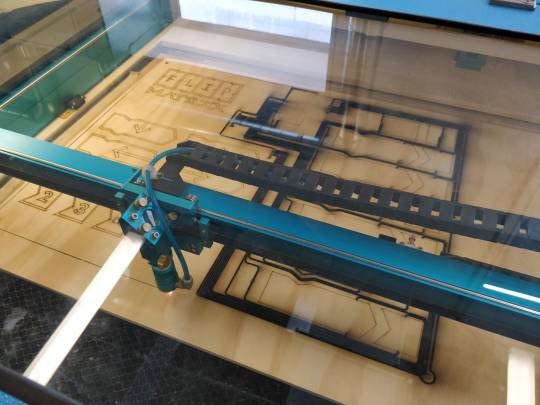
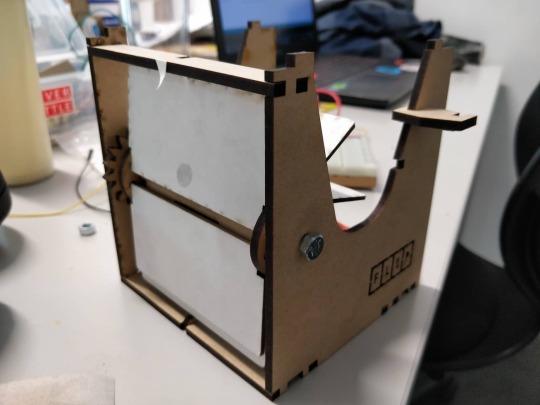
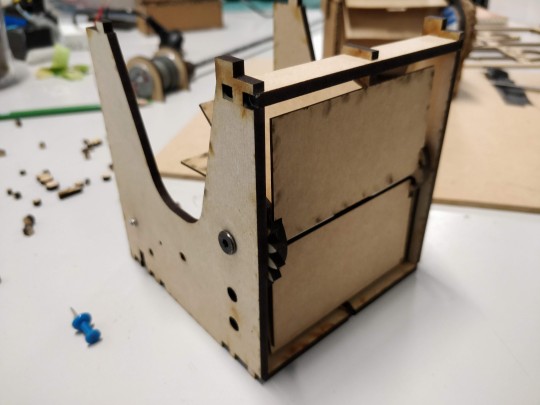
Cradle Assembly and Finishing Final Construction
21/10/2019
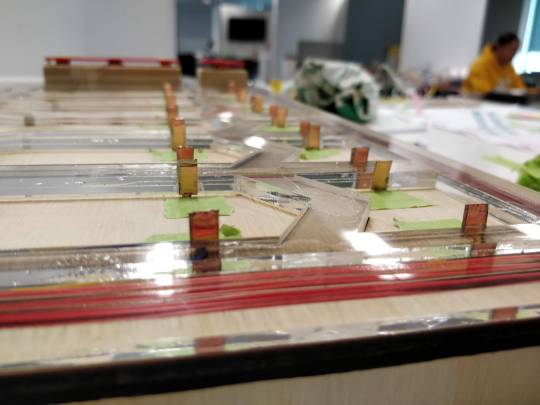
We tested the laser engraving onto the acrylic as we had initially hoped to do, however it turned out that the engravings became opaque and even with a heatgun it did not make the engravings any more transparent. This resulted in us having to engrave it on the plywood instead as, though the opaque textured wire lines looked cool in their own way, it was not what we were going for. Furthermore, we found that there was no reason to go through all this effort to make the wires visibile if they weren’t clear through the acrylic.


Though that being said, engraving the same pattern onto plywood was no easy feat either as we encountered that the low concentration deep cutting laser burnt too much of the wood thus caused a lot of the lines that were too close to each other to merge and become one large one which was less than ideal. So we after some further testing on the plywood we had to go back to the fusion file and make the gaps between each wire a further millimeter wider to make sure the burn doesn’t merge into one.
Laser cutting the Cradle:
As time was running by fast and with only a week left to complete the project we had to cram down a lot of the things that needed to be done. Talia came up with this efficient way of delegating tasks and clearly display what needed to be done so that the project would be completed in time in the most efficient way possible.

Soldering and assembly:
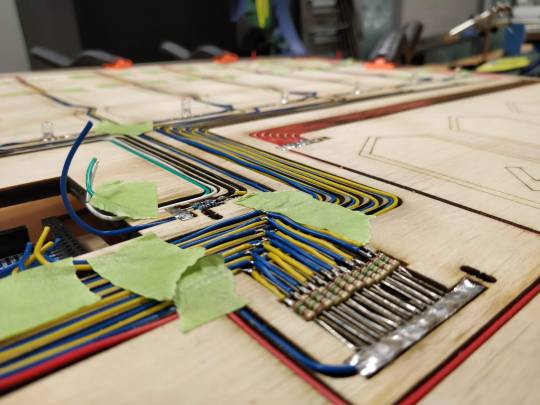
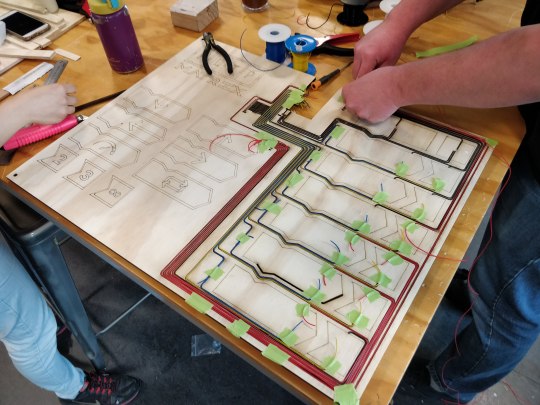
Assembling Box together:
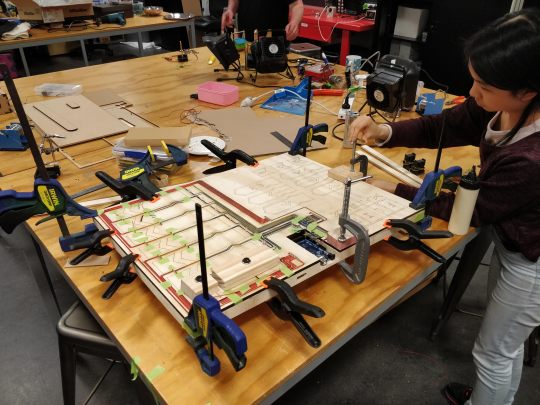
Testing:
Applying Contacts.
One thing we realized after it was too late was that the cradle slots were too snug with the coding blocks which was a nice and tactile feeling however, it left very little room for the contacts to bend in their intended way. Thus resulting to have to compromise and use a single layer contact instead of the bent method we took inspiration from a powered hand drill battery charger. Ideally, the contacts SHOULD have felt much more smoother and easier to use but it came too late and for the compromise we had to do I think we couldn’t have done too much to alleviate this issue.
THE FINAL FINISH:

1 note
·
View note
Text
Interaction and Play Index
20/10/2019
Aotea Square
Developing an Idea
Instrument Playtest
Prototyping and Sound
User Profile and Prototype Planning
Prototyping and Playtesting
Diverging Ideas
0 notes
Text
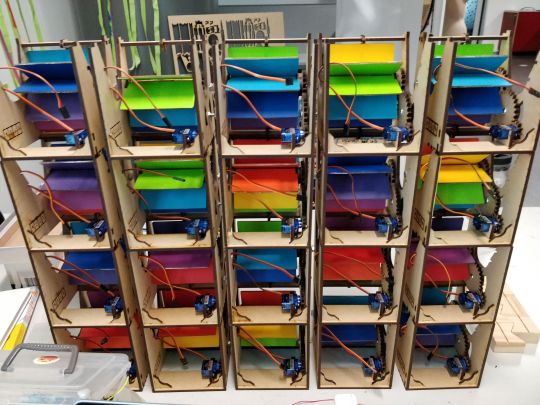
Final Construction Continues
18/10/2019
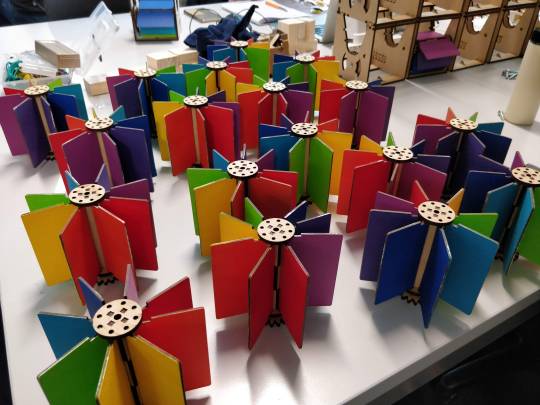
PAINTING THE PANELS AND ASSEMBLING THE ‘PIXELS’:
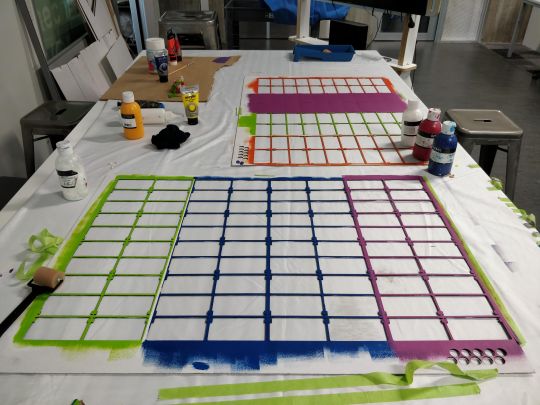
Talia helped painting the panels but from then on it was just me assembling assembling assembling, slaving away.

This is a little tool I made so that assembling the panels is much easier, this is a tool I realized I had to make whilst making the previous iterations and noticed how annoying it would be to make all 20 without this tool

Talia had been working on the code for a long time as it is a big undertaking, whilst I assembled, she worked on the code opposite to me and you can see as I progress with assembly how much coding took a toll on her.
@taliabct BEFORE CODING:
@taliabct AFTER CODING:
FINISHED ASSEMBLY OF ‘PIXELS’:
@kalebuchanan DEBUGGING HIS CODE:

TESTING THE CRADLE CONTACT METHODS:

Taking the coding block contact method inspiration from this charging dock of the powered hand drills.
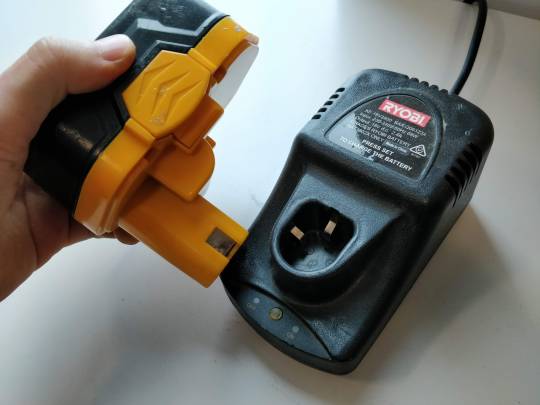
Testing out a similar contact method


TESTING THE ‘PIXELS’:
CURRENT CRADLE DESIGN:
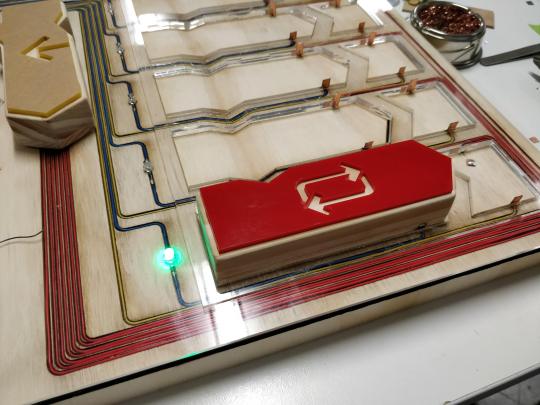
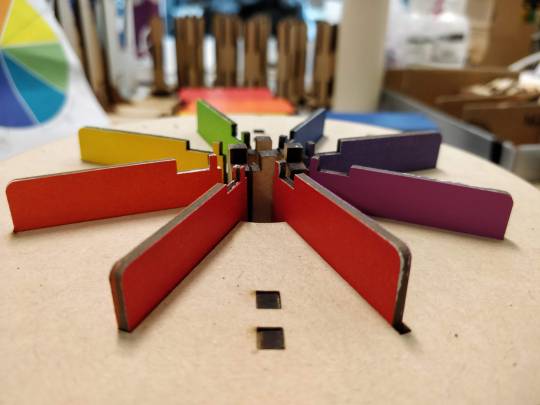
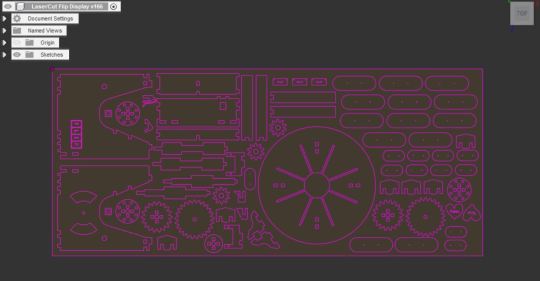
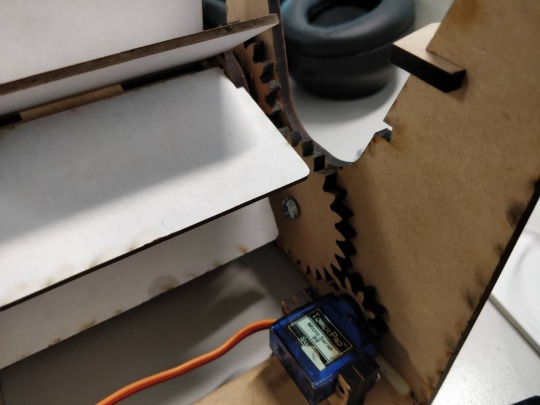
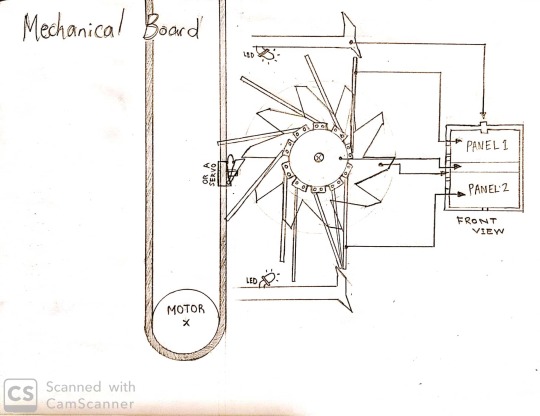
For the cradle design I suggest we use sort of like an ‘open back’ design sort of like how a mechanical watch may exhibit their inner workings of how they work with a glass case back or like how a PC case exhibits its inner components to display. Not only was this an aesthetic design decision when I had proposed it to the team but also a thematic one as it reveals some of the STEAM concepts to the user allowing to have a better understanding of the technologies that power Flip Matrix making it more down to earth and approachable. This will be done through the use of a clear acrylic covering the exposed wires resting on a wood grain textured surface which will most probably be plywood.
Suggested wiring method:

Kale’s breadboard Fritzing schematic for Flip Matrix

Cradle outlined up on Fusion 360

3D model and simulation of the cradle created by Talia

1 note
·
View note
Text
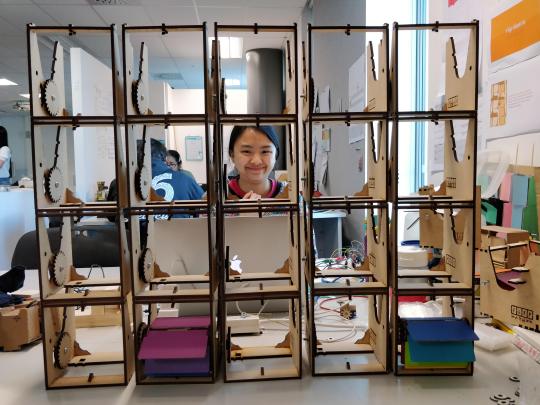
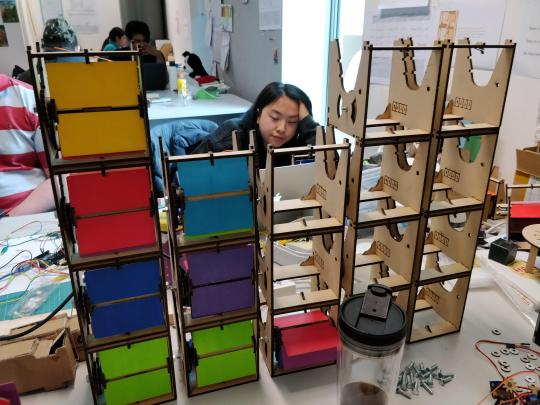
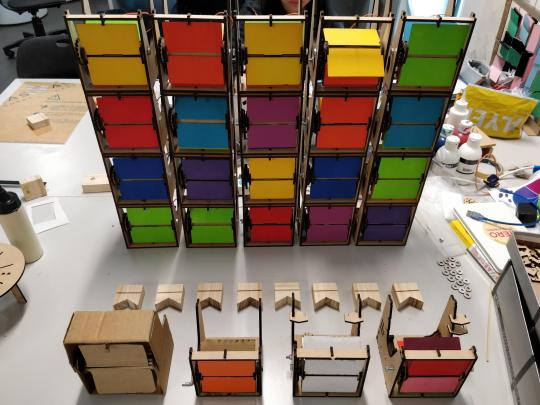
Final Construction Begins
14/10/2019
There isn’t too much to say about this part of the production process as most of the testing for creating the flip matrix display has been finished and finalized so it has been mostly DOING rather than TESTING.
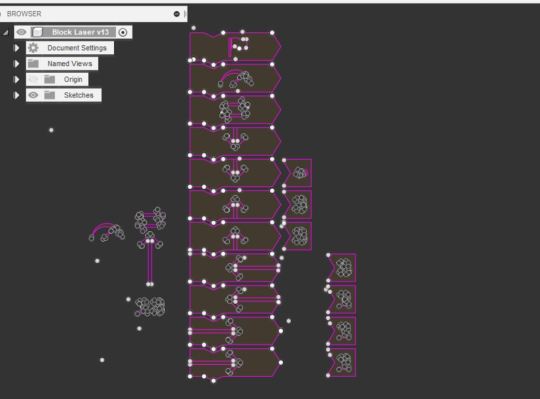
The first test print file of the flip panels. I had crerated a seperate file for making sure that everything prints out just fine and since this is the final iteration, this is just to make sure that I hadn’t made any mistakes from the previous iteration through to the latest one. After this print I made sure that everything is okay before I print out the rest of the 19 copies of the same thing.
Panels for the flip panel laser cutting file

Acrylic pieces file to laser cut
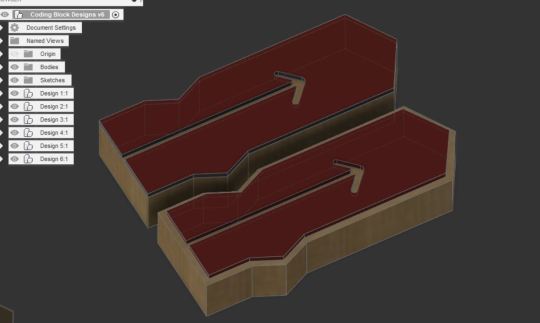
Block model I created. I then used this reference image to go around and ask people which version they preferred aesthetically. Almost everyone said that they preferred the bottom one and so that is the design we went with.
Mass Laser cutting:

All the individual pieces:
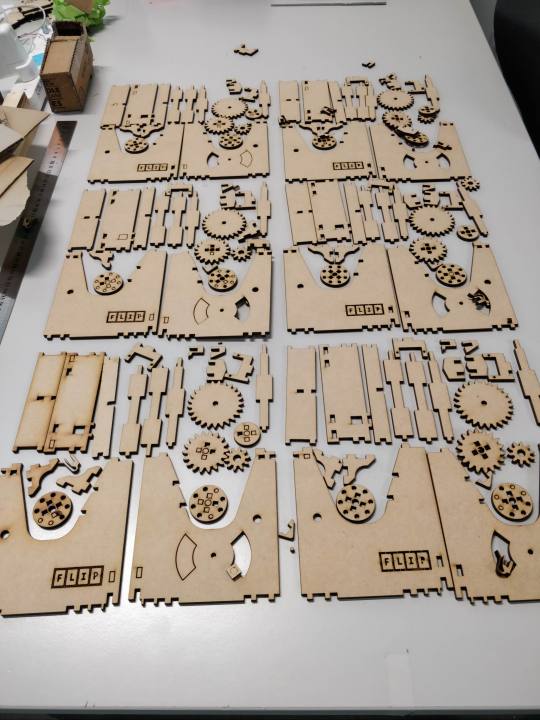

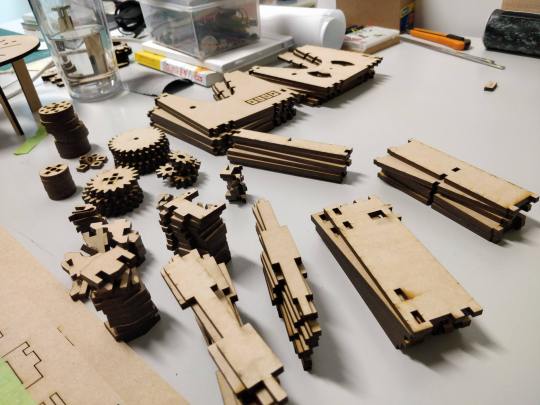
All the panels cut up and stacked on top of each other:

Getting the panels ready to paint. Though we had considered using alternative materials for the panels and or different finishings/coatings. The limited time frame we had left refrained us from doing proper testings of such finishings. We considered laminate, spray painting, recycled materials and or other materials for various reasons. However, one of the only criteria’s for the panels that we had was that the material had to be capable of creating that synonymous click clack sound of a conventional split flap display as well as having a uniform even finish. With the few materials that I did test with, they either was a costly option we could ill afford at this time in the semester (Our spending so far had already reached around $330 dollars from our initial estimated budget of around $250) and or the sound was muffled when the finish was applied.

I was also in charge of making the coding blocks themselves. For this we chose to use pine wood as it a soft wood grain. From Bunnings we picked out the straightest and flattest pieces we could find but even then overnight all the wood warped as moisture and temperature changed the shape and properties. So I had to do A LOT of regluing, squaring off and overall making sure that the stock pieces were as clean to work with as possible which may not look like much of a change from but it took a hell of a lot of time to get that right.
1 note
·
View note
Text
Diverging Ideas - A Reflection Blog
10/10/2019
Though our group work had led us together in the same path for about 99 percent of the journey I decided to branch off and propose Musical Chairs through my own interpretation. There are several reasons why.
Nearing the end of the projects development I had noticed a stagnant effort to continue exploring new ideas and themes that could benefit our project goals. From discussing with the group it came across to me that there was very little will to redesign key elements of the project. Or I may be just misinterpreting them, regardless I think that the rest of the group was not that keen to pick up on the ideas/feedback that the playtesters provided us with. Though I did attempt to sway them otherwise in the end I decided to pursue the idea on my own in time for proposing the project idea for final submission. If the final submission was still quite a time away I would not have pursued my own interpretation of the idea and have stuck with group decisions but since it is so close to the end I decided to do it.
I feel that the memo that Interaction and Play is merely a 15 point paper has been a stain on our group effort for a vast majority of the project. I personally enjoy physically making, testing and wiring things up to see it working with actual participants. I also don’t think that constantly reminding everone in class that it’s “merely a 15 point paper” sets a stage that people shouldn’t put in A LOT of effort and so that is what we ended up picking up on and not actually going full on and making test prototypes. I wish this was not the case and that we as a group had a high ambition. This is also a part of the reason why I decided to pursue my own interpretation of our project.
0 notes
Text
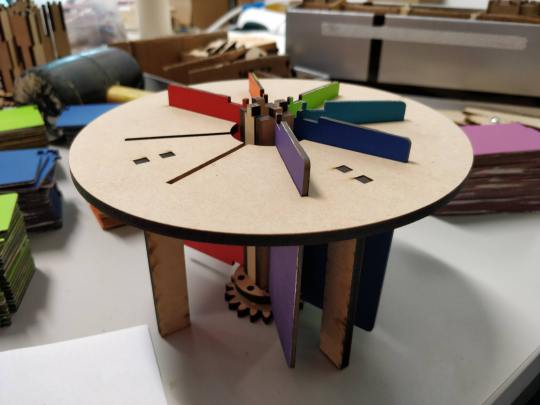
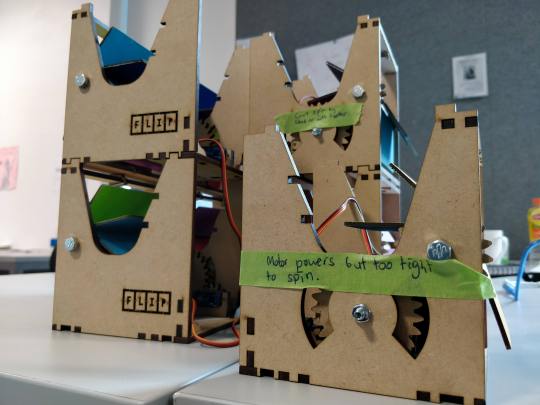
Iteration 3
07/10/2019
This iteration saw some improvements from the previous design in that there now was adjustments to the fittings between parts, the servo now had a dedicated spot to sit on and that it would be able to slot next to other panels with dividers in between. One thing that I had realized that had been really annoying to make these panels was that the laser cutting machine has a blade length. I think I just assumed that since it is cutting with light (which in itself is kind of a crazy concept to wrap your mind around) still has to cut off some amount of material for it to cut cleanly through. This tiny amount of material (for the thickness of our material which is 4mm MDF) seemed to shave off around 0.3mm off of every side of each piece. This tiny difference seemed to make the huge difference when assembling the pieces together as the tiniest gap would make every other piece fit loosely rather than a friction fit. From making lots of iterations I have learnt a lot about assembly and laser cutting techniques and specifications and conundrums that I have to keep in mind when using this method in the future.

The mechanism in which it operates is rather quite simple. One thing that I could potentially change though I don’t think it would make much difference is the teeth count of the spur gears as a higher teeth count from what I have looked up increases reliability and meshing of the gears. However, from testing these mechanisms that I had laser cut thus far seemed to work just fine. Though it is something to keep in mind if we were to create a much larger scale flip display for the greater concept. Another issue I had was that sometimes the gears were difficult to rotate, though just simply running them for a while would wear them out and over time smoothen out any rough edges or faces that it had thus making the operation much smoother.
This is what the construction of iteration 3 looks like though the top piece at which a piece of paper is currently the place holder never seems to quite work out as hoped as that mechanism seems to be a very tight, precise specification and without a complient mechanism that can bend, hold and stop the panels at will, I will need to find another way to resolve that physical limitation.
Kale had been testing the coding block resistances to get a reliable output from Arduino to send to Unity. This is a rough but very similar set up we would be using for the actual build
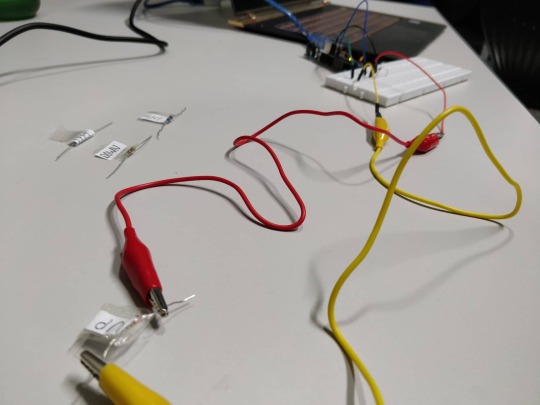
Arduino code showing the output of the received block/resistor:

In the mean time Talia had been working on how the coding blocks would actually look and feel. Though we had been at the precedents together and design inspirations I suggested using acrylic on top of the wooden blocks as a design aesthetic. This is something that may later on inspire the design of the cradles.

Design iterations for the acrylic in which Talia had been working on:


1 note
·
View note
Text
The Motor Dillema
07/10/2019
Our biggest limitation for building a big scale electromechanical display is budget. We REALLY want to build a large display, it would look the coolest by far and make the whole project seem so much more breathtaking. However, as per usual, the grandiose scale is always slightly out of reach due to the resources available to us and so once again we are limited and forced to compensate.
The motor dillema was that we had to choose from three different motor options being: Stepper motor, Standard Servo and Continuous Servo. To get a good a collective agreement on where we want to spend our money/convenience I put together the pros and cons of each option as shown below:
Stepper motor
Pros:
Cheap (around 3 - 5 dollars)
Continuous rotation
Accurate with angles
Cons:
Difficult to code (Compared to other methods)
I have absolutely no idea how its going to communicate to unity
Wiring issues, requires 4 pin connections, don’t know how to have 25 of them run through one arduino.
Slow rotation (Suitable if flip display has 20+ panels. Since we only have 8 it is too slow)
Standard Servo Motor (90 Degree)
Pros:
Cheapish (around 5 dollars)
Easy to connect / code and communicate to unity
Fast movement
Cons:
Requires ratchet gear for more than 180 degree turn
Ratchet gear increases part count and requires spring / specific tolerances
No full rotation
Continuous Servo Motor (360 Degree)
Pros:
Easy to connect
Fast movement
Continuous rotation
Cons:
A bit more difficult to code than the standard servo motor
Expensive (around 10 dollars)
In the end we decided to go with the continuous servo as that best suited our needs. I think if we had concretely settled on our idea a lot sooner or have not pursued to work with RUSH then we would have had time to secure funding for a larger scale project able to use a wider range of materials and hardware. This in turn would have created a much more robust project overall.
1 note
·
View note
Text
Test for a Treat / Future Direction
02/10/2019
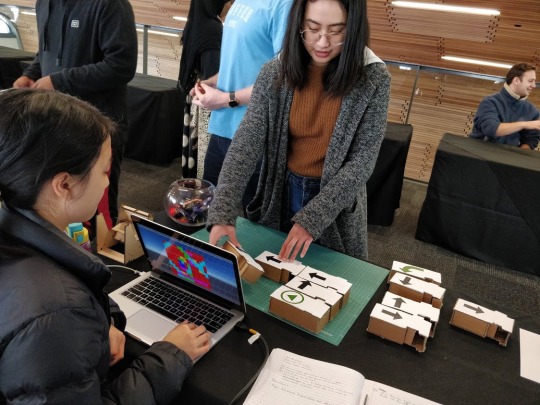
We had the opportunity to part-take in a public user testing event known as ‘test for a treat’. For this, people are welcomed to test out projects in progress for a free treat thus giving us valuable feedback.
Our project was nowhere near polished nor fully functional so we had to act as the computers for the test which was fine as it was still able to get the experience across to the user.
For the playtest Talia acted as the computer that read the sequence of codes in which the output was displayed onto a TV screen next to us. Kale had produced the coding blocks and I had been developing the electromechanical display and so we couldn’t quite compute our prototypes ourselves quite yet.
It was really interesting to see how people interacted the blocks and we realized that we still had a lot of work to do in terms of design languages.
One thing people constantly seemed to do is connect them side to side (which they were not designed to fit like that). As far as the block design is concerned they need to be designed so that you ‘physically’ can’t connect them in that fashion. Alterantively we could provide them with smaller blocks that are meant to fit to the bigger blocks side to side which could act as ‘add ons’ to the bigger blocks, sort of like giving it an extra ability.
This is the questionnaire the participants had to answer during each visit. We decided to keep the questions as short and concise as we could and make the experience quick and easy.

Below are the following raw feedback that we had received with an overall positive response to the testing that had been conducted.


Though we didn’t get as many play-testers as we had hoped I think it wasn’t too bad considering that these playtesters weren’t familiar with the BCT studio environment and the sorts of work that we do everyday. Furthermore, it was atleast more than five people which is a good number to reach if you plan on testing often. This is because of my experiences working with RUSH digital and their user testing knowledge that after around five people the general answers level out and that if you test often, then five is a good number to strive for, for each test.
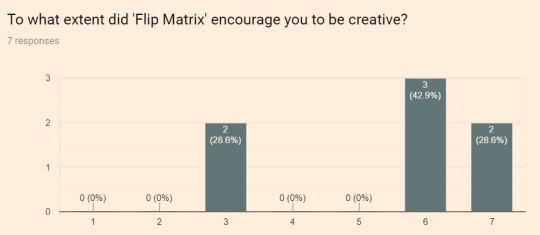
In terms of the actual responses themselves, I think there still some people that were quite confused about the setup and how they connect visually/physically but that’s okay as there actions told us how to better improve the designs. The overall answers proved that our current iteration is succeeding in our primary objectives to create excitement for the STEAM field.
I think once we create more options in the coding blocks to allow for more complicated coding/outputs then that would incentivize people to feel more creative.
1 note
·
View note
Text
Iteration 2
01/10/2019
Below shows a rudimentary version of our idea that we had initially thought of before we fully settled on the current version.

Originally we had planned for the idea of each player placing a ‘pixel’ onto the collection of pixels onto the wall thus leaving their mark on the display. However, as discussions and ideas developed we moved away from that and decided to have a somewhat standard electromechanical displays that show simple colors. Though the colours themselves don’t necessarily symbolize anything within STEAM, they were instead inspired by the precedents of other electromechanical displays.
However,
The eventual decision pipe line focused more on the STEAM aspect of the project rather than the users ‘leaving their mark’. The RGB aspect (Though we thought was very cool and somewhat relevant to technology and physics) we ended up dropping that theme and instead build on the idea of the users interacting with the electromechanical display using a tangible visual code. The visual coding would be of blocks that they would be able to connect to each other.
Though I think we would all agree, personally I see huge potential in the eventual idea that we have come up with. Not only within the promotion of the STEAM industry that is ever so present amongst women and potential tertiary students but also in terms of the sorts of alternative projects this could spin off into.
The blocks connect with wires instead of puzzle like joints, that way multiple blocks can be connected to each other with little limitations. This results in the possibility in more complex codes done by the user and more unique patterns.
However, as we were quickly running short on time and realizing the enormous amount of production work still required that severely limited the level of complexity we could recreate onto our project.
Shortly after finalizing what we are actually going to be making I began creating iteration number 2 for the electromechanical display. As I have been working primarily on the mechanical display, the laser cutting file has been taking up most of my time as some 9000 veritices were placed onto the design within the following weeks.
Laser cutting path:

Laser Cut Panel:

Constructed Frame:
Iteration 2 sitting next to Iteration 1.

OBVIOUSLY, there are still so many kinks and misfits here and there scattered all around the laser cutting file that I need to work on and I imagine this will take a huge chunk of my time fixing. However, for iteration 2 I think it turned out quite successfully.
0 notes
Text
Prototyping and Playtesting
19/09/2019

Response from Ben:
Look into Methods of designing a soundscape - week 10 -12, the feeling from the sound etc if we were to bring this project to completion
What do people say about this kind of music, the structures, definitions, examples, how to achieve it
Can apply to all aspects of the project. The processes that can help for future projects.
Not meant to be finished but look at the process on its creation.
Creating the prototype:
The physical prototype was created by me. We wanted to begin playtesting as soon as possible so I began drafting up a rough idea as to the core basics of what is essential to our playtest. This was because we wanted to flesh out the fundamental interactions out before we discuss/research further precedents for things such as materials, animations etc.
The materials I had available to me to construct the buttons out of was just some spare MDF’s in the mechlab. Though I have considered using proper clicky buttons to make stepping on them satisfying and intruiging, However, the main concern I had was the robustness of the setup. The resolution for this issue resulted in NOT using a standard button as I feared that would just break the device. I ended up using a simple foam and copper contacts to actuate the signals which actually ended up working quite well.
I think for the future direction I would want to draft up some concept ideas on the polished mechanism so that it is more robust and offers a more diverse range of possible inputs rather than a simple on and off.
The Playtest:
During the playtest we gathered around 15 people to simply record and observe there actions to see the current design language that the installation speaks. Almost all participants interacted with our set up as to be expected, making small notes and collaborating with their partner (if they had one) to try and create tunes/notes together. The responses were however, quite interesting in which they had some neat ideas though most of them we had previously talked about as a group.
One idea that resonated with me (Pun intended) was the idea of the notes displaying a flower and creating a ‘digital garden’ if you will within Aotea Square. The idea being that it is playful, yet unique and colorful. Certain notes will produce a certain type of flower and creating a garden will cause new flowers to sprout. The flowers will dissapear over time requiring and incentivizing people to come down and ‘grow a community garden’ in which the colors will be orchestrated by the people that intereact with it. Of course, there can be big potential in this idea of incorporating more than that, for example: A statement could be made about the bees and their extinction, Climate change, etc.
0 notes
Text
Prototyping Mechanism
16/09/2019
Realizing WHERE we want to be in the next several weeks we started to think about WHAT we want.

We soon settled on the idea of having the user interface into a visual coding exercise in which Talia and Kale promptly began prototyping with.

I was on the other hand tasked with testing and creating the electromechanical display. Exciting yet daunting task I pursued with my first prototype drawing which I soon realized probably would not work.

The issue with the drawing I had done above was that because cost was a big constraint for us, reducing the most costly part of the mechanism would drastically help with feasability and so I tried to reduce motor count so that only one motor would be needed per row. Though I soon realized after talking to some technical experts that it probably would not happen the way I had hoped.
My first mechanism prototype began as a cardboard. Though as I was making this I realized so many shortcuts I could take without reducing quality, whilst also reducing part count.

0 notes
Text
Feedback plan and next steps
04/09/2019
We tally’ed up the responses from AUT Live and made some executive team decisions.
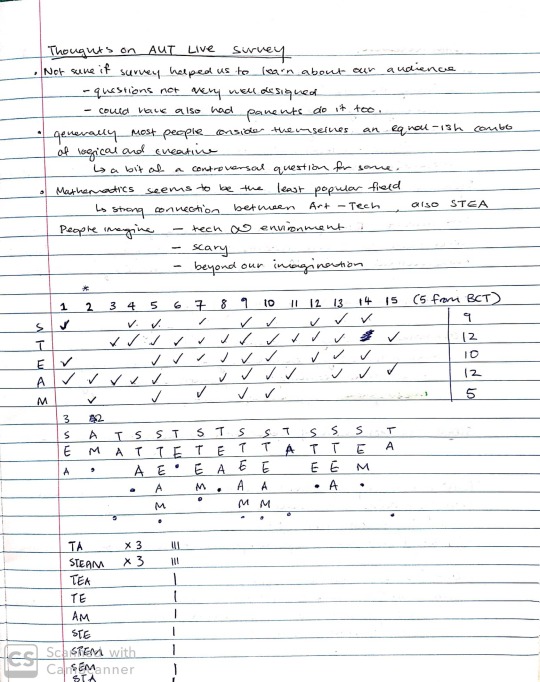
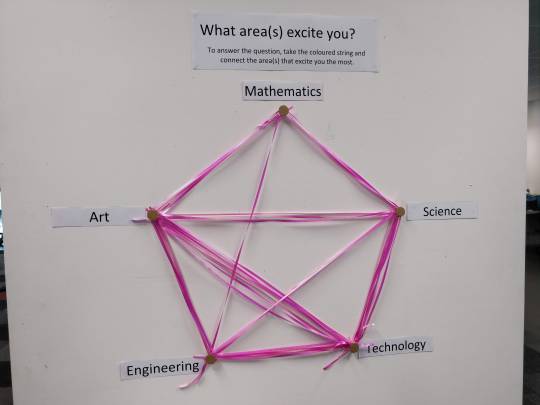
Though the results weren’t very clear we did find that Technology, Engineering and Arts were the areas people found most interest in.

From that we re-evaluated what we want to do with the feedback we gathered and decide what our new success metrics are.
Summarizing and further clarifying our goals for the project.

I think our new direction and feedback plan is much more concise and direct than what we had before. We like where we’re heading and teamwork, contribution and presence has been reliable since our group was initially formed.
0 notes
Text
Prototyping and SOUND
04/09/2019
Ben’s Responses:
What is our audience (not all the people in Aotea Square, but just a few or one)
What kind of sound do we want and what kind of interactions would create those sounds.
Can we fake parts of our prototype?
Week 9 stop fabricating.
Make progress on fabrication.
With regard to the audiences that we are addressing, though we have tackled the type of people we aim to create for, I think that our audience is most probably not as well as defined as I had initially thought as I often still find myself confused as to who they actually are. So, as a group we discussed that our target audience will be:
Parents and children
Spectators (People eating food, Smokers)
Common Passer Byers
We can most definitely fake parts within our prototype, things such as the scale, materials, number of inputs etc. Though for the sake of our prototype we may most definitely have to make these shortcomings as the project would otherwise consume too much resources and time that of the group members.
I understand that we need to start prototyping ASAP and now is a better time to start than later and so it has begun already, however. Without the sort of sounds it is difficult to continue, and of course the sound is a huge part of the project that needs to be considered. I myself am not very good at music nor do I feel like I am confident enough to know what sounds sound good or better than others so I may need to rely on another team member to take that role.
Below is a series of inspirations and types of sounds Matt and I have looked at together.
Musical Examples of possible tone. Expressing themes from target audiences.
https://www.youtube.com/watch?v=I4M4XTsx2cA
https://www.youtube.com/watch?v=x23I8f9PwlI&list=PL19JeoRIjn_NT1l7lbVRcQS4LIn0k9c57&index=1
https://www.youtube.com/watch?v=pKvdJxpUuUs&list=PL8E444015062466EE&index=1
Great toning but lacks a lighthearted theme.
https://www.youtube.com/watch?v=JIcp1L0uI0Y&list=PL4619CDF2FD0D8394&index=14
https://www.youtube.com/watch?v=qwtdyoyYGuM&list=PLX0jSFrWx1v1BcGvAGDI1pqLZ5W_YhfQP&index=7
https://www.youtube.com/watch?v=ABXga9y0B3I&list=PLSaAi5XOwA7O1eDCn1lMZ4L1YGNZwXvvu&index=5
Very unsure, but interesting
https://www.youtube.com/watch?v=pQkajyGKvUU&list=PLSaAi5XOwA7O1eDCn1lMZ4L1YGNZwXvvu&index=10
https://www.youtube.com/watch?v=1CbBt41joeg&list=PLOXlluVERdko5bG6Wi59tgrMgtqRgGDet&index=11
https://www.youtube.com/watch?v=UCMP8mlhu8M saints row 4 a pleasant day
https://www.youtube.com/watch?v=XPM1o9QKw1Q family guy theme song
0 notes
Text
Presentation to RUSH and its consequences.
28/08/2019
Our Presentation to RUSH Digital:
We felt nervous before our presentation was due. Though to be fair we had kind of left the actual making of the presentation to last minute. However, that was not because we had not been doing any work. In fact, the opposite. We have been constantly deciding and deciding whilst trying to settle group executive decisions it has been an on-going testing, prototyping and analyzing prior to the presentation stage.
The presentation I believe actually went quite well though I personally was not too happy with it as I feel like I get stage fright too easily and also because our pitch still sounded broader than I feel that it should be at this point in the semester.
Once the presentation was over and we had all calmed down. We debriefed. Judging off of the atmosphere of our group and the judges we felt that we wanted to branch away from the RUSH Digital group as we felt that it was too restraining and that our pitch probably wasn’t something that they are looking for. That being said I think that we all wanted a bit of fresh air from this target audience and moving away from such industry like approach was quite suitable and in fact appropriate for us as a group.
Although we decided to branch away from RUSH I personally felt that the exercise was still quite educational and have taught me a lot about brand ethos and how a fast paced tech company such as RUSH operate. Things like brand tool kits working hand in hand with their responses was an interesting twist for me during my time at BCT.
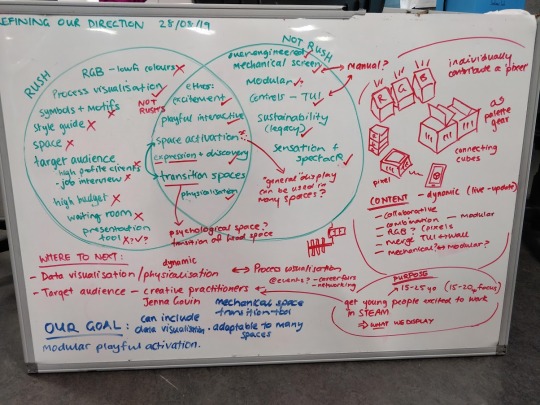
From this we drafted up a new plan of action.
As seen in the venn diagram above we went over everything that we had encountered over the past several weeks and have split up what we considered strictly RUSH vs what is not and everything inbetween. We then as a group decided what we liked and as a result wanted to keep as the project continues and what we wanted to ditch.

We still very much liked the idea of a mechanical display and how it seems to create a sense of awe and curiosity amongst our playtesters and ourselves. We decided to persue this aspect of the RUSH project that had been lingering for far too long but now with fresh perspective and angle.
What worked well for us before during the RUSH presentation was each of us coming up with our own elevator pitch and then combing them into one. I think this worked well because though we may understand our concept and context very well, we may all be thinking about it from a slightly different perspective and the combination of all our own pitch makes sure to encapsulate all of them into one.

We decided to take advantage of the upcoming AUT LIVE and the flurry of ‘out of BCT’ audience to help with our understanding of the new target audience that is the S.T.E.A.M industry. STEAM of course stands for: Science, Technology. Engineering, Art and Maths. We settled on three different questions to ask this potential audience and eventually managed to settle them down to a short and easy to understand question in which you can see them below. I suggested that the mode of survey should encite ‘play’ and interactivity as that would probably create the greatest incentive to actually complete them rather than handing out surveys for people to complete.

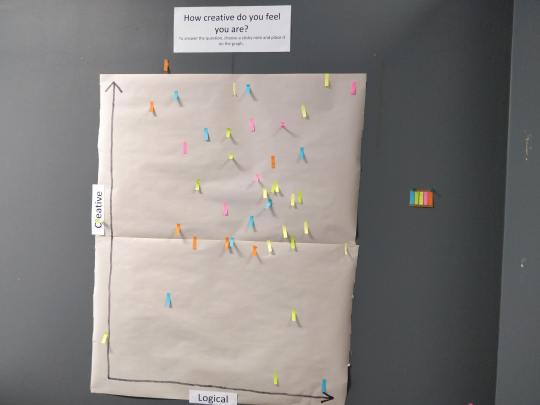
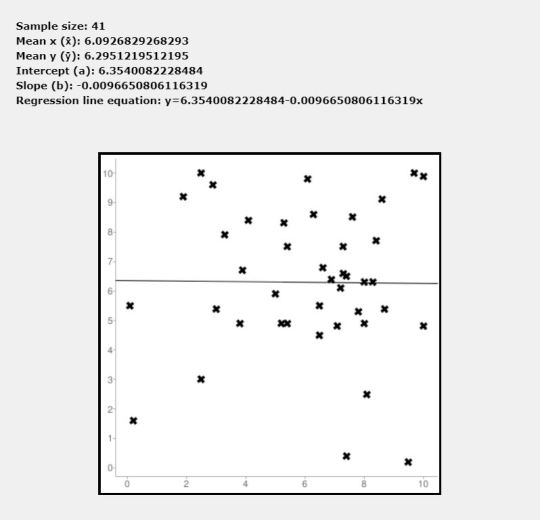
With the most answered question that we received I decided to create a digitized more refine version of the data and there didn’t seem to be any sort of correlation amongst the types of people that decided to come up to check out BCT. At first I thought that the data was pointless and that it was odd that there was no strong cluster towards one axis over the other. However, now that I think about it, it makes the most logical sense as Creative Tech I believe requires both skills in an equal and almost intertwined way.
0 notes