
Don't wanna be here? Send us removal request.
Statistics
We looked inside some of the posts by downloadsoftwareforwindowsm-blog and here's what we found interesting.
Average Info
Notes Per Post
0
Likes Per Post
0
Reblog Per Post
0
Reply Per Post
0
Time Between Posts
25 days
Number of Posts By Type
Text
14
Last Seen Tumblr Blogs


Fun Fact
In Q3 of 2020, 31% of US users access the Tumblr app daily.
Text
All-in-One Songs Downloader & Converter-- KeepVid Songs
There is no question that no person can live without music. Music resembles a medicine for unwinding your mind and body. There are lots of cds and also tracks offered around the web and are enhancing day-by-day. Yet looking for the tracks you intend to download on your tool from various web sites is actually taxing and also boring job.
But say goodbye to! now you don't need to look from site to web site for your preferred song to download and install. As Today I'm examining my just recently checked music downloading software called Keepvid Music.
Well, it will not be fair to call this software application a songs downloader because it does greater than simply downloading and install the tracks or albums. Keepvid Songs is all-in-one software program which assists you to uncover and also download music from 1000+ internet sites at one location. You can even move, arrange share and also backup your media library. This software program additionally uses you a tool kit which includes superb devices such as Rebuild iTunes Library, Get rid of DRM, transfer iTunes to gadget and also many more. Keepvid Music also contains music collection of 30,000+ songs, Leading 100+ charts, 1000+ fine-tuned playlist as well as 35,000+ cds.53.
So, allows us uncover much more about Keepvid Songs.
Discover Music
Keepvid Songs permits you to discover numerous tracks from the internet at the one area. It offers you the most recent as well as leading tunes collection. The software program offers you access to greater than 35,000 cds, numerous tracks as well as over 1000 fine-tuned playlist.
To uncover music utilizing Keepvid Songs, you require to introduce the software, click get music and then select Discover alternative. There you go, it will certainly show a significant number of songs right in front of you. You can discover tunes on the basis of their genre & state of minds, musicians, Leading Lists and also Playlists.

Download and install MP3 straight
Well, from now on you will not need to go to a few other internet sites to look and also download your favorite tracks. Keepvid Songs is below to solve this issue. With Keepvid Music you can download tracks from a lot of prominent sites such as YouTube, Vevo, Spotify, DailyMotion and also a lot more in Mp3 styles. Keepvid Music sustains greater than 1000 sites. Yo can even download and install whole playlist with simply a solitary click. The procedure for downloading songs utilizing Keepvid Music is straightforward as received the screenshot listed below.
First, download the software. It is free to attempt. After you complete setting up the software application, just introduce it. Now look for your preferred tune. Just at the right side of the tracks, you will certainly see a download symbol, just click that symbol. Your track will certainly begin downloading. It will certainly likewise be received the downloading and install checklist which you can discover at the appropriate leading edge of the primary home window.
Now, you just require to click on that download button, it will certainly reveal you the entire list of tracks which are being downloading or currently downloaded. Tape tracks.
As I told you that Keepvid Songs allows you to directly download and install MP3 from the preferred solutions, if there is some website which is not supported by Keepvid Songs and tunes can not be downloaded then no fears, you can tape-record that track utilizing inbuilt recorder easily. The built-in recorder can videotape any songs which uses your system. This wise recorder immediately spots the ads and splits the track as necessary.
KeepVid Songs Toolbox
Toolbox supplied by Keepvid Music teems with extra and also valuable tools. These devices assist you to perform a series of various features such as secure, arrange, backup, share your collections as well as much more. The toolbox of Keepvid Songs includes Rebuild iTunes Collection, Transfer iTunes to Gadget, Cleanup Music Collection, Backup/restore iTunes, Get rid of DRM, Cars And Truck Playlist and also Burn CD.
Backup/Restore iTunes assists you to develop a backup your iTunes library on any system or exterior disk drive. You can move all your iOS/Android songs to iTunes with any inconvenience.
Transfer Songs b/w tools.
Keepvid Songs enables you move your iTunes media documents like TELEVISION programs, iTunes U, Music, Podcast, Playlist, film and so on to any device without restrictions. Method whatever your device is, Keepvid Songs enables you to transfer your iTunes media data to your device as well as vice-versa. You don't need to fret about the file support in your device since Keepvid Songs automatically discovers the data type sustained by particular gadget and also iTunes as well as transforms the iTunes media data to that supported format.
Final Words.
I highly recommend this software program. It is a terrific, totally included and also expert device. Keepvid Music allows you to find, download and install, move, backup, document and also arrange your favorite tracks and also albums. The tool kit offered by this software additionally includes several useful devices.
So, there is absolutely nothing left which is not provided by Keepvid Songs as a music downloader. An additional wonderful point is that it gives you a 30-days complimentary trial, so that you can make use of the software program prior to really buying it. Thus its worth the money, as well as you must absolutely give it a try.
0 notes
Text
Tape your screen and conserve as animated GIF with LICEcap
There are lots of factors why individuals want to take screenshots. Firstly, it aids record an essential occasion or situation. One great instance of this is when you are taking a screenshot of your online discussions as well as video clip chats. You can likewise produce a quick tutorial by merely taking a series of screenshots. Nevertheless, screenshots might not be the finest choice especially if you wish to record your entire screen task. So as opposed to saving your screenshots as still photos, why don't you simply make use of LICEcap? It's an extremely easy screen capture tool that will immediately conserve your display recordings as computer create animated GIFs.
What Is It And also Just what Does It Do
Key Capability
If you still haven't heard of LICEcap, you may as well know that it is a free display capture device that is produced and also established by Cockos Incorporated. With this software program, you could tape a specific segment or area of your computer display as well as after that you get to conserve it as a GIF or LCF file. This also indicates that you could straight save your screen recordings as computer animated GIFs.
Bear in mind LICEcap deals with Windows and also Mac OS X. We especially examined the Windows version for this testimonial.

Pros
Very simple interface, very easy to utilize
Can instantly record your display and also save it as GIF or LCF
Users can specify the screen location or section that they intend to tape-record-- just drag the LICEcap home window to any kind of area as well as after that you type in your preferred display width and elevation
You could pre-format your animated GIFs by including a title display, etc. You can also style your GIFs in a method that they won't go on repeating like a limitless loophole.
Hotkey assistance-- simply press CTRL + ALT + P to pause your screen recording (repeat the very same hotkey command to return to or "unpause").
You can set your recommended structure rate (FPS).
Mobile.
Cons.
Absence of customer choices-- there are no buttons for minimize, make the most of and full display, there's also no alternative for setting your GIF to play in reverse order. There is no hotkey command for "stop" and also "record". No built-in editor-- you can not choose the frames that you want to erase, you could not resize your GIF, there's no crop tool and also you cannot even include some straightforward boundaries, arrows or message impacts.
Conversation.
LICEcap screencap GIF example LICEcap has lots of uses and it's mainly terrific for customers that are regularly doing some testimonials as well as tutorials. It's also fantastic for documenting certain events in a more in-depth format. You might even use it for taking display recordings of your online video gaming turning points and achievements.
What's excellent concerning this device is that it is very straightforward. It does not have any type of complicated controls or commands. It's likewise portable so you can utilize on it any kind of computer system or laptop computer. When utilizing this device, all you need to do is to change its recording window to your favored dimension and afterwards you place it in addition to any area that you intend to capture as an animated GIF. You could also set your favored structure price. Just maintain in mind a high framework price will certainly also impact your animated GIF's data size.
Afterwards, you push its "document" switch as well as then you specify the location about where you want your file to be saved. You can also establish your GIF's playback residential or commercial properties as well as title framework. As soon as everything is established, you click the "conserve" button and afterwards the tool will instantly tape-record your display activity. You can additionally "pause" your display recording and also as soon as you're done, just press the "quit" button. The output will certainly after that be saved to your favored location.
Performance sensible, I really like that this tool provides a simpler method to videotape any kind of display task. It could not be comparable to those advanced screen recording tools but it's definitely helpful. It's just that it can have been made better. It still lacks a great deal of essential functions and also customer options. I additionally find it a little bit frustrating that it can not effectively videotape my computer display in its complete resolution. This is because when I established the LICEcap home window to complete display, the "document" button will certainly be pushed out of the display area plus I could not also utilize a hotkey to initiate the stated activity.
While I really did not have any significant problems regarding this software program, it's still like a rugged treasure. It has a terrific prospective however with its existing version, it still hasn't already revealed its real capacity. Nevertheless, it's completely efficient in taking screen recordings without any kind of lags, glitches or errors. The top quality of its computer animated GIFs could additionally be as compared to those that you could typically generate utilizing an advanced GIF generator.
0 notes
Text
Create a Bootable Duplication of Your Apple Mac Computer for Trouble-Free Backup
A good backup method is important for any type of computer customer. And also with built-in backup tools like Time Device, macOS makes it easy to go on top of standard backups. However the macOS ninjas available do something also far better than Time Machine: they use a bootable clone to recover their system from complete destruction at a minute's notice.
A bootable clone, likewise called a bootable backup, is a backup that you can utilize to boot as well as run your computer. Is basically an exact duplicate of your computer system's boot drive, efficient in being "identified in" for duty at the decline of a hat.
If somehow your disk drive gets trashed (either with physical death or software application damage) you can swap in a bootable backup to conserve the day. You can also utilize a bootable backup to run your very own system off various Mac equipment, meaning you can bring a duplicate of your computer system to a brand-new location on a USB flash drive as well as proceed functioning (sorta) flawlessly.
Ultimately, bootable back-ups have one more killer feature: you can pull private documents from the drive. You don't require to restore the entire point, or switch out your hard disk. You access the drive similar to any type of other storage space device and pick which submits you intend to go back to your system.
This makes a bootable clone an outright essential for a strong macOS bootable backup method.

Obtain Carbon Copy Cloner
Prior to we can make a bootable clone, we'll need to download some software. While there are a couple of various energies that can achieve making a bootable backup, Carbon Copy Cloner (CCC) is simple to make use of and also has a long-lasting trial setting.
1. Download Carbon Copy Cloner from the programmer's web site.
Producing a Bootable Clone with Carbon Copy Cloner
After you've moved Carbon Copy Cloner to the Applications folder, the application will automatically open up. You'll see the main display below.
1. Click the "Resource" panel as well as pick your boot drive. By default, it will certainly be named "Macintosh HD."
2. Click the destination panel as well as select the hard disk destination hard drive. In this case I have actually picked an outside USB drive named "Southern Reach."
You can make use of any kind of hard disk drive that can link to your computer, offered it is huge sufficient to consist of all the information from your boot drive. This disk drive will certainly need to be in the macOS-standard HFS+ style. If you can, utilize a newly formatted, vacant drive.
3. With your source and also location set, you can click the Clone button in the lower right.
4. If this is the very first time you've run Carbon Copy Cloner, you'll require to mount the Carbon Copy Cloner helper device. Enter your manager password and also click the "Install Helper."
5. Let the cloning commence! A blue bar on top of the home window will report on the bootable backup's development in actual time.
6. When the clone is full, you can shut Carbon Copy Cloner. The application will ask if you intend to conserve your present job. You can safely click "Don't Save," which deletes the backup task, not the data you just duplicated.
Arranging Your Bootable Backup Task
1. Conversely, you can also click "Save" to create a persisting job for your bootable backup. As long as you can keep the target drive connected to your computer system, you can develop a set up task that takes place behind-the-scenes and keeps your drive up to date.
You can additionally pick "Conserve" from the documents food selection to conserve the backup task.
2. After that, click the "Schedule" box on the right of the screen.
3. Click the dropdown menu that claims "Do not run this job on a routine" to pick the regularity you would certainly like the backup to happen at.
4. Ultimately, utilize the menu's turn up choices to choose when and also how you would certainly like the backup to take place. We advise updating your bootable clone at the very least when a week throughout a time you're not utilizing your computer. The various other alternatives can be left at their default, particularly if you're uncertain what they do.
Booting from Your Cloned Disk
Since you have actually made your bootable backup, you can begin your system from it. Make certain to test this out before you actually require the backup to make sure whatever is functioning effectively.
1. Connect your bootable backup to your computer system.
2. Restart your Mac.
3. Press and also hold the Alternative key while your Mac reactivates to get in the boot disk selection trigger.
4. Select your bootable backup from the readily available alternatives at the resulting food selection.
Verdict
If the information on your hard drive is important to your performance, a bootable backup will conserve both your time and that data. If anything ever before fails with your computer's hard disk, you'll have a functioning "spare" ready to go at a moment's notice.
0 notes
Text
Just How to Conveniently Download Online Videos to Android with Keepvid Android
This is a funded write-up as well as was enabled by Keepvid. The real components and also point of views are the single sights of the writer that preserves content self-reliance, also when a blog post is funded.
It might not be everyday however there will certainly be times when you intend to download and install a streaming video clip or sound so you can appreciate it offline. This is particularly real when you are taking a trip and also will not have any kind of reputable Web link. Nevertheless, the issue with a lot of streaming applications is that they will not allow you download and install the video clip or sound for offline watching. Also when they enable it, you will not have the ability to play them in your preferred sound or video clip gamer as a result of DRM limitations. To take care of these sort of scenarios, you can utilize a complimentary application like Keepvid Android.
Keepvid Android is a basic as well as simple application that allows you download video clips from different video clip streaming websites like YouTube, Facebook, Instagram, Vimeo, Tumblr, and so on

Attributes of Keepvid Android Application Sustains a vast array of video clip sharing websites: Among the very best aspects of Keepvid application is that it sustains greater than twenty video clip sharing websites. These websites consist of yet are not restricted to YouTube, Facebook, Instagram, Vimeo, Tumblr, Creeping Plant, Dailymotion, SoundCloud, FunnyorDie, MixCloud, as well as Cloudy.
Download High Definition Videos: On sustained websites like YouTube, you can download high definition video clips. As a matter of fact, the Keepvid application sustains and also downloads and install HD, UHD, as well as 2K video clips with no issues.
Sustains Set Downloads: Making use of the Keepvid application you can download and install numerous video clips from several resources at the very same time.

Transform as well as Download Songs Record: If you intend to, you can transform video clips right into songs data on the fly as well as download them from sustained websites like YouTube. Similar to with video clips, you can download and install the sound in 128kbps, 256kbps, or 320kbps high quality. This function is really beneficial when you intend to download tracks, podcasts, and so on
. Simple as well as Minimal Interface: Unlike various other video clip downloader applications, Keepvid's interface is extremely marginal and also simple. Simply pick your video clip streaming website, discover the video clip you intend to download and also touch on the Download symbol. It is that straightforward to make use of the application.
Setup as well as Use
To begin, download the Keepvid application from its main internet site. Considering that the application is out Play Shop, you require to allow the "Unidentified Resources" alternative in Android to mount it. To do that, open up the Setups application and also browse to "Protection." Right here, scroll down and also toggle the switch beside "Unidentified Resources" under the Gadget Management area.
In my situation I intend to download and install a video clip from YouTube, so I have actually chosen the YouTube choice on the primary display, looked for the video clip, and also opened it. As the video clip is being played, touch on the "Download" switch showing up on the bottom-right edge.
As quickly as you click the switch, Keepvid will certainly examine the video clip as well as display screen all the various top qualities the video clip can be downloaded and install in as well as their corresponding download dimensions. Simply touch on the video clip top quality you desire the video clip to be downloaded and install in. Like I claimed previously, you can likewise download and install the video clip as an MP3 documents. All you need to do is choose the ideal alternative. In my situation, I'm choosing the 1080p video clip.
As soon as you pick the video clip top quality, Keepvid will certainly download and install the video clip.
When the download is total, Keepvid will instantly combine the sound as well as video clip to ensure that you do not need to stress over combining and also transforming them by hand. YouTube sends out audio as well as video clip data individually when you choose the premium choice. To see the download, click the Download symbol showing up on the upper-right edge.
The above activity will certainly take you to the Downloads web page. Below you can see all the downloading as well as downloaded and install video clips from different video-sharing websites.
By default, Keepvid shops all your downloaded video clips in the inner storage space. If you are short on area, you can transform the download area to the exterior SD card. To do that, click that little equipment symbol showing up on the upper-right edge on the Downloads web page.
In the Setups web page touch on the "Downloads Course" choice.
Currently, pick the "ExtSDcard" choice.
The setups web page details the brand-new download course. Take a note of it to ensure that you can discover your downloaded video clips when making use of a documents supervisor.
Likewise, when you attempt to play the downloaded video clip straight from Keepvid, it plays it with KV Media Gamer. If you wish to, you can make the video clip play in your preferred media gamer. To alter the alternative, scroll down as well as touch on the alternative "Default Video clip Gamer."
Final thought
Keepvid Android is a basic application that does specifically what it claims it will. Absolutely nothing extra, absolutely nothing much less. You do not need to bother with unneeded alternatives, jumbled interface, invasive ads, and so on. In addition, unlike various other applications, Keepvid provides you the versatility to enjoy video clips as well as pay attention to songs offline in your favored media gamer. So, if you such as to delight in offline media, after that do offer Keepvid a shot. Nevertheless, it is complimentary.
That being claimed, the complimentary variation of the application is sustained by advertisements. If you do not such as the advertisements, you can acquire the costs variation for $1.99. With the costs variation, you will certainly likewise open the capacity to download 2K video clips and also top notch MP3 sound data.
Do remark listed below sharing your ideas as well as experiences regarding utilizing Keepvid to download and also watch video clips offline.
0 notes
Text
I Intend To Clone My Whole Hard Drive To A Brand-new Hard Drive Or A Brand-new Machine
There are several factors to make a specific clone of your hard drive. Expect your laptop computer is harmed as well as you have to send it in for repair work. In the meanwhile, you not just need to obtain one more computer system throughout of the fixing, you likewise do not have your data, applications as well as workplace specifically as they got on your machine. This absence of company can be really irritating and also prevent your efficiency. When you obtain your machine back from repair work, you need to handle finding any kind of changed files on your loaner computer system and also replicating them to your original computer system. Additionally, Apple advises that you backup your data prior to sending out in a machine for repair services since they are exempt for lost data.
In this scenario, it would certainly be perfect to merely replicate off the whole materials of your hard drive to an exterior hard drive-- to produce a "bootable clone" of your manufacturing machine. You can after that boot a loaner machine from this bootable clone and also job from it as if functioning from your original machine (see the associated paperwork listed below for usual inquiries associated with running one more Mac from your back-up).

When you require a full, easy back-up of your whole hard drive:
Open Up Carbon Copy Cloner
Select the volume that you wish to clone from the Source selector
Select a properly-formatted volume from the Destination menu
Click the Clone button
If you intend to upgrade your duplicated volume in the future, merely run the very same job (or arrange it so it runs immediately) and also CCC will certainly upgrade the back-up volume with just the products that have actually altered considering that your last back-up.
Usage Setup Assistant or Migration Assistant to move data from a CCC back-up to a brand-new Mac
An additional circumstance in which it would certainly be preferable to do a full-volume clone is when you have actually acquired a brand-new Mac and also you would love to relocate whatever from your old Mac to your brand-new Mac. When you obtain a brand-new computer system from Apple, however, it has a particular variation of macOS set up on it, and also additionally, a hardware-specific "construct". Your brand-new Macintosh can not boot from the older variation as well as develop of macOS that is mounted on your older Mac, so just duplicating your old Mac onto your brand-new Mac will not function. Because of this restriction, we advise that you utilize the Setup Assistant application (work on your Mac's really initial boot) or the Migration Assistant application to move material from your old Mac to a brand-new Macintosh. You can move straight from a Carbon Copy Cloner back-up of your old Mac. When you have actually moved your customer accounts as well as applications utilizing Setup Assistant or Migration Assistant, you can remain to utilize Carbon Copy Cloner to support your Mac to the very same back-up volume that you were making use of for the old Mac.
Migration Assistant as well as the CCC SafetyNet
If your back-up volume has a "_ CCC SafetyNet" folder, you can relocate that folder to the Trash prior to making use of Migration Assistant to prevent duplicating that folder throughout a movement. This is specifically vital if that folder has a great deal of data in it and also you're moving to a disk that is smaller sized than the back-up volume. If you want to maintain the SafetyNet folder on the back-up volume, do not clear the Trash. After Migration Assistant has actually finished, after that you can relocate the SafetyNet folder back to the origin of the back-up volume.
0 notes
Text
Exactly How to Create Animated Gifs For Your Blog
What captures your attention when you read another person's blog site?
Images and also video are great for separating great deals of web content as well as they include some color to your blog posts.
Yet what regarding including some moving images and also animations to your blog site?
A computer animated GIF is a series of images assembled to give the appearance of motion. A computer animated GIF can play instantly so it captures the interest of your customer. They are truly preferred on the internet in a range of layouts, as well as well-known websites like BuzzFeed are well-known for their use of animated GIFs.
These animations can be extremely quick to create and also they can additionally be truly valuable, for example, producing a brief GIF to demonstrate a tool that you like using online.
We lately created a post on how to make an animated GIF for social media and also it was so prominent we have investigated a lot more tools for you.
Below are two computer animated GIF devices worth taking a look at if you wish to create some mini animations for your site:
1. Develop a Quick, Animation with LICEcap
LICEcap is a complimentary, downloadable device that allows you to record activities that occur on your display as well as conserve them as a computer animated GIF.
It is extremely easy however its outcomes go over.
When you have actually downloaded and install the software and release the device, it can look quite complex, since it simply resembles a vacant box.
But, as a matter of fact, this is the rundown of the area of the screen that LICEcap is mosting likely to catch. This means you can resize the LICEcap capture box to ensure you are just taping the component of the screen you desire.
The recording can be stopped briefly (by clicking 'time out' or by using the keyboard shortcut ctrl+ alt+ P) and the structures per secondly (FPS) can be selected-- a greater number will provide a smoother gif, however the documents dimension will boost as well as this can slow your internet site down.
2. Develop a GIF with Giffysnap
Giffysnap is a website where you can submit a collection of picture files as well as produce an animated GIF from them. It is totally free to make use of and you do not even need to sign up to make use of the service.
GIFs like this can be particularly great to reveal makeovers. Possibly your real-life shop has undertaken renovations and also you wish to show before-and-after images, or you have updated your web site layout as well as want a GIF to scroll through screenshots revealing the modifications that have been made.
You can determine the order your images should appear in, how quickly they should scroll and what size the last GIF need to be.
When the GIF has been produced, you can download it to your computer or obtain code to paste it onto your website. There is a tiny logo design under right-hand side of the final GIF, yet this is a truly quick-and-easy device to use.
0 notes
Text
Usage Carbon Copy Cloner To Make A Precise Copy Of Your Hard-Disk
Though Time Maker is an extremely beneficial and basic to utilize backup utility, it is sound technique to not place all your digital eggs right into one basket. Further, when you update your hard drive, cloning the old drive makes for a completely seamless transition to the new one. All of your passwords, applications, files, and so on will certainly be best where you anticipate them to be.
I want to show you exactly how to use the Shareware (uncrippled, unlimited demo) program Carbon Copy Cloner to support your files. Making Use Of Carbon Copy Cloner is a bit much more involved than Time Equipment however the advantage of making a precise, bootable duplicate is well worth the extra effort.
Evolving Media In The Digital Age As computers have gained a boosted function in our lives, the requirement for safely storing digital memories has actually expanded to be more vital than ever before. Unlike substantial objects like pictures, letters and also postcards, a hard-drive filled with digital 0's as well as 1's is conveniently removed or simply lost track of, as technology boosts with time. For instance, I still have a cabinet filled with floppy disks formatted for the Amiga, despite not possessing that computer system for several years. Though it's not impossible to get my information off them, it's a migraine therefore I have actually placed it off indefinitely. This probably will not hold true with Mac OS X as it's an even more extensive Operating System however is still worth pondering just how future-proof your backup system will certainly be in years to find.

A Two-Step Refine There's a lot to think about when supporting your information and the most effective method will certainly depend upon your requirements. Though more basic back-up energies like Time Equipment are wonderful in their own right, it is a good concept to maintain an exact duplicate of your hard-drive. This way, every single data as well as system choice will certainly be kept on your external hard-drive exactly as it was copied, with the added capacity of having the ability to boot from this disk image need to catastrophe strike as well as your hard-drive be shed, swiped or damaged.
Nonetheless, making the actual back-up is only the first step required to protect your data, as an outside hard-drive might quickly be literally harmed by fire, earthquake or flood. Ideally, you'll be saving a historical duplicate of the back-up at an additional secure place, such as an office safe or trusted member of the family's home - this need not be done each day, yet a regular monthly regimen is advised. If this is not useful, then at least consider an off-site cloud based back-up of 'worst case situation' files, such as your most cherished images, passwords and vital details. Apple's upcoming iCloud service will quickly change the means we think about on the internet information storage, yet until after that, there's Dropbox.
Preparing The Target Disk First of all, we're mosting likely to require somewhere to support to, so plug in an outside hard-drive and fire up "Disk Utility" on your Mac. Currently partition your external hard-drive (The "Target Disk") to ensure that you have a partition with adequate space to suit your Mac's major hard-drive (The "Resource Disk"), with a couple of gigabytes left over for good measure. As you can see, I've classified mine CCC - short for Carbon Copy Cloner - and also inserted the date. See to it you format your drive as "Mac OS Extended (Journaled)".
Getting Started With Carbon Copy Cloner
Setting Up Carbon Copy Cloner Head over to Bombich to order a complimentary copy of Carbon Copy Cloner and experience the easy setup procedure. Once set up, we can begin making our initial back-up, so release the program.
Mounting Carbon Copy Cloner Head over to Bombich to get hold of a cost-free duplicate of Carbon Copy Cloner and experience the straightforward setup procedure. Once installed, we can start making our first backup, so release the program.
Carbon Copy Cloner's Main Interface As you can see, CCC's user interface is quite easy and also direct. It is exceptionally essential to make certain the correct "Resource Disk" and also "Target Disk" have actually been chosen. So, for "Resource Disk" we're mosting likely to need to pick our Mac's hard-drive as well as in the "Target Disk" choose the complimentary dividers formerly made in Disk Utility. Lastly, click the box labelled "Remove items that do not exist on the resource".
Take a moment to read through the information, especially under the heading "What is mosting likely to happen?"
Currently click on "Clone" and you'll get one more caution, as shown below. Thinking that every little thing is fine, go on as well as back up your hard-drive!
Carbon Copy Cloner - Final Warning Prompt The backup procedure will certainly take a while, depending upon your hard-drive speed as well as whether it's a USB link or Firewire. My MacBook Pro takes just over 2 hours to finish the back-up procedure when making use of a USB 2.0 link to a typical Western Digital 5400 RPM outside hard-drive.
Booting From Your New Backup Since you've made a back-up of your Mac's whole hard-drive, you can boot right into it if wanted. To do this, just switch your Mac on with the outside hard-drive linked and also hold back the "Option" (or alt) essential right after you powering on. You'll now see your Mac's normal hard-drive as a boot alternative, in addition to your recently made Carbon Copy Cloner partition. Select this as well as your Mac will certainly boot equally as normal, albeit substantially slower if you're running USB.
Review The Handbook
Carbon Copy Cloner's Help Documents The procedure defined above is only the most standard of backup options which Carbon Copy Cloner has to use. The aid documentation included with CCC under Help -> Carbon Copy Cloner Assistance is an extremely valuable resource and gives clear directions on just how to execute incremental back-ups, just how to set up back-ups as well as even more.
Beyond The Fundamentals: Organizing
Setting Up A Back-up Task Carbon Copy Cloner can make per hour, daily, weekly and also regular monthly scheduled backups. To set-up a back-up, begin the actions necessary to backup your drive as previously described, however rather than clicking "Duplicate" select "Conserve Job".
Now the "Set up" box shows up, as seen over. I've established my backup to occur when a week, late on Sunday night/Monday early morning. This will just occur if my outside hard-drive is placed.
Past The Fundamentals: Restoring From Your CCC Back-up A worst-case circumstance situation; your Mac's installation is messed up and numerous programs are damaged. All efforts to deal with the OS has actually failed.
You would certainly begin by booting into your CCC backup as laid out above. After that, as soon as your Mac is fully loaded, run Carbon Copy Cloner and also pick your setups thoroughly. "Source Disk" must currently be your CCC back-up as well as "Target Disk" will certainly be your Mac's primary hard-drive. Experience the warnings once more and review the message under "What is going to occur?" once again.
This recover must take a whole lot less time than a backup, once the process is completed, reboot your Mac without the outside drive reconnected (you may have to hold the "Option" key as well as choose your Mac's hard-drive this very first time).
Final thought We have actually still only covered a couple of elements of what Carbon Copy Cloner can do and as soon as you're confident with basic and also scheduled back-ups, there's a great deal more advanced functions to obtain stuck into. No one back-up process is excellent, yet Carbon Copy Cloner can provide one aspect of your backup needs. If you discover yourself utilizing Carbon Copy Cloner a whole lot, take into consideration contributing some money towards (minimal $10) keeping this great software program alive!
0 notes
Text
KeepVid Music: Download any type of song or video clip from the web to your Mac or PC
Have you ever viewed a video on YouTube as well as desired you could conserve the track to your computer? Well, you can, with KeepVid Music.
We set up the app in order to download MP3s straight from YouTube and also over 10,000 other music and also video clip websites, such as Facebook, Spotify, SoundCloud, Vimeo, Vevo, as well as MTV. It basically let us record any type of track or playlist we could discover online, however it smartly cut out the adverts and also split up all our tracks for us - immediately. While we messed around, we found several other useful attributes.
What is KeepVid Music?
KeepVid Music is a Mac and Windows video downloader app. It's called a "ideal music tool" that can maximize "your music on phone and computer", in addition to allow you "download, record, find, handle, as well as play music". It mostly lets you download songs from several music and video websites, however you can additionally use it to videotape any tune or playlist on the net.
Other main features include the ability to check out and also download from KeepVid Music's own considerable music collection, along with handle your iTunes library, as well as transfer any media files in between iTunes and also iOS, COMPUTER, Mac, and Android gadgets. Getting going
Go here to buy, download, as well as install KeepVid Music for Mac or Windows. Once the app is completed installing on your computer system, launch it. When you open KeepVid Music, you will see 4 tabs on top. The very first is Obtain Songs. While on that particular tab, you will observe it has 3 screens: Discover, Download, and also Record. Keep reviewing to see an explanation of these three screens and also their functions.

Download songs, playlists, and also video clip
Discover allows you search as well as download songs or playlists from KeepVid Music's very own collection. You can additionally search fro songs, artists, cds, etc. Simply utilize the search bar. When you look for and find a tune or playlist you want, strike the Download switch. The download status icon in the edge allows you handle the download, including erase it or find the folder it lies in (choose folder switch).
You can take care of where downloads go under KeepVid Music > Preferences > Download > Downloads saved to. By default, our documents went to the KeepVid Music folder in our Mac's Songs folder. In the Preferences dialog box, you can additionally change your YouTube video clip quality from the default 720p to 1080p or higher. We recommend messing around to discover even more concealed, granular controls readily available.
Anyhow, back to the Obtain Songs tab on KeepVid Music.
The 2nd display is Download, which allows you download from sites on the web, such as YouTube, Spotify, SoundCloud, Vevo, and so on. The Download screen supplies some quick-access web links to these websites, yet you can likewise paste a link to any type of video or song on the net into the download search area. Simply specify MP4 or MP3 if you want it to download the entire video or just the audio, specifically.
Occasionally KeepVid Music may send you on-screen desktop notices when you're checking out a video or listening to a song in order to provide you an easy way to download from there. Once you download it, click the download status symbol in the corner to manage or find your download.
Tape-record songs and playlists
So, on the Obtain Songs tab in KeepVid Music, we've covered the Discover as well as Download screens, however we still have Record left.
Go on as well as click Document. You'll observe the only thing noticeable on that display is a record button. Click the button to begin recording whatever tune you're paying attention to now. If you're paying attention to a track on SoundCloud or Pandora, you can record it and save an audio file to your computer. Easy. This function allows you record music openly from any type of website online. You can even videotape video clip right into sound.
Transfer music or playlists data
Now that you've downloaded and install all this media, you may want to transfer the files between your iOS, COMPUTER, Mac, and also Android devices.
You can quickly add music from your PC or Mac over to your iOS or Android phone, for instance. Just most likely to Tool tab, then attach your gadget to your computer with a USB cable television, and ensure it is identified in KeepVid Music. From there, click Music in the corner, then click the Add button, and also choose Add documents (for Windows) in the corner to add music from PC or Mac to your linked device.
To move in between two gadgets, attach the two tools to your computer via USB wires. Most likely to the Gadget tab, after that click the Device icon, as well as choose the Tool you intend to move from. On the major interface, select Replicate Music to Other Device tab to begin moving.
To include music from your Mac or PC to your iTunes library, most likely to the Library tab, then click on Add icon in the corner, and also include music files from PC/Mac. Make sure to open iTunes to check that whatever moved properly. You can also drag and drop them right into iTunes.
Handle iTunes library
One of the last significant features we wanted to look at is how to handle your iTunes Library.
Once in KeepVid Music, click on the Toolbox and then click Tidy up iTunes Library. From there, click on Check switch to scan your iTunes music library to figure out the amount of tracks need to be taken care of. And also click the Repair button to finish organising in one-click. There are likewise choices to clean missing tracks, delete duplicate songs, and fix songs tags and covers, etc. Look into this FAQ page for much more.
0 notes
Text
iMobie PhoneRescue apple iphone Information Recuperation Software application: Fetch Lost Data In All Risks
I have been a devoted customer of apple iphone since it did well in charming me about a decade ago. In addition to being my essential daily motorist, it has actually become a considerable part of my life.
To shield the data on my apple iphone, I regularly backup the tool using iCloud or iTunes. Though they make it fairly very easy to allow me backup the data, I need to take the assistance of third party software to recoup the information which gets erased unintentionally.
There had been numerous celebrations when I unconsciously erased a message, call or photo while attempting to clean up the phone. Thanks to making use of data recovery software, I have been able to get whatever with ease.
iMobie PhoneRescue Information Healing Software for Mac/Windows Having attempted my hands on some data recuperation devices, the one that has thrilled me one of the most is PhoneRescue. We have actually already assessed it a number of times, and also we are set to have a go at it again. Truthfully talking, each time we have actually given the information recovery software application a try, it has actually emerged as a runaway victor.

The majority of Experienced
With the ability to retrieve as many as 25 sorts of data like images, messages, video clips, music as well as more, PhoneRescue is by far one of the most versatile tool.
Thus, you have the choice to recuperate almost any lost data of your gadget. The simple interface gets the job done with absolute convenience. It's this flexibility that sets it in addition to the rest.
Much-Needed Safeguard
What I really value about this data recovery tool is the capacity to obtain your data even when your gadget can not be accessed from the computer. With making use of iTunes backup (even if secured), it's able to recuperate the needed info.
Besides, it likewise utilizes the iCloud backup to make certain all your shed information is simply a couple of clicks far from returning to life again.
Promptly Pinpoint Missing Data
You don't have to invest a lot of time in checking a particular documents among hundreds given that it can allow you promptly identify an individual documents.
Having actually contrasted the web content between iPhone storage as well as iTunes backup, it quickly finds out the missing documents. As a result, the job of looking any type of data is no longer made complex.
Import Data Straight on Your iPhone/iPad
The ability to rapidly recuperate erased notes from iPhone makes it very useful. To me, this is an awesome performance that has added an all new dimension to it.
Furthermore, it enables you to export your data to the desktop computer in the wanted style. You can additionally send them as a full backup.
iphone Fixing Equipment
The software now aids you to fix your damaged apple iphone from any system crash. There are times when iphone devices do not function correctly as a result of specific concerns like random collapsing. The tools have been keyed to solve such troubles.
The iPhone proprietors that often encounter aggravating concerns on their gadget as well as locate exceptionally tough to settle them wish to having a go at these repair tools. I rejoice to see them as they can be of terrific assistance on numerous events.
Ready to Get Started?
With the revamped UI, PhoneRescue has actually become extra user-friendly. I bet, you would certainly discover it a great deal easier to move on with.
See to it:
Turn on Plane Mode (Setups → Plane Mode). Stay clear of running any type of applications in the background. Don't make use of any cleaning software application. Turn off iTunes as well as other third-party software application. Action # 1. Download and also mount PhoneRescue on your computer system.
Action # 2. Next, you need to connect your apple iphone to Mac or PC.
Step # 3. Currently, you will have the choices to recover your information from iphone device, iTunes backup, iCloud account. Besides, have a look at iOS repair service tools which will allow you take care of a busted iOS device from any system crash.
Select the needed choice and also proceed with the instructions to either obtain files or fix your apple iphone.
The Judgment.
PhoneRescue has actually constantly been amazing data recovery software program. However, this time, it has actually become a total bundle thanks to the boosted performance along with brand-new features.
" Whether you are food craving for a flexible tool to allow you get virtually any type of shed data on your apple iphone or dream to have superb repair work devices to fix issues with utmost ease, you need to offer it a worthy position on your Mac or Windows COMPUTER.".
0 notes
Text
Just How to Make Use Of LICEcap to Document and Transform Display Catches right into Animated GIFs
When I covered enhanced plugin installs being eliminated from WordPress 4.2 recently, a couple of visitors asked how I produced the animated image that demonstrates how glossy updates function. I utilized LICEcap by Çockos Incorporated, which is free, GPL licensed software offered for Windows and OSX.
LICEcap has a flexible frame that you place over the content you intend to tape. You can readjust the frame by hand by dragging the edges with your mouse cursor, or you can key in a precise size. You can likewise change limit frames per 2nd, but keep in mind that the greater the number, the bigger the file size will be.
When you hit the record button, you'll be prompted to name the file and also select where it will certainly be conserved. There's likewise configuration settings that permit you to manipulate the recording.
I don't recognize what the majority of the choices do as well as LICEcap does not have any type of documentation outside of this discussion forum. I recommend examining the box to make use of Control + Alt + P to pause the recording. By doing this, you won't see the mouse cursor move off the display to click the pause button. LICEcap doesn't have an editor to take care of frames so if you make a mistake, you'll need to start over. Because animated GIFs need to be as short and little as possible, the absence of a frame editor isn't a large deal.

When everything is set up, click the save switch and a three second countdown begins. When the countdown reaches 0, LICEcap begins taping activity within the frame. Under left of the recording home window, you'll see the size of the frame, timestamp, and the amount of FPS.
Once you're pleased with the recording, submit the GIF data to the WordPress media library. When you put it right into a post, make certain to use the full size image since animated GIFs do not scale along with JPG files.
A Few Tips When Developing Animated GIFs
Maintain the recording as short and small as possible. Resize the recording window so it's just as large as necessary. Animation such as scrolling and page browsing ought to be maintained to a minimum. Last but not least, have fun with the recording options as there might be a mix that decreases the file size of recordings.
Animated GIFs are wonderful for a couple of laughs, however they're also a superb method to show how something works. They're a fantastic option when using video doesn't make sense. What do you utilize or recommend to videotape screen records in GIF format?
0 notes
Text
The Very Best iPhone Data Recovery Software
Why Do I Need iPhone Data Recovery Software?
Nowadays, it seems as though we lug our entire lives on our phones and mobile devices. Numerous pictures, voice recordings, memos, calendar dates and also contact number circumnavigate with us anywhere we go, and also we always assume that those pieces of information will be easily available whenever we need them.
Yet, life can be unpredictable, as well as all digital devices have the possible to fail. Whether from an unsuccessful upgrade, a forgotten password, or even more catastrophic scenarios like water damage or theft, our most priceless and also vital details can be gone in a flash. Backing up your most important data is a crucial step in today's gadget-reliant world, yet sometimes we fail to remember to in fact back up our info until it's far too late.
The good news is, options exist to take several of one of the most immediate stress off of an information loss situation. A few of the leading recovery tools include Tenorshare iPhone Data Recovery, Data Recovery for iPhone, EaseUs MobiSaver and also iMobie PhoneRescue.
iOS Data Recovery: What to Try to find
A variety of iPhone recovery tools exist, yet knowing which one is right for your situation can be complicated. Right here are some crucial elements to consider when you're in need of an effective healing solution.

Compatibility
The very first thing to search for when it concerns data recovery for iPhone is a program that is compatible with your device. As newer generations of apples iphone and iPads turn out, healing software application is doing a sufficient job of maintaining, but not every program works with every generation. The specifications are usually pretty very easy to discover on a designer's web site. Know the version and also iOS of your gadget to ensure that prospective recovery programs will work.
You should likewise verify that the iPhone recovery software application you select is compatible with your pc. Although iOS recovery programs manage data recovery on Apple devices, some programs are only developed for use on a PC. On the other hand, some programs are only for suitable with a Mac computer. Since proprietary software program is the exemption and also not the guideline, it is very easy to think that a picked program will certainly have both versions readily available. Double-check this prior to you purchase it. If you wrongly assume that a program has both variations, as well as you are inaccurate, you may not be able to return it.
Healing Methods
3 major kinds of iOS data recovery exist: straight scan, iTunes backup and iCloud backup. Straight scan, as its name suggests, entails attaching your gadget to a computer by means of USB and also scanning it for any type of salvageable files. The iTunes backup technique needs you to have formerly synced your with your iTunes account; from there you can recover the most current backup. These iTunes files might be secured, so picking a program that can manage encrypted files is imperative if you want to recover information utilizing this technique. The last method is the iCloud backup, which is similar to iTunes because you have to have formerly synced your device to your iCloud account.
Expense
The price of recuperation software program can differ, so it pays to ensure that a program fully meets your needs before you purchase it. Numerous websites supply totally free trials with minimal functionality. If you are intimidated by computer software, make sure your selected program has a technology support line provided on its web site, or a money-back assurance at the minimum.
Losing information can be possibly disastrous, yet there are lots of iOS recovery tools offered to ensure that all is not shed for life. Your first line of defense need to be on a regular basis arranged back-ups, but an excellent recuperation software application system can help you recover data you stopped working to sufficiently support in the first place.
0 notes
Text
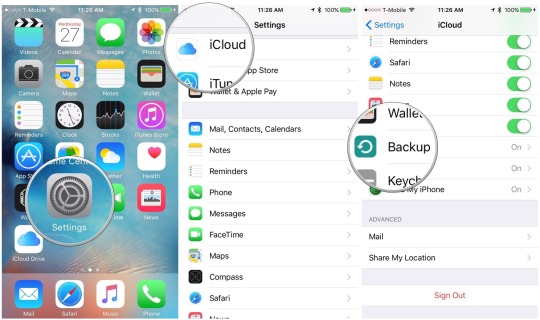
Easy Steps to Backup iPhone Pictures
If you are an iPhone user then you already know that its camera functionality is something to swear by. Taking pictures and shooting videos is more fun with this Apple smartphone. It is like never enough for you and you keep hoarding it on your Camera roll, then comes a time when everything seems to be overflowing. At this time, you need a backup to store your videos and your pictures elsewhere. Through this article, you will learn three easy ways to store your iPhone pictures.
Using iCloud
The first thing that you need to remember when it comes to iCloud backup is that it helps you get rid of clutter from your iPhone. You can easily store your pictures on iCloud and the best part is that you can take a backup at anytime. Using the Wi-Fi network, it is possible that you can easily initiate the process of backup to iCloud. However, you need to remember to enable the option of My Photo Stream within each picture that is stored in your Camera Roll. This way all the pictures will be uploaded to iCloud and it would be automatically available in Photo Stream.
First you need to enable the My Photo Stream to create backup of pictures on iCloud: Settings-> iCloud->Photos-> Enable My Photo Stream
• After taking pictures you need to connect to Wi-Fi so that your new pictures are immediately backed up in iCloud
• The iCloud pictures will appear in Photo Stream
Here, you need to remember that the pictures that are there in iCloud cannot be transferred to your system however, you can view them in your iPhone or your iPhoto or your iPad. Another thing is that Photo Stream only offers you with the advantage of keeping recent 1000 pictures. These pictures are stored in iCloud for duration of 30 days. For more than 1000 pictures you will need to synchronize them to iTunes. Using iTunes
If you are wondering that you need more than what you have for taking backup with iTunes then you are wrong. Taking backup with iTunes is relatively hassle-free and would only require a system, iPhone and USB cable, here is how it is possible:
• Hook up your iPhone using USB cable
• Launch iTunes
• Go to Device-> Backups-> This computer-> Backup now
You need to remember one thing that when you are taking backup with iTunes you do not have the choice of selectively taking a backup. Additionally, you can only view your pictures after restoring them to your iPhone. To restore pictures form iTunes backup, you can utilize a program like PhoneRescue.
If you have selectively taken backup of your iPhone pictures then you can easily transfer them to your desktop. All the pictures stored on your iPhone can be sent to your desktop.
Taking Backup to Desktop
It hardly matters which system you are using as your desktop because there are means of transferring your pictures that are lying in the Camera Roll of your iPhone. Even if you are using Windows system you can use the AutoPlay or Windows Explorer. For Mac there are other options like iPhoto, Image Capture, Aperture, and Preview.
One thing that you need to understand here is that you can create a backup of Camera Roll images only. This means that Photo Stream pictures are out of question including My Albums and Photo Library. However, using a tool that will help manage iPhone will give you desired results like iMobie AnyTrans, Here is how it is possible:
• Download and install iMobie AnyTrans program to your desktop system
• Using USB cable connect your iPhone to it
• Launch AnyTrans program and go to Photos to choose the pictures that are already in your device and select the pictures-> choose Mac/ PC option
No matter what mode you are using if you are not able to go through the process of transferring your pictures from your iPhone or your Photo Stream to desktop or iCloud then you can seek expert technical help in this matter. An expert will help you create the backup proficiently without any hassle if you are not able to do it yourself.
0 notes
Text
Creating Bootable OS for Backup
Today, we are going to discuss about one of the most ignored yet utterly vital aspect of owning a Mac – backing up your precious data.
It is probably the worst situation to find yourself – with a crashed hard drive and no access to all your data. This probably means all your music, pictures collected over many years, all your digital documents and any important projects you were working on. In most cases, this means a permanent loss of data, unless you can afford data recovery services which are usually expensive. Moreover, data recovery does not come with a 100% guarantee – nobody can recover ALL of your data, at least no without damage.
In such a situation, your only way out is a backup of your data from which you can restore everything you hold dear on your Mac and one of the best ways of doing that is via a software which can help you create said backups. And in this post, we will discuss how to use one of the most popular such suites for Mac – Carbon Copy Cloner.
Carbon Copy Cloner is a backup software that can create bootable backups of your Mac – meaning that in the scenario where your Mac’s hard drive has crashed, you can simply boot up your Mac via a Carbon Copy Cloner backup without the hassle of data recovery.
Installing Carbon Copy Cloner
Grab your copy of Carbon Copy Cloner from Bombich.com and go ahead with the fairly simple install process. Post install, launch Carbon Copy Cloner to begin the backup process.
Carbon Copy Cloner's Main Interface
Carbon Copy Cloner’s GUI is fairly straightforward and simple. Make sure you select your Mac’s OS hard drive in “Source disk” and in “Target disk”, you select either an existing partition on your Mac, an external HDD or another Mac.
Press the “Clone” button, and post accepting the warning that pops up, your backup should begin.
The backup process can take anything from twenty minutes to 2 hours depending on the size of your backup, and the type of connection in use (USB 2.0, USB 3.0 or Firewire).
Booting From Your New Backup
To do this, simply reboot your Mac and hold down the “Alt” (Option) key while your Mac powers on. In the consequent options, choose your new backup as the boot drive. Your Mac will boot up as usual, however USB backups can take longer to boot than backups on a hard drive partition.
Beyond The Basics: Scheduling
To avoid performing this process repetitively, you can simply schedule Carbon Copy Cloner backups. To create a schedule, follow the steps previously stated and on the final prompt, choose “Save task” rather than “Clone”.
The “Schedule” window will appear, and you can now schedule hourly, daily, weekly and monthly backups.
Note: In case your “Target disk” is an external USB, scheduled backups will occur only when that disk is connected.
Beyond The Basics: Restoring From Your CCC Backup
However, we keep backups for worst-case scenarios – like our Mac crashing with permanent corruption of the OS installation, along with loss of data.
In such a case, simply boot up from your Carbon Copy Cloner backup and when booted up, run Carbon Copy Cloner. But be careful – this time you must choose your Carbon Copy Cloner backup as your “Source disk” and your original Mac partition as your “Target disk”. The rest of the process remains the same, and voila! In simply a span of a few minutes, your original Mac OS is up and running.
To access it, simply reboot, hold the “Option” key and choose your Mac OS partition to boot up. Make sure to disconnect any external drives.
Conclusion
This post has covered only the basics of Carbon Copy Cloner, with a host of advanced features yet to be discussed, most significant of them being incremental backups – the ability to backup only the changes you have made since the last full backup, reducing your backup time and making the whole process highly efficient.
Carbon Copy Cloner is highly recommended for anyone who wants to keep a bootable backup of their Mac handy for that I-hope-it-never-happens-to-you scenario. If you find it to awesome, just remember that it’s a donation-ware, so feel free to donate some money towards its continuous development.
0 notes
Text
Role of GIF In Garnering More Social Media Traffic
The presence of animated GIFs has increased rhetorically over the past few years which is providing websites with a new and effective way of attracting more users. These fun and moving images can have a big role to play in determining the fate of your social media campaign ad by reaching your target audience in a better manner. Let us see how:
Given the fact that people are most likely to spend their leisure time browsing social media portals, the GIFs with their eye-catching attribute can be the perfect pick for attracting them. Their charm and perpetual movement can provoke the ever-so-desired “Stopping Power” which is bound to make people stop and take a look at your content while scrolling through their timelines.
You can do everything from making your audience laugh to educating them through the 5 second GIF clippings. This is why they are extremely important for communicating a particular idea or mood.
Compared to informational pieces, GIFs can show a sequence in motion as well as convey attitudes, ideas and forms of humour. This becomes crucial when the spirit of your brand is being expressed for showcasing a more authentic and human image to the users.

Given our hectic lifestyles, we hardly have much time for sitting back and studying the offer documents of a particular product or company. In such a case, GIFs can be the easier and faster way out while showcasing new collections and sale items as well as offering your services to the public.
GIFs can narrate a story in a dynamic yet concise manner so that you can present your proposal to your followers in less than a minute regarding why they should opt for your brand and how your corporate image has changed over the years.
In a way similar to infographics, GIFs can serve as the perfect tool for summarizing and expressing information in an instructive manner. Animated diagrams, dynamic graphics and maps are some of the biggest examples of such GIF applications which present data in an easy-to-comprehend and accessible manner.
Animated GIFs can be your absolute salvation while trying to explain a particular process to your target audience such as how to use a face pack or maybe a shampoo. In this way, a few-seconds-long GIF can save you the trouble of imparting an hour-long lecture and facing constant service inquiries.
People usually spend their leisure time scrolling through social media feeds. Thus, nothing can match up to the potential of such a content which can make your audiences share a good laugh. Herein lies the importance of funny GIFs in helping your audience relax and have some good time online.
You can create animated GIFs using the LICEcap tool which can capture a part of your desktop for being saved directly in .GIF format. This intuitive yet flexible application ensures lightweight functioning and high performance as you get to enlarge or reduce the size of GIF by simply editing the window dimensions.
0 notes