Statistics
We looked inside some of the posts by exploring-art and here's what we found interesting.
Average Info
Notes Per Post
15
Likes Per Post
14
Reblog Per Post
1
Reply Per Post
0
Time Between Posts
15 days
Number of Posts By Type
Text
7
Last Seen Tumblr Blogs


Fun Fact
Tumblr Inc. has $15.1M in annual revenue.
Text
Review on Final Project
The Final Project is now complete, so its review time yet again!
Let's start off with three key things that I learnt through this
Watch your laptop's performance
Make sure you use (high performance) proxies!
Make sure to save constantly and make several copies!!
Throughout the post production of the film the programs were too heavy on my laptop, causing frequent program crashes, black and blue screens of death. With one fatal one causing the opened files to corrupt, setting me back 2 weeks right at the deadline! So make sure you keep an eye on your processes!

As mentioned in the previous blog, I decided to create a film about "sight" or specifically, what you can't see but what the camera "hears". It honestly was a lot more challenging than I thought to materialise my ideas, then having to repeat it again due to the corruption. But it was a fun challenge indeed!
Reflection
There is definitely a lot of things that I learnt from the first project, but more so in this final one. From effects, timing and blend modes, to playing with opacity, rotoscoping techniques and audio adjustments. But likewise there were aspects that I didn't realize or needed to develop more:
First was that I didn't draw enough frames again on the 16mm film. Unlike digital where I can insert more frames, since the 16mm was recorded using a Steenbeck, it made it difficult to add more frames. I did add a few more here and there by digitally editing them in Photoshop, but it just didn’t feel the same.
Second was rotoscoping. After researching and realizing that rotoscoping on Premier or Hitfilm required using the line tool and how it wasn't as versatile as I thought, I quickly searched how to import the video into an animating software and rotoscope that way. Unfortunately this was a lot more difficult than I imagined as well. I tried programs like Blender and Pencil 2D. But Pencil 2D did not support video import, and Blender was a bit confusing to use, especially in the short time I had.
My version of Photoshop was also missing the Dynamic Link so it couldn't import videos either. So I converted all the parts that I would like into an image sequence and imported them into the timeline, manually editing each frame’s time duration as the default is 7 seconds and I wanted it to be at least 0.03 seconds. My limit was rotoscoping and animating 30 seconds each day before either the day is up, or my steam runs out. Thus losing those 2 weeks meant that I needed to redo something that took me a minimum of 5 days. It also meant that since I couldn’t directly link the video content to the animation, I needed to make time markers such as the following to know how much to rotoscope:
16 sec of walking before clunk sound, then 6 seconds more before music starts
7 sec of wind
People walking 10 seconds
Horse = 3 seconds
More walking 7seconds
Bell = water
Waves 20 seconds
Listening to music and slowly sitting down
I also had to make sure that I saved it in parts not only to avoid corruption again, but to decrease the file size. Nevertheless, I learnt a lot about rotoscoping, animation and how to do that in Photoshop! Hoping to do it more for fun and casual use.

Lastly, timing. I felt like my timing for a few parts were a bit off after export, but when editing, it seemed to be aligned with the audio. I’ve tried several times but to make the deadline, I had to be quick as it takes at least an hour for the 5 minute video to render and be exported. There were a total of 6 audio tracks and 5 video tracks to care, keep an eye out for and render. Even though I was using the frame to frame hotkeys (< and >) to make sure that I was getting it in the right place, occasionally due to the proxies and lag, what I thought was in the right place turned out not to be. It became a bit of a gamble whether I layered them in the right place and paced them correctly or not!

Explanation
Sypnosis:
A blind girl goes about her daily life when she falls asleep on the bus. Only to realize that after getting off, she left her cane on the bus. Panic and anxiety start to set in until she hears a meow from a cat and starts to follow it. Calming herself down, her imagination starts to go wild as she envisions all these strange and mystical objects that appear before her based on what she hears, developing a peculiar and fun world to explore in from this unknown newfound place.
By utilizing the two different techniques, I was able to separate the two different “worlds” and perspectives. With 16mm film and 3rd person perspective as the “real world”, and digital rotoscoping/ animation and 1st person as the girl’s imaginative world.
Noises aren’t always as they seem. Similar to how foley artists use an array of different and peculiar objects to make sounds, a lot of the noises I got were used to inspire other objects. Such as the clunking of the light rails sounding a lot like chickens clucking or a boat in rough seas with its bell. The visual of the wind to represent zoning out to all the noise just like how everyone does, to buses that sound like whales as they pass by, and women running in heels to the footsteps of horses. I was also lucky to be recording when there was a band nearby playing, “giving” me the background music I needed otherwise I would’ve been stumped as to what to use. There were a few times where the transitions were a bit rough such as the movement to look at a bench and sit down, but it was a great experience. There are a few easter eggs here and there so I hope you can find them and that they were able to be expressed nicely!
I also learnt a lot about blind people and how they get by through a Youtube channel by Lucy Edwards. Learning and taking inspiration, the girl in my film travels and is notified a lot by morse code vibrations through her phone. The three messages that occur are:
Bus is coming
Searching for location
Location unknown
I was nervous at the beginning of rotoscope animations as I thought that each frame needed to have very smooth transitions, making it a very daunting task. Until I stumbled across a Youtuber named RubberRoss where he and a group of other animators would animate on a web game called Gartic Phone. It both intrigued and inspired me as though there were only a few frames and each drawn by a different person, how they were able to create a “story” with such high dynamics and flow. I quite liked the ending result of the rough effect it left which lead me to enjoy it (as not everything is smooth sailing in life).
Alas, this brings me to the end of my experimental journey for now. There are a lot of aspects to film that I learnt and there are still more to go in which I hope to check out in the future one day! There is a lot more I could develop on in my own techniques as I’ve only made two films, and even they have more things I could refine on. The final film is a bit rougher than what I imagined, but its roughish touch has quite a nice effect at the same time. One thing in particular that I could’ve changed is to see what effect would it have if I completely got rid of the original real-life film and just had the rotoscoping, possibly leaving the audience thinking more. Since they were done in Photoshop, if I would like to change that, I would have to go into Photoshop, hide that group, exporting as an image sequence, import it back into Hitfilm and then realign it back to its position. Nevertheless, I’ve had a fun journey learning a lot of interesting and unique techniques while expanding my knowledge!
Thank you for following and supporting me on this experimental film journey and hope to see you on my next art medium!
“There is no such thing as going back to square one. Even if you feel like you’re having to start over, you are trying again with more knowledge, strength and power than you had before. Your journey was never over, it was just waiting for you to find it again.”
― Unknown
(P.s animating the chickens was probably one of my favourite parts! Look at how fluffy they are~)
Fun fact:
I had a total of 1 hour of raw footage to sift through, totalling to 19GB
A total of 10 copies of the editing file
Split the rotoscoping/ animation part into 9 section after the corruption
Altogether the whole project is a whopping 50GB!!

4 notes
·
View notes
Text
Animating rotoscopes
Imagining what we cannot see
Just got the 16mm film back from digitalization and it is better than I thought it would be! Since the frames are so fast (which I will get to play around with post edit), all those tiny mistakes and insecurities about the clarity of the scene disappeared. It was really exciting to see what the raw film created and I can’t wait to sequence it to the soundtrack I’ve roughly made now. The fact that it wasn’t lined up right on top of each other also allowed the animation to have more “life” as it jumped around in the frame rather than being stationary.
To the next step, rotoscoping!
I found a website by Into Film about rotoscoping in big films which made me realize what other films used this technique. Some that I knew of such as older Disney films that used this technique a lot (and still do to this day), to others I didn’t know which really opened my eyes. This included the most recent in their list, Guardians of the Galaxy where they used rotoscoping for Rocket with a racoon named Oreo as his base. Since there are so many articles and tutorials on rotoscoping, the more I read into it, the more immersed I get. Here are some more links to other blogs, tutorials and articles that I found interesting which would help me in my own rotoscoping:
What is Rotoscope Animation? The Process Explained
Learn what is Rotoscoping and how to use it in Animation
A Complete Guide to Rotoscoping
Another inspiration I used is the vast pool of animation and animatic videos. One of which is Nazoani_Museum on Twitter. They are a Japanese account that posts a lot of different small original animation snippets which I love to watch, especially since some of them are so unique and go off into their imagination. YouTube is also a great source of inspiration. You can use also the “,” and ”.” (or “<” and “>”) on your keyboard to go through a video frame-by-frame. I would use this to study how animations would be done and the pacing of the frames. Otherwise I would put in all the in-between frames in which gives off quite a stagnant feeling with no dynamics, stretches or pulls, creating a “flat” animation.
Original from Nazoani_Museum
I have done claymation and frame-by-frame animation in the past which serve as a good base for the skills that I have today. Though it has been a while (at least 6 years!) and newer programs have replaced the ones I used, I can’t wait to get my hands deep into rotoscoping and releasing my imagination. The perks to what I’m imagining is that I will be doing the rotoscoping digitally to express the clear contrast from “real life” (the 16mm film) to the girl’s imagination (digital rotoscoping). This will also allow me to see the raw footage that I took on my phone and either omit, add or enhance detail to the scene; creating something out of nothing, just from what the camera hears. This also gives me the added benefit of being able to “control + z” for undoing any mistakes!
Moving on, I’ll be using a test animation sequence that I’ve been dying to create as my experimentation piece to get me used to it before I start. But always learning different art skills, techniques, and different ways to do it is always so interesting and fun to do! Having the tendency to make life harder than it is, will always lead me to uncharted paths that I never stop enjoying and I can’t wait to see what challenges lie ahead!
“The journey is never ending. There's always gonna be growth, improvement, adversity; you just gotta take it all in and do what's right, continue to grow, continue to live in the moment.”
― Antonio Brown
“Let your joy be in your journey - not in some distant goal.”
― Tim Cook
0 notes
Text
Stage 1 out of many
“Animating” on 16mm film
Animating by directly drawing on 16mm film and rotoscoping is a fun challenge indeed.
Though I haven’t just yet finished my storyboarding, I find the pleasures in “happy accidents”. My storyboards typically consists of bullet points rather than visual images right now as I tend to find myself restricted if I create a visual one. I like to let the medium guide me and inspire me to do the creating.
“I am enough of an artist to draw freely upon my imagination. Imagination is more important than knowledge. Knowledge is limited. Imagination encircles the world.”
― Albert Einstein
At this stage, I have just finished animating on the 16mm black film, sent it for digitalization and got all my audio roughly sorted out into a 5-minute duration (however, I am still collecting more as you never know what sounds will appear, or even, what sounds the camera will hear!)

Drawing on 16 mm film turned out to be just as challenging as I thought from Project 1. I used the technique of wetting the film first to make it easier to scratch into, but developed it even more as I noticed a few more things:
If the film is too wet, it will create these bigger bolder lines that are a bit wavy shaped
If the film is too dry, occasionally it will be the same as if it wasn’t wet in the first place or create these really thin lines
If wet then lead to dry, ideal - where it creates these average thin lines
If it was scratched into while water is on it still - unpredictable as the water can create various lines depending on how much is “absorbed”

I also learnt from Project 1 to add a “soundtrack” line which I covered using masking tape. This allowed me to know where the “borders” of the frame would be, which I didn’t notice until after the film was developed in Project 1. Although the soundtrack is about 3mm only, it does make a vast difference in centering since the frame is so small. I also made sure to leave a frame or two between each segment so that they don’t “blend” into each other as it passes through the steenbeck/ flatbed scanner.

Though there are a lot of films and even larger theatrical films that were done on 16mm film, they also used cell animation. Nevertheless, I found this website as I was researching how draw on film was done and found it as a really great source of inspiration. If course there are several others such as on Lightcone, YouTube and other media sites, just the simple information and quick tutorial on how to draw on film gave me confidence, especially the line “You don’t have to worry about straight lines, most of the animation sequences are more like scribbles”. It made me more confident to trust the abstractness of scratching into the film as I mentioned, it is such a tiny frame, it is difficult to see all with the naked eye. I did however, sketch the frames first with a water-based maker to outline what I wanted to draw, where, making sure it is the same size and if it is centered.
https://webneel.com/drawn-on-film-animation

That is the development I have so far. I can’t wait to see how this film will turn out as I continue to develop my technique in experimental film!
0 notes
Text
Final Project proposal
What to do, what to do.
The final project is a 2-5 minute film about anything, using the techniques we have learnt so far and endless inspiration. So! My proposed film’s synopsis is as followed in this blog!
“Poetry is inspired by the elements of random thoughts, an overflow of gazing at the unseen.”
― Michael Bassey Johnson
Inspired by this quote, I desired my theme to be Sight; what can or can’t be seen.
I’ve always been interested in what we can and cannot see such as sound waves, imaginative creatures, powers, nature, mythology and so forth. But another meaning that I bring is that since being stuck in lockdown, we all have tend to lose sight of what we are after, so it becomes like a reset.
Research, Inspiration and Meaning
Developing over what we have learned, seen and done in class, these 4 other items have further inspired me:
Out of Sight is an animation film of a blind girl as she explores and fantasizes about her world when her guide dog went to chase the thief who stole her bag. She starts to fantasize about being a witch, taking a stick and imagining it to be a star wand, and exploring the surroundings before her. I took the inspiration of how shapes were used to describe objects and sounds before the little girl was able to figure out what they are. Such as the ball rolling around until its revealed to be a cat when it meows. This thought of curiosity as you figure out what they are is something I would like to incorporate.
Out of Sight (敲敲)
Next, two other Youtube Dance films on rotoscoping express the technique and how I would like to do it. This included when they rotoscoped over the dance moves, accentuating them, but also adding other elements such as omitting details or adding things that weren’t there.
January 2019 Animation Compilation
Rotoscoping animation 로토스코핑 [ every single thing - Homeshake ]
The last inspiration was the book Sight by David Clement-Davies. Albeit it has been a long time since I read the book and that I may remember parts incorrectly, but the book is about a pack of wolves where few possess a strange mythical power called the Sight. I remember it being a book full of mystery and fantasy as I was drawn into their unique journey. I would like to bring this aspect of journey and storytelling to my film too.

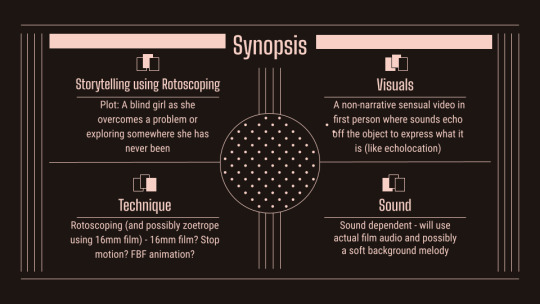
Synopsis:
My main plan is to do Storytelling using Rotoscoping.
With the plot currently being: A blind girl as she ovecomes a problem or how she is exploring somewhere she has never been.
Though the plot currently doesn’t sound all too unique and original from what I just said my inspiration was. The visuals is to be a non-narrative sensual video in first person where sounds echo off the objects to express what they are (similar to echolocation or how sound waves can be used to portray an image). I have not just yet decided what problem or encounter the girl would meet, but I would like to explore the idea of coming out from lockdown and trying to explore the world yet again.
For the technique, as mentioned I will mainly be using rotoscoping (and possibly the idea of a zoetrope using 16mm film which I have benn trying to accomplish, but not just yet succeeded). The other ideas were to use 16mm fully such as using the black or clear film, stop motion or even frame-by-frame animation. The reason why I chose to do rotoscoping was not only because I have yet to make a film using this technique, but also due to the ability of being able to have the video, and change it to just being shapes, or lines by what they sound like. It is also to be able to create fantastical immaginations from it (similar to feeling given off in Disney’s Fantasia, especially the one with Mother nature; my favourite short film!) Rotoscoping allows me to various things to the video such as simplification, abstract and fantasy!
As my film is highly sound dependent, it will use the actual film audio taken and possibly a soft background melody to have it tied to everything. But this does not necessarily mean what you hear is what you see, hence my theme and what I want to explore further for my film.
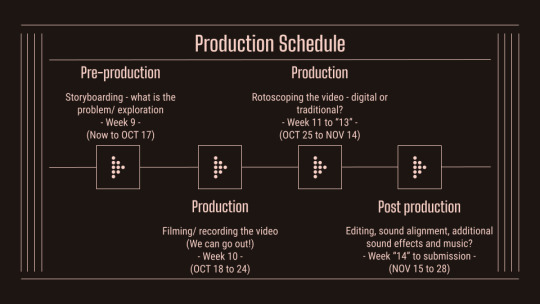
Production schedule
My production schedule is as followed:
Taking now till the end of the week to storyboard, and filming the next week as we are out of lockdown. With rotoscoping taking the biggest time gap as it is the most time-consuming component, where I will have to rotoscope the whole film. After would be the fun of post-production yet again!
Well, it's time to create the storyboard! Though right now I have a plan of what I would like, I have no idea how it would turn out as (experimental) film is a unique medium that not only lets you create what you want, but also leads you down unexpected paths. Paths that I am excited to explore!
0 notes
Text
Review on Project 1
Project 1 is complete so its review time!
The theme for Project 1 was “Rhythm”.
I took it quite literally, basing my film heavily on the beat of my song chosen, rather than creating a beat for the film. Thinking of this quote throughout the project:
“To live is to be musical, starting with the blood dancing in your veins. Everything living has a rhythm. Do you feel your music?”
- Michael Jackson
Concept Execution
I got my inspiration from a lot of other films; both from the ones shown in class to the ones that I researched myself. Here is just a screenshot that showcases just a few of the many I saw.

But my main inspiration is “Forget” by POGO (shown at the bottom left corner), which is also the song that I used in my film. The reason why it was my main inspiration is that the song itself was created by a remix of sounds from Disney movies. As a result, I wanted to create a rhythmic film by creating something from a mash of things (just like a remix). The use of 16mm film allowed me the possibility of creating various types of film due to its vast and various applications due to many additives and subtractive techniques, and the ability to portray several shapes and movements.
I named my film “Fever Dream” as the words “Go Dream” are often repeated in the song. Also while watching my film, you get the feeling where you just sit there, bobbing along to the sound of the beat. Where you’re not thinking of much and just absorbing the film. Or possibly daydreaming of the future or reminiscing in the past.
Rendering
Since I was following POGO’s style and creating a remix, there were a lot of post edits including slowing down, image sequencing, repetition, blend and colour dodge, reverse, colour balance/ curves, sound layering and more. The one that I learnt more about was image sequencing in which I did to make it easier for me to edit. It is where I took the video, change it into image files, and reordered them. Changing the time and creating repetition to make a stop-motion like snippet. I layered quite a few snippets so that I didn’t have to trim each clip everytime a new part showed up just for a few seconds, some with blend modes while others don’t have.
Here is a screenshot of just how much editing I did:

Development
This project has allowed me to understand how 16mm film works, a medium I’ve never worked with, but dreamed to. I found out that if you wet the black film, it makes it easier to scratch into! Originally I wetted it to reduce the amount of “dust” coming from the film and going everywhere as I was scratching out full frames. But was delighted that it made it smoother and clearer to scratch into too. I was also happy that the scratch marks on the transparent film also showed up to create another film variant.
It also opened my mind to the difference between the physical look of the film reel, to the digital processing. Where I can now ask questions such as:
What fits in the frame?
What visual difference is there from taking a scan/ photo vs the steenbeck?
Such as using the flora which only expressed shadows into the steenbeck, and washi tape and newspaper. Though they were translucent, the colours that I had did not show through which created these intricate translucent shadows.
Furthermore, I also got used to using a video editor. Being conscious of aspects such as pacing/ timing, alignment, editing, sound and visuals. Automatically the film was set to fill the whole frame without the black borders. But I quite liked the effect created by it so I changed the settings to keep it.
Lastly, it opened my eyes to the difference between thoughts and outcomes. In addition to the song, I also wanted to incorporate the sounds created from the found film’s soundtrack. However, the steenbeck was having trouble recording soundtracks. Nevertheless! I was able to incorporate the sounds coming from the steenbeck and layered them throughout the song, creating a quite pleasant surprise.

There were a lot of small details that I learnt from this - from transparency, editing, alignment and more. This project was extremely fun and allowed me to just go crazy with my creativity (which I hope was conveyed through my film). But I do want to try other techniques that I wasn’t able to do such as zoetropes and rotoscoping, and hope to continue expanding my horizons with experimental film!
0 notes
Text
Films made without a camera
Zoetrope and Praxinoscopes, Rotoscoping, Stopmotion, Additive and Subtractive Techniques
Hello! It’s been a while~
Over the weeks since my last post, we’ve come across many techniques to create film without a camera (or at least an analog camera). This’ll be a longer post but I’ll be recapping some of what I’ve learnt and what inspires me for each one!
Zoetrope and Praxinoscopes
Zoetrope, meaning “turning life” in Greek is the early type of animation machine from still images.
I think the first time I ever saw one of these was in a science museum and has ever since loved them. Though I haven’t looked into it in recent years, I’m amazed about how much they have developed over time. From how people have developed it into 3D zoetropes to even inverted and shadow zoetropes
One that really interested me was Moray McLaren’s “We Got Time”
The seemingly one take video took my breath away the first time I saw it. It felt like it was truly hypnotizing; drawing you in. I just loved the take on a modern zoetrope and the story telling ability, along with how they were able to stack up several zoetropes on top of each other, then remove it again too.
Moray McLaren - We Got Time
The other was Christine Veras “Silhouette Zoetrope”
It’s a simple yet intricate piece where the zoetrope is “inside out”. I really liked the illusion it was able to create, with the bird “disappearing” as you move the zoetrope since it is backlit.
Silhouette Zoetrope
Here is an example of a 3D zoetrope using the Catbus from Tottoro!:
Rotoscoping
I never knew that this technique was called rotoscoping. Rotoscope is when a source material is used and traced over or cut out parts of the image to create a new composite image, kind of like a traced stop motion animation. Now that I think about it, there are a lot of these on TikTok where people animate dance moves onto anime characters digitally. Below is a link TikTok compilations on Youtube:
Anime characters dancing compilation | tiktok compilation | 2021
I always wondered how they were able to do it. But now that I know, I can’t wait to try this out myself - both for this project on analog film or personally digitally. There are also several videos on how to rotoscope on Youtube that it makes me really excited to try.
Stop motion
Stop motion will always have a place in my heart as it was the first film technique I ever did with claymation and using images taken on burst mode. There’s always more for me to learn and its never ending. I normally use a simple video editor and take the images frame by frame, but we were introduced with an application which would definitely make things easier, so I might fiddle around with that next time as it helps to actually see the onion layering while taking the photos instead of post editing them to line up.
There are a lot of examples of stop motion animation that I’m interested in - from those done in big picture such as Disney works and movies like Kubo, to shows like Wallace and Gromit, and more with Soupe Opéra as an example:
Soupe Opéra 16 - Soup Opera 16
Additive and Subtractive Techniques
Last but not least is working on the film itself. There are several things that have been done to the film:
Scratching - leaving marks on the film
Adding - from pasting inanimate objects such as flora, newspaper, washi tape to painting acrylic, markers/ textas, and nail polish → anything can be added so long as it is thin enough to fit into the steenbeck/ flatbed scanner
Note: if whatever you are adding onto the film is flaky, it’s best to tape it down with clear tape (and recut the sprocket holes out again) in case it clogs up the scanner
Bleach - which warps the colours, makes the film faint or even “bleach” it out. It is quite a unique and an unknown medium that gives off surprising results
Aging - can be done in various ways → from sun, leaving in the dark, buried, and more. The only issue is that it does take time to age well
Here are some I did myself!

Working with film without a camera is quite time intensive, however all these techniques have given me insight to what I can do and more. I have several ideas now floating in my head and things I can use for my final, but won’t say anything just yet!
9 notes
·
View notes
Text
Starting the new semester with a new art medium!
Experimental Film - Using analogue film to tell a story
(I’ve never used Tumblr to blog so please bear with me as I try to work this site, express my thoughts and be casual about it at the same time ^^”)
Whilst browsing through a site called Light Cone for experimental films, I was really interested in how people create such films and that there are so many styles, impacts and meanings, yet somehow strangely still look similar no matter how many years pass - and also create a film without a camera! I came across two films that really stood out to me (because I couldn’t decide between the two!):
ANNABELLE DANCES AND DANCES
Serpentine and Butterfly Dances
by AMERICAN MUTOSCOPE & BIOGRAPH CO. & William Kennedy Laurie DICKSON & EDISON MANUFACTURING CO. & William HEISE & James WHITE
1900 (1894-97) / 35mm / tinted b&w / sound / 1S / 5' 18 min
At the beginning of the film, it states that there were “no edits, no camera movements, just a graceful kinetic invocation”, however throughout the film you notice that the colour of Annabelle’s dress changes over the duration like a mood light and is never really the same constant shade throughout which makes me believe that either it was due to the natural tint of the film, or that it was made to be like that with the addition of colour as suggested by “tinted b&w”. It was interesting to see that even though the subject matter was always aligned well, at times you could see the sprockets, scratches and burn out marks in frame, really encapsulating that vintage timely feeling. Since it was a frame by frame, it really gave me the vibe of Disney's 1950 Cinderella movie with how the fabric flowed around. Additionally to what it reminded me of and with the aid of classical piano music, creating quite a surreal appearance, Annabelle really captured the sense of butterflies and serpentines dancing through her movements with the fabric. Appearing as these rhythmic flutters of butterflies which change colour over time.

EIDOLON
by Mike ROLLO
2020 / 16mm / b&w / sound / 1S / 3' 35
Going forward 120 years is Eidolon by Mike Rollo.
Where on the site it has this written as the description:
“The seer passes beneath branches, crosses fields, observes the quiet corners of creation. Bright and dark take turns showing their faces, a two-sided phantasm, one energy shape-shifting through time. The seer makes note, gleans eidolons”
With just this information and watching the black and white film again, it gives off a really ominously dark and heavy feeling as shadows pass by rocks and rustling sounds in an unfamiliar place. The sound given is quite simple yet eerily effective. The images tie nicely to it through tempo such as flickering, certain series of images get tied to a certain sound, making the film heavily montaged and edited, with lots of rearrangements. Even though it is a fairly brand new film, the way it captures time and its visual appearance is similar to those made in the past.
Quickly googling what “eidolon” is, it’s a spirit image of a living or dead person, almost like a shadow or phantom look-alike in human form based on ancient Greek literature. With this, I feel like it ties the film together more as it reflects that strange like creature hiding or lurking in the shadows. It also clarifies the description given and resonates with me deeper as I quite like ancient literature, mythology and folktales from all cultures.

Although I made quite a lengthy first blog to my first taste in Experimental Film, I can’t wait to explore this medium deeper!
(I should’ve done this with my other units! It would’ve been really cool)
Some honorary mentions are below:
DIANA THE HUNTRESS - story telling
CONEY ISLAND AT NIGHT - almost like a stop-motion animation
BYE-BYE-BLACK-BIRD - kind of confronting (almost like those TVs with the loud white noise when it gets disconnected)
SENSITOMÉTRIE II - photos into animation
2 notes
·
View notes