Statistics
We looked inside some of the posts by felis-mods and here's what we found interesting.
Average Info
Notes Per Post
6K
Likes Per Post
3K
Reblog Per Post
3K
Reply Per Post
45
Time Between Posts
1 month
Number of Posts By Type
Text
8
Photo
1
Last Seen Tumblr Blogs


Fun Fact
The “We are the 99%” Tumblr blog became the slogan for the Occupy Wall Street movement.
Text

comm of a bd3 chara !! ✧ commissions are open! ✧
30 notes
·
View notes
Text
Reblog if your an FFXIV blog!
Help the lost Twitter spirits find us all.
5K notes
·
View notes
Text
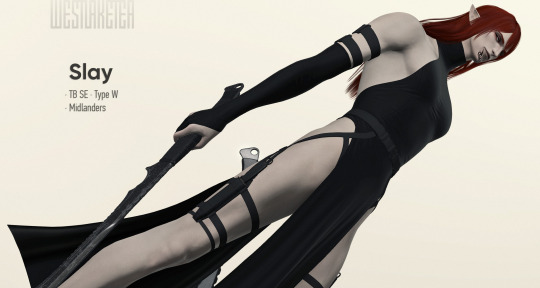
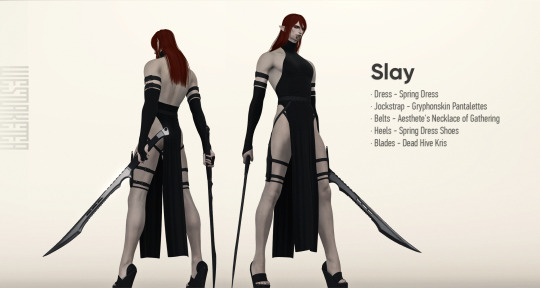

Slay [TB SE Dress + Blades]
Outfit for TB SE · Uses TB SE legs/hands + Type-W torso (shape derivative of TB SE tosro). Works for male Midlander, Miqo'te, Elezen, Au Ra, Viera. For this mod to work, you need to install TB SE
To correctly display the character in heels, use Heels plugin
Replaces: · Dress - Spring Dress; · Jockstrap - Gryphonskin Pantalettes; · Belts - Aesthete's Necklace of Gathering; · Heels - Spring Dress Shoes; · Sleeves accessory version - Aesthete's Ring of Gathering; · Blades - Dead Hive Kris.
Jockstrap has dress-friendly model option. Belts have "Cake"-friendly model option (my stockings mod).
Sleeves can clip in extreme poses. The skirts of the dress can clip with the character's butt in sitting poses. Sleeves accessory version is designed for use with Type-W mods only. Jockstrap and heels will work for male Highlanders.
Physics video
Contributor Information: Tsar - The Body SE
Public release · 2 September 2023
Boosty
181 notes
·
View notes
Text

Glowing Atramentum Luminis Eyes | XIV Mod Guide
A guide for learning how to add glow to eye textures using Photoshop & Atramentum Luminis.
33 notes
·
View notes
Text

How to Upscale Hair Textures in Photoshop 📝 XIV Mod Guide
You will need:
FFXIV TexTools
Photoshop (I use CC 2022)
NVIDIA DDS Photoshop Plugin
Waifu2x Caffe
Export the normal and multi texture maps as DDS from TexTools.
Open them in Photoshop, save the RGB and alpha channels as separate PNG files.
To grab the alpha:
Click alpha channel name
Ctrl + A to select all and Ctrl + C to copy alpha
Click RGB channel name
Ctrl + V to paste alpha
Add these 4 PNG files to a new folder, name doesn't matter.

Open Waifu2x, drag the folder into the Input path (Export path will auto generate).

These settings have given me the best results. Do either 2x or 4x (I do 4x). 3x will not give you a compatible size for TexTools. Level can be 2 or 3. I like 3 for hair, 2 for clothing usually. 1 looks like butts.

Drag all your new upscaled images into Photoshop.
OPTIONAL POST PROCESSING STEP IF YOUR TEXTURES ARE STILL CRUNCHY: For each RGB, add the following filters in this order: Denoise, Surface Blur, Smart Sharpen (recommended settings below)

These can be tweaked manually for best results. Sometimes I will add more Denoise to a specific channel, or add filters separately to each RGB channel.
On the alpha channel PNGs, add Contrast or adjust Levels to minimize gray areas. You want as little fading as possible but still have nice soft lines.

You can download the Photoshop Action preset I made for these here: Google Drive
Go back to the original DDSs and Ctrl + Alt + I to resize 200% or 400%, whatever you put in Waifu2x (this is also in the Action preset I linked above)
Ctrl + A and Ctrl + C each PNG one by one and Ctrl + V into their original locations. (you can also create an alpha channel on the RGB PNG and paste the alpha PNG in there, but I like doing it this way)
XIV textures can be real crunchy sometimes, and you might have to manually smooth out some lines with the Smudge Tool on both RGBs. I usually use a brush size of around 7 px, hardness ~50%, and strength of ~25%.
Topaz Studio 2 is also a good optional Photoshop plugin with advanced denoising filters. It helps minimize the manual smoothing and gets that deep c r o n c h.
Save as copy, select DDS and choose 8.8.8.8, make sure 'Both' is checked for color and Alpha.

Import them into Textools and YOU DONE.
Here is the before and after (again):

And here is an example of a REALLY CRONCHY hair that needed to be manually smoothed with the Smudge Tool and a prayer:

Hair still cronchy in some places?
Sorry, you gotta smooth them out manually most likely. It do be like that sometimes.
Blurring or weird artifacts near edges?
Too much gray in your alpha channels, add more contrast to it on the normal texture map.
Hair texture is too flat?
You might have lost some details or contrast in the RGB channels, this happens more often when you Denoise too much. Adjust the levels of both RGB channels until the lights and darks match the original image more. Keep the middle arrow in the center as much as you can.
How do you do this in Gimp?
I have no idea. 😭 BUT you can use Photopea! It's a free web-based Photoshop clone: https://www.photopea.com/
How do I upscale gear textures?
It's generally the same process, with a few IMPORTANT differences.
The normal texture map will give you the most trouble:
Treat the blue channel as an alpha channel (because that's what it's doing)
The actual normal alpha channel is directly linked to colorsets.
Do NOT add filters to this channel that alter the shades. If you are denoising, make sure it's lightly to minimize bleeding.
When scaling the original normal DDS, you can use Nearest Neighbor or Preserve Details 2.0 and ignore the alpha channel completely if you don't wanna mess with it (wise).
You may have to retrace some areas. I recommend Bizu's guides if you go that route. Because that stuff is Alot.
I've had better results applying filters to the individual channels, it's also easier to see that way.
It's a lot of manual blurring and smudging if you want it completely smooth, tis the nature of complex textures like fabric.
51 notes
·
View notes
Text
How to Edit Colorsets in Penumbra 📝 XIV Mod Guide
To edit colorsets in Penumbra, go to Advanced Editing and then Materials. Choose the material ending in "…_b.mtrl". The beginning will look like "GEAR_NAME/CHOICE_NAME/…". There may be several depending on the size on the modpack, so read them carefully.
You CANNOT revert back to the original colorset after you save, you have to reimport the mod for that. This is the macro I use for Penumbra Redraw:
/micon "Auto-attack" /penumbra redraw
33 notes
·
View notes
Text
How to Transfer Vertex Groups to Another Skeleton for Mashups 📝 XIV Mod Guide
So when you're doing a hair mashup, you're gonna have a bunch of vertex groups that don't do anything after joining onto another skeleton, because the bones don't exist anymore. This is a quick guide on how to rename your vertex groups to match your hair skeleton, then join it onto that skeleton. So your hair weights work! Woo! The UV part is only necessary when working with non-XIV models. All models exported from TexTools will have correctly named UVs.
Keyboard shortcuts used:
DEL - delete menu will pop up
CTRL + left click - select multiple meshes (always select the mesh you are merging to last, it will be yellow)
Default bones in every hair skeleton:
j_kao - base head bone (all bones branch from this)
j_kubi - neck area
j_kami_a - first ponytail/long hair bone
j_kami_b - second ponytail/long hair bone
j_kami_f_l - hair on left side of head
j_kami_f_r - hair on right side of head
Naming conventions for bones in extra skeletons: (h0001 used as an example)
j_ex_h0001_ke_f - front of hair
j_ex_h0001_ke_b - back of hair (similar to j_kami_a)
j_ex_h0001_ke_l - hair on left side of head (but custom)
j_ex_h0001_ke_r - hair on right side of head (but custom)
j_ex_h0001_ke_u - usually small random sections, like a little ponytail or tuff of hair somewhere
I think there are more types, but I live in the M Viera hair section, so these are the most common ones I see. Remember to update the Metadata in TexTools or Penumbra to reflect the skeleton you used before importing the mesh.
40 notes
·
View notes
Text
Terms of Use (TOU)

Feel free to: ✅ Port to another game or within XIV (different body, race, etc). ✅ Use parts of mesh and/or textures in other mods. ✅ Edit or commission edits for personal use. ✅ Do a sick kick flip.
Please do not: ❌ Monetize edits behind a paywall website. ❌ Use in hateful content. ❌ Use in NSFW content involving minors or Lalafell.
Please credit me and any original asset creators listed when publishing public edits.
Thank you!! 💙

9 notes
·
View notes
Photo
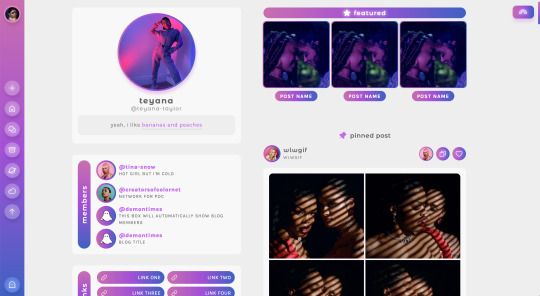
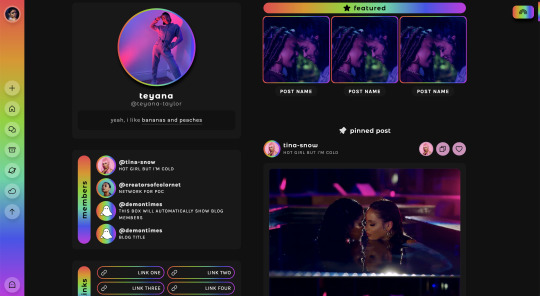
TEYANA | fansite theme by sage static preview & code / rainbow preview / live preview @lgbtqcreators event 01 — get to know the members / this theme is inspired by pride & some of my fav lgbtq+ musicians, happy pride month!!
read this post before asking questions consider supporting a gay nonbinary woc this pride month ♡
main features (more info below the cut):
navigation bar w/ blog icon, up to 3 extra links, menu button, & scroll to top
left sidebar with sections for:
an uploadable image or blog icon, title & url, custom description
optional: members, links, event, schedule, affiliates, projects, & stats
optional featured posts
follow button with status text
optional slideout menu with updates, faq, & ask box
color gradient with 3 color stops or a toggle-able rainbow color gradient!
toggle: rainbow, featured posts, slideout menu, every sidebar section, circular side image, hover tags, & glow effect
540px post size & 0px, 5px, or 10px border radius options
custom description, post margin, google font, title font, & font size
responsive design
everything except the affiliates section can be edited in the customize panel - there’s no need to change anything else in the code
terms:
reblog if using
do not repost/redistribute or claim as your own
do not remove the credit
credits page
Keep reading
1K notes
·
View notes