
Don't wanna be here? Send us removal request.
Statistics
We looked inside some of the posts by geekshelp1 and here's what we found interesting.
Average Info
Notes Per Post
1
Likes Per Post
1
Reblog Per Post
0
Reply Per Post
0
Time Between Posts
2 months
Number of Posts By Type
Text
14
Last Seen Tumblr Blogs


Fun Fact
US Tumblr user growth rate is estimated to slow down to 4.1%.
Text
0 notes
Text
#create icloud account on pc#create icloud email on pc#create new icloud account#create icloud email from pc
0 notes
Text
Printer Offline Mac
0 notes
Text
There are many different games that can be played on unblocked games. One of the most popular is basketball. Basketball is a game that was created in 1891 by James Naismith and has been played by people all over the world ever since.
There are many sites that provide a variety of unblocked games for basketball lovers.
Some of the best sites that provide these games are: and more! via @mygeekshelp
0 notes
Text
If you are unable to fix dell error code 1 2 3 then you can contact dell computer repair. Or read the article and try to solve it yourself. and more! via @mygeekshelp
#dell optiplex diagnostic lights 1 2 3#dell light codes#dell diagnostic lights 1 2 3#dell diagnostic lights 1-2 3#dell optiplex 960 error codes
0 notes
Text
The best blog posts for your content needs
The simplest ways to find blogs that get guest posts therefore you grow your audience! and more! via @mygeekshelp

0 notes
Text
Avast Won’t Open on Windows Computer after Update
The Avast antivirus is a free, powerful, and easy to use antivirus software that protects your PC from viruses, malware, ransomware, and other threats. It also offers security for smartphones and tablets.
Avast Antivirus offers a variety of features to protect you from cyber-threats including: virus protection (including ransomware protection), web protection (including adware protection), email protection (including spam filtering), mobile device protection (including anti-theft software).
Here we provide the right information Avast Antivirus is not open after the update
· Setup and Installation issue of the Avast Antivirus.
· Avast Antivirus not Working
· The user interfaces may have not been loading.
· May have issued with subscribing to Avast Antivirus.
· While installing process enabling issue has been created.
· Ways to update the Antivirus of Avast.
· Avast Antivirus Won’t Open
· How to delete, switch off or disabling the Avast Antivirus.
· When Avast Antivirus is not running or showing an error.
· Ways to fix refund or billing issues.
Ways to Fix Avast Antivirus Not Responding
Avast-Antivirus is not responding after download then don’t worry about that because it is a very common problem. It’s not so confused you just need to follow some steps and try to get rid it of.
Here are some tips to get rid of it from this Avast-Antivirus issue:
· First, you just need to sign in to the Windows as a user administrator
· Please keep in mind you need to right click on the Windows start button
· There you will see a menu displays, You must choose features and apps
· You must click on the modify button
· Ensure that you must setup Avast-Antivirus
· If you must apply above all instructions, you are needed to click on ok.
If you apply all steps which are given above for resolve the Avast-Antivirus issue
What to Do When Avast Doesn’t Open on Windows 10
There are many reasons why Avast doesn't open on Windows 10. The most common one is that your antivirus software is not compatible with the new operating system.
Avast doesn't open on Windows 10 because of:
●You need to update your antivirus software to a version that is compatible with Windows 10.
●You have an outdated version of the antivirus software, which needs to be updated.
●Your computer has malware installed, which prevents the Avast program from opening.
●Your computer has been infected by a virus, which prevents the Avast program from opening.
Update Avast and Your Computer Operating System
If you are using Avast Antivirus and you have recently upgraded to Windows 10, you might find that your Avast doesn’t open on Windows 10.
This is because of the default settings in Windows 10. In order to fix this issue, you need to change some of the settings in your computer.
Step 1: Go to Settings > System > Default Apps > Choose Default Apps by App and then scroll down until you see "Choose an app" and click on it.
Step 2: Scroll down until you see ‘Avast Free Antivirus’, select it and click ‘Set as default’
Step 3: Now try opening Avast again and it should work!

Repair the Avast Antivirus Software
Step 1: Download the installation file from https://www.avast.com/en-us/software/antivirus
Step 2: Install the software and restart your PC
Step 3: Run the Avast Antivirus setup wizard
Step 4: Select what you want to install and click next
Step 5: Review the installation settings and click install
Step 6: You will be prompted to restart your PC once more
After your PC has finished installing Avast Antivirus, you are ready to go!
Restart Avast Antivirus Services:
1. Click on the Windows icon and type “services.msc” into the search bar.
2. Right-click on the Avast Business Security Services and click on Restart Service.
3. Restart your computer to complete the process

Try a Clean Installation
If you are facing this problem Avast antivirus installation, then performing a fresh installation will surely solve the problem. Follow the given step to solve the problem.
Step 1: Go to the Avast website and download the latest version of Avast.
Step 2: Next go to the Control Panel and find the Avast and click repair and then click next a pop-up window will appear, click on the Confirm tab.
Step 3: Next go to the Uninstall section and download the Avast Clean uninstall utility and carefully save it on your computer.
Step 4: Now, that both the downloads are completed, switch off your internet router and boot into Safe Mode
Step 5: Next, press the Windows Key + R >> open the Run dialogue box
Step 6: Next, type in 'msconfig' and press the OK button to open your System Configuration

Step 7: Next go to the boot section and click the check box >> Safe Mode >> Click OK

Step 8: Now you are required to restart your computer in order to boot into Safe Mode
Step 9: Run Avast Uninstall Utility and browse the folder well where you have installed Avast
Step 10: Hit the Remove tab finally and restart your computer in the normal startup option.
These steps solved fix Avast won’t open the problem. So, you can try the next method.
Update your Avast Antivirus Application
The following is a step-by-step guide to updating your Avast Antivirus software.
1. Select the "Settings" tab on the left side of the screen.
2. Click on "Updates" in the row of icons at the top of your screen.
3. Click on "Update now."
4. The Avast Antivirus update should download and install automatically, but you can also click on "Install now" to manually install it if it does not do so automatically for some reason.

Updation has been done, open the Avast Application. Your problem has been solved.
Solve Avast Causes Black Screen in Windows 10
Avast is a free antivirus program that has been trusted for years by millions of people. However, for some users, it causes a black screen in Windows 10.
The problem is usually caused by the Avast’s compatibility with Windows 10. The solution to this problem is to change the Avast’s compatibility with Windows 10.
Users can disable the compatibility mode of Avast and then try to run it again. If they still face the same issue, they should try installing an older version of Avast or uninstall it completely and then reinstall it again after changing its compatibility mode to Windows 8.1 or 7.
Step 1: Download and install Avast Antivirus from the official website.
Step 2: Click on "Scan" to start scanning your system for any virus, malware, or spyware.
Step 3: Click on "Fix Now" to remove any threats found.
Now your Avast antivirus Application will open and run without any problem.
So, you already know how to fix Avast won't open problem. Also, you try these methods and hope your problem is solved
#avast antivirus update#avast wont open#can t open avast#avast antivirus not opening#Avast Not Opening#Avast antivirus issues#avast wont start#avast not loading#how to repair avast
0 notes
Text
Aka MS Remoteconnect Minecraft | Steps for AKA MS remote Connect
Remote desktop connection software aka remoteconnect is a remote desktop application that allows users to access their computer remotely. It is a very useful tool for people who work in different locations and need access to their computers.
Aka.ms/remoteconnect – Solve Minecraft Crossplay PS4, PC, Xbox, Switch (2022)
Gamers may use their Microsoft account to play games on a variety of systems, including the PC, Xbox One, PlayStation 4, and Nintendo Switch.
Minecraft is a popular game that is appreciated by both children and adults. If you want to play Minecraft, you can quickly connect your account to multiple devices by going to aka.ms/remoteconnect.
The website http://aka.ms/remoteconnect is where users go to activate crossplay for Playstation, Xbox, Switch, and PC. To properly attach devices to the Microsoft account, users will need to provide a code.
However, switching between devices and corrupt saved data can cause the aka.ms/remoteconnect problem to appear. Sign in with your Microsoft account again to repair the problem, or remove the corrupted Minecraft save files.
Find answers to the Mirror remote connect access error for PS4, PC, Xbox, and Switch in this article.
What Is Aka.Ms/Remoteconnect and How Does It Work?
Aka.Ms is a cloud-based, AI-powered chatbot that helps you manage your customer service interactions.
Aka.Ms is a chatbot that will take over your customer service operations. It can answer questions, handle queries, and help with customer retention.
It’s not just about answering questions and queries though: Aka.Ms can also automate tasks for you in the background to save you time and improve your efficiency!
Why does https://aka.ms/remoteconnect error occur?
This article is about the steps to troubleshoot https://aka.ms/remoteconnect error and the possible solutions to this issue.
The first step is to check whether the device is connected to the internet or not. If not, then you need to connect it with a network cable. If it's connected with a network cable, then you need to make sure that there are no other devices using that same network connection.
If there are no other devices using that same network connection, then you should try restarting your computer and check again if it still gives an error message or not.
There are various probable explanations if your Minecraft game normally runs properly but the aka ms remoteconnectsuddenly appears. The two most common reasons, however, are as follows:
a shady game
Because Minecraft has numerous versions and may be played on a variety of platforms, it's possible that your game's data are corrupted.
Corrupted files might occur as a result of a lost internet connection during an upgrade or installation. Other forms of connection and server failures can be caused by unreliable internet connections.
The ms/remoteconnecterror, which is caused by faulty Minecraft game data, can be fixed by reinstalling the game with a solid internet connection.
Changing devices
If you utilise the CrossPlay feature on several devices frequently, you're more likely to get the aka.ms remoteconnect problem.
While switching between devices regularly is the most typical source of the remote error, it doesn't mean you'll always get it.
https aka ms remoteconnect Not Working Switch: Can’t login into my Microsoft account
The website aka.ms/remoteconnectallows people to play Minecraft with other people who have computers. Minecraft can now be played on the PS4 and Nintendo Switch thanks to the aka.ms/remoteconnect website.
Users can register and sign in to play in arcade mode with other players on the site using a free Microsoft account if they want to play on a non-Microsoft system. Minecraft users can now play with their pals online thanks to Microsoft.
There's a lot more you can do with the https /aka.ms/remoteconnect account, as this post will show you. So let's dig right in and learn more about it.
Microsoft no longer wants to sign into the new Minecraft on the Switch.
· Go to your system settings on your switch
· Go to data management tab
· Go to manage save data/screenshots and Videos
· Go to Delete save data
· Delete the save data for YOUR login in Minecraft (NOT NINTENDO SWITCH EDITION). This resulted in the deletion of my existing worlds, but it was well worth it in my opinion. There could be a way to save your worlds from being deleted, but I'm not sure how.
So, basically, this will reset your game, and you'll be able to connect into your Microsoft account once more. It worked for me the second time, so if it doesn't work the third time, you can repeat the process. I hope I was of assistance!
Please let us know if this is of assistance!
How to setup aka.ms/remoteconnect on your Xbox one using a smartphone app?
This tutorial will show you how to setup aka.ms/remoteconnect on your Xbox one using a smartphone app.
1) Download the Xbox One Smartglass App from the Google Play Store or the Apple App Store and open it on your phone or tablet.
2) Sign in with your Microsoft account and follow the steps to connect your Xbox One console to your device.
3) Select "Settings" in the left column, then select "System" and click on "Remote Connections".
4) Under "Connect via SmartGlass", select "Allow connections from any device".
5) Click on the right arrow to save changes and return to settings menu.
Note: This set of instructions is free to use only for smartphone users.
What is the best way to set up the Xbox cross-play engine?
Step 1: Connect Xbox One console to the same Wi-Fi network as your Windows 10 PC.
Step 2: Open the Xbox app on Windows 10 and navigate to the "Settings" tab.
Step 3: Select "Add a new device" on the Settings page and follow the instructions to add your console.
Step 4: Select your console from the list of devices in Settings, then select "Link Console."
Step 5: Select "Linked Console," then select "Xbox Live Gold" under Services and click "Link."
Step 6: Once you have completed linking your Xbox One to a Microsoft Account, you will see options for Linking your Controller or Linking an IR Blaster.
Step 7: Click on Link Controller, and follow the instructions to link up
How to configure aka.ms/remoteconnect on Nintendo Switch or PS4?
1. First and foremost, you must visit a Sony PlayStation store or a Nintendo PlayStation store to purchase PS4 systems.
2. After that, search for Minecraft and select the Minecraft from Switch download option.
3. To download Minecraft for PS4, join the "Minecraft PS4" group and press on the "Minecraft for PS4" button.
4. Follow the steps to register for a Microsoft customer identity.
5. To sign in, go to the Minecraft main menu and tap the sign in button.
6. From the signin tab, tap on the link, and it should direct you to a remote connection.
7. Make sure the eight-digit activation code is correct.
8. Launch the internet browser and navigate to https /aka.ms/remoteconnect.
9. You must enter the code number on the computer screen.
10. Select "Next" from the drop-down menu.
11. After that, you must complete the login procedure by following the on-screen instructions.
Delete Minecraft Saved Games100
If you are an avid Minecraft player, you might have saved a lot of games in your PC. However, if you want to delete those saved games, it is not as easy as it seems. You will need to go through the following steps.
Step 1: Open the folder containing your Minecraft game files
Step 2: Find and delete the folder named "saves" and all its subfolders
Step 3: Delete any remaining empty folders with names that start with "saves"
Step 4: Empty your recycle bin

How can I delete the game data that I've saved in https /aka.ms/remoteconnect?
Follow the procedures below to erase all corrupted files and the saved game process in aka.ms/remoteconnect:
1. First and foremost, you must begin with Minecraft.
2. First, go to "Settings."
3. After that, select "System settings" from the drop-down menu.
4. Press and hold the storage button.
5. The following step is to go to the Minecraft shop docs and select "Fame storage."
6. Finally, you'll be able to remove all of your Minecraft Saved data.
What problems might you encounter if you go to aka.ms/remoteconnect?
· The device being used has changed.
· On the device, there is an antivirus/firewall.
· Data or files in use that have been corrupted.
How to solve the issues with https //aka.ms/remoteconnect?
· You can now restart your console.
· Log out of any other devices that are linked to your computer.
· Delete the papers from the games or game files that have been corrupted.
· Make use of the new Microsoft Account.
· Minecraft should be reinstalled.
#aka remoteconnect#aka ms remoteconnect#aka.ms/remoteconnect#remoteconnect#https //aka ms/remoteconnect switch
0 notes
Text
How to reinstall Microsoft store Windows 10?
This article outlines the release cycle for administrators to update the Microsoft Store apps installed by default on Windows 8 or reinstall Microsoft store Windows 10 -based computers.
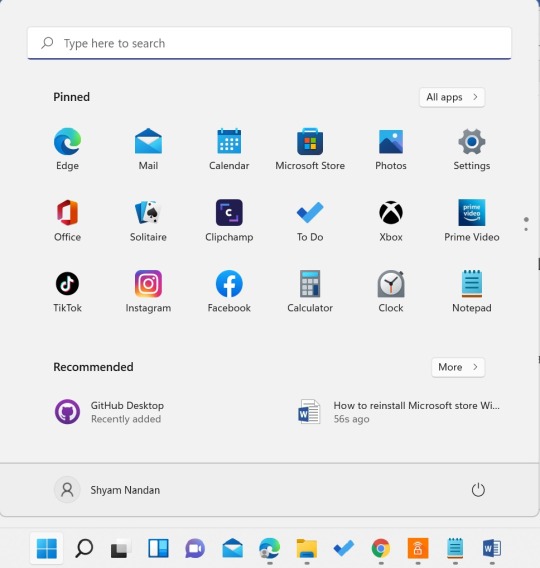
If you are unable to see the Microsoft store-shaped icon, it means this has been unpinned from your taskbar.
To make sure you can find it easily later, press and hold (or right-click) the Microsoft Store Shopping bag-shaped Store icon tile and select Pin to Start Pin-shaped Pin icon or More > Pin to taskbar Pin-shaped Pin icon.
To locate it, use the following steps:
Step-1. Go to your computer and click on the start menu icon.
Step-2. Hover the mouse on the search box that will be, pinned from the taskbar.
Step-3. Type in the search box icon "Microsoft store"
Step-4. Click on the Start menu.
Step-5. Click on the settings
Step-6. Click on apps
Step-7. Go to the apps & features.
Step-8. Find their Microsoft store application from the list
Step-9. Click on the Uninstall/ Update.
Step-10. Go to the reset option
Step-11. Press on the Reset button.
Step-12. Click on the reset again.
Step-13. Open the Window menu. I think your problems should be resolved now.
2 Method: If any issue with fixing time, so you can try this method
Many Windows 10 users unintentionally remove the Microsoft Store when uninstalling built-in contemporary apps.
It usually happens when third-party tools or PowerShell scripts like Get-App XProvisioned Package-online or Remove-AppxProvisionedPackage-online, which remove all contemporary UWP and AppX programs with no exceptions, are used carelessly (see the article on how to properly reinstall Microsoft store windows).
If the Microsoft Store is missing or not working on Windows 10, you can use the techniques in this tutorial to either reset or repair it.

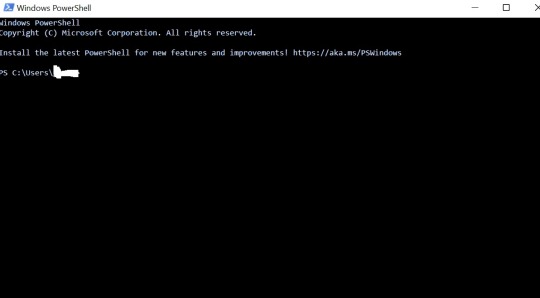
First, open the Start menu icon and then type PowerShell.
Right Click PowerShell and select "Run as Administrator".
Click "YES"
After opening the PowerShell, you will see a cmd prompt
Paste this code as given
Right-click on the White frame.
Select edit and then paste this code.
# Get all the provisioned packages
$Packages = (get-item 'HKLM:\Software\Microsoft\Windows\CurrentVersion\Appx\AppxAllUserStore\Applications') | Get-ChildItem
# Filter the list if provided a filter
$PackageFilter = $args[0]
if ([string]::IsNullOrEmpty($PackageFilter))
{
echo "No filter specified, attempting to re-register all provisioned apps."
}
else
{
$Packages = $Packages | where {$_.Name -like $PackageFilter}
if ($Packages -eq $null)
{
echo "No provisioned apps match the specified filter."
exit
}
else
{
echo "Registering the provisioned apps that match $PackageFilter"
}
}
ForEach($Package in $Packages)
{
# get package name & path
$PackageName = $Package | Get-ItemProperty | Select-Object -ExpandProperty PSChildName
$PackagePath = [System.Environment]::ExpandEnvironmentVariables(($Package | Get-ItemProperty | Select-Object -ExpandProperty Path))
# register the package
echo "Attempting to register package: $PackageName"
Add-AppxPackage -register $PackagePath -DisableDevelopmentMode
}
Press enter button.
After this process, your system will be, started automatically.
Your problem will be fixed now.
3. Method: If this doesn't work
Firstly, open start and then type in the search box "WSREST"
Click on the "WSREST" app.
Please Wait for the Windows store to be repaired.
Close the store and restart.
How to reinstall windows 8.1?
This article outlines the release cycle for administrators to update the Microsoft Store apps installed by default on Windows 8 or reinstall Microsoft store Windows 8.1 -based computers.
The purpose of this paper is to explain how to reinstall Windows 8, it will explain how to use Windows 8 recovery and what to do when the reinstallation fails. The steps will be followed in detail with screenshots and examples. The whole process will be explained step by step to make it easier to understand for you.
Step-1. First, go to the star Windows menu.
Step-2. Press on the Power buttonwith the hold and shift key.
Step-3. Next, click on the restart button, but make sure key hold press with shift key because that is the head process.
Step-4. You will see a screen (Choose an option) after restarting your laptop/pc.
Step-5. Choose the Troubleshoot option.
Step-6. Click on the advanced option.

Step-7. Go back and click on the Reset this PC (1. Keep my files, 2. Remove my files)
Step-8. Click with "Keep my files" and move to the next
Step-9. Wait until finish the process.
Step-10. Will restart your PC/Laptop automatically and open with them the "Hi there" welcome screen.
Step-11. Fill in the admin data form, then click accept button.
Step-12. Your problem will be fixed if you have followed this process step by step.
How to reinstall Windows store windows 8.1?
Note that the ability to revert to a previous version of Windows is only available for a limited time after the upgrade (10 days, in most cases).
Go to your computer and select the Start (window icon)
Go to shut down or sign out>Restart.
Press F2 to enter setup (Tap the Delete option, F1, or F2 button on your keyboard, depending on the type of BIOS your computer is using)
Go to the Boot menu option.
Choose the CD-ROM Drive
Click yes to save the configuration.
Tap any key to boot from CD or DVD.
Click on the Install now button.
You can try this method also: [ Reinstall windows store windows 8.1]
Go to the network option.
Make sure the computer should be connected via the Internet.
Go to the setting (gear ring icon)
Click on the Change PC settings option.
Select the Update & Recovery, then click "Windows Update" (keep your personal data but remove apps and drivers installed after the upgrade)
Select the Windows 8.1 Important
Tick on the Windows 8.1 update (KB2919355)
Download and install the update.
Restart your computer when prompted.
Note:
Use the media creation tool to create installation media for Windows 8.1 if you have a product key from a prior version of Windows, and then do a clean installation of Windows. See Find your Windows product key for assistance.
Reinstall Windows 8 is an easy task with the right tools and instructions. You can reinstall Windows 8 on your computer or laptop, restore your system to its original factory settings, and keep all your data and programs.
That will erase all of your data and programs and settings, including apps, games, and files on your hard drive. If you don't want to lose everything, back up your data and programs before you begin.
If you have any questions or doubts, do not hesitate to contact us! We are here to help you! We are a professional service.
Disclaimer: Our aim is only to help you know How to reinstall the Microsoft store (Windows 10) and reinstall the Microsoft store. We have no affiliation with any company. We gather general information from a company's official website and present it to you.
#reinstall microsoft store#reinstall microsoft store windows 8.1#reinstall windows store windows 8.1#reinstall windows 8
0 notes
Text
How to fix No Sound issue in Google Chrome?
In this article, we discuss chrome sound not working and how to solve google chrome sound not working?
I have provided the right information sound not working on chrome. Therefore, I have given some best solutions to resolve, sound not working on google chrome.
There are many Computer users choose Google Chrome as their primary web browser. So, many users reported that there had been times when this application had failed to play audio. This issue can be frustrating, just when you notice that all your other applications have sound. Normally, the simplest way to solve no sound in Chrome is to restart the web browser along with the entire Windows 10 Computer. So, that fixes do not always good results. You do not the panic solution is very simple. If you want to learn how to solve sound not working on google chrome. Just read and apply the solution. We have put side by side different ways to resolve your audio problems. Therefore, you should try them and test which matches for you.
Step 1.
Before trying it our solution, you may want to check a few of the obvious culprits why you are not hearing sound your web browser. Here are a few things you should perform first:
Make certain that your laptop’s sound isn't always on mute. In case you discover a quantity manipulate on the net app, make certain that the sound is audible as properly.
Test if the audio is working nicely on different internet browsers like firefox and explorer. You could additionally double-test if there’s sound coming from laptop apps.
If you do not hear sound from other computer applications or web browsers on your computer, then the problem not related to Chrome. Otherwise, a few of the solution included in this paragraph may not be useful to you. Next to the other hand, If you can judge that chrome is the best one with problematic sound, then feel free to try our solution given below.
Solution 1: Update your Sound Driver
Sometimes you are facing issues related sound is not working your computer. So, you need to update the sound driver in your device. Thereafter, It is important to have updated and compatible driver version for your Windows 10 computer. You confirm that your applications and hardware will perform smoothly.
There are two paths to update your drivers: Automatically and manually using Driver Updater. Previously, you update to manually, you must know that in this process can take more time and effort. You can do it visit the manufacturer’s official website and find the latest version of your driver and check compatibility with your device. If you have installed the not compatible version your device facing more issues.
Solution 2: See and check volume mixer to check the sound
Microsoft Windows 10 has a quality that allows you to see and adjust the Vol. level for specific applications. If you hear audio coming from the applications apart from google chrome, After then is doable that you have muted the Vol. from your web browser. You can solve this by following the given steps:
1. Visit the lower right side of your taskbar and right hit the Sound tab.
2. Choose Open Vol. Mixer.
3. Move Chrome's Vol. slider to an audible level.
Note: If you are not seeing the Vol. Controller for Chrome, you can try audio or video from your web browser.
4. Reset Chrome and play some video or audio on it to check if the issue has been solved.
Solution 3: Clear your browser cache and cookies
Cache or cookies are temporary files that boost the speed of web pages. Therefore, over time, your web browser saves too much of them. Hence, the Chrome browser becomes overloaded with temp data, causing various problems like shortage of audio. Therefore, it is best to clear your browser cookies and cache. You can do it follow the given steps below:
1. Open Chrom.
2. Visit the top right portion of the browser and hit Customize and Control Chrome. see hare tree verticle line close to the address bar.
3. Choose More Tools from the given list, after that Clear Browsing Data.
4. Select a time range for the data you wish to delete.
5. Hit Clear Data.
If you want to understand all the details about "chrome sound not working" please visit our website and flow the steps to solve the problem. If you stuck to do this "sound not working on google chrome" please contact Customer Support. A technician available 24/7 available in the help of the customer.
#chrome sound not working#google chrome sound not working#sound not working on chrome#sound not working on google chrome
0 notes
Text
How To Fix Google Chrome Sound Not Working
How To Fix Google Chrome Sound Not Working
In this article, we discuss chrome sound not working and how to solve google chrome sound not working?
I have provided the right information sound not working on chrome. Therefore, I have given some best solutions to resolve, sound not working on google chrome.
There are many Computer users choose Google Chrome as their primary web browser. So, many users reported that there had been times when this application had failed to play audio. This issue can be frustrating, just when you notice that all your other applications have sound. Normally, the simplest way to solve no sound in Chrome is to restart the web browser along with the entire Windows 10 Computer. So, that fixes do not always good results. You do not the panic solution is very simple. If you want to learn how to solve sound not working on google chrome. Just read and apply the solution. We have put side by side different ways to resolve your audio problems. Therefore, you should try them and test which matches for you.

Step 1.
Before trying it our solution, you may want to check a few of the obvious culprits why you are not hearing sound your web browser. Here are a few things you should perform first:
Make certain that your laptop’s sound isn't always on mute. In case you discover a quantity manipulate on the net app, make certain that the sound is audible as properly.
Test if the audio is working nicely on different internet browsers like firefox and explorer. You could additionally double-test if there’s sound coming from laptop apps.
If you do not hear sound from other computer applications or web browsers on your computer, then the problem not related to Chrome. Otherwise, a few of the solution included in this paragraph may not be useful to you. Next to the other hand, If you can judge that chrome is the best one with problematic sound, then feel free to try our solution given below.
Solution 1: Update your Sound Driver
Sometimes you are facing issues related sound is not working your computer. So, you need to update the sound driver in your device. Thereafter, It is important to have updated and compatible driver version for your Windows 10 computer. You confirm that your applications and hardware will perform smoothly.
There are two paths to update your drivers: Automatically and manually using Driver Updater. Previously, you update to manually, you must know that in this process can take more time and effort. You can do it visit the manufacturer’s official website and find the latest version of your driver and check compatibility with your device. If you have installed the not compatible version your device facing more issues.
If you want to understand all the details about "chrome sound not working" please visit our website and flow the steps to solve the problem. If you stuck to do this "sound not working on google chrome" please contact Customer Support. A technician available 24/7 available in the help of the customer.
#chrome sound not working#google chrome sound not working#sound not working on chrome#sound not working on google chrome
0 notes
Text
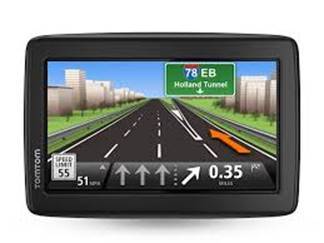
How to Update a TomTom for Free
TomTom is a Dutch Company product that offering GPS Navigation Application and devices, Sports Watches, Digital Maps, Action Cameras and respective services that many countries of Europ and America. The Company headquarters in Amsterdam and that was founded in 1991. Presently, It has offices in 37 various countries with about 4000 employees. These company offerings provide manlily assists traffic Knowlege, navigation helps understands the route with the recent maps. TomTom has restored the Google Maps for providing the plans (map) in Apple's deliverance iOS 6 and also give maps to the transportation company "Uber" thenceforward across 300 towns.
Ways to Update TomTom Map Free of Cost
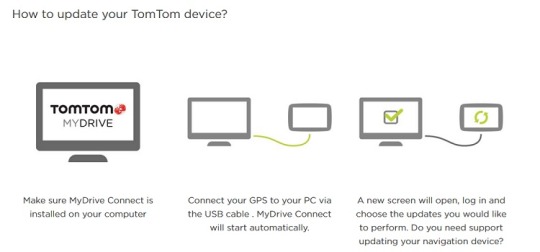
To update my tomtom GPS maps free, Follow the given instructions.
1. Install the TomTom home on your computer. After that connect the device with the navigation device.
2. Next, log in to your TomTom account.
3. Hit on the Tools Menu then chose and click to "Use the Latest Map Guarantee"
4. If the latest version of the map is available, after then it gets shown on the screen. Ahead, if you are in the first three month period after purchasing a new GPS device, the information of the latest updates is sent to your email id.
Ways to updating the navigation device.
For improve the navigation device, flow the given instruction below. You required to use either "My Driver connect" or "TomTom Home" for this. To know which application required to be updating the maps in your tool, visite "how to update tomtom GPS on Computer and what application to do this required?"
My device driver connects - If you are applying My Driver Connect, Next follow these ways to update TomTom map.
1. Conform first you are using the updated version of My Driver Connect, on the computer.
2. Attached the navigation device to the PC. Switch on the device.
3. My Driver Connect will at the time automatically search for any latest updates for the navigation device. This latest Map will be offered an updated guarantee.
4. Next, hit Continue and follow the given instruction on the screen. And download the updated version on the device.
5. Next installation is finished; the page goes redirected to My Content page. The state at this time on My Drive attached changes to "Connected". Then after seeing the "attached" status and the message that the installation has completed, disconnect the navigation from the PC.
6. Next, the device can be used with the updated Maps.
Thereafter, there is the easiness of Map share in the updated devices which permit you to make changes on your map while navigating. you can also describe the online map changes and can even share the map with the millions of users, online.
With the compiled advantage of a suspect the upcoming traffic hassle, tricky curvature, speed limits, damaged roads, fuel saver, the list of benefits TomTom has been unlimited. The company is making deep efforts to renovate the functions superior to ever before. The group is also endlessly putting in hard work for giving the most updated versions of the application and device for public use.
TomTom offers five different types of products and service.
Navigation devices
So, personal use of navigation assistance, tomtom update provides a device which grants an oblique view an overhead view of the street. The application uses a GPS receiver to orderly define the spot and also helps by giving visual or audio directions meaningful on how to access the desired destination. So TomTom Products can also be attached to mobile phones via Bluetooth. Few can take calls and can make out aloud the texts regarding the right directions.
If you want to understand all the details about "how to update tomtom GPS on Computer" please visit our website and flow the steps to solve the problem. If you stuck to do this "tomtom update" please contact Customer Support. A technician available 24/7 available in the help of the customer.
#tomtom update#how to update tomtom gps on computer#how to update tomtom#update my tomtom gps maps free
0 notes
Text
why is my hp laptop not turning on?
If your hp laptop not turning on, that does not surely mean there is any wrong with the laptop itself. There are some attached device or Softwares between conflicts on your laptop. Or the devices you have got accessory to your PC, and there are fairly simple to settle with what is called a power reset or "hard restart".
Fix Conflict
Your PC is not a single device. It haves hundreds of parts of applications and hardware to add up to one working, operative computer, and all of those rags have to play well together. If you have ever listed heard the first day of practice for an orchestra or took a share in the first day of participation for a team sport, you will know that does not happen lightly. With the laptop, it ordinarily means that more than one device or two assemble of application are trying to use the common resource at the same time. This means your laptop freezes and will not reply to the keyword, or it can mean your computer will not boot. To make difficult things just a small more, most recent computers try to remain a "snapshot" of what you are running on, so you will not lose your thing if you lose power. When the time you boot, it can bring you right back to the same issue. The reply is to clear the computer's memory.
Whether You Have a Removable Battery
To clean the computer's memory, you have to take away the start of electricity that let it keep things in RAM. Next, turn off your laptop if you can. If it is completely fixed, do not worry about it. Next, you do unplug the power cable from your device, then close the lid. If you have a printer, a dock, a monitor or anything else connected to the computer, unplug them. Turn on your computer over, and see for the battery's lock. On a few models, they will be in the look of looks that slide to the side, and on others, they will be easy clips that you nip to release. Remove the battery, then flip the laptop right-side up and open the cover so you have entered to the Power button. Press and hold the button for about 15 sec. This clears the capacitors on the devices main board that acts as a kind of support to your battery. Once there are drained, anything in your RAM or ROM is elated away and your device will be able to do clear boot.
Whether You do not have a Removable Battery
why will my hp laptop not turn on?
Few HP Computer does not have a battery you can remove. If your computer falls into the category, do not worry: you can again try to reset. Next, try to the same way, bu shutting down your laptop if you can and then removing any outer devices you have got accessory to it. Next Press and hold the power button for 15 sec, and release it.
Take Starting Back Up
Next way is to turn the laptop back on, but do not connect any other accessories. If your hp laptop will not turn on because of friction with one of your external device, reconnect it just means you are going to have the same issue. Alternately, turn on the computer without any extra parts attached. Your laptop may Start up simply, or it might give you a startup menu and inquire if you want to boot in Safe Mode. Select Start Windows Normally, and press the Enter key. Your Device should finish booting simply. Once it is running, then you can start adding your devices one at a time.
0 notes
Text
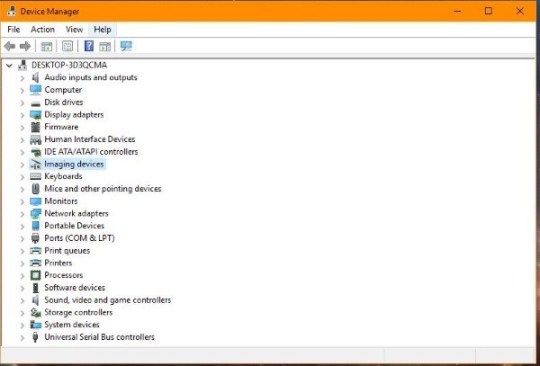
Fix Lenovo Camera Not Working in Windows 10
In this article, we discuss Lenovo webcam not working
There is an unknown problem on a few Lenovo laptops where the webcam does not work. The webcam automatic does not find out by Windows or there is a clear glitch with the device driver. It is an irritating issue that takes a very common problem with Lenovo camera not working but could occur to any laptop.
So hare, I show to fix the Lenovo webcam not working, you might well find this problem to helpful solving like issues with other webcam identification.
The problem showing stems from a problem with a setting in a few Lenovo laptops that disqualify the webcam for the privacy of the laptop customer.
This types of problem can be system form a problem with setting in a few Lenovo laptops that disable the webcam for the privacy of the computer user.
Therefore, it is a fine goal that Lenovo has the few steps to protect its laptop customers privacy, a side impact is that it might make the webcam some bit harder to get running properly.
If you are lucky, this is wrong with your webcam. In this condition, solving your camera should be fairly easy to solve.
If you are not solving, you might have a few updating or modify to do to get your camera to work.
Do not worry, I will show you what you required to do to solve some general problems you can run with your Lenovo camera.
LENOVO CAMERA NOT WORKING: HOW TO SOLVE
As you make get it working, then Lenovo camera is very nice. Colour and detail are valid, responsiveness is good, and it will thing in very light conditions.
I have a Lenovo Thinkpad and I believe it is a very good device and I use it all the time.
First, think Lenovo camera not working is inside the Lenovo application itself. Press the F8 button on your device keyboard. This is the key to disable and enable the Lenovo EasyCamera.
If that one not works, try another step to solve the webcam:
1. Type "Lenovo" into the Microsoft Windows Search box and choose Lenovo Setting.
2. Choose Camera and scroll to Privacy Mode.
3. Toggle Turn Privacy Mode Off and On.
4. Retest your Camera.

This privacy setting is designed for your safety. It is less simple to hack someone's camera if you might get into the device, and there have been great incidences of this happening.
When your webcam is compromised, cybercriminals can use the webcam to spy on you, or further use the webcam to reason other sorts of issues, such as receiving you in a DDoS invasion.
Therefore it was not Lenovo webcam that was involved, 2016 DDoS attack that nearly brought down the net was carry by a malware application that enlisted a zombie army of webcams all sending to goal the same time.
If you want to know all the details about "Lenovo webcam not working" please visit our website and flow the steps to solve the problem. If you stuck to do this "Lenovo camera not working" please contact Customer Support. A technician available 24/7 available in the help of the customer.
1 note
·
View note