
Mi stap GO OKA WEMOHAWE, Man bilong wokim BILUM. =) Mi save mekim Simbu Bilum na Goroka Bilum olsem Meri. GO OKA WEMOHAWE i stap tok ples bilong liklik ples AKAMEKU. Em i min: Bilum wokim Man ! =)
Don't wanna be here? Send us removal request.
Statistics
We looked inside some of the posts by go-oka-wemohawe and here's what we found interesting.
Average Info
Notes Per Post
70K
Likes Per Post
30K
Reblog Per Post
40K
Reply Per Post
69
Time Between Posts
7 months
Number of Posts By Type
Text
5
Photo
12
Last Seen Tumblr Blogs


Fun Fact
Tumblr has a low social media market share in South America.
Text
early Warning Signs of natural Disasters
Frühwarnsignale vor Naturkatastrophen
youtube
youtube.com/watch?v=1ebYnhFckQk
youtube
youtube.com/watch?v=RT3-KKP_h2o
youtube
youtube.com/watch?v=zovwL06-gQs
youtube
youtube.com/watch?v=os8iJQUzt-c
br.de/mediathek/podcast/iq-wissenschaft-und-forschung/tsunami-2004-wie-tiere-eine-insel-vor-der-katastrophe-gerettet-haben/2101270
welthungerhilfe.org/news/latest-articles/into-the-mountains-if-the-earth-trembles-three-times/
welthungerhilfe.de/aktuelles/blog/tsunami-2004-in-simeulue-retteten-sich-80000/
futura-sciences.com/planete/actualites/tradition-secret-ile-survecu-presque-intacte-tsunami-2004-plus-meurtrier-histoire-118485/
youtube
youtube.com/watch?v=V0s2i7Cc7wA
tumblr.com/unisdr/149029949489/tilly-smith-in-disasters-lessons-save-lives
t-online.de/nachrichten/panorama/menschen-schicksale/id_100554360/tsunami-2004-kind-rettete-mehr-als-100-menschen.html
#tsunami#tsunamis#Erdbeben#earthquakes#earthquake#early warning signs#warning signs#Frühwarnsignale#Warnsignale#Anzeichen#Sensibilität#sensibel#Vulkanausbrüche#vulcanic eruptions#warning sign#Warnsignal#Frühwarnsignal#early warning sign#Achtsamkeit#achtsam#awareness#aware#Tilly Smith#Simeulue#receding water#zurückweichendes Wasser#unruhiges Wasser#sich zurückziehendes Wasser#boiling Sea#kochende See
1 note
·
View note
Text
Tilly Smith: In disasters, lessons save lives

When I was 10 years old I was on holidays in Thailand with my family. We had been there a week and had just celebrated Christmas with family and friends on the beach the day before it all happened.
It was Boxing Day and I was on the beautiful white sand beach of Mai Cao, in Phuket. It was eight in the morning. I was enjoying a family walk before breakfast along the beach with my dad, Colin, mum, Penny, and seven-year-old sister Holly.
I had a watched a video before I went to Thailand and as soon as I got on the beach I recognized that the sea was not going in and out but was just coming in further and further on the beach. I also noticed there was a white froth on the surface of the sea and those were the two things that I linked back to the video and I just had a gut feeling that something was wrong.
I had watched the video at school. My geography teacher Mr. Karney at Danes Hill School, Oxshatt, Surrey, had put it on. I was in year six. He brought a tray into the class and there was a three-storey house made out of polystyrene and we would shake it and see that it fell down. We had a discussion on earthquakes and the sea, and an earthquake in the sea creates a tsunami. It was two weeks before we went on holiday.
We were walking along the beach and I got more and more paranoid because my mum was not responding and didn’t believe me so I ran back with my sister and dad and spoke to the security guard where my dad said I thought there was going to be a tsunami, a word he was not familiar with. In the meantime my mum had come running back and we were all screaming and that’s when the wall of water came up.
The security guard at that point received a message saying there was a tsunami in Indonesia and it was on its way. When I was on the beach I was getting hysterical and people overheard and then when we got the message from the security guard that there was one on the way that’s when everyone on the beach just ran.
Luckily we ran towards the hotel and we went to the lobby which was on the third floor from which you could see the waves coming in and it was manic, everyone grabbing their kids and going up to their rooms to get their passports. They wanted to leave and all the local staff were pleading with us to stay.
We were worried that there was going to be another tsunami coming. We went to a hotel that wasn’t completed on higher ground and they looked after us for a day and I remember looking at their television and the death toll just kept going up.
We saw people coming in who had lost family. We got people from other parts of Thailand coming in. I remember seeing this girl who had scars all over and she had got caught up in the waves. The beach was wrecked. The pool was wrecked.
In early 2005, we got home and I remember being on the plane and security people came on. They asked who had lost people in the tsunami and many put their hands up. That’s when the full reality of it sank home. These were the people coming back to England, so how much worse was it for local people who had lost so many loved ones. The fact that I remember that Thai Airways flight now obviously means it had a massive impact.
We got home and then it properly hit that we had been through something traumatic. My mum was definitely traumatized. We got home and it was the top story everywhere and it was still in the news. There were journalists on our doorstep. That wasn’t very nice. No one knew the extent of what we had been through.
I had letters coming in seven or eight letters months later from people saying things like how they had named their dog after me. My story appealed because it was one story that was positive out of all the devastation. There was the fact that as a 10-year-old I knew about this particular disaster risk and my mum and dad did not, and I had learned about it at school.
My school friends could not believe I was there. It made the whole story much more interesting. Mr. Karney could not believe it either that something like that could happen so close to when he had taught me the lesson.
When Bill Clinton became the UN Special Envoy for the Tsunami, I was brought over to Washington to meet him. As a volunteer with the UN Office for Disaster Risk Reduction, the big lesson for me from the Indian Ocean Tsunami is how important it is to educate children about natural hazards and disaster risk. Children can pass on what they learn at school to their parents and others in their communities.
I know now that over 60 million children are affected every year mainly by floods, storms and earthquakes so they are valuable eye-witnesses to disasters and should be used as agents of change. Children are creative and will always come up with good ideas about how to reduce risk in their communities if they are engaged.
We also need to make sure that schools are safe from floods and earthquakes. Children and youth successfully lobbied for this at the UN World Conference on Disaster Risk Reduction in March 2015 in Sendai, Japan.
The last world conference was a few weeks after the tsunami and it put the spotlight on all the crazy ways we increase risk by building in the wrong places or using poor quality materials but not enough has been done about making schools safe from disasters. Thousands of schoolchildren have died in earthquakes in the last ten years.
We try to go back to Thailand every Christmas. A hotel my grandparents once stayed in was destroyed in the tsunami. Our one survived. It’s bigger now. We always have a chat with the security guard who is still there on the beach. There are signs now warning about the danger and showing the evacuation route. It’s a day we will always remember.
Tilly Smith, now 22, earned the nickname ‘The Angel of the Beach’ thanks to her quick thinking during the Indian Ocean Tsunami in 2004, and has continued to act as an advocate for disaster risk education since then. Click here for a video about her story.
#tsunami#early warning signs#Warnsignale#Anzeichen#Früherkennung#Achtsamkeit#awareness#mindfulness#mindful#aware#flood#Flut#Flutwelle#Frühwarnsignale#warning signs#be aware#achtsam#Eigenverantwortung#Eigenverantwortlichkeit#self-responsibility#Warnsignal#warning sign#Frühwarnsignal#early warning sign#zurückgehendes Wasser#retreating water#schäumendes Wasser#boiling water#boiling sea
29 notes
·
View notes
Text


Stone-Axes & Stone-Adzes Steinäxte & Steindechsel
used Minerals/Stones for Stone-Axes:
Mineralien/Steine zum Bau von Steinäxten:
DANI:
Glaukophan (Hornblende-Art) (blau) >Wang-Kob-Me<
Epidot / Chloro-Melanit (Härte 6 bis 7) (grün) >Andiba<
Kieselsandstein (schwarz) >Kä-Lu<
KIM-YAL:
Andesit-Lava (feinkörnig) (blaugrün)
EUROPÄISCHE VÖLKER:
Serpentin (grün)
Nephrit
Amphibolit
Hornblendeschiefer
-----------------------------------------------------------------------------------------------
The Last Stone Axe Makers
Commentary by Benjamin Raven Pressley
This is a report on an article called The Last Stone Ax Makers by Nicholas Toth, Desmond Clark and Giancarlo Ligabue and appeared in Scientific American, July 1992 This is an article worth reading. It describes a chance encounter with a people living in New Guinea’s highlands that still make and trade stone axes in almost complete isolation from the outside world until 1984 when a German doctor met them while on an expedition in the area. These people, who call themselves the Kim-Yal, are horticulturalists who live in Langda village in the central mountains of Irian Jaya, western New Guinea. Their language belongs to one of the many Papuan families, they call Uni. The average Kim-Yal man stands about 4 feet 6 inches tall which is much shorter than populations who live in the central highlands and the southwest coast.
They cultivate sweet potato and taro root, raise pigs, chickens and supplement their diet with wild plants and small game. They clear a new field by felling trees and chopping out the residual roots with their stone axes. However, these implements are slowly yielding to imported metal axes and it is estimated that their stone implements will give way and disappear within a few short years as stores providing metal tools are introduced in the highlands and mountains and a cash economy replaces the traditional system of barter. Given that none of the younger members of the tribe are currently apprenticed in this craft, it is likely that most of this skilled axe-making technology will be lost within one or two generations. An archeologist would normally classify the type of ax they make as an adze. The blade is shaped and hafted in such a manner as we would define an adze; however, it is used to chop wood and fell trees and such implements are generally classified according to their use rather than their design.
The craft of ax making confers high status to the male specialists who practice it and to their sons who traditionally learn the work in lengthy apprenticeships. Today every man at Langda owns at least 2 stone axes and each woman at least one. Most children older than five years old also tote an ax to the fields where they work alongside their elders. This article describes very well the entire process these people use to produce their fine blades with the expertise of an experienced flintknapper. I am including the line drawings from the article below that illustrate the process very well. The article itself describes the process in detail. It was interesting to me that the entire reduction process was done with hammerstones decreasing in size and weight the finer the work became and the closer to the finishing stages, rather than using wooden or antler billets and flaking tools. Typically the Kim-Yal ax maker started with a large stone hammer 25 cm (10 in) in diameter swinging it at a boulder through their legs much like the motion of an American football center. It was noted in the article that to their knowledge this technique has never before been described ethnographically, although it could have been used in antiquity for detaching such large flakes. They also produced suitable flakes, sometimes by throwing one boulder hammer against another boulder core or by kindling a fire alongside a boulder to initiate fractures. A typical blank measures 24 cm long, 14 cm wide and 7 cm deep (about 10 x 6 x 3 inches). The final product of flaking is a long, thin ax with nearly parallel sides, a triangular cross section and a bit end having a slightly convex outline and an edge beveled at about 50 degrees. A typical ax measures about 20 x 4 x 3 cm. The time spent flaking from quarry blank to ready to grind varies from 30 to 50 minutes. Between 10 and 20% of the blanks tend to be lost to breakage. After final flaking, the ax maker grinds the working end against a wetted slab of fine grained sandstone. An hour or so of grinding turns out an ax head with a polished bit and an extremely regular edge. Grinding a tool that already has a razor sharp edge helps the tool hold the edge longer and then makes it more ready to be re-sharpened which is also done by regrinding the edge.
After hafting onto a T-shaped wooden handle at about a 45 degree angle, a Langda villager can fell a tree as thick as a telephone pole in five to ten minutes. The article also mentioned other tools used by Langda villagers such as small, flat, slate knives that are oval, kidney or subtriangular in shape, and are used to cut off leaves, or split and scrape taro root. They also used split bamboo knives for butchering pigs. They re-sharpened the latter by simply tearing off a strip of bamboo with a thumbnail or with their teeth.
I hope you get this article and read it for it has much more than space allows me to review in this short article. You can get it at the local library or purchase a downloadable version HERE.
---->
#Steinaxt#Steinäxte#Steindechsel#Dechsel#Axt#Äxte#Axes#Ax#Stone-Ax#Stone-Axes#Stone Ax#Stone Axes#Stone-Adze#Stone-Adzes#Stone Adze#Stone Adzes#Adze#Adzes#Herminette#Herminettes#Herminettes de Pierre#Herminette de Pierre#Hache#Haches#Hache de Pierre#Haches de Pierre#Tomahawk#Tomahawks#Steine#Stones
4 notes
·
View notes
Photo


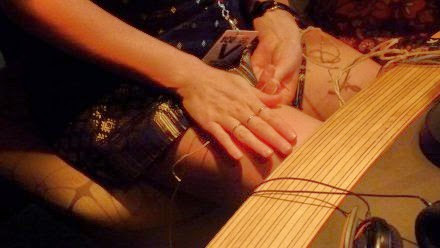


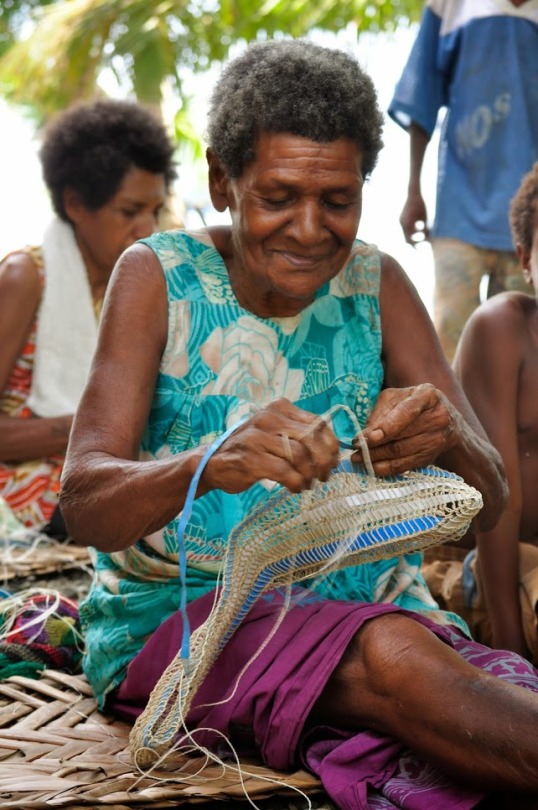
How to Make a Bilum
Step-by-Step-Instructions for GOROKA-Bilums & SIMBU-Bilums:
https://drive.google.com/drive/folders/1qb-VMFC5uDFv3j3_DzUz6c1OxPkbKJSv
[This originally appeared in the Lik Lik Buk, a populist development guide produced in Papua New Guinea in the mid-1980s -A] The bilum is a traditional PNG string bag. Bilums come in a variety of shapes and styles and are made for different purposes. Bilums are made to carry food, to carry babies in and to use for leisure. People can identify a person just by the creative design or style woven on the bilum. Despite the many different aspects and purposes of bilums they all are made from the same basic weaving method. Bilums are worked by forming rows of a special knot around a strip which today is usually made of plastic packing strips but previously people used coconut and pandanus leaves to make these strips. The strips are used to determine the size of the stitches and help to make the job of holding hte stitches easier. The string is owrked in short lengths as all of the string yet to be used is fed into the existing knots. When the string runs out a new length is tied on to the end. You will need (beginner): 1. Some coloured string 2. Cut a piece of plastic strip about 60cm or more to form the base row. 3. Cut the other plastic strips about 30cm long. These should be the same width (about ½-1 cm)as the longer strip. 4. A pair of scissors 5. One or two needles larger and longer than sewing needles (darning needles). Some people use old spokes from an umbrella. (Traditionally: bones of the Flying Foxes ) Method: 1. Make a loop around the plastic strip and tie with a slip knot. Pace one end of string on the front of the plastic strip (that is the side facing you) and hold it down with your thumb at the front and with your forefinger at the back of the plastic strip. 2. Pull the working end over the top and then behind the plastic strip creating a loop at the top of the plastic strip. 3. The working end is brought under the plastic strip and is fed under the other end of the string so that the plastic strip now has a circle of string around it. This mesh must be kept loose enough to be able to feed the subsequent stitches into the loops of the previous ones. 4. The working end goes over the loose end into the top loop from the left side to the right side. It is imortant that the points where the stirng crosses over are kept at the bottom and top of the plastic strip. The working end foes behind the plastic strip and is fed from left to right into the bottom loop. 5. Repeat the procedure until you reach the required length which will be the half the circumference of your bilum. Subsequent Rows Bilums consist of a spiral of rows of meshes. 1. Bend the plastic strip backward (away from yourself) and work the stitch in the normal way but over the two palstic strips instead of one. 2. Turn the pastic strip so that the back is now facing you. Make the next stitch over the one plastic strip in the following manner. 3. Take the working end and go over the plastic strip at the front and into the previous stitch at the back from left to right and then into the loop of hte stitch on the rprevious row. Pull the string behind the front plastic strip. Continue until the second row is the same length as the first row. These two rows mae the base of the blium. (if the plastic strip is short slip another strip in). 4. All subsequent rows are made in the smae manner. 5. Continue the procedure until you have 18-20 rows (medium size bilum). Mouth of the Bilum 1. Get a new piece of string and join it to the ned of the string that you used for making the body of the bilum. 2. Hold the top of the bilum facing you so that you can clearly see the top edge of the stitches forming the top row. 3. Skip the last working stitch of the body of the bilum.Count three loops to the front and feed the string into the thuird loop from left to right. Make a knot. Count three loops and feed the string into the third loop from left to right. From right to left push the string into the knot that you made. Bring the string back towards you forming a circle. 4. Count another three loops in front and feed the string into the third loop. Bring the string back and feed it into the previous circle. Continue around the mouth of the bilum. 5. When the two ends meet feed the last stitch into the first stitch to form a continuous chian. To finish tie a knot and cut the extra string. Handle Bilum handles are sometimes made separately from the bilum and then joined on. Others are made straight from the side of the bilum. There are many styles but the simplest uses the same basic stitch as in the body of the bilum. 1. Use a shorter plastic strip and make about 8-10 sitthces. 2. Use a second plastic strip. Make the next row using the same stitch. 3. Continue making rows until you reach the length of the handle you want. Joining the Handle to the Bilum 1. Hold the Bilum up and from the way it hangs judge where the sides are. The handle must be attached to these points so that the bilum when it is carried will be evenly balanced. 2. The handle and the body of the bilum are joined together by looping stitches. It is important that the joining stitches are made into the first row of the bilum not just into the finishing edge of the mouth of the bilum so that your join is strong. 3. When finished, secure with a knot. Styles and techniques for different patterns are constantly evolving in PNG. This method described above is for a very basic one-colour bilum. Colours can be added by joining different coloured strings to your working string or depending on the complexity of your design are worked in by a method too complicated to explain here. Far better when you have mastered the basics to have someone who know how to show you. Contributor: Joy Sahumlal, ATDI, Unitech, Lae, MP. Url:
http://alex.golub.name/porgera/bilum.html
Step-by-Step-Instructions for GOROKA-Bilums & SIMBU-Bilums:
https://drive.google.com/drive/folders/1qb-VMFC5uDFv3j3_DzUz6c1OxPkbKJSv
#sac de transport#carry bag#carry bags#Tragetaschen#Tragetasche#Bilum#Bilums#Noken#Papua-Neuguinea#Papouasie-Nouvelle Guinée#Papua-NewGuinea#Achterschlung#8er-Schlung#knüpfen#geknüpft#geschlungen#Schlingen#8er-Schlingen#Achter-Schlingen#Achterschlünge#sacs de transport#Tragenetz#Tragenetze#carrying bag#carrying bags#carrying net#carrying nets#carry net#carry nets#Behältnis
3 notes
·
View notes
Photo


“the Crown of Creation”
“la Couronne de la Création”
“die Krone der Schöpfung”
#apes#ape#monkey#monkeys#singe#singes#Affe#Affen#Menschenaffen#Menschenaffe#anthropoid#anthropoids#planet of the apes#Planet der Affen#planète des singes#Mitgeschöpflichkeit#Mitgeschöpfe#fellow creature#fellow creatures#zweierlei Maß#double standards#Doppelmoral#Krone der Schöpfung#couronne de la création#crown of creation#la couronne de la création#the crown of creation#Arroganz#arrogance#Hochmut
12 notes
·
View notes
Photo


https://www.youtube.com/watch?v=-8rGMJcMd9w
#orang utan#orang-utan#Affe#ape#monkey#Menschenaffe#Mensch#man#homme#Regenwald#rainforest#forêt tropicale#deforestation#Abholzung#Mitgeschöpfe#Mitgeschöpflichkeit#Krone der Schöpfung#die Krone der Schöpfung#Menschenaffen#singe#singes#anthropoid#anthropoids#double standard#double standards#zweierlei Maß#Regenwälder#rainforests#forêts tropicales#apes
1 note
·
View note
Photo


Stone-Axes & Stone-Adzes Steinäxte & Steindechsel
used Minerals/Stones for Stone-Axes:
Mineralien/Steine zum Bau von Steinäxten:
DANI:
Glaukophan (Hornblende-Art) (blau) >Wang-Kob-Me<
Epidot / Chloro-Melanit (Härte 6 bis 7) (grün) >Andiba<
Kieselsandstein (schwarz) >Kä-Lu<
KIM-YAL:
Andesit-Lava (feinkörnig) (blaugrün)
EUROPÄISCHE VÖLKER:
Serpentin (grün)
Nephrit
Amphibolit
Hornblendeschiefer
-----------------------------------------------------------------------------------------------
https://wayoftheraven.net/2018/06/10/the-last-stone-axe-makers/
The Last Stone Axe Makers
Commentary by Benjamin Raven Pressley
This is a report on an article called The Last Stone Ax Makers by Nicholas Toth, Desmond Clark and Giancarlo Ligabue and appeared in Scientific American, July 1992 This is an article worth reading. It describes a chance encounter with a people living in New Guinea’s highlands that still make and trade stone axes in almost complete isolation from the outside world until 1984 when a German doctor met them while on an expedition in the area. These people, who call themselves the Kim-Yal, are horticulturalists who live in Langda village in the central mountains of Irian Jaya, western New Guinea. Their language belongs to one of the many Papuan families, they call Uni. The average Kim-Yal man stands about 4 feet 6 inches tall which is much shorter than populations who live in the central highlands and the southwest coast.
They cultivate sweet potato and taro root, raise pigs, chickens and supplement their diet with wild plants and small game. They clear a new field by felling trees and chopping out the residual roots with their stone axes. However, these implements are slowly yielding to imported metal axes and it is estimated that their stone implements will give way and disappear within a few short years as stores providing metal tools are introduced in the highlands and mountains and a cash economy replaces the traditional system of barter. Given that none of the younger members of the tribe are currently apprenticed in this craft, it is likely that most of this skilled axe-making technology will be lost within one or two generations. An archeologist would normally classify the type of ax they make as an adze. The blade is shaped and hafted in such a manner as we would define an adze; however, it is used to chop wood and fell trees and such implements are generally classified according to their use rather than their design.
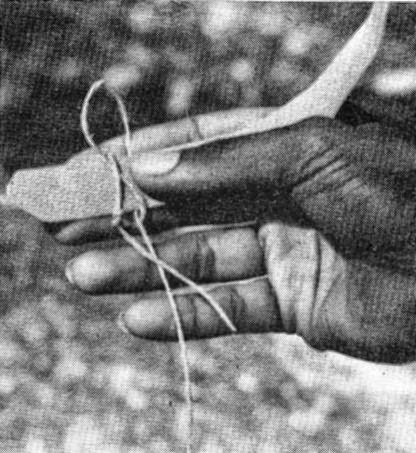
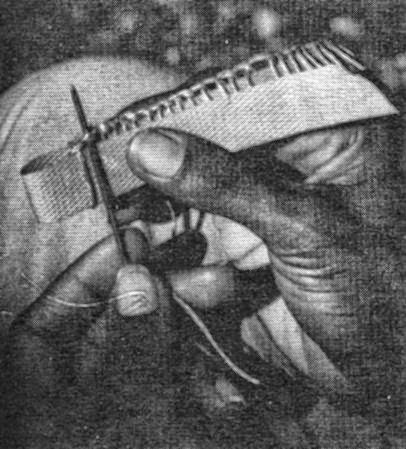
The craft of ax making confers high status to the male specialists who practice it and to their sons who traditionally learn the work in lengthy apprenticeships. Today every man at Langda owns at least 2 stone axes and each woman at least one. Most children older than five years old also tote an ax to the fields where they work alongside their elders. This article describes very well the entire process these people use to produce their fine blades with the expertise of an experienced flintknapper. I am including the line drawings from the article below that illustrate the process very well. The article itself describes the process in detail. It was interesting to me that the entire reduction process was done with hammerstones decreasing in size and weight the finer the work became and the closer to the finishing stages, rather than using wooden or antler billets and flaking tools. Typically the Kim-Yal ax maker started with a large stone hammer 25 cm (10 in) in diameter swinging it at a boulder through their legs much like the motion of an American football center. It was noted in the article that to their knowledge this technique has never before been described ethnographically, although it could have been used in antiquity for detaching such large flakes. They also produced suitable flakes, sometimes by throwing one boulder hammer against another boulder core or by kindling a fire alongside a boulder to initiate fractures. A typical blank measures 24 cm long, 14 cm wide and 7 cm deep (about 10 x 6 x 3 inches). The final product of flaking is a long, thin ax with nearly parallel sides, a triangular cross section and a bit end having a slightly convex outline and an edge beveled at about 50 degrees. A typical ax measures about 20 x 4 x 3 cm. The time spent flaking from quarry blank to ready to grind varies from 30 to 50 minutes. Between 10 and 20% of the blanks tend to be lost to breakage. After final flaking, the ax maker grinds the working end against a wetted slab of fine grained sandstone. An hour or so of grinding turns out an ax head with a polished bit and an extremely regular edge. Grinding a tool that already has a razor sharp edge helps the tool hold the edge longer and then makes it more ready to be re-sharpened which is also done by regrinding the edge.
After hafting onto a T-shaped wooden handle at about a 45 degree angle, a Langda villager can fell a tree as thick as a telephone pole in five to ten minutes. The article also mentioned other tools used by Langda villagers such as small, flat, slate knives that are oval, kidney or subtriangular in shape, and are used to cut off leaves, or split and scrape taro root. They also used split bamboo knives for butchering pigs. They re-sharpened the latter by simply tearing off a strip of bamboo with a thumbnail or with their teeth.
I hope you get this article and read it for it has much more than space allows me to review in this short article. You can get it at the local library or purchase a downloadable version HERE.
---->
https://www.jstor.org/stable/24939142?seq=1#page_scan_tab_contents
https://wayoftheraven.net/2018/01/25/celts-and-axes/
#Steinaxt#Steinäxte#Äxte#Axt#Dechsel#Steindechsel#adze#adzes#stone-adzes#stone-adze#stone-ax#stone-axes#stone ax#stone axes#haches de pierre#hache de pierre#herminette de pierre#herminettes de pierre#hache#haches#herminette#herminettes#tomahawk#tomahawks#Glaukophan#Epidot#Serpentin#Hornblende#Nephrit#Andesit-Lava
0 notes
Photo


How to Make a Bilum
Step-by-Step-Instructions for GOROKA-Bilums & SIMBU-Bilums:
https://drive.google.com/drive/folders/1qb-VMFC5uDFv3j3_DzUz6c1OxPkbKJSv
[This originally appeared in the Lik Lik Buk, a populist development guide produced in Papua New Guinea in the mid-1980s -A] The bilum is a traditional PNG string bag. Bilums come in a variety of shapes and styles and are made for different purposes. Bilums are made to carry food, to carry babies in and to use for leisure. People can identify a person just by the creative design or style woven on the bilum. Despite the many different aspects and purposes of bilums they all are made from the same basic weaving method. Bilums are worked by forming rows of a special knot around a strip which today is usually made of plastic packing strips but previously people used coconut and pandanus leaves to make these strips. The strips are used to determine the size of the stitches and help to make the job of holding hte stitches easier. The string is owrked in short lengths as all of the string yet to be used is fed into the existing knots. When the string runs out a new length is tied on to the end. You will need (beginner): 1. Some coloured string 2. Cut a piece of plastic strip about 60cm or more to form the base row. 3. Cut the other plastic strips about 30cm long. These should be the same width (about ½-1 cm)as the longer strip. 4. A pair of scissors 5. One or two needles larger and longer than sewing needles (darning needles). Some people use old spokes from an umbrella. (Traditionally: bones of the Flying Foxes ) Method: 1. Make a loop around the plastic strip and tie with a slip knot. Pace one end of string on the front of the plastic strip (that is the side facing you) and hold it down with your thumb at the front and with your forefinger at the back of the plastic strip. 2. Pull the working end over the top and then behind the plastic strip creating a loop at the top of the plastic strip. 3. The working end is brought under the plastic strip and is fed under the other end of the string so that the plastic strip now has a circle of string around it. This mesh must be kept loose enough to be able to feed the subsequent stitches into the loops of the previous ones. 4. The working end goes over the loose end into the top loop from the left side to the right side. It is imortant that the points where the stirng crosses over are kept at the bottom and top of the plastic strip. The working end foes behind the plastic strip and is fed from left to right into the bottom loop. 5. Repeat the procedure until you reach the required length which will be the half the circumference of your bilum. Subsequent Rows Bilums consist of a spiral of rows of meshes. 1. Bend the plastic strip backward (away from yourself) and work the stitch in the normal way but over the two palstic strips instead of one. 2. Turn the pastic strip so that the back is now facing you. Make the next stitch over the one plastic strip in the following manner. 3. Take the working end and go over the plastic strip at the front and into the previous stitch at the back from left to right and then into the loop of hte stitch on the rprevious row. Pull the string behind the front plastic strip. Continue until the second row is the same length as the first row. These two rows mae the base of the blium. (if the plastic strip is short slip another strip in). 4. All subsequent rows are made in the smae manner. 5. Continue the procedure until you have 18-20 rows (medium size bilum). Mouth of the Bilum 1. Get a new piece of string and join it to the ned of the string that you used for making the body of the bilum. 2. Hold the top of the bilum facing you so that you can clearly see the top edge of the stitches forming the top row. 3. Skip the last working stitch of the body of the bilum.Count three loops to the front and feed the string into the thuird loop from left to right. Make a knot. Count three loops and feed the string into the third loop from left to right. From right to left push the string into the knot that you made. Bring the string back towards you forming a circle. 4. Count another three loops in front and feed the string into the third loop. Bring the string back and feed it into the previous circle. Continue around the mouth of the bilum. 5. When the two ends meet feed the last stitch into the first stitch to form a continuous chian. To finish tie a knot and cut the extra string. Handle Bilum handles are sometimes made separately from the bilum and then joined on. Others are made straight from the side of the bilum. There are many styles but the simplest uses the same basic stitch as in the body of the bilum. 1. Use a shorter plastic strip and make about 8-10 sitthces. 2. Use a second plastic strip. Make the next row using the same stitch. 3. Continue making rows until you reach the length of the handle you want. Joining the Handle to the Bilum 1. Hold the Bilum up and from the way it hangs judge where the sides are. The handle must be attached to these points so that the bilum when it is carried will be evenly balanced. 2. The handle and the body of the bilum are joined together by looping stitches. It is important that the joining stitches are made into the first row of the bilum not just into the finishing edge of the mouth of the bilum so that your join is strong. 3. When finished, secure with a knot. Styles and techniques for different patterns are constantly evolving in PNG. This method described above is for a very basic one-colour bilum. Colours can be added by joining different coloured strings to your working string or depending on the complexity of your design are worked in by a method too complicated to explain here. Far better when you have mastered the basics to have someone who know how to show you. Contributor: Joy Sahumlal, ATDI, Unitech, Lae, MP. Url: http://alex.golub.name/porgera/bilum.html
Step-by-Step-Instructions for GOROKA-Bilums & SIMBU-Bilums:
https://drive.google.com/drive/folders/1qb-VMFC5uDFv3j3_DzUz6c1OxPkbKJSv
#bilum#bilums#carry bag#carry bags#Tragetasche#Tragetaschen#8er-Schlung#8er-Schlünge#8er#8#knüpfen#Achterschlünge#Achterschlung#Papua-NewGuinea#Papua-Neuguinea#Papouasie Nouvelle-Guinée#PNG#P.N.G.#Noken#Sylvia Baker#how to make a bilum#make your own bilum#making a bilum carry bag#sac de transport#sacs de transport#Handarbeit#Handarbeiten#weaving#weave#woven
2 notes
·
View notes
Photo
Laubenvogel


Aside from being accomplished architects and artists, many bowerbirds are also skilled mimics. Male satin bowerbirds will imitate the calls of other local birds during their courtship displays. Even more startling, MacGregror’s bowerbirds have been heard imitating human speech, pigs grunting, and even the sound of nearby waterfalls.
#bowerbird#bowerbirds#Laubenvogel#Laubenvögel#Laubenbauer#Lauben#Laube#birds#Vögel#oiseaux#Papua#Papouasie#Papua-Neuguinea#Papua-New Guinea#Papua-NewGuinea#Papouasie-Nouvelle-Guinée#Nouvelle-Guinée#NewGuinea#New Guinea#Neuguinea#endangered#gefährdet#endangered species#endangered specie#gefährdete Art#gefährdete Arten#bedrohte Art#bedrohte Arten
4K notes
·
View notes
Photo


Stone-Axes & Stone-Adzes Steinäxte & Steindechsel
used Minerals/Stones for Stone-Axes:
Mineralien/Steine zum Bau von Steinäxten:
DANI:
Glaukophan (Hornblende-Art) (blau) >Wang-Kob-Me<
Epidot / Chloro-Melanit (Härte 6 bis 7) (grün) >Andiba<
Kieselsandstein (schwarz) >Kä-Lu<
KIM-YAL:
Andesit-Lava (feinkörnig) (blaugrün)
EUROPÄISCHE VÖLKER:
Serpentin (grün)
Nephrit
Amphibolit
Hornblendeschiefer
-----------------------------------------------------------------------------------------------
https://wayoftheraven.net/2018/06/10/the-last-stone-axe-makers/
The Last Stone Axe Makers
Commentary by Benjamin Raven Pressley
This is a report on an article called The Last Stone Ax Makers by Nicholas Toth, Desmond Clark and Giancarlo Ligabue and appeared in Scientific American, July 1992 This is an article worth reading. It describes a chance encounter with a people living in New Guinea’s highlands that still make and trade stone axes in almost complete isolation from the outside world until 1984 when a German doctor met them while on an expedition in the area. These people, who call themselves the Kim-Yal, are horticulturalists who live in Langda village in the central mountains of Irian Jaya, western New Guinea. Their language belongs to one of the many Papuan families, they call Uni. The average Kim-Yal man stands about 4 feet 6 inches tall which is much shorter than populations who live in the central highlands and the southwest coast.
They cultivate sweet potato and taro root, raise pigs, chickens and supplement their diet with wild plants and small game. They clear a new field by felling trees and chopping out the residual roots with their stone axes. However, these implements are slowly yielding to imported metal axes and it is estimated that their stone implements will give way and disappear within a few short years as stores providing metal tools are introduced in the highlands and mountains and a cash economy replaces the traditional system of barter. Given that none of the younger members of the tribe are currently apprenticed in this craft, it is likely that most of this skilled axe-making technology will be lost within one or two generations. An archeologist would normally classify the type of ax they make as an adze. The blade is shaped and hafted in such a manner as we would define an adze; however, it is used to chop wood and fell trees and such implements are generally classified according to their use rather than their design.
The craft of ax making confers high status to the male specialists who practice it and to their sons who traditionally learn the work in lengthy apprenticeships. Today every man at Langda owns at least 2 stone axes and each woman at least one. Most children older than five years old also tote an ax to the fields where they work alongside their elders. This article describes very well the entire process these people use to produce their fine blades with the expertise of an experienced flintknapper. I am including the line drawings from the article below that illustrate the process very well. The article itself describes the process in detail. It was interesting to me that the entire reduction process was done with hammerstones decreasing in size and weight the finer the work became and the closer to the finishing stages, rather than using wooden or antler billets and flaking tools. Typically the Kim-Yal ax maker started with a large stone hammer 25 cm (10 in) in diameter swinging it at a boulder through their legs much like the motion of an American football center. It was noted in the article that to their knowledge this technique has never before been described ethnographically, although it could have been used in antiquity for detaching such large flakes. They also produced suitable flakes, sometimes by throwing one boulder hammer against another boulder core or by kindling a fire alongside a boulder to initiate fractures. A typical blank measures 24 cm long, 14 cm wide and 7 cm deep (about 10 x 6 x 3 inches). The final product of flaking is a long, thin ax with nearly parallel sides, a triangular cross section and a bit end having a slightly convex outline and an edge beveled at about 50 degrees. A typical ax measures about 20 x 4 x 3 cm. The time spent flaking from quarry blank to ready to grind varies from 30 to 50 minutes. Between 10 and 20% of the blanks tend to be lost to breakage. After final flaking, the ax maker grinds the working end against a wetted slab of fine grained sandstone. An hour or so of grinding turns out an ax head with a polished bit and an extremely regular edge. Grinding a tool that already has a razor sharp edge helps the tool hold the edge longer and then makes it more ready to be re-sharpened which is also done by regrinding the edge.
After hafting onto a T-shaped wooden handle at about a 45 degree angle, a Langda villager can fell a tree as thick as a telephone pole in five to ten minutes. The article also mentioned other tools used by Langda villagers such as small, flat, slate knives that are oval, kidney or subtriangular in shape, and are used to cut off leaves, or split and scrape taro root. They also used split bamboo knives for butchering pigs. They re-sharpened the latter by simply tearing off a strip of bamboo with a thumbnail or with their teeth.
I hope you get this article and read it for it has much more than space allows me to review in this short article. You can get it at the local library or purchase a downloadable version HERE.
---->
https://www.jstor.org/stable/24939142?seq=1#page_scan_tab_contents
https://wayoftheraven.net/2018/01/25/celts-and-axes/
#Steinaxt#Steinäxte#Steindechsel#Dechsel#Axt#Äxte#Tomahawk#Tomahawks#adze#adzes#stone-axe#stone-axes#stone-adze#stone-adzes#herminettes#haches de pierre#hache de pierre#herminette de pierre#herminettes de pierre#Glaukophan#Epidot#Chloro-Melanit#Andesit-Lava#Hornblende#Serpentin#Amphibolit#Nephrit#Hornblendeschiefer#axes#axe
1 note
·
View note
Photo

0 notes
Photo
https://www.youtube.com/watch?v=dl8FzzEXMXs
waitpela Gras

Look at these blonde haired Melanesian angels 😍😍
#blonde#blonde-haired#blond#blondhaarig#Melanesier#melanesians#Papuas#Papua#curled hair#curls#Locken#Lockenköpfe#Lockenkopf#Neger#negrid#hell#bright#light#aufgehellt#Papua-NewGuinea#Papua-Neuguinea#Papouasie#Papouasie Nouvelle Guinée#Nouvelle Guinée#Melanesien#Melanesia#Pikinini#waitpela#waitpela Pikinini#waitpela gras
37K notes
·
View notes
Photo

Where the Afro-Germans at? We are coming to meet you next week! If you live in around Munich please get in contact with us! #afroeuropean
36 notes
·
View notes
Photo

Owotii Iinong Elementary Cultural School.
#Owotii Iinong#Owoti linong#Papuas#Papua-NewGuinea#Papua-Neuguinea#Papouasie#Papouasie Nouvelle Guinée#PNG#P.N.G.#Niugini#skul#skulboi#skulmeri
6 notes
·
View notes
