
Statment of practice : Eliandro Monteiro is an afro-european performance designer whose work is main focus on set and costume design.
Don't wanna be here? Send us removal request.
Statistics
We looked inside some of the posts by humaninteractiond4d2018 and here's what we found interesting.
Average Info
Notes Per Post
0
Likes Per Post
0
Reblog Per Post
0
Reply Per Post
0
Time Between Posts
10 hours
Number of Posts By Type
Text
16
Photo
1
Last Seen Tumblr Blogs


Fun Fact
In February 2021, Tumblr had 518.6 million blog accounts.


Text
23 - Concept and Reflection
Human Interaction
Designer: Eliandro Monteiro
Dance School: Rambert School of Ballet and Contemporary Dance
Name of Choreographer: Lara Fournier
Name of the Dancers: Elin Anderson (solo), Connor Scott (duo), Joey Barton (duo), Gabriel Ciulli (trio), Adélie Lavail (trio) and Llewelyn Lewis (trio).
Title of the music: Kasinie - R.roo , Trentemoller - The Very Last Resort. Haelos - Intro/ Spectrum, Radiohead - 15 steps
Number of Dancers: 6
Description of ideas behind piece: It is undeniable that we are leaving a communication revolution. A series of technological innovations dramatically reshaped the way people communicate. We communicate more and faster than we ever did. Although, it is a fact that we are losing the essence of human communication. We replaced a long conversation and a hug by a scroll down on a screen and like on picture. Based on the work of philosophers such as Jean-Paul Sartre (Huis-Clos), Eugène Ionesco (Rhinocéros), Samuel Beckett (En attendant Godot), and Albert Camus (L’Etranger) as main references, relying on the principles and concepts of the French Théâtre de l’Absurde. "Human Interaction" invites the spectators to turn off their wi-fi and experience true human communication.Using mirrors and blindfolds as main tools, this piece will recreate and deepen situations experienced by the average human in the current society. This piece will explore the relationship that we develop during our life time with ourselves, with partners and within society.
During the creative process of designing the costumes for this show, I got mainly inspired by the concept of establishing relationships. During our life time frame, we develop different kinds of relationships with people in order to be able to live within society. We build relationships with our family, relatives, friends and with ourselves . These relationships are based on confidence, the confidence that we have in ourselves and the confidence that we give to someone else ( idea expressed by the dancers be wearing blindfolds).
The use of mirrors intend to explore this subject, showing the different and subjective images that we have of ourselves. We change every day, we adjust ourselves to different environment and different people. We grow up every second, we are constantly finding more about ourselves until the day of our death. The use of reflection that repeats and distorts the human body, explores this concept that we intend to talk about . The journey of establishing relationships is quite hard and melancholic. Taking this as a inspiration, as well as, of part of the lyrics of a song played in the piece - “I’m going to talk to you this evening, On the subject of the spectrum of love” - Haelos - Alan Watts spectrum of love lecture, I decided to use different shades of grey/ spectrum of greys as the colour scheme for the costumes.
Costume Materials: Mixed cotton and fabric dyes . Set Materials: shrink mirror film, mirror window film, clear perspex and wood - timber (frame) .
Reflection:Design for dance was actually the one the reasons why I decided to do PDP. The opportunity to work with dance always fascinated me and it was a challenge that I wanted to take in my practice. The project exceeded my expections and teached a lot about how to be professional. Working in this collaboration teached me a lot a about how to listen others ideas but also how to persuade and convice someone about my own ideas. This project in particular made me grow up a lot tecnically. I improved a lot my set construction skills and my costumes making skills. The only thing that I felt that I missed in this project was the opportunity to create a set and costume at the same time as the coreography was being made . In my particular case, I felt that my set design could be way more interective and versatil but the coreographer said that could not change the coreography because did not have time. So I worked on top of a concept, coreography and some set and costume elements that were estabelished since the begining. I learnt alot creating in this way as well and I enjoyed this colaboration with coreographer a lot. However, I feel like in the future I want to work along with creating process of the concept and coreography in order to achieve an outcome even better.
0 notes
Text
21 - The Shrink Mirror Incident
The shrink mirror incident was probably the most remarkable and valuable experience I had in this project. During one of the scene changes of the tech rehearsal one technician accidentally broke two of my shrink mirror walls. The technicians covered the costs of the materials and tried to help me fixing my set. Unfortunately, this accident happened in the busiest moment of the project and the shrink mirrors took me days to make and none of the technicians had this amount of hours to spend helping me remaking part of my set. Even though I worked really hard to fix the set meanwhile I was fixing some other small problems on the costumes for the day of the show. It became impossible achieve the final outcome that I had imaged in my head.
This situation made me appreciate the personal value of project. It made me value even more what I learned through the techniques I used in piece and what we actually learn from our mistakes. It made me also think that as set designer, I should be extremely careful with my set. Not just be careful when I am making it but also give instructions to the technician about how to store and hold the set, in order to avoid these kinds of accidents.
0 notes
Text
20 - Lighting Workshop 3
vimeo
On the final lighting workshop we did a full run trough our lighting queue and had it extra part on the choreography . As we had a bit of extra time we decided to try out a different lighting at the beginning of the choreography . When we did that we found out that had a light pointing directly to the wall made by window film it would stop being see trough and became just reflective. So we agreed that would make sense to have the solo performer coming from outside and placing herself in the middle of two walls because in the initial concept of her solo she is building a relationship with herself , fighting between herself and what is reflect in the mirror in order to herself.
0 notes
Text
19 - Blindfolds


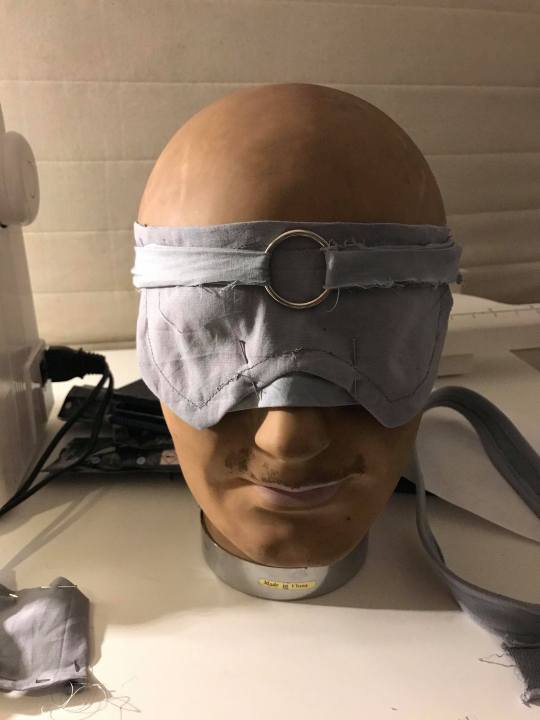

To create the blindfolds, I kept working directly on the mannequin. I experimented different shapes for the blindfolds until I achieved something simple to not loose the meaning of the of covering their eyes.

Final chosen design
0 notes
Text
18 - Lighting Workshop 2
vimeo
vimeo
vimeo

During the second lighting workshop, there was more time to play with our lighting since all the set was in place. We also had the performers wearing parts of the costumes which gave us better idea of the final outcome and it helped us choosing the best lighting for the piece. In this session we did tried out some lighting textures and side lighting. We decided not to use any of these lighting effects as the side lighting was reflecting on the mirrors and affecting the viewing of the piece, and lighting textures did not looked like as we wanted on stage. So we decided to keep the top lighting and use cold colours to create the atmosphere that we wanted.
0 notes
Text
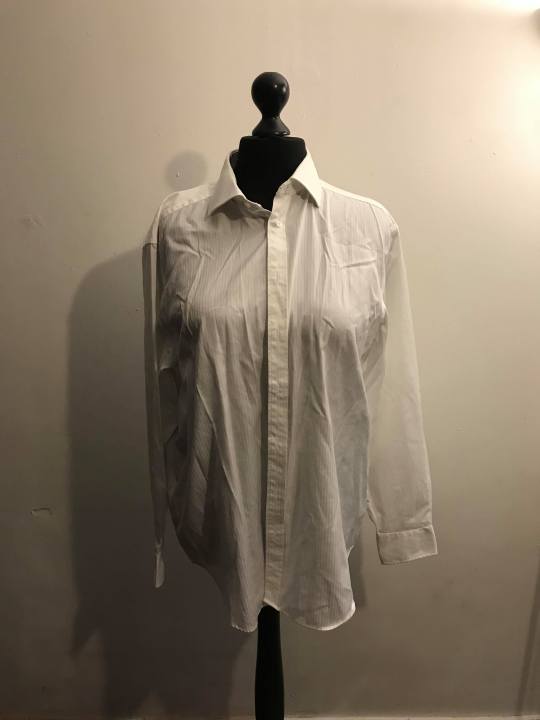
17 - Costume making

Step 1 : Once I got the the delivery from the bases clothes for my costumes, I organised a fitting session with all my performers.

Step 2: After getting the bases fitted on the bodies, the choreographer and I decided to cut the sleeves of the all shirts. We decided to leave the movement more exposed and emphasize it.

Step 3: Right after my fitting, I started working on the dress for the solo performance. Unfortunately, the based that I found on internet for her dress was out of stock so had to make her dress from scratch.

Step 4: When I got the dress done, I attached a stripe of fabric on waist of all the trousers to cover the brands name.

Step 5: After that, I started making skit panels out of paper and place them on top of the mannequin and make them look like I had sketched.

Step 6: Once I got the shape I wanted, cutted my pattern in fabric. Unfortunately, when I started attaching them on the skirt I relised that they were to heavy and they making my dress lose all the moviment. So I gave up on the panels idea and left the dress as it was initially.

Step 7: Once I finished, I put the costumes standing next to eachother and analised them. I came to the conclusion that they needed all an element to uniform them, so the performers looked like that they were all from the same place and socially equally. The solution that I found for that was to make the same belts and and turtle necks for all the costumes.

Step 8: I made a belt out a pattern but after trying it on the costumes I realised that the best option would be a braided belt made it out of lycra cord.

Step 9: For a turtle neck I took the measurement of the performers necks and made and attached a neck in each top.

Step 10: Once I got all the sewing done, I dyed all the costume in grey.
vimeo
Step 11: Finally, to ensure that all the costume fitted the performer and were not in conflict with their movement, we had a last fitting.
0 notes
Text
16 - Lighting Workshop 1
vimeo
On the first lighting workshop, we spent the majority of the session attaching stage jacks to the shrink mirror frames and hanging my prepex's wall on the first pieces of the set that I had made. So we did not have much time to experiment with lighting. However, we did quickly try the same top lighting used by the choreographer on her first show at the Rambert School and it seemed to work at the Platform Theatre.
0 notes
Text
15 - Set Construction

Step 1: To make my set, I started from peal the perspex sheets and lay them down on flat surface.

Step 2: Once I got the perspex sheets flat, I sprayed the whole surfaces with washing liquid mixed with water and applied the the window film on top.

Step 3: to support the perspex sheet and the shrink film walls, I made 5 wooden timber frames. I constructed them by assembling the timber stick in rectangles.

Step 4: After I painted the frames in black I left them drying out. Once they were dried, I attached the the perspex sheets to one of the frames by screwing them together.

Step 5: For the shrink mirror walls, I started from frame the shrink mirror with staples and masking tape.
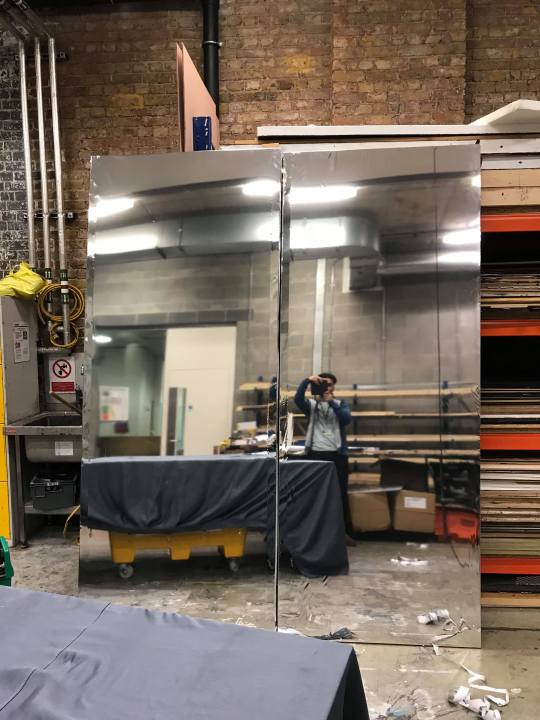
Step 6: Finally, I warm them frames up slowly with a heat gun until they got completely stretched.

Final outcome
0 notes


Text
13 - Costume Sketches Final


Following the advice I was given at the production meeting, I was more aware of my time management for buying the clothes and modify them. I picked clothes from a online shop instead of a charity shop. I also made some drawings that I would use as a guide line when I was modifying the clothes on the mannequin. This process saved me a lot of precious time for making the costumes.
0 notes
Text
11 - Production Meetings
For the production meetings I brought a model box of my set, some drawings, samples of the materials I would use for my set and some reference videos to convey my idea. I received some very constructive criticism and the production team made me aware of a few potential issues in my designs.
The main issues to be resolved on my designs were:
- scene change solution: my intention was not practical as there was not enough space in flyers for all the pieces of my set
- the 4 floor lights need someone to switch them on and off which would disturb the performance
- the cost of materials for the set would be really high
- buying clothes from charity shops and modifying them is time and labour intensive, and I am working with a short time frame to make the costumes
- a 'formal look' for the costumes does not seem to connect with the set design
The solutions found for this issues were:
- impractical scene changes solution: fly up the front wall of the box and carry the other two walls on a stage jack
- the 4 floor lights: use top lighting
- high costs for the set: reduce the set to 3 walls - the wall on the left side of the stage and the front and back walls of the cube.
- ‘formal look’ and clothes from charity: have some costume sketches, even if the designs change after finding the clothes (it would save time choosing at shops because I knew already what I was looking for)
0 notes
Photo


5
Research - stage 3
In order to improve the practicality of my costume design, I did some movement studies by watching my performance and checking if the performers were laying on the floor or being held by a partner during the performance. In this way, I ensured that the performers would be safe and my designs were not in conflict with their movement. To achieve that, onto sketches of the performers, I marked the areas of the body that my designs needed to be more considerate of with coloured highlights. From my research I concluded that all of the performers should be wearing leotards, as they would perform a lot of flips and rolls on the floor. The forearm was the only part of the body that I could have a more bulky design, as it was free from any contact during the performance. For the solo performer, as she does not have a partner, her arms and hands were free from any contact. I also notice that her arm movements were quite open and fast.
0 notes
Text
12 - Research - Stage 4 - redesigning the costumes
youtube
youtube
youtube
youtube
youtube
On my research to redesign the costumes I decided to look up artists that work/worked mainly with modern and contemporary dance and used everyday clothes on their shows. The artists that influenced me the most were two choreographers, Alvin Ailey and Andrew Winghart. Using really simple costumes they were able to convey moods and atmospheres. They used long loose skirts made by light and flowing fabrics to emphasise the movements of female dancers. Kyle Abraham used lighting textures on top of costume really well to convey a certain atmosphere on stage at Alvin Ailey’s piece, ‘Untitled America -Second Movement’. These were some aspects that I definitely influenced my redesign of the costumes.
0 notes
Text
10 - Modifying Clothes Idea

I decided to take the choreographer’s suggestion about to costume and try to design costumes with a formal look. I bought clothes from charity shops that I would later on dye, assemble and modify. The process of designing the clothes was based on experimentation and simply trying things out on the mannequin directly because I could not predict what I would find in the charity shops. Designing in this way felt intuitive and I was able to make decisions quickly and respond to the material directly.
0 notes
Text
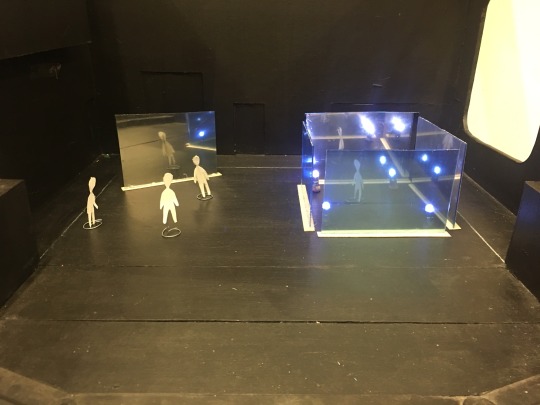
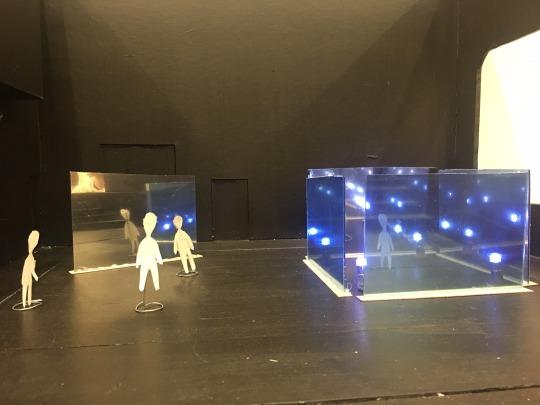
9 - First Ideas For The Set Design


In my first ideas for the set design, I intended to build 5 walls that would be moveable, either with wheels at the bottom or lifted up using the flyers of theatre. After drawing a side elevation and a plan of the theatre, I saw that the box should be placed 3 metres away from the audience, and the walls should be 2.5 metres high in order that everybody in audience could view the infinity reflection inside of the box, even if they are seating at the far back row of seats. The 5 walls would have a timber wooden frame structure. The wall placed at left back side of the stage and the back wall of the cube would be made by shrink film. The other 3 walls would be made by window film and perspex sheets.
0 notes
Text
8 Research - Stage 4 - Techniques And Materials
youtube
youtube
Shrink Mirror
After I decided to create an infinity reflection on stage, I knew that I would need a mirror. I wanted to make a very large mirror that would take up the whole stage and capture all performers in the reflection. After talking with some technicians from the Platform Theatre, I was advised to make smaller mirrors out of a material called ‘shrink mirror’. This material, was cheaper and less dangerous than actual mirror because it cannot break and injure someone.
youtube
youtube
Infinity Candle Box
In order to reduce costs of my set, I started researching ways to display my mirrors and reflective walls on stage to create an infinity reflection. During my research, I found a candle decoration that seems to take us to a infinity visual trap . I thought it would be interesting to bring this domestic decoration to the stage by amplifying it to a bigger scale.

Reflective Window Film
The window film was the material that I chose to cover some of the walls of my infinity box. This is a readily available material and simple to manipulate. It also can be applied to any kind of flat surface, which allowed to choose a cheaper, safer and lighter material for the surface. I chose to apply the window film on perspex because it was cheapest and easiest to get since I was working on a with a short time frame to make my set after the production meeting.
0 notes