
Statistics
We looked inside some of the posts by it-solve and here's what we found interesting.
Average Info
Notes Per Post
5
Likes Per Post
5
Reblog Per Post
0
Reply Per Post
0
Time Between Posts
1 month
Number of Posts By Type
Photo
17
Last Seen Tumblr Blogs


Fun Fact
In 2020, 27% of US Tumblr users had an annual household income of over $100,000.
Photo
A1708 Macbook Pro no Backlight Repair due to a failed Flexgate - https://it-solve.au/repair-cases/a1708-macbook-pro-no-backlight-repair-due-to-a-failed-flexgate/
Today we have a MacBook Pro 2018 for a flexgate repair in our Adelaide workshop. Although it’s a 2018 model, it is an absolutely delightful device to work on.
Did you know that the 2018 A1708 was the last Macbook with removable SSD storage? Thats right. The last Macbook allows data to be extracted by connecting the drive to another Macbook when an accident happens. And trust me, these accidents happen all the time. The amount of MacBooks with liquid damage we get daily, where customers want only the data is enormous.
Unfortunately, though, all the data is stored on an encrypted chip which is soldered onto the login board. So how do you get the data? The only options to recover such data are either Macbook Liquid Damage Repair or Macbook Data Recovery. And let me tell you, it’s neither easy nor cheap!
How and Why Macbook Flexgate fail?
Flexgate failure on Macbooks is a well-known issue, where the ribbon cable that carries a backlight voltage crimples and fails.
The ribbon cable that carries the Backlight voltage is very thin, as thin as a printer paper. On top of that with 2016-2018 models, Apple manufactured this cable slightly shorter due to being the first-gen display of its kind. Hence cable criples at the bending rea more than 90* and breaks.
Do I have a failed Flexgate on my Macbook?
An easy way to identify if the flexgate has failed on your Macbook is to check if there is a faint picture on the screen. Flexgate cable carries backlight signals,
no Flexgate = no Backlight
#ITSolveRepairs
How to fix Macbook black screen caused by Flexgate failure?
The flexgate failure on Macbooks is repairable and does not need a complete screen replacement. Although the cost can be slightly over half of the price of a Macbook Screen Replacement in Adelaide.
Unfortunately, fine soldering tools and lots of experience will be required to be able to resolder and extend the cable
IT-Solve specialises in Macbook Repairs in Adelaide, instead of a complete screen replacement, we attempt to repair and extend the cable. That way we are saving a complete screen assembly ending up in the landfill, as well as saving 40% of the cost of a new screen, win-win.
Repairing Flexgate on Macbook Pro in Adelaide
To be able to repair the flexgate on this Macbook in our Adelaide workshop, we had to cut off the bent broken bit and using a 0.1mm fine copper wire (as thin as a human hair) we extended the flexgate cable.
With extended and insulated cable. The backlight on this Macbook will not fail again.
Successful Flexgate Repair on a Macbook Pro in Adelaide
Another successful Macbook Flexgate Repair Adelaide!
These Macbooks are amazing, although have their fail points. They are much more reliable than the new Apple Silicone or T2 versions, which are overengineered and fail for no reason. Especially after a failed software update.
Worthy Macbook and will keep kicking for another couple of years with no issues!
#1990#itsolverepairs#A1708#ITSolve.Repairs#Macbook Flexgate Repair#Macbook Repairs#Macbook Screen Replacement#Repair Cases
0 notes
Photo

A1708 2017 Macbook Pro Not Turning on due to breadcrumb corrosion - https://it-solve.au/repair-cases/a1708-2017-macbook-pro-not-turning-on-due-to-breadcrumb-corrosion/
A1708 2017 Macbook Pro Not Turning on due to breadcrumb corrosion
A1708 2017 Macbook Pro Not Turning On causes
This week we had a 13″ Macbook Pro in our Adelaide Workshop. Unfortunately, it was not turning on and responding to the power button press.
A1708 2017 Macbook Pro showing 5V on the charger and not Turning On
Our not-so-fancy charger shows only 5V and no current consumption, immediately pointing us towards an electronic fault.
New generation USBc model Macbooks communicate with the charger all the time and if something is not going well within the Macbook they do not let the charger to output 20V. Instead, they limit the voltage to 5V to prevent any future damage or fire hazard.
Macbook Pro Not Turning on – the Repair process
Dust and organic materials visible on the not turning on A1708 2017 Macbook Pro logic board
We could immediately spot the abundance of dust on the bottom side of the logic board. Quite often this layer of dust traps organic materials like hair and breadcrumbs creating ideal ground to absorb humidity from the air.
There is one solution for such failure, and it is a Macbook Not Turning on Repair in Adelaide.
#itsolverepairs
A1708 2017 Macbook Pro Not Turning on Repair
Looking closely around the charging chips, we could spot oxidation towards the right side of the right CD3215 IC. Small oxidation like this one is most likely caused by breadcrumbs floating within the Macbook and an unlucky one getting stuck in the dust.
Unfortunately, organic materials have oil and other corrosive agents within them. When in contact with air, heat and electricity starts a chemical reaction known as oxidation. Once started, oxidation similar to rust, “eats” through the traces and interrupts signals required for those chips to work seamlessly.
Assembling and Testing A1708 2017 Macbook Pro after a Logic board Repair
Once the repair is complete, we can assemble the Macbook and run a full suite of diagnostics to ensure a reliable and timely repair in our Adelaide Macbook Repair workshop.
Successful A1708 2017 Macbook Pro Not Turning on Repair
A1708 2017 Macbook Pro Repaired, turns on and charging
Once assembled we could see that the charger now is communicating with the charging chips and is happy to provide 20V, together with 2.7A to charge the battery.
A1708 2017 Macbook Pro with Repaired Logic Board
We have completed this repair in a span of a day, Another Macbook is saved from ending up in the landfill!
#itsolverepairs#A1708#ITSolve.Repairs#Macbook Logic Board Repair#Macbook Not Turning On Repair#Macbook Not Charging Repair#Macbook Repairs
1 note
·
View note
Photo

Data Recovery from Liquid damaged Macbook A1534 - https://it-solve.au/repair-cases/data-recovery-from-liquid-damaged-macbook-a1534/
Macbooks built after 2017 have integrated SSD chips, resulting in complications in data recovery from liquid-damaged MacBooks.
Liquid-damaged macbook A1534 not turning on – Data Recovery
Why is Macbook Data Recovery needed if it doesn’t turn on?
Unlike Magbooks without USBC ports, these Macbooks do not have removable storage. Hence we cannot just remove the storage and attach it to another Macbook in an attempt to retrieve the data.
Liquid-damaged Macbook A1534 is not turning on due to liquid damage.
There are mainly two ways to recover the data from not turning on Macbooks from this generation.
1. Recovering Data from not turning on Macbook – Removing Storage Chips
As guessed, this process requires desoldering SSD chips and shipping them to a specialised chip Data Recovery company. It is a very complex, hence costly process. Usually topping the $3000 mark.
Due to the time, cost and specialised third parties involved, we leave it as a final option once we drain all options.
2. Recovering Data from not turning on Macbook – Bringing Macbook back to life
Repairing the Macbook or at least bringing it to a vegetable state so that we can pull the data is the option we prefer. This ensures that we control the whole process and hence can control the quote and cost. As well as provide a much faster turnaround with less waste.
However, like the first method, it is complicated and requires specialised skills in understanding electronics, which were not meant to be taken apart, yet alone repaired or repurposed.
How to handle Liquid Spilled Macbook
Motherboard of Macbook A1534 with liquid damage signs on the board
The liquid is the worst enemy of any electronics. But let’s be realistic, accidents happen, and we do not live in a bubble. So it’s normal to spill something on the Macbook, we need to know how to handle the situation with as less damage as possible.
Unfortunately, due to misinformation regarding treating liquid-damaged Macbooks. We see more and more customers who let their liquid-damaged Macbooks dry. This is a big NO! We would highly advise reading what to do when spilled liquid on a Macbook
#itsolverepairs
Data Recovery from Liquid Damage Macbook by Repairing it
Removing the Logic Board of a Macbook A1534 after a liquid spill
As seen in the photo, liquid, while drying, turns into residue (the blue/green gunk). This residue is highly corrosive and conductive. Usually, within minutes of spillage while on or charging, it starts corroding traces and components. Hence quick action in Macbook Liquid Damage Repair is a must. If not treated on time, components inside short and Macbook either stop charging or completely seize functionality.
Liquid Residue on a Macbook A1534, corroding due to being left to dry
We need to immediately clean and rebuild/repair damaged traces and replace corroded/faulty components. Due to the integrated battery design – every minute we waste not repairing the Macbook is a reduced chance of a successful repair.
Macbook A1534 turning on after logic board repair
Once we repair the Macbook Logic Board, we can bring the device to a vegetable state with the aim of recovering the customer’s data.
Turning on Macbook A1534 after a successful Repair
The customer already purchased a new Macbook, but data is something stored on the logic board. And until Liquid Damaged Macbook is Repaired, there is no cost-economical way to extract the data from a dead Macbook.
Successfully Recovering Data from Not Turning on Liquid Damaged Macbook A1534
Testing Successfully Repaired liquid damaged Macbook A1534
After successfully bringing the Macbook back to life, we usually need to run extensive tests to ensure it is a reliable Macbook. After all, Repair is worth the cost only if we can be comfortable that the repair can hold at least 3-5 years, especially with the newest, more fragile laptop and Macbook builds.
Preparing Macbook A1534 for a Data Extraction
However, this was not the case with this Macbook. Our Adelaide customer has already moved to a new one; they only wanted the Data to be Recovered. Hence we can run data extraction straight from the customers’ Operating System and ensure there is no stone unturned and all data is extracted safely and securely.
Why can we not rely on USBc type Macbooks?
Recovering Data to an External USB Drive to be used on the new Macbook
New generation Macbooks are Slim, Sleek, Thin, Fast, Quiet, and Cool. What they are not is Reliable and Repairable! Apple takes every possible measure to overcomplicate the Macbooks, unnecessarily creating multiple failing points. As we mentioned at the beginning of this long post, we do not live in a vacuum, idyllic, accident-free bubble as Apple might.
These USBC Macbooks are designed to fail within 2-3 years of ownership, with or without “user-inflicted damage or error”, as Apple calls it.
Hence the best advice we can give any Macbook user is:
If you are after a reliable, lasting and easily repairable Macbook. Dig up your old magnetic charger Macbook from the cupboard, dust it off, and make it better than new. We can vouch that it will last longer than your brand-new one.
#itsolverepairs
#itsolverepairs#A1534#ITSolve.Repairs#Macbook Data Recovery#Macbook Liquid Spillage Repair#Macbook Liquid Damage Repair#Macbook Not Turning On Repair#Macbook Repairs#Repair Cases
1 note
·
View note
Photo
HP Envy Hinge Repair - Left Hinge Separating - https://it-solve.au/repair-cases/hp-envy-hinge-repair-left-hinge-separating/
Why it is essential to Repair HP Envy 14 hinge ASAP
Recently we got this gorgeous HP Envy 14 for a Hinge Repair in our Adelaide ITSolve workshop.
Often we receive laptops for hinge replacements. This HP Envy with a broken hinge, coming for a Repair in our ITSolve Repairs Adelaide main Workshop, was no different case.
It is vital to tackle the separating hinge on HP Envy laptops as soon as possible. Otherwise, the pressure from the separating hinge will push the screen out and might cause the screen to crack.
If we crack the screen, that might add 600$ additional cost to the Laptop Hinge Repair Cost.
Why HP Envy Hinge Breaks and Needs a Repair
This is not a unique fault for HP Envy laptops. Most laptops might feel sturdy by the aluminium casing, but inside, the hinges are secured into a plastic hinge support, glued onto the aluminium back cover.
Usually, within two years of usage, the hinges would get clogged up with dust This dust will seize them up, causing strain to be transferred from the metal hinge to the weaker plastic hinge support.
We can easily compare the broken left hinge to the right hinge, which seems intact at first glance.
However, looking closely at the second threaded nut on the left, we can see how the plastics around it start cracking up. This will soon lead to the right side of this HP Envy hinge needing a Repair.
Why not replace back cover of the HP Envy with a broken hinge
Although replacing the back cover with a new one would be easier, we prefer to repair the HP broken Hinge Support.
The hinge s port is plastic. If we replace the back cover, it will fail within two years when the hinges seize up again.
Instead of replacing it, we prefer to spend more time and fix it more reliably.
HP Envy Hinge Repair process
Over the years, we tried to replace back cover and hinges, glue t e support, and even fuse the broken case together of HP Envy laptops. None yielded a reliable long-term solution.
Over the years, what worked was to create a metal-to-metal connection holding the hinge to the back cover and skip reliance on fragile plastic support altogether.
Runn ng aluminium rivets all the way through the back cover through the hinges is a more reliable way of doing HP Envy Hinge Repair in Adelaide. It ensures we skip the plastic hinge support altogether by sandwiching the hinge and back case.
Fitting all together while repairing HP Envy broken Hinge
The screws which hold the hinges in place come with low-profile flat heads. This is mainly due to the low-profile LCD panels newer laptops are using. It limits the free space available between the screen and the back cover.
These rivets are long, and unfortunately, it requires quite a few metalworking skills to ensure that once we place the screen there, it will fit nicely.
How to ensure HP Envy Hinges don’t break again
To ensure the longevity of this HP Envy Hinge Repair, we clean and oil the hinges. This, combined with stronger support of the hinge attached to the back cover, now have extremely durable hinges which can last years without straining any weak plastic parts.
Additionally, we also repaired the right hinges as well, to prevent any future breakdown of the right hinge support as well.
Of course, we should not forget why this failed in the first place. It is not HP Envy’s design fault. It is planned obsolescence on every model laptop out there. They are designed to fail, and if not serviced annually, we see these hinges barely lasting two years span.
Successful HP Envy Hinge Repair
Repairing the hinge, although it takes at least three times longer to replace the back cover, is a more reliable and resilient process. It ensures the life expectancy of the laptop is greatly increased instead of capped at another two years.
Just remember that lack of annual servicing is the reason why newer laptops fail so often. If it is not a broken hinge, it will most likely be a component failure due to overheating.
New laptops tend to be as thin as possible, reducing the time they clog up internally and overheat. On top of that, they are jammed up with powerful chips and not enough cooling. It’s not if but when they will overheat and fail.
#itsolverepairs#HP Envy Hinge Repair#ITSolve.Repairs#Laptop Hinge Repair#Laptop Repairs#Repair Cases
0 notes
Photo

Dell Inspiron 7000 broken Hinge Repair - https://it-solve.au/repair-cases/dell-inspiron-7000-broken-hinge-repair/
A Dell Inspiron 7000 with a broken hinge was recently brought to our Adelaide ITSolve workshop for a Laptop Hinge Repair.
It’s crucial to address a separating hinge on Dell Inspiron laptops as soon as possible. Mainly because if left unrepaired, the pressure may break the screen. Separating hinge can push the screen out and cause it to crack. If the screen cracks, it could add an additional cost of up to $600 to the laptop hinge repair cost.
Reason for Dell Inspiron Hinge Failure
The hinge breaking and needing Dell Inspiron Hinge Repair is not unique to Dell laptops.
Laptops may feel sturdy due to the aluminium casing. However, industrial glue glues the hinge support onto the aluminium back cover.
Within two years of usage, the hinges may get clogged up with dust. Dust can seize hinges up and cause strain. This strain gets transferred from the metal hinge to the weaker plastic hinge support.
Dell Inspiron 700 Hinge Repair Process
Instead of replacing the back cover with a new one. We prefer to repair the broken hinge support, which may fail again within two years when the hinges seize up.
A reliable way to Repair Dell’s faulty Hinge
Our preferred method is to create a metal-to-metal connection. This connection holds the hinge to the back cover, bypassing the fragile plastic support altogether.
Running aluminium rivets through the back cover and hinges is a more reliable way of repairing the hinge of these Dell Inspiron laptops. Ensuring that we skip the glued hinge support altogether by sandwiching the hinge and back cover together is the most resilient way.
To ensure the longevity of the hinge repair, we clean and oil the hinges, combined with stronger hinge support attached to the back cover.
This results in extremely durable Dell Hinge Repair that can last years without straining any weakened glued parts. We also repaired the right hinge to prevent any future breakdown of the hinge support.
Successful Dell Inspiron Hinge Repair in Adelaide
It’s important to note that the lack of annual servicing is often why newer laptops fail.
It’s not Dell Inspiron laptops’ design fault but planned obsolescence on every model laptop out there. Check HP Envy with separating left hinge support we published recently.
They are designed to fail; if not serviced annually, we see these hinges barely lasting two years.
By repairing the hinge instead of replacing the back cover, we ensure a more reliable and resilient process that can greatly increase the life expectancy of the Dell Inspiron 7000.
#itsolverepairs#Dell Inspiron Hinge Repair#ITSolve.Repairs#Laptop Hinge Repair#Laptop Repairs#Repair Cases
0 notes
Photo
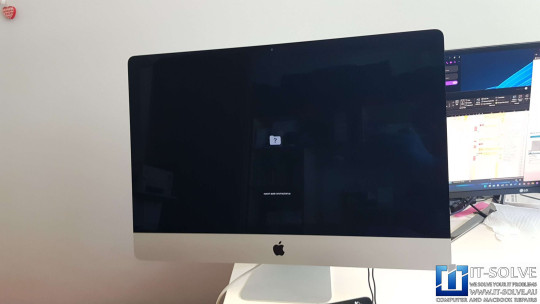
27" 2017 iMac question mark folder repair with a failed fusion drive - https://it-solve.au/repair-cases/27-2017-imac-question-mark-folder-repair-with-a-failed-fusion-drive/
This week we have a 27″ 2017 iMac question mark folder repair in our Adelaide #itsolverepairs workshop. Like many iMacs manufactured between 2013 and 2019, these iMacs come preinstalled with two drives. A small SSD drive, usually 128GB. Additionally, they consist of a second 3.5″ SATA drive, usually between 1TB to 3TB. These two drives are merged under a system called Fusion Drive. This way, the SSD drives work as a cache which speeds up the access to files and the system.
Unfortunately, the SATA drive is a mechanical drive, which is extremely sensitive to heat and degrades quickly under such an environment.
2017 iMac question mark folder on Startup
2017 iMac question mark folder Repair Process
One way only to repair iMac with a question mark folder if the drive has failed is to perform iMac Repairs in Adelaide. TOf course, ais process ensures life expectancy of these machines can be extended by another five years at least. A different story will be the sothe ftware compatibility, but even Monterey runs smoothly on this system without any trouble.
Taking apart 2017 iMac
Of course, step one of this process is to take the iMac apart, which is not as easy as in 2012 and earlier models, where the screen consists of magnets and screws.
This model has a fragile screen, and we already had multiple queries this week alone from people who cracked the LCD by trying to DIY take them apart.
Sorry, that’s $1500 for a cracked iMac LCD replacement – You just have wasted your iMac!
2017 iMac full of dust, which caused failed Fusion Drive
While it’s apart, it is crucial to service the iMac. Otherwise, the dust inside will fail the newly installed drive in under a year.
Servicing 27″ iMac to prevent future overheating and drive failures
As part of the service, we clean the inside of the iMac and the best time to do so is when the screen is apart. Once we do this service, annual service is enough to keep it running without a fail for a decade.
Replacing Failed Fusion Drive on 27″ iMac
This issues is a Fusion Drive failure, and we need to replace it. Luckily for this customer, our Adelaide iMac Repair Centre is equipped with all the tools and expertise needed to attend 2017 iMac question mark folder repair. Not to mention wide the stock of parts ready to fit, this way we can provide fenomenal iMac Repair Service as well as the quickest turn around in Adelaide.
Replacing SATA Drive with an SSD on a 27″ iMac
SSD drives are different form factor than the SATA drive installed in iMacs. But that’s not a problem as we can use a bracket to transition the drive size and ensure a snug fit.
2017 iMac fitted with SSD drive
Successfull 2017 iMac question mark folder repair
With installed drive we are ready to glue back the massive 27″ 5K LCD. It’s shame that Apple doesn’t build 27″ imacs anymore, neither 5K iMac’s. Afterall only upgrade we get from apple these days is a design and year of build, everything else downgrades instead.
Installing Monterey on 27″ 2017 iMac after SSD upgrade
Latest OS we can install on this 2017 iMac is a Monterey, its a sleek and snappy. Exact upgrade the customer needs to achieve optimal performance from this gorgeous iMac. One of the last quality build we will ever get from Apple.
0 notes
Photo

Happy Australia Day from #itsolverepairs (at IT-Solve Computer and Macbook Repairs in Adelaide) https://www.instagram.com/p/Cn0nQb6PHEh/?igshid=NGJjMDIxMWI=
0 notes
Photo

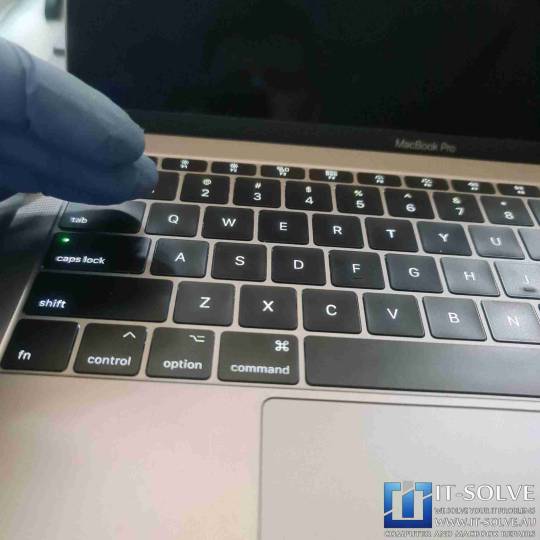
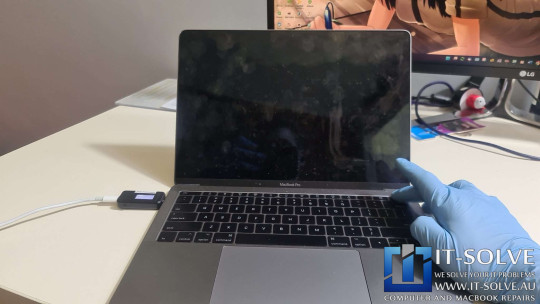
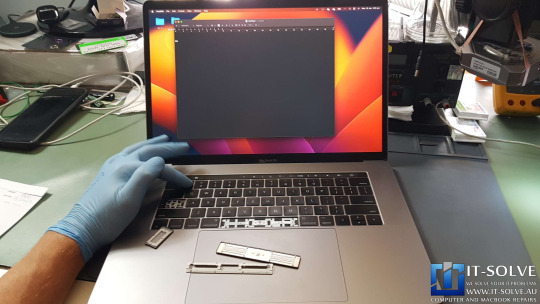
2018 Macbook not typing keys Repair - Keyboard Replacement - https://it-solve.au/repair-cases/2018-macbook-not-typing-keys-repair-keyboard-replacement/
Macbook keys not typing and fallen off
This week we had a 15″ Macbook Pro A1707 in our Adelaide Macbook Repair Workshop. Customer had spilled cola over the keyboard and trackpad nearly 3 years ago. It is a miracle that internal damage hasn’t occurred on the electronics.
Only couple keys on this Macbook were not typing correctly. As seen, the customer tried to remove the caps and clean underneath, but has damaged the mechanism and could not fit the keys back.
We highly advise any liquid damaged Macbooks not to be used and be cleaned and repaired within as quick as possible. Check the reasons why it is important to repair liquid damaged Macbook ASAP.
Inspecting logic board on liquid damaged A1707 Macbook Pro
First, we need to ensure there is no liquid residue remaining on the logic board itself. Although, it worked for 3 years after the spillage, we need to ensure there is no oxidation or corrosion on the board which might fail it.
A1707 Macbook Pro Keyboard Replacement Process
Removing Macbook Pro keyboard cover on A1707
Unfortunately individual non typing keys cannot be repaired with any laptops. However, there is one solution for keyboard failure, and it is a Macbook Keyboard Replacement in Adelaide.
New generation Macbook keyboards are riveted. Removal of these keyboards requires breaking it to pieces and prying it out. This can be a challenging procedure, as these bits are sharp and can bent the keyboard frame. Once bent, the feeling of the keyboard presses is not as smooth as before.
Prying out Macbook Pro A1707 keyboard as part of the replacement process
Once we pry out the keyboard, Which fells on pieces due to the PCB based design. We need to clear and remove all rivet bits and pieces.
Cleaning remaining bits from the faulty keyboard on Macbook Pro A1707
These little rivets cannot be riveted again, as they are part of the palmrest assembly. So we need to be quite innovative to get the keyboard fitted nicely. Otherwise it will be uneven.
Fitting new keyboard on Macbook Pro A1707
A1707 Macbook Pro Sticky Trackpad Repair
Additionally, we also noticed that the trackpad is bit sticky and not responsive as it should be. So we took it apart and cleaned it.
Trackpad has some residue and needed clean as liquid residue was interfering with the keyboard and trackpad controller.
We had to clean the trackpad and luckily there was no damaged traces and corroded components. So we did not had to replace the trackpad and clean was sufficient to bring it to fully functional state.
Successful A1707 Macbook Pro Keyboard Replacement
Successful A1707 Macbook Pro Keyboard Replacement
A1707 Macbook Keyboard was Replaced successfully in our Adelaide workshop took 2 days once we had the part ready to fit. However, overall result was great and the system is working as new, with both keyboard and trackpad.
#itsolverepairs#ITSolve.Repairs#Macbook Keyboard Replacement#Macbook Liquid Spillage Repair#Macbook Trackpad Repair#Macbook Keyboard Repair#Macbook Liquid Damage Repair#Macbook Repairs#Repair Cases
0 notes
Photo
2018 Macbook not typing keys Repair - Keyboard Replacement - https://it-solve.au/repair-cases/2018-macbook-not-typing-keys-repair-keyboard-replacement/
Macbook keys not typing and fallen off
This week we had a 15″ Macbook Pro A1707 in our Adelaide Macbook Repair Workshop. Customer had spilled cola over the keyboard and trackpad nearly 3 years ago. It is a miracle that internal damaged hasn’t occurred on the electronics.
Only couple keys on this Macbook were not typing correctly. As seen customer tried to remove the caps and clean underneath, but has damaged the mechanism and could not fit the keys back.
We highly advise any liquid damaged Macbooks not to be used and be cleaned and repaired within as quick as possible. Check the reasons why it is important to repair liquid damaged Macbook ASAP.
Inspecting logic board on liquid damaged A1707 Macbook Pro
First we need to ensure there is no liquid residue remaining on the logic board itself. Although, it worked for 3 years after the spillage, we need to ensure there is no oxidation or corrosion on the board which might fail it.
A1707 Macbook Pro Keyboard Replacement Process
Removing Macbook Pro keyboard cover on A1707
Unfortunately individual non typing keys cannot be repaired with any laptops. However, there is one solution for keyboard failure, and it is a Macbook Keyboard Replacement in Adelaide.
New generation Macbook keyboards are rivetted. Removal of these keyboards requires breaking it to pieces and prying it out. This can be a challenging procedure, as these bits are sharp and can bent the keyboard frame. Once bent, the feeling of the keyboard presses is not as smooth as before.
Prying out Macbook Pro A1707 keyboard as part of the replacement process
Once we pry out the keyboard, Which fells on pieces due to the PCB based design. We need to clear and remove all rivet bits and pieces.
Cleaning remaining bits from the faulty keyboard on Macbook Pro A1707
These little rivets cannot be riveted again, as they are part of the palmrest assembly. So we need to be quite innovative to get the keyboard fitted nicely. Otherwise it will be uneven.
Fitting new keyboard on Macbook Pro A1707
A1707 Macbook Pro Sticky Trackpad Repair
Additionally, we also noticed that the trackpad is bit sticky and not responsive as it should be. So we took it apart and cleaned it.
Trackpad has some residue and needed clean as liquid residue was interfering with the keyboard and trackpad controller.
We had to clean the trackpad and luckily there was no damaged traces and corroded components. So we did not had to replace the trackpad and clean was sufficient to bring it to fully functional state.
Successful A1707 Macbook Pro Keyboard Replacement
Successful A1707 Macbook Pro Keyboard Replacement
A1707 Macbook Keyboard Replaced successfully in our Adelaide workshop took 2 days once we had the part ready to fit. Overal result was great and the system is working as new, with both keyboard and trackpad.
#itsolverepairs#ITSolve.Repairs#Macbook Keyboard Replacement#Macbook Liquid Spillage Repair#Macbook Trackpad Repair#Macbook Keyboard Repair#Macbook Liquid Damage Repair#Macbook Repairs#Repair Cases
0 notes
Photo

Acer SP314 Separating Screen Repair - https://it-solve.au/repair-cases/acer-sp314-separating-screen-repair/
Acer SP314 Separating Screen Repair
This week we got an Acer SP314 Separating Screen Repair in our Adelaide Workshop. An issue with this Acer Spin was that when the screen opened, it would start separating.
Acer SP314 Taking apart and disassembly
Taking apart Acer SP314-51 for a Broken Hinge Support Repair
Taking apart these models is a breeze, as Acer laptops are well-designed with the same type of screws all through the chassis.
Acer SP314 Taking the screen off for a hinge repair
Identifying fault on Acer SP314 Separating Screen
Acer SP314-51 Broken Hinge Support
There is one solution for such failure, and it is Laptop Hinge Repair. The hinge support of laptops is usually plastic. When the hinge gathers dust and becomes stiff, inevitably, the pressure is transferred from the hinge to the plastic hinge support. As a result, it cracks and snaps together with the fused nuts.
Acer SP314-51 Broken Hinge Support Repair
Acer SP314-51 Left hinge support snapped.
Both hinge support seems to have snapped cleanly. Hence both sides will need to be repaired.
Acer SP314-51 Cracked plastic on hinge support nuts
As seen above, the plastic which holds the fused nuts is also weak and cracks over time under the pressure of stiff hinges. Hence we prefer not to replace the complete back cover.
Acer SP314-51 Broken Hinge Support Repair
Additionally, we need to clean and oil the stiff hinges. Otherwise, they will apply additional pressure to the back cover, which might crack.
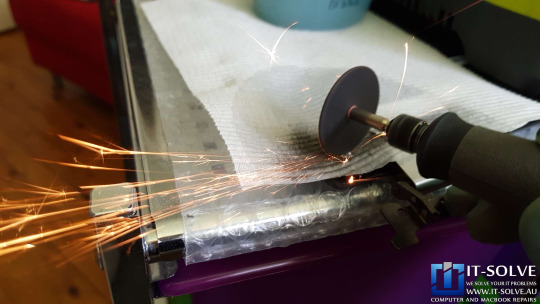
Acer SP314 Separating Screen Repair Process
Acer SP314-51 drilling through broken hinge support.
Our first step is to drill through the back cover to make way for rivets.
Acer SP314-51 riveting the back cover
Riveting the back cover requires correct size rivets as smaller or longer rivets will not fit correctly and will cause the back cover to stay separated.
Acer SP314-51 Riveting Broken Hinge Support
Acer SP314-51 Riveted Broken Hinge Support
Shaving excess rivet of Acer SP314-51 Hinge Repair
We also had to repeat this process for the left hinge support, which was also broken.
Shaving excess rivet from Acer SP314-51 during Broken Hinge Support Repair
Successful Acer SP314 Separating Screen Repair
Rather than replacing the back cover, which will break under pressure. We prefer to run aluminium rivets through the back cover. This way, we ensure stable and long-lasting repair.
Acer SP314-51 with Riveted Hinge Supports
This process is completed within a day or two in our Adelaide Laptop Repair Workshop.
Acer SP314-51 Broken Hinge Support Repair
The last step is to do open-close tests and let the laptop run on some tests to ensure everything works as expected.
#ITSolveRepairs
Want to see the action?
Check how this repair is done on our social media.
Instagram
Facebook
Follow us to see similar cases at #itsolverepairs
0 notes
Photo

Acer SP314 Separating Screen Repair - https://it-solve.au/repair-cases/acer-sp314-separating-screen-repair/
Acer SP314 Separating Screen Repair
This week we got an Acer SP314 Separating Screen Repair in our Adelaide Workshop. An issue with this Acer Spin was that when the screen opened, it would start separating.
Acer SP314 Taking apart and disassembly
Taking apart Acer SP314-51 for a Broken Hinge Support Repair
Taking apart these models is a breeze, as Acer laptops are well-designed with the same type of screws all through the chassis.
Acer SP314 Taking the screen off for a hinge repair
Identifying fault on Acer SP314 Separating Screen
Acer SP314-51 Broken Hinge Support
There is one solution for such failure, and it is Laptop Hinge Repair. The hinge support of laptops is usually plastic. When the hinge gathers dust and becomes stiff, inevitably, the pressure is transferred from the hinge to the plastic hinge support. As a result, it cracks and snaps together with the fused nuts.
Acer SP314-51 Broken Hinge Support Repair
Acer SP314-51 Left hinge support snapped.
Both hinge support seems to have snapped cleanly. Hence both sides will need to be repaired.
Acer SP314-51 Cracked plastic on hinge support nuts
As seen above, the plastic which holds the fused nuts is also weak and cracks over time under the pressure of stiff hinges. Hence we prefer not to replace the complete back cover.
Acer SP314-51 Broken Hinge Support Repair
Additionally, we need to clean and oil the stiff hinges. Otherwise, they will apply additional pressure to the back cover, which might crack.
Acer SP314 Separating Screen Repair Process
Acer SP314-51 drilling through broken hinge support.
Our first step is to drill through the back cover to make way for rivets.
Acer SP314-51 riveting the back cover
Riveting the back cover requires correct size rivets as smaller or longer rivets will not fit correctly and will cause the back cover to stay separated.
Acer SP314-51 Riveting Broken Hinge Support
Acer SP314-51 Riveted Broken Hinge Support
Shaving excess rivet of Acer SP314-51 Hinge Repair
We also had to repeat this process for the left hinge support, which was also broken.
Shaving excess rivet from Acer SP314-51 during Broken Hinge Support Repair
Successful Acer SP314 Separating Screen Repair
Rather than replacing the back cover, which will break under pressure. We prefer to run aluminium rivets through the back cover. This way, we ensure stable and long-lasting repair.
Acer SP314-51 with Riveted Hinge Supports
This process is completed within a day or two in our Adelaide Laptop Repair Workshop.
Acer SP314-51 Broken Hinge Support Repair
The last step is to do open-close tests and let the laptop run on some tests to ensure everything works as expected.
#ITSolveRepairs
Want to see the action?
Check how this repair is done on our social media.
Instagram
Facebook
Follow us to see similar cases at #itsolverepairs
0 notes
Photo
Acer SP314 Separating Screen Repair - https://it-solve.au/repair-cases/acer-sp314-separating-screen-repair/
Acer SP314 Separating Screen Repair
This week we got an Acer SP314 Separating Screen Repair in our Adelaide Workshop. An issue with this Acer Spin was that when the screen opened, it would start separating.
Acer SP314 Taking apart and disassembly
Taking apart Acer SP314-51 for a Broken Hinge Support Repair
Taking apart these models is a breeze, as Acer laptops are well-designed with the same type of screws all through the chassis.
Acer SP314 Taking the screen off for a hinge repair
Identifying fault on Acer SP314 Separating Screen
Acer SP314-51 Broken Hinge Support
There is one solution for such failure, and it is Laptop Hinge Repair. The hinge support of laptops is usually plastic. When the hinge gathers dust and becomes stiff, inevitably, the pressure is transferred from the hinge to the plastic hinge support. As a result, it cracks and snaps together with the fused nuts.
Acer SP314-51 Broken Hinge Support Repair
Acer SP314-51 Left hinge support snapped.
Both hinge support seems to have snapped cleanly. Hence both sides will need to be repaired.
Acer SP314-51 Cracked plastic on hinge support nuts
As seen above, the plastic which holds the fused nuts is also weak and cracks over time under the pressure of stiff hinges. Hence we prefer not to replace the complete back cover.
Acer SP314-51 Broken Hinge Support Repair
Additionally, we need to clean and oil the stiff hinges. Otherwise, they will apply additional pressure to the back cover, which might crack.
Acer SP314 Separating Screen Repair Process
Acer SP314-51 drilling through broken hinge support.
Our first step is to drill through the back cover to make way for rivets.
Acer SP314-51 riveting the back cover
Riveting the back cover requires correct size rivets as smaller or longer rivets will not fit correctly and will cause the back cover to stay separated.
Acer SP314-51 Riveting Broken Hinge Support
Acer SP314-51 Riveted Broken Hinge Support
Shaving excess rivet of Acer SP314-51 Hinge Repair
We also had to repeat this process for the left hinge support, which was also broken.
Shaving excess rivet from Acer SP314-51 during Broken Hinge Support Repair
Successful Acer SP314 Separating Screen Repair
Rather than replacing the back cover, which will break under pressure. We prefer to run aluminium rivets through the back cover. This way, we ensure stable and long-lasting repair.
Acer SP314-51 with Riveted Hinge Supports
This process is completed within a day or two in our Adelaide Laptop Repair Workshop.
Acer SP314-51 Broken Hinge Support Repair
The last step is to do open-close tests and let the laptop run on some tests to ensure everything works as expected.
0 notes
Photo

Lenovo Yoga 9 14ITL5 Sticky Keyboard Replacement - https://it-solve.au/repair-cases/lenovo-yoga-9-14itl5-sticky-keyboard-replacement/
Lenovo Yoga 9 Sticky Keyboard after spilled Juice
Lenovo Yoga 9 Sticky Keyboard after spilled Juice
This week we received this Lenovo Yoga 9 14ITL5 with a Sticky Keyboard after spilled Orange Juice. Liquid damage on Laptops and Macbook water damage Repair are so typical that we fixed repair costs and prices based on a fault for a quick quote and turnarounds.
Lenovo Yoga 9 disassembly and taking apart
The first thing to ensure after spilling liquid on any electronics, let alone a thin Lenovo Yoga 9 laptop is to disconnect the battery and not feed any power to the system until the oxidation is clean. We have explained it in detail in What to do when spilled liquid on a Laptop article we wrote a while ago.
Lenovo Yoga 9 Keyboard Replacement Process
Stripping down Lenovo Yoga 9 for a Keyboard Replacement
There is one solution for Laptop Keyboard Failure, and it is a Laptop Keyboard Replacement in Adelaide.
In some cases we can clean those sticky keys. However, if multiple keys are exposed (lots of liquid spilled over them), we prefer to replace the keyboard as it will eventually fail.
Lenovo Yoga 9 with removed keyboard backlight
The good design of this keyboard is that the keyboard is attach to the palmrest with screws, which is a breeze to work on compared to Macbook keyboard replacements. Apple uses rivets to secure the keyboard to the palmrest, which is a pain to remove, pushing Apple to generate unnecessary eWaste by replacing the palmrest, battery and keyboard simultaneously.
Removing Keyboard from Lenovo Yoga 9 14ITL5
After removing each of those tiny screws, the keyboard comes straight off, and we can clean all that juice residue around the palmrest. While at it, we also disinfect and clean the laptop from liquid oxidation and residue.
Lenovo Yoga 9 fitting new Keyboard
Successful Lenovo Yoga 9 Keyboard Replacement
Lenovo Yoga 9 14ITL5 Repaired and Keyboard Replaced
This process is complete within a day in our Adelaide Laptop Repair Workshop once we have the keyboard in stock.
The last step is to run keyboard tests and let it complete a couple hours of streaming tests. This way, we inspect for manufacturing faults.
#itsolverepairs#ITSolve.Repairs#Laptop Keyboard Replacement#Laptop Liquid Damage Repair#Lenovo Yoga 9#Laptop Keyboard Repair#Laptop Repairs#Repair Cases
1 note
·
View note