
Statistics
We looked inside some of the posts by jojogape and here's what we found interesting.
Average Info
Notes Per Post
372
Likes Per Post
312
Reblog Per Post
58
Reply Per Post
2
Time Between Posts
3 months
Number of Posts By Type
Text
11
Photo
5
Link
1
Last Seen Tumblr Blogs


Fun Fact
Tumblr was the first site to host the blog for President Barack Obama in 2011.
Text
Here's the MediaFire download!
Someday v0.11 is out!!


Currently available on YNOProject.
MediaFire download will be posted in a few days.
-> 3 new feats
-> New worlds
-> LOTS of tweaks
-> Shift menu
-> New endgame content
Enjoy!
29 notes
·
View notes
Text
Someday v0.11 Music Guide
Hey.
How are you? Having trouble collecting all of Someday's music on the YNO release? Don't worry! Nulsdodage, who coded the "music room" feature for v0.10+ Evergreen, was kind enough to give me a list of all the conditions needed for each song. So I've made a music guide! Please do let me know if there are any errors, although I'm far more active on the YNO Discord server! Updated for v0.11.
The Computer itself
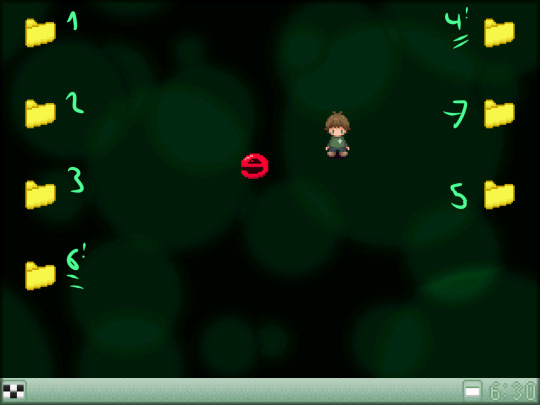
6 folders can be found on the desktop. Keep in mind, folder 6 is the one to the lower left, because this one was added in v0.10! 5 is the Glitch World one. Let's go!
Folder 1
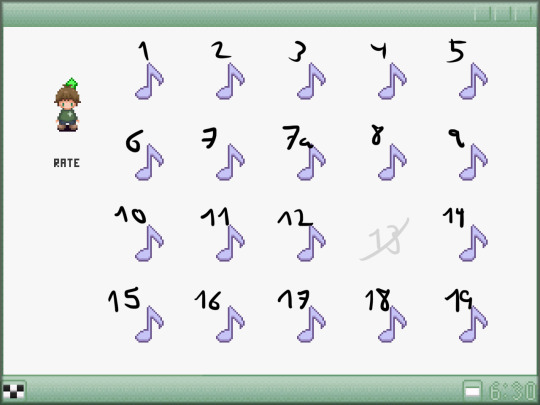
01 Doodle World Post-it
02 Hospital (Entrance) Hospital Question World
03 Nexus
04 Caves (Entrance) Caves Caves (Exit) Beach
05 Sewers
06 Lava World Lava Path
07 Window Shower
07a Bar (Outside) Relaxing Room
08 LSD World (Downer)/Hospital (4th floor, 2nd room to the lower left) Hexagon Realm
09 Glitch World
10 Clock Tower Clock Tower (Slow)
11 Clock Tower (Fast-Forward)
12 8-bit Tree Path
13 (empty space, not unlockable, does not count for 100% completion)
14 Space World Moon
15 Purple Polka-Dot World
16 LSD World (Dynamic) Edible World
17 Desert Desert (Four Seasons Path) Orange Crystal
18 Forest (Wasps Event) Haunted House (Hall)
19 School (regular Bullying Event)
Folder 2
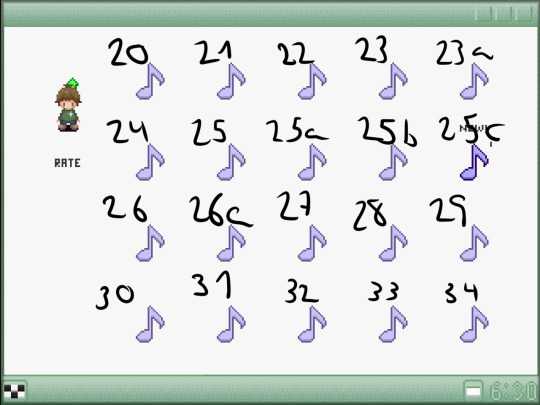
20 Testing Area (Entrance) Test End 1 (after test 10) Test End 2 (after test 20)
21 Alphanumeric World Letter Path
22 Clock Tower (Rewind)
23 Monochrome Mall (Entrance) Monochrome Mall Monochrome Mall (Outside) Circles
23a Big City (Shady Stranger Event beginning) Monochrome Mall (Vaporwave Event)
24 Hatsuyume Mountain World (Four Seasons Path) Mountain World
25 Tubes (TV effect room)
25a Tubes (Entrance)
25b Tubes
25c Tubes (Bubbly's room)*
26 School Entrance School Halls School Playground School Playground 2 Junior High School Entrance Junior High School Junior High School (Joaquin's Room)
26a Rage Path Corrupted School (corrupted) Corrupted School (alternative Bullying Event)
27 Title Screen Lamppost World
28 Neon World
29 Rain World Rain World (Inescapable) -> Accessed through Lava World's Hexagon
30 Clock Tower Entrance Tree Path Forest Ice (Four Seasons Path) Forest B (Four Seasons Path) Ice Ice Home Decision Path Dark Art Gallery (beginning)
31 Flying Tuna Pink Maze Pink Path Pink Path 2
32 Rusty Tubes (TV Room)
33 8-bit Garden
34 Seabed Seabed (Checkpoint) Hospital (2nd floor, 3rd room to the lower right) Grassland World
*As of v0.10+, there is a bug that unlocks track 25c upon visiting any computer folder. This bug will be fixed someday in the future.
Folder 3

35 Junior High School (Party)
36 Dark World Dark World (to Haunted House)
37 Computer World Computer World (to Glitch World) Internet Deep Internet
37a COMPUTER Event
38 Art Gallery
39 Neon Path
40 Tsukitsuki's Bedroom Tsukitsuki's Balcony
41 Rainbow World Rainbow Path
42 Art Gallery (Oblivion) Art Gallery (Checkpoint) -> return after talking to the robot Fog World
43 The Lake
44 LSD World (Upper) LSD World (Upper) (Inesc.) -> accessed by getting caught in the Shady Stranger Event
45 LSD World (Static)
46 Nice Town Nice Town (Square)
47 Subway Subway (Speedway) Space Flight Event
48 Subway (Stairway)
49 Grassland World (Fuzzy House) Grassland World (Not Fuzzy House)
50 Data World Big City Data World 2
51 Shower (with the water running)
52 Wobble
53 Other Bar Grid Path
Folder 4
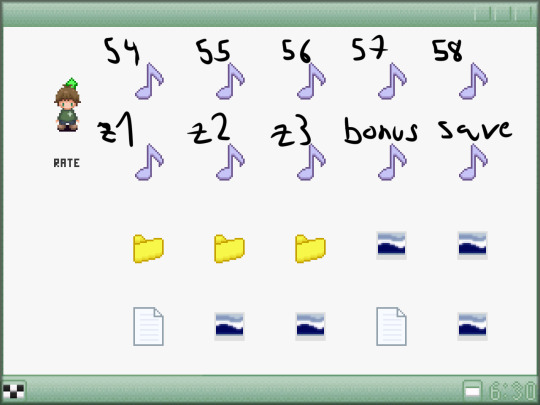
54 Deep Internet (det'ok)
55 Hospital (3rd floor, 4th room to the upper left)
56 Water Path
57 Glacier
58 Big City (Shady Stranger Event chase)
zapgame1 ZApNeF Title Screen
zapgame2 ZApNeF Title Screen Glitch World (Fake ZApNeF Level)
zapgame3 ZApNeF Level 4
Bonus Tracks bonustrack: Break the "?" Box in Grassland World bonustrack2: Break the "?" Box in Neon World, and unlock all "01 - Doodle" variants (see folder 1 above) bonustrack3: Break the "?" Box in Question World, and unlock all Clock Tower variants (see folders 1 and 2 above) bonustrack4: Break the "?" Box in Dance Flood
Savesongs savesong is available from the beginning savesong2: Go to Data World and Data World 2 savesong3: Get 10 Feats savesong4: Get the Clockworker effect savesong5: Heal the Nice Guy in the Hospital (3rd floor, 2nd room to the upper right) savesong6: Get 20 Feats savesong7: Get 30 Feats savesong8: Get all seven Crystals
savesong9: Get 3333 N
(FOLDER 5 goes to Glitch World and has no music players)
Folder 6

59 Moon 2
60 Bar
61 Shooting Star Path
62 Thread World Red Crystal
63 Memory Graveyard Dark Art Gallery
64 Void Purple Crystal
65 Space Party Ship Wing Yellow Crystal
66 Rusty Tubes (Bubbly's Room) Rusty Tubes
67 Playground Turquoise Crystal
68 Overgrown Caves Overgrown Path Green Crystal
69 Silent Laughter Event
70 Dance Flood The Wetness Switch
70a Dance Entrance Dance Flood The Wetness Switch Blue Crystal
Folder 7
71 Pulse World
72 Senior High
73 COMPUTER Event (Bleak Room)
4 notes
·
View notes
Text
Someday v0.11 is out!!
Currently available on YNOProject.
MediaFire download will be posted in a few days.
-> 3 new feats
-> New worlds
-> LOTS of tweaks
-> Shift menu
-> New endgame content
Enjoy!
29 notes
·
View notes
Text
youtube
In JST, it is now the eleventh day of the eleventh month of the eleventh year since Someday v0.00 was released.
Let's celebrate!
6 notes
·
View notes
Text
Someday v0.11 Music Guide
Hey.
How are you? Having trouble collecting all of Someday's music on the YNO release? Don't worry! Nulsdodage, who coded the "music room" feature for v0.10+ Evergreen, was kind enough to give me a list of all the conditions needed for each song. So I've made a music guide! Please do let me know if there are any errors, although I'm far more active on the YNO Discord server! Updated for v0.11.
The Computer itself
6 folders can be found on the desktop. Keep in mind, folder 6 is the one to the lower left, because this one was added in v0.10! 5 is the Glitch World one. Let's go!
Folder 1
01 Doodle World Post-it
02 Hospital (Entrance) Hospital Question World
03 Nexus
04 Caves (Entrance) Caves Caves (Exit) Beach
05 Sewers
06 Lava World Lava Path
07 Window Shower
07a Bar (Outside) Relaxing Room
08 LSD World (Downer)/Hospital (4th floor, 2nd room to the lower left) Hexagon Realm
09 Glitch World
10 Clock Tower Clock Tower (Slow)
11 Clock Tower (Fast-Forward)
12 8-bit Tree Path
13 (empty space, not unlockable, does not count for 100% completion)
14 Space World Moon
15 Purple Polka-Dot World
16 LSD World (Dynamic) Edible World
17 Desert Desert (Four Seasons Path) Orange Crystal
18 Forest (Wasps Event) Haunted House (Hall)
19 School (regular Bullying Event)
Folder 2
20 Testing Area (Entrance) Test End 1 (after test 10) Test End 2 (after test 20)
21 Alphanumeric World Letter Path
22 Clock Tower (Rewind)
23 Monochrome Mall (Entrance) Monochrome Mall Monochrome Mall (Outside) Circles
23a Big City (Shady Stranger Event beginning) Monochrome Mall (Vaporwave Event)
24 Hatsuyume Mountain World (Four Seasons Path) Mountain World
25 Tubes (TV effect room)
25a Tubes (Entrance)
25b Tubes
25c Tubes (Bubbly's room)*
26 School Entrance School Halls School Playground School Playground 2 Junior High School Entrance Junior High School Junior High School (Joaquin's Room)
26a Rage Path Corrupted School (corrupted) Corrupted School (alternative Bullying Event)
27 Title Screen Lamppost World
28 Neon World
29 Rain World Rain World (Inescapable) -> Accessed through Lava World's Hexagon
30 Clock Tower Entrance Tree Path Forest Ice (Four Seasons Path) Forest B (Four Seasons Path) Ice Ice Home Decision Path Dark Art Gallery (beginning)
31 Flying Tuna Pink Maze Pink Path Pink Path 2
32 Rusty Tubes (TV Room)
33 8-bit Garden
34 Seabed Seabed (Checkpoint) Hospital (2nd floor, 3rd room to the lower right) Grassland World
*As of v0.10+, there is a bug that unlocks track 25c upon visiting any computer folder. This bug will be fixed someday in the future.
Folder 3
35 Junior High School (Party)
36 Dark World Dark World (to Haunted House)
37 Computer World Computer World (to Glitch World) Internet Deep Internet
37a COMPUTER Event
38 Art Gallery
39 Neon Path
40 Tsukitsuki's Bedroom Tsukitsuki's Balcony
41 Rainbow World Rainbow Path
42 Art Gallery (Oblivion) Art Gallery (Checkpoint) -> return after talking to the robot Fog World
43 The Lake
44 LSD World (Upper) LSD World (Upper) (Inesc.) -> accessed by getting caught in the Shady Stranger Event
45 LSD World (Static)
46 Nice Town Nice Town (Square)
47 Subway Subway (Speedway) Space Flight Event
48 Subway (Stairway)
49 Grassland World (Fuzzy House) Grassland World (Not Fuzzy House)
50 Data World Big City Data World 2
51 Shower (with the water running)
52 Wobble
53 Other Bar Grid Path
Folder 4
54 Deep Internet (det'ok)
55 Hospital (3rd floor, 4th room to the upper left)
56 Water Path
57 Glacier
58 Big City (Shady Stranger Event chase)
zapgame1 ZApNeF Title Screen
zapgame2 ZApNeF Title Screen Glitch World (Fake ZApNeF Level)
zapgame3 ZApNeF Level 4
Bonus Tracks bonustrack: Break the "?" Box in Grassland World bonustrack2: Break the "?" Box in Neon World, and unlock all "01 - Doodle" variants (see folder 1 above) bonustrack3: Break the "?" Box in Question World, and unlock all Clock Tower variants (see folders 1 and 2 above) bonustrack4: Break the "?" Box in Dance Flood
Savesongs savesong is available from the beginning savesong2: Go to Data World and Data World 2 savesong3: Get 10 Feats savesong4: Get the Clockworker effect savesong5: Heal the Nice Guy in the Hospital (3rd floor, 2nd room to the upper right) savesong6: Get 20 Feats savesong7: Get 30 Feats savesong8: Get all seven Crystals
savesong9: Get 3333 N
(FOLDER 5 goes to Glitch World and has no music players)
Folder 6
59 Moon 2
60 Bar
61 Shooting Star Path
62 Thread World Red Crystal
63 Memory Graveyard Dark Art Gallery
64 Void Purple Crystal
65 Space Party Ship Wing Yellow Crystal
66 Rusty Tubes (Bubbly's Room) Rusty Tubes
67 Playground Turquoise Crystal
68 Overgrown Caves Overgrown Path Green Crystal
69 Silent Laughter Event
70 Dance Flood The Wetness Switch
70a Dance Entrance Dance Flood The Wetness Switch Blue Crystal
Folder 7
71 Pulse World
72 Senior High
73 COMPUTER Event (Bleak Room)
4 notes
·
View notes
Text
Someday v0.11 Master Post
Hey! Apparently Tumblr's page links don't really work on the mobile app, so I'm making them into a HUGE POST with the most important stuff you might need to know! Obviously, it contains spoilers.
WORLD MAP

EFFECTS
Scooter
Go to the Purple Polka-Dot World, and walk down the green path.
Doodle
Enter the Doodle World, walk southwest until you find a house and enter. Walk over the pencil.
Sick
(I recommend getting the Candle holder first, especially if you have trouble seeing in the dark.) In the Dark World, try to walk northeast until you find some sort of big circle made of “red acid”, with a maze inside. The circle can only be entered from the south. Once you’re in there, go east then north all the way until you see a cloud of smoke. Get into the cloud and interact with the deep fryer inside.
Glitch
Go to Computer World, and enter the second folder to the right. You should see another folder inside a crack. Interact with it several times and eventually the screen and the music should start getting distorted, until you finally get to the Glitch World. Here you can run at maximum speed but once you equip/unequip an effect you go back to normal. This world is huge, so I recommend having maximum speed on. Walk southeast until you find a glitchy NPC running erratically towards you. Touch it to get the effect.
8-bit
At the 8-bit World, walk east-southeast, and interact with the yellow star-shaped flower. You will be teleported to a small field the size of one screen (20x15 tiles). Now fill the screen with flowers as you walk all over it. When all flowers are there, another star flower will appear at the center, interact with it to get the effect.
Nerd
Enter the School. Inside, go left, then right, then left again and you’ll find a lonely classroom. Go inside and interact with Little Itsuki.
Monochrome
In the School, take the right door, keep going to the right and take the first door down (in front of the window and the plant). Interact with the monochrome girl inside. Now, at the Decision Path, go all the way to the right and interact with the tall black rock.
Bald
Effects needed: Fox
At the Mountain World, take the upper path and go to the left to find a spire-shaped teleporter. Go from teleporter to teleporter until to get to Data World 2 (this a different maze than the one you can access from the Nexus). To get through the maze you’ll need the Fox effect - interact with ledges to jump over them.
Island 1: Just jump up and take the teleporter.
Island 2: At the upper part, take the teleporter to the left.
Island 3: There are 6 teleporters. Take the fourth one (starting from the left).
Island 4: Take the teleporter to the right.
Island 5: Go up and take the teleporter to the left.
Island 6: No explanation needed.
Island 7: Take the teleporter to the north (right next to the ledge and north of the hole on the floor).
Islands 8 and 9: No explanation needed.
At the Ice World, go up and after you jump over the second ledge walk to the right until you find a bald Itsuki reflection on the floor. Walk over his feet (completing the reflection) to get the effect.
Megaphone
In Purple Polka-Dot World, take the yellow path*. (Go down, then right-down, then down, left and down again. When you reach a bifurcation, take the middle path and go all the way down, then left and then up.) Interact with the tetrahedron, and once in the Neon Path try to get to the other tetrahedron, avoiding the neon lights (only visible when you bump into them). In the Neon World, walk east-southeast until you see a flashing NPC in the middle of a circle. Interact with it.
*Alternatively, you can take the green path and then two blue shortcuts until you see the tetrahedron next to the yellow path.
Blob
Enter Alphanumeric World (the most colorful door). Walk northwest until you find a wall. Walk around it and try to find nine 9’s. You should see an NPC walking around there. Talk to him to get the Blob effect.
Wrench
At the Space World, go west-northwest to find an asteroid cloud. From there, walk either west or east and you should find the Wrench floating in space.
Raincoat
Enter the Lava World, go southeast and then east until you see a Hexagon. Then walk south all the way until you reach a dead tree, then go southwest and find the path that leads to another tiny island with a hole in it. Enter the hole to access the Rain World. When you find a bifurcation, go left all the way and interact with the raincoat on the ground.
Scarf
At the 8-bit World, walk southwest to find a sunflower field. You’ll find the Scarf there.
Classic
Go to Alphanumeric World, and walk southwest until you find a door in the middle of a rainbowy mass of letters and numbers. Enter the door, and now solve the tiny challenge to get through the Flip Swap Path. You’ll arrive at the Rainbow World. Again, go southwest to find a door that leads you to the Rainbow Path. Go left or right until you find an identical door, open it to enter Tsukitsuki’s room (a generic fangame protagonist room). Interact with Tsukitsuki to get the effect.
TV
At the Computer World, interact with the e-Man to enter the Internet World. You can either follow the dots going left, up all the way and then right to find a group of TVs, or simply walk south-southwest, always avoiding the chasers. In the middle of the TVs there’s a tube. Go down the tube into the Tubes World. The maze is simple - when in doubt, always take the tube to the left. You’ll eventually enter a triangular room with a blue TV. That’s the effect.
Fox
Enter the Data World, and follow these instructions.
Island 1: Go right, down, left and down again. Use the teleporter there.
Island 2: No explanation needed.
Island 3: Take the left teleporter.
Islands 4 and 5: No explanation needed.
Island 6: Take the second teleporter (starting from the left).
Island 7: No explanation needed.
The Forest is just a single path to the right, and you can jump down ledges even if you don’t have the Fox effect yet (the effect is just for jumping *up*, which means you’d need the Fox effect to walk back to the Data World). You can’t miss it. At the end you’ll see a tree with a fox hiding in it. Interact with the fox to get the effect.
Candle holder
In the School, take the right door, keep going to the right and take the first door down (in front of the window and the plant). Interact with the monochrome girl inside. Now, at the Decision Path, go all the way to the left to enter the Question World. Once there, walk north-northwest to find a square of question marks with a pink heart at the center. Step on it to enter the Pink Maze. Now go up, left, up - from then on, getting to the center of the maze shouldn’t be a problem. Interact with the candle.
Clockworker
Enter the Lava World, go southeast and then east until you see a Hexagon. Then walk south all the way until you reach a dead tree, then go southwest and find the path that leads to another tiny island with a hole in it. Enter the hole to access the Rain World. When you find a bifurcation, keep going up, then right and look for another hole. Fall down the hole, then walk to the right and go up the stairs to get to the Clock Tower. The tower has six floors, all of them shaped like a square. Each floor has one NPC that modifies time in a different way: from lowest to highest, Play, Slow Motion, Stop, Rewind and Fast Forward. The sixth floor’s NPC gives you the effect, but he’s really fast so it’s better to try to get him with either Slow Motion or Stop time modes.
Diving suit
There are two methods to get this effect. The first one is shorter but requires the Fox effect, and the second one is longer, especially if you don’t have the Diving Suit already.
First method: At the Grassland World, start going west while sticking to the upper shore. Now keep going north, past the group of trees and houses, then go west again and use the Fox to jump up the ledges and get into the cave. Now, there are two paths that both lead to the exit, the right path requires the Fox and the left one doesn’t. If you get lost it’s easy to find your way again, it’s a tiny cave maze. Eventually both paths join and lead to the Beach. Talk to Shell to get the effect.
Second method: Go to Purple Polka-Dot World, and take the orange path. When you reach some sort of grid formation, go north until the last bifurcation, then east, north and finally east all the way, you should notice there’s a path that goes away from the grid. Take it and interact with the tetrahedron to enter the Sewers. Try to walk north until you find a hallway that loops horizontally. Don’t get into the big hole, keep trying to walk north instead (one way is blocked by water but the other isn’t). This next hallway loops horizontally as well. Now find the big hole in THIS hallway and enter it. Walk north again and enter another hole to get to the Seabed. The Scooter doesn’t work here, the only way to navigate quickly under the sea is using the Diving Suit… which you probably don’t have yet. Fortunately, the Seabed is easy to go through, just walk north and you’ll eventually reach a shallow pathway that ends at the shoreline. Keep going north to get out of the water and end up at the Beach. Talk to Shell.
Mercury
Effects needed: Fox, Megaphone
Go to the Space World, walk west-southwest until you find an asteroid cloud (different from the one mentioned earlier) with a blue teleporter. It will teleport you to the Moon. Once in there, find another blue teleporter to enter the Testing Area. Yet another blue teleporter (next to a “1”) will lead you to the first test. In these tests you have to solve some puzzles in order to find the teleporter to the next test. Tests 1 and 3 require the Fox effect, and Test 5 requires the Megaphone in order to move the metal spheres and push the buttons. At the beginning of Test 6, interact with the puddle of mercury.
Healing aura
At the Mountain World, go west to find a spire-shaped teleporter. Use it and try to go east, until you see a pair of yellow blocks. Walk between them to enter the Fog World. Walk east-southeast to find another pair of blocks (these are taller) and walk between them. Be careful - they’re easy to miss in the fog. Now walk north or south (and a little west too) to find the last pair of blocks (these are even taller). Go through there and walk north to reach the Hospital. After you go through the waiting room you’ll reach the first floor. Go up the stairs to the second floor, and enter the third room to the lower right. Interact with the glowing outline of Itsuki.
Wood
Effects needed: Fox, Megaphone, Mercury, TV, Scooter (advised)
Go to the Space World, walk west-southwest until you find an asteroid cloud (different from the one mentioned earlier) with a blue teleporter. It will teleport you to the Moon. Once in there, find another blue teleporter to enter the Testing Area. Yet another blue teleporter (next to a “1”) will lead you to the first test. In these tests you have to solve some puzzles in order to find the teleporter to the next test. Tests 1, 3 and 10 require the Fox effect, Tests 5, 7, 9, 10 require the Megaphone in order to move the metal spheres, Tests 6, 7 and 10 require the Mercury effect and Test 8 requires the TV effect (it must be turned ON with the 1 key). Once you finish Test 10, the second set of tests will be unlocked, which means you can access Test 11 from the Testing Area’s entrance directly from then on. The new teleporter should appear right below the big “2” mark. In Test 14, go east avoiding the lunatic metal spheres and then you’ll see the way down is blocked by a quick metal ball, but there’s a tree-shaped mark on the ground. Go north to find an alternate teleporter that leads you to an island in the Grassland World. Interact with the green fairy to get the effect (which will enable you to continue testing if you use the same blue teleporter to go back to the Testing Area - Test 20 is the last one).
Tomato
Effects needed: Scooter, Wrench (to get money)
Money needed: 100 N
There are many ways to reach the Tomato effect, but all of them imply going to the Subway at some point. The Subway has seven stations (the first and second ones are initially inaccessible, this will be covered later), and the one that’s closest to the Nexus is the Grassland’s - the third station. At the Grassland World, start going west while sticking to the upper shore. Now keep going north until you reach a group of trees and then go northwest to a patch of grassless ground that leads to a peninsula. There’s the green entrance to the Subway. Go down the stairs and pay 100 N to enter the Subway (you’ll also need the Scooter to be allowed inside). If you don’t have enough money you can start killing Grassland NPCs, they always give you money but it’s usually few (1, 2, 5, 10 or 25). Once you’re in the Subway, go to the fifth station (the one with a “!” mark), and go up the stairs. You’ll access the Mall. It’s easy to navigate through it, just try to walk north until you see a door outside and, instead of going through it, walk east all the way to the yellow/orange light to arrive at the Edible World. Now walk north again until you find a horizontal line. Walk over it going west and you should find a tomato rolling around. Interact with it to get the effect. There’s a secret way to access the Edible World, too… but it’s honestly much harder.
Lab coat
Effects needed: Healing aura, Wrench (to get money)
Money needed: 10 N
Follow the instructions for the Healing Aura, but don’t leave the Hospital. Instead, go up to the third floor, walk all the way to the left and use the effect on the green (+) spot, facing the glitched door. Enter the room. You’ll see there’s only a phone booth inside. Pay 10 N for the phone booth and it will take you to Streetlight World. Walk south-southwest to find a Subway entrance. Instead of the Scooter and 100 N, you only will need the Healing Aura to enter, since there’s a glitch between the second and third stations that can only be fixed if you enter from here. You don’t need to “heal” the glitch in order to access the second station, but if you do these stations will be unlocked forever, and you won’t need to use the phone booth method anymore (at the cost of having to pay 100 N like in the rest of stations). The second station has a “^^” mark on it. Go up the stairs and you’ll arrive at the Nice Town. The map is only 20 tiles wide and loops horizontally, so you just have to walk north all the way. There’s only one blind alley, and you can easily go back and try another path. Next is a small square that can be left by walking north as well. You’re now at the High School. Go up the stairs to reach the first floor. Now go down the other stairs and walk through the long hall to find a humanoid NPC with dragon wings. Talk to him. He’ll show you the other NPCs you have to find. Considering you’re in Floor 0 and Floor 1 is the entrance, the first two NPCs can be found in Floor 2, the next two in Floor 3, and the last one in Floor 4. Once you find and talk to them all, you will be teleported back to the place with the winged NPC, who is now having a party with his friends. Talk to him and he will give you the effect.
Baku (+ Endings)
Effects needed: All 24
In order to find the Baku effect, you'll need to trigger the endgame, the only place where you can use it.
Once you have all 24 regular effects, you can either go out of Itsuki's bedroom, triggering the Bad Ending, or you can go back to sleep and look for the endgame. You must enter Doodle World, then walk southeast until you see a giant hand with a broken portal on its palm. (There's an arrow next to it, pointing to the right. If you see the arrow, follow it and you'll arrive at the portal.)
Use the Healing Aura effect to fix the portal. Going through it and then up the stairs will lead you to The Lake. This is where you can talk to the Teru, and doing this with an effect on will transfer that effect into the Lake, appearing as a bubble. You can also interact with the bubble to retrieve that effect.
After transferring all 24 effects, Teru will make them levitate, but a glitch will occur, where the game seems to send you to the main menu. Select the only save file, which will take you to Itsuki's fake room. Sleeping will then lead you to a glitched version of the Nexus, where only the Computer World portal works... almost. Taking it will lead you into an even more broken version of Itsuki's room, where you can leave and enter the Chaos. It is a jumble of stolen assets from several worlds, although the path is fairly straightforward, and contains no actual chasers or dangers despite what it may seem. Simply walk all the way down until you find another identical door, and enter.
You will be taken to a bifurcation. Taking the right, more glitchy path will lead you to the Glitch Ending. Taking the left, more stable path leads you to a straight hallway with a green door that allows access to the Meta-Nexus. Only the golden door in the center actually works, it guards a stairway where Teru awaits again. He will give you the Baku effect.
Once you have it, you can go back through the green door, but as you enter the hallway, it will become corrupted and slowly fill up with creeping glitches - if they catch you, you will also get the Glitch Ending.
If you make it safely back to the bifurcation, you're pretty much done! Just take the right path, and simply enjoy the Good Ending.
TESTING AREA
(TO BE UPDATED FOR v0.11.)
Effects needed: Scooter, Fox, TV, Megaphone
Effects you'll find: Mercury, Wood
First of all, here’s how to actually reach the area. From the Space World, go west-southwest until you see a blue teleporter among some gray asteroids. Use it. Now at the Moon, use the other teleporter to access the Testing Area. Using the blue teleporter with 1 near it will begin the test proper. (The one near the 2 gets unlocked when you complete the first 10 tests.)
- TESTS 1 TO 10 -
Test 1
Effects needed: Fox
Jump up the ledge, turn right, jump off the ledge.
Test 2
Effects needed: None
Go south, push the button and go north through the now deactivated force field.
Test 3
Effects needed: Fox
Jump up to the buttons and push them, then go south.
Test 4
Effects needed: None
The five buttons have numbers assigned to them. From left to right: 1, 2, 3, 4 and 5. The screen tells you the button you have to push. Here’s the sequence anyway: 4-3-2-5-1. (It’s so obvious, you wonder why you even bothered to ask.)
Test 5
Effects needed: Megaphone
These bothersome metal balls get in your way all the time. They only hover over concrete floor (the one with a chess-like pattern). Thankfully you can attract them using the Megaphone effect wisely, and then push the three buttons so you can go south and end the level.
Test 6
Effects needed: Mercury (found here)
Oh. If only you could through that little crack on the wall. But don’t despair, the Mercury effect does just that for you! Press 1 in front of the crack to become a puddle of liquid mercury and pour through it.
Test 7
Effects needed: Megaphone, Mercury
Use the Megaphone to attract the balls all the way to the north until you can go all the way south. Then use Mercury on the crack, push the button, use Mercury again and go north.
Test 8
Effects needed: TV
When you TURN ON the TV effect here. A strange thing happens. Sometimes the TV lets out a short beep, and it gets faster as you reach a certain position. That position is around the middle-southeast of the room. When you step on the exact coordinates, the door opens. How? Aliens.
Test 9
Effects needed: Megaphone
You know you love these metal balls. Attract the first one until you can go east, then north, then attract the second ball all the way to the east, now Go West, then north, attract the ball towards yourself so you can keep going north, and then go east and attract the ball until you can get past it. Make sure you push the button so the force field is deactivated though.
Test 10
Effects needed: Fox, Mercury, Megaphone
This test is divided in three sub-tests. Here’s my personally favorite order: First go west and up the stairs with the Fox, push the button and go down. Then go southeast and though the crack with Mercury. Push the button and go back through the crack. Now go east and - yep you guessed it - attract the metal balls using the Megaphone so you can keep going. Push the button and… attract the balls again to go back. Once at the beginning, go north and smash all the crates. If I remember correctly, you should get 350 N. That should be enough for all the events that require money in Someday.
Completing Test 10 gives you the Test Subject feat, and unlocks a direct teleporter to Test 11.
- TESTS 11 TO 20 -
Test 11
Effects recommended: Candle holder
This test has a lighting problem that can be solved with the candle holder effect. The buttons from left to right are numbered as follows: 1, 2, 3. Press 1-3-2-3-1 to deactivate the force field.
Test 12
Effects needed: Scooter
Simply run to the east while avoiding the hostile metal ball, as it will teleport you to the beginning of the test if it catches you.
Test 13
Effects needed: Scooter
Follow the test track while avoiding the metal balls.
Test 14
Effects needed: Scooter, Wood (found here)
Run to the east until you find one metal ball that you can’t avoid. Instead of going south, go north and you’ll find a teleporter that takes you to an island in the Grassland. Talk to the green fairy to get the Wood effect. Go back to the metal ball and stand on the tree symbol on the floor, then press Z or Enter. You’ll swap places with the small wooden doll, thus being able to reach the end of the test.
Test 15
Effects needed: Scooter, Megaphone, Wood
Use the Wood effect to get past the first metal ball. Now go east and attract the static metal ball (not the lunatic one) in a way that leaves the lunatic ball trapped and lets you go down the hall to the south. This one is tricky, so if you don’t get it right at first you can voluntarily touch the lunatic ball to restart the test until you do. Now press the button at the end of the hall, go back north and then go east.
Test 16
Effects needed: Scooter, Megaphone, Wood?
This test has two “endings”. First of all, you can’t take the left path at the beginning. Take the right path and avoid the two lunatic balls. Now, once you find the third lunatic metal ball you can go left or right. The left path will take you to Test 17. But the right path… seems to have nothing at the end. But don’t be tricked. There’s a Wood effect teleporter hidden over there! It’ll take you to a “forbidden” part of the test. If you keep going left you’ll see the place starts glitching out. But you can still turn south and use the fake blue teleporter. Then go north and… well, I guess you’ll have to check the Feat guide for that!
Test 17
Effects needed: Fox, Scooter, Megaphone, Wood
Jump up the ledge. See that dear sweet precious ball to the left? It’s your Companion Sphere. It will never threaten to teleport you and, in fact, cannot speak. Run between the lunatic metal balls with the Scooter, go north, and use the Wood effect. Now go south and attract the ball towards yourself. Make sure you bring it with you. Because you’ll need after you go north and find the extremely fast lunatic metal ball. Trap it with your dear sweet precious Companion Sphere so that the lunatic one stays to the left of your path, letting you go east. This test also provides you with a Checkpoint Fairy! But there are no actual chasers in here, right? To find the Checkpoint Fairy, go west after you reach the end.
Test 18
Effects needed: Fox, Wood, Mercury
This test is divided in three parts, each with a button at the end. From left to right, the parts go as follows: 1, 2, 3. The correct sequence, as shown on the screen provided with the test, is 3-2-1. So, to reach the third button find the crack on the wall and pour through it with the Mercury effect. To reach the second button, use the Wood effect on the tree symbol on the floor. To reach the first button, jump up the ledge to the left of the rest. Once the sequence is complete, go east and jump up the other ledge. Turn right.
Test 19
Effects needed: Scooter, Megaphone
Effects heavily recommended: Wood (but thankfully you already have it by now)
Go north, then east, then north while avoiding the lunatic balls (tip! follow the left one until it crosses the right one, then go to the right and RUN! that’s how I do it), then east and north avoiding the balls once again, turn left and avoid MORE balls… phew! Now turn south and… well, a metal ball is blocking your way. Just use the Megaphone and… oh dear, it’s a Hexagon! Now you can try to push the button and go all the back through the test track… or simply use the Wood effect and teleport right to the end. Yes, the force field and the button were a ruse. A distraction, if you will.
Test 20
Effects needed: Scooter, Fox, TV, Wood, Megaphone, Mercury
This test is divided in four mini-tests. I usually do them from right to left since the rightmost test is the only one with lunatic metal balls. So, go east and try to avoid the balls as you reach the button. Go back. Now go southeast and prepare your sexy Megaphone effect because you have to get past two more metal balls. The last metal balls. In the entire game. You are a winner. Wait, not yet. Pour through the crack in the wall with the Mercury effect. Press the button. Go back, again, using the Megaphone. Now go southwest and use the Wood effect on the tree symbol on the floor… three times. Press the button. Go back. Finally, go west, jump down the two ledges, turn left, jump up another ledge and turn on your TV effect. Go towards the upper left corner to deactivate the final force field. These 650 N are just for you. Congratulations!
Completing Test 20 gives you the Test Devourer feat, and unlocks a direct teleporter to the end of the test track, where you’ll need the Lab Coat effect to unlock the final teleporter to the Space View.
FEATS
(TO BE UPDATED FOR v0.11.)
Rise up
Effects needed: Nerd, Scooter, Wrench
At the School World, go to the rightmost part of the school, then go to the playground while wearing the Nerd effect. Instead of monochrome children, you should see a bunch of flashing mask chasers. The doorway is locked. Go east while using the Scooter as the masks will eventually start chasing you. At the end you’ll find a lone mask waiting for you. Hit it with the wrench before the other masks get you. This is one of the few feats that “leave a mark” on the general gameplay: masks wil no longer chase after you, except during the Corrupted School Event (see Perspective below), where masks are always active.
Fallen
Effects needed: Fox
From the Mountain World, go to Data World 2 and then to the Ice World. Go north all the way until you see an X-shaped crack on the ice. Stand in the middle of it.
Kondo
Effects needed: Glitch
Go to Computer World, and enter the second folder to the right. You should see another folder inside a crack. Interact with it several times and eventually the screen and the music should start getting distorted, until you finally get to the Glitch World. Here you can run at maximum speed but once you equip/unequip an effect you go back to normal. This world is huge, so I recommend having maximum speed on. Make sure you find the Glitch effect, then meet Kondo (a blonde girl sitting in front of a computer) and talk to her while wearing the Glitch effect. (Interacting with her without the effect triggers a different response that doesn’t grant anything in particular. Also, Kondo is the only character with actual dialogue in Someday.)
Paralyzed
Also known as: Haunted House Event
Go to the Dark World, walk notheast until you pass near a nose with eyes in its nostrils and a lot of reddish crates. Now go north and you should see two black pillars with a crate in the middle. There’s a 1 in 8 chance that the crate won’t be there and you’ll be able to pass between the pillars (the possibility resets every time you enter the world, and it’s higher if you go from the Bubbly Event, see Oxidation and Reduction below). Go north once you pass between the pillars and you’ll see the Haunted House. Enter and go down the dark hall. Open the door.
Oxidation
Also known as: Bubbly Event
Effects needed: Wrench
At the Computer World, click on the e-Man icon to access the Internet. Go southeast until you find a tube with some TVs around it (watch out for chasers!). Interact with the tube. Once in the Tubes World, right before finding the TV effect turn right instead of left to find Bubbly. Hit Bubbly with the wrench.
Reduction
Also known as: Bubbly Event, part 2
Effects needed: Scooter
Bubbly will let out a deafening scream and the Tubes World will become rusty and bloody. Welcome to .flowday. You’ll see the path has changed completely, and the tubes no longer lead to the same places, but it’s all linear. Eventually you’ll find the tube that’s supposed to lead back to the Internet but instead it leads to the room with the TV effect, only this time it is red and heavily distorted. Interact with the bleeding TV to enter the Hexagon Realm. Make sure you have the scooter (there are two fast Hexagons here) and go north-northeast until you see “Shadow Itsuki”. Talk to him, he’ll take you to the Dark World, ending the event. Keep in mind, however, that triggering this part of the event makes all Hexagons lunatic so there will be another one chasing you there. It also makes it much more likely that you’ll be able to get the Haunted House event (see Paralyzed above), as it’s a 1 in 3 chance instead of 1 in 8.
Snow
Effects needed: Raincoat
From the Mountain World, go to Data World 2 and then to the Ice World. Wear your raincoat. Since it’s so cold, you will get snow instead of rain.
Flowers (Until v0.09. This feat was replaced in v0.10)
This is the only feat that comes with an effect too. At the 8-bit World, walk east-southeast, and interact with the yellow star-shaped flower. You will be teleported to a small field the size of one screen (20x15 tiles). Now fill the screen with flowers as you walk all over it. When all flowers are there, another star flower will appear at the center, interact with it to get the 8-bit effect and get this feat.
Silent Laughter (v0.10 onwards)
Effects needed: Scooter
Money needed: 100 N
Enter the Subway from any station (I personally recommend the Grassland’s, it’s closest to the Nexus), and get down in the fifth one, sporting a “!” sign. You’ll arrive at the Grayscale Mall. Get inside and go all the way north. Interact with the fairy until it multiplies so much you can’t move. You’ll arrive at a dark, empty version of the Art Gallery. Go all the way south, interact with the drawing of Kondo, go north and take the west door,
.
AAAA99999
Effects needed: Wrench or Megaphone
From the School World, go east and take the first door to the south (right before the playground doorway). You should see an opaque monochrome girl in the classroom. Talk to her to access the Decision Path. Going right gets you the Monochrome effect and you can still go back to take the left path, which leads to the Question World. Go north-northeast to find a Hexagon. Now either try to hit it with the wrench or simply play the megaphone so it becomes lunatic. Get caught, he’ll send you to a secluded part of the Alphanumeric World. Step on the A. Now, this next part is not necessary but if you go back to the Nexus using the Clockworker effect and enter the Alphanumeric World, you’ll see everything has turned into A’s and 9’s, thus making the world much harder to navigate since they are the same color as the background.
Zero
Effects needed: Wrench
Follow the instructions right above to access the Question World, but instead of walking north-northeast, walk southwest and step on the pink heart. You’ll be in the Pink Maze. Enter the heart-shaped maze and go left all the way, then up until you see a wooden create. Hit it with the wrench and it will give you… 0 N. This is the only box in the entire game that doesn’t give you money.
Lucky
From the 8-bit World, go northeast until you find a bridge. Cross it and keep going east-northeast and you’ll see some trees forming a backwards C. Enter the tree formation, and get through the Tree Path to access a secluded part of the Forest. Jump all the way down (no Fox needed, just gravity) and interact with the four-leaf clover
Shame
Effects needed: Wrench
At the School World, go find Child Itsuki as if you wanted to get the Nerd effect (see effect guide), and hit him with the wrench.
Fulgurites
From the Data World, take the south path once you reach the main bifurcation to access the Desert. There are 24 fulgurites. They are natural sand formations that look like vines or tentacles. Interact with them to tear them down (they are very fragile). Leaving the Desert will reset all the fulgurites, so make sure you touch all 24 of them to get the feat before leaving.
Rainbow
Effects needed: Raincoat
Effects recommended: either Fox or Swimsuit depending on the path
This event is triggered by going to the beach while it’s raining. You can equip the raincoat before or after you arrive, as long as the rain stays (you have to manually unequip the effect in order to stop the rain, either by pressing 3 or by re-equipping the raincoat when it’s already equipped). This will make a rainbow appear over the beach. There are two ways to reach this place, either from the Grassland and then the Caves (needing the Fox effect in order to jump to and inside the Caves), or from the Purple Polka-Dot World (orange path), then the Sewers (take the north exit), and then the Seabed (in this case I advise you to get the Swimsuit first, which is ironic since you actually get it at the Beach). If you get there from the Seabed you may notice that the rain doesn’t work underwater, but as soon as you come out of the sea it’ll be raining again. In fact,
Perspective
Also known as: Corrupted School Event (because every fangame needs one)
At the Lava World, go southeast until you reach a narrow passage. At the bifurcation, take the path to the left. It’s a dead end, but there’s a 1 in 4 chance that you’ll see a shadow figure. Talk to it, it will take you to a one-screen maze that’s very easy to solve. The exit is at the bottom. The screen will flash and, after a pause, you will become Child Itsuki in the Corrupted School. It’s not corrupted in the usual “bloody” sense, but more in the “something is wrong” sense. The colors are oversaturated, the music is distorted and all classmates are now static chasers. At this point you are unable to use the pause menu until the event is over. Exit your classroom and go east all the way - any other doors will be blocked. Go to the playground to see a reenactment of the event that gets you the Rise Up feat, except this time you are smaller, don’t have effects, and can’t escape. Eventually the chasers will come to get you, but this time instead of teleporting you, they start bullying you, even the lone bully at the end of the playground, and it gets really hard to keep moving. A transparent, gloomy version of Itsuki is staring from the other side of the fence. Interact with him, and after a flash the chasers will become normal classmates - all of them male - and you will wake up, ending the event.
Colours
Also known as: Flying Tuna Event (symbolic name)
Effects recommended: Swimsuit
This event can be found at the Seabed. You can reach the Seabed either from the Grassland, then the Caves and the Beach (where you can get the Swimsuit which enables you to swim faster), or from the Purple-Polka Dot World (orange path), then the Sewers taking the north exit. Once at the Seabed, keep swimming close to the east until you see a passage that leads “out of the screen”. You’ll arrive at a smaller part of the Seabed. Go north and peek through the colourful hole in the wall.
Tinnitus
At the Purple Dolka-Dot World, take the yellow path to get to the Neon Path, which is not really a path per se, but actually a black void with some hidden neon lights that make you bounce back when you touch them. The easiest way to get through it is going down at one tile from the left edge of the screen, then going right one tile away from the lower edge of the screen. Open the door to enter the Neon World… and get out. There’s a 1 in 9 chance that when you exit the Neon World from that door, Itsuki will get a tinnitus from all the loud music. The variable gets reset randomly every time you exit the world, so you can just get in and out all the time until you manage to trigger it.
Test subject
From the Space World, go west-southwest until you see a blue teleporter. Now at the Moon, use the other teleporter to access the Testing Area. You must complete 10 tests here to get this feat. For further information on the matter please check the guide for the Testing Area.
A thousand pictures
At the Doodle World, go north until you see a doodle of Zapnef (he’s the minigame’s protagonist), then turn left and look for a painter stick figure that’s flashing in several colours. Talk to it, go across the Blur Path and enter the painting to get to the Art Gallery. You can also get here from the Internet. Go north until you get to the giant egg, then turn right and go to the end of the long hallway with a painting of a head (called “SbvQa RejffthWI BVme7”), and go through the door, then interact with the robot.
Canvas
Effects needed: Psychedelic or Monochrome
At the Doodle World, go north until you see a doodle of Zapnef (he’s the minigame’s protagonist), then turn left and look for a painter stick figure that’s flashing in several colours. Talk to it, go across the Blur Path and enter the painting to get to the Art Gallery. (You can also get here from the Internet, but you’d need the Healing Aura to fix the door. Also the Doodle World doesn’t have chasers, while the Internet does.) Go north until you see the blue head sculpture (“eul nabmwek”), turn right and then go north all the way. Enter the door and you’ll access a tiny room with a 8x8 tile black canvas. Interact with any of those tiles using either the Psychedelic or Monochrome effects and you’ll get the event. Using the Monochrome effect turns the tile white, using the Psychedelic effect turns the tile into the color you are wearing (default red, yellow, green, cyan, blue or magenta, remember you can change it by pressing 1), and using any other effect or none at all will turn the tile black again.
On fire
Also known as: Bad Omen Event
Effects needed: Wrench
From the Lava World, go southeast and then down the very narrow passage. When you reach a bifurcation, take the right path and then turn left when you see a dead tree. You should see another narrow passage that turns north, with a hole at the end. Jump into the hole to get to the Rainy Plains. Go northwest all the way, then turn right and look for another hole. Jump into it and you’ll enter the Clock Tower. Not counting the entrance (the only floor that is silent and not affected by the flow of time), there are 6 floors. Each one contains a different clockworker, except the sixth floor, which contains Bun the time ghost. Kill the five clockworkers and the Clock Tower will be shut down. Bun will also disappear. You will be unable to wake up, use the pause menu or disable the Wrench. Walk back to the Tower’s entrance and jump into the hole. You will be back at the Rainy Plains, except they’re not rainy and the music is gone. The path to the Lava World will be closed, so you can only go southwest where the Raincoat should be. However, instead of the Raincoat you’ll find a burning tree. Interact with it.
Habit
Effects needed: see below
Follow the instructions in this guide to get to Test 16 in the Testing Area. Take the “glitchy path” that is mentioned in the guide. You’ll arrive at Internet World 2, a smaller version or the Internet with some blinking beacons that lead the way into a hole in the floor. Jump inside, and then use the Wood effect to get to the other side of the… map. Enter the… eye/nostril/unidentified bodily orifice. You might want to turn the volume down now. You’ll access the COMPUTER Maze. It’s not really a maze, but actually a really twisted linear path that looks like a maze, and the background makes it much more confusing. Use the Wood effect again whenever you reach a tree symbol. Eventually you’ll reach the computer, the music will (thankfully) stop and the map will become a 20x15 looping void with no exit. It’s a dead end.
Test devourer
From the Space World, go west-southwest until you see a blue teleporter. Now at the Moon, use the other teleporter to access the Testing Area. You must complete all 20 tests here to get this feat. For further information on the matter please check the guide for the Testing Area.
Hatsuyume
At the 8-bit World, walk to the south and interact with the cartoony orange flower. Go up the Water Path to access the LSD World. Now go southwest until you arrive at a big lake between two plateaus, and check if a torii is in there in the water. If it’s not, touch the walls or the trees to be teleported to another part of the world (textures and music may change and you might even see Hexagons but it’s still the same world), eventually the torii should appear in the lake, as it’s a 1 in 4 chance. Go through it and you’ll end up at a looping, tiny void with a background that’s divided in 4 pieces. The background pieces are lying on the floor somewhere. Once you find the first one, try to fit it within the upper lef tcorner of the screen, it will get fixed to the background and the next piece will appear. Once the puzzle is complete, the background will become a real place, granting you the feat, as well as 100 N. Also, it’s not a dead end - walk towards the right edge of the screen and Itsuki will appear at the Doodle World right below a New Year confetti ball.
Empty
Effects needed: Scooter, Wrench (to get money)
Money needed: 100 N
Enter the Subway from any station (I personally recommend the Grassland’s, it’s closest to the Nexus), and once you reach the speedway, keep going right until the neon arrows are off and the place starts looping. Get down in this signless station. The music will stop and everything will be dark. Go up the stairs and out of the Subway, and walk towards the edges of the screen.
Dizziness
Effects needed: Scooter
Money needed: 145 N
Enter the Subway from any station (I personally recommend the Grassland’s, it’s closest to the Nexus), and get down in the fifth one, sporting a “!” sign. You’ll arrive at the Grayscale Mall. Get inside and go north, then turn right to reach the Edible World. Go north again. Cross the line where the tomato is rolling and you should see two pathways, one savory (takoyaki and sauce puddles) and one sweet (chocolate and cookies). Take the savory one and you’ll arrive at a Nice Dude Kiosk. Pay 45 N for a bottle of Spoiled Mentsuyu and watch the colours spin right round. Spoiled mentsuyu sure is a wild experience.
A snowy day
Effects needed: Mercury
At the Purple-Polka Dot World, take the orange path to get to the Sewers. When you get to the part that loops horizontally, pour through the crack on the wall using the Mercury effect. Now go into the puddle and you’ll fall through it, as it’s actually a portal to the Shower. Walk to the right until you reach two faucets. Turn the blue one (cold water) and go all the way to the left to reach the Ice World (alternatively, the hot water faucet leads you to the Desert). It is important that you use this method to reach the Ice World, as getting here from the Mountain World or the Subway will not work. Now go south east until you find the Subway entrance, and get into it. Go down the stairs and you’ll see a transparent couple of NPCs that seem to be holding something. Talk to them and you’ll become an even younger than usual version of Child Itsuki, waiting inside a poorly drawn cabin. The pause menu is blocked, you can’t use effects, and you can’t wake up. Get out of the cabin and go all the way down the snowy road, then jump down into the frozen lake. The screen will fade to black and you’ll wake up after some noises.
Stranger
Effects needed: Scooter
At the Purple-Polka Dot World, take the orange path to get to the Sewers. When you get to the part that loops horizontally, enter the first hole you see, and keep going until you see a graffiti that reads “SLEEP”. Normally the letters are merely a black outline, but there’s a 1 in 5 chance, reset every time you dream, that the graffiti will ooze a bright green slime. Touch the graffiti and you’ll teleported to a dark alley in the Big City. Going all the way down the alley lead you to another one, but this time it’s just a straight narrow line and you can’t go back. Use the Scooter and RUN to the end of the alley. Eventually a chaser will appear and he will get faster as you reach the end of the alley, so don’t stop running. Getting caught will teleport you to a secluded area in the Water Path. If you reach the end of the alley you will be teleported to the real Big City, ending the event and granting you the feat.
Trapped
Go to Computer World, and enter the second folder to the right. You should see another folder inside a crack. Interact with it several times and eventually the screen and the music should start getting distorted, until you finally get to the Glitch World. Here you can run at maximum speed but once you equip/unequip an effect you go back to normal. This world is huge, so I recommend having maximum speed on. Go southeast until you find Kondo, and then go east to find a glitched Zapnef (the guy from the mini-game), and use the 8-bit effect while talking to him. You’ll be teleported to a glitched version of Zapnef’s Level 3. You can jump here, just like him, but you are also immune to everything. Objects grant you no points. Simply walk to the end of the level, where you will be ambushed by a horde of metal balls. The “game” will then crash, causing Itsuki to wake up.
Careful cruise
Also known as: Space Flight Event
Effects needed: Lab coat
First you must complete all 20 tests at the Testing Area at least once. When you do, a new teleporter at the lower right corner of the Testing Area’s entrance should appear, taking you right to the end of the test track (you also get there by completing Test 20). There will be a deactivated teleporter with a lab coat sign next to it. Put it on, and then use the teleporter to activate it. From now on, that teleporter will always be active. It takes you to the Space View, where you can talk to the flashing guy and pilot a spaceship. At soon as you get into it you’ll receive the feat, but there’s more. There are N coins scattered through space! You can try to get them while avoiding the asteroids. You can also press Cancel to get off the spaceship - when you get inside again all the coins will be back and can start all over. This is a prize for triggering what, in my opinion, is by far the hardest event in Someday. Infinite money! Of course, the trip ends abruptly if you collide with an asteroid… but don’t worry, you’ll get cake as a consolation prize.
Platformer
Complete all nine levels of Zapnef. There is no mystery to it, really, it’s a linear platform minigame, but if you need a guide on Zapnef please let me know!
Wasps
Effects needed: Wrench
At the Data World’s main bifurcation, take the west path to eventually reach the Forest. It’s a linear world, so simply keep going until you arrive at a really big place where you have to go north to continue. There should be a wasp flying around. Kill it with the wrench, get out of the Forest and then go back. The world will have a yellowish tint and it will be infested with invincible wasps. They do nothing, but they make it hard to walk and Miru is scared of them, making it impossible to get the Fox effect. It wears off when you wake up.
This makes a total of 32 feats. Getting 10 feats grants you the turquoise menu, getting 20 feats grants you the 8-bit menu, and getting 30 feats grants you the gourmet menu. Getting all of them doesn’t do anything because I didn’t want to make it necessary to get all of them in order to see everything in the game. I know some feats can be really hard to get without help - that’s why I made this guide.
Good luck!
CRYSTALS
Red
School World. Enter the school, walk towards the right until you see a classroom towards the south. Talk to the monochromatic girl inside. In Decision Path, walk to the left. In Question World, walk north-to-northwest around the hole in the floor until you find a large square with a pink heart inside: step on it to reach the Pink Maze. Walk towards the eastern wall outside the maze, you should see a small gap next to a red coin. Walk through the gap and across the small path and you will reach Thread World, which is easy to follow to the end. Taking the one pink thread at the end will lead you to the crystal.
Orange
Data World.
Island 1: Go right, down, left and down again. Use the teleporter there.
Island 2: No explanation needed.
Island 3: Take the right teleporter.
Island 4: Take the teleporter to the lower right. The rest is straightforward.
At the Desert, walk all the way down while staying in the right side of the map - near the end of the large island you should find a small peninsula with a patch of land in a different color. It will take to the Four Seasons Path, a series of short, straightforward paths cycling all the way from Mountain to Ice to Forest and back to Desert - once you're at the end, walk north and enter the small cave to find the crystal.
Yellow
Space World. Walk northeast until you see a small greenish star with a comet circling it. If you lose your way, you can also walk toward the Sun in the solar system, then move south-southwest.
At the Shooting Star Path, simply follow the way, walk north once given the choice, and enter the spaceship at the end. At the Space Party, talk to the giant blue alien, walk to the right and talk to the smaller cyan alien, and find the brightest star north of the map (It's Polaris! kind of) to reach the crystal.
Green
Grassland World. Walk southwest into the peninsula with a house at the end, enter the house and touch the giant plant. In the Overgrown Caves, walk to the east, then south while staying close to the wall until you can go east again. Keep following the blue 5 N coins north, then turn east when you see a yellow 10 N coin. It is narrow, but you can make it. You will see a secret path that keeps going north. Follow it to the end to reach the crystal.
Teal
Doodle World. Walk southeast until you see a giant hand with a broken portal on its palm. Then go south and into a small scribbled door made of toy cubes. The Playground is straightforward - just walk all the way down to find another similar door and you'll reach the crystal.
Blue
(Diving suit effect recommended.) Purple Polka-Dot World. Take the yellow path*. (Go down, then right-down, then down, left and down again. When you reach a bifurcation, take the middle path and go all the way down, then left and then up.) Interact with the tetrahedron, and once in the Neon Path try to get to the other tetrahedron, avoiding the neon lights (only visible when you bump into them). In the Neon World, walk northwest until you see another door with horizontal lights. It will take you to the Dance Flood.
It's called Dance Flood because you can fill it with water! Walk southwest, and after you get through an arrangement of four swimming pools, go all the way to the west, then south along the large pool, then walk east to reach the Wetness Switch room. The switch is in the north half of the room. Since the Dance Flood will be... flooded, you'll be able to walk inside the pools, but the Scooter will not speed you up, which is why the Diving Suit is recommended, as it *does* speed you up underwater.
Now, go back through the Dance Flood until you see a path going south that you didn't take before. There's a pool later on which gets in the way, but since the whole place is flooded, you can walk (or dive) to the doorway on other side and find the crystal.
*Alternatively, you can take the green path and then two blue shortcuts until you see the tetrahedron next to the yellow path.
Purple
Dark World. Circle around the patch of sludge below Itsuki (not the small one above). Make sure you're right under the sludge. Follow it all the way northwest, keep going until you see a tunnel made of neon flashing squares, then take it to reach the Memory Graveyard.
Walk northeast. Eventually you should reach a wooden crate or a statue of Teru on an island. Then, walk towards the east until you see floating stairs going north. The stairs will lead you to the final crystal.
Also, here's the music guide!!
Feel free to contact me if any direction is wrong, outdated or not clear enough! Have fun!
17 notes
·
View notes
Text
April 16-17th, 2022 (10:11PM - 1:21AM CET)
Someday online tour hosted by Uliz and me 👀 Thanks to @jojogape for making such a wonderful game and accompanying us during the tour!


https://twitter.com/i/events/1299025317592354817

19 notes
·
View notes
Text

Greetings, dreamers!
Since we're celebrating Itsuki's birthday today (May 10), here's an announcement: on Someday's 10th anniversary, July 21, the entire OST will be released on YouTube!
I know you guys have been asking for the full OST, but I was never in the right time to actually do it, until now! I'll be preparing the playlist slowly - there's more than 100 tracks in total! Especially if you count the versions at other speeds!
As for today, i just released a small bugfix that preloads all sounds right after loading the game, just like in Yume Nikki, so there's no lag when triggering any sounds in the game. You might not notice much of a difference besides one or two extra seconds when loading or saving, but for slower systems, I think it's worth it. Or if you play it online!
Downloads are the same, check them all here!
11 notes
·
View notes
Photo
Thank you so much!! I absolutely adore him here, you got him 110% right!!!

Commission for @jojogape of their character Fermi! Quiet please, he is reading :)
#rh fermi#look at my vampire son#regulus harbor#keroa's art has been an inspiration for quite a few years :')
30 notes
·
View notes
Text
youtube
Hey! A few weeks ago I made a full 3D replica of the main part of the Number World from Yume Nikki! Here's a short animation of it. Download link in the description.
(Contains flashing lights, with an especially bright one at the beginning. The entire video is kind of trippy.)
7 notes
·
View notes
Link
Hey! I know this blog is super dead rn, but I was in college with these guys for a few years, so feel free to give a signal b00st! It's always nice seeing your former classmates present their own projects <3
Hace unos meses publiqué en Steam mi primer videojuego con unos amigos. En el juego eres un operario en un almacén de objetos perdidos que tiene que encontrar por la descripción de unas notas los objetos que se le han pedido a los clientes lo más rápido posible para conseguir puntos. Estamos añadiendo actualizaciones gratuitas cada mes y que próximamente queremos añadirle un modo historia con las mecanicas que tenemos :) Si os animais a comprarlo y dejais un comentario positivo, os estaré muy agradecido. No sabeis el apoyo que da una simple review positiva en Steam. Twitter: https://twitter.com/LAF_WhatIf Discord: https://discord.gg/VAcYx9nPxH
10 notes
·
View notes
Text
Someday is now playable on Yume Nikki Online!!
Now you can explore Itsuki's dream world with friends and share your impressions in the chat!
Made possible thanks to KekamiDev!
Widely acclaimed fangames, such as .flow and Answered Prayers, are there as well as Yume Nikki itself. Authors are contacted and asked for permission before their fangames are included.
(In other news, I made a new artblog.)
13 notes
·
View notes
Text
A SPECIAL MESSAGE FROM ITSUKI INOUE
"Hello everyone. I am writing this from a different place than where I was when I made my first work and shared it online. Nevertheless, many people poured lots of love onto it, and for that I am very grateful to all of you.
If you used to follow me back then, you might have known me online as ayosu-5ki, on places like NicoNico, 2ch, pixiv or YouTube.
Well, I have decided to start using my own name in my works, but I will also operate from Ayosu Studio, a small step in the world of indie games, where I hope I can afford to connect with a larger community and maybe make some exciting things you can enjoy in the future.
I have thought several times about what kind of project should I make. But there is one in particular that does not leave my mind, and holds a very special place in my heart.
Though the Korean Version of this project had some exclusive additions to the core game, I feel that I am prepared to do much, much more.
So, with that being said... please look forward to ZApNeF Into The 3D, a full 3D remake of ZApNeF, with completely new levels and mechanics, made with blender and Unity. The trailer will be published a year from now, on April 1, 2022. Thank you for your support all these years."

107 notes
·
View notes
Photo


Hello, everyone. I know this blog isn’t active anymore, but I wanted to stop by to tell you about Regulus Harbor, this modern fantasy story I’ve been writing. It’s also my first full-blown original story, after the short experiments that were 311 and Reinvent Yourself.
It’s currently only available in Spanish, though I do intend to hire a translator for an official English version eventually, if it takes off.
I waited until now because... yes, Itsuki is in it! He recently crashed into the story at the end of Chapter 6. New details about Itsuki will be gradually revealed in RH, as he’s going to be one of the main characters. Although I will keep Yume Nikki-ish things to a minimum since this is an original story and I don’t want to make it too derivative, you might want to stick around. In a way, for him, this is like some sort of isekai sequel to his dream adventures in Someday, except this time he will walk the waking world. A fantasy waking world, that is!
By the way, Entry #50 has been available for a while at @ayosu-itsuki. You can consider it an epilogue to Someday’s events, before he is mysteriously “spirited away” to the Regulus Harbor universe.
But don’t take this as a random crossover, because it isn’t. There’s more to this journey than meets the eye.
The first book of the trilogy, The Starry City, is about 50-60% done. You can read it right here! https://www.wattpad.com/story/231823032-regulus-harbor-i-la-ciudad-estrellada
48 notes
·
View notes
Photo


Someday: Open The Door
A short comic reinterpreting Someday’s ending.
I made this as an experiment to try doing a webcomic before I tackled my biggest project yet: Regulus Harbor, a fully original story. It was originally going be to be a webcomic, but I realized the time and limitations it requires, so it will be a book series instead. If you like modern fantasy stories make sure to check it out! https://twitter.com/RegulusHarbor/ Who knows? You might like it.
14 notes
·
View notes
Photo


Outotsu Yume has been updated to 0.04. 7 new effects, lots of new areas, computer functionality and bug fixes were added.
Our new hosting site: https://outotsuyume.itch.io/outotsu-yume
13 notes
·
View notes
Photo


Long time no see.
Someday v0.10+ is now available in English, Spanish... and Japanese!
Among several minor details and fixed bugs, Zapnef’s tutorials are now pictures instead of text, and the Crystals now come with their own new fullscreen events, instead of written entries.
Thanks to Sakura -also known as Sharp-, developer of the Yume Nikki fangame E Nikki, and Let’s Player Sainibi for helping with the translation. Without their efforts and support, this new version wouldn’t exist at all.
JP (rar): http://www.mediafire.com/file/ydn1xhin6zfki1n/Someday_v0.10%252B_%25E6%2597%25A5%25E6%259C%25AC%25E8%25AA%259E.rar/file
JP (7z): https://www.mediafire.com/file/gk6zf80xyj4bxhi/Someday_v0.10+_%u65E5%u672C%u8A9E.7z/file
ENG: http://www.mediafire.com/file/o4ewdwd2nnk31vx/Someday_v0.10%252B.rar/file
SPA: http://www.mediafire.com/file/onbmfc35y9k3y5r/Someday_v0.10%252B_Spanish.rar/file
Friendly reminder that I’m also making a webcomic adapting Someday’s endgame, Someday: Open The Door.
Sakura’s Pixiv
Sainibi’s NicoNico channel
11 notes
·
View notes