
Don't wanna be here? Send us removal request.
Statistics
We looked inside some of the posts by josephbradshawregeneration and here's what we found interesting.
Average Info
Notes Per Post
8
Likes Per Post
7
Reblog Per Post
1
Reply Per Post
0
Time Between Posts
1 day
Number of Posts By Type
Text
17
Last Seen Tumblr Blogs


Fun Fact
Tumblr has been providing a Korean-language service since 2013.
Text
REGENERATION EVALUATION
This project wasn't the easiest for me, but I have definitely gained a lot of new skills that ill carry on to future projects, such as how to sew with light fabrics like chiffon and georgette, sewing a rolled hem, and using natural dyes. I also put my pattern cutting skills to the test this project which definitely challenged me, and showed me that I have a lot more to lean that I thought I did. I loved using natural dyes like sloe berries, red cabbage, and rust, its definitely one of the most useful skills I've learned this project, and its something I can't wait to push further in the future. I also found learning abImageout different techniques such as shibori and boro very interesting, finding out how different cultures use and manipulate fabric is so useful, as it gives me a broader understanding of the origin of certain techniques, and the cultural significance behind them.


the theme of regeneration definitely opened my eyes to how unsustainable the fashion industry currently is, and how wasteful it is. The fashion industry is one of the most wasteful industries in the world, and throughout this project I've learned about small changes that we can all make to make a real change. I never realised how wasteful pattern cutting is until this project, and looking into all the different, sore sustainable alternatives have been really interesting. For example, subtraction cutting is a modern patten cutting technique that creates virtually zero waste, and is not only sustainable, but redefines what we think of as clothing. it provided a window to the future of fashion design, which I though was very beneficial to my project. Also researching the sustainable uses of mushrooms and mycelium was something I had never thought about, yet has so much potential. The possibilities range from mushrooms that biodegrade plastics, to sustainable packaging made from mycelium, to vegan mushroom leather. This project has definitely showed me that a sustainable future is within reach, and there are a lot of ways to make a change.


I've looked through a range of artists work throughout this project, which provided a lot of inspiration for my experimentation, and eventually my final piece. One of the main artists that inspired me is India Flint, who experiments with a lot of natural dye techniques, and loves to work into her art with different mediums. I love how raw and natural her work is, and how she works alongside nature, instead of fighting against it. I was especially inspired by the way she sometimes buries her work, or leaves it out on the open for weeks, allowing nature to put its hand to her work, She inspired me to use natural dyes in my work, as well as embrace a more unfinished look, as if my final piece has also been worn by the elements. Issey Miyake is another artist / designer that had a big impact on my final piece, his garments heavily inspired my fabric print, and his whole approach to fashion design I found very inspiring, he strives to find inspiration in tradition, and embraces his culture and history while still creating innovative, modern designs. I really love his use of pleats and folds as well, although I didn't feature them heavily in my final piece, I experimented a lot with them, which definitely influenced my outcome. I love Siarn Martin's work because of how detailed and complex she makes it, I like how she works into her art, building up layers of colour and texture. I tried to mirror this with multiple layers of natural dyes and boro stitching, which I think I did successfully.

No matter what project brief I get given, I think I'll always interpret it through a fashion piece because its what Im best at, I think fashion has a unique way of communicating emotions and ideas that other specialisms can fall short on. I find that dressing the female form is what gets me inspired, I think I create my best work when I'm working on a physical garment, where I get to create a character in my head who I create my final piece for, I can make up her circumstance and what she looks like, and it really lets me pinpoint what I'm trying to say with what I make. Throughout this course I've also been really trying to hone my skills in pattern cutting, and practice the techniques needed to make clothes, I've taken each brief I've gotten as a chance to push my knowledge of sewing further and further, to see what I've leaned, and what I need to learn. I'm also aiming for a future in fashion design which is no easy feat, its a very competitive industry and I'm aware that only the best of the best are successful, so ill take every chance I get to put myself to the test and produce fashion work that im proud of.


to link my final piece to sustainability, I wanted to use a number of techniques that I thought were beautiful in their own right, regardless of their positive effect of the environment. I already knew I wanted to lean heavily on using natural dyes, as I love the organic, natural tones you can achieve. I used a mixture of herbal teas that I simmered for about 30 mins to dye the bodice, which I think turned out great, I really love that pinkish brown colour, and I was really happy with how pigmented it turned out to be. I made sure to layer this dye to create different shades, I didn't want it to look too flat and monotone, as I'm looking at mushrooms and fungi I wanted a much more natural, mottled look. for the skirt I used sloe berries, which I steamed for an hour with my denim. when I took it off the heat the colour wasn't nearly as intense as I would want, which was confusing as the samples I made with the same berries looked so vibrant. I didn't use a small amount of synthetic red dye just to give the colour a boost, but I made sure not to over do it and I still let the natural dye colour shine through. I also used an old pair of jeans that I up-cycled to create the miniskirt, which was sometimes difficult as there wasn't a lot of fabric to use. I had to patchwork the seams together to create enough fabric to cut out the skirt sections. Finally, I used the borro technique on my bodice, which I thought would look really good because of how sheer and translucent my chiffon is, I wanted to really work into my bodice and layer different techniques over each other. I really like how this looks, not only does it strengthen my bodice, I also think it all interest, and pulls my garment together.
8 notes
·
View notes
Text
FINAL PIECE PHOTOSHOOT


As my final piece has a lot of textile elements to it, I wanted to make the background very plain and simple so the photos wouldn't be too busy and distract you from the main focus, which is my final piece. I couldn't find a model that could fit into my garment in time, but I would like to eventually do a photoshoot with someone actually wearing it later on. Although I plan on doing another final photoshoot with a real model, I also think these photos with this white mannequin have a lot of charm, it has a ghostly element to it which I really like, and the mannequin has the perfect body type to flatter the low waisted miniskirt I made. In this project I definitely came up against a lot of problems in terms of mental health, and my own skill level. I've leaned that I have a lot more to learn on pattern cutting, its not as easy as it looks, and its a good idea to ask for help if I'm not 100% sure what im doing, especially if there's limited fabric. This project has also taught me a lot about pushing yourself out of a bad situation, there were times where I thought I had made a big mistake with my design, or that I wasn't going to be able to make the bodice look like how I wanted it to, but despite this I pushed through and created a final piece that I'm happy with. Although I think I've done a good job with this project, I think this scratches the surface of what I'm capable of producing, this isn't the limit of my skill as a designer, and I do think in slightly different circumstances I could have created a final piece that I was more satisfied with.
0 notes
Text
3 Petri dish grown mold samples


Here are three mold samples that I grew over the course of 3 weeks that I was so happy with! I was so impressed by the way the mold formed, they turned out a lot better then I thought they would. After making my own agar by mixing beef stock powder, gelatin, and sugar together over a low heat and letting it set in my dishes, I swabbed bacteria and mould from around my bathroom and kitchen floor, and put it in the dishes making sure not to disturb the agar. I found a warm, humid spot which was in my airing cupboard and kept them in there to grow, making sure to keep the lids on so no spores would be released into the air. I wasn't sure if they were going to to anything at first, but after the a week and a half mold slowly started to form. After the third week they really started to grow and take on really cool, unique shapes. I think the shapes the mold forms in are really cool, the circles and rings are so beautiful, while still having a disgusting element to them at the same time.
0 notes
Text
day 4 construction: draping, fraying, and natural dying


I was so happy with how my bodice looked on the white mannequin, it fit really well considering it wasn't made to measure at all. As I'm having trouble finding a model who would actually wear this, my second option would be to do a photoshoot on this mannequin instead. The neckline looks exactly how I wanted it to, I love how white and delicate it looks, although my plans are to spray it with a natural dye to stain it. Im going for a ripped, unfinished look, although I spent a lot of time rolling the hems to show that its not because of laziness, its to fit my chosen theme to do with mould and decay. To communicate this I wanted the bottom to be frayed and unhemmed, so I used an unpicker to distress the edges all along the bottom, as well as making small holes around the edge, to make it seem as it its rotting away. To dye the denim I used a mixture of sloe berries, along with some synthetic red dye to add a vibrancy that can be hard to achieve with natural dying methods. I used a pair of old jeans, which I cut up into flat sections and steamed with my natural + synthetic dye for about an hour until it came out a mottled blood red shade, which was just what I wanted.
0 notes
Text
day 3 construction: pattern cutting + sewing


This was when I had to remake my bodice, as my other one went wrong. This time I knew what I wanted to do differently, I was much more careful sewing the princess seams, and in general payed much closer attention to how accurate I was. I got through it a lot faster than the last one, and made sure to put it on the mannequin frequently to see how well it fit. Im so much happier with how this bodice turned out compared to the last one, I'm glad I stuck to my guns and made another one instead of changing my idea, although this has taught me a lesson about the suitability of certain fabrics when designing a garment.
0 notes
Text
day 2 construction: pattern cutting


This bodice ended up being the one I scrapped, but I think it was very useful in terms of figuring out mistakes I had made in my pattern, and in sewing the pieces together. I found the princess seams in the front so hard, sewing a princess seam with chiffon with a French seam is not something I would wish upon anyone, its just impossible to pull of perfectly at my current skill level, I'm happy I aimed high, but it definitely tested my ability. The seams on the back ended up being the reason I scrapped it, they just didn't fit the mannequin at all, and was definitely a problem with my patten cutting. Next time I do this I'll definitely ask a teacher before making any final cuts. they were way too puckered and lifted, and there was a lot of tension around those areas too. I think testing myself with this challenging fabric will mean when I sew with something more forgiving, I'll know what I'm doing a lot more than I did before. I was very happy with my neckline, though, I wanted it to be very wide and show off the collarbones, which I think I did well, I knew when I put a rolled hem on it it would look really flattering. after doing this I was getting a bit worried, it wasn't looking the way I had planned it, and I was unsure of what to do next. I didn't know if I should come up with a new concept, or if I should stick it out and remake it all over again. it took such a long time to get to this result I really wasn't happy with, it was kinda disheartening and made me loose a lot of motivation, it made me learn a valuable lesson on pushing forward and not giving up even after failing.
0 notes
Text
day 1 construction: making my patterns


making the patterns for my bodice was something I was really nervous to do, as I don't have a lot of experience with pattern cutting, and I don't really know what I'm doing. I had also never made my own arm pattern, and I didn't really have enough of the chiffon to make a toile (although I ended up redoing my bodice, so I did get to practice making it beforehand) . making these patterns was really fun, I like the process of transferring my drapings onto paper. I was also very nervous, whenever I pattern cut it always seems to come out very inaccurate no matter how careful I am, so I made sure to spend a lot of time double checking my measurements. I think what may have been the reason not everything fit together perfectly was the seam allowance, I wanted to make every seam in my bodice a French seam to hide the raw edges as chiffon and georgette frays very easily, but to do so I made the seam allowance 2 cm, which I think was too big and stopped my patterns being so accurate. Overall though, I'm proud of myself, they're definitely the most challenging patterns I've cut, and I think they worked well enough, although I definitely would like wo work on my pattern cutting skills moving forward.
0 notes
Text
zip installation process
This is a time-lapse of me installing a zip into the back of my bodice. It was honestly really annoying to do, sewing with chiffon was probably not the best idea as its so hard to handle, it feels like sewing air. I had to unpick and resew my stitching multiple times, but I was adamant that I wanted my zip to look as professional as possible. I made sure to tack as much as I could, so that nothing slipped or moved out of place, although despite this it did multiple times. I ended up not going for the zip that I finished in this video as it didn't look neat enough, on my second try I got it perfect. it's a little annoying that you can see the hem of the zip through the chiffon fabric, but I also think its cool that you can see the inner workings of my bodice. I'm definitely glad I put the work into this zip, as it would have ruined my garment if it wasn't sewn right.
0 notes
Text
Pestalotiopsis Microspora (a fungus that biodegrades plastic)


0 notes
Text
sustainable packaging made from mushrooms


mushroom packaging was first invented in 2007, and began being distributed in 2010 by a number of different companies. its made with anything from wood chips or shavings to hemp hurds, and mycellium. Its made by mixing the hemp hurds with mycelium spores, packing it into a mould, and left to grow for 7 days. the mycelium act as a glue, growing through the hemp and binding it together. the moles are then put in an oven, killing the mycelium so it stops growing further, and solidifying the organic packaging. the product that comes out is water and heat resistant, strong and durable, and most importantly is completely biodegradable. it breaks down and composts in 30 days, and adds nutrients to the soil. This is an important step in the direction of reducing waste, I personally really wish this kind of packaging was used my more companies, plastic packaging is most of the time very unnecessary and bad for the environment.
0 notes
Text
final print design experimentation
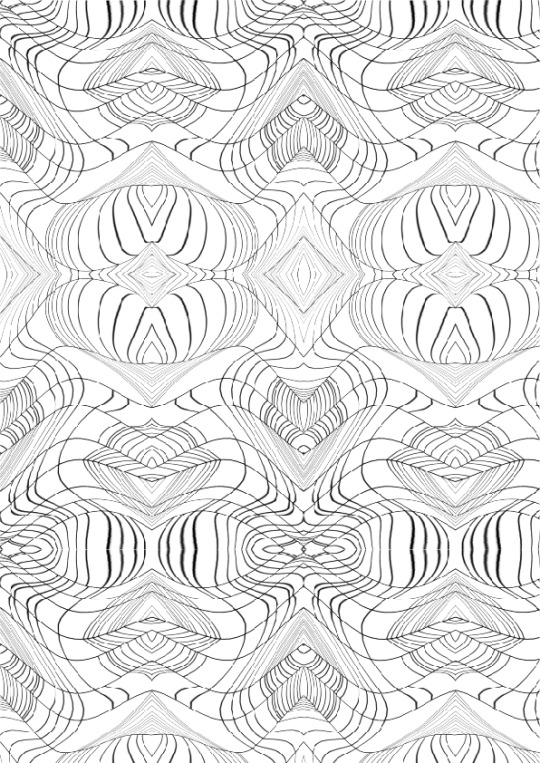


this was definitely as essential step in my design process, I needed to find out which of my ideas would translate in a repeat print, whether they would work on Georgette fabric. My initial idea was to edit and distort pictures of roadkill until they were unrecognisable and make a repeat print out of that, but when I did this I didn't think it looks as effective as the other prints I had designed. The colours just didn't work very well, and the shape wouldn't have complimented my fabric. I do think it was a good idea with some potential though, if I had more time it think I would have worked into this idea more instead of moving on. I really like my digital drawings I did because of how good it looked when put into a repeat print, I especially love the pink and red marks, without them I think the print would look a little basic, they definitely add another layer of detail and interest. My favourite by far, and the one I decided to go forward with, was the digital Miyake tracing I did, which I distorted and mirrored to make a repeat print. I think it would work really well with my fabric I chose, the natural curves compliment the light, flowy way the fabric moves. The next step is to work into this print more, I might try and layer my cell design over the top, as I really like it and want to feature it in some way.
0 notes
Text
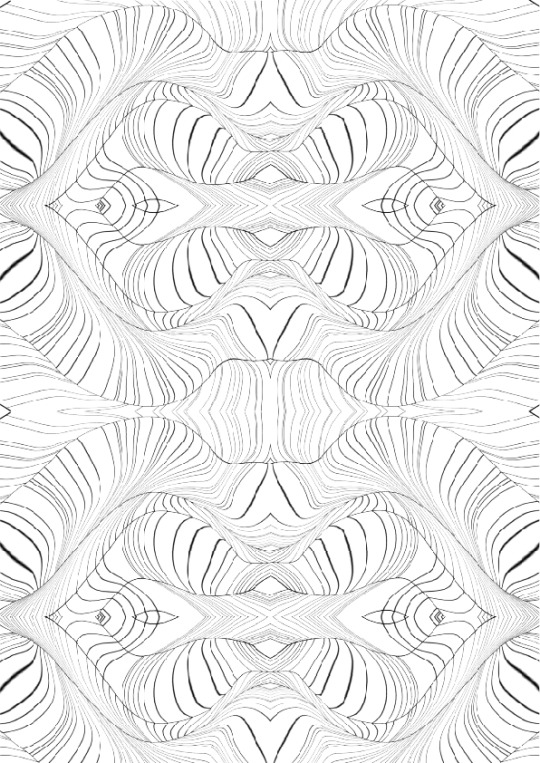
final fabric design process


I'm so happy with how my final fabric design has turned out, it was really important for me to create a design that looks expensive and well done, that also links to a designer such as Miyake who influenced my creative process a lot. I first took a digital line drawing I did of one of Miyake's designs, and used the liquify tool on photoshop to distort and shape the straight lines to create a natural, free flowing shape. I wanted to make the lines look almost like the gills of a mushroom. After this, I cropped a small section and mirrored it four ways, creating a repeating pattern that I thought looked very intricate and eye catching. because I wanted to add more layers of design, I mirrored and repeated a digital drawing of a cell I had looked at through a microscope, the detailed particles I draw complimented the swirling likes really well, and gave the design more depth and interest. because my theme involves fungus and mushrooms, I wanted the background colour to be flesh toned and muted, mirroring the earthy tones that mushrooms often have. All in all I love this digital fabric design, I can't wait to see how this print looks on the fabric Ive chosen.
0 notes


Text
final piece design ideas


these are some fashion illustrations I did when coming up with my final piece design. I really want to communicate the idea of life from death, and the regenerative aspect of mushrooms and fungi from dead matter. I want to make a garment that's very delicate and detailed, but still looks worn and degraded, almost decomposing. I had an idea to create these fugal growths out of pleated dyed calico that would go all over my shirt design, I really like the idea of this, however I don't know how well the chiffon would hold the weight of this, as I wouldn't want them to sag at all. I'm relying on how taught and tight the garment will be on the body to hold the weight, which I hope will work. I would love to involve borro into either the shirt or skirt design, I think borrowing would look especially good on translucent chiffon. I think id like to use a mixture of natural dyes and synthetic dyes, to tie into my theme of sustainability, while still achieving a deep vibrant colour that can be hard to get with natural dyes. I want a very earthy, flesh toned colour palate, with a lot of deep browns, reds , and blues. I think I will go for this for my final design as I think its achievable, given how much time have, and it touches on all my themes I've explored throughout this project.
0 notes
Text
draping experimentation with my digital print


Here I wanted to experiment with how my fabric print looked when pleated, and see what the best way of presenting my print was. I originally chose to use a translucent fabric so I could layer my fabric print together, and here I was just testing to see how that would look. I ended up not going for a pleated design because I don't think the fabric was see through enough to achieve the layered look I was doing for, although I think the print suited pleats very well. Looking back, I do think that pleats may have added another layer of interest to my garment, and if I could work into my final peice further I would experiment more with adding pleats into my bodice design. I found draping with Georgette easier than other fabrics I've used because of how easy to manipulate it was, its so thin and has a stretch to it that meant it wasn't too hard to get the pleats even and accurate.
0 notes
Text
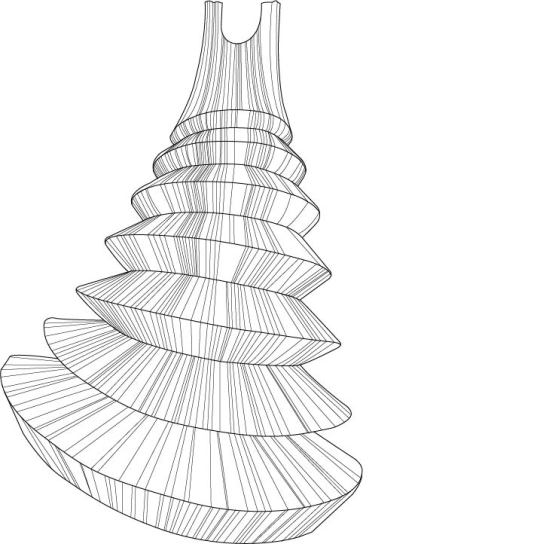
mushroom fabric manipulation

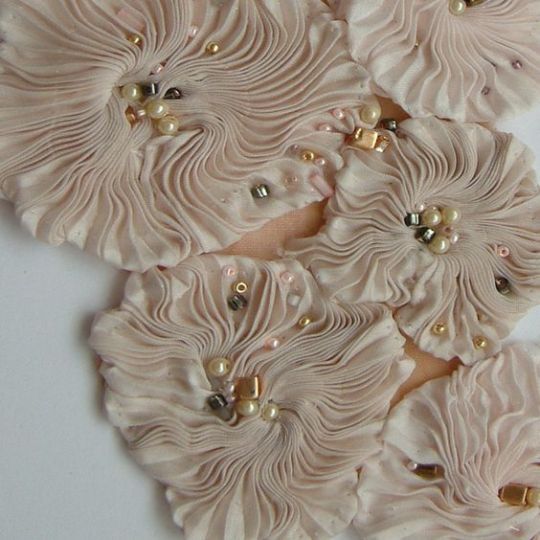


when searching for imagery of fabric manipulated to look like mushrooms or fungus, I was looking for a relatively simple, manageable design, that would be lightweight so that my thin bodice fabric could take its weight. I was inspired by interesting dye techniques and mottled, natural looking fabric colours. my favourites were the ones that were very intricately pleated, they reminded me of disc mushrooms and would work well in my final piece. I don't want to choose anything too complex as I have limits time and don't want to start a project I won't be able to finish. these pictures have given me a clear idea on how I'm going to dye and construct the mushroom discs that will go over my bodice, im going to use a combination of salt dyeing and detailed pleating to achieve the look I want
0 notes


