
I will post shading tutorials, interesting tech demos and papers from other talent people and some random stuffs.
Don't wanna be here? Send us removal request.
Statistics
We looked inside some of the posts by jyb125 and here's what we found interesting.
Average Info
Notes Per Post
11
Likes Per Post
10
Reblog Per Post
1
Reply Per Post
0
Time Between Posts
6 months
Number of Posts By Type
Text
17
Last Seen Tumblr Blogs


Fun Fact
Tumblr is used by 21% of adults online aged 18-29 years.
Text
TressFX Hair plugin, Character Package, and Hairstyles assets released
youtube
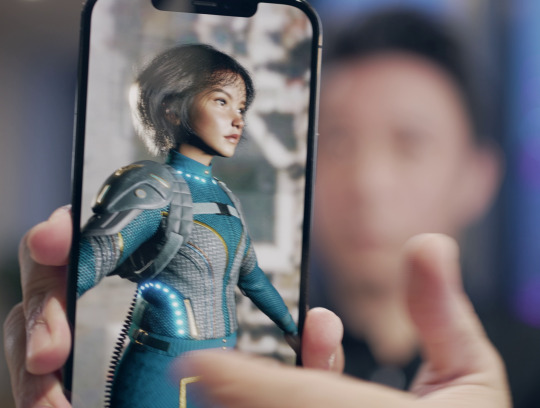
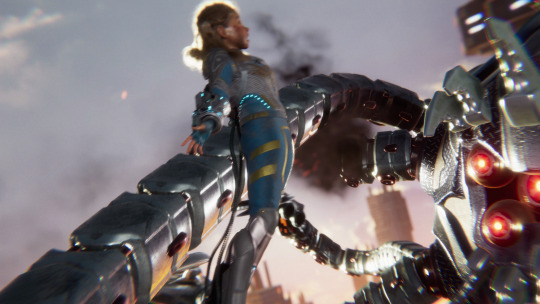
We’d like to share with you our latest project, Defender, from the creators of the award-winning and Oscar-qualified short film Windup. We’ve integrated the TressFX hair system in Unity for both the HD Render and Universal Render pipelines. Our plugin enables game developers to access spline-based, realistic hair compatible with PCs, consoles, and even mobile phones with Unity. This AAA-quality, auto-simulated hair runs smoothly without needing extra optimization steps beforehand. Additionally, we are releasing a character package that has multiple hairstyles for everyone to try out. It will help you learn how to create high-quality hairstyles for your projects quickly.
You can download the tool and the Character Package for free at GitHub:
HDRP & URP version

How to use the TressFX Hair plugin
You can use any hair grooming tools to create hairstyles you like to generate curves, and then use our plugin to transfer them to a TFX file.

Then we can export the hair’s splines as Maya’s MEL files.
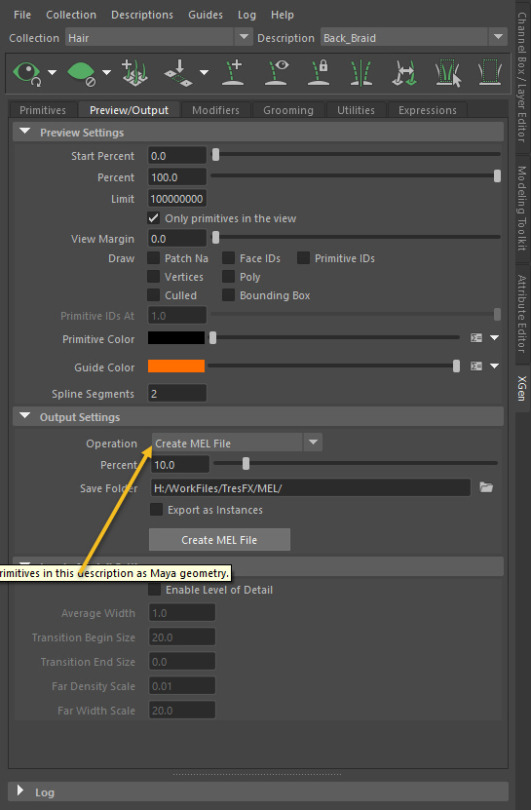
Once we re-import the MEL files back into the Maya scene, we can see the hair we created as curves:

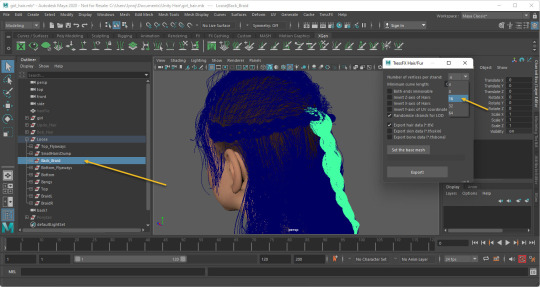
We can now export hair groups using the TressFX Export Plugin by opening up TressFX->Export Hair/fur window:

Select the hair group you want to export, and then select the Number of vertices per strand. For long braided hair like this, I usually choose 16, and you can use a lower number for shorter hair:
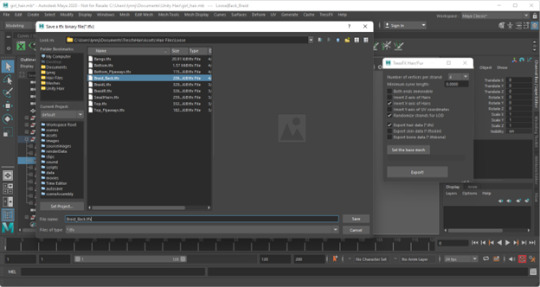
Click Export! You can now save the hair group as tfx file and use it in Unity:
Hairstyle Examples
The easiest way to learn how to set up a hairstyle in Unity is by looking at our examples.
We have five examples in our Character test scene. They are under Soldier->Hair Styles.
How to import tfx file as a hairstyle in Unity
For one hairstyle, we usually set it up as one Unity Hair Profile file, which includes the setting of the hair model and the hair simulation:

Unity Hair Profile can connect to multiple Unity Hair Assets, which are the .TFX files we exported from Maya. The reason we exported our hair as different TFX files is to give us the freedom to have different modeling and simulation settings for the different sections of the hair:

You can add more Unity Hair Assets by clicking the + button:

You can also assign different hair materials for different hair sections. Make sure to keep the hair materials number the same as hair assets number.

Adjust hair model and hair simulation
For the overall hair model we usually only adjust four settings: Hair Count, Hair Offset, Tessellation Per Strand, and Hair Thickness.

We adjust the Hair Count and Hair Offset to achieve the density of the hair we want.
Tessellation Per Strand is for the smoothness of the hair strands. A lower number will make your game run faster, and a higher number will make your hair look smoother. You can find a middle ground to optimize your hair.
Adjust Hair Thickness can help you to get the hairstyles you want. For example, you can have much thicker hair for Anime hairstyles.

For hair simulation, we usually keep most settings as default settings.
The ones we adjust a lot are Location Stiffness, Shape Stiffness, and Damping.
For loose hair, we can set Location Stiffness and Shape Stiffness as similar values, we use higher numbers for short hair and lower numbers for long hair.
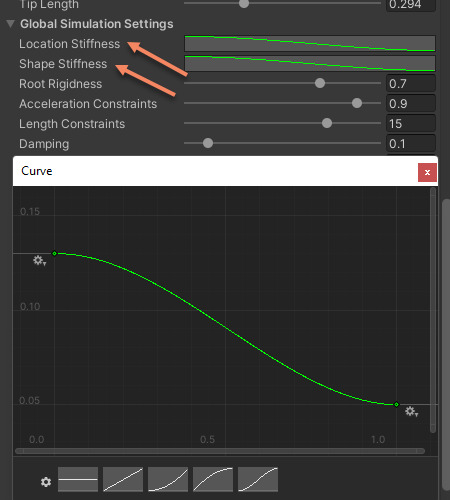
But for hairstyles like braids, we should keep the Location Stiffness the same way as loose hair, but for Shape Stiffness we should keep it 1, so that we can keep the braid shape.

Damping is for how fast we want the hair to follow up with the head movement. For regular dry hair, we usually choose the Damping value to be 0.04~0.06. If you want the hair to move more like underwater or like cloth, you can raise the Damping to 0.1~0.15.
Wind settings

The wind setting is very straightforward. We usually set Wind Magnitude and Pulse Magnitude to the same number and the Wind Turbulence value as half of the Wind Magnitude.
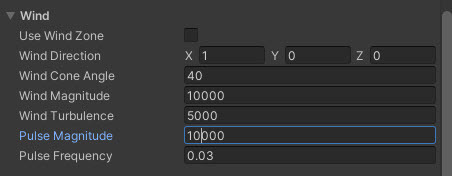
Of course, you can adjust any of those numbers as you like for your hairstyle.
Hair Shader
In HDRP, We use built-in hair shader directly from HDRP. If you create your own shader and make sure you have the correct setting as follows:
Graph Settings
Material : Hair
Material Type: Physical
Advanced Options/ Geometry Type: Strands
Master Stacks
Custom Function node:
Name: GetExpandedVertex
Source: VertexStrsndGroom (hlsl file)
Hair Strand Direction: 1,0,0

In URP we created a new Hair Material, If you create your own shader and make sure you have the correct setting as follows:
Graph Settings
Material : Physical Hair
Geometry Type: Strands
Master Stacks
Custom Function node:
Name: GetExpandedVertex
Source: VertexStrsndGroom (hlsl file)
Hair Strand Direction: 1,0,0

Feel free to try it out and give us feedback!
7 notes
·
View notes
Text
Hey, my dear friends!
I'm so excited to unveil our animated short film "Windup", which is a real-time production made in Unity! It's a great honor to work with so many top artists all over the world from the US, China, Sweden, France, Spain, and Canada. A lot of us were working at home remotely through the internet. Real-time rendering made this impossible collaboration possible!! Keep an eye out for "Windup" in the following film festivals.
youtube

0 notes
Text
Power point file of my GDC talk
Hey guys,
For anyone who can’t make it, you can see the recorded content from GDC Vault in 2 weeks.
Also here is the link to my slices, feel free to download it:
https://www.gdcvault.com/play/1025511/Art-Direction-Bootcamp-Windup-An
1 note
·
View note
Text
Real-time render test - Unity's short film 'Windup'

Hey guys, it's been a while. I have been working on our upcoming animated short film called 'Windup'. And this is a test scene from it! For more details check out here: https://www.artstation.com/artwork/83EBx
1 note
·
View note
Text
'Windup': An Animation Feature Quality Rendering in Real-Time
Hey guys, we are making the film using the HD Render Pipeline in Unity. Rather than using methods seen in VFX, we take methods from the AAA game production that push the visual bar while being real-time.
For more details, feel free to drop by my talks at GDC 2018 in San Francisco: Art Direction Bootcamp - Mar 19th 5:30 pm - 6:00 pm, Moscone Center, Room 20, North Hall (Yibing Jiang, Andrew Maximov) Ask the Expert - Mar 21st 2:30 pm - 3:20 pm, Unity Technologies, Broforce, 2nd floor

0 notes
Text
I’m going to present at Siggraph Advances in Real-Time Rendering in Games

http://advances.realtimerendering.com/s2016/index.html
If you have a pass, please join us the ceremony of real-time graphics!
0 notes
Text
We are going to present at Siggraph Real-Time Live!
Frank and I will present at Siggraph Real-Time Live! Tuesday, 26 July, 5:30pm - 7:15pm
youtube
0 notes
Text
Power point of Shading in Movie and Video Games
Hey guys, I’m uploading the power point of my latest talk - Shading in Movies and Video Games as request. Hope you guys like it!
Download it

0 notes
Text
Disney's Practical Guide to Path Tracing
Even though there is no way we can afford path tracing in game. It's still fun to learn what is path tracing and why it make scene look realistic.
youtube
0 notes
Text
Shading tutorial 1-- What is shading, what’s really required to be a good shading artist
Recently I got a few emails from some students in school who are really interested in becoming a shading artist, but have no idea where to start.
Yes, it’s quite confusing. Especially when a lot of game companies put ”Experiences of working on AAA games” and “Expert of HLSL” as the requirements of an shading artist position, which I’m not entirely agree. ( It’s true that we need to be really technical to reproduce those materials in game engine, but programing skills should not be the key of being a good shading artist, I will come back to this.)
I grew up in an old and crowded city with narrowed, two storied houses located one closely next to the other. The stones tiles on the floor, the bricks and layered concretes on the walls, the wooden stairs to my apartment have been there for decades or maybe a hundred years. Every single one of them seems have a story. Time added varies of materials layered on each other, like the rings of the trees. I was really fascinated with the idea of recreating them.


There would be so many interesting discoveries, if you pay more attentions on the materials.
For example, this was what I found out today when I visited Getty villa:
Those statues were all made by marble during similar time period, but just because they were located in different locations, the aging process was quite different, which made them appear differently:


Now we are going back to topic: What’s really required to be a good shading artist?
I would say: The eye of details, the ability to realize the subtlety between different materials, the ability of fall in love with materials you are about to recreate, study them, find something unique about them. After all that, find out what kinds of techniques you need to use to recreate them and to make sure the final art piece look like something has a story too.
Also I would like to suggest the companies, which are currently looking for an good shading artist. Don’t shut down candidates just because they never touch HLSL or C++ before. HLSL is not that difficult to learn, the important part is whether they know what to do to recreate certain materials. If you are giving a test to the candidates, the final result of material artworks should be more important than how many years they were in AAA companies or how many programming languages they have on their resume. To make sure they have the skills, during the interview, ask them about the process of how they recreated certain materials that were supposedly very difficult to make, that would give you an idea that how much they know about recreating the materials, how technical they are, their working habits and whether they are a good fit for the team.
Next chapter – I would like to talk about how I studied materials on characters. Please let me know if you have any feedback?
0 notes
Text
My demo is on the frontpage of DualShockers!
http://www.dualshockers.com/2015/07/16/naughty-dog-shading-artists-demo-reel-is-a-joy-for-the-eyes/
Naughty Dog Shading Artist Yibing Jiang’s Demo Reel Is a Joy for the Eyes
0 notes
Text
Our presentation just got on the frontpage of ArtStation
http://magazine.artstation.com/…/watch-headspace-evening-n…/
Watch Headspace: An Evening with Naughty Dog
See over three hours of demos and practical tips from leading Naughty Dog game artists, recorded at Gnomon's live event last month.MAGAZINE.ARTSTATION.COM
0 notes
Text
Daily drawing
When drawing became a hobby, when it became so addictive....
0 notes
Text
Plans for tutorials of Shading
Haven’t had time to update this page for a long time. Since I was focusing on shipping the demo and optimizing the shaders.
Since I can’t post any new tech related to current game that I’m working on. Some of my friends suggested me to start with a series of tutorials of basic shading.
I’m going to post the first tutorial soon! Please let me know if you have any ideas, and thanks for the support!
1 note
·
View note
Text
New articles for Separable Subsurface Scattering
Just found a new article for SSSS, a screen space technique with different kernels. That can be used in skin and other materials (eg. plants, marble, soap, etc), from Károly Zsolnai.
Source file:
http://cg.tuwien.ac.at/~zsolnai/gfx/separable-subsurface-scattering-with-activision-blizzard/
There are a demos and source code, which is really handy if you want to achieve better look skin and other materials.
Abstract
In this paper we propose two real-time models for simulating subsurface scattering for a large variety of translucent materials, which need under 0.5 milliseconds per frame to execute. This makes them a practical option for real-time production scenarios. Current state-of-the-art, real-time approaches simulate subsurface light transport by approximating the radially symmetric non-separable diffusion kernel with a sum of separable Gaussians, which requires multiple (up to twelve) 1D convolutions. In this work we relax the requirement of radial symmetry to approximate a 2D diffuse reflectance profile by a single separable kernel. We first show that low-rank approximations based on matrix factorization outperform previous approaches, but they still need several passes to get good results. To solve this, we present two different separable models: the first one yields a high-quality diffusion simulation, while the second one offers an attractive trade-off between physical accuracy and artistic control. Both allow rendering subsurface scattering using only two 1D convolutions, reducing both execution time and memory consumption, while delivering results comparable to techniques with higher cost. Using our importance-sampling and jittering strategies, only seven samples per pixel are required. Our methods can be implemented as simple post-processing steps without intrusive changes to existing rendering pipelines.
youtube
Resources
Paper
Supplementary materials
Demo Binary
C++ code
Matlab code
Convolution kernels
1 note
·
View note
Text
“Physically Based” does not mean “Correct”
Recently read John Hable's blog - “Physically Based” does not mean “Correct”. I feel it's quite necessary to reblog it, to spread the word and let people understand shading more.
I remember when I just started to working on real-time shading, I got rejection a lot when I requested to change the shading model to make certain materials look right,such as fabric and skin, and I always got questions like:"Why you need to change it, then it won't be physical correct?"
Hope the following article can answer those questions, and here is the original link:
http://www.filmicworlds.com/2014/03/11/physically-based-does-not-mean-correct/
“Physically Based” does not mean “Correct”
One important consideration with shading models is that physically based models don’t necessarily look like the real world. They might, but usually do not.
The goal of shading models in games is to create simple, fast shading models that match the look of materials in the real world. Physically based rendering means those formulas are based on mathematical models. The catch is that real world surfaces don’t match the idealized surfaces that those lighting models assume.
Let’s start with an example. Do these two images look the same?
Those images came from the supplementary material from Experimental Analysis of BRDF Models. You hopefully have already heard of the MERL database. Basically, they did some very accurate measurements of surfaces to create a 90x90x90 volume texture of the isotropic BRDFs. Then in that paper, they solved the models to the real materials to see how well they fit.
The image above comes from the first one in the list: Acrylic-Blue. The left side is the measured data. The right side is the solve to Cook-Torrance. Does it match? Of course not. Here is a zoom of the upper right.
At a glance, there are two obvious issues:
The overall specular is too dark.
The specular has a softer falloff with a “bloomy” look.
In theory, these two problems could be solved. We could make the specular brighter. We could also add a second specular lobe. But there is another hidden issue. Look at the circled areas.
At the very, very edge the Cook-Torrance model has a very bright highlight which is much darker in the real data. So Cook-Torrance fundamentally does not match the ratio of direct angles to grazing angles that the real surface has. If we made the overall specular brighter to match the majority of the highlights, then the specular at the very silhouette would be out of control.
There is a misconception that physically based models are “right” and hacky tweaked models are “wrong”. It’s simply not true. The physically based models are based on theoretically perfect materials that don’t exist in the real world. While the physically based models tend to be less wrong than the hacky artist-made models, they still are not exact and should not be treated as sacred.
If you look at the full supplemental material, you will see that many of the surfaces do not match very well. At a glance they look okay. And the rougher surfaces tend to match pretty well. But when you closely look at the specular highlight the shape of the lobe and the ratio from inner to outer does not match for many of the surfaces, especially the smoother ones with sharp highlights.
I’m not saying that artists should be allowed to do ridiculous things like making the silhouette of a surface more orange because it “looks better”. Rather, physically based lighting models are best used as a starting point. And if you have legitimate visual reference that the lighting model is wrong, then it is ok to tweak it.
0 notes