lalagivemesomeadvices
354 posts
... and a shihtload of poses.
Don't wanna be here? Send us removal request.
Note
Lame question, but I've been trying to figure out how to pose my TS3 sims for portraits - do you have any tutorials on how to do that? Or maybe links to others? Your stuff always looks amazing, it'd be awesome to learn how to do it as well
It's not a lame question but a good question to help you learn. If you are looking for a basic how to guide I recommend modfrenzy's guide to posing because they provide a good explanation of what you need, the technical how to do it, what cheats are recommended, etc.
Also graphic settings for the game are a factor. Mine are on the highest setting for sims as well as I'm using a Gshade preset so my game looks different in general.
If you're interested in how i do it, I sorta left a "how to" down below.
So when I take photos, I've really just combined other simblr's processes and just put my spin on them.

This is my basic lighting set up in game. I use @nectar-cellar's set up as a guide for my ideal.

This is what it looks like in Tab/ camera mode. After selecting the pose and before I'm about to take a screenshot, I turn the camera the long way or make the camera vertical ( SHIFT + A or SHIFT+ D). I got the idea from noelyely or now @tau1tvec
So it goes from this:

To this:

I get up all in my sims face and take photos. I'm just focusing on what I want reflected for my sim's personality so I choose poses and expressions that suit them. I take MULTIPLE shots from different angles and with different poses.
When I get into editing, I have to turn the photo right side up. Use some photoshop magic and then boom!

She done.
That's all I be doing. I hope that helps!
68 notes
·
View notes
Text
Expanded Active Households/Homes

This mod allows sims to live in different homes and even community lots around the world, while still being in the same household! More info and download below 😊
Download (ModTheSims)

2K notes
·
View notes
Text
[WIP] TS3 UI "Krystal"
I figured it would be cool to finally publicly share what I've been working on behind the scenes, as well as some mockups!
A few of you on Patreon or Discord may have already seen sneak peeks/given feedback. I kept things quiet because I wasn’t sure I’d even do it in the first place as a next modding project, and I didn’t want to let anyone down.
Luckily, @lazyduchess’s Monopatcher made the job ten times easier. The biggest hurdle was that I would've had to make a core mod to override UI code (I’m normally anti–core mod), but the patcher solved that and let me push ahead.
(Psst, if you're looking at seeing the mockups bigger, I also posted this post on my site: Simblr.cc 😉)
Creating the Mockups

Fun fact: I actually have a degree in UI/UX design! (for websites) While principles like “How wide should this padding be?” or “Which colors send the right signal to the user?”—game UI is a whole different beast.😬
Main Menu


I started with the main menu:
Cut the SimPoints clutter and the “Buy TS4!” banner—after a decade, we get it exists 😉.
Grouped items into clean blocks
Added a text-free “Create New Family” icon
Swapped lot thumbnails for family shots (still baffled by EA’s original choice).
Dropped an options gear in the bottom-left; might label it if it’s too subtle.
Different backgrounds: one solid blue, one closer to the classic gradient.
A lil' sneek peek of where I'm at:

She's not finished, but it's definitely getting there! 😉
Load Screen


Not much has changed here! It's just less... busy I suppose, lol!
2 Different backgrounds to choose from
Moved the Game Tips to the bottom, so the main focus stays on that loading bar 😉

I also have a third option but I'm strongly leaning towards just having the loading bar as it's the most clear!
Live Mode

The hardest of them all lol. Kudos to EA for figuring that one all out! I really struggled with this one in regards to shape and what to even move around/remove!

I figured, it should be nice to pull really into that glassmorphism I've been using over the Mockups! Now I do realise that it can hamper user experience in the sense of not being able to read anything. But these are pictures! So that should be all fine and dandy.
The active item in the queue will now be more "visible". The queued item however, you'll see look a bit more "unactive" compared to what the current version has.

I also completely overhauled the thumbnails for your sims, showing their moods a bit better, and giving the active sim a tiny plumbob! :D

And now the real deal: The control panel! You might notice it's not the whole thing, but I'm still working on that part.
I removed the camera controls from the panel. However, upon feedback, I did hear that it's better to have them as some people are limited in their hand movements on their keyboard and that those controls are really useful. So I will make sure to share 2 versions :)
I also realised I completely forgot the Build/buy mode buttons 😬 So, err, stay tuned for that? lol.

Notifications I really just tidied up :p
I am aware that the space where the text is and the thumbnail is huge, and normally I'd wrap the surrounding text, but apparently in TS3's UI stuff that's practically impossible. Hence that they got this "2 column" effect to them 😉
About releasing the UI:
I'm hoping to release them all in bits and pieces! So first up is the Main Menu (and possibly the Loading screen given it's simplicity).
After that, I hope in my second "update" to release a big portion of Live mode, but that's a bigger task on it's own of course 😉
Any feedback at this point is also completely welcome by the way!
462 notes
·
View notes
Photo
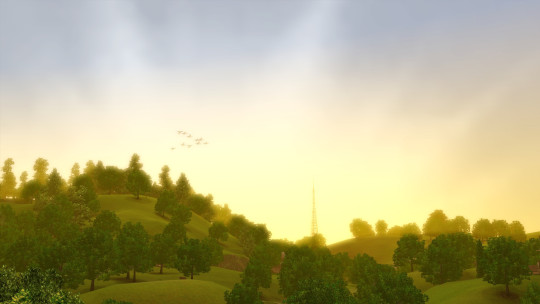
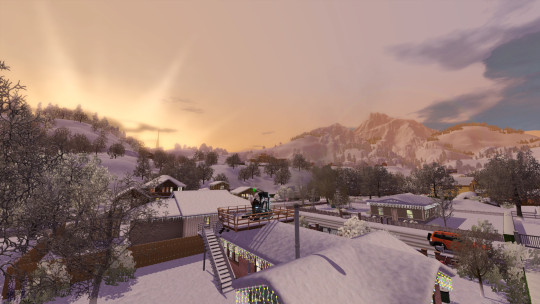
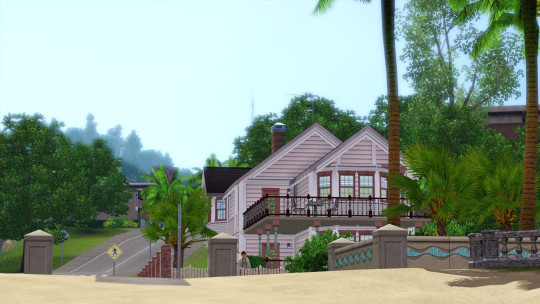

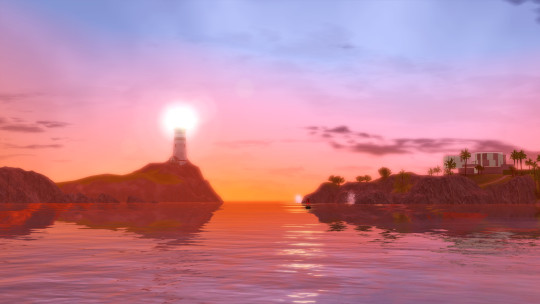
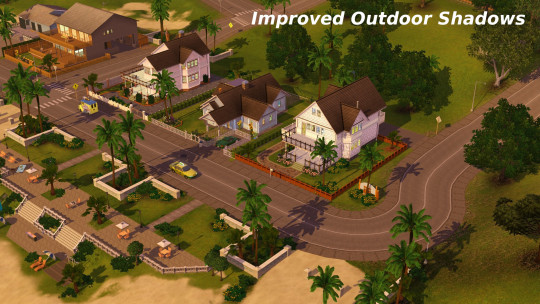
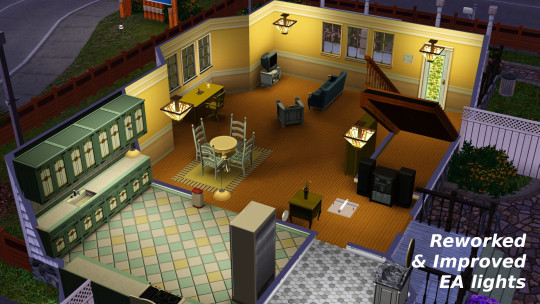

Custom Lighting & Environment Mods for TS3
@amphoraesims
asked me “What lighting mod do you use?”
So here is the complete list of all the lighting mods I’m currently playing with.
(the pictures above are completely unretouched - no Reshade
UranesiaLightingMod_NOGreenSunrise+DefaultWater+BrighterNight by Nilxis : it’s the main lighitng mod.
Wasset_EnchantedEnvironment_Seperated by Wasset ; it change the appearance of both the sun and the moon (plus adding them a beautiful “halo”), of the clouds, rainbow and stars, and few other features. The original link on his page is broken, so I just uploaded it HERE
Improved Environmental Shadows by Simsi45 ; I’m using just the DYNAMIC file (the shadows respond more accurately to the sun’s position, letting them stretch further towards the horizon).
Shadow Extender by Lazy Duchess: it increases the draw distance of shadows and in addition improves the look of map view by making trees and other miscellaneous deco cast shadows, when they previously did not.
Snow but Better by Lyralei: instead of the snow replacement of Wasset, I’m using this one, more detailled. The terrain snow textures are entirely redone; Frosty windows and glass now has more detailed frost on it; it fix that annoying and ugly “Grass” patches.; Icicles have a new texture; Roads got bumpier and more detailed.
Reworked & Impreved EA lights by Simsi45: it modifies the lite resource for almost all the lamps, making the game a little bit more atmospheric and visually appealing.
Shader Tweaks by Lazy Duchess: this is a set of improvements and fixes to some of the shaders. The color of rooms will now contribute to lighting on Sims. Outdoor Sims skin lighting was slightly “flattened” to make Sim faces look slightly better. Bloom has been reduced significantly.
1K notes
·
View notes
Text
Sims 3 Gameplay Mods
I was going through MTS looking for mods to improve my gameplay and thought I would share the ones I downloaded!
Livestreaming Mod - Allows your sims to livestream from a PC for tips, blog followers, and celebrity points.
More Pregnancy Interactions - Adds more options for the pregnant sim and more social interactions with all age groups!
Yoga Mod - Allows your sim to do yoga and also lead a yoga class for simoleons.
Laundromat Fix - Actually empties the laundry hamper on your sims home lot when using a washing machine at a laundromat.
Dirty Laundry Mod - Gives your sim a negative moodlet when dirty laundry hasn't been washed in a few days. Gives more incentive to do your sims laundry!
Layoff Mod - Gives your sim a 2% chance at the end of every work day of being laid off. Depending on their work level they may get unemployment benefits.
Nicer Vendors - Overrides the default animations when interacting with vendors, looks more friendly.
Acne Mod - Gives teens-adults a chance of waking up with acne. Adds washing face options and applying acne toner at sink.
Sunscreen - Allows you to buy sunscreen from the store, will protect sims from getting a sunburn with Seasons installed. Works on vampire sims as well.
Restaurant Host Career - Allows your sim to work part time at diners/bistros as a host. Only 1 career level.
TSM > TS3 Facial Expressions - Overrides most s3 facial expressions with the sims medieval ones making them a lot more realistic and natural looking.
One With Nature - Allows your sims to sleep outside on ground, wash themselves in bodies of water, and go to the bathroom outside. Needs Nraas traveler mod to work. (Good for apocalyptic gameplays/adding realism?? haha)
Walk Cycle Edits - Overrides original walk cycles so there's no forced smile, allowing your sims to make facial expressions based on mood/surroundings.
The Randomizer Mod - Triggers more random events that effect your household. Adds more realism and can effects the relationships/friendships your sims have. (Can choose between which random event modules you want in your game based on play style!)
More Negative Moodlets - Negative moodlets cause a greater effect on your sims mood making it a bit more realistic.
2K notes
·
View notes
Text

It's BIG.
It's BLUE.
It's UPDATED.
Hiya Simblr, it has been a while. I have a big update today- it's one of my oldest guides on MTS, but new and blue! The changelog is in the MTS comments- but the short and sweet is that two years of learning Blender has been squeezed in there for your convenience, complete with graphics and GIF examples.
ModTheSims tutorial Google Docs tutorial Blender Templates

198 notes
·
View notes
Text


Unlocked Mailboxes
EA provided us with different kinds of mailboxes, but they locked them behind debug mode. Also, initially I faced issues with Basegame and Expansion Pack mailboxes having missing names and descriptions, and the name/description I created for them weren’t recognized in the game.
Thanks to @sweetdevil-sims who shared with me a detailed tutorial, I was able to fix these issues. Store mailboxes, on the other hand, already had proper names and descriptions, so they only needed unlocking.
Unlocked Mailboxes from both in-game content and the Store
Fixed Names and Descriptions for Basegame and Expansion Pack mailboxes
Repaired RIG file for the World Adventures mailbox
Available under Storage > Storage Misc & Outside > Lawn Decor
You can check out the appearance of each mailbox on the Sims Wiki
Download: SFS
257 notes
·
View notes
Text

[WIP] Lyralei's Pose addon - Part 2
(See previous post: Click me!)
First things first, MASSIVE thanks to @thesweetsimmer111 for all the help to make this work better and sharing her knowledge on Track masks with me (and the world!)
👀 Better Look at (with reactions!)
Maybe it’s just me, but I used to get endlessly frustrated when Sims wouldn’t properly turn their heads to face an item. So, I set out on a little mission to make their head movements more natural! Unfortunately, that didn’t go as planned—turns out EA’s code for the “Look At” feature is completely deprecated and no longer functional.
Knowing I couldn’t just code a fix, I had to explore other approaches. That’s when @thesweetsimmer111 came up with a brilliant solution: blending left, right, up, and down poses to create a more convincing look-at effect! 🎉
(See: Post)
What's different?

Here's the original pose, without Look at turned on....


On the left, we got VA's original look at.
On the right is what Savanita and I came up with! :)
don’t want to make it seem like the original Look At feature was awful—it actually works pretty well in some cases! For example, in this pose, if the plant were on the other side, the difference wouldn’t be that noticeable since her head is already tilted slightly. 😊


(Same layout again: Left = VA's, Right = Me and Savanita's approach)
Plus, maybe you do want something more subtle, then VA's Look at is great!
Anyways! Of course, I couldn't stop there! Now, your sim has a few options of turning towards the object:

(Note, this list will get 10x cooler in the next feature ;D)
This list is what the "trackmasks" are. :)
Okay, let's give "Eyes Only" a try. So, we expect Morgana to ONLY look at the plant, with her eyes.


(Left is before using look at, Right is with look at, and one up for fun-cies)
And, to please @nocturnalazure's wishes, yep! It now accepts Facial Expressions! :D

(I never would've thought I would see Evil Morgana lmao)
🎭Blending Poses/Reactions
After Savanita's amazing idea of using Track Masks, I found out that I can apply that same technique on, well, poses! And this is a feature I'm SUPER proud of (And honestly, it's taken me an entire week to get working 🙃)
First things first, when we choose the interaction, we will first be greeted by our "trackmask" list with all the selections on it


So, I made a few examples to show of what you could do, but in all fairness, it's endless!

Here I chose the option "Both Arms".

Here I chose "Head And Neck". Look! She even has the expression! (Don't worry though, i also have an expression-less version in the making ;))
What about... Animations?!
While blending poses has the ability to also type in your pose names by name, rather than list, you can also use EA's!
The list is pretty long ( believe 200 entries?) but here is a sneak peek:


Though, as far as I've been able to tell, EA reactions aren't as flexible, where I can tell it to only use the arms, or the eyes. Instead, we got these options:

So, unless I found a way to get around it, this is the only way to do it.
But without further ado....

Here I used the same pose(left) as the last 2 pictures, but with "OverlayHead". And chose "Boo"
(I just realised it looks like she is about to get hit by a ball lol)
🕰️ History List


The Add-on now remembers your pose history!
Whether you’re a dedicated “Pose by Name” user or prefer the simplicity of “Show by List”, both options now display your pose history for quick reference.
Note: Each Sim has their own individual history list. This means you’ll only see the pose history for Sim X when clicking on them, and not for Sim Y.
📓What's up next?
Adding all the trackmask. (I still need add the hands and legs ones)
Adding an in-game Category maker, so you don't have to edit the XML. It will mean you need to replace the XML file in S3PE yourself. But I can always make a quick How-To for guidance 😉
(Note to self) Optimize the Categorisation code. It's currently taking 1 minute up from the loading screen 😬)
Fixing some minor bugs where Look at will still turn the sim's head back to it's original position.
Fixing some issues where Blending poses with certain track masks aren't working well or at all.
Fixing an issue where the dialogs can crash the whole game (woops!)
Sooo, I think a release date is pretty soon! I think within a week :)
Any VA Addon Bug Fixes?
Of course! It's the mod that inspired me to make stories, and even get to make this mod! I couldn't just... leave it to collect dust while it's other child mod is getting all the attention. :p
Changelog:
There is now an interaction that uses both look at & reaction simultaneously. (In case you don't want to use my look at interaction).
Fixed an issue where reactions would sometimes or never show on the sim.
Fixed an issue where using "Random Quick Poses" would occasionally show a breathing sim, doing nothing.
Fixed an issue where certain poses get called twice, making it harder to keep reactions or even look at history data.
Some minor code changes that aren't worth mentioning honestly.
260 notes
·
View notes
Text
ULTIMATE Realistic Populated World Roleplay Mods | The Sims 3 | Guide and Tutorial
What's up everyone! Welcome back to my channel, I am super excited to give you guys this tutorial, I've been wanting to make it for awhile! I'm going to offer some alternative and lighter weight techniques on how you can populate your sims 3 world with a small combination of mods and households. I'm also going to show you how to tweak your ini files and how to actually create the lots in your world to simulate the best experience. Let's jump straight into the video because I am so excited to show you!
youtube
Ini Tweaks:
So the first thing you want to do is open your graphics rules ini file in your bin folder. You won't have to scroll or search , the cpu settings will be there as soon as you open the notepad file, change all of those numbers to 4. What this does is massively improves how the sims 3 engine allocates resources in your game. This alone will start sending more sims to more community lots naturally, without any mods. However, we are going to add some extra mods on top of this to help sims make more logical decisions on which lots they will visit, as well as insure that every lot a sim in your active household visits will autonomously send available sims there.
Before we get into the mods I need to explain two very important things to you first.
Community Lots and Households:
These are very important factors when you want to go about creating a more lively world. Contrary to old beliefs, you don't need over 50+ households to populate your worlds. And the smaller the world is, the less sims you'll actually need to fill it.
You also do not need every single community lot available to you in every world, either. In fact, the more optimized your community lots are in the world, the more likely sims will visit them on their own. I will explain this further in depth.
Let's start with community lots:
For example, if you have 3 gym lots in your world, sims will get very confused on which gym to visit. They won't just pick the gym closest to them, and the decision might be so taxing on their little minds they will more than likely choose to not go to any of the gyms altogether.
So if you want to see a more active Gym lot, only regulate this to one gym lot in your world. This may not have been the perfect example as most of you will already have one gym lot in your world, but then you should also notice that it's the easiest lot for the sims 3 engine to fill up. Because it's only one decision the townie sims have to make on where and how to visit this lot.
So for the bars and clubs in your world, you want to regulate this to one of each, and you could probably fit in a second one if you have the NPC's to fill it. Remember that the engine can't send sims to fill the lots if there aren't enough sims to fill it. You also have to factor in if those sims have children and their work hours as well.
So, I typically will make 2 dive bars, one will be a low end hole in the wall, and another will be on the whole other side of town in a completeley different theme or style, I try to incorporate new activites that you can't find on the other lot, so a pool table, karaoke machines, the bull rider, etc. I can get away with 2 dive bars because I use this fixed MSC mod, this mod fixes the EA LN oversight that didn't send townies to these lots very well, it adds a script that will automatically invite sims to these lots when your sim goes to them. So I don't have to worry too much about how many sims are available, as the mod does this for me and invites sims who are free without me having to do anything. The fixed MSC mod also applies to all of the LN lots, btw. And the reason why I keep emphasizing "Fixed" is because someone fixed the travel crash and error code 12 issue that was on the older builds.
As far as an exclusive lounge and dance club, I only make 1 of each. This gives me 3-4 options respectively to have an authentic bar hopping experience in my world. As I love doing this on my sims fun and wild night outs.
So when it comes to all of the other community lots, you already know to have one of each. The only other tip I can offer is that you don't want to put too many functional objects on these lots. As again, this could result in overloading a sims decision making process. The lot and sims become way more optimized when you give them less to do actually. This means you can create themed lots for very specific occasions. For example, when I downloaded a casino lot for my simler90 series, the lot had a ton of the gambling store objects, including a bunch of random objects that wouldn't neccassarily fit into this lot, which resulted in sims standing around a lot more and choosing to sit down instead. When I lowered the amount of functional objects, you begin to see sims gambling more as they now had a clearer reasoning path to decide on what objects to use. This resulted in the lot overall feeling and acting much more realistic, as I would enter the lot and see sims already gambling on it; acting like a real casino.
This is how I was able to understand the sims 3 engine and AI a lot better. We used to make 64 by 64 lots with a bunch of stuff and wonder why it was so laggy, empty, and when sims did get there they weren't really doing anything. You have to optimize lots to get a better aesthetic and gameplay experience.
A coffee shop should only have the ability to buy coffee and free space to sit and chat or use a laptop. This will force sims on this lot to just buy coffee and talk with sims while sitting down. So this lot will look and feel like an actual coffee shop.
So as a basic overview for the lots:
You now know to limit the amount of community lots actually available to all the sims in your world. This makes for a much more immersive experience overall, as sims will naturally populate these lots a lot more when given a reasonable amount of options to visit them.
You now know to limit the amount of functional objects on these lots so that when sims do decide to come to these lots, they will act in a much more realistic way on these lots resulting in a more immersive and roleplay experience.
So now if you are a builder, or just some who likes to remap your world to have a better gameplay experience, consider these steps above. Since you now know that you don't have to add every kind of community lot to get a more active experience, and in fact, this actually hurts the goal you're trying to achieve, remapping the world becomes less stressful and more strategic.
For example, if I have a fish village kind of world, this allows me to add new unique lots specifically for this world that would make more sense. I can send sims to a savvier seller fish market, this is functional, sims can come here and buy all kinds of fish. I can make a cozy cottage core type of wedding venue and winery, this could fit into this world. I could make a small camping lot that can only be reached through a hiking trail on foot, this could fit into this theme. When I think of a fish village I think about family play, so I could add a unique arcade, daycare, and adorable festival lot, where you could see some younger sims running around more frequently. I could make an old town themed pub as a dive bar. I would really only need one of these in this world, so it would be very active, especially at night. I could add an underground rave scene and give it the dance club community lot type, this could signal a small rebellion of these traditional fishery values in the village, and still be quite active, since there would be only 2 "party" lots for sims in this world to visit.
And etc, make the lots fit for your world, and limit the access to how many types of community lots there will be. This ensures more time spent on detail without having to worry about how full these lots would get, as you know they will be very full using this method.
As a final note, you also want to consider opening up your rabbit holes. While, you won't have to make them functional with zerbu's uc mod, you can make these lots functional using other techniques without having to sacrifice less activity. So for example, opening up the diner and bistro RH, allows me two external dining options for my sims. The diner could be a mcdonalds, and the bistro could be a benihana's. I typically roleplay this, like the diner rh being a nice chill hangout and eatery, and the bistro being a much more wealthier upscale place, I use the consort dress code mod, so you can only be in formal attire here, or you could combine this lot with an exclusive lounge and get play out of both types of lots on one optimized lot. Adding Ani's business as unusual set, a piano which will auto assign a pianist, some pretty ball room floors and deco, and you've got a perfect date night or mobster family dinner. Depends on your play style. Because there are 2 of these, the engine will send sims to these lots because it has the RH on them, and when sims get there they will use the menu's to sit down on there own and begin ordering.
So now let's talk about Households.
I made a pretty extensive guide about this on tumblr, which I will link. But as a basic overview, I figured out a couple years ago that you don't actually need a lot of sims in a world to make the world feel populated. However, if you do add a lot of sims, there are ways you can go about it, which isn't as taxing on the sims 3 engine. As you may have noticed, having a lot of sims in your world increases lag and freezing, this is because when you hit the world's limit of townies, you'll get a lot of routing errors (which cause the freezing), with too many community lot options they get confused on where to go change their mind half way, go somewhere else, too many objects on that lot, so an ai freeze when trying to decide what to do. This overall results in a chaotic and laggy experience.
In general, I like adding townies I will actually care about, but this number of households needs to be manageable. So I make around 10-12 official townie households in my world, with a lot of detail on their cas and homes. I decorated their homes in the same way I would mine, because I'm more than likely to actually visit these sims in their homes. This means I can remove all the other houses in my world, because I don't want SP to fill these homes with more sims I don't care for, and will add more strain on the engine anyway. This also leaves more room to configure where I'll be placing my optimized community lots. Don't worry, when I want to world to look like it's more populated than it really is, I add deco buildings, homes, and sims.
Then I add, NPC households. This is an interesting and amazing method because of how it works. I make a very basic home, usually in a basement, with 8 beds, 1 bathroom and 1 kitchen. Just the basics, no cc or detail or decor. Then I add 8 sims. This could be single men/women, teens, children, cashiers, robots, elves, etc.
This is how I can begin to actually populate my world with very little strain on the resources in the sims 3 engine. You see, when sims don't have any way to entertain themselves, or advance their skills, or fulfill their wishes, they are pushed more than ever to LEAVE the home to achieve this. This means you'll see 8 sims from each NPC household more than likely OUTSIDE than sitting in their homes. The engine seems to spend a lot more resources on maintaining the townies when they are in their homes more than when they are visiting a community lot. I noticed this when I had a lot of townies in their homes, without any of these mods or ini tweaks, I had a significant lag because the engine was micro managing all of those sims in their individual homes. This removes so much strain on the engine, when all it has to do is force the sims to leave their homes, as also mentioned before, the engine spends less time on extending resources to them on community lots vs when they are in their homes.
So esentially, what I've done here, is given my engine a huge break, allowing it to allocate ram and resources much more effectively and much quicker, while at the same time introducing more sims into the world without the engine thinking this = more strain.
The third and even less engine intensive technique I use is, Arsil's custom role generator mod. This allows me to add any kind of sims I want, that the engine doesn't actually have to control or allocate, as this mod is a script and sims from this script are seen as bin sims/service sims. They simply disappear back into an invisible bin until their shift starts. So if I want to add regular customers to my Benihannah's without worrying about the strain on my engine I can achieve this effortlessly. However, I use this method on lots that aren't seeing a lot of activity. Keep in mind, everyone builds their worlds differently, and there are many factors to consider why a sim may not be as interested in one community lot as others, while this is mostly self explanatory sometimes, this isn't as cut and dry. So, for example, I notice that unless my sims actually visit the beach lots in my worlds, there won't be a lot of sims on it. Sometimes, there will be one or 2 sims, but in general, it doesn't see a lot of action. So I set a seasonal lot marker on the lot, and then proceed to add 4-6 new custom role markers (I transmogrify them into beach deco items, to blend in), I set this up for the summer time, as this would make the most sense for more sims to visit. And then I add a bunch of deco beach sims to the lot on top of that. That way when my sims visit the beach, it will already have 4-6 sims on it, but it will look like 20 sims are there, and the engine will probably send 5-8 more sims which will result in a very active lot everytime I visit.
This is how you can utilize the arsil technique to gain more popularity on lots.
Which leads to my next point, consider what is actually about the population that you care about so much? For me, I want the world to look full without the lag. I was able to achieve this with deco sims. The engine doesn't have to do anything at all for this, as deco sims are objects. I want to play on lots where I could take a screen shot without having to even set up a scene, like for instance making the lot look and feel full. Deco sims are already posed, so all I have to do is move them into place. I have learned how to severely decimate these objects to make them completely playable in the sims 3, so I am going to have a lot of fun converting ts4 deco sims to ts3. This is going to be perfect for my building and roleplaying style.
For me, a townie that I don't care for might as well be a deco sim, the only use I have for them is to decorate the background of my screen shots. That may sound harsh but it's the reality. I make every sim in my world with intention. If I can't see you being an enemy, lover, friend, at some point in my story, then the sim isn't useful to me. And if the sim isn't manning a savvier seller station, or cooking and serving at my benihanna's then what are you even doing here other than taking up resources? I wouldn't even care for the sim to populate my UC lots, because I can just use deco sims for that, too.
Understanding these new household techniques, combined with your new understanding of community lots creates a POWERFUL new experience that's results in smoother/faster gameplay on active and filled community lots.
So in general, you actually want to have more townies than community lots. You can achieve both without lag using my NPC households method, and more strategically themed community lots together. This means all of your community lots will more than likely always be active no matter what your sim is doing in the world.
And now we are going to add mods on top of that.
We already discussed the fixed MSC Mod. So let's move on to the others.
I know most of you were expecting to see the Lot Population mod on this list, but I'm going to tell you exactly why it isn't. The mod teleports sims randomly around my world, the mod promised to send sims to lots they would actually visit, and even according to the season, but I didn't see this result. Instead, sims, no matter what their personality was, were randomly appearing at every lot I paused an looked at. I wouldn't even be sending my sims to this lot, I'd just be looking at the lot, this often resulted in freezing, hiccups, and slight lag. If I had more than one sim in my household out and about and I switched over to other sim, I would see the same sims I just saw across town pop out over there. This broke my immersion by a lot. Not only that, but a lot of these sims would be using objects, with props, and when being teleported it temporarily broke the interaction, which resulted in props and objects floating in mid air, or being unusable, or showing up on other lots where it wouldn't even be possible for those objects and props to show up. This caused routing and script lag in my game by a noticeable amount. I was on a reduced version, and still noticed these issues. I really wanted to like this mod, and if it didn't break my immersion and cause more performance issues, I would otherwise love it. But unfortunately, I had to find some lighter alternatives that handled both of the issues I noticed with this mod.
This leads me to the Get out project, or you could of course just download arsil's script yourself and tweak the settings to your liking. BoringBone's tweaks the settings of Arsil's script and includes his own mods in a few modules to balance out the tweaks he made as well as enhance the overall experience.
These are the modules I downloaded for my mod list: Pedestrians Smart Vehicles
With all of these mods combined, sims are being pushed out and about in the world immediately, consistently, reasonably, while still allowing some sims to stay home. Which is another issue I had with the lot population mod. There were never any sims at home. This caused issues when townies threw parties, and invited me, I would go and no one would be home; so no party. This caused issues when I wanted to visit a friend I made in their homes for story telling and gameplay purposes, because they weren't home to open the door. This caused issues when inviting sims out, going on dates, inviting sims over. They would be randomly selected to teleport to another lot my other sim was on so it would completely break these interactions. The get out script isn't that invasive. It doesn't break these features and interactions, sims aren't being teleported, they are choosing to visit more lots more frequently. If they throw a party, or invite me out, or I invite them out, the EA script function takes back over and allows me to actually see the end of these interactions. On top of that, there wasn't any lag with this mod installed, as sims would be doing what the engine is already coded for them to do, just more of it; visiting community lots. The mod also adds walk abouts like how you'll see in the TS4, which I also combine with Shimrod's townies out on the town, where you'll see double the amount of walkabouts, while also extending a reasonable and light weight function to populate the lots in between.
Combing this with the Supreme AI mod, unlocks the sims AI in very innovative ways, for this particular guide, the supreme ai mod allows sims to make more logical decisions on which community lots to visit based off of their traits. While it's not completely set in stone, and still has a randomized feature which adds more interesting outcomes, now you'll see a lot more athletic sims at the gym, sims with hampers in their home at the laundromat, rebels and part animals at bars, clubs, and arcades, teens and kids at parks, arcades, libraries, the pool, etc. Let alone all of the other changes included in this mod, it has to be recommended for the logical fixes it applies to EA's system of how sims decide to go where.
The last mod I want to recommend here is the nana no shop in RH's. This mod makes it so sims no longer autonomously visit and enter RH lots. If you ever wondered where all your sims were, and you knew they weren't working at the time, they were probably inside of a RH. The game pushes them to sit inside of them for an extended period of time, this is to simulate to the player that the townies are alive and doing their own things. This isn't a problem in an unmodded game, however, when you're like me and open up your RH anyway, this mod would be a perfect enhancer, it still sends sims to my opened RH lots, and RH's in general like to eat outside of a bistro or diner, but it no longer allows them to enter RH's and sit inside of them. This means more sims who are available to visit community lots actually visiting those lots. Townies don't need to go grocery shopping in the RH because they can automatically get their ingredients from the fridge, with whatever recipes they choose to cook. The only reason a townie would need to visit the hospital is if they are giving birth. Unless a sim works at the police department or is going to jail, they don't need to be there, either. And well, you get the point. Any need for a RH for townies will be assigned to their tasks and they will be unable to take it off, this is for what they NEED. When you want to actually see those townies around town instead of sitting in RH's, this mod fixes that issue altogether.
So now I'm going to go in game and show you the kind of results that you can expect by following this guide.
First I will show you the normal populated world, this is what you're used to seeing in game. Then I will show you what it looks like when you optimize your community lots and add my NPC Household method. Let's begin!
Conclusion: As you all saw the massive difference in gameplay, either one still works out much better than the normal EA lot population method. So you can play this in either style. With my NPC household method and more optimized community lots this just promises better performance with populated lots, significantly. You don't have to follow this method, you can just use the guide and mod collection outlined here!
I want to thank you all for joining me , I am so happy I finally got to show you guys how to populate your worlds lag free, I love all of the support I've been getting, you guys are just so awesome! I have more videos coming for you so I'll see you in the next video!
Mod links:
MSC Fixed mod get out supreme ai shimrods townies out on the town
nana no shop in RH's
Arsil Custom Role Generator
315 notes
·
View notes
Text


Have you ever wanted to remove that red border when you pause your game or that purple border when you're viewing your map ? and somehow the border that shows up when you're recording within the game ? Rest assured, this mod was made for you. I've made all three borders completly invisible in game. Originally it was only for the pause border, but then I chose violence against all borders :)

Note : If you're not using a UI recolor/overhaul, this mod is instantly compatible.
For custom UI recolors/overhaul :
Compatible
Gray UI by Helren Sakura UI by aecyia Golden UI by GogosOVS Black Girl Magic UI by Mookymilksims Cinnamonroll UI by Mookymilksims Sweetdreams UI by sasunaru123 Mint UI by fernpolska
Incompatible
Clean UI by Justmiha97 Dark as night : Black UI by spamaccount
Possible question : How do I make my UI recolor compatible with this mod ? - I explain that here in the description
Unknown compability
Bedrock UI by simstate (As the download for the UI is no longer available on their patreon, I can't fully verify it's compability. Although from the paused pictures, it seems that the UI already has an invisible pause border)

Download : ModTheSims | Simfileshare
Minor update : Fixed a texture inside ATLAS_HUDBorderTreatments_01
138 notes
·
View notes
Note
HI Frankie! I am building in Saint Greer Islands (and loving it!) but I'd like to edit a few things in CAW. I found the ask where you uploaded the files for CAW (thank you for uploading them!) but I'm dumb with CAW, and I simply don't understand how to open the world in CAW to edit it and what to do with the files I downloaded! Could you help me please? Thank you so much!
Oh sure!
The files go into your world data folder in you My Documents/EA/ and then I forget the rest but the caw folder and then maybe user data? That should be a folder with the world name and a .world file. World CC also needs to be put into CAW and I think online tells you how. I forget where the resource.cfg goes, I think in the bin of your CAW files (so under C/program files…) and the make a folder for the CC called packages (I think).
I honestly do not remember what was in that upload but those are the 3 things you need!
11 notes
·
View notes
Text

It's the tutorial that no one asked for! And I blew my entire day on it, so you better appreciate it! :) No, seriously, this is as much for me as for anyone else. I don't do this process often, and when I do, I have to re-remember the steps, and sometimes I forget some of them and have to figure it out again. This will save future me from having to do that.
Even if you aren't me, if you're interested in being able to place diving lots in most any world you like and that has ocean, this will be relevant to your interests. Unfortunately, it is a sometimes fiddly process to get a working lot at the end, and I went into a lot of detail, so the tutorial is long, but please do follow it closely because if you skip a step or mess anything up, your lot will be wonky or it might not work at all, and I don't want to hear your whining. :)
Note that this is a tutorial for placing a new, empty diving lot, which is the first step in placing a downloaded diving lot or one that you yoinked from another world, but this tutorial doesn't cover how to get such lots working. This just shows you how to place an empty lot, which I'm assuming for this tutorial's purpose that you will then build/decorate yourself. Frankly, I've discovered that building your own is much easier than trying to ram square pegs into round holes, which is what placing downloaded dive lots often feels like, even if you know what you're doing. It can be as time-consuming, if not more time-consuming, to get a pre-made lot placed and working than it does to just build your own.
So, here we go.
Step 1: Pick Your Poison. Choose the world/save you'd like to plop a dive lot into, open it, and go into Edit Town. You can use any world you want, EA or custom, so long as it has accessible ocean in it. (More on that in Step 3.) I'm going to use Sunlit Tides, just because many people want to put dive lots in it yet can't always get them working.
Step 2: Cheats! You need some cheats, so open the cheat box by pressing Control+Shift+C and then enter these three:
testingcheatsenabled true buydebug on enablelotlocking on
Note that you need to enable testing cheats first because the other two aren't available otherwise.
Step 3: Placing the Lot. Go into World Editor and in the Lots submenu of it choose the lot size you want:

As far as I know, a dive lot can be any size you want from the minumum 10x10 to the maximum 64x64, any of the EA standard sizes or any custom size you might add using this mod. If you are bound and determined to try and place a downloaded/yoinked lot, then in my experience, it's best to make the new lot a little bigger than the lot you want to place, if possible, so that you have some wiggle room to get it to fit better. But, I'm assuming you're going to build your own here.
If you plan to do lots of terrain sculpting on your dive lot, bigger is better. That said, unless you're going to do something really elaborate, it doesn't have to be 64x64, the largest possible size, either. Smaller will mean that your prospective lot will fit in more places on the map. So, it's up to you. For this, I'm just going to place a 30x30 lot, because I'm not going to build/decorate it or anything.
Now, it needs to be said that not every world will be able to have diving lots. The world must have ocean, obviously, and that ocean must be routable or else sims won't be able to get to it. The ocean also has to be deep enough. Generally speaking, "deep enough" is if the water is dark blue. (Or green, or whatever color the lighting mod you use might make it.)
For instance, in Sunlit Tides here, it's pretty obvious where the deeper water is:
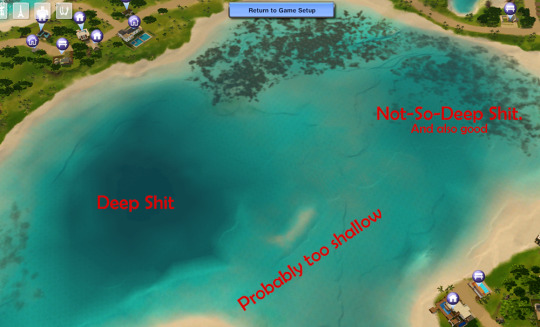
But you know what? I'm going to place a dive lot in some of the shallower water, anyway, because I/you actually can, within reason. And if you're interested in doing this in Sunlit Tides, I'll warn you that the deep spot in the pic above has a very uneven bottom. It's really not a good place to put a dive lot. And I'm not sure what the deep water on the outskirts of the map is like, but the good news is that much of the deeper and flat-bottomed shallows, as I've noted, work well.
So: With your chosen lot size selected, move your cursor around in the ocean where it seems to you that the water is "deep enough" until you come to a spot you like and where the lot grid is green. If the grid is never green, then the ocean likely isn't routable at all and you won't be able to place diving lots in that world. I have never run into that, myself, but I also haven't done this all that often, so it's certainly possible. Anyway, I'm picking here:
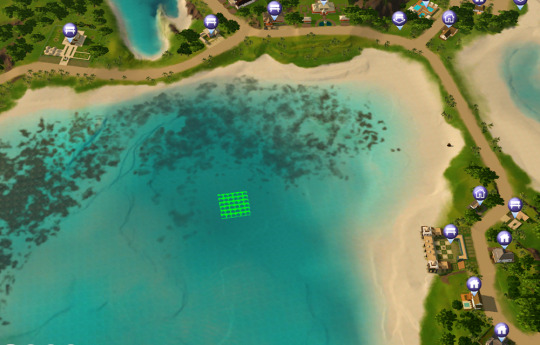
My advice would be to not make your lot too far off-shore even if you can do so, or else it will take sims a long time to get to it. Especially merfolk, because they always swim out to dive lots rather than take a water taxi, and they swim much more slowly than a water taxi moves. Once you find your spot, go ahead and place the lot. Doing so will create a square island, not a sunken lot. That's fine. We'll fix it in a moment.
Step 4: Change the Lot Type. Click the lot's icon and change the lot type to community and then choose "Diving Area" as the subtype:
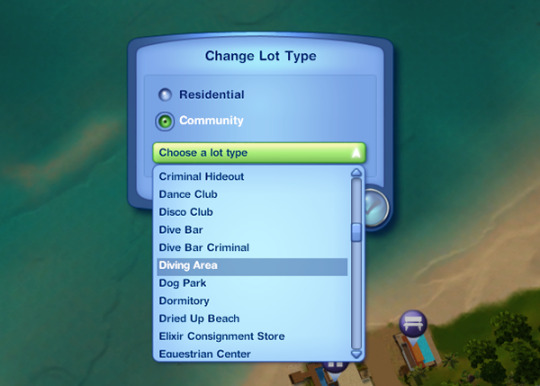
Note that this option will only show if you've enabled lot locking. So if you didn't enter that cheat up in Step 2 or if you entered it incorrectly, rectify that situation now so that you can set the lot type.
Step 5: Sinking the Lot Enter the lot and flatten it with this tool in build mode:


This will submerge the lot so that it's level with the sea floor rather than being an island. You can now move the camera down under the water and have a look at your potential diving area, like so:

In particular, check the edges of the lot to see if there are any huge drop-offs or other great differences between the level of your lot and the surrounding terrain. Whether or not this will happen is world-dependent. Some worlds have very uneven/jagged underwater areas, which is what will make you end up with drop-offs, while others, like Sunlit Tides here, are (mostly) pretty flat.
You can see in the above pic that this lot is a little sunken along two of its sides. That's fine; that small amount of difference can easily be smoothed out with the terrain sculpting tools. If there are steep drop-offs or upward slopes, you can sculpt the lot to try to blend it with its surroundings, but be advised that 1) Interactable objects like dive caves can't be placed on uneven terrain and still be usable and 2) If you end up really deep down, the camera goes wonky and it's frustrating-to-impossible to build or play the lot. So, if you've got a huge drop-off and/or a steep upward slope on one or more of the edges of your lot, I'd recommend just trying a different spot. But, it's up to you. If you feel you can work with the uneven edges in some way, have at it. You are braver than me.
Step 6: Save that MFer. Once you have a lot you're satisfied with, this is a good time to save. So, go back to Edit Town and do that.
I recommend saving often during this entire process because, I don't know about your game, but sometimes mine will "hang" or even crash when moving between Edit Town and Build/Buy, especially if I do it a lot. And with this process, you will be doing it a lot, not to mention exiting out to the main menu and then going back into the save a few times. Since getting a dive lot placed can be a fiddly business, it sucks to lose a lot of progress to a hang/crash. So, in my opinion, you can't save too often, but in this tute I'll only prompt you to do it when you must.
Step 7: Exit Stage Right Remember long ago in the last step how I said you'll be exiting to the main menu a few times? Yeah, the first time is now. You do this because, for whatever reason, the game doesn't register changes made to the "structure" of dive lots without exiting and re-entering the save. So do that. Once it's reloaded go back into Edit Town and then back into the new diving lot. Because now it's time to place a dive buoy.
Step 8: Deploy Buoy The dive buoy is located in the debug items, so if you haven't turned on access to that yet, do so now. Then, go into the buy menu, sort it "by function," not the default "by room," and you should see this question mark here:

Click that, and then I recommend that you go to the filters on the right-hand side of the menu and choose just Island Paradise objects. Because you'll be going into the "Misc. Objects" tab and, especially if you have all EPs/SPs, there's a crap-ton of objects in there to sort through. So, filter, then choose the "Misc. Objects" tab, and you'll see this much-more-manageable selection:
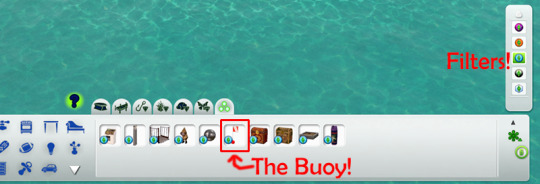
Choose the dive buoy, as indicated, and place it anywhere on your dive lot. It doesn't matter where because (spoiler alert) this one's going to be deleted, anyway.
Step 9: Ogle That Shapely Buoy Once your buoy is placed, move your camera down to the ocean surface and have a closer look at it. Like so:
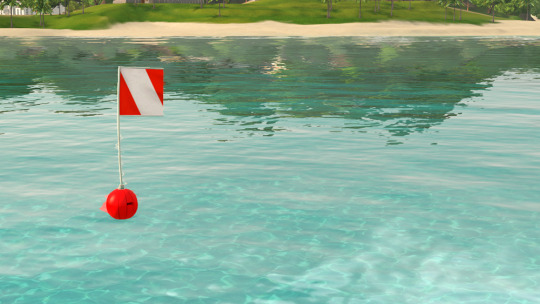
See how the ball part of it is just sitting on the surface of the ocean? That's bad. If you were to leave it like that, you'd have sims (and sharks, if you place a surface shark spawner) swimming/snorkeling in the air, if the lot would work at all. But don't panic! We can fix it. We just need to shift the entire lot down a l'il bit, so let's do it!
Step 10: Copy the Lot to the Library Go back out to Edit Town. Check to make sure that your lot designation is still "Diving Area." (Because during this process, it will sometimes change.) Then, save the lot to your library. The game will give you a warning about cancelling all sim interactions or something. That's fine. Just put a copy of the lot in the library. The thumbnail in the community lot catalog will look like a blue square.
Why are you doing this, you ask? Because now you're going to bulldoze the original. Why? Because we need to move the entire lot down a little bit, and you can only do that by placing a fresh copy of the lot. And you may need to do this several times until you get it at the right depth, so having a copy of the lot in your library is necessary. You can delete it out of the library once you've got your dive lot in the right place, if you want.
Step 11: I'm a Steamroller, Baby Once you've got a copy of the lot safely in your library, bulldoze the original lot you placed. Once bulldozed, the game will change the lot designation back to "No Visitors Allowed," so you'll need to change it back to "Diving Area."
Step 12: Go Down on That Lot To move the lot down when it's placed, you need this cheat activated:
setimportedterrainoffset -0.1
The value at the end can be whatever you want, as many decimal places as you want. A positive number will move the lot up, and a negative number will move it down. (You can use a larger negative number to make deeper a lot that's too shallow, and it can also be helpful if you're intending to try to place a downloaded diving lot on this lot so that it might better match the depth of the water in whatever world it came out of, but this won't always have the effect you want. For one, your lot will be down in a hole.) For the purposes of this tute, all I need to do is move the lot down a teeny bit so that the dive buoy on the lot is sitting IN and not ON the surface of the water. Hence, the -0.1 value.
(Now, I should mention that other tutes I've seen will have you just lower the terrain right under the buoy to sink it a little bit rather than doing this bulldoze-and-replace-with-a-whole-lowered-lot thing I do. This method can work, but I don't like it for various reasons that I won't go into for brevity's sake. I'm just telling you what I do, which has worked every time I've placed a dive lot, including shallow-water ones like this one.)
Step 13: Re-Placing the Lot Go into your library and place your saved lot back where it was. DO NOT ROTATE IT or else things will get screwed up. (Namely, your lot will become an island again and resinking it won't really work.) Just click "Accept." And then check its lot designation and change it to "Diving Area" again, if necessary, which it probably will be because stupid game.
Step 14: Ogle that Shapely Buoy 2, Electric Boogaloo Now, enter build mode and move the camera down to the ocean surface again to check the dive buoy. Ideally, it will now be sitting IN, not ON, the water, like so:

If it's still sitting on the surface, the lot needs to be deeper and therefore moved down farther, so go back to Edit Town, bulldoze the lot again, change the value of the imported terrain offset cheat to a larger negative number (Perhaps -0.5) and try again. Be aware that, as I said, once you get to larger numbers (as in greater than -5 or so) you start ending up with your diving lot down in a hole, which may or may not be workable.
Now, there is a marker on the buoy, the little black rectangle I outlined in the pic above. If the ball part of the buoy is at least partly in the water but that marker is still above the water, as in the above pic, the lot will still work, but there will be a "hop" (and sometimes a pause) when a water taxi or a swimming merperson crosses the boundary of the lot. The higher the marker is above the water line, the larger that "hop" will be. (Because, if you haven't figured it out yet, the dive buoy is what tells the game where sims can swim, vertically, on a dive lot.)
If such a hop doesn't bother you, you can leave the buoy as-is. If you're a perfectionist like me, you go back to Edit Town, bulldoze the lot, and change the value of the terrain offset cheat to try again. Do this as often and with as many decimal places as your level of perfectionism demands. :) I'm not that fussy, so I usually just move the lot down in increments of 0.1 until the marker is at or below the water line but the ball of the buoy is not completely underwater because you don't want the ball completely underwater, either. At least some of it needs to be above water. So, fiddle as much or as little as you feel you need to.
(For reference/scale, the gap between the marker and the water line in the above pic would probably be fixed by an offset of about -0.15 instead of -0.1. But it would also be fine as-is unless a little hop at the lot boundary will bother you.)
Step 15: Bye-Bye Buoy! Once you have the lot so that the buoy is where you want it, DELETE THE BUOY. I repeat: DELETE THE BUOY. Yes, DELETE THE BUOY. For whatever reason, dive lots drawn from your library that contain buoys won't work. I don't know why. They just don't. You need to place a fresh buoy. (I'm pretty sure this is why lots of people can't get downloaded dive lots or lots that they pulled from other worlds to work. Sometimes the answer is simply to delete the buoy, if the lot came with one, and place a fresh one.)
Step 16: Exit Stage Left Once you have DELETED THE BUOY and only once you have DELETED THE BUOY, go back to Edit Town, check to make sure the lot is still designated as a diving area (and change it back if necessary) and save. Why? Because now you need to exit to the main menu and reload the save again. So do that.
Step 17: Fresh Meat Buoy! Once the save is reloaded, go back into Edit Town, and check to make sure the dive lot is still designated as one. Redesignate, if necessary. Then, go into build/buy and place a fresh buoy, just as you did before. This one will be staying permanently, so place it where you actually want it to be. (Which really doesn't matter; aside from defining the vertical space of the diving lot, it just designates where your sim "enters" the lot.) If you want the lot to generate sharks on the surface, you can also place surface shark spawners now, too, as few or as many as you want, and because you have properly adjusted the height of the lot, the spawned sharks will not be swimming in the air. The spawners are also in debug mode, under the fish spawners. (There is also a spawner for underwater sharks. Do not put that one on the surface. Make sure you only put surface shark spawners on the surface.)
Step 18: Set the Lot's Skill Level You set the required skill level for the diving lot by going to buy mode (if you left it), making sure the hand tool is active, and then holding down control and shift while clicking on the dive buoy. Choose the option "Set Required Diving Level…" from the menu that comes up:
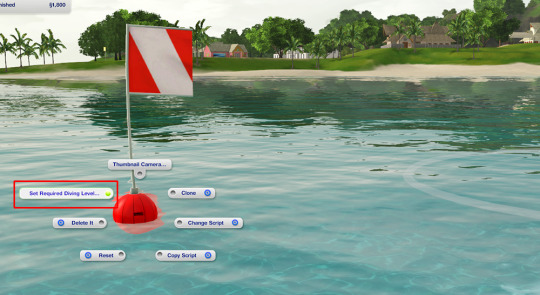
…and then from the resulting options under that choose a NON-ZERO number. For some bizarro reason, buoys default to level zero when placed, and a diving lot set to skill level zero is inaccessible even if a sim has level 10 scuba skill. (Good move, EA! Why is zero even an option if it doesn't work??) So, pick whatever skill level you'd like, so long as it ISN'T ZERO. (I suspect that this is another reason why people can't get downloaded dive lots that they place in a world to work.) Once you have the skill level set, go back to Edit Town and save.
Step 19: Test And now you're pretty much done. All that's left is to test the thing to make sure the lot works before you bother with building/decorating it. So, return to the game and send a victim to your new, empty lot and see if they successfully arrive (with or without a "hop" at the lot boundary) and successfully get themselves underwater. (My advice, for testing purposes, is to just give the sim you pick enough diving skill to use the lot. This can be done with NRAAS Master Controller.) Don't bother with doing anything further with the lot until you make sure it works.
Here is evidence that my lot, though shallow, works:
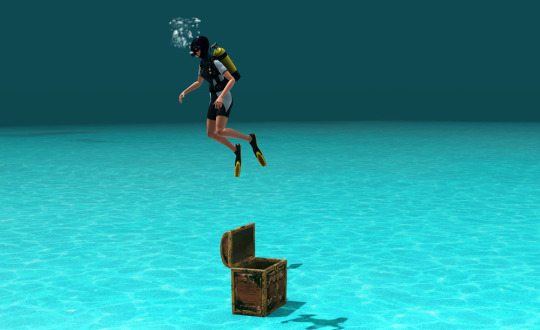
If your lot doesn't work, then something went wrong somewhere. Most likely, you missed a step or did a step wrong. I know there are a lot of words here, but they're all necessary to (more or less) guarantee a working lot in the end. So, try again. It's possible that you will have to pick a different location and start over, but I've been able to get a lot working wherever I've placed one, so long as it was in deep-enough routable ocean.
Step 20: PROFIT! Assuming that your lot works, "all" that's left is to build it! :D I'm not going to go into detail about that. It's all up to you. You can sculpt the terrain, paint it with whatever terrain paints you want, place objects, whatever. If you're in shallower water, any objects you place that are tall enough to stick out of the water will just be chopped off at the water line; you won't be able to see the rest above water. The corals and stuff are in debug mode under "Underwater Objects," but if you don't want the tropical look, so long as you have moveobjects turned on, you can place (almost) any object you want down there, aside from things like walls and fences and other build items that can't be drawn underwater. Rocks, plants, trees, columns, and anything from the buy and debug catalogs are all good. If such an object has a function, sims won't be able to use them, though. They'll just become deco. (So, no underwater basketweaving sculpting. Sorry.) So, go to town. Have fun. For this tute, I'll just mention a couple objects and their settings and we'll finally be done.
Miscellaneous Objects:
First, treasure chests. Like the dive buoy, they're located in the "Misc. Objects" of debug mode. There are two versions, one for land and one for water. Obviously, on a diving lot, you want the water one if you want any at all. If you do want to use them on your lot, place down as many as you want, and then set the diving skill level necessary to open each one and designate the treasure each one will hold. You do both by holding down control and shift while in buy mode with the hand tool active and clicking on a chest, just like setting the skill level of the lot on the buoy. This brings up this menu:
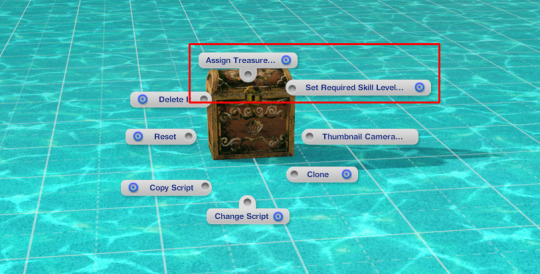
The "Assign Treasure" option gives you eight different treasures for the chest. You simply pick the one you want. The "Set Required Skill Level" option allows you to assign the diving skill necessary to open the selected chest. You can choose any number you like from 0 to 10. (Yes, zero is OK for this purpose, even though no one with zero skill can scuba dive, so…Yay EA.)
Then there's the dive caves. I think they are in the "Underwater Objects" section of the debug catalog; I'm not sure because a mod I use moves them to the regular rock section. Anyway, there are two styles, which you're probably familiar with, but they both function the same way. If you have more than one of them in the world, even if they're all on the same lot, your sims can travel between them, much like a subway. Unfortunately, I can't show you how to set this up because that mod I use to move the caves to the rock section also makes them recolorable, but it breaks setting up this functionality and I don't feel like hunting the mod down and taking it out. But it's pretty easy. You Control-Shift-Click on each one, give them a name, and then you can connect them by using the names you give them. Again, it works much like subways. It's pretty self-explanatory.
Finally, there's the fog emitter. If you're unfamiliar with this object, it's a base game object located in the "Misc. Objects" section of the debug catalog. The thumbnail in the catalog looks like this:

And it looks like this when it's placed:
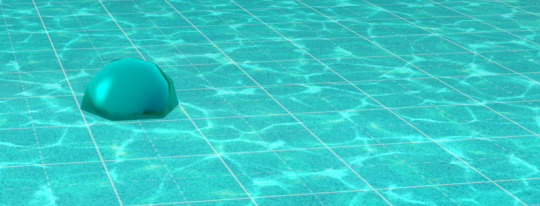
They can be used on any lot, they disappear in live mode, and they can generate not just fog but many, many different effects. Literally thousands of different effects. You place the emitter where you want, and then control-shift-click on it and choose "Set Visual Effect" from the resulting menu:
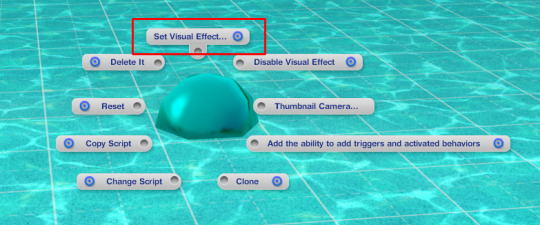
When you click on it, you get this:
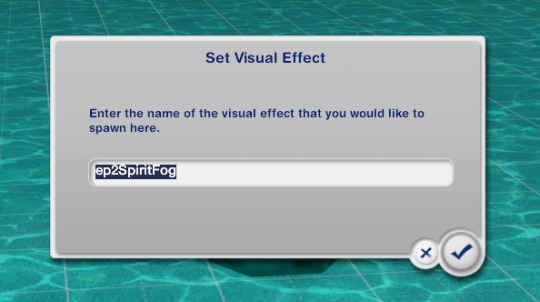
In that window, you type/paste the code for the effect you want. Of course, you will need to know the code for the effect you want. For your convenience, I've uploaded my list of effect codes, which is complete and includes the codes from all EPs, here. It's just a text file, and the codes are in alphabetical order. Since the list is all-EPs, some of them may not work if you don't have the EP the effect comes from, but if that's the case, then any such code you enter simply won't do anything.
The most relevant effects for a diving lot all start with "ep10," but there are others you could possibly use, too. Some of the names of the codes are more helpful than others in terms of knowing what it will do. Generally, you need to experiment. But, you can add schools of fish, single (but non-catchable) fish of all kinds (if you want catchable fish to spawn, you need to use the spawners, not the fog emitter), sharks (non-interactable), light rays, bubbles, glows, fog, all sorts of things, if you're patient enough to go through the list, look for interesting possibilities, and try them out to see if they will work for you. There are whole tutorials dedicated to the object, if you look for them. There's also a mod that makes them shiftable, which can be very useful, here.
One final suggestion: If you go through this process in a world that you know or even just suspect that you'll want to use again and you'll want the dive lot(s) you made in that future save, for the love of pie keep a copy of this save file somewhere. That way you won't have to go through all this crap again. Because even if you save a copy of your finished lot, unless you manage to place the empty initial lot in the new save in the exact spot you placed it when you built the lot, it's not likely to be quite right. So beware.
And with that, I think we're done here. If anyone has any questions, or if you decide to try to make your own diving lot and have questions along the way, feel free to hit me up and I'll do my best to help. Just keep in mind that I'm not an expert by any means.
365 notes
·
View notes
Photo


Make your Own Graffiti Mod: University Street Art for the Sims 3
This is a DIY mod. You can see my old Graffiti mod here. In the longer tutorial, you can find a lot more detailed description of how to work with the images. I show you how I used this to make this street tag to express my solidarity with my friend and fellow-simmer Hayley. If you haven’t already, consider contributing to her gofundme. It takes only $1.62 US to be able to contribute and our small change can really add up a big life-changing item for Hayley. With this post I’m going to break the ice on small donations and make a £1 donation. Will join me donating £1? Thank you! And a big thank you to Spladoum for the ask that inspired this!
edit: You can donate smaller change through PayPal! It doesn’t even have to round off to a full pound: [email protected]
Download the Solidarity with Hayley graffiti tag: mediafire (This will only replace one of the many high-skill 3x3 murals in the University street art skill.)
The short tutorial:
1. Download the original images (dropbox or mediafire) or go hunt for them yourself (why would you do that? I have done it for you!)
2. find the four images you want to mod, open them in a DDS-capable graphics program. You can also work from one of the three “blank murals” or even my PSD files which have pre-extracted alphas for making your own alphas, and simply “save as” whatever file you want to mod.
3. modify them, save them as DXT5 ARGB 8 with the original file name.
4. Import these altered images into a new package in S3PE and name it something cool. Voila!
For the long tutorial with lots more images and tips, read more below!
The long tutorial:
Afficher davantage
75 notes
·
View notes
Text

»» 2024 SIMBLREEN GIFTS PT 1 ««
Canning Jars Default Replacement
Happy Simblreen!! I started these last year and only just now finished them lol. I have one other gift for you guys that´ll be coming later!
This replaces the mesh and textures of the jam/preserve jars that come with the canning station. It IS compatible with Butterbot's overhaul and I would reccomment installing that mod also! (although you can use this replacement without it if you so choose)
I did NOT include the textures for meal rations sorry, I just find the idea of an entire cheeseburger stuffed into a jar a little too silly! I'd like to make an updated version of Butterbot's mod one day that includes a new mesh for rations.
Place this in your OVERRIDES folder!
» DOWNLOAD HERE
If you like more historical/medieval gameplay, stay tuned over on my sideblog @omedievalpixel cause I´ll be releasing another version there shortly!
682 notes
·
View notes
Text
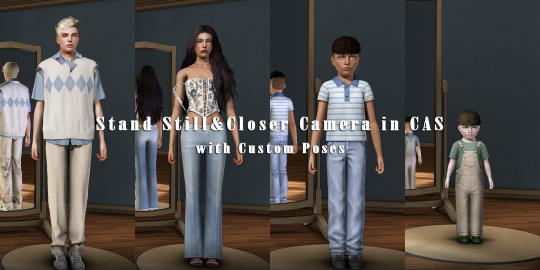
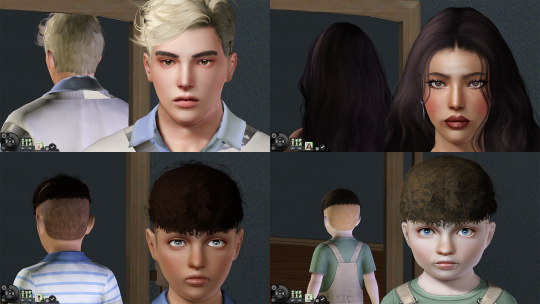
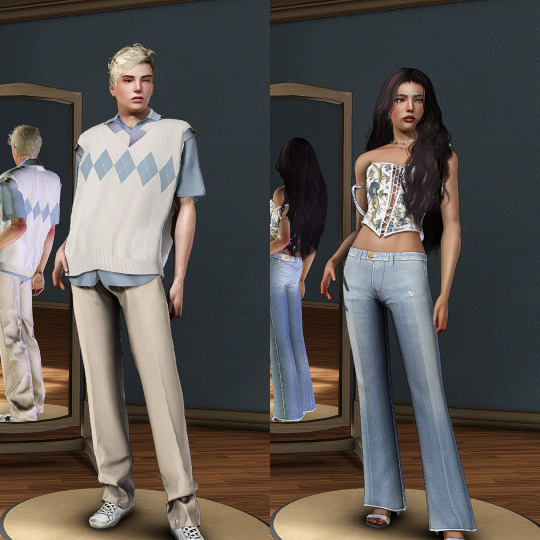
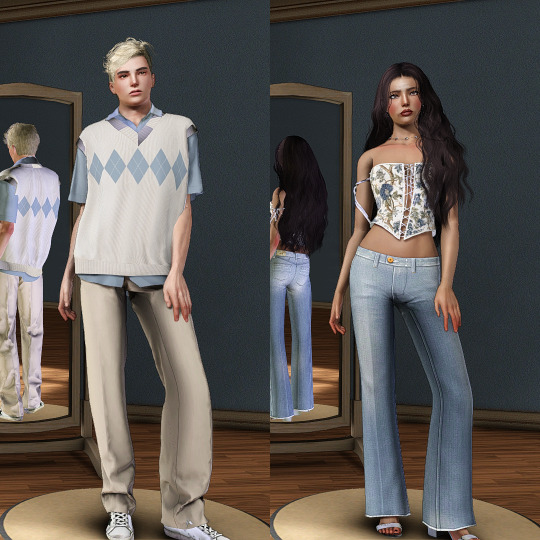
Stand Still&Closer Camera in CAS with Custom Poses Mod
Description
It's finally here^^This mod is inspired and based on spagtscully's New CAS and CAP animation options Mod Version1 which will make your sims and Pets stand still in CAS without any movement and facial idles. I edited its jazz script and now other than that, your sims can stay freeze in the custom poses imported into the package file with this mod. And it's super easy to replace them with the ones you like. I'll show you how to do it in the below. I've also noticed that spagtscully's original mod conflicts with closer camera mod. So I replaced its CASCamerasWS.ini file with the one used in Shimrod101's Zoom-In CaS Camera Mod and edited the parameters to keep the camera focusing on toddler's face rather than belly when zooming in. Hopefully this mod can bring more vitality to the sims 3 CAS~
Features
Sims and pets will keep freeze in custom poses unless you pick species and traits. You can customize sim's poses as you want.
Cameras will get closer when zooming in.
Compatibility
Work fine on1.67/1.69 and base-game compatible.
Conflicts with any other mod that changes CAS animations and CAS cameras.
How to customize the poses
These are the animation names I used in this mod.

For those who know how to create poses in blender and want to customize this mod in an easy way. You can export the pose or animation you want, changing its animation name to the corresponding one listed above and exported it again. Then copy the file you just saved and paste it into the mod in s3pe. It will replace the original file. And that's it, your sims will stay in the new pose you've just chosen. Currently male and female sims are sharing the same pose. I will make a new version that male and female sims have separate animation files if it's needed.
Download(choose only one)
Poses for pets stay the same as the original mod, you can check them out here.
Version 1: Toddlers, children, teen-elder males and females stay in the same pose shown in the first image.
Version 2: Compared to Version 1, teen- elder sims' poses are additionally changed to the one shown in the third image.
Version 3: Compared to Version 1, teen- elder sims' poses are additionally changed to the one shown in the fourth image.
Credit
@spagtscully@Shimrod101 for the base mod. This would be impossible without their ideas and work~
@tau1tvec@satellite-sims@chamomilewine for the poses I used in this mod~
2K notes
·
View notes
Text


nobody asked for this, but I wanted to share it in case anyone else wanted it & also to have somewhere to direct people whenever I do inevitably get asked about it.
I love this cas mod by criisolate (version 1), but it always kinda bothered me that adults looked sort of hunched over, so I taught myself how to edit poses and straightened the ol' neck & head. I also moved the legs a little further apart, although as I sit here typing this I've realised I kind of picked the worst possible pair of pants imaginable to try and show that. just trust me lol
this edit is only of the adult pose in version 1 of this mod - I have not touched anything else!
I only tweaked the pose; full credit for the mod itself goes to criisolate and to the creators of the poses he used for it (of whom I am unsure, 'noelyely' is the name attached to the pose but criisolate has credited the pose creators in his original post either way).
download.
442 notes
·
View notes
Text
Conteúdos e Mods que eu utilizo no The Sims 3 (Parte II) :

🌅 Mods Visuais, partiu deixar esse The Sims 3 belíssimo? -
💡Melhor Iluminação do mapa e locais : As vezes tudo que a gente precisa é olhar no mapa e ver que as sombras, luzes e etc estão tçao organizadinhas e bonitas, né? Dá uma olhada nesse mod, novamente o @boringbones arrasando noq ele faz.

🔦 Correção de Luz no cas : Esse mod deixa a iluminação do cas mais natural e com melhor sombreamento, o Boring Bones tem um desse também, porém, como são os que eu uso, mostrarei pra vocês o que eu achei mais bonito >PRA MIM<, do criador de mods @simbouquet.
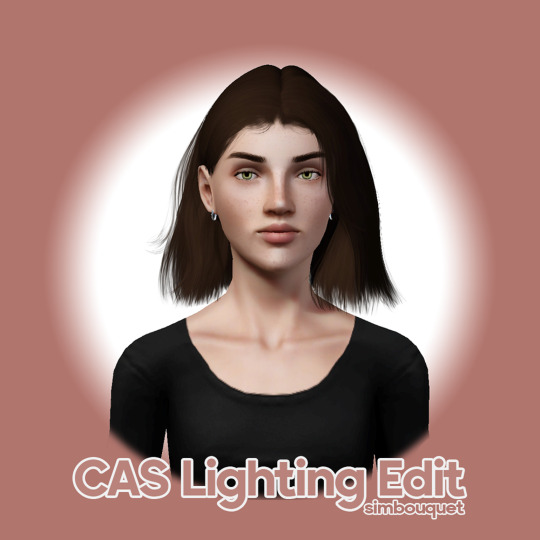
😎 Mod Por do sol, céu, noite e água mais bonito : Eu pessoalmente não consegui usar o mod do brnttwaffles de deixar o céu bonito com água de outros mundos, porém, consegui achar um mod que, novamente pra >mim< Koori, é mais bonito, porém ele também tem vários flavors, ou, opções pra escolher, caso você queira deixar como o meu jogo, assim como vc viu no Youtube selecione o "NOGreenSunrise+BrighterWater+BrighterNight" Créditos desse mod à @nilxis

❄️Substituição da Neve do The sims 3 : Esse mod também soluciona Bugs relacionados a plantas com essa neve replace.

🌞Mais luz vinda das janelas : Não vivo sem, o jogo fica mais bonito e também com mais sentido, em relação á sua luminosidade.

Bom é isso! Me ajuda lá no meu canal por favor <3
Créditos á @boringbones, @ohrudi, @simbouquet e @nilxis
75 notes
·
View notes