
larets
2K posts
Don't wanna be here? Send us removal request.
Statistics
We looked inside some of the posts by larets and here's what we found interesting.
Average Info
Notes Per Post
15K
Likes Per Post
9K
Reblog Per Post
6K
Reply Per Post
3
Time Between Posts
2 months
Number of Posts By Type
Link
3
Photo
14
Last Seen Tumblr Blogs


Fun Fact
Tumblr.com rank in the US is 25.
Link
Materials
Yarn: any thin yarn will work. I used Järbo 8/4 100% Cotton “Mercerized & Gassed” 50 g (offwhite and linen).
Hook: as suggested on your yarn label. I used hook size 2.0.
Abbreviations (US terms)
ch: chain
sl st: slip stitch
sc: single crochet
msc: modified single crochet
prev: previous
st: stitch
rep * *: repeat from * to *
Notes
The size of my bag is 14.5 x 9.5 cm. You will be working in rounds. For this pattern you should be familiar with the tapestry crochet (you can find the tutorial here). Photo instructions below show the main steps how to make a pouch. This pattern uses a modified single crochet: make a single crochet back loop only, just instead of yarning over for the last step, yarn under (see the tutorial here). Except the first round and the two rounds where you make holes for a string, every round is made in the same way: chain one, make 83 modified single crochets, join with a slip stitch. Follow the color scheme showing how you should change colors.
Pattern
Start by chaining 41 + 1 with white yarn.
Round 1: To make the first round, you will be working down the chain, then turn and work in the other side of the chain. Make sc in every st of the chain starting from the second chain from your hook. Turn. 1 sc in the end of the chain, make sc in every st (starting with the one you have just worked into; now that st has 3 sc in total) until you come back to the beginning of the chain. 1 sc in the end of the chain. Join with a sl st to the first sc of this round. In total you should have 84 st.
Now add the linen yarn and follow the color scheme for all rounds until the end.
Round 2-27: ch 1, msc in every st of the prev round. Join with a sl st.
Fasten off. Sew in a zipper.
Color scheme

How to read the scheme
Each square represents a stitch and its color. In each round you have 84 stitches (42 columns in the scheme times 2). Rows represent rounds. For each round you have to read the row in the scheme from right to left (columns 43 to 84 are the same as 1-42). The chain that you make in the beginning of each round counts a stitch.
After finishing the first round you have 84 white stitches. Before joining with a sl st, check what is the color of the first st in the next round. Round 2 starts with a white st, therefore, the sl st should be white (if the row would start in linen, the sl st would be in linen). Round 2 says you need 3 white stitches, then 6 linen, 8 white, 6 linen, etc. So, chain 1, make one full msc, start the second msc and since the next st should be linen, finish the second msc with your linen yarn. Make 7 msc in linen, start the 8th msc in linen and finish it with your white yarn. Keep working in the same principle till the end.
Rules for changing color
The last msc of the round:
Finish making your last msc of the round with the same color yarn as the first st of the round. For example, round 2 ends with a white st and starts with a white st, therefore, finish the last st of round 2 with white yarn.
The slip stitch:
The color of a sl st depends on the color of the first st in the next round. For example, round 4 ends with a white st, so finish making your msc with white yarn; round 5 starts with a linen st and it means that you should make a sl st in linen.
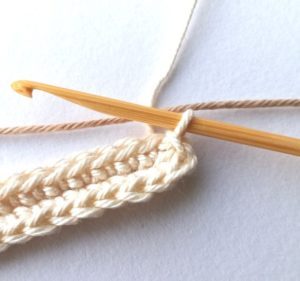
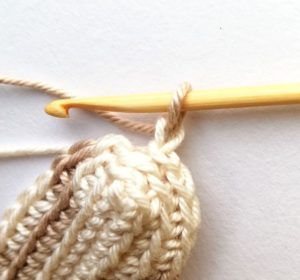
1. Round 1. Start with a chain and make single crochets around it. Join with a sl st to the first sc in this round, not to the chain 1. You do this only in the first round, in all other rounds you have to make a sl st into the ch 1 which you make in the beginning of the round. Put your linen yarn behind your hook and in front of the white yarn that you are working with.
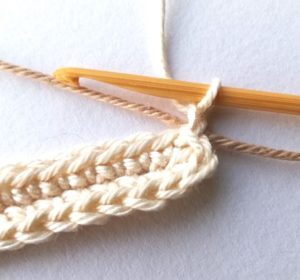
2. Round 2. Ch 1. Your linen yarn is secured now.
3. Round 2. Make the first msc wrapping the linen yarn. Msc is made like the usual sc, except you work in the back loop only and when you have two loops on your hook, instead of yarning over you should yarn under and pull the yarn through both loops. Start making the second msc with white yarn and finish it with linen yarn.

4. Round 2. Continue making msc with linen yarn.

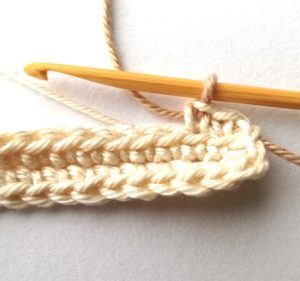
5. Round 2. To finish the round, insert your hook in the first st of the round, which is a chain.
6. Round 2. Round 3 starts with a white st, therefore make a sl st in white.
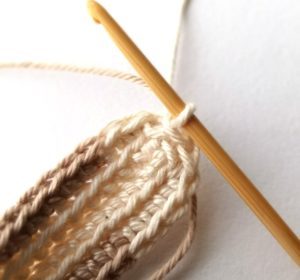
7. Round 4. To finish round 3 make a sl st in white. As the second st in round 4 is in linen, chain 1 in linen.

8. Round 4. Here you can see the first stitch in white and the second in linen.

9. Follow the color scheme till the end. Done!
2 notes
·
View notes
Link
Materials Needed
Any medium worsted (#4) weight yarn. I used WeCrochet’s Brava worsted yarn in:
Rouge (1 skein, or 200 yds)
Rosebud speckle (1 skein, or 210 yds)
Cornflower (1 skein, or 200 yds)
Tidal speckle (1 skein, or 210 yds)
Celestial (1 skein, or 200 yds)
Snow Day speckle (1 skein, or 210 yds)
Freesia (1 skein, or 200 yds)
Plummy speckle (1 skein, or 210 yds)
US size I/9 (5.5 mm) hook
Tapestry needle
Steam iron or garment steamer (optional)
Kids foam puzzle mat (optional)
Gauge
7 HDC and 5 rows = 2 inches
Each square is approximately 4.75 inches wide and 4.75 inches tall
Finished size is approximately 33.5 inches wide and 38.5 inches long; 7 squares wide and 8 squares tall
Abbreviations
Ch(s) = chain(s)
Ch-2 sp = chain-2 space
DC = double crochet
HDC = half double crochet
Puff = puff stitch
SC = single crochet
Sl St = slip stitch
Split Puff = puff stitch worked over 2 stitches
St(s) = stitch(es)
YO = yarn over
Notes
This pattern is written in US standard terms
The pattern and photographs in this document are property of Smiley Goose, and are for personal use only. Please do not alter, share, or sell this pattern as your own. You are, however, more than welcome to make and sell finished products using this pattern. I ask that you please credit Smiley Goose and provide a link back to the pattern listing if you are selling online.
[ ] = stitches in brackets should all be worked in the specified stitch/space
Work chain 2 space stitches around the chains and not in any loops.
You can easily alter the size of your blanket by making more or less tiles.
First stitch of the round is always worked in the same as join stitch.
Chain 1 or 2 at the beginning of round does not count as a stitch.
Special Stitches
Puff Stitch – YO, insert hook into st. YO, pull through a loop. *YO, insert hook into same st. YO, pull through a loop. Repeat from * 2 more times until 9 loops are on your hook.
YO and pull through all 9 loops on hook. Ch 1 to close.
Split Puff Stitch
YO, insert hook into st. YO, pull through a loop. YO, insert hook into same st. YO, pull through a loop.
YO, insert hook into next st. YO, pull through a loop. YO, insert hook into same/2nd st. YO, pull through a loop.
YO and pull through all 9 loops on hook. Ch 1 to close.
Kaleidoscope Baby Blanket Pattern
Make 56 squares (14 in each color combo), or desired amount.
With variegated yarn, make a magic ring
**Optional start: ch 3, sl st to first ch to form a ring.
Round 1: Ch 1 and work 8 HDC into the ring. Pull tight and join with a sl st to first st. (st count = 8 HDC)
Round 2: Ch 1, Puff in each st around. Join with a sl st to first st. (st count = 8 Puffs)
**Note: you can ch 1 or 2 at the beginning of Puff rounds. I chained 1 so their wasn’t such a gap between first and last sts.
Round 3: Ch 1. *HDC, then work 2 HDC in next st. Repeat from * around. Switch to solid yarn with the last loop of the last st. Join with a sl st to first st. (st count = 24 HDC)
Round 4: With solid yarn, ch 1. Puff in first st. Split Puff over next 2 sts. *Puff in each of the next 2 sts. Split puff over next 2 sts. Repeat from * until 1 st remains. Puff in last st. Join with a sl st to first st. (st count = 12 puffs, 6 split puffs)
Round 5: Ch 1. SC in same as join st and next st. HDC in each of the next 2 sts. Work (2DC, ch 2, 2DC] all in the next st. *HDC in each of the next 2 sts. SC in each of the next 4 sts. HDC in each of the next 2 sts. Work [2DC, ch 2, 2DC] all in the next st. Repeat from * until 4 sts remain. HDC in each of the next 2 sts. SC in each of the last 2 sts. Switch to variegated yarn with the last loop of the last st. Join with a sl st to first st. (st count = 48 sts, 4 ch-2 sps)
Round 6: With variegated yarn, ch 1. SC in each st around. At each corner ch-2 sp, work [SC, ch 2, SC] all around the chs and not in any loops. Join with a sl st to first st. (56 sts, 4 ch-2 sps).
Tie off and weave in all ends. Block squares using your desired method.
Assembly
You can join the tiles with any preferred method (slip stitch, mattress stitch, SC, etc.). I slip stitched mine together – here is a great video tutorial from Blossom Crochet if you have never tried it: https://m.youtube.com/watch?v=MEy_GPcWnI8
Blanket Border
Round 1: Round 1: With variegated yarn, join with a sl st anywhere on your blanket’s edge. Ch 1 and SC in same as join st. Continue to SC in each st around. When you reach each corner ch-2 space, work [SC, Ch 2, SC] around each ch-2 sp. Join with a sl st to first SC.
Round 2: With solid yarn and alternating colors every 19-20 sts (optional), ch 1 and SC in same as join. SC in each st around. When you reach the corners, work [SC, Ch 2, SC] around each ch-2 sp. Join with a sl st to the first SC.
Finish off and weave in all ends.
If some of your tiles are puckering after being seamed together, you can always do another quick steam block over the entire blanket.
0 notes
Photo


DIY Crochet Star Stitch Potholder
petit bout de chou shares a visually striking tutorial for the crocheted star stitch. I love all of her pics. Check out everything via the link. LOVE.
263 notes
·
View notes
Photo

Here’s another great little reference chart (click through the link for a larger version).
Source: http://design-peak.com/130-crochet-stitch-symbols-you-should-know/
868 notes
·
View notes

Photo

Tutorial: How to Install Zippers Perfectly
Don’t be alarmed when you see the instructions in Swedish. If you scroll further down the page, you will find them in English as well. This method seems to do a fabulous job of installing zippers in knitted garments!
http://frogknitting.blogspot.se/2013/08/att-sy-i-dragkedjor-installing-zippers.html?m=1
461 notes
·
View notes
Link
Not a particularly new tutorial, but this popped up on my FB feed today and it’s super handy for fixing your sockos
303 notes
·
View notes


