
Don't wanna be here? Send us removal request.
Statistics
We looked inside some of the posts by legendaryhertsteam7 and here's what we found interesting.
Average Info
Notes Per Post
2
Likes Per Post
2
Reblog Per Post
0
Reply Per Post
0
Time Between Posts
13 hours
Number of Posts By Type
Text
17
Last Seen Tumblr Blogs


Fun Fact
The Tumblr app for Google Glass was released on May 16, 2013.
Text
Kevin Adanan, Wednesday 12th of February
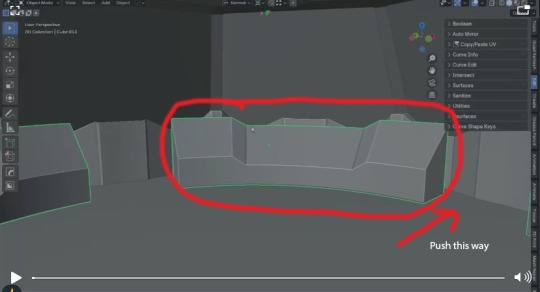
For the past few days I have worked on trying to collect all the assets etc and then add into the environment. On Sunday I worked on populating the environment for the test that took place on Monday.

After the test on Monday, I felt that the scene needed to be populated more as it looked quite barren. There wasn't enough ships and events happening etc. Unfortunately, there was also the issue of having enough time to render the videos. Many other groups claimed that it took them 12-15 hours to render the final product.
I went back to library to add in more ships etc. While there, I did a test render that took in the region of 2 hours for the first part of the project, the space section and not the peaceful planet part.
The next morning on Tuesday, I recorded the first part of the project. While doing this, I tried to implement the planet part of the scene. Rahul had developed this using a program called Gaea. The scene looked amazing.

Gaea needed a plugin to be opened in Unreal. I downloaded the plugin, installed and then tried to add the environment to the Unreal Engine project file. I added in some foliage that Sidharth had developed to make the scene look more like the artstyle that we were going for. When I went to render the scene on my laptop, the scene was quite slow to render... 10 seconds of footage was marked down as needing 8-10 hours to render. The 1.30 mins of the space scene took 2 hours to render. I knew something was wrong with the plugin, after trying to research how to fix it, I decided that since Rahul developed the scene on his system, that I could send him the Unreal project file and he could render it. I sent him the scene along with a video describing how to render the video using the settings for the Panoramic Render.
After an hour or so, it became clear that the render wouldn't work on his end. Unfortunately, the render kept crashing. At this stage, I made the decision to just build the planet section using the Landscape Editor and then to record the video.
This took some time as it had been a while since I had used the editor and I hadn't had any textures to use for the grass etc. I downloaded materials from Substance 3D Assets. Basic materials like grass, rock and sand. I then exported them out as maps from Substance Painter. I needed this tutorial to remind me how to overlap materials in the Landscape Editor.
youtube
(Gorka Games, 2023)
Once I developed the environment, I wasn't happy with the results. The ground looked too basic. I remembered that Sidharth had created a concept where the spaceship would be looking up as the plants as they were so overgrown that they overlooked the spaceship. So, I decided to try and add this effect. I raised the scale of the assets and placed all around the spaceship.
Once this was done, I recorded the footage, brought it into Premier Pro and combined the videos with the music and sound that I received from the Sidharth and Rahul. Rahul had suggested we use "I'm Leaving" by Low Roar.
youtube
(Low Roar, 2014)
The song gave an interesting feel to the scene. I added this to the scene however, once I added in Sidharth's sound effects, I felt that the music and sound didn't match.
Instead, I went for a more dramatic soundtrack from the Outer Wilds. I felt that it matched the theme of having something dramatic and then for the second part of the video to be more relaxing.
youtube
(Andrew Prahlow - Topic, 2020)
Once this was done, I brought the project into Adobe After Effects and added the changes to fit the dome shape.
Andrew Prahlow - Topic. (2020). The Ash Twin Project. [song] Available at: https://www.youtube.com/watch?v=0ddvyyyCCD4 [Accessed 12 February 2025]
Gorka Games (2023). Landscape for Beginners - Unreal Engine 5 Tutorial. [online] Available at: https://www.youtube.com/watch?v=FSsOS6M2u1s [Accessed 12 February 2025]
Low Roar. (2014). I’m leaving. [song] Available at: https://www.youtube.com/watch?v=JrU4e8-w7x4 [Accessed 12 February 2025]
0 notes
Text
Muhammad Humza Zahid: Reflection and Learning Outcomes
The project delivered an exceptional learning opportunity that let me acquire new methods and enhance my current abilities. The principal aspect of this assignment allowed me to collaborate with transformative immersive systems like the 360° dome system.

The project required both technical expertise development together with teamwork between various creators from different fields. The educational experience showed me how to unite many artistic points of view to create a unified immersive environment.
youtube
The complex software processes of the project required extensive guidance from YouTube tutorials during its duration. I resolved my modeling and texturing and UV unwrapping obstacles by using detailed videos which showed me systematic tutorials. The experience of using Blender and Substance Painter provided me with additional artistic tools that will support my work in upcoming projects.
youtube
The multiple rounds of testing facilitated the creation of our pod through the creative process. The outcome proved better than expected as my team and I engaged in ongoing testing along with improvement efforts that turned the final creation into something unpredicted earlier in the process. The creative process within collaborative work and design flexibility proved essential factors in understanding this project through its development.
Reference:
Adobe Substance 3D (n.d.) Title of the video. Available at: https://www.youtube.com/watch?v=-ZbmRsOnApk&list=PLB0wXHrWAmCwnqWfKdGEmbtSKN2EzvLrY&ab_channel=AdobeSubstance3D (Accessed:10 February 2024).
Vicinity360 (n.d.) Title of the video. Available at: https://www.youtube.com/watch?v=fdiCe43sUmo&ab_channel=Vicinity360 (Accessed: 10 February 2024).
#Team7#Hertsteam7#dome project#360 video#concept art#envoirnment design#Muhammad Humza Zahid#Muhammad Humza#being Mughal#Hertfordshire#blog#youtube#vr games#Youtube
1 note
·
View note
Text
Sidharth Ojha - 10th Feb 2025
Fighter-ship and Sound
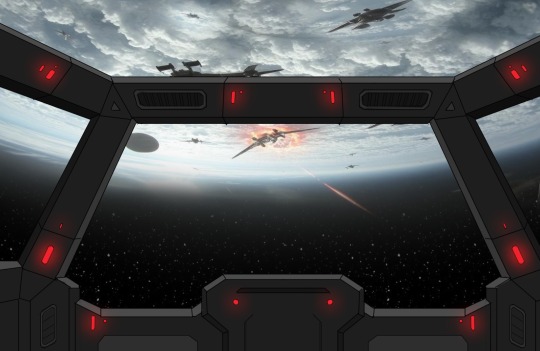
With some extra time I decided to make a fighter spaceship, I was inspired by fighter jets like F-16s and F-22s. But to make it look like a spaceship and not a jet I also took some inspiration from a NASA space shuttle. I also added greenish and bluish colors to give it a militaristic look.
I am also working on the sound for the scene, I wanted a tense and and claustrophobic feeling in the first part of the experience so that we could juxtapose it with the calm scene that comes later. I made the sound using the sound of plane turbulence, faint radio chatter, the muffled sound of explosions and gunfire outside, and loud thuds of debris hitting the pod surface.


0 notes
Text
Stevin Josy
Finalizing the Second Spaceship
It was ready to add the last details to bring the second spaceship to life after the base colors were applied. My main sources of inspiration during the texturing process were Siddharth Ojha's concept and color palette.


Creating the textures that matched the initial idea took about an entire day in Substance Painter. To enhance realism and break up the clean surfaces, I began adding panel edges and material details. Subsequently, there were little scratches and edge wear, sufficient to give the ship a worn-out but well-kept appearance.


Seeing everything come altogether and the ship appear finished at this point is usually the most satisfying. This was a successful collaboration thanks to Siddharth's design and color scheme, Kevin's UV work, and my Maya adjustments and Substance Painter texturing. The spaceship is now prepared for incorporation into the finished project since it has been fully textured. I'm excited to see how everything works out!
0 notes
Text
Rahul Karthikeyan - February 10
Making the terrain for the alien planet
Now for the final scene, it was planned to be made into scene where the escape pod has landed safely on a island of an alien planet. So for that the terrain had to be made for the scene. I initially planned on making the terrain on unreal engine but I did a bit of a research and that is when I came up upon Gaea. Using the gaea software, you can make heightmaps for terrain quite easily and so I went into it and started tinkering around. Eventually I kinda figured out how it works and started making the terrain height map.
The height map was ready after hours of tweaking and checking out many nodes and settings. Now I imported the heightmap into unreal engine and presto it was alive. Then it was time to focus on texturing the terrain. There was not much time, so I used a automatic texturing tool called 'MW auto landscape texture' from unreal marketplace. The texturing tool was actually quite effective and did its job. After finishing up with the texturing and adding water bodies. I shared the file to kevin to do the rest.


0 notes
Text
Stevin Josy, 9th February
Refining and Texturing the Second Spaceship
This spaceship's concept, color palette, and Blender base model were all contributed by Siddharth Ojha. His concept work was the main source of inspiration for the general design, details, and proportions. I thoroughly examined the sketch before I began to comprehend how to convert it into 3d.

Siddharth's Blender basic model was a fantastic to start, however it needs some work. It was my responsibility to refine and I used Maya for rearranging the geometry and modifying the dimensions to give it a smooth look. Before continuing, make a few minor adjustments here and there to make sure everything looks correct.

Kevin Adanan assisted with UV unwrapping after the model was prepared, ensuring that everything was neatly mapped out. Kevin did a fantastic job making sure everything was arranged correctly, and this stage is highly important because poor UVs can destroy a texture.

With that done, I moved into Substance Painter to start the texturing. First, I applied the base color keeping it simple before adding details.

Now that everything is in place, the next step will be detailing panel lines, subtle wear, and emissive highlights to give it depth and realism. I’ll be finalizing the textures and posting an update on the final look.
1 note
·
View note
Text
Kevin Adanan, Sunday 9th of February
Today I had to tweak a UV for a large ship. I made a few errors last night when I sent the FBX to Stevin for texturing. There was a shell that needed to be cut and unfolded. It was strange as the shell would Unfold as expected. I had to cut of the overlapped section and then reattach it to the entire UV shell. This morning, Stevin informed me that there was still an issue with the unwrap. I had left some of the UV outside of the texture space. I then had to add this back in.
Later in the day, I had to scale up the UV's of the rock asset as the previous textures were split on to two separate texture sheets and weren't utilising the UV space. I took the meshes into Max, touched up the unwrap and then scaled up the UV to fit the texture space in order to get a better texture. Once the changes were added, I updated the mesh in Substance Painter and exported the new meshes and textures into Unreal and added them to the scene.

Once all this was complete, I then adding more bits and pieces to the scene in Unreal and populated the environment more. The space scene is almost complete. Tomorrow, I'm going to work on the second part of the scene, the planet itself.
0 notes
Text
Kevin Adanan, Saturday 8th of February
Yesterday was a great day for the project. I learned how to set up the file for the dome from the notes that Ian Willcock posted on Canvas. Once I put together the scene in after effects, there was a weird seam issue on the video. I couldn't quite figure it out, fortunately Gautham was able to advise me on how to fix the issue. He spotted that the issue was the Motion Blur in Unreal. I was very grateful as he is part of another team but took the time out to help me.
Today I worked on level building and fixing a UV unwrap. I was sent a mesh of ship to clean up the UV.

Once this was done, I went back to level building for the environment and added changes that Sidharth had given me advice on. He suggested to increase the Brightness of the scene. I did this by increasing the Exposure and I added some larger ships in certain areas to help give a better sense of scale. I was happy with the changes, I feel that they add to the scene.
0 notes
Text
Stevin Josy, February8th
Texturing the Spaceship in Substance Painter
The next step after finishing the modelling phase was to add texturing to make the spacecraft look alive. To give the design more professional, futuristic appearance while keeping to the concept, I added materials, details, and wear using Substance Painter.
Preparing the Model for Texturing
My coworker Kevin Adanan assisted me with the spaceship's UV unwrapping before I began the texturing phase. His assistance made ensuring the UV maps were clear and arranged correctly, which greatly streamlined the texture creation process. The completed UV arrangement is as follows:

I was given a color scheme that could define the ship's general appearance to keep things consistent. This helped me blend surface features and metallic finishes by guiding my material selections.

Applying Base Colors
Creating a solid foundation color was the initial task to do in Substance Painter. To fit the futuristic style of the work, I began with a basic metallic gray. The more intricate texturing work that came next was made possible by this step.

Adding Details and Wear
To create realism, I added details after the initial texture was complete.
Panel Lines: I made thin panel lines all over the ship's surface using pen tool and regular maps.
Subtle Wear: To provide the ship with a worn-out, useful appearance without letting it seem unduly damaged, I added minor edge wear and scratches.

Final Textured Look
I made last-minute changes to the materials after adding all the features to make sure everything looked good. To regulate the way the light interacts with the material's surface and ensure that the colors matched the original design concept, I adjusted the roughness along with metallic properties. The spacecraft appears as follows once the texturing process is finished:


A fascinating feature of the project was the texturing stage, which gave me the chance to give the spaceship individuality and depth. Kevin Adanan deserves special recognition for his assistance through the UV unwrapping, this greatly streamlined the texturing process. The final style was largely defined by the color scheme, which made sure that all the materials were consistent.
The spacecraft is now prepared for incorporation into the finished project since the texturing is finished. As part of the team's video, I'm excited to watch it in action. As the project develops, continue to tune in for more updates!
0 notes
Text
Rahul Karthikeyan - Febraury 8
Texturing the plant life
After the friday class, Kevin asked if I could do the texturing for the plants that sid shared on the drive and I said I'll do it. Well after getting those files, I took them into substance painter. I took a look at sid's concept for those plants and I did them like that but the plant color looked too earthy to me and not like an alien planet flora so I decided to give it some different color to make it pop and look alien. The concept for the 2nd plant was great and looked alien like but for some reason my mind went to super mario and I thought I've already committed to the weirdness, why not go through with it for the whole thing, so I made the second one pop too.


0 notes
Text
Rahul Karthikeyan- February 7
Creating the Spaceship debris
After Stevin was done with the modeling of the spacecraft, I accessed the model from our team drive and started to prepare to make debris from the model. for this like the rock debris, I used the shatter effect and Solid shatter did not work on it since it is a too complex geometry and it could not compute the actions. As I was tinkering around with all the options, I came across surface shatter. Surface shatter breaks apart a model only on the surface level of the geometry and I had a go at it. After many trial and errors, I successfully took apart parts of the spaceship and made them look damaged so that it could be used as a debris. After taking apart the ship and making debris, I took those models and put them in substance painter to texture them. I wanted the debris to look damaged rather than smooth and brand new, so I used a smart material and tweaked the settings on it to give it a nice damaged and charred and slightly melted look so that it can be looked at and said it was an after affect of a explosion from a battle.


0 notes
Text
Kevin Adanan, Thursday 6th of February
Today I worked on adding in more animation to the scene. Hamza sent me the FBX for the Drop Pod yesterday. I added it to the scene. Unfortunately, due to having to replace the original test mesh, I the n had to re-record a lot of the animations. This took most of the day, as I had to re attach the camera to a new mesh.
youtube
(3D College, 2024)
I followed this tutorial again. Later in the day, I recorded 2 videos of the scene. One is 1080 by 1080 in resolution and the other is 2160. Tomorrow, I am going to render these out in Adobe Premier.
3D College. (2024) Unreal Engine 5 - attach Sequencer Camera to object. Available at: https://www.youtube.com/watch?v=yXjkod85ZUQ (Accessed: 6 February 2025)
0 notes
Text
Muhammad Humza Zahid: Texturing Phase and Collaboration with Team Members
The following task involved the pod texturing process after finishing the basic model construction and UV unwrapping procedures. My first efforts in Substance Painter involved working with standard textures because I wanted to apply basic materials to a surface while experimenting with distinct surface effects. I discovered that Substance Painter served me well in my first extensive usage because the tool provided me better texturing capabilities than traditional 3D painting methods.
The textured concept of the pod which Sidhart sent me at this stage helped me finalize the direction for implementing final textures. The reference work from Sidhart gave me better understanding of how the pod would appear when completed. Based on this concept I went back to texturing the pod within Substance Painter to improve its surface details.
This specific project shines because of its collaborative approach toward the team members. The joint work efforts and mutual sharing of progress steps led our project toward more creative achievements. Partnering with other team members was essential for undertaking our combined roles toward establishing an immersive experience as a whole.
#Team7#Hertsteam7#dome project#360 video#concept art#envoirnment design#Muhammad Humza Zahid#Muhammad Humza#being Mughal#Hertfordshire#blog#youtube#vr games
0 notes
Text
Rahul Karthikeyan, Febraury 5
Modeling and Texturing Rock Debris
With everyone working on something, I myself asked to do the debris parts of the sequence. With that I started doing the modeling for the debris in Maya. I started with the rock debris and I wanted it to look like actual meteor debris and have irregular broken shape. To get this, I first made a circle object and deformed it by using soft select tool. Then after looking into it, I used the shatter option. Now the shatter option had 3 options and the one I used was solid shatter. The solid shatter did actually work but it was uniform at first then I had to tweak the irregularity slider and boom the deformed circle was shatter in an irregular manner making it look like an actual debris. Then I took out the model into substance painter and modeled it with a rock texture to finish it off.


0 notes
Text
Kevin Adanan, Tuesday 4th of February
Over the past few days I have worked on modelling, texturing and animation. Yesterday I worked on texturing some mushroom assets that Sidharth designed. I then added them to the Unreal Engine scene. I plan to add the to a foliage scene later this week.

After that, I worked on adding in more animation to the environment.
Today I modelled and textured some meteor assets. I started the assets in ZBrush, after this I unwrapped them in 3DS Max. I textured them in Substance Painter.

I then added them to the Unreal Engine scene and animated them coming at the space ship.
0 notes
Text
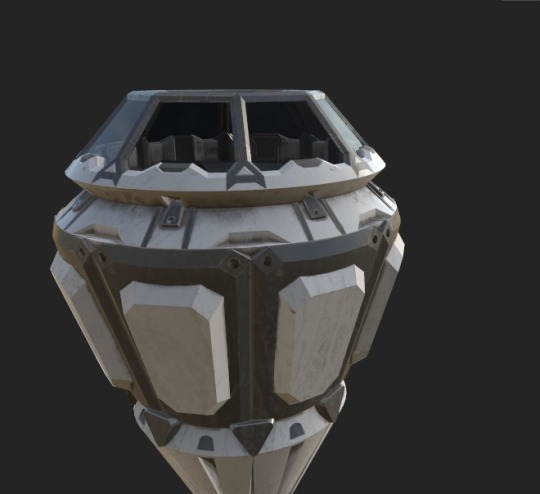
Muhammad Humza Zahid: Final Pod Modeling
The project began with group members developing the immersive experience design process. The core thematic element within the project involved a spaceship pod which would act as a significant interactive component before transitioning to the final 360° dome show. Modeling the spaceship pod fell under my responsibility when working as part of the team. I selected Blender as the essential software for carrying out this work. The very first step involved drawing conceptual sketches for the pod's design since I worked on determining its size while setting the object dimensions. Blender allowed me to develop a fundamental 3D model which preserved the core elements of our beginning design plans.

I proceeded to work on unwrapping after achieving finalizing the pod shape. The UV mapping process became my most challenging task during this stage when I needed to create smooth and unbroken UV layouts for later texturing. The UV unwrapping tool in Blender made the assignment much easier because it helped me easily map three-dimensional shapes onto two-dimensional planes before texturing.

I referred to numerous online tutorials to improve knowledge about Blender's sophisticated tools during this phase. My skills improved through watching YouTube tutorials specifically on "Blender 3D Modeling Tutorials." The tutorials delivered vital information about both effective modeling methods and UV unwrapping strategies that I previously lacked knowledge about.
youtube
Refrencing:
BlenderGuru (n.d.) Title of the video. Available at: https://www.youtube.com/watch?v=XeBUfMKKZDo&ab_channel=BlenderGuru (Accessed: 2 February 2024).
#Team7#Hertsteam7#dome project#360 video#concept art#envoirnment design#Muhammad Humza Zahid#Muhammad Humza#being Mughal#Hertfordshire#blog#youtube#vr games#Youtube
0 notes
Text
Kevin Adanan, Sunday 2nd of February
We held a meeting at 11am today in the library. We discussed people's progress and what had to be developed. I tested a Panoramic Render in Unreal that would only record 180 degrees to see if it would work. Immediately, the render crashed the system I was using in the library. After this, I UV unwrapped 3 all the assets that Sidharth modelled and textured some mushroom assets he modelled. After this, I worked on some more animation in Unreal. Towards the end of the day I received a space ship from Stevin and started to clean up some of the geometry before UV unwrapping it. I have just started the unwrap and I hope to finish it tomorrow.
0 notes