
Don't wanna be here? Send us removal request.
Statistics
We looked inside some of the posts by loadingcharter936 and here's what we found interesting.
Average Info
Notes Per Post
1
Likes Per Post
1
Reblog Per Post
0
Reply Per Post
0
Time Between Posts
14 days
Number of Posts By Type
Text
11
Last Seen Tumblr Blogs


Fun Fact
Tumblr posted its first advertisements in May 2012 and subsequently earned $13M in revenue.
Text
Primetech 3d Software Free Download

Download 3D object creator software for windows from the biggest collection of windows software at softpaz with fast direct download links.
Free nvidia 3D vision software download. System Utilities downloads - NVIDIA 3D Vision Driver by NVIDIA Corporation and many more programs are available for instant and free download.
3D Piping software is used to create piping designs for various industries and apartment complexes. The tool helps to quickly create the 3D piping model. We review the features of 6+ best piping software here. This will help you to make the choice of the best piping software. The 3D design software is available free for download.
Cinema 4D is a professional 3D modeling, animation, simulation and rendering software solution. Its fast, powerful, flexible and stable toolset make 3D workflows more accessible and efficient for design, motion graphics, VFX, AR/MR/VR, game development and all types of visualization professionals. Cinema 4D produces stunning results, whether. Updated at June 1, 2016 By Artec 3d. Artec Studio 11. High-precision 3D scanning and post-processing software compatible with majority of popular sensors, for the most seamless 3D scanning experience.
Gemvision Matrix 3d Jewelry Software Smart 3d Network
Primetech 3d software, free download For Pc
matrix 3d jewelry design software 7 free download crack is free HD wallpaper was upload by Admin. Download this image for free in HD resolution the choice 'download button' below. If you do not find the exact resolution you are looking for, then go for a native or higher resolution.
Don't forget to bookmark matrix 3d jewelry design software 7 free download crack using Ctrl + D (PC) or Command + D (macos). If you are using mobile phone, you could also use menu drawer from browser. Whether it's Windows, Mac, iOs or Android, you will be able to download the images using download button.
Most Powerful Tools 3design Cad 7 Jewelry Design Software
Primetech 3d software, free download Windows 10
Pin On Global Software Solutions Team
Gemvision Matrix 3d V6 0 Jewelry Design Software Crack

Matrix 6 Free Version Jewelry Cad Trainingjewelry Cad Training
G V Canada Launches Innovative Matrix 9 0 Software
Jewellery Cad Software Matrix And Matrixgold Cad
How To Make 3d Gemvision Jewelry Design Matrix 8 King Of Dragon Part 5
Matrix 3d Jewellery Design software, free download
Gemvision Cad Matrix V 8
Related : Matrix 3d Jewelry Design Software 7 Free Download Crack.
download free, softwares for PC computers.
Free softwares is a selection of freeware program for PC computer. Download free video editing, photo, design, antivirus, recovery, DVD, music, burning, PDF, converter, audio, recording software for free.
Free design softwareFree video editing software 3D CAD design software program free downloadEditing video free. software download3D design software, free downloadVideo edit free. software download3D house design software program free downloadFree video editor software downloadArchitect software, free downloadMake video free. software downloadCircuit design and simulation softwareDrawing program software, free downloadFloor plan program software, free downloadHome design software, free downloadHouse design software, free downloadInterior design software, free downloadKitchen design software, free downloadLandscape design software, free downloadLoudspeaker box design programPCB layout design programsFree music softwareFree photo editing softwareFree DJ software download programPhoto editing software free program downloadMusic composing software, free download programFree picture editing software program downloadMusic editing software, free download programPhotos editing software, free downloadMusic editor software, free download programDownload photo editor free programMusic mixing software, free download programPicture editing free. software downloadMusic recording software, free download programPlay instruments software, free download programProgram for making music free download. software
Video software for PC
Software for video editing freeedit video from any camcorder Capture video from a DV camcorder, VHS, webcam, or import most any video file format including avi, wmv, 3gp, wmv and divx. Software for DVD free decrypt and remove DVD protections, copy DVD. Software for burning freeCD and DVD, including Blu-Ray and HD-DVD. Software for movie editing freedrag and drop video clips for easy video editing, apply effects and transitions, adjust video speed and more. Software for movie maker freefrom basic cut to final edit. Software for movie making freecreate movies for DVD, HD, and more Burn your movie project to DVD for playback on TV. Software for playing DVD freemultimedia player (DivX, HD and AVC video, movie, audio, DVD Software for recording video freeof any format AVI (DivX, xvid.itd and MPEG videos without losing quality. Software for streaming video freestream & Broadcast Videos over the Internet. Software for USB cameraadd fun special effects to your webcam. Software for video capture freerecord all screen and audio activity on your computer. Software for video conference freetalk and video chat with people from around the world. Software for video making freesimple cuts, filtering and encoding,transitions and visual effects. Software for video recording freerecord video from a webcam, recording device or capture video from screen. Software for virus freedetects and stops viruses, threats and malware.
Audio software for PC
Primetech 3d software, free download 2012
Software for CD coverscreate your own CD covers, download album cover images for your music collection. Software for audio freeediting, recording, playing, mixing, converting audio files. Software for audio recording freecomposing and creating music,record any sound your computer makes. Software for making music freemake and edit voice, music and other audio recordings. Software for cutting music freecut MP3 or WAV segment from MP3 and WAV format files. Software for mixing music freecomplete solution for mixing music for amateur and professional DJs. Software for DJ mixingmix digital music in various formats such as MP3, WMA, AAC, OGG, WAV, FLAC or CDs in real time. Software for mixing songsyour songs will always stay on the beat. Software for music composition freecomposing and creating music on your PC. Software for music creation freecomplete editing program for making music. Software for music editing freerecording and editing music. Software for music freemake and edit voice, music and other audio recordings. Software for music notation freecompose a song by inputting notes. Software for music production freerecord your own music, voice, or other audio files, edit it, mix it with other audio or musical parts, add effects. Software for online radio free online radio player for listening to radio on the internet. Software for recording music freeprocessing and recording sounds. Software for sound recording freerecord your own music, voice, or other audio files. Software for voice recording freerecord voice, save streams and record MP3 and WAV. Software for writing music freecreate sheet music with WYSIWYG editor, listen to your score with computer playback.
Drawing software for PC
Software for 3D animation freecreating animated films, visual effects, interactive 3D applications or video games. Software for CAD freecreate accurate professional drawings, working drawings, designs, plans, layouts and diagrams. Software for 3D design free3D models for home design and visualization of architecture. Software for cartoon animation freeproduce high quality animated cartoons. Software for 3D drawing freecreate exact models, 3D views, ground-plans and lists for all your construction and furnishing projects. Software for CD coverscreate your covers, inlays, labels, and even booklets. Software for 3D modeling freecomplete 3D modeling application for computing aided drafting in three dimensions. Software for drawing circuit diagrams freedrawing of electrical and electronic diagrams, schematics, control circuit diagrams. Software for animation freegraphics software product used for creating animated films. Software for drawing diagrams freeproduce working drawings for engineering projects, UML diagrams, network maps, and flowcharts. Software for drawing floor plans freefor drawing floor planecombines easy handling with professional cutting-edge CAD functions. Software for drawing house plans freesee your ideas in near photo-realistic 3D Software for drawing plans freeLandscape plan template. Floor plans House plans. Software for electrical drawing freeelectrical and electronic diagrams, schematics, control circuit diagrams. Software for engineering drawing freecreate drawings for engineering and science. Software for flash animation freecreate Flash animations without coding. Software for furniture design freesee your ideas in near photo-realistic 3D. Software for interior design freerearrange furniture in a household floor plan. Software for kitchen design freedrawing software forkitchenand interior design that helps you place your furniture in 2D and 3D design. Software for map drawing freedrawing maps of all types topographic maps, city maps, hiking and biking maps, Internet maps. Software for technical drawing freeCAD program for drawing professional quality, technical drawings. Software for graphic designgraphic design and Photo Editor. Paint & Draw Online Create Page Layout, Logos, Illustrations and Promotional Products Software for house designyour Home, Office, Deck, or Landscape. Software for fashion designcreate stunning and highly realistic 3D garments for friends, family, business, or just for fun. Software for landscape designcreate perfect landscape, Garden, Deck, and Patio Plans in Minutes. Drawing software for kidselectronic coloring pages, animals, flowers, automobiles, airplanes. Software for garden designplan your garden according to your wishes,add trees, shrubs and plants to your plan. Software for arhitectural drawing free3D models for home design and visualization of architecture, landscapes, exhibits, or any kind of spatial design.
Photo software for PC
Photo editor software for free downloadcomplete set of image editing tools, you can remove red eye instantly, enhance the color of the image, make funny caricatures, add astonishing lighting effects, straighten, resample and crop images. Software for photo album freecreate great looking web photo albums from your digital photos. Software for photo books freecreate a digital photo album using your digital photos, images. Software for photo collage freemake impressive photo collages and digital scrapbooks with your photos. Software for photo editing freeedit and optimize photos the easy way. Software for photo effects freefun and easy photo editing software that enables you to fix and enhance photos, special effects included. Software for photo mixing freecompositing software that mixes up faces and body parts between two photos. Software for photo slideshow freemusical slideshow with 150+ transitional effects Software for picture editing free picture editing and processing images and photos.
Antivirus software for PC
Software for antivirus freedetects and stops viruses, threats and malware, removes Spyware, Keyloggers, Rootkits, Adware, Hijackers. Software for malware freemalware protection and effectively find and destroy various threats.
Security software for PC
Software for backup freeBack up your documents, pictures , music, videos and more. Software for password freeshow you most passwords that are typed in a password edit box,remove the password and restrictions.
Utility software for PC
Software for bootable USBapplication for formatting and making bootable, USB Flash Memory Drives and USB Hard Disks. Software for hard drive repair freerepair all data loss problems including data lost from software crash, formatted or damaged hard disk drive, virus attack, lost partitions. Software for computer repair freeprotect, repair, clean, and optimize your PC. Software for ocr freerecognize the text contained within any scanned document or image. Software for PDF freegenerate PDF documents using any of your applications. Software for recording desktop freerecord your computer screen activity in video. Software for recording screen freerecord all screen and audio activity on your computer. Software for recovery freerecover accidentally deleted files. Software for remote freeremote control any computer over the internet. Software for USB stickcollection of portable software for everyone. Software programs for kids freeeducational software for children.
E-mail software for PC
Software for email marketing free deliver email newsletters. Software for marketing freecreate amazing cards with shapes, logos, cool arts and print them.
Internet software for PC
Software for internet caffemonitor and take the control of your clients from Server. Software for internet speedaccelerate downloading of online videos, eliminate buffering Software for web design freecreate great websites fast.
0 notes
Text
U Control Uca200 Drivers For Mac
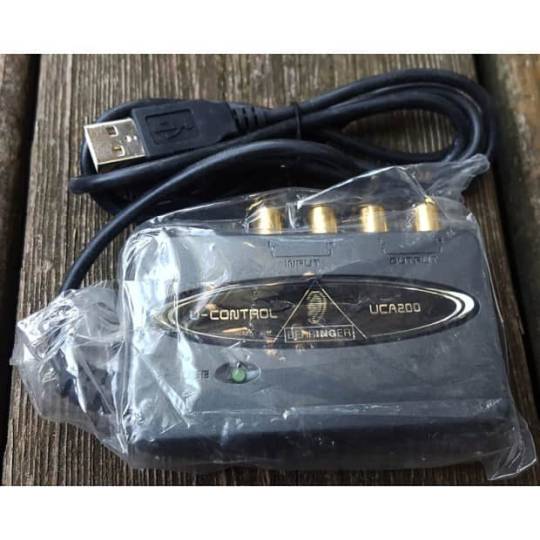
The behringer u-control uca202 needs to be connected first. The add new hardware wizard dialog box guides you through the driver installation process. Ultra low-latency 2 in/2 out usb/audio interface with direct analog-to-digital conversion. Same stereo interconnect cable 1m our price. To find the right one, search for u-control uca200-sr. Operating Manual Version 1.2 april 2006 U -C O N TR O L U C A 2 0 0 2 U-CONTROL UCA200 CAUTION: To reduce the risk of electric. Mac–no setup or drivers.
Trouble shooting a failed installation of WIBU USB dongle and uninstalling If installation procedures failed to successfully install WIBU, perform the following tasks. Uninstall all instances of WIBU.

Behringer U-control Uca200 Driver Mac
Wibu-box U Drivers For Mac
Navigate to your Control Panel B. Select “Programs and Features”. Look for “WIBUKey Setup” in the list and choose unstall/change. Shut down the system. Physically remove/unplug the WIBU USB dongle from the system. Reboot the system and run the WIBU installation software (without WIBU USB).
U Control Uca200 Drivers For Mac Free
For installation instructions click. Shut down the system and plug in WIBU USB dongle into a open 2.0 USB slot on the system. Turn the system on.
When the system returns to the final desktop you should see the WIBU completed its final installation and state it was successful. As a confirmation that the WIBU USB dongle is installed in a proper 2.0 USB slot you can look for it in the system's “Device Manager”. To get to the Device Manager, RIGHT CLICK on My Computer on the desktop. Click on MANAGE, then select DEVICE MANAGER. In the center dialog box that appears, navigate to UNIVERSAL SERIAL BUS CONTROLLERS. Then look for WUBU-BOX/U. If it appears in the list then it is installed.
Wibu Key 64
Cached
Now open the CONTROL PANEL and click on WIBUKEY, it should now show you the WIBU serial number and license information.
0 notes
Text
Rise Of The Tomb Raider Outfit Mods

Rise Of The Tomb Raider Outfit Mods Download
Rise Of The Tomb Raider Pc Outfit Mods
Rise Of The Tomb Raider Outfit Mods For Xbox One
Rise Of The Tomb Raider Outfit Mods
Rise Of The Tomb Raider Outfit Mods Xbox One
Rise Of The Tomb Raider Outfit Mods For Sale
Oct 03, 2020 2) Unzip your nude mod download. Most on the later parts of this thread rely on the 'Slight Jiggly Lara' mod from the Nexus as a base, so this will be the first mod installed. Unzip it, and open the first folder. Inside is another folder, named something like 'Lara Nude Mod (Expedition) -Jiggly'.
Nov 04, 2016 There are several unlockable outfits for Lara in Rise of the Tomb Raider. Some can be bought, while others are earned through missions and story progression.
2) Unzip your nude mod download. Most on the later parts of this thread rely on the 'Slight Jiggly Lara' mod from the Nexus as a base, so this will be the first mod installed. Unzip it, and open the first folder. Inside is another folder, named something like 'Lara Nude Mod (Expedition) -Jiggly'.
Shadow of the Tomb Raider was released in September 2018 and since then there hasn’t been any nude mod for it. Blasphemy, I tell you. Thankfully, at least for some people, that’s about to change as the first proper nude mod has been released for it.
If I recall correctly, the first big nude mod that came out on the PC was for the first Tomb Raider game (everyone wanted to see Lara’s triangular boobs back in the 90s). As such, I am a bit surprised that it took modders almost seven months in order to release a proper nude mod for Shadow of the Tomb Raider.
Titled Shadow of the Tomb Raider Nude mod (Booty Edition) and created by modder ‘JOSTAR MOD’, this mod introduces 25+ sexy outfits alongside multiple naked versions of Lara.
Rise Of The Tomb Raider Outfit Mods Download
The mod was tested with version 1.0.237.6 and works with all of the in-game texture quality settings. https://loadingcharter936.tumblr.com/post/653308890228850688/aiseesoft-pdf-to-text-converter-for-mac. In other words, you can safely select Low, Normal, High or Ultra.
Rise Of The Tomb Raider Pc Outfit Mods
As always, we won’t allow any direct links to the mod, however you can find and download it by searching for its title at the game’s NexusMods page. Make sure though to log in and enable the Adult content, otherwise you won’t be able to find it. Moreover, you’ll need Kaldaien’s Special K mod in order to install it.

Rise Of The Tomb Raider Outfit Mods For Xbox One
Dropbox command line mac. Do note that in its uncompressed version, this mod is 1.65GB in size so make sure you have enough hard-disk space. Once you find and download it, you can install it by extracting (SK_FFXV.7z) inside the Shadow of the Tomb folder, extracting the mod at “SteamLibrarysteamappscommonShadow of the Tomb RaiderSK_Resinjecttextures”, turning off DX12 and the run the game, go to Campfire and choose the OUTSIDER OUTFIT.
Rise Of The Tomb Raider Outfit Mods
Have fun everyone!
Rise Of The Tomb Raider Outfit Mods Xbox One
John Papadopoulos
Rise Of The Tomb Raider Outfit Mods For Sale
John is the founder and Editor in Chief at DSOGaming. He is a PC gaming fan and highly supports the modding and indie communities. Before creating DSOGaming, John worked on numerous gaming websites. While he is a die-hard PC gamer, his gaming roots can be found on consoles. John loved - and still does - the 16-bit consoles, and considers SNES to be one of the best consoles. Still, the PC platform won him over consoles. That was mainly due to 3DFX and its iconic dedicated 3D accelerator graphics card, Voodoo 2. John has also written a higher degree thesis on the 'The Evolution of PC graphics cards.' Contact: Email
0 notes
Text
New Pan Card Application Form 49a Word Format

New Pan Card Application Form 49a Word Formatting
New Pan Card Application Form 49a Word Format 2018
New Pan Card Application Form 49a Word Format Pdf
New Pan Card Application Form 49a In Word Format Free Download
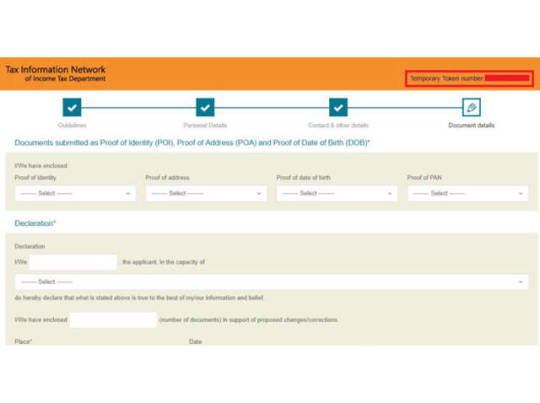
A PAN card application form, referred to as Form 49A or Form 49AA, is used for the allotment of the Permanent Account Number (PAN). PAN cards are essential for the Income Tax Department to identify taxpayers.
The process to fill in the form for the PAN Card has now been automated and you can go ahead and fill in the online forms. However, there are still some of us who would prefer to fill the offline application for PAN Card. In such a case, it can be a problem if the forms are not available through the offline method. Well, the good part is that the PAN Card Forms are available for the download and you can obtain a print of the form as well. These forms can then be submitted to local offices to avail services.
New Pan Card Application Form 49a Word Formatting
(c) ‘Individual’ applicants should affix two recent colour photographs with white background (size 3.5 cm x 2.5 cm) in the space provided on the form. The photographs should not be stapled or clipped to the form. The clarity of image on PAN card will depend on the quality and clarity of photograph affixed on the form. The Income tax department notified new PAN application forms form 49A and 49AA in pdf format. These forms are used for applying new PAN card. These new formats of PAN card replaces old format of form 49A and 49AA. Income tax department issued a notification no. 96 dated 23 December 2013 regarding new format of PAN card and annexure A, B and C.
In this article, we have listed the details of the PAN Card Form along with the download link for the form so that you can get the form without having to visit the department. This will save a visit for you and you can simply submit the form in one single visit after filling the form.
Below are the details of the forms along with the download Link
Different Types of PAN Card Forms
Form 49 A – This form is that is required for getting a new PAN Card by individuals. Apart from this, you can also use this form to make corrections in the PAN Card and to apply for HUF, companies,and forms that are incorporated in India


Download Link – https://www.tin-nsdl.com/downloads/pan/download/Form49A_NSDL%20e-Gov_01.06.16.pdf
Form 49 AA–This form is also used to apply for new PAN card and to make corrections in PAN Card but this form is specifically to be used by the individuals and the companies that are not incorporated in India. The form needs to be filled by all such entities and also, the PAN Card issued to such entities will have the information of the location of all these entities.
Download Link – https://www.tin-nsdl.com/downloads/pan/download/Form49AA_NSDL%20e-Gov_01.06.16.pdf
Steps to Download the PAN Card Form
If you do not wish to download the forms that are listed above then you can follow the steps listed below
Visit the TIN-NSDL Website athttps://www.tin-nsdl.com/pan-center.html.
On the website, click on Downloads Button and select PAN from the drop-down list.
You will notice the hyperlinks for Form 49A and Form 49AA on the page. Click on these hyperlinks and the form will be displayed in PDF Format. You can then download and print them as per your requirements.
Steps to Fill and Submit the PAN Card Form
New Pan Card Application Form 49a Word Format 2018
Once you have the form with help of the link above, you can simply go ahead and print the form. It is recommended to at least print the 2 copies of the form so that you have a backup if you make a mistake in the form. After that, you can follow the steps listed below. https://loadingcharter936.tumblr.com/post/653308890228850688/aiseesoft-pdf-to-text-converter-for-mac.
New Pan Card Application Form 49a Word Format Pdf
You need to begin filling the form by attaching the photo, filling the details of AO Officer and other personal details. Fill in the details of the parents, address and other contact information.
Once that is filled, enter the details of the income along with the details of the documents that you are attaching for the proof of identity and proof of age and proof of address.
You can then attach the documents along with a demand draft of the fee and submit the form to the PAN Centers in your area or you can send it via post to the department in Pune.
If you wish to know about the location of PAN Centers then you can visit – https://www.tin-nsdl.com/pan-center.html
Tips for Filling the PAN Card Form
It is quite easy to fill these forms but we would like to share the tips with you that would ensure that the form is not returned to you. Dropbox command line mac. Here are some of those tips
New Pan Card Application Form 49a In Word Format Free Download
Use only Block Letters while filling the form and only use a Black Ball Point Pen.
Ensure that there is no over-writing or correction of the form.
Do not use abbreviations in the form.
Photos should be passed in the form. Do not staple them or clip them on the form.
Details mentioned on the documents should match with the details that you mention on the form.
The signature should be clear and it should be signed across the photo. If you plan to put a thumb impression then the thumb impression should be attested by Notary Public or a Magistrate.
0 notes
Text
Apache Ps2 S Iso

Black (Europe) PS2 ISO Download. ID: SLES-53886, SLES-54030. Languages: English, French, German, Italian, Spanish. For Sony Playstation 2.
Apache Ps2 S Iso Games
Apache Ps2 S Iso Free
Apache Ps2 S Iso Full
Apache Ps2 S Iso Download
Psp Iso
Jet Li: Rise to Honor
Apache 2 will not even let you place a particular file in the iso if it is larger and there is an issue where the program crashes when switching layers. Apache 3 warns you that it can corrupt the iso to replace a file if is larger and if you tell it to do so anyways the program crashes.
Apache2 is a tool with a wide range of possibilities. It can import.iml/.ims, extract files from the disc for PS2, and view the information contained in the volume. Gives us the ability to switch between different layers. And download individual files from them, it converts:.iso to.bin/.cue (RAW!). It contains such programs as Zandal's Helper or DVDScan.
CoolROM.com's PS2 ROMs section. Browse: Top ROMs - By Letter - By Genre. Mobile optimized.
Apache: Air Assault RELOADED Apache: Air Assault is a modern combat flight simulation game where players control a variety of lethal Apache attack helicopters outfitted with cutting-edge military weaponry. The goal is to prevent terrorist attacks by raining down destruction from above in the world’s most volatile warzones.
LEGO Racers 2 на PS2
Power Rangers: Super Legends - 15th Anniversary (2007/RUS/NTSC) / PS2
Power Rangers: Super Legends - 15th Anniversary (2007/RUS/NTSC) / PS2
Grand Theft Auto: Liberty City Stories (NTSC) (Archive) (2006|Rus)
Grand Theft Auto: Liberty City Stories (NTSC) (Archive) (2006|Rus)
(PS2) Spider-Man 3 (RUS|PAL)+dlc
Teenage Mutant Ninja Turtles 2 PS2
Dead Or Alive 2 PS2
Apache Ps2 S Iso Games
Whiplash PS2
Freestyle Metal X
Peter Jackson's King Kong: The Official Game of the Movie ps2
Peter Jackson's King Kong: The Official Game of the Movie ps2
Hunter The Reckoning: Wayward (RUS/ENG/NTSC)
PS2 GAME COLLECTION(BG)
God of War (NTSC-U/RUSSOUND)

Скачать торрент Rule of Rose PS2
City Crisis (2001) (PS2) (PAL) (Unofficial) (Ru)
(PS3) Enchanted Arms: Special Edition (EUR/RUS)
(PS2) Ratchet & Clank: Going Commando (2: Locked and Loaded) (RUS|NTSC)
(PS2) Ratchet & Clank: Going Commando (2: Locked and Loaded) (RUS|NTSC)
(PS2) Ratchet & Clank 3: Up Your Arsenal (RUS|NTSC)
(PS2) Ratchet & Clank 3: Up Your Arsenal (RUS|NTSC)
(PS2) Ratchet & Clank: Size Matters (RUS|NTSC)
(PS2) Shadow of Rome (RUS/Multi5|PAL)
Apache Ps2 S Iso Free
(PS2) Primal (Full RUS|PAL)
(PS2) Kuon (RUS/ENG|NTSC)
Apache Ps2 S Iso Full
(PS2) Magic Pengel: The Quest for Color (ENG|NTSC)
Apache Ps2 S Iso Download
(PS2) Magic Pengel: The Quest for Color (ENG|NTSC)
Psp Iso
(PS2) Mercedes-Benz World Racing (RUS|PAL)
0 notes
Text
Download Dropbox Onto Mac

4/5(1 vote )
Download Dropbox Onto Laptop
Dropbox For Mac Os
Download Dropbox Onto Computer
Dropbox Download Mac Os X
Installing and using Dropbox for Mac is as simple as downloading and installing the app. From there, your Dropbox acts like a folder on your computer—except that it resides in the cloud. Here's how to add it to your Mac. That’s it, you’ve just copied the file from a shared Dropbox folder onto your own MacBook Air or other Mac system. In fact, since it’s a video, my demo can now be opened and viewed: With a name like “Crash Landing” you can probably guess how the video ends. Anyway, that’s it. Dropbox on the Mac. Super easy to work with. I spoke my book to an audio producer and he put it on Dropbox. To e-transfer it to disc I need to download my dropbox file onto my MacBook Air and the file is only available in a link from Dropbox.
The importance and utility of Cloud storage in our life are certainly of great help to provide security against data loss threats. Its role has been of significant assistance in making our lives much easier and convenient. The small businesses and even regular computer users use embedded security features of cloud storage for file sharing rather than using expensive server systems.
The cloud-based platforms including Dropbox and Google Drive are even better alternatives that use such programs so that you can get access the cloud files from your desktop.
Mac users: Click on the Dropbox icon in your menu bar, select the gear icon at the bottom left, and click on Preferences. Click on the Account tab, and then click on Change Settings.
What is Dropbox and how to uninstall it on Mac.
Contents
How to remove Dropbox from Mac
How to manually remove Dropbox from Mac
An alternate method to remove Dropbox from Mac:
Dropbox is a personal cloud-based storage service that allows you to file sharing and collaboration. It also allows quicker sharing of files across multiple devices and lets you even stream files online. It further allows you to back up your files onto a database in the cloud for safekeeping. Here, in this article, we are providing you with a complete guide for how to remove dropbox from Mac with ease.
All those users who change their mind and wish to switch from Dropbox to another platform have faced difficulty and are generally unsure of how to uninstall dropbox on Macbook. The users may wish to delete the dropbox because of the limited 2GB free storage that it provides or because of security concerns about dropbox use.
There also may be several other reasons why you want to remove the dropbox from your computer, that’s why this article seeks to explain everything to you in relation to understand about How to remove dropbox from Mac system, keeping your data safe.
Things to remember before uninstalling dropbox
There are a few things that you must remember before you uninstall dropbox. The concept of cloud storage is that your files are not actually on your system; instead, they are being stored on a cloud server so that you can access them remotely. If we follow this concept, the process of removing dropbox from your Mac is not actually deleting the files stored in it.
The only thing happening is that the dropbox program is being removed from your desktop. And to note, you will only able to access your dropbox account and files in that folder via the Dropbox website.
The users who have their file synchronization can no longer avail of this luxury. So, if you really want to delete your Dropbox files or account, then deleting it is not the right approach. To understand in detail, this article will explain to you how to remove dropbox files from Mac system.
How to remove Dropbox from Mac
There are two methods to remove dropbox from Mac. The first method is by removing the dropbox manually and the second method says to remove dropbox from Mac by using utility or applications. Also, in another way, you can remove your dropbox account or delete it. Lets’ discuss the two methods in detail:
How to manually remove Dropbox from Mac
The first method to remove dropbox from Mac can be done by removing it manually. If your dropbox is open, then quit the dropbox by following the methods:
Step 1: Unlink your Dropbox account
Launch Dropbox on your Mac > Click on the dropbox icon from the menu bar > Go to the settings > Select ‘Preferences’ > Dropbox command line tool.
A new menu appears where you click on ‘Account’ tab > Now, click on the ‘Unlink this dropbox’
settings to remove your account > Once done,
click on the ‘Dropbox icon’ at the top of the screen >
Now dropbox Account is unlink quit the dropbox icon from so that it stop working.
Step 2: Move the Dropbox Application the trash folder
When done, go to the application folder and remove the dropbox application to the trash folder.
You can also trash the folder which contains all the remaining files.
But the thing is, this manual removal of the dropbox method sometimes doesn’t work because the system shows that the removal of the application is impossible as the app is bound to the application account. Still even after unbinding the application account and then try to remove the dropbox folder with all the files.
Further, if you also wish to remove the files in the dropbox folder from hard drive, then drag the dropbox folder to the trash. Applying this way, it will deflect your dropbox folder which is present in a local folder.
How to delete Dropbox account on Mac completely

Uninstalling the dropbox program from Mac won’t delete your dropbox account. But if you still wish to delete your Dropbox account as well from the Mac device, then you follow the below-listed steps. However, it is to be noted that performing these steps will delete your dropbox files too, so ensure that you have a copy of your files to prevent any important data loss.
Step 1: Open a browser app and type Dropbox.com into the address bar.
Step 2: Sign-in to dropbox using your email id and password.
Step 3: Once there, go to the top-right, click your name and select the ‘Settings’ from the drop-down menu.
Step 4: Below the ‘General’ header, locate and click on ‘Delete My Account’
Step 5: An optional step with a window asking the reason for your decision will appear. If you want to give a reason then enter your password, write so, and click ‘Delete my account.’ Now you are done.
An alternate method to remove Dropbox from Mac:
The other alternate method to remove the dropbox from your Mac device is by the usage of tools or utilities. To carry out this secondary method, there is particular software available for the same. The name of the software goes by “App Cleaner and Uninstaller” which enables you to remove the dropbox folder from your device. This software also lets you manage the different extensions. With the help of just one click, the software app cleaner will disable the unwanted Mac start-ups programs. You just need to follow these easy steps:
Step 1: First thing, you need to quit your dropbox application. Once done, you need to launch the app cleaner and then search out for the dropbox on it.
Step 2: When you find the application on the app cleaner, click on the app > select the delete option and press ok to delete it.
The above methods will completely delete the data of an application from your device.
Mac free memory cleaner. Nonetheless, it is to be noted that the services of the App cleaner software are basically cloud-based so in case, you are afraid of losing any other important file and wish to reinstall the dropbox on your Mac system, then you can restore all of your data or lost files.
In case you are facing trouble issue while removing dropbox from Mac, then you follow these 4 steps as given below:
Step 1: Go to utilities and go to applications available on the dropbox folder.
Step 2: Open the activity monitor and scroll to find the lines that say dropbox.
Step 3: Once there, click on X to force to quit an application.
Step 4: You need to repeat this method for each line which is saying dropbox, and then try to uninstall the dropbox again.
Delete Dropbox using Third party app:
There are plenty of third party app which uninstall dropbox in single click. few of them are list below.
CleanMyMac X
CleanMyMac X is all-in-one package to awesome your Mac. It cleans megatons of junk and makes your computer run faster. Just like it did on day one.
Download and launch CleanMyMac X
Click on the Uninstaller tool in the sidebar.
Locate Dropbox in the list of apps and check the box next to it.
Press Uninstall.
Check for any leftover files by clicking on Leftovers in the Uninstall utility. If there are any listed, check the box next to them and press Uninstall.
AppCleaner
AppCleaner is a small application which allows you to thoroughly uninstall unwanted apps.
Simply drop an Dropbox application onto the AppCleaner window. It will find for the related files and you can delete them by clicking the delete button.
Optional Method for removal of the dropbox from Mac
Additionally, there is another optional method to remove the dropbox from your Mac system can be done by following these simple steps as listed below:
Step 1: Open the finder > Select ‘go to a folder’ > Press shift + command + G.
Step 2: Or you can simply go to the ‘menu’ and click on it to open the dialog box. Now, copy and paste the ~/. Dropbox into the box > and press the ‘Return key’.
Once it is done, you can remove the Dropbox app from the system settings and select all files in that dropbox folder and drag and drop them into the trash.
How Do I Remove Dropbox from my Mac without Deleting Files?
There are a lot of queries from users to know how to remove Dropbox from Mac without deleting files. Well, there are two effective solutions to save your important data, while uninstalling Dropbox application from your Mac device.
The first and easiest way to ensure no data is lost while removing the dropbox app is to check for the green mark which is available next to the File’s icon. The green mark indicates that the data from your files is still available on your hard drive so you can now safely uninstall dropbox from the device.
Another way that is a more thorough alternative to make sure about the safety of your data is to move the files out of your Dropbox account. This can be done by creating a copy of the files or moving the original files out of the dropbox folder. Now that the files are no longer in your Dropbox account, they are not available for download from elsewhere but are still stored safely on your Mac device.
If You Can’t delete dropbox from my Mac?
It is possible that sometimes you are not able to delete dropbox from your Mac device. The reason may be the background processes of the dropbox application that are not shutting down properly. You can close these manually by following steps:
Step 1: Click on the ‘Activity Monitor’ located inside the utilities folder within your applications. But the problem is they may restart if you open Dropbox again.
Step 2: In the Activity Monitor, look for lines that say ‘dropbox.’ Select the process and click ‘X’ located in the top-left corner to force it to quit.
Select 3: Repeat the same step 2 for each process and then try to uninstall dropbox again by deleting the app from within the finder.
Concluding Remarks on How to delete Dropbox from Mac

Following the above-mentioned full guide for removal of dropbox from the Mac device, it is evidently clear that it is not a difficult task to remove dropbox from the system. Certainly, the difficult part is to ensure that all traces of the application are deleted. The steps for removal of dropbox become pertinent to follow when you are selling your Mac laptop and want to scrub off any personal important data left unintentionally on the system.
Well, it is no wonder, that some users think that uninstalling and manual deletion of the dropbox folder is not sufficient to remove the dropbox from Mac. For that, the answer is App Cleaner and Uninstaller tool that can be used by the users to remove Dropbox from Mac. Now, you can conveniently uninstall dropbox from Mac device, following the above complete guide.
Moreover, it is also possible that while on the go on removal process you may accidentally delete some important files. But we have got you covered, with steps explaining how to uninstall Dropbox from Mac without deleting files. I hope, you have found the article useful and helpful. Thank-you!
Also Read:
Expand cloud storage on Mac
CloudMounter connects unlimited storage to Finder.
A number one cloud-based storage system today, Dropbox essentially made storing data online mainstream. This app simplifies syncing files across different devices and offers an easy way to share photos, folders, or send large files (i.e. too large for emails) to others. Although Dropbox isn’t the only cloud-based storage and syncing service for Mac, it remains extremely popular.
Even though, as a Mac user, you do already have iCloud storage and syncing service right at your fingertips, integrated with your Mac and other iOS devices, there are still reasons for you to download Dropbox for Mac.
Get Setapp for seamless storage control
No matter where you keep your precious files, Setapp apps will help you make storage management easy. A single toolkit for everything.
Dropbox makes it easy to share whatever it contains, by offering advanced features such as shared folders or the ability to copy a Dropbox link to allow someone to download a file from your folder. Besides, Dropbox is one of the more common cloud services used by third-party productivity apps that could offer you great additional features.
Despite iCloud and Dropbox both having basic cloud storage functionality, there are quite a few differences in what you can expect from each. You can’t easily share with iCloud, as its associated solely with a given Apple ID, while Dropbox lets you share folder contents with others, constantly syncing among those connected to the folder. On the other hand, don’t expect Dropbox to automatically sync your data like photos or contacts like iCloud does. You only get quick access to what you put inside your Dropbox folder.
How To Sync Dropbox On Mac Easily
While you can always access your data from the Dropbox website, in the long run, it's easier to install the Dropbox desktop app. Using the Dropbox desktop app means you won't have to manually upload or download files in your Dropbox folder and any time you make a change to a file and are connected to the internet that change will sync everywhere you have Dropbox installed. Dropbox app for Mac works even when you're offline — just like an ordinary folder.
How to install the Dropbox app for Mac?
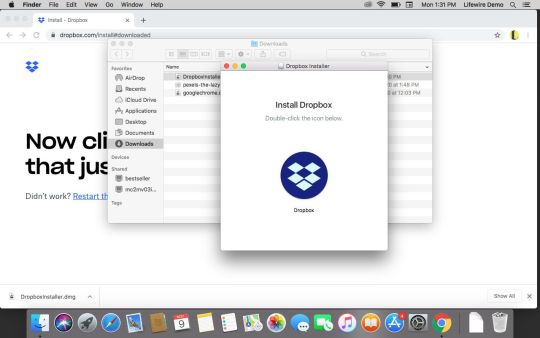
To download Dropbox for Mac, look for the Dropbox installer on dropbox.com. Once the download of the Dropbox installer is complete, you should be able to find it (DropboxInstaller.dmg) in your Mac’s Downloads folder. Open the file to start your Dropbox download app:
Double-click on the Dropbox icon in the installer window
A warning sign will appear cautioning that Dropbox is an application you downloaded from the internet ➙ click Open to start the installation process
Once the basic installation is complete, Dropbox will ask you to sign in. If you don’t already have an existing Dropbox account, use the sign-up link near the bottom-right corner of the window and follow the online instructions to set up your Dropbox account.
If all done right, after you sign in to your Dropbox on Mac, you’ll see a congratulations message for successfully completing the installation. Well done!
Now on to your Dropbox folder. To set it up:
Click Open My Dropbox Folder button in the final installer window
Enter your Dropbox password ➙ then click OK
Dropbox will add itself to your Finder’s sidebar and deposit a Dropbox for Mac tutorial into your Dropbox folder (a Get Started with Dropbox .pdf file). Take a few moments to read through the guide — it provides a good outline for working with Dropbox.
Tips for using Dropbox on Mac
Understanding how does Dropbox work is easy. Once you install the Dropbox desktop app and set up your Dropbox account, it’ll appear on your computer as a special Dropbox folder, which will become the heart of how does Dropbox work. Anything you place inside that folder is automatically copied to the cloud and synced with your other devices that run Dropbox. Note that Dropbox might not automatically copy all the files on your computer (e.g. when you don’t have enough space) — you might have to pick and choose which ones you want to save.
Transferring files to the Dropbox folder is a matter of seconds. First Dropbox will show a blue icon with circling arrows in the lower left — this means copying the file and uploading it to the cloud. Once it’s done, the icon will turn green and display a check mark. If you wish to transfer multiple files at once:
Hold ⌘ and click on each file you want to move
Drag one of the files to move all selected ones into the Dropbox folder
What you don’t have to worry about is how to sync Dropbox. Dropbox for Mac automatically saves all data placed inside the folder across all devices. As long as you can access your account, you can download any file stored in your Dropbox folder on your local machine. For example, you can move pictures you took on your phone to Dropbox and look at them on your Mac in seconds.
One of Dropbox’s strongest features you should definitely benefit from is sharing files with colleagues and family members. To designate files for sharing:
Right-click on the item you wish to share in your Dropbox
Select the option that says “Share…” with a Dropbox icon next to it
In the text field below the question “Who do you want to share with?”, type the email addresses of the people with whom you want to share the file
Grant the permission you want, either view only or with the ability to edit the file
Once done, you’ll be able to write a message for the recipient(s) if you want to do so. You can also create a link to send to people yourself if you don’t want Dropbox to send the link by email.
Using Dropbox on Mac as pure cloud storage is popular too, as it helps you keep backup copies of important files safe and ready to restore should need be.
What is Dropbox pricing?
Dropbox is available in four pricing plans: the first three let you expand the amount of storage you have by referring others to the service. For example, the basic free version of Dropbox will give you 500 MB per referral, expanding the initial 2 GB to a possible maximum of 18 GB of free storage. A Plus plan for $9.99 per month will give you 1 TB of storage space.
More than just Dropbox app for Mac
Having been one of the best choices for cloud file storage for a long time, more and more often Dropbox isn’t the only one in the cloud services portfolio for many people. For personal and professional data storage needs, more than one service is frequently used.
Why? A combination of cloud-based storages increases your Mac’s disk space to virtually unlimited, as long as you have an active internet connection. Unfortunately, it also turns managing different cloud accounts into quite a hustle.
Use CloudMounter to keep every storage in one place
Forget the trouble of switching across your cloud storage accounts. CloudMounter enables you to access it all from one app.
Luckily, there are apps like CloudMounter that allow you to use all your storage solutions in one place. CloudMounter connects your cloud storage providers to your Mac as if they were your external drives. This lets you treat cloud data just like local files and even move documents between the different clouds.
Download Dropbox Onto Laptop
Another benefit of using CloudMounter is its latest encryption algorithm that guarantees the security of your cloud files. Plus it allows encrypting sensitive data on the cloud and doesn’t share your login info with third parties. The app works perfectly with all major cloud services and could become your ultimate cloud manager if you’re constantly dealing with several cloud services or feel there’s not enough free space on your Mac’s SSD.
Even better, you could match amazing cloud-storage opportunities with clever productivity apps. One such example that uses Dropbox to sync your work files across all devices is Unclutter.
Unclutter does wonders for those of us with busy clipboard lives: when you often have to copy several things at once and be able to paste each of them multiple times. Instead of creating temporary work folders and flood your desktop with files, opt for Unclutter’s drag-and-drop area that keeps your desktop clean and all your files, links, and notes at your fingertips.
Even more, Unclutter keeps track of everything you copy to your Mac’s clipboard even after the system was rebooted, lets you create separate lists to save particular clips for future use, has a memo assistant to remind you of things you don’t want to miss, and can have all the different files ready for you every time you open your Mac. And you’ve guessed it right, all the content is auto-synced across all your Dropbox-connected devices!
Best of all, you can find CloudMounter and Unclutter mentioned above on a free trial through Setapp, a platform of more than 150 useful Mac apps and tools that will completely overhaul the way you interact with your computer. So you decided how to use Dropbox on Mac yet?
Dropbox For Mac Os
Setapp lives on Mac and iOS. Please come back from another device.
Meantime, prepare for all the awesome things you can do with Setapp. https://loadingcharter936.tumblr.com/post/653308890228850688/aiseesoft-pdf-to-text-converter-for-mac.
Download Dropbox Onto Computer
Read on
Dropbox Download Mac Os X
Sign Up
Setapp uses cookies to personalize your experience on our website. By continuing to use this site, you agree to our cookie policy.
0 notes
Text
Docker Bitwarden

Docker Bitwarden Backup
Bitwarden Docker Image
Use bitwardenrs instead. Install via docker and docker-compose for super easy setup. Uses.FAR. fewer resources. I have it plus a bunch of other stuff running on a 1GB VPS and I’m at 50% ram.
Daniel has implemented a full (unofficial) BitWarden work-alike using a fully FOSS stack: the Rust language, storing data in SQLite, and (quite thoughtfully) re-using other open source licensed components of the BitWarden system that don't have proprietary dependencies, including the website code and layout (which is part of the server).

Dropbox macos command line. Bitwarden will be deployed and run on your machine using an array of Docker containers. Bitwarden can be run with any Docker Edition or plan. Evaluate which edition is best for your installation. Deployment of containers is orchestrated using Docker Compose.
If you’d just like to dive into the code for adding a Bitwarden password manager to the same server hosting our simple WordPress app you can skip ahead to Putting It All Together.
This is Part 9b in a series describing a project to create a local WordPress development environment using Docker-Compose. The series is structured as follows:
Part 9b – Hosting Bitwarden behind a reverse proxy server
In Part 9a we installed the Bitwarden password manager and configured it for our project. You must complete the setup discussed in that article before continuing here. In this article we will configure the nginx service of our WordPress app to act as a reverse proxy for the Bitwarden app. This will closely mirror the work we did when adding multiple WordPress services in Part 8 so I’m not going to dwell overly long on the changes we need to make. Refer back to Part 8 if you need a refresher.
The first step is to add our external Docker network, wp-bw-net, to our nginx service in our Compose file. Next, we need to create a signed SSL certificate for the Bitwarden service that we will reference in our nginx configuration file.
Compose File Changes
Similar to out Compose modifications in Part 9a for the Bitwarden app, we have to add our external Docker network, wp-bw-net, to our WordPress app’s nginx service so the two apps can communicate with each other. However, instead of making this change with an override file as we did in Part 9a, let’s just change the WordPress app Compose file directly. This is appropriate because we don’t have to worry about the file being overwritten.
First add the top-level networks key to your Compose file. Specify our external network the same way we did in Part 9a as follows.
Next, add the networks key below to our nginx service to allow it to join the external network. Note that I’ve also included the default network. The default network is created by Compose on project startup to facilitate internal communications between the containers in your Compose file, which join the network automatically. If you specify another network for a container, you have to also specify the default network if want that container to join it.
Create a Signed SLL Certificate for Bitwarden
As with our existing WordPress sites, we’ll access Bitwarden over a secure network connection with https protocol. As such we’ll need to create an SSL certificate for it.
I covered how to create a signed SSL certificate in Part 7a – Creating Your Own Certificate Authority. If you’ve completed that tutorial it is a simple matter to create a signed SSL certificate for Bitwarden. Simply run the create-cert.sh script, as discussed in Part 7, in the /part-9/secrets/certs folder for the bw.local domain that we specified in Part 9a when installing Bitwarden.
To map this domain to your server’s IP address, you’ll need to add the bw.local domain to your hosts file as described in Part 7b – Securing Network Communications with Your Own Certificate Authority. To do this you can simply duplicate the WordPress domain line in your hosts file and substitute the bw.local domain for the wordpress domain.
NGINX Configuration File Changes
Last up, we need to configure our web server for Bitwarden. We can accomplish this by simply copying a set of our existing WordPress associated blocks and editing them for Bitwarden.
Starting with our nginx configuration file from Part 8, copy the WordPress server blocks for ports 80 and 443 and create similar blocks for our Bitwarden domain, replacing wordpress with bw.local. Your added server should look like the following for port 80.
The server should look like the following for port 443. Note that we’re passing requests to the Bitwarden nginx service over port 8080.
And that’s it. Any requests to Bitwarden over http protocol will be automatically redirected to the https server which will pass the requests to Bitwarden on port 8080 which it exposes by default. Docker automatically handles the communications between the apps over the wp-bw-net network we created in Part 9a. Note that communication over the wp-bw-net network uses the http protocol and thus is not encrypted. However, Bitwarden encrypts all sensitive information flowing between its password vault and web browser client so your sensitive data is not at risk. In a future article I’ll show how to encrypt communications over the wp-bw-net network for added security as well.


Putting It All Together
Start with a copy of the project folder from Part 8. I’ve labeled my folder part-9.
Our final Compose file is shown below. Note that I’ve included the depends_on key in the nginx service as discussed at the end of Part 8 to ensure our nginx service starts after those services referenced in its configuration file.
Updated docker-compose.yml file with Bitwarden network
Our final nginx configuration file is as follows.
Updated nginx/nginx.conf file configured for Bitwarden

Finally, make sure you’ve installed and configured Bitwarden and created the wp-bw-net network as described in Part 9a. Also make sure you’ve created the signed SSL certificate and edited your hosts file for Bitwarden as discussed in Create Signed Certificate for Bitwarden above. Assuming you’ve created and installed your own Certificate Authority per Part 7a – Creating Your Own Certificate Authority, then your all set to go as we haven’t made changes to any other files used in Part 8.
You can now start up Bitwarden and your WordPress app. We have to start up Bitwarden first as our WordPress app’s nginx service references it. As such Bitwarden must be up and running or the nginx service in the WordPress app will fail to start. Start Bitwarden by running its master script with the start option.
After Bitwarden has started you can start up your WordPress app with docker-compose up -d. Going forward, you might want to make a script to perform both of these commands in one go.
Let’s take a look at the containers we’ve created with the docker ps -a command. Recall that we use the -a option to list any containers that may have failed to start.
PDF to ePub Converter Convert PDF to ePub file for easy reading on iPhone iPad iPod. For Win For Mac PDF to Image Converter Convert PDF to image (JPEG, PNG, GIF, BMP and so on). For Win For Mac PDF to Text Converter Convert PDF to text for editing or reading for eBooks reader. For Win For Mac PDF to SWF Converter. Aiseesoft pdf converter ultimate. Aiseesoft PDF to Text Converter for Mac is a professional PDF to TXT converting app that brings productive and professional PDF to Text file conversion to the Mac platform. TaxCalc Individual for Mac Acorah Software Products Limited. Convert PDF to ePub for various mobile devices. As a readable e-book format, ePub can be. Aiseesoft Mac PDF Converter Ultimate 3.2.80 macOS 159 mb Mac PDF Converter Ultimate is the highly efficient PDF converting software for Mac users (macOS Catalina and macOS Mojave supported), which easily converts PDF files to document (Text, Word, Excel, ePub, and HTML) and/or image (TIFF.
You can see that along with our WordPress associated containers, we’ve created ten additional containers associated with the Bitwarden service. Of particular interest is the bitwarden-nginx container. You can see that it is configured to expose ports 80, 8080 and 8443 for communications with other containers on the same network.
You can access Bitwarden in your browser with https://bw.local. If you access it with the http protocol, Nginx will redirect your request to a https connection. If you’ve properly created the SSL certificate for this domain then you should be taken directly to the Bitwarden web client login page.
To begin, click Create Account and fill in the requested account information on the Create Account page. Note that at the time of this writing, Bitwarden requires a password to be at least eight characters long. When you’ve finished entering your account information, hit Submit to create your new Bitwarden account. You’ll then be taken back to the login page to log into your newly created account. After logging in you’ll be directed to your My Vault page.
At the time of this writing, Bitwarden did not have a Getting Started guide, but its interface is very intuitive. I’m not going to cover using Bitwarden. If you need help you can refer to Bitwarden’s Help Center for a variety of help topics or a third-party article, Bitwarden: How To, for a fairly comprehensive set up guide.
In the upper righthand corner of the My Vault page you’ll see a Verify Email notice which allows you to verify your account email address to unlock all Bitwarden features. I’m not sure which features are unlocked after verifying your email, but it seems like the most commonly used features are available without doing this. Note that if you click on Send Email, you’ll see a notice informing you to check your email for a verification link. However, you won’t receive the email as we haven’t set up Bitwarden’s SMTP mail server settings. I’ll show you how to do this in a future article.
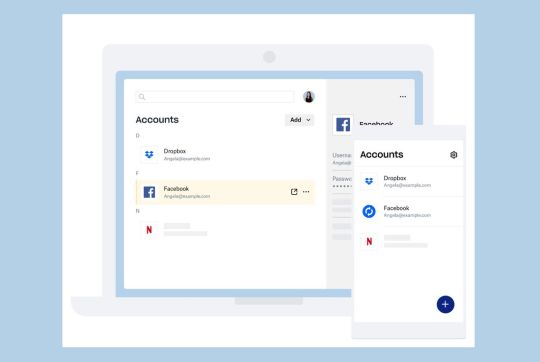
One useful Bitwarden feature you might want to check out is a Bitwarden Browser Extension which allows easy access to your password vault from your favorite browser and allows you to automatically fill-in login page information for sites associated with items in your vault. Bitwarden has extensions for many web browsers on their download page. I’ve tested the extension for Chrome successfully with my self-hosted version of Bitwarden. I was not able to get the Microsoft Edge extension working for self-hosting but it does work for Bitwarden’s cloud vault. Note that the browser extention does work in the new Microsoft Edge browser.

An Alternate Configuration
Before we wrap up, I thought it might be interesting to cover one of the test configurations I created in investigating how to get Bitwarden and WordPress working together. A logical question regarding the structure shown at the beginning of Part 9a is why not just use the Bitwarden nginx service to handle the WordPress app as well. This in fact was the first approach I took. As part of investigating possibilities of hosting both Bitwarden and WordPress on my Ubuntu server, I successfully tested such a set up. At the time I rejected it because I thought the only way to configure this was to modify Bitwarden’s default nginx configuration file for my WordPress app servers. This isn’t desirable since any modifications would be overwritten when Bitwarden was updated. What I didn’t realize at the time was that nginx can use multiple configuration files when starting up and thus I could maintain my WordPress app nginx configuration separate from Bitwarden’s, much like using a Docker Compose override file.
There are other limitations however, that make this solution less than ideal for my project. Bitwarden’s Compose file is set to version 3. As such any override file must also be version 3. You’ll note that our WordPress project specifies version 3.7 and thus would need to be modified to version 3 to be successfully used as a Compose override file with Bitwarden. However, at least at the time of my testing and with my version of Docker and Compose, version 3.1 of the Compose file is required to use secrets, so at the minimum our WordPress app Compose file would need to be modified to eliminate the use of secrets.
Perhaps the biggest drawback of hosting our WordPress app behind Bitwarden is that future expansion of my server would be limited to changes I could make in Bitwarden’s docker-compose.override.yml file. I’d prefer to have this file limited to just the modifications needed to run Bitwarden rather than house all of the Compose apps running on my server. I could make the same argument for my WordPress app, but ultimately, I could just move the WordPress app nginx service to its own app if needed. I don’t have this problem with my current setup. My only limitation is that I have to start all dependent apps prior to my WordPress app, the one containing the main nginx server. Well, enough looking back. I’ll leave it to you to try this setup if you find it interesting or useful for your purposes.
Memory Clean is the ultimate app for optimizing your Mac's memory and is best used after you have finished using a memory (RAM) intensive app or game. It replicates the feeling of a fresh system restart. RAM is short for “Random Access Memory”. It’s the temporary data storage space that your Mac uses to load apps and processes. Usually, the more RAM memory available, the faster your Mac should run. MacKeeper’s Memory Cleaner can instantly free up RAM on Mac in just a click. 8+ Best Mac Memory Cleaner Software Reviews The performance any device depends on the hardware you used in building the rig and the software installed. Sometimes, having too many contents in your MacBook can also slow down its processing speed. https://loadingcharter936.tumblr.com/post/653308978238046208/mac-free-memory-cleaner. By Nektony Memory Cleaner monitors your memory usage and cleans up your Mac's memory, increasing performance. The application monitors RAM usage on your.
Wrapping Up
Docker Bitwarden Backup
You can shut down your Bitwarden app with ./bitwarden.sh stop. This will stop the Bitwarden service but maintain your password vault. You can restart Bitwarden with ./bitwarden.sh start and access your password vault as before. I’ll cover how to backup and restore your password vault in a future article.
As before, you can shut down your WordPress app with docker-compose down while maintaining all of your WordPress site data in Docker volumes. Use the -v option if you’d like to remove these volumes but be careful as you’ll lose all of the data associated with your WordPress app. From experience I know how easy it is to mistakenly include the -v option out of habit when shutting down a Compose project. If you’re likely to make such a mistake, create a script to shut down the services for you.
Bitwarden Docker Image
I’m going to take a break from the tutorial series for a while to cover some information that may be useful to those just starting the series. Check back later for more.
0 notes
Text
Big Sur Dropbox

Cloud storage is a wonderful way to extend limited hard disk or SSD space on your computer to an accessible internet-reachable location. Many services combine synchronization and storage offloading. Synchronization ensures that files on every linked device are stored in a central repository and copied and get up to date on every attached device. Storage offloading lets you opt to keep the file in central storage but not on every end point after the file is first uploaded.
Mac free memory cleaner reviews. RAM is short for “Random Access Memory”. It’s the temporary data storage space that your Mac uses to load apps and processes. Usually, the more RAM memory available, the faster your Mac should run. MacKeeper’s Memory Cleaner can instantly free up RAM on Mac in just a click.
Dropbox Big Sur Beta
Big Sur Dropbox Finder Integration
Big Sur Dropbox Smart Sync
Big Sur Update Stuck
Pdf to word. Dropbox and iCloud Drive are two popular options for macOS, iOS, and iPadOS cloud storage, and they differ substantially in this approach. Dropbox changed its approach last summer for personal accounts, so it might be a little different than you recall if you haven’t used it for a while.
iCloud Drive works with any tier of iCloud storage, although you can only really get much use out of it at the 200GB tier or higher. macOS entirely manages which files are stored on your Mac, and which are purged to free up storage, and only when you have Optimize Mac Storage checked in the iCloud preference pane (macOS Mojave and earlier) or in the iCloud tab of the Apple ID preference pane (macOS Catalina). You can also check the Desktop & Documents Folder to sync and optimize those folders across Macs.
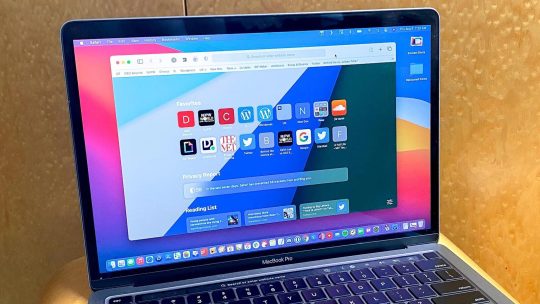
Apple is known to have released the first beta of a few days ago macOS Big Sur, the desktop operating system. Mac dropbox not syncing. The first beta is aimed at developers, the public test version for brave everyday users. The Dropbox desktop app for Mac computers If you have a Mac computer and you want to run the Dropbox desktop app, you need to use: OS X Yosemite 10.10 to macOS Big Sur 11 Find out what operating system you’re currently using.

macOS uses various cues about file access and modification to remove those in least use from each Mac with that setting enabled. Those files are always stored in iCloud, however, and can be reached via the Files app in iOS and iPadOS or iCloud Drive via iCloud.com.
With Dropbox, the Dropbox folder on each Mac you use automatically syncs and updates everything from all other Dropbox sources on all platforms and via Dropbox.com. You can Control-click any file or folder in the Finder, however, and choose Smart Sync > Online Only to shift the file or folder and any nested contents off the current Mac. (A paid Dropbox plan is required.)
With both iCloud Drive (and Desktop & Documents) and Dropbox, you can double-click or open a file or folder to have its contents appear, and any necessary files are automatically downloaded and made available locally as required. The file and folder structure is intact, too, so you know exactly what’s stored in each folder, whether it’s on the Mac or not.
Dropbox Big Sur Beta
The only limit is the amount of bandwidth you may have at the location you’re attempting to retrieve the file from. For large files, that may be an issue on thin broadband pipes.
This Mac 911 article is in response to a question submitted by Macworld reader Gilberto.
Big Sur Dropbox Finder Integration
Ask Mac 911
Big Sur Dropbox Smart Sync

Big Sur Update Stuck
We’ve compiled a list of the questions we get asked most frequently along with answers and links to columns: read our super FAQ to see if your question is covered. If not, we’re always looking for new problems to solve! Email yours to [email protected] including screen captures as appropriate, and whether you want your full name used. Not every question will be answered, we don’t reply to email, and we cannot provide direct troubleshooting advice.
0 notes
Text
Dropbox Command Line Mac

The Dropbox desktop app can be controlled with the Linux Command Line Interface (CLI). Depending on your Linux distribution and the package you used to perform installation, you may need to download a Python script to control Dropbox from the command line.
Dropbox Command Line Mac Os
Dropbox Macos Command Line
Dropbox Mac App
Install Dropbox
Dropbox Command Line Windows
Applications
Support
Joplin API - Get Started
Joplin API - References
Development
Google Summer of Code 2021
About
Run the following command to start the dropbox from the terminal: dropbox start -i. In the window that opens, click ok to install daemon: The first use of Dropbox on ubuntu 20.10. The following image will display after installing Daemon: You need a Dropbox account. Go to the dropbox website and create an account for yourself.
A command line tool for Dropbox users and team admins. DBXCLI is a command line client for Dropbox built using the Go SDK. With it you can upload files, download files, automate Dropbox backups, and much more! Supports basic file operations like ls, cp, mkdir, mv (via the Files API) Supports search; Supports file revisions and file.
Clear your cache on a Mac. Open the Finder and select Go to folder. From the Go menu (or press Shift-Command-G). A dialog box should appear. Now copy and paste the following line into the box and press the return key: /Dropbox/.dropbox.cache; This will take you directly to the Dropbox cache folder.
Joplin is a free, open source note taking and to-do application, which can handle a large number of notes organised into notebooks. The notes are searchable, can be copied, tagged and modified with your own text editor.
Notes exported from Evernote via .enex files can be imported into Joplin, including the formatted content (which is converted to Markdown), resources (images, attachments, etc.) and complete metadata (geolocation, updated time, created time, etc.). Plain Markdown files can also be imported.
The notes can be synchronised with various targets including the file system (for example with a network directory), Nextcloud, Dropbox, OneDrive or WebDAV. When synchronising the notes, notebooks, tags and other metadata are saved to plain text files which can be easily inspected, backed up and moved around.
Operating systemMethodmacOS, Linux, or Windows (via WSL)Important: First, install Node 12+. NPM_CONFIG_PREFIX=~/.joplin-bin npm install -g joplin sudo ln -s ~/.joplin-bin/bin/joplin /usr/bin/joplin By default, the application binary will be installed under ~/.joplin-bin. You may change this directory if needed. Alternatively, if your npm permissions are setup as described here (Option 2) then simply running npm -g install joplin would work.
To start it, type joplin.
Unsupported methods🔗
There are other ways to install the terminal application. However, they are not supported and problems must be reported to the upstream projects.
Dropbox Command Line Mac Os
Operating systemMethodmacOSbrew install joplinArch LinuxAn Arch Linux package is available here. To install it, use an AUR wrapper such as yay: yay -S joplin. Both the CLI tool (type joplin) and desktop app (type joplin-desktop) are packaged. You can also install a compiled version with the chaotic-aur repository. For support, please go to the GitHub repo.
To start the application type joplin. This will open the user interface, which has three main panes: Notebooks, Notes and the text of the current note. There are also additional panels that can be toggled on and off via shortcuts.
Input modes🔗
Joplin user interface is partly based on the text editor Vim and offers two different modes to interact with the notes and notebooks:
Normal mode🔗
Allows moving from one pane to another using the Tab and Shift-Tab keys, and to select/view notes using the arrow keys. Text area can be scrolled using the arrow keys too. Press Enter to edit a note. Various other shortcuts are available.
Command-line mode🔗
Press : to enter command line mode. From there, the Joplin commands such as mknote or search are available. See the full list of commands.
It is possible to refer to a note or notebook by title or ID. However the simplest way is to refer to the currently selected item using one of these shortcuts:
ShortcutDescription$nRefers to the currently selected note$bRefers to the currently selected notebook$cRefers to the currently selected item. For example, if the note list is current active, $c will refer to the currently selected note.
Examples:
Create a new note with title 'Wednesday's meeting':
Create a new to-do:
Move the currently selected note ($n) to the notebook with title 'Personal'
Rename the currently selected notebook ($b) to 'Something':
Attach a local file to the currently selected note ($n):
The configuration can also be changed from command-line mode. For example, to change the current editor to Sublime Text:
Editing a note🔗
To edit a note, select it and press ENTER. Or, in command-line mode, type edit $n to edit the currently selected note, or edit 'Note title' to edit a particular note.
Getting help🔗
The complete usage information is available from command-line mode, by typing one of these commands:
CommandDescriptionhelpGeneral help informationhelp keymapLists the available shortcutshelp (command)Displays information about a particular command
If the help is not fully visible, press Tab multiple times till the console is in focus and use the arrow keys or page up/down to scroll the text.
For general information relevant to all the applications, see also Joplin home page.
To import Evernote data, follow these steps:
First, export your Evernote notebooks to ENEX files as described here.
In Joplin, in command-line mode, type import /path/to/file.enex. This will import the notes into a new notebook named after the filename.
Then repeat the process for each notebook that needs to be imported.
One of the goals of Joplin was to avoid being tied to any particular company or service, whether it is Evernote, Google or Microsoft. As such the synchronisation is designed without any hard dependency to any particular service. Most of the synchronisation process is done at an abstract level and access to external services, such as Nextcloud or Dropbox, is done via lightweight drivers. It is easy to support new services by creating simple drivers that provide a filesystem-like interface, i.e. the ability to read, write, delete and list items. It is also simple to switch from one service to another or to even sync to multiple services at once. Each note, notebook, tags, as well as the relation between items is transmitted as plain text files during synchronisation, which means the data can also be moved to a different application, can be easily backed up, inspected, etc.
Currently, synchronisation is possible with Nextcloud, WebDAV, Dropbox, OneDrive or the local filesystem. To enable synchronisation please follow the instructions below. After that, the application will synchronise in the background whenever it is running, or you can click on 'Synchronise' to start a synchronisation manually. Joplin will background sync automatically after any content change is made on the local application. If the terminal client has been installed, it is possible to also synchronise outside of the user interface by typing joplin sync from the terminal. This can be used to setup a cron script to synchronise at a regular interval. For example, this would do it every 30 minutes:
*/30 * * * * /path/to/joplin sync
Nextcloud synchronisation🔗
You will need to set the sync.target config variable and all the sync.5.path, sync.5.username and sync.5.password config variables to, respectively the Nextcloud WebDAV URL, your username and your password. This can be done from the command line mode using:
If synchronisation does not work, please consult the logs in the app profile directory (~/.config/joplin)- it is often due to a misconfigured URL or password. The log should indicate what the exact issue is.
WebDAV synchronisation🔗
Select the 'WebDAV' synchronisation target and follow the same instructions as for Nextcloud above (for the terminal application you will need to select sync target 6 rather than 5).
For WebDAV-compatible services that are known to work with Joplin see WebDAV synchronisation.
Dropbox synchronisation🔗
When syncing with Dropbox, Joplin creates a sub-directory in Dropbox, in /Apps/Joplin and read/write the notes and notebooks from it. The application does not have access to anything outside this directory.
To initiate the synchronisation process, type :sync. You will be asked to follow a link to authorise the application.
OneDrive synchronisation🔗
When syncing with OneDrive, Joplin creates a sub-directory in OneDrive, in /Apps/Joplin and read/write the notes and notebooks from it. The application does not have access to anything outside this directory.

To initiate the synchronisation process, type :sync. You will be asked to follow a link to authorise the application (simply input your Microsoft credentials - you do not need to register with OneDrive).
When Ctrl+Clicking a URL (or opening with the shortcut 'o' while it is highlighted), most terminals will open that URL in the default browser. However, one issue, especially with long URLs, is that they can end up like this:
Not only it makes the text hard to read, but the link, being cut in two, will also not be clickable.
As a solution Joplin tries to start a mini-server in the background and, if successful, all the links will be converted to a much shorter URL:
Since this is still an actual URL, the terminal will still make it clickable. And with shorter URLs, the text is more readable and the links unlikely to be cut. Both resources (files that are attached to notes) and external links are handled in this way.
In Markdown, links to resources are represented as a simple ID to the resource. In order to give access to these resources, they will be, like links, converted to local URLs. Clicking this link will then open a browser, which will handle the file - i.e. display the image, open the PDF file, etc.
Commands can also be used directly from a shell. To view the list of available commands, type joplin help all. To reference a note, notebook or tag you can either use the ID (type joplin ls -l to view the ID) or by title.
For example, this will create a new note 'My note' in the notebook 'My notebook':
To view the newly created note:
Give a new title to the note:
There are two types of shortcuts: those that manipulate the user interface directly, such as TAB to move from one pane to another, and those that are simply shortcuts to actual commands. In a way similar to Vim, these shortcuts are generally a verb followed by an object. For example, typing mn ((m)ake (n)ote), is used to create a new note: it will switch the interface to command line mode and pre-fill it with mknote ' from where the title of the note can be entered. See below for the full list of default shortcuts:
Shortcut can be configured by adding a keymap file to the profile directory in ~/.config/joplin/keymap.json. The content of this file is a JSON array with each entry defining a command and the keys associated with it.
As an example, this is the default keymap, but read below for a detailed explanation of each property.
Each entry can have the following properties:
NameDescriptionkeysThe array of keys that will trigger the action. Special keys such as page up, down arrow, etc. needs to be specified UPPERCASE. See the list of available special keys. For example, ('DELETE', 'BACKSPACE') means the command will run if the user pressed either the delete or backspace key. Key combinations can also be provided - in that case specify them lowercase. For example 'tc' means that the command will be executed when the user pressed 't' then 'c'. Special keys can also be used in this fashion - simply write them one after the other. For instance, CTRL_WCTRL_W means the action would be executed if the user pressed 'ctrl-w ctrl-w'.typeThe command type. It can have the value 'exec', 'function' or 'prompt'. exec: Simply execute the provided command. For example edit $n would edit the selected note. function: Run a special commands (see below for the list of functions). prompt: A bit similar to 'exec', except that the command is not going to be executed immediately - this allows the user to provide additional data. For example mknote ' would fill the command line with this command and allow the user to set the title. A prompt command can also take a cursorPosition parameter (see below)commandThe command that needs to be executedcursorPositionAn integer. For prompt commands, tells where the cursor (caret) should start at. This is convenient for example to position the cursor between quotes. Use a negative value to set a position starting from the end. A value of '0' means positioning the caret at the first character. A value of '-1' means positioning it at the end.
This is the list of special functions:
NameDescriptionenter_command_line_modeEnter command line modefocus_nextFocus next pane (or widget)focus_previousFocus previous pane (or widget)move_upMove up (in a list for example)move_downMove down (in a list for example)page_upPage uppage_downPage downnext_linkSelect the next link in the currently opened note (the first link will be selected if no link is currently selected)previous_linkSelect the previous link in the currently opened note (the last link will be selected if no link is currently selected)open_linkOpen the currently selected link externallyactivateActivates the selected item. If the item is a note for example it will be open in the editordeleteDeletes the selected itemtoggle_consoleToggle the consoletoggle_metadataToggle note metadata
The following commands are available in command-line mode:
Copyright (c) 2016-2021 Laurent Cozic
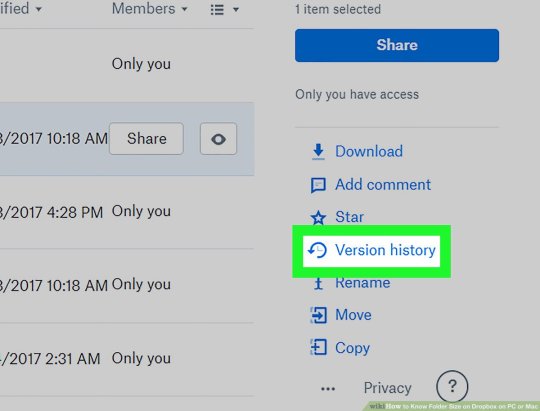
Permission is hereby granted, free of charge, to any person obtaining a copy of this software and associated documentation files (the 'Software'), to deal in the Software without restriction, including without limitation the rights to use, copy, modify, merge, publish, distribute, sublicense, and/or sell copies of the Software, and to permit persons to whom the Software is furnished to do so, subject to the following conditions:
The above copyright notice and this permission notice shall be included in all copies or substantial portions of the Software.
Dropbox Macos Command Line
THE SOFTWARE IS PROVIDED 'AS IS', WITHOUT WARRANTY OF ANY KIND, EXPRESS OR IMPLIED, INCLUDING BUT NOT LIMITED TO THE WARRANTIES OF MERCHANTABILITY, FITNESS FOR A PARTICULAR PURPOSE AND NONINFRINGEMENT. IN NO EVENT SHALL THE AUTHORS OR COPYRIGHT HOLDERS BE LIABLE FOR ANY CLAIM, DAMAGES OR OTHER LIABILITY, WHETHER IN AN ACTION OF CONTRACT, TORT OR OTHERWISE, ARISING FROM, OUT OF OR IN CONNECTION WITH THE SOFTWARE OR THE USE OR OTHER DEALINGS IN THE SOFTWARE.
As a cloud storage service, Dropbox offers computer applications for us to use. However, sometimes there is a problem that this application starts automatically on system startup. To fix it, here we will give you three methods to stop Dropbox from opening on system startup.
Method 1: Stop by Preferences of Dropbox
Step 1: Click the icon of Dropbox on the bottom right corner of taskbar.
Step 2: Click the icon of setting on the top right corner.
Step 3: Click Preferences in the context menu to open a Dropbox Preference window.
Step 4: On the popup window, choose the General tab and uncheck the option that Start Dropbox on system startup and click OK to save the change. Finally, Dropbox won’t auto-opening on system startup.
Method 2: Stop by A Utility Tool
However, the operations of Method 1 might be different as Dropbox versions updating. So, we will teach you how to use a utility tool to stop Dropbox opening on system startup. Here we take a useful tool named iSunshare System Genius as an example, which can help to change the auto-startup apps starting mode and remove them from Windows startup.
Step 1: Download iSunshare System Genius and install it on your computer.
Step 2: Run System Genius and click Startup on the left menu.
Step 3: Under the Startup item management, select Dropbox and click the Disable start button.
Step 4: Then the condition of Dropbox will be turned to disabled. Of course, you can click the button again to enable it to auto-open on system startup.
Method 3: Stop by System Startup Settings
If the above method doesn’t work, you can try to stop Dropbox from opening on system startup by system startup settings. Here are the detailed steps in Windows 10 and 7.
For Windows 10:
Step 1: Press Ctrl + Shift + Esc shortcut simultaneously to open Task Manager window.
Step 2: On the Task Manager window, click the Startup tab and then right-click Dropbox and select Disable in the context menu.
For Windows 7:
Step 1: Press the Windows Logo key + R to open a Run dialog.
Dropbox Mac App
Step 2: Type msconfig into the Run dialog, then click OK.
Step 3: On the System Configuration window, click the Startup tab and then uncheck Dropbox and click OK to save the change.
Install Dropbox
Step 4: Restart your computer to apply the changes.
Dropbox Command Line Windows
Attentions: On the contrary, if Dropbox is not starting on system startup, you can also add Dropbox to system startup with the above methods. It is worth mentioning that if the Dropbox is disabled on system startup, it won’t start automatically even you set it enabled on the Preferences of Dropbox.
Related Articles:
0 notes
Text
Mac Free Memory Cleaner

The Mac maintenance and security app called Combo Cleaner is a one-stop tool to detect and remove “Your computer is low on memory” virus. This technique has substantial benefits over manual cleanup, because the utility gets hourly virus definition updates and can accurately spot even the newest Mac.
Frankly speaking, CleanMyMac X is Tesla Roadster among other Mac cleaners. And it does a great job revealing your junk and other clutter, uninstalling unneeded apps and their leftovers, and keeping your Mac’s system clean and optimized. Another pro is that CleanMyMac X is Apple-notarized, which means it’s safe for your Mac.
Mac Free Memory Cleaner Free
Memory Clean Download
How To Clean A Mac For Free
What Is The Best Memory Cleaner For Mac
Memory Clean Mac
By Gina Barrow, Last updated: February 2, 2021
All activities on Mac saves temporary and unimportant files including the things we save, bookmark, download, browse, and many more. Over time, these files tend to slow down and affect the performance of the device.
Speed Up Your Mac. Memory Clean 3 is an absolutely gorgeous, extremely powerful and super slick app for optimizing your Mac's memory. The app replicates the feeling of a fresh system restart and helps to keep your Mac running smooth and fast.
Memory Cleaner monitors your memory usage and cleans up your Mac’s memory, increasing its performance. The shows you the RAM usage and allows you to free up unused memory with one click. With Memory Cleaner, you can easily manage your memory usage. Disk Drill is a prominent professional recovery tool for Mac and comes with useful disk cleaning functions. It analyzes storage space and locates different kinds of files, making it the best memory cleaner for Mac devices. It also monitors the health of the storage device and delivers timely alerts in case of any malfunctions.
To ensure that your Mac is well-performing, you can remove all these junks manually or use a program to automatically clear out these files safely and conveniently.
To make the cleaning on Mac easier, therefore, we are going to discuss the best 5 Mac Cleaners for 2020 here. Let's check out the best free Mac Cleaner for 2021 and discover its advantages!
Tips:
What is the best free mac cleaner in 2021?
FoneDog Mac Cleaner
CleanMyMac 3
Dr. Cleaner
DaisyDisk
Data Rescue
#1. Best Free Mac Cleaner in 2021 - FoneDog Mac Cleaner
Mac Free Memory Cleaner Free
The best Mac cleaner should have the analysis, cleanup, and optimization features to really get through the whole idea of removing unnecessary files and speed up the system.
FoneDog Mac Cleaner has the complete, comprehensive, and most effective solution, so far. It does not only boost your device's performance but rather ensures that every part of your Mac is working, stable, and at its peak level. May users are now switching to FoneDog Mac Cleaner because of these features and user-friendly interface.
FoneDog Toolkit - Mac Cleaner has all the essential tools needed to ensure that your Mac is running efficiently and effectively. It has the following powerful features:
System Status
Mac Cleaner
Similar Image Finder
Duplicate Files Finder
Mac App Uninstaller
Extensions Manager
Browser Privacy Cleanup
File Shredder
This program easily locates and deletes unnecessary files to free up space, analyze system status including the CPU status, memory, and disk usage. One of its best features is being user-friendly and no-beating-around-the-bush steps which make it one of the top choices of Mac users. FoneDog Mac Cleaner offers a free version for you to download and try!
People Also Read17 Reasons that Why Your Mac Running Slow!How to Speed up Your iMac/MacBook?
#2. CleanMyMac 3
CleanMyMac 3 by MacPaw is the third-gen utility offering useful tools. Its interface is simple yet it offers a variety of functions.
General system clean
Removing temporary files
Deleting unnecessary parts of applications
Removing any app files left after uninstalling
Search and remove cache files or junk files
This program offers a free version for you to try too for a limited amount of file and requires purchase for a premium version.
#3. Dr. Cleaner
Dr. Cleaner is also a standout Mac cleaning software that sorts the disk usage results in categories and sub-categories after scanning. It offers 3 major features:
Memory Optimization
Disk Cleaning
and System Monitoring
Its latest added features, Dr. Cleaner provides Junk Files Cleaner, Big Files Scanner, Duplicate Files Finder, Intelligent App Manager, and File Shredder.
#4. DaisyDisk
DaisyDisk primarily focuses on scanning and analyzing the disk. It scans the disk to create a map of files and folders to keep all displayed information up to date and can scan multiple disks in parallel. Its colorful interface is also compelling with features:
Scans multiple disks in parallel and at maximum speed
Conveniently erases files right in the app
However, when it comes to complete cleanup solution, DaisyDisk only offers single-functionality which can be a con to most Mac users looking for an all-in-one solution.
#5. Data Rescue
Data Rescue is another Mac cleaning app to look for but its strengths are more on recovering hard drive. You can use Data Rescue when you are planning to recover files from a collapsed hard drive or from a failed and deleted file recovery. Nevertheless, Data Rescue is not really a Mac Cleaner, it can optimize through and clean up poorly performing files inside your Mac and other system areas that cause performance issues.We have just discovered the best 5 Mac cleaners for 2021 above. We hope that this article has helped you in your search for finding the best software that suits your needs. Each of the software we gave has its own pros and cons based on the exact functionality you are looking for.
Surely, using dedicated software will save you a lot of time rather than manually stressing yourself in finding these culprits and space-eaters inside your device. Remember that if you are using your computer on a daily basis, you should have a regular cleanup to ensure that it is on its well-running condition.
Although doing it manually saves you money, however, the safety and convenience of your files are also to be considered especially when you are unfamiliar with how these technicalities work. Besides, you can have longer benefits of using dedicated software, where you can use the time to spend on more important things.
Have you tried using a Mac cleaner? What's the best solution for you? Let us know in the comments below!
>Clean up Mac >Free Download The Best Mac Cleaner Software (2021 Reviews)
Comment ()
“No matter what I do, my Mac is still slow”, an average tech-consultant hears this phrase multiple times a day. Give a person even the most powerful computer, and pretty soon it will be cluttered with apps, extensions, and things that are too much for it to handle. To reverse it, one has to go back and сlean up the mess, removing memory agents one by one. Prepare for a fight — every byte of memory is at stake. So let’s put your Mac on a diet and get it more free RAM to breathe freely.
First, remove desktop clutter. Get a combination of Setapp apps that clear away unneeded desktop files.
Download Declutter Free
“Your system has run out of application memory”
How do you know your Mac is low on memory? Floating “rainbow wheels” aside, you may notice your Mac now takes ages to load. You’ll also see many browser applications crashing. You’ll be also thrown warning messages as “Your system has run out of application memory”. To help it, you should first visit the Activity monitor to see memory usage on Mac.
How to check RAM usage on Mac
Go to Applications and type in Activity Monitor in the search bar. This invokes a good old Activity Monitor that should tell how much free memory you’ve got left.
A shortcut to open Activity Monitor:
Press F4 and start typing Activity Monitor in the search bar.
I’ve attached a screenshot from my Mac and as you can see my memory usage almost reached full capacity. Here’s what it all means:
App memory: taken by apps and processes Wired memory: reserved by apps, can’t be freed up Compressed: inactive, can be used by other apps Swap used: memory used by macOS Cached files: memory you can really use
Notice the colored graph under Memory Pressure. If your graph is all but red and yellow, your Mac is really gasping for fresh memory. It seems counter-intuitive, but “available memory” your Activity Monitor is not that important after all. In fact, it’s a system intended behavior to use all memory resources when available. On the contrary, the Memory Pressure graph is much more telling, so grow a habit to check this graph in the Activity Monitor every now and then.
How to check CPU usage on Mac
Open the CPU tab in Activity Monitor to keep in check CPU-heavy processes. Normally an app would be using 0-4% of CPU. If it takes abnormally more than that, go inside that particular item in the list and press the Quit button.
How to free up memory on Mac
Tip # 1. Remove Login Items to lower Mac memory usage

Login items are programs that load automatically upon Mac startup. Some of them covertly add themselves to the list and this is no good. If you’re looking to free up RAM, they are the first candidates for deletion. Don’t worry, you’re not deleting the app itself, you just stop it from auto-launching every time.
So, to remove Login Items and at the same time reduce your memory usage of your Mac, you need to:
Open System Preferences and select Users & Groups.
Click your nickname on the left.
Select the Login Items tab.
Check programs you don’t want to load as your Mac starts.
Press the “–” sign below.
Now, you won’t see these apps pop up the moment you turn on your Mac. Although this method doesn’t require some superpowers of yours, some special Mac optimization and memory cleaner tools may do the job faster and ensure the smooth performance of your Mac. CleanMyMac X is an excellent example of such software. Here’s how to disable Login Items with CleanMyMac X:
Download it for free and go to the Optimization tab.
Check Login Items to see the list of apps that get opened when you start your Mac.
Click Remove.
As you’ve already come to the Optimization module of CleanMyMac, you can also fix hung apps and heavy memory consumers there. In this way, you’ll free up the solid amount of RAM on Mac — 100% free of charge.
Tip # 2. Free up disk space if Mac is low on memory
The available space on your Mac’s drive translates into virtual memory. This comes to save you when you’ve run out of physical RAM. So now your computer relies on your hard drive space to keep your apps going.
The classic geek rule of thumb holds it that you should keep at least 20% of disk space on your startup drive. Not only this potentially reduces your future spending on iCloud storage but it also keeps your Mac speedier.
What to delete to free up space:
Large unused files, like movies
Old downloads
Rarely used applications
System junk
But here’s a simpler solution to save your time — clean up your drive with CleanMyMac X— the app I’ve mentioned above. Many users recommend it as an excellent way to free up more space because it searches for large & old files, useless system files, Photo junk, mail attachments and shows everything you can safely delete. Interestingly, it finds about 74 GB of junk on an average computer.
Extra trick: How to free up RAM on Mac with CleanMyMac X
If you have downloaded CleanMyMac, you may also take advantage of its amazing feature — the ability to free up RAM in a few seconds. Try this next time you see “Your system has run out of application memory” message.
Go to the Maintenance tab on the left.
Click Free Up RAM.
Click Run.
As simple as that!
And you can do it even if you download a free version of the app.
Tip # 3. Clean up your Desktop
This tip always comes at the bottom of instructions and unfairly so as it is quite effective. Without even looking at your Desktop I would assume it’s cluttered with mountains of icons. Thing is, your macOS was designed in a way that it treats every Desktop icon as a little active window. The more icons, the heavier memory usage on Mac. So in order to release available memory resources, it’s recommended to keep your Desktop clean.
You don’t have to do it all by yourself. With apps like Declutter and Spotless, every desktop cleaning session will be scheduled in advance and executed automatically. Your only job is to define the rules on how your files should be organized.
Tip #4. Clear cache files
Another way to free up RAM on Mac is to clear it of cache files. Of course, it won’t save you gigabytes of space, but deleting cache regularly, you can help your Mac run faster and avoid system issues.
So, to remove cache files on your Mac, you need to:
Open Finder.
From the Go menu, select Go to Folder.
Type ~/Library/Caches in the field and press Go.
In the window that appears, you will see all your cache files.
Press Command+A to select all files or delete files one by one.
Enter your user name and password to confirm.
Memory Clean Download
If you find some files still in the folder after you emptied it, maybe you have some windows open on your Mac. Just like that, you can save up some space on your Mac. Don’t forget to empty the bin afterward.
Tip # 5. Tune up Chrome’s Task Manager
Although Google Chrome is not the one to blame for massive memory usage, it can indeed affect your Mac's performance. If you use Chrome as your primary browser, you probably have many windows opened there. Chrome runs a lot of processes to ensure a fast browsing experience for you. So, it uses your RAM for storing your tabs, plugins, and extensions. Look at how many entries Google Chrome has in Activity Monitor:
The question then arises, 'Why does Chrome use so much RAM?' The thing is that each process is responsible for a separate plugin or extension of your browser. For example, when a tab unexpectedly falls, you need to refresh it to continue your work there. If one process were responsible for all tabs and extensions, you would need to restart the whole browser instead. Can you imagine how many times would you do that? That’s the proper answer to why Chrome uses so much RAM.
I’ve been using Chrome for some years only to discover (recently) that Chrome had a task manager of its own. You can use it to force quit memory-heavy processes in the browser. It’s a handy tool because it lets you see how a page weighs on CPU usage on a Mac.
Go to Chrome settings (dotted icon in the top right corner)
Click More tools -> Task Manager
How To Clean A Mac For Free
To free up even more RAM, close the GPU process. The GPU Process, though helpful in theory to accelerate pages, eats up a considerable amount of memory. Click to end it to free up RAM on your Mac.
Tip # 6. Manage RAM usage with CleanMyMac X menu
What Is The Best Memory Cleaner For Mac
CleanMyMac X has another useful and convenient feature for managing your Mac’s performance and memory usage. As you install CleanMyMac X and start it for the first time, it’s icon will appear in your menu bar. Click the icon to open the CleanMyMac X menu. Here you can find updates on the current condition of your Mac and perform quick tweaks to increase your Mac's speed. Whenever you feel like your Mac underperforms, open the CleanMyMac X menu to check how much RAM is available and free it up as well.
Tip # 7. Close Finder windows
Okay, suppose you’re still asking yourself, how do I clear RAM on my MacBook Pro/MacBook Air. The next trick is as magical (you’ll see for yourself) as it is time-saving. It’s no secret that each window in the Finder eats up RAM. But how many open windows are there? Some of them are collapsed or stacked in some blind spot on your screen. This Finder command merges all your windows into one. See how to do it:
Click on Finder > Window > Merge All Windows
Now you can manage Finder windows more effectively and free up memory on MacBook.
What else you can do to minimize memory usage on Mac
I’ve saved the easiest tips for the end, as long as these ones are self-explanatory.
Replace AdBlock (very memory-demanding) with a lighter extension
Keep fewer opened tabs in the browser
Restart your Mac more often to free up RAM
Close all hung-up print queues
That was my take on how to make your Mac a bit speedier to use. If you’re looking for more guidance, check simple ways to speed up your Mac.
Frequently Asked Questions
How to check application memory on Mac?
Memory Clean Mac
To check RAM usage on your Mac, go to Activity Monitor (Applications > Utilities). In the Memory tab, you will see all the active processes that are using your Mac’s RAM. At the end of the window, there is a Memory Used graph, which indicates how much application memory is used.
How to find out whether your Mac needs more RAM?
Your Mac may be using almost all its RAM, but you don’t need more if it’s using it efficiently. Open Activity Monitor and go to the Memory tab. The Memory Pressure graph shows the current condition of your RAM: green color means your Mac’s using RAM effectively, while yellow is a sign that some application or process is using too much of application memory. The red memory pressure signals that your Mac needs more RAM.
How to quickly free up RAM on your MacBook?
To free up RAM on your Mac, firstly, you should find out what app uses so much of your memory. The memory-heavy programs are listed in Activity Monitor, Memory tab. If there is an app you aren’t using at the moment, click it and press the “X” sign to quit it. This will, in turn, free some of the application memory.
0 notes
Text
Aiseesoft Pdf To Text Converter For Mac

'Who can tell me how to open this DAT file, or how to convert this DAT file to MP4? I can't play this file with any video player' - One normal message from BBS
Aiseesoft Pdf To Text Converter For Mac Download
Pdf To Text Converter Free Online
Image To Text Converter
Buy# Image to PDF Converter best free software Buy# iStonsoft Data Recovery advanced computer program. ( Aiseesoft Mod Converter Suite free. software download Buy( DataNumen Excel Repair advanced computer program Buy( Max Utilities Pro - 20 PCs / Lifetime License trial version. Buy. Enolsoft Video to iPad Converter for Mac.
If the similar cases are troubles for you, you come to the right place. A DAT file is a specific data file created by a special application, which means the DAT files can be accessed only by the application that created them. It may contain video or text format (text-based DAT files can be viewed in a text editor). So if you have a DAT file copied from VCD, you had better to convert the DAT file to MP4. This article will recommend some great methods to help you.
Part 1: Top 5 software to Convert DAT to MP4
To convert DAT to MP4 easily, you can download some professional programs. In this part, we will recommend you 5 programs to convert DAT to MP4, which may be the best converters to solve the problem.
1. How to Convert DAT to MP4 with AnyMP4 Video Converter Ultimate
With AnyMP4 Video Converter Ultimate, you can easily convert DAT to MP4 and enjoy them with your friends on different devices. Not just MP4 format you can convert to, but more than 500 output formats you can convert to. With only one click, you can get any format you want. Here is the specific steps and make sure you follow the right step in case some unknown mistakes occur.
Step 1: Download and install the PC or Mac version on official website that suits you, and then open Video Converter Ultimate after the installation is done.
Aiseesoft Mac PDF Converter Ultimate 3.2.80 macOS 159 mb Mac PDF Converter Ultimate is the highly efficient PDF converting software for Mac users (macOS Catalina and macOS Mojave supported), which easily converts PDF files to document (Text, Word, Excel, ePub, and HTML) and/or image (TIFF.
Convert PDF to ePub for various mobile devices. As a readable e-book format, ePub can be.
Step 2: When you see the main interface, click 'Add Files' button at the top left corner and choose the DAT files you want to convert. Or you can also drag-and-drop the DAT media file to the software pane to start video conversion.
Step 3: After adding the video, you can check the video file and start editing this video by clicking 'Edit' icon. You can adjust the video settings such as quality to your satisfaction in the edit window.
Step 4: Click 'Profile' drop-down column and choose MP4 as the output format. Then click 'Save to' column and define the output folder, which you can save DAT to MP4 to some devices directly.
Step 5: When all settings are prepared, click 'Convert All' button in the main interface. When you click the 'Convert All' button, you can convert DAT to MP4 in no time.
2. How to Convert DAT to MP4 with Aiseesoft Video Converter Ultimate
Aiseesoft Video Converter Ultimate helps you to convert DAT to MP4 within simple clicks. It has simple interface and practical functions.
Step 1: Install and launch Aiseesoft Video Converter Ultimate on your computer. After installed, launch the software and click 'Add File' button to load the DAT file to the program.
Step 2: Click 'Profile' and choose the right format suits best for your device. In this case, just choose the MP4 format. Then click 'Browse' and define the output folder where the converted or ripped video will be saved temporarily.
Step 3: After all is set, click 'Convert' button to convert DAT files to MP4. Wait for a few seconds, and you can see the MP4 video has been converted successfully.
3. How to Convert DAT to MP4 via Apowersoft Video Converter Studio
Apowersoft Video Converter Studio supports all video and audio formats. It's a great video converter to convert DAT to MP4. Just follow the specific steps as below.
Step 1: Launch converter and click 'Add files' button on the toolbar, then select the DAT video/audio files you want to convert.
Step 2: Click to open 'Profile' drop-down list, and then choose the MP4 format as the output format.
Step 3: Click 'drop-down' button in the 'Output' bar, then choose the destination folder for saving output files, after that click 'OK' button to return to the main window.
Step 4: After the above settings, check the files needed to convert in the file list, and click 'Convert' to start video conversion.
4. How to Convert DAT to MP4 with Wondershare Video Converter Ultimate
In this part, we will introduce you the Wondershare Video Converter Ultimate. With this software, you can convert different video & audio formats, download YouTube videos, and edit videos. Just follow the steps to convert DAT to MP4 below.
Step 1: Download and install Wondershare Video Converter Ultimate. Open the software and click 'Add Files' button to browse and choose DAT files you want to convert. Or you can also drag the file to the software's pane to start conversion.
Step 2: After the file is imported, you can go to drop-down list of Convert all files and then find the Video category. Finally just choose MP4 as the output format.
Step 3: Once you click the 'convert' button on the right side of the main interface, it will start converting the DAT files to MP4 without watermark.
5. How to Convert DAT to MP4 via iSkysoft iMedia Converter Deluxe
iSkysoft iMedia Converter Deluxe helps convert video, audio and even DVD file to various formats like MP4, MOV, M4V, AVI, FLV, etc. It's convenient to convert DAT to MP4.
Step 1: Launch the iMedia Converter Deluxe software program. And then click the 'Add Files' button to load the DAT file you want to convert.
Step 2: Click the 'subtitle' button. And then adjust the settings such as where you'd like to position the words to convert DAT to a suitable MP4 file.
Step 3: Choose an appropriate media format for your newly edited video based upon how you will play your video. Of course, you can keep the original format as needed.
Step 4: Next, you could choose where you will save your video by 'Preference' > 'Location'. Then you can click the 'Convert' button and start to convert DAT files to MP4.
Part 2: Top 5 Websites to Convert DAT to MP4 online
Some people may wouldn't like to download extra software to convert DAT files to MP4. So in this part, we will introduce 5 websites for you to process converting online. And those websites are all free.
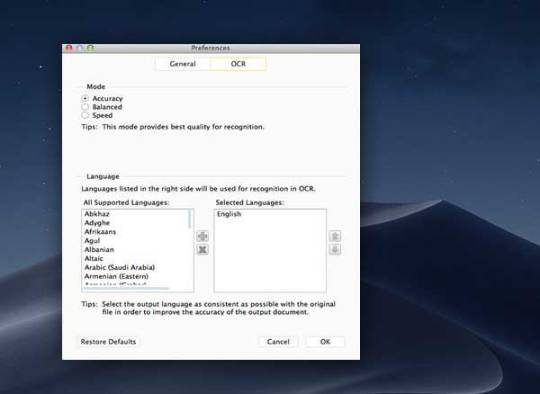
1. How to convert DAT to MP4 with Online Convert
Step 1: Open your browser and enter 'https://www.online-convert.com/' in the address bar.
Step 2: Find 'Video converter' icon in the top right corner, then select 'Convert to MP4', and then click 'Go'.
Step 3: Upload your video you want to convert DAT to MP4 and adjust the setting, after that, you can click 'Convert file' to start converting.
2. How to convert DAT to MP4 with Apowersoft online converter
Step 1: Open your browser and enter 'https://www.apowersoft.com/free-online-video-converter' in the address bar.
Step 2: Click 'Select files to start' button, a small window will pop up, then click 'Download Launcher' to start to download and install launcher.
Step 3: Once installed, you can upload DAT files you want to convert and then start converting the DAT file to MP4.
3. How to convert DAT to MP4 with Aconvert.com
Step 1: Open your browser and enter 'https://www.aconvert.com/video/' in the address bar. Once the page has been opened, click 'Choose File' to browse and upload the desired DAT file.
Step 2: Select MP4 as the output file format in the 'Target format' bar in order to convert DAT files to MP4.
Step 3: Click 'Convert Now' button to start converting. After that, you can download the MP4 file through the main page.
4. How to convert DAT to MP4 with Online Converter
Step 1: Open your browser and enter 'https://www.onlineconverter.com/mp4' in the address bar. When the page has been opened, select 'Upload File' button to upload the desired DAT file.
Aiseesoft Pdf To Text Converter For Mac Download
Step 2: Click 'Convert' button to start the process. Once the conversion for DAT to MP4 finished, you can download the MP4 file at the main page.
5. How to convert DAT to MP4 with ezgif
Step 1: Open your browser and enter 'https://ezgif.com/video-to-mp4' in the address bar. When the page has been opened, select the desired DAT file you want to convert.
Step 2: Click 'Upload video' button to start the process. And then you can convert DAT to MP4 now. You can download the MP4 file at the main page.
Conclusion
Pdf To Text Converter Free Online
DAT file is usually not compatible to lots of video player. If you want to share DAT video with your friends, you'd better convert DAT to MP4 or some other popular formats. In this article, we recommend top 10 methods to convert DAT to MP4. With those methods, you can easily solve this problem. If you would like to suggest any additions or updates to this page, please let us know.
Part 3: FAQs of Converting DAT to MP4
1. What is DAT?
DAT is the file extension of VCD videos created by Sony, JVC, Philips and Matsushita in 1993. If you have a video CD, you will find the DAT files on it. A DAT file is encoded in the MPEG-1 or MPEG-2 format.
2. How to play DAT files?
For playing DAT files, you can try using DAT players to play your DAT files, such as AnyMP4 Blu-ray Player, VLC Media Player, 5KPlayer, DivX Player, etc.
3. What is the best DAT file to MP4 converter?
Image To Text Converter
The best DAT to MP4 converter is AnyMP4 Video Converter Ultimate. With this all-in-one converter tool, you can easily complete the conversion from DAT to MP4. And you can also convert DAT to 200+ formats as you want. It also works as a DVD ripper to help you rip DVD disc/ISO/Folder with high quality.
1 note
·
View note