
Don't wanna be here? Send us removal request.
Statistics
We looked inside some of the posts by lukesummersfutureworks and here's what we found interesting.
Average Info
Notes Per Post
3
Likes Per Post
3
Reblog Per Post
0
Reply Per Post
0
Time Between Posts
10 days
Number of Posts By Type
Text
17
Last Seen Tumblr Blogs


Fun Fact
Tumblr Inc. is using 66 technologies for its website.
Text
DD2000 - ROUTE TO INDUSTRY
Job Roles/Designers
After completing my degree at university, I intend to seek employment within the game industry as a prop artist/environment artist. I believe I am a capable 3D artist to the extent of being given a theme and being able to quickly accumulate a large amount of 3D assets according to said theme, whilst simultaneously constructing the environment for them to exist within. I believe my skill set could aid me in the acquisition of the role as a prop artist as I have quite an extent of work I could include in a portfolio that demonstrates my abilities, though at this current stage in time it would be difficult for me to acquire the role of an environment artist, this is certainly a role I would like to seek employment in, though I do need to improve my abilities first.
One artist with a skillset that represents where I believe I am heading myself is Chris Reid. Chris Reid works at Foundry 42, a subsidiary of the Cloud Imperium Games Corporation who are currently developing the video game Star Citizen. Foundry 42 is currently developing Star Citizen’s Squadron 42 single player game, a unique cinematic experience set in the star CItizen universe as a standalone game.

https://www.dualshockers.com/watch-gollum-play-a-bad-guy-in-star-citizens-squadron-42s-behind-the-scenes-video/
In Chris’s role, he is responsible for the creation of 3D assets that aid in the construction of environments, mainly consisting of modular assets used to create the in-game environments such as architectural building sets, organic’s, etc.
In recent communication when Chris came to my university and took part in a guest lecture along with Joe Neville, he showed myself and fellow students the work he used to acquire the role he has today. The work he showcased to Foundry 42 was a 3D scene of a kitchen, the scene was ripe with assets and any assets implemented were done so keeping in mind an underlying narrative.

https://www.artstation.com/artwork/5qeXg
The kitchen appears to depict a scene in which someone had left in a sudden hurry, featuring a wide range of props and well-utilised lighting, his work represents a level of skill I believe is not too dissimilar to my own, the 3D assets are within my current skillset, though I do need to improve my ability of constructing a scene in a realistic manner regarding lighting and asset placement, showcasing some sort of narrative, I believe I am getting closer to achieving such a skillset as is apparent in my own submissions at University.
Below is a more recent environment created by Chris, utilisation of modularity is apparent.


https://www.artstation.com/artwork/D1XGE
Joe Neville, the second participant at the guest lecture, is a Senior Vehicle Artist at Foundry42, another role that I could possibly fulfil, though achieving the skillset to do so what take quite some time. Joe is responsible for the creation of highly detailed vehicular models that will be implemented into Squadron 42 and piloted by the player alongside NPC’s. Though I believe at my current level I could replicate an asset such as the one below, not created by Joe as his work is difficult to find online, but created by Paul Dalessi Senior Vehicle Artist at CD Projekt RED, I do believe I do not yet require the skillset to create such an asset in an efficient manner, my attempt would most likely result in an overly high poly count, meaning my outcome would not be suitable for implementation into a game.

https://www.artstation.com/artwork/LJex5
I believe with much practice I could fulfil such a role, though I do not have a predilection for such a role at this current moment in time, I will, however, continue to practice 3D modelling and fine tune my lesser abilities, particularly in regards to efficiency and more complex modelling techniques.
Job Prospects
There is no immediate option I can foresee for my self in terms of applying for a job as soon as I have completed my degree at university, though dependant on my third year and with consistent practice and further development of my current skill set as a 3D artist and environment artist, there are possible paths I could go down.
My best source for possible job prospects is the Cloud Imperium website, as this is an example of a company I would like to work for in the future when I believe I meet the requirements.
They currently have an opening and are actively looking to enlist an environment artist to aid in the development of their current project. On their website, they have listed the skills and qualities they are in search of that applicants must adhere to in order to be a successful candidate for the aforementioned role.
They are looking specifically for environment artists with experience in the creation and development of high-poly modular environments that will act as the structure for gameplay within Squadron 42. Any applicants will be required to work closely with designers in laying out geometry, props, materials and textures.
Below is a more detailed list of requirements for the role of environment artist.
Portfolio or demo reel should demonstrate:
• Exceptional modelling skills. Great assets examples using custom normal workflow or high to low poly baking • Strong understanding of a PBR workflow • Examples of building realistic shader libraries • Ability to create game-ready assets, that work well within the given technical limitations • Very strong texturing skills and excellent knowledge of Adobe Photoshop • A keen eye for detail and realism • A strong sense of composition, colour and light • At least average drawing/painting skills
Responsibilities:
• Creating game ready models of environmental objects (architectural building sets, organic’s, etc) • Working in the editor to build out levels and environments • Creating efficient UV layouts that work well within the engine/platform constraints • Creating realistic PBR shaders • Work closely with Level Lead, and Lead Environment Artist • Work closely together with the Level Design department • Work independently on asset sets and oversee level art
Requirements
• Thorough knowledge of the game development process. • Previous experience creating high-quality environments for AAA games. • Strong working knowledge of 3DS Max and Photoshop, as well as, experience in using editors to lay out environments. • Strong knowledge of Substance / Quixel packages • Experience creating environments using modular systems. • An Understanding of effective asset creation and optimization. • Experience applying and tweaking shaders. • A keen eye for spatial composition and building believable scenes. • Excellent sense of form, mass and volume. • Passion for pushing the state of the art in asset fidelity and production techniques. • High degree of self-motivation and initiative. • International travel may be required as part of the role.
Pluses
• Experience with Cry Engine. • Hard surface modelling experience. • Experience using ZBrush or Mudbox for organic shapes. • Knowledge and/or experience with PBR • Experience with programmatic and/or parametric environment generation tools. • Strong verbal and written communication skills. • An avid gamer. • Experience in architecture, interior or industrial design.
This role is definitely a role I could see myself one day fulfilling, though I would need to practice and improve my skill set a great deal before I was to consider applying for such a role as the requirements and expectations are quite vast and certainly at his moment in time I would not have much chance of acquiring such a role.
Realistically I could see my self after university taking on a smaller role in the industry, perhaps still working for a company like Foundry 42, though working as perhaps a QA tester, it would certainly be a step in the right direction, as I practice and communicate with employees, I could gain an advantage when I eventually decided I am ready to apply for a more demanding role that is in line with my interests and desired prospects of becoming an established environment artist.
Cloud Imperium and other similar gaming companies are often seeking QA testers that work closely with the Senior QA team to find bugs, execute test plans, write up reports, and provide support for the development team, this is a job I have known people to go into when they are not as experienced or do not have the skillset to acquire there more desired role, this role is, of course, paid less as it is a less important role woithin the industry, though still detrimental to the development of video games nevertheless.
Portfolio Assessment
Currently I would be comfortable including the following in my portfolio, along with the videos below I have included a breakdown of what is visible in the videos as well as what improvements I could make to these examples if they were to be used to highlight my abilities within a professional portfolio I could use to aid me in the acquisition of a job role in the game industry.
Apartment Scene 1
The following is my submission for my first assignment in the module XB2178, the goal of this project was to create a large scale apartment filled with a vast amount of assets, demonstrating my ability to quickly accumulate a vast variety of models based on a set theme. I was quite happy with my outcome at the time of submission, though I was aware of lack of detail, lack of realistic scale, and poor lighting quality.
If I was to go back and make alterations to this project, I would use newly developed skills I have acquired since this submission. At the time of submission I was unaware of how to properly implement lighting into a scene, as you can see my submission below mainly consists of point lights that I have scattered around the scene, my lighting implementations and my understanding of lighitng at the time of development led me to the creation of a scene that appears to be set at night time, the scene is overly dark and appears to be mainly lit by unnatural lgihting, this was not actually my intention when I was creating and developing this project, it was just soemthing that occured over time due to a poor understanding of how lighting works within UE4. If I was to make alterations I believe I could easily make this scene look much more professional with proper implementation of lighting, I would utilised directional lights merged with atmospheric fog to create the appearance of natural sunlight, along with a skylight that would help calculate proper distribution of light, with the aid of a lightmass importance volume that limits the area of which the engine has to calculate the lighting for the scene.
I would also go back and make general improvements to the assets, first starting with the scale of any assets implemented, assuring they all adhere to some sort of real-life measurements, which I could easily obtain form my own living environment or online. I would then go back and improve the overall quality of the assets, perhaps creating my own textures or using more varied textures within substance painter acquired from within the program and external sources. I would be sure to ensure that edges are not as jagged as they appear in the video below, this was before I understood the importance of bevelling edges, such an implementation would by far increase the overall quality and lifelikeness of the scene.
youtube
Bedroom Scene
The scene below is a more concentrated attempt at something similar to my first XB2178 submission, in this example I was sure to use real scale in the majority of assets visible in the scene, for example, when modelling the record player I used a real-life record play which I had to hand, I measured it meticulously with a ruler and translated my result into Maya, ensuring that details such as the distance between dials were accurate, resulting in a much more pleasing visual outcome. I repeated similar methods throughout with every asset, using similar modelling techniques to accumulate enough models to construct a scene, I even utilised a new program, Marvelous Designer to aid me in the construction of the bed sheets and pillows featured within the scene, aiding me to create a much more lifelike result than my attempt in my first submission.
I also learnt a great deal about lighting in the development of my scene submission for XB2178, I used the aforementioned methods of lighting, directional light, skylight, lightmass importance volume etc, to help give the scene a much more interesting and realistic look, for the most part, light does appear to act realistically throughout the scene, though there are some results that are undesirable such as the edges of the chimney breast and overly bright books to the left of the window, if I was to include the following I would be sure to amend this issues and I would also add more assets to the scene, keeping to the current theme though adding finer details and more assets that appear to be positioned realistically and to aid the scene appearing to represent a lived in environment.
youtube
Modular Level Design
The following is an initial attempt at modular level design, I have demonstrated I have some understanding of modular level design and I have developed a short but appealing walking simulator type video game, though there is certainly room for improvement and I do believe that I would struggle to acquire the role of an environment artist with such an addition to my portfolio, as the following represents a very simple form of modular design, I would certainly need to develop something that represents a greater understanding of modular level design, including more complex modularity on a much larger scale, this is certainly an area where I am seeking to improve.
youtube
Key Games/Aspirations
There are several key games that have influenced me in my decision to begin learning to become an environment artist, there are several franchises in fact which have had a massive impact on myself and my choices, franchises that have also impacted the games industry and similar subsequent additions to the vast array of games that exists to date.
The Elder Scrolls
The Elder Scrolls franchise has been around for decades, with a heavy focus on fantasy orientated gameplay and visuals, revolving around magical elements and medieval kingdoms in which inhabit all manner of medieval characters. The Elder Scrolls franchise is known for its in-game environments and they are particularly what entice me to the franchise. For example, the transition in Oblivion from the lush grass-filled lands....

Into The Planes of Oblivion.

Both environments so different from one and other, though well implemented and designed.
Even now in Elder Scrolls Online, such fantastical implementations are still visible even on the loading screens, beautiful exaggerated fantasy based scenes featuring dragons and other mythical beasts are common throughout gameplay.

It is more than likely that other video games such Dragonage and other titles within the Dragon Age franchise along with games like Dark Souls and Neverwinter have drawn inspiration from the Elder Scrolls Franchise as I myself plan to in my own future work within the industry and in the development of my own portfolio.
Another Franchise I take much inspiration from in my decision to pursue the role of an environment artist is the Battlefield franchise. Particulary the most recent additions to the franchise, Battlefiled 1, Battlefiled Hardline and Battlefiled 4, all represent great attention to detail in regards to realism, as visible in my second submission for XB2178, photorealism is certianly a style I am drawn towards, though I do have a passion for fantasy style environemnts and this is where I plan on first further developing my skills initially, I do have a fond appreciation for relaistic environments as they help to bring a narrative to life in the best possible way and you could argue that they are often the easister to model, as they have the most references to work from as they actually exist, which is certainly a preference, as, withhout extensive reference, modelling can be quite tedious and guess work can often lead to undesirable results.
Below are some images for the aforementioned video games, they represent a level of skills I aspire towards and along with improving my skills regarding the development of fantasy environments, I would certainly like to replicate the skill level shown below.


And of course, Star Citizen/Squadron 42. Scifi games like Star Citizen and the standalone single player experience Squadron 42 merge the line between fantasy and realism as sci-fi, bringing the impossible to life with stunning triple-A visuals, jumping from realistic close quarters environment to a huge sprawling planet what inhabits large fantastical extraterrestrial beasts as visible below. Certainly, a game that is taking the world by storm, being the highest crowdfunded project, there will certainly be competition for such a franchise leading to similar video games, all the while creating jobs for aspiring environment artists like myself to hopefully one day work on.

1 note
·
View note
Text
XB2178 - Final Outcome
youtube


Overall I am quite happy with my outcome, if I had more time allocated to the further development of this project, I would increase lighting quality, create lightmaps for meshes and add some finer details I have missed, though I am more than satisfied with submitting my outcome as it is.
0 notes
Text
XB2001 - Modular Level Design - Reflective Blog Post
As of 22/04/2018 I have completed the development of my level design orientated game focusing on my contextual theme of doors.
What went well and what did not?
I am quite content with my final outcome for this project, I have produced a video game I believe to be in line with my skillset as a 3D artist, I have heavily focused on aspects such as lighting and other aesthetics as this is where I knew I could make my game stand out. I have also achieved my goal of using what I do know about blueprints in UE4 to create an atmospheric experience, achieving my goal of creating a video game that envokes suspense and even fear amongst other emotions.
I have utilised audio and cinematics to help bring my game to life, as the game is more of a walking simulator and there is not much player interaction other than opening the doors and triggering the cinematics and audio cues, I believe I have done this effectively and I have already had positive feedback from fellow students, family, friends and tutors.
Though I am happy with my outcome and more than happy with the visual aspect of my game, I do wish I had set aside more time to research into perhaps some more complex mechanics and cinematic sequences I could have implemented into my project to bring it a higher level of quality, I spent the vast majority of my time on this project creating lighting and recreating the modular pieces and their lightmaps. This project was definitely a learning experience and I do feel it has enabled me to become a more competent level designer and environment artist. I have learnt a lot about lighting and how it can be utilised to bring a sense of realism in my work, which is something they I can translate between projects and will definitely aid me in future endeavours.
Below are some screenshots of my final outcome.


What would you do differently next time?
Next time I would be certain to set more time aside for any tasks and research I may need to undertake, particularly research, my workflow has a tendency to consist of learning stuff as I go along and when problems arise, I think it would help my time management and project generation a lot of I was to research into aspects of a project I wish to implement much sooner, going into a project knowing exactly how I am going to do everything I intend and in the shortest possible timescale.
I also have a tendency to focus on preferred projects in other modules if multiple projects are intersecting at university, though I enjoyed this project I did not spend as much time on it as I could have, affecting the quality of my outcome to at least some extent, though I do not believe it has had a catastrophic effect, as I was able to allocate a great amount of time at the end of this project to amend and implement additional content.
I would have also liked to have spent time on UI and adding a more natural start and an end to the game, something I will definitely consider at earlier stages in future projects I undertake.
I would also like to mention I did have two mechanics that I didn’t include in my final outcome, the flashlight switch mechanic and item inspection, I did not include these mechanics as they didn’t add much to the experience in the state it is currently in.
You can review my earlier implementation of these mechanics in my level work in progress blog post entitled, “XB2001 - Modular Level Design - Progress Tracking/Workflow”.
http://lukesummersfutureworks.tumblr.com/post/170716446744/xb2001-modular-level-design-progress
0 notes
Text
DD2000 - ROUTE TO INDUSTRY - Presentation Proposal
In my presentation I will be looking into the possible job roles I could eventually go into upon completion of my degree and upon successful accumulation of sufficient work I deem fit and to of high as a standard as possible to include in a personal portfolio to aid me in seeking employment. I will be discussing the type of work I intend to include in my own portfolio and the type of work I will be required to include based on research.
The key role I am hoping to one day receive employment in, being an environment artist, I will be looking at designer Chris Reid and how he received employment as a Junior Environment Artist at Foundry 42, what his portfolio consisted of and what responsibilities he has at his job working for Foundry 42 on the standalone game Squadron 42 based within the Star Citizen universe. I will also be looking into Joe Neville as though I am more interested in the role of an environment artist, I may consider the role of a more refined 3D artist, undertaking the development of vehicular assets, though dictated by my development over time and my progression as a more technical 3D artist, which is currently lacking, whereas though my skill regarding the development of environment art and design is currently also lacking, I see environment art being a more realistic path for myself and one I have more interest in, it is certainly a role I can see myself improving my skills in preparation for the acquisition of a corresponding role at a greater rate.
I will also be evaluating a job opening at Cloud Imperium Games as an environment artist, breaking down the expectations, requirements and desired qualities the company has for an application of such a role.
I will also use the presentation to critique my own work I have submitted whilst studying at futureworks, particularly my environment projects, focusing on the positives and negatives, highlighting where I have found areas for improvement and how I hope to adhere to such revaluation and redevelopment, resulting in a much more polished portfolio, that would be better suited to aid me in the acquisition of a role within the games industry.
There are three main articles of work I plan to evaluate in my blog and presentation, my first apartment scene, my second refined attempt at replicating the first submission which I will have completed by the date of the presentation and my modular level design for XB2001, as I believe modular level design and the understanding thereof, plays an integral role in becoming an environment artist and a high ability in the construction of such modular designs is what is likely to greatly aid in the acquisition of a job role as an environment artist. I will also be discussing key games that influence myself and my choice to one day seek employment in my selected field of expertise, comparing different inspirations and aspirations and how they differ from one and other, whilst highlighting similarities and the skills needed to develop a similar line of work.
0 notes
Text
XB2002 - Modular Modelling - Blog Post 2 - Planning/Testing
Before focusing on the visual aspect of my modular assets, I first decided to construct said assets with the focus solely on the dimensions, in order to help me determine appropriate scalability for the player's confines within my game level.
The assets I created for the level thus far are individual wall variants that fit together to create varying corridors, the 2 main types being a corridor with a corner and a straight corridor, other variants whilst similar, have doorways located at different positions, allowing me to construct a maze-like level with unlimited possibilities.
The initial modular assets I created ready for my game to be tested at university. were created according to the following plan.

Below you can see the modular assets laid out to the extent necessary for playtesting. With the addition of a doorway modular piece and a smaller blank wall, the confines of the gameplay were relatively simple to layout within UE4.

Feedback from the playtesting of my game was very useful, particularly the feedback from my tutor concerning my art direction. Everyone who tested my game was happy with the gameplay and seemed entertained throughout their experience, being confident with my progress regarding the gameplay itself, I am encouraged to focus on the 3D art aspect.
I have decided I will be recreating my modular assets with a realistic Georgian theme, whilst keeping the length and width of the hallways similar, the ceilings will be higher and dependant on how quickly I progress I would also like to model Georgian props consisting of assets such as chairs, light fittings and framed paintings, all of which will be inspired by my reference imagery in my blog post entitled, “XB2002 - Modular Modelling - Blog Post 1 - Reference Images“.
I have also managed to locate an extremely useful reference in the form of a virtual tour of a modern Georgian style home.

The virtual tour can be found at the following link.
https://firebasestorage.googleapis.com/v0/b/iview3d-15bc8.appspot.com/o/Bedford%20Estates%20-%20The%20Reynolds.html?alt=media&token=88993523-9a97-48de-b1b8-33e5467adf6e
I have decided that I will be basing the style of my modular assets on the following image, as I believe I can achieve a nice aesthetic for my modular assets whilst not overly complicating the process of translating such an aesthetic into a 3D space.

The modular pieces below are each 400cm in width and 300 cm in height, both are currently untextured. Both pieces are all that is necessary to restructure the confines of my game in entirety, a far more minimalistic approach than my first attempt.

As you can see below, I have laid out all modular pieces within UE4.

0 notes
Text
XB2002 - Modular Modelling - Blog Post 1 - Reference Images


0 notes
Text
XB2178 - Negotiated Artifact 2 - Blog Post 7 - New Project - Progress Tracking
As mentioned in the previous blog post, I will be shifting my efforts in this module to the creation of one room. I plan on using this room to practice using lifelike scale and lighting to create a realistic looking scene withing UE4.
I have decided that this room will be a bedroom, to aid me in the finalization of a realistic outcome, I will be using real-life measurements from my own home as I can easily transfer these measurements into units within Maya which I will set relative to the units in UE4, allowing for a smooth transition between programs.
Before I begin modelling detailed 3D assets, I am going to gather the necessary measurements from my home, along with some photographic references to aid me in the development of this new project.
Measurements
General Measurements - The following measurements are not pertinent to scale of the actual room I am planning on creating, though they will be useful in determining the height of the room, they do not set boundaries for the overall size and scale of the room.
Door height: 196cm
Doorframe height 203cm
Door Width 75.5cm
Doorframe width 88cm
Wall/skirting height 244cm
Skirting height 10cm
Wall depth 12cm
Specific Measurements - The following measurements are more in-depth and will be used as a basis for the creation of the room itself, detailing width of walls and specifics such as depths of alcoves.
Front wall opposite door - Left Alcove - 140cm width, 51cm depth
Front wall opposite door - Middle Chimney Breast 160cm width
Front wall opposite door - Right Alcove 123cm width, 51cm depth
Bellow is an image of the wall measured above.

As you can see below, I have used these measurements and translated them into UE4, to get a sense of scale, the player characters height is roughly 5' 9′’.

The next key measurement I need is for the length of the room, as I already have the width, which is 423cm or 4.23 m’s. I will get this measurement by measuring the length of a bedroom in my home, though I will add 3 foot to the retrieved measurement, to give the controller character room to walk around my outcome.
The exact length of the measured bedroom is 11 foot, as mentioned I will add 3foot to this measurement, meaning the length of the room featured in my outcome will be 14 foot.
I now have an idea of what the scale of the room is like in a 3D space, as you can see below.

I will now consider doorways, windows and lighting.
The door measurements I already have so I have placed a simple doorframe and door appropriately within the existing confines.
I have measured a window in the same room I got the measurements for the room length, which recedes 22cm into the left wall, is 263cm in width and 115cm in height.
As you can see below, I now know how the room will be structured and how the real-life measurements reflect in UE4.


Next, I will take these confines into another UE4 project, where I will be adding some models and working on lighting.
The first model I need is a door with a doorframe, to create this model I will be using my own measurements, along with the reference image below.

Below is a quick render of the completed door with frame.

I will now model the room within Maya, before importing it into UE4.
As you can see below, I have done as I previously stated I would, I have also textured the room, floor and door and began working on lighting.

Below is the current state of the room, I have altered lighting, added spotlight meshes created in Maya and I have created a custom particle effect, simulating dust particles.


Next, I plan on creating assets, the main assets I want to create are as follows:
Fireplace
Television
Picture Frames
Bed
My reasoning for prioritising the creation of these particular models is due to my belief that they will help populate the scene and give me a sense of space within the room I have created thus far. I will be creating all models with real-life scale in mind.
Before creating any models, I have first added skirting boards to the room and I will now remodel the chimney breast and give it a brick texture.


Keeping in mind the positioning of assets such as the bed I have in mind, I decided to add wooden beams to the centre of the room, just to add a bit more intrigue, also, they will flow well with asset placement.

The next 3D asset I will be creating is the bed. I will be using the following imagery as reference. There is a similar bed in my home that I will be referring to for measurements, though I will be creating a more unique design.

The main measurements I need are as follows:
Headboard, left pole, 132 cm in height
Headboard width 142cm
Bedframe, left side, 30cm from ground, 13cm in height, 2.4cm thick
Matress, 4′ 6′’ x 6′ 3′’
As you can see below, I have created the bed model, though I have yet to texture it. I am happy with the scale and it flows very well with the room and the wooden beams.

Before I texture the bed or go on to any other tasks, I am going to gather reference images to aid me in the creation of smaller 3D assets and to help me with the rooms decor.
My primary source for the following references is Urban Outfitters as this store carries a variety of aesthetically pleasing items that I will like to replicate in a 3D space. This store often presents their goods in an appealing fashion too, giving me ideas for the positioning of objects within my final scene.
The image below I find very aesthetically pleasing, I would like to replicate this perhaps in a corner of my final scene, the plant pots and cinder blocks do not seem overly complex, though I have little experience in creating plant life, though I am interested in investigating this area.

I find the image below quite inspirational for my own intended outcome. If I was to replicate something similar in a 3D space I am confident it would make an aesthetically pleasing addition and it would be an addition that could easily be created and textured to be realistic.

The two previous images have both been sourced from the following link on 09/03/2018, it is likely that they will not be view-able at this link within the following weeks, as Urban Outfitters often update their website with the addition of new stock. https://www.urbanoutfitters.com/en-gb/home-gifts
Shelving is something that I believe will help make my scene more complete, I have a preference for rooms that take advantage of their wall space and I intend to use shelving as a surface for some smaller 3D assets.

https://www.urbanoutfitters.com/en-gb/shop/double-triangle-shelf?category=storage-shelves&color=070

https://www.urbanoutfitters.com/en-gb/shop/half-circle-shelf?category=storage-shelves&color=070
Shelving is certainly a simple addition, though it is is an addition that is quite simple to make appear realistic in a 3D space, particularly when paired with the correct lighting in UE4.
Below is an image I really like the look of, I would like to have a feature wall on one end of the room in my outcome and I really like the method in which paint has been applicated in the following image.

I would also like to feature a framed record collection on a wall in my outcome similar to the one below.

Happy with my reference images, I am now going to remodel the floor and walls of the room, ensuring they are all 1 model, which will feature a new wooden floor and a feature wall inspired by my reference image of the feature wall with the triangular pattern.
Below is an initial attempt at creating a custom laminate flooring texture.

Next, I continued to create assets, taking a break from my blog to focus my time an energy on asset creation.
Below you can see my final scene, all assets now created and laid within.
youtube


1 note
·
View note
Text
XB2001 - Modular Level Design - Progress Tracking/Workflow
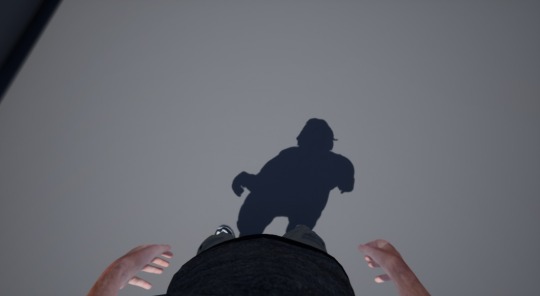
The first step in the development of my level is creating the project and setting up the player camera. I have decided to use a first-person camera for my level, though I am starting off with a third person preset for this level, I will be altering the third person camera to emulate a first-person camera, limbs and shadowing of the default third person character will be visible in this mode that would not have immediately been present in the first person preset.
I will achieve this by attaching the follow camera to the third person character mesh via the head socket and I will be positioning the camera so it appears merged with the meshes head, meaning the player will be viewing my level from a first-person perspective, this is commonly known as a true first-person camera.
As you can see below, I have achieved my goal of creating a true first-person camera, when the player looks towards the ground, they can now see the character's body, along with its shadow. Another interesting outcome of the previous step is because the camera is attached to the characters head, it also follows a breathing animation, adding a more realistic aspect to my level.

Happy with the previous step, I am now going to create the flashlight which will aid the player in darker areas of my level.
To do this I started by creating a new input in the project settings.
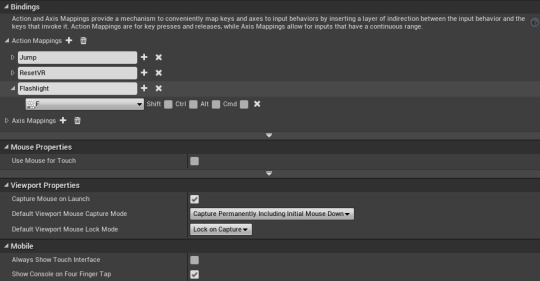
Next, I added a spotlight component to the character viewport and attached it to the follow camera. I then set the flashlight to switch on and off with a FlipFlop node which alternates between both input A and B, starting with A, which enables and disables the visibility of the spotlight component.
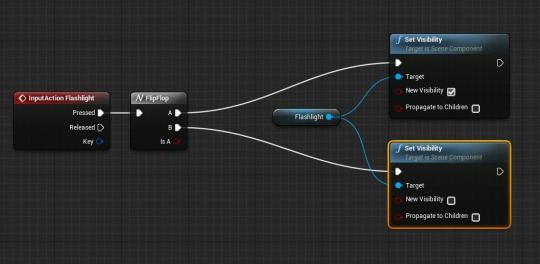
Below you can see the flashlight both deactivated and activated. Finer details of this component such as the intensity and the attenuation radius can be easily altered at a later date if need be.


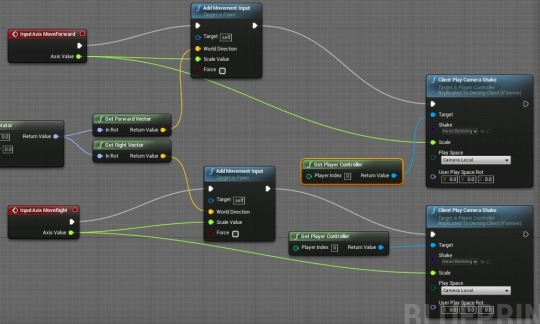
Next, I decided to add head bobbing to my level as I want to make the characters movement seem more realistic when said character is moving. I did this by creating a camera shake blueprint which I combined with the existing movement input.
I am happy with my results, though I may alter the severity of the headbobbing at a later date, dependent on feedback.
Next, I am going to add item inspection to my level, to do this I will be using guides found on YouTube, outside of University I find that this is my most preferred method of learning how to blueprint. The series of videos I am using to create my item inspection is titled Unreal Engine 4 - Item Inspection created by Titanic Games, I will not be going too in depth in my blog regarding how I go about creating this mechanic, as it is quite a lengthy process and it can be reviewed in the series by Titanic Games.
I have now completed the previously mentioned step, below is a screenshot of me inspecting a simple cube, it is rotated and triggers a depth of field post-processing effect, the object also returns to its original position upon ending inspection which is triggered currently, by the E key.

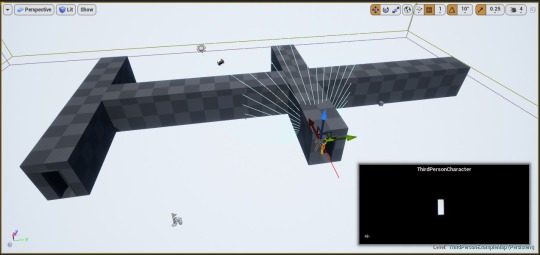
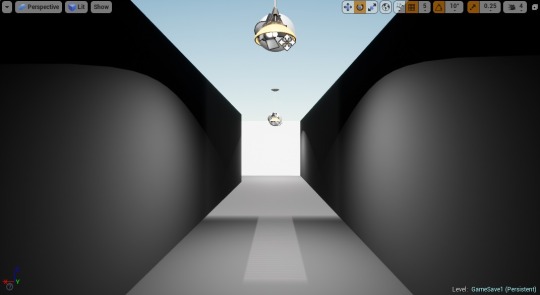
Next, I am going to begin white boxing the actual confines for where the gameplay will take place. I am going to create a simple corridor with a doorway of which I will duplicate as many times as needed, laying the corridors in a maze-like fashion.
To ensure I am using apropriate scale, I set both Maya and UE4 to scale in units of centimetres, meaning I can easily create realistically scaled corridors that merge well together. For the time being, I am using measurements from my own home, though I do not have access to corridors that I would like to emulate in my level, it will help me work with a realistic sense of scale, particularly when it comes to the door to wall height and width ratio.
Below are the measurements I will use to aid me in the whiteboxing of my level:
Door height: 196cm
Doorframe height 203cm
Door Width 75.5cm
Doorframe width 88cm
Wall/skirting height 244cm
Skirting height 10cm
Ceiling coving height n/a, though I would like to add ceiling coving to my corridors.
Wall depth 12cm
The only measurements I don’t have are for the length of each corridor, I will base this off playtesting.
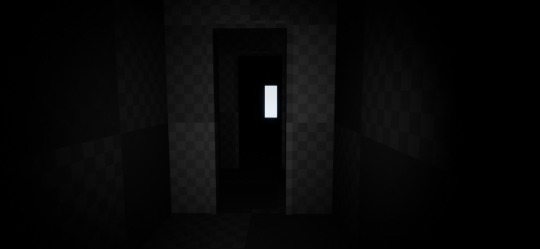
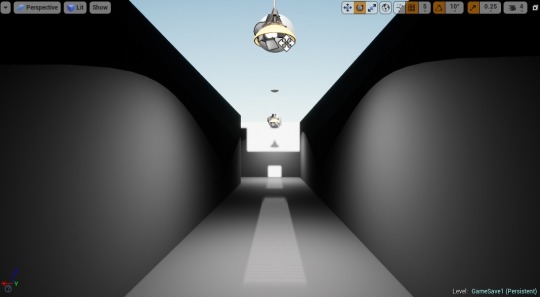
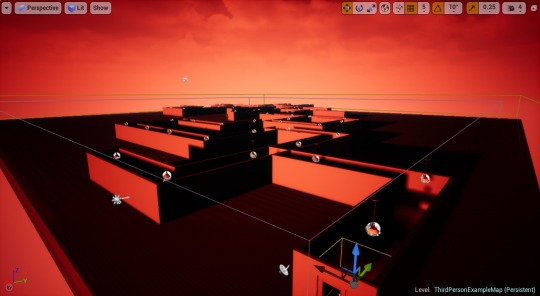
Using these measurements, I have created a very simple corridor with doorways at either end along with two other doors opposite each other about midway up the corridor. I have connected several of these corridors together, added a ceiling and floor and I am happy with what I am seeing so far, currently the flashlight needs to be utilised as other than the light coming from the currently empty doorways leading to the outside game world, there are no other sources of light, though this appears to be a satisfying result, as it adds a suspenseful atmosphere to the level, however basic it may be at this point.
Upon a quick playtest, everything seems to be more than satisfactory, though the run cycle seems a little misplaced, I would like to only allow the player to walk through the level, adding more suspense to the gameplay and an eventual desire to explore their surroundings, as currently my initial thought when launching this level in its current state, is to run as fast as I can through the level in order to escape the maze-like confines.
Below are some screenshots of the level in its current state.
After some help from a fellow student, Andrew Speed, I was able to locate the walk speed setting in the character blueprint, I set this to 200 for now, which seems an appropriate speed, aiding in the suspenseful feel I want for my level.
The next steps I feel are necessary for this level, are implementing doors with open and close animations, adding footstep sounds and creating a flickering light source which I will be able to replicate throughout the level. I will start with the flickering light which I will create using a tutorial named Unreal Engine 4 Tutorial: Horror Game - Part 11 "Flickering Light", created by YouTuber MrFantasticGhost.
As you can see below, I have achieved my goal of creating a flickering light source, something I will easily be able to replicate at a later date.

I have now added animated doors which open with the E key, below is a video showcasing my current progress. As the doors are now triggered by the E key, I have changed the inspection key to R, though I am likely to change this at a later date, I have yet to look into how to utilize the same key for multiple functions.
youtube
I will now develop the game area further according to my own planning. The next implementations will include jumps scares, music, ambient sounds and idle animated characters visible through keyholes.
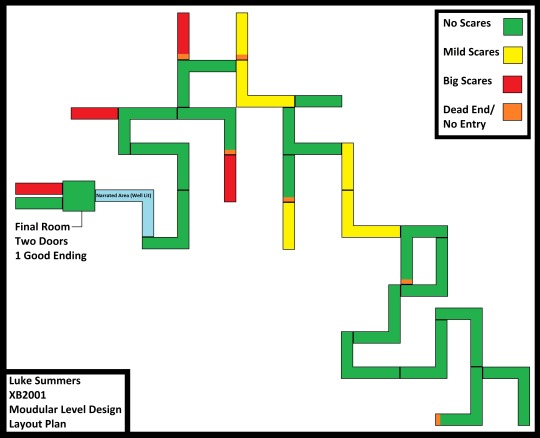
My next step is whiteboxing the entirety of the level according to the following layout plan.
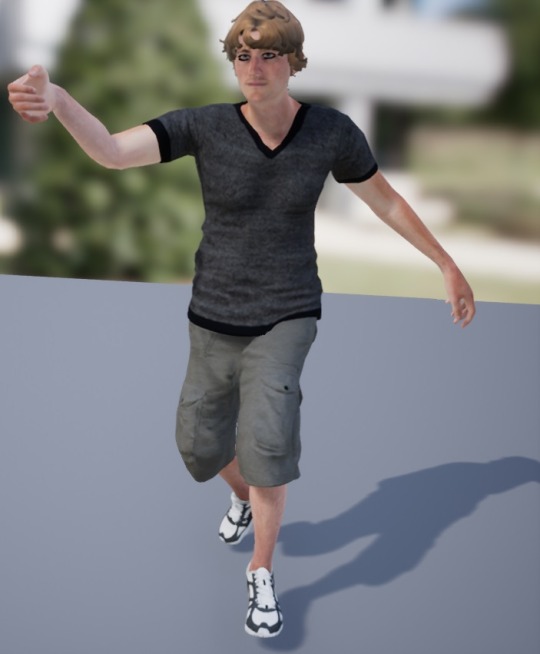
Before constructing the confines of the actual gameplay, I am fist going to alter the player character. I am going to change the player character to one I have retrieved from Mixamo, along with an idle animation and a walking animation.
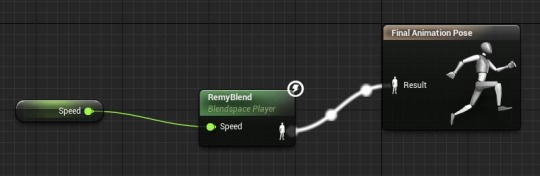
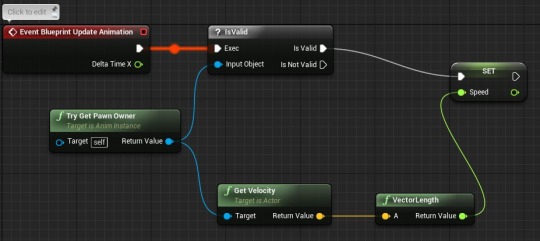
After downloading the animations and character from Mixamo, I created a blendspace within UE4, which is basically a way of merging the idle and walking animations, meaning the player will transition from an idle stance into a walking animation smoothly.

Then I created the animation blueprint, which directly connects the animation to the payer controller and allows for a smooth speed transition between animations.
Below is the anim graph for the animation blueprint:
Below is the event graph for the animation blueprint:
I then attached the camera to the character mesh, socketed to the head as I have previously done to create a true first-person camera, and I am happy with the outcome.
On the Mixamo website, I altered the walk animation so the right arm is extended and the palm is open in a manner that would be suitable for holding a mobile phone, which I would like to use as a torch, as opposed to my previous efforts where a torch would emanate from the player characters head.
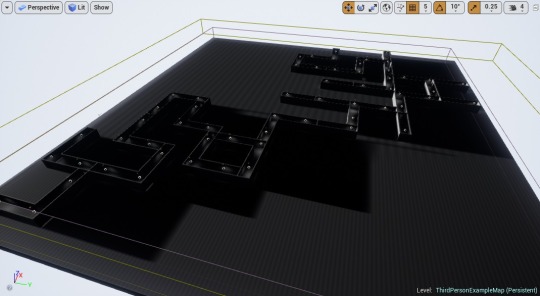
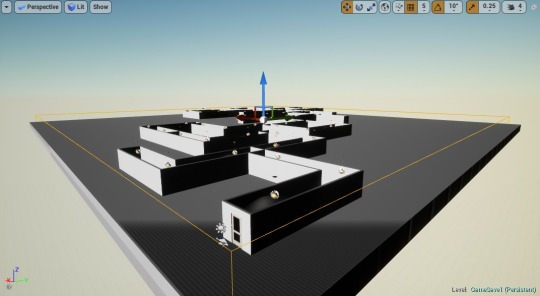
Now, I will white box the entire playable area using a modular kit I created for 3D module XB2002. In its current state, the modular kit is simply made up of various flat walls and one wall with a doorway, I am going to keep these models simple for the time being, as I can add more detail to them at a later date and easily replace the existing models in UE4 without altering their position within the 3D space.
As you can see below, I have begun laying out my modular assets according to my planning. I have also added doors and doorframes to doorways and I have replicated the flickering light asset blueprint I previously created appropriately throughout the confines.
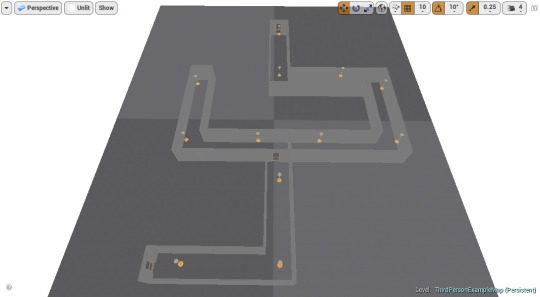
Below is another screenshot of the layout in progress.
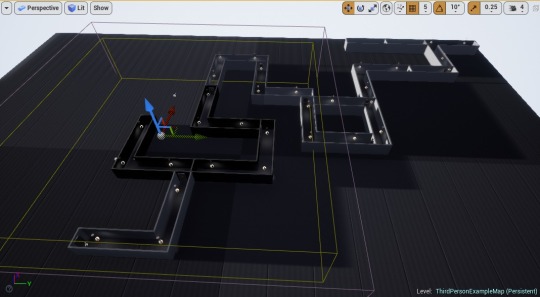
As you can see below, I have now laid out the majority of the confines.
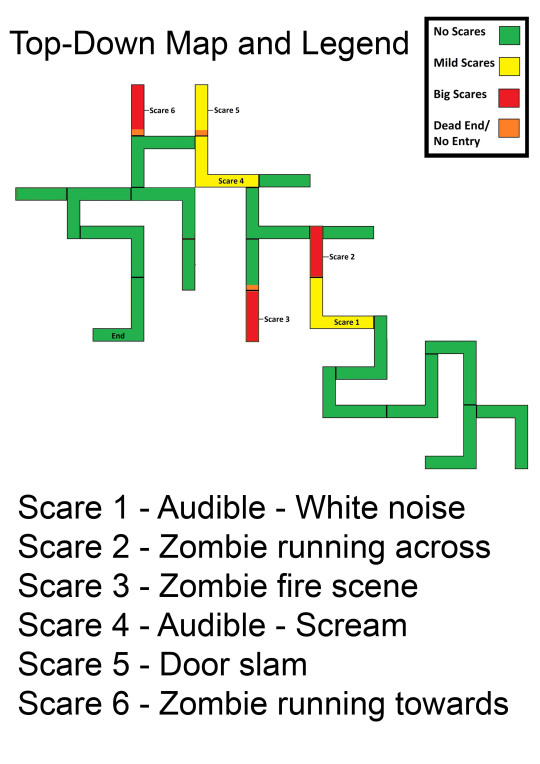
Next, I need to begin implementing scares into my game, which means I need to plan out exactly what type of scares occur in which corridor. I have previously identified where I would like different levels of scares to occur, though I have yet to specify what exactly those scares consist of.
I have created a new layout plan that details the exact location of all 9 scares that I will be implementing.
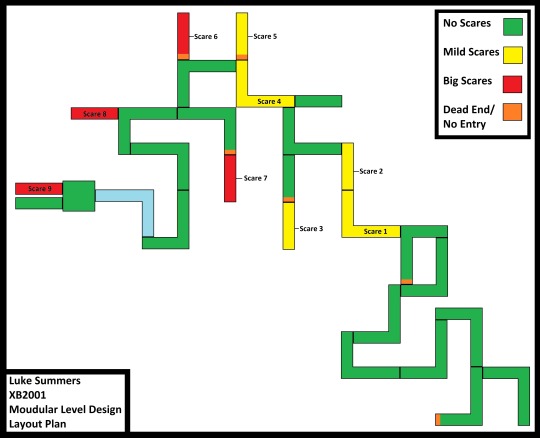
Scares
My game will consist of 9 scares, gradually increasing in intensity as the player progresses through the confines.
Scare 1 - Scare 1 will be an audible scare, when the player steps into the room, they will hear a loud sound, perhaps a scream or the roar of an unnatural being.
Scare 2 - Upon opening the door to the highlighted corridor, the player will trigger an event in which a character runs towards the next corridor, though when the player turns into the next corridor, the character will not be present.
Scare 3 - Scare 3 exists within a corridor with no entrance, this scare will consist of numerous idle beings and 1 being appearing to feast on a lifeless character.
Happy with these ideas, I will now go on to work on these first 3 scares, beginning with scare 1.
Implementing Scare 1
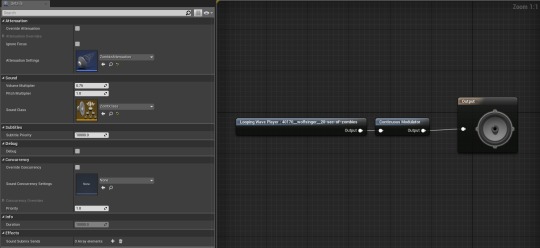
This particular scare is relatively simple, I need to set up a trigger for the player to activate, which will trigger an audio file to play upon activation.
The sound I am using for this scare is from Freesound and can be found at the following link.
https://freesound.org/people/ngrib/sounds/381951/
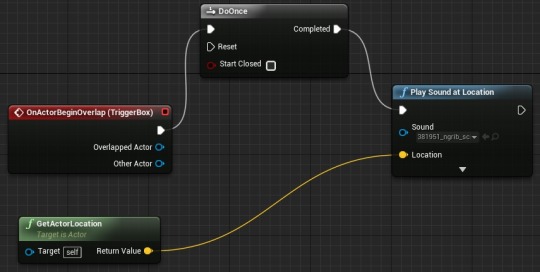
This scare is now functioning as intended, I added a “DoOnce” node, to quickly alter the blueprint to only trigger the sound once, as upon playtesting I noticed that it could be triggered indefinitely.
Implementing Scare 3
This scare is implemented using character models and animations from Mixamo, I have downloaded several zombie characters models along with idle animations which loop indefinitely, another zombie has a biting animation and I intend to have another character appearing to be fed upon.
Below is an event which triggers a cinematic in which a zombie character stands up in front of the player and a sound is played. This cinematic was created by using matinee and you can see how it is set up in the second following image.
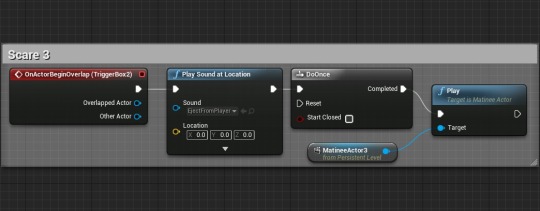
The following is an image taken from my game in the perspective viewport, visible are 4 zombie characters, all of which have idle animations.
Implementing Scare 2
As with scare 3, for this scare, I need to set up a matinee cinematic in which an animation of a character is triggered. The animated character will be the same character visible at the forefront of the image above.
Below is the blueprint for this scare. As you can see, the matinee which consists of the running animation is triggered once to play and after a 2-second delay, the running actor is destroyed, meaning no traces of the character will be found immediately around the corner.
For this scare to function as I intend, I have made an adjustment to the scale of the playable confines, adding an extra corridor for the running character to emerge from.
Before
After

This scare is now complete.
Lighting and Post-processing
Lighting
Before continuing with implementing any mechanics and animation, I am going to alter lighting, to ensure my game looks as good as possible, even in its current state.
The following are steps I have taken to optimise the quality of lighting in my game:
Added directional light
Added atmospheric fog
Connected directional light to atmospheric fog, directional light can now alter the position of sun disk.
Altered cascaded shadow maps - First I altered the dynamic shadow distance which determines how far ahead lighting and shadows are calculated with the results visible, measured from the camera. At first, this was set to 500 units, meaning that light would appear cut off even at a very close distance as you can see in the first following image. In the second following image, with the dynamic shadow distance set to 2000, no lighting appears cut off though lighting calculations do not continue to stress the system far beyond the confines unnecessarily as you can see in the second following image.
Added lightmass importance volume, concentrating the area that requires the highest quality lighting.
Altered flickering lights attenuation radius and outer cone angle.
Post-processing
Added post process volume
Added vignette effect, set intensity to 1 - I added this effect and set it to 1 units as I like the way it soaks up some of the more intense lighting and blends it towards the edges of the screen.
Added scene tint (may be temporary dependant on feedback)
Upon review, I have decided neither implemented post-processing effects seem necessary, at least at this current stage, they actually seem to make the 2 visual scares far less impactful at this moment in time.
One quick change I made was the first audible scare, I changed the sound file to the one available at the following link, I have found this sound to be more effective and natural than the previous audio file.
https://freesound.org/people/josepharaoh99/sounds/390959/
I then added the following audio file to the first visual scare, far more appropriate than the placeholder.
https://freesound.org/people/SirBedlam/sounds/393824/
For the second visual scare, I added a sound cue that is only audible when the player is st a set distance, meaning the closer the player is to scare 3, the louder the sound will be.
Before continuing with the mechanics and animations for my game, I am going to focus on my work in the XB2002 module, which I will be merging with this project. I will return to this blog when I have game ready modular assets, along with 3D prop assets.
Alteration to layout
Whilst laying out my new modular pieces, I made an amendment to the structure of the confines, juts before scare 1 there was a left turning corridor, it has been replaced with a straight corridor to avoid colliding with other geometry, below is the updated plan.

Further alterations to layout, alterations made due to time constraints, I decided to focus more on the visual aspect of my game, creating models and focusing on realistic lighting as you can see below, along with the new layout/progression diagram.

I have now completed my game and I am happy with my outcome.
0 notes
Text
XB2178 - Negotiated Artifact 2 - Blog Post 6 - Big Update
After some reflection and upon discussing my current progress with my tutor, I have came to the conclusion that I must divert from my current path. I have decided this due to the fact the the project I had aimed to have completed by submission date, is in fact too ambitious, particularly when considering the limited time I have to work on this project and other projects for separate modules, to achieve such a goal as I had originally planned, I would have to focus solely on this project and I would have no time for other projects. This module in particular is 20 credits, where as another assignment which requires much more time and dedication is 40 credits and I have barely started that project due to occupying my time with this particular project.
I have decided that my intended hand-in for this project will now be something similar to my first negotiated artifact, though on a smaller scale with more attention paid to quality as opposed to quantity. I am planning on creating one room, most likely a bedroom and if I have the time I would also like to create a en-suite bathroom and perhaps a hallway outside of the bedroom door, though my initial focus will be the bedroom, ensuring I pay close attention to real life scale and proportions, I will be creating models in Maya and I will be using Substance Painter to texture any models I create for this project, Substance Painter will help me to create realistic textures for assets, increasing the quality of my intended outcome.
Over the past several days I have been researching into realistic 3D environments that I intend to look to for inspiration in the creation of my new intended hand-in.
Below are some examples that I will be using as reference in the development of my new outcome.
Silent Hills P.T. - Silent Hills P.T. was a playable teaser of an unreleased title in the Silent Hill video game series. This interactive teaser featured a realistic environment which was the confines of a psychological horror game. It is apparent that great attention has been paid to detailing the environment and 3D models within, there is nor a vast of amount of models that exist within the presented 3D space, though each models that is featured is very realistic and they all fit well together and into the scene. I will mainly be looking to this reference to aid me when adding finer details to my own product and to aid me in the creation of a realistic and interesting environment, with the inclusion of large indentations into walls and parts of walls that are further forward that others, as well as the inclusion of skirting to the top and bottom of the walls, all set to a realistic scale.
Below is a video walkthrough of Silent Hills P.T. that I am using as reference.
youtube
Allison Road - Allison Road is an example very similar to Silent Hills P.T., though more populated with much more variation than the latter.
Below is a video walkthrough for Allison Road I will be using as refence.l
youtube
Resident Evil 7 - Resident Evil 7 is another example of a video game with a heavy focus on realism, though this example is definitely different to my previous examples as it features more extreme assets that fit in more with the horror genre, though this video game is largely responsible for my interest in realistic 3D modelling and as it is the only example of mine that has actually been released as a full title, there are hours of gameplay for me to refer to.
Below is a full palythrough of the video game I will be using as reference.
youtube
Though not all of my previous research, progress and planning is relevant to my new intended outcome, I will still be referring to some of it for inspiration and reference in the development of my new outcome.
The majority of the models I have already created for my initial intended outcome are no longer relevant for my new intended outcome, though some of them fit with the realistic aspect I am going for, they are heavily representative of a previous theme I was going with so it is unlikely I will be able to utilize any of these existing models in my new intended outcome.
0 notes
Text
XB2001 - Team Prototype - Blog Post 4 - Applying Materials/Final Touches
Having received the level from Alex with mechanics in place and Dom having placed the majority of my assets, the next necessary step is to apply materials which I prepared in a separate project. Below are some screenshots from the prototype showing my assets within the engine with materials applied. I am happy with the appearance of my assets within our prototype, though the layout of the models, not dissimilar to the level design by Dom, appears to be very uniform, I was unaware when creating my assets that they would be replicated to such a huge volume, though this does work as this is just a prototype, alterations to the variation could be carried out of this project was taken further.


Noticing some slight problems with textures and lighting applied by Dom, I decided to make a few alterations. I started by simply making certain textures darker as the lighting was reflecting off the ground in a strange and overwhelming way, I suspect these issues could be due to exporting the project and opening it on different computers various times.
Next, I added some music to add a tone to the game. For the music I simply used an in engine sound named Starter_Music01, it works well with our prototype. I am now done with this project and I will pass it back to Alex, he will be making some alterations, including the addition of sound, finalising the project, ready for presentation.
0 notes
Text
XB2001 - Team Prototype - Blog Post 5 - Reflective Blog Post
Coming to the end of this project and as submission day approaches, I am encouraged to reflect upon this project and evaluate any failures and triumphs that have occurred over the past several weeks.
Initial Thoughts
Overall, I am fairly happy with my team's outcome, we have worked well within quite a limited time constraint to create a working prototype. We started off this project with only ideas and we have managed to turn our concepts into something we are now quite happy with, a working level for a video game based around one of our favourite genres, science fiction. I feel our inspiration is visible in our outcome which has mainly been inspired by successful video game titles such as Destiny 2 and games form the Mass Effect Series along with many other favourites. I am confident that I have showcased my abilities as an aspiring 3D artist to a fairly high level and I am happy with each and every asset I have created to contribute to my team’s final outcome.
What went well?
From the outset, my team has been able to communicate ideas in a manner which swiftly lead to actions throughout the past weeks, we were all immediately passionate about creating our own prototype, especially one relevant to the sci-fi genre, a genre each of us has enjoyed for the majority of our life's. Although we carried out the majority of our work alone, working as individuals in our own personal workspaces, we always ensured that each of us knew what task we had to undertake and complete, this translated well into my own role as a prop artist. As I had never previously created assets relevant to the science fiction genre, it was quite easy for me to hit a brick wall of sorts, particularly in the early stages of development. I began the development of 3D assets by creating obvious prop assets such as crates and weaponry based on some quick google searches for inspiration, though I quickly became unsure of what to create next. This was a regular occurrence, I would create one or two assets based on discussions and feedback on my team and then struggle to decide on what to create next independently, this was where my team was able to quickly step in and give me some guidance on what I should make next, which was usually relevant to what they were working on. Reliant on my own skills in 3D modelling and regular communication and feedback from my team, I believe I have managed to create quite an array of unique 3D models to an efficient standard, I have demonstrated my capabilities regarding the development of my own 3D work, based on existing concepts and my own interpretation of the science fiction genre. I have managed to create assets with a consistent theme and aesthetic that I personally find very appealing.
What did not?
Upon reviewing our outcome and seeing my own work implemented into our prototype, there are no obvious faults I can point out. There are faults that exist in our outcome that are not visible though, faults of my own. The unwrapping process is a process which I still struggle with to this day, though I do feel I am improving at a steady rate, this is particularly prevalent in this project. At the beginning of this project, I would say I had a very loose grasp on the unwrapping and texturing processes, I was unaware of most common protocols and practices needed to efficiently texture 3D assets I had created. I found myself in a position where I would texture 3D assets in a manner that would lead me to a desired visual outcome, though would be considered improper and unprofessional. My common practice consisted of me assigning a separate material to polygons that required segregation from other parts of the model, more often than not quite simple assets would have several materials applied when actually I only needed 1 material for the whole model and I just had to unwrap the model, leaving no uv's overlapping, something I was completely unaware of at the beginning of this project.
Below is a screenshot taken from Substance Painter, in this screenshot you can see several materials with UV's laid out in a very unusual and inefficient manner, this was when my knowledge of UV unwrapping led to me automatically unwrapping uv's without consideration for the history of the object, transformation properties and overlapping uv’s. As noted in my blog post entitled, “ XB2001 - Team Prototype - Blog Post 1 - Progress Diary “, as the below model was not unwrapped properly, I decided to abandon it and only implement models that did not have overlapping uv’s into our outcome.

Below is the most recent model created for this project, consisting of only 1 material which I have used more effectively to get the outcome I was looking for, at this point I was more aware of how to unfold and layout uv's and just knowing that I had to delete a 3D models history and freeze its transformations before applying an unwrap has made me more capable of successfully unwrapping objects of varied complexity.

What would you do differently next time?
If I was assigned the role of prop artist in another project, my foremost priority in the development of any assets would be implementing correct unwrapping and texturing procedures. In this project the final texturing process was quite tedious, several assets had an unnecessary amount of materials applied to them and in some cases, a lot of uv space was left empty as you can see below, this is very undesirable and I aim to never replicate such implementations again.

I am now more confident at unwrapping and texturing assets, I have become very familiar with the user interface within Substance Painter and the features available to me, I now know how to manipulate the software to create aesthetically pleasing outcomes that often almost contradict the level of detail implemented into the actual modelling of assets, using tools such as hard surface stamps, I have become familiar with techniques that allow me to create assets that appear a lot more complicated than they actually are, geometry appears modelled onto surfaces, geometry that would otherwise take up a large portion of the polycount if it was in fact modelled onto an asset.
In preparation for any other 3D work I undertake, I will ensure that I research into the unwrapping process of 3D assets at a more in-depth level, as I believe this will increase my efficiency and enable me to be regarded as a much more professional 3D artist.
The last thing I would do differently is increase the complexity of my models, though I am more than happy with all of the assets I have created that have been implemented into our prototype, I do feel some are a little simple, though my own thoughts contradict themselves on this matter, as my time constraint of 6 weeks for this project has largely dictated the complexity of the assets I have created. If I began this project with the goal of creating strictly complex assets, it is unlikely I would have many assets ready to be imported into our prototype by the end of the project, so whereas I might prefer an outcome consisting of complex assets, that would have definitely been an unrealistic goal for this assignment, given the time constraints. With this being said though, I do feel I have become a much more competent 3D artist as a result of this project and models I may have once considered complex, that would have taken me hours to model, unwrap and texture, I believe I could now have game ready within a fraction of the time it has previously taken me.
Final Thoughts
Overall I am quite happy with my own personal outcomes as well as my team's outcomes, we have delivered a product I am satisfied with and I believe we have demonstrated that we are quite capable of taking on such a project. I am now more confident in my ability as a 3D artist and as a functioning member of a game development team and I am particularly looking forward to any group work that is still to come during my time at university. There was one main thing that effected our outcome that I would like to point out, though I am quite happy with our outcome I do feel it is a little unbalanced, I suspect this is due to the amount of time each of us has dedicated to this project, I feel I have dedicated quite a substantial amount of time to this project, which is visible in my assets, though Dom and Alex had little time they could set aside as they both have jobs which take up a large amout of their time outside of university, if we had more time to work on this project, I feel our otucome would be more balanced, I will dsicuss this more in my peer review.
0 notes
Text
XB2001 - Team Prototype - Blog Post 3 - Project Inspiration
When coming up with a central theme for our prototype, it did not take long before me, Alex and Dom decided that we would like to base our prototype around the science fiction theme, this is a theme that we all have a predilection towards, inspired by many existing sci-fi video games, tv shows and movies alike.
As I am the prop artist for this project I have been heavily inspired by existing sci-fi video games in the development of my own work, there are two recent titles in particular that have heavily inspired my development process, Titanfall 2 and Mass Effect Andromeda.
Titanfall 2 is a marvellous first-person shooter game that represents the type of game that I aspire to work on in my career. The weaponry, robotics, props and scenery are all very aesthetically pleasing and help give Titanfall 2 its own unique personality.
Below are some screenshots I have taken from the game.
The two images directly below both feature the use of emission, such implementation is common within sci-fi titles and really helps to bring a sci-fi feel to a game, without this existing layer a sci-fi title might even look incomplete. The addition of such pronounced emission as visible below is not a particularly complex procedure, though it has a profound effect on the overall aesthetic of titles such as Titanfall 2, helping the player to have a much more immersive experience, one that feeds into preconceptions about the future of our planet and how technological advancements might affect our own inhabitancy in the decades and centuries to come.


Titanfall 2 features many assets such as crates that I have and will continue to draw inspiration from in the creation of any assets for our prototype. Such assets as the ones visible below really bring a futuristic and industrial feel to the game, the scene I took the screenshots below from is a scene in which you are in a futuristic factory which is responsible for mass producing man-made structures, interiors and environments, a very futuristic concept. Most technological advancements, particularly in the last century are the result of the urgency to advance technologically to aid war efforts, I feel games like Titanfall 2 visualise concepts for future technology in a very accurate way, assets do not appear unrealistic and illogical.
When creating my own assets I have been heavily inspired by titles such as Titanfall 2, and along with other sci-fi related external references from Sketchfab and existing assets packs, I feel I am able to accurately develop my own unique assets that fit in with the sci-fi theme.


Below are several screenshots I have taken whilst playing Destiny 2, each screenshot contains assets that represent the style and modelling techniques that I have and will continue to implement in my own development process. Though Destiny 2 has a very similar art style to Titanfall 2, I would lean more towards Titanfall 2′s style and modelling tehniques for inspiration when creating my own assets, mainly because Destiny 2 is a much newer game and the majority of the models have a very high level of detail, if I had more time on this project I would have most likely taken the majority of my inspiration from Destiny 2 alone, as I would have more time to focus on individual models and I would be able to impement a higher level of detail to each model.


0 notes
Text
XB2178 - Negotiated Artifact 2 - Blog Post 5 - References
To aid me in the creation of any assets I intend to make for this project, I will be taking inspiration from existing objects, materials and textures. In this post I will be referencing any imagery that has inspired my modelling and texturing process in this project, as well as any 3D models found on Sketchfab.
Please note that some imagery featured within this post has already been referenced in my planning and research document and some models have already been created by the date I am writing up this post.
Reference Images
Living/Planning Area Specific Assets
Sofa - Although the image below is of a chair, I have taken inspiration from this 3D Sketchfab upload when creating my sofa model, the texture has the level of ware I would like to reproduce in my own outcome.

https://sketchfab.com/models/e7c2470811954058bf355c4bf29bddd9
Coffee table - Below is an image of a coffee table I have used for reference when modelling my coffee table. This model is quite immaculate, I will be texturing my own version with my own interpretation of how such an object would show signs of ware

http://www.preloved.co.uk/adverts/show/105827974/old-charm-tudor-brown-coffee-table-bookcase-cabinet-mag-rack.html
Side Table - When creating my side table model I used similar modelling and texturing techniques to the ones implemented into the coffee table model.
Mobile White Board and Bulletin Board - I will refer to the below imagery when creating these assets, they modelling process for creating these assets will be fairly simple, though texturing may be a lengthy process if I was to replicate the below imagery quite closely.

https://kotaku.com/gta-v-heists-update-is-4gb-unlocks-heist-planning-at-l-1690496973

https://kotaku.com/grand-theft-auto-v-the-kotaku-review-1324730770
Fridge - To aid me in the creation of this model, I will refer to the fridge freezer located in my own home, below are images of this particular appliance I have taken myself, As you can see this particular appliance is not particularly worn looking, I would like to ensure the textures on my own final outcome appear more worn and aged.
Key Rack w/ keys
Valuable Storage Room Specific Assets
Safe - Below is an image of a safe I have refereed to when creating my open and closed safe models.

http://www.strategiesonline.net/buying-safe-keeps-valuables-safe/
Display Case - A good reference for the creation of this model, I have already created this model though I have added textures that appear more worn and as if this object has been in rough transit.

https://www.yliving.com/sovet-italia-nest-standing-display-case.html
Valuables (rings, watches, cash, gold bars etc.)
Gun storage/ Data Center Specific Assets
Gun Display Racks - I will more than likely be modelling 2 variations of this model, similar to the image below, and each will have to be manipulated according to the volume and dimensions of any weapons I make.

http://www.thefirearmblog.com/blog/2016/03/25/top-100-best-gun-rooms/
Upon further research I have also found the below reference, I will go on to use this image in the creation of my own gun storage unit, this model will consist of the gun display rack and shelving for things like ammunition.

http://www.thefirearmblog.com/blog/2016/03/25/top-100-best-gun-rooms/
Modern Pistol - Below is a Sketchfab upload of a Desert Eagle pistol, this is my favorite pistol variation and I would very much like to create something resembling the contents of the image below.

https://sketchfab.com/models/9fbb2b0de8004f4baae4eeda4373f2ac
Revolver and Loose Bullets - The image below has been taken from a Sketchfab upload, I am particularly fond of this interpretation of a revolver and the loose bullets are a nice touch, I will refer to this image when I come to model and texture my own interpretation of a revolver.

https://sketchfab.com/models/58dc7f2185ea422997f18558d83313e8
Sniper Rifle - In the creation of the sniper rifle I have used the below image, though I have implemented techniques in the modelling and texturing process that make the model appear more modern and worn.

https://www.pinterest.co.uk/pin/345721708878583933/
Weapon Display Case - I will base the creation of this model on the same image I have referenced in the creation of the display case model for the valuable storage room.
Bedroom Specific Assets
Mattress and Bedding - I have found a model on Sketchfab that I will refer to when creating my the mattress model with bedding that will reside within the bedroom in my final outcome, I really like the texturing exhibited within the image below, though the modelling itself is very low poly which does not fit in with my chosen art style, I will refer to my existing knowledge of such an objects parameters when creating this model.

https://sketchfab.com/models/89d029834283431e9a262571a79ef237
Multi-room Assets
Framed Art and Canvas Art - The model for each of these assets is very simple, to avoid using copyrighted artwork, I have asked friends and family for artwork I can feature in my outcome, below is the artwork I have been given so far.

0 notes
Text
XB2178 - Negotiated Artifact 2 - Blog Post 4 - Asset Creation Tracking
Assets to Create (By room)
Living/Planning Area Specific Assets
Sofa x
Coffee table x
Side Table x
Mobile White Board
Bulletin Board
Fridge
Key Rack w/ keys
Valuable Storage Room Specific Assets
Open Safe x
Closed Safe x
Display Case x
Valuables (rings, watches, cash, gold bars etc.) x
Gun storage/ Data Centre Specific Assets
Gun Display Racks
Modern Pistol
Revolver
Assault Rifle
Sniper Rifle x
Submachine Gun
RPG
Ammunition Case
Loose Bullets
Weapon Display Case
Desk
Computer and Peripherals
Bedroom Specific Assets
Mattress and Bedding
Bathroom Specific Assets
Sink
Toilet
Broken Mirror
Multiroom Assets
Discarded Food and Drink Containers
Food and Drink
Light Fittings
Full and Partially Full Refuse Bags
Indoor Bins
Frame Photographs
Framed Art
Canvas Art
0 notes
Text
XB2178 - Negotiated Artifact 2 - Blog Post 3 - Modelling Progress
This blog post features any and all models created for this project, some models have been merged into one scene as they will exist within the same area within my final scene.
The models featured in this blog post are not necessarily finalized, I may alter models featured in this post if I feel it is necessary at a later stage in development.
Loot stash - Below is a compilation of several models I have created for this project, 2 safe models, 1 open and 1 closed, a display case which will contain valuables such as jewellery, a low poly gold bar which can efficiently be replicated a large number of times along with a $10,000 stack of money which is also low poly which can also be efficiently replicated.

Jewelry - Below is some jewelry I have created to feature in my final outcome.
Watch

Balck Diamond Ring

Diamond Bracelet

Sniper - Below are renders of a sniper model I have created for this project, I am happy with this model though there is one issue. The butt of the gun is slightly flat looking, this model will only be viewed from the side in my final outcome as it will be mounted to a wall so changes may not be necessary.


Beer - A custom beer 6 pack textured in Substance Painter along with a custom label made at canva.com.

Coffee Table - Below is a coffee table I have created with great focus on surface detail. I have added coffee cup stains, blood and scratches to this model, giving it somewhat of a personality.


Side Table - Made using the same methods as the coffee table, this model has been textured to appear as if liquid has split upon its surface and gathered dust overtime, the surface also has scratches and coffee cup stains. I have used a different wood texture than the one I used for the coffee table, adding vitiation to my final outcome, however slight.

Sofa - For this model, I went with a fairly realistic texture and I added some blood stains to its surface which appear aged like the leather they are featured upon.

Shotgun - My second attempt at creating a weapon for this project, roughly based on a Winchester Shotgun. Angles seem more fluid and lifelike than my previous attempt at creating a weapon, though some detail is needed to increase the overall standard of this model. So far I have modelled two guns, both have been based on fairly old existing weapons, the M40 and the Winchester, I definitely need to seek some form of guidance if I am to take on the task of creating more modern weaponry and I would like to become more efficient at hard surface modelling, I feel at this point that is where I struggle the most.


Sawn-off Shotgun - A modernised variation of the above shotgun, I have altered the existing model into a sawn-off shotgun.


1 note
·
View note
Text
XB2178 - Negotiated Artifact 2 - Blog Post 2 - Layout Test
In preparation for modelling assets, I decided to create a quick scene in maya using basic geometry and some previously created assets to visualize what my final outcome could look like. Below are some renders taken from Maya of the simple layout.
Overall Layout - The layout of the scene is presented in the image below, the assets I create will inhabit 4 rooms in total, consisting of a living area, gun storage/date centre room, bedroom and loot stash room.

Living Area - This area will be very untidy, it will feature clutter and worn materials applied to assets and it will also be the area in which planning and preparation is carried out, blueprints and heist plans will be featured on walls and notice boards.

Gun storage/ data centre - This room will feature the majority of the weapons I will be creating for this project which will be displayed mounted to wall fixtures and in a display case. This room will also contain servers and computers along with a safe.

Bedroom - The bedroom, like the living area, will feature an untidy theme yet again, stained furnishings, spilled beverages etc, along with a stash of money and other stolen goods. This room will most likely feature at least 1 weapon and walls will most likely feature stolen artwork, contradictory to the implied nature of this rooms inhabitant.

Loot Stash - This room sill serve as a storage/display room for a vast amount of stolen money and stolen valuables.

0 notes
Text
XB2178 - Negotiated Artifact 2 - Blog Post 1 - Initial Thoughts and Planning
Upon Reflection/Initial thoughts
For this project I have decided to produce something similar to my first negotiated artifact, in the last project I created assets for an apartment without the initial plan of creating the apartment for the assets to reside in within that project, for this project I will be creating the assets and a location for them to reside in simultaneously.
In the first project I created primarily furniture assets, I believe I have demonstrated my ability to do this fairly efficiently, so for this project I would like to branch out a bit more. I will be creating assets for a themed room, the theme for this room will be a bank robbers HQ. I have chosen this theme as it will give me an opportunity to showcase my skills as a 3D artist at a more advanced level, showcasing assets such as weaponry and equipment that would be used in a bank robbery.
Inspiration
There are several games I will be referring to for inspiration in this project when creating my assets and scene, the games I will be looking to for inspiration are the following:
Payday 2 - Payday 2 is probably the most well known bank robbing orientated video game featuring a vast amount of well designed assets suitable for such a theme.


GTA V - The GTA V single player is based around the life’s of 3 bank robbers and the multiplayer also lets the player create their own character of which they can use to perform heists online, this game is full of 3D assets I will look to for inspiration.


Battlefield 4 and Battlefield Hardline - Two of my favourite FPS games featuring beautifully modelled weaponry and equipment that would be appropriate for a bank robbers HQ.


Based on my experiences playing these particular video games I have already came up with an idea for the scene I will like to create and the assets I would like to feature within this scene.
My Idea
My idea is to create a scene featuring a vast amount of 3D modeled assets created by myself, assets related to bank robbing and I would like to use these assets and the scene itself to to tell a story of sorts, it will look lived in, ware will be visible and the scene will have evidence of life. The scene will feature assets such as safes, stolen works or art, a vast array of weaponry, bags of money, furniture assets that are more realistic than those presented in my first project, smaller assets such as discarded food containers and packaging, discarded beverages and much more.
I have at least 5 months until the summative hand in for this project so there should be no reason for me not to submit an outcome of a high standard, with great attention to detail.
Plan
Start Date - 13/11/2017
Progress Presentation Date 12/1/18
Submission Date - 27/04/2018
9 Weeks Until Presentation - There are 9 whole weeks until I will have to present my progress on this project, I aim to have completed the majority of the assets for this project by then and I plan on having a scene to showcase these assets within, ready for this presentation, though it is unlikely to be completed and at as a high of a standard as I would like at this early stage in development.
I plan on setting aside as much time as possible for this assignment so I can create the best possible outcome without having to lower expectations due to time constraints.
Week 1 - I will use this week to white box a scene within Maya to get an idea of how assets will be laid out within the scene and when I am happy with this concept, I will begin modelling assets.
Week 2 - Continued asset creation
Week 3 - Continued asset creation
Week 4 - Continued asset creation
Week 5 - Continued asset creation
Week 6 - Continued asset creation
Week 7 - Continued asset creation
Week 8 - Scene creation and refinement - I will use week 8 to create any necessary rooms that will make up the scene that the assets I will have created will reside within.
Week 9 - Scene layout and asset implementation.
This is a rough plan for the time being, if I have an abundance of time I will be able to finalize stages at a faster rate, with Christmas holidays approaching I will have a vast amount of time free to work on this project.
0 notes