Don't wanna be here? Send us removal request.
Statistics
We looked inside some of the posts by makersmagazine-1689-yahoopa-blog and here's what we found interesting.
Average Info
Notes Per Post
21
Likes Per Post
3
Reblog Per Post
18
Reply Per Post
0
Time Between Posts
7 months
Number of Posts By Type
Text
17
Last Seen Tumblr Blogs


Fun Fact
China blocked Tumblr because of pornography and censorship problems in 2013.
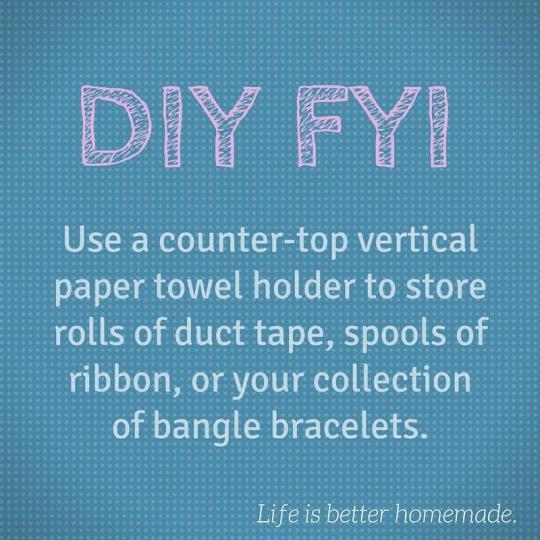
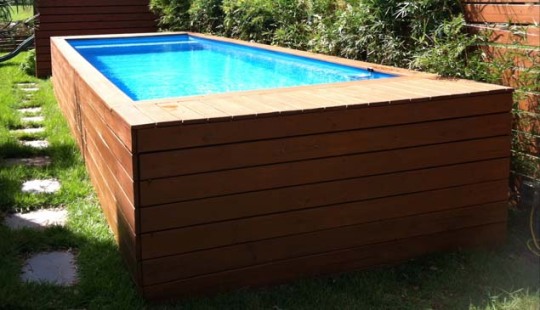
Text
DIY Dumpster Pool Is Much Classier Than You Think
One man’s trash is now a truly chic swimming pool. Architect Stefan Beese converted a regular old dumpster into a designer patio and swimming area for his family. With a little insulation, pool liner and wood, you would never guess this old container, now dubbed the Pool Box, used to store trash. Beese, cheekily known on his Facebook page as Dumpster Dive DeLux, has used containers for other high-end projects he calls “Cargotechture,” including VIP lounges for music festivals and the 2012 DNC and RNC conventions. Now he’s trying to spread the word on the virtues of extreme upcycling.

The Pool Box
Before covering the pool, Beese used anticorrosion paint to protect the dumpster. He covered the ground in limestone to help secure it. (Source: Stefan Beese)
Source: Yahoo Makers

Dumpster Diving
Beese enjoys the fruits of his labor at his New Orleans home. “The pool has about a 5-foot depth. It goes up to the shoulders,” he told the New Orleans Times-Picayune. (Source: Stefan Beese)
Source: Yahoo Makers
Portable and Practical
In the event Beese and his family ever move, the Pool Box is totally portable and can relocate with them. “When we move we’ll take it with us. This is our family pool now,” he told the Times-Picayune. (Source: Stefan Beese)
Source: Yahoo Makers

Cleanest Dumpster You Ever Saw
Like any pool, the Dumpster Dive DeLux requires maintenance. Beese has hidden the pump under the wooden deck for a designer look. (Source: Stefan Beese)
Source: Yahoo Makers

Creative Way to Hide a Dent
Because the 30-yard container already had an indentation on one end, Beese built a rectangular shelf over it to provide swimmers access in and out of the pool, making a ladder unnecessary. Since Beese completed the project a few years ago, he’s been showcasing other examples of creative, eco-friendly design on his Facebook page. (Source: Stefan Beese)
Source: Yahoo Makers

Not Quite Ready for a Swim Yet
This file photo of a dumpster shows what sort of challenge Beese faced when he embarked on his project. But the price was right. “You can get a dumpster for about $1,500 - $2,500,” Beese told the Times-Picayune.
Source: Yahoo Makers
#projects#diy#slideshow#_category:yct:001000624#_uuid:ecc3fdaa-d434-3290-906b-8e753536fa35#_lmsid:a0Vd0000003sA7XEAU#_revsp:makersmagazine_733
0 notes
Text
This Man ‘Grew’ a Church From Living Trees
This living, breathing, green church is a personal project long in the making for New Zealander Barry Cox. As a deeply religious child, he aspired to be Pope one day. But a deep love of trees (his business, Treelocations, rescues and relocates them) combined with a lifelong fascination with the ecclesiastical architecture eventually led to what he calls “Tree Church”—a beautiful merger of his passions. Originally created as a place of private enjoyment for Cox and his family (it’s set right in his own backyard) Tree Church opened to the public just this year after overwhelming interest from friends, local garden clubs, and couples looking to marry—who are now lining up to book weddings. And, well, look at it. It’s difficult to imagine any more lushly beautiful sanctuary to wed, plan an event, or simply relax and ponder the wonders of creation.

A Bird’s Eye View of Tree Church
“I walked out my back door one day and thought, ‘That space needs a church’ – and so it began. I cleared the area in April 2011 and made the iron frame, drawing on all the research I had done over the years of studying churches,” New Zealander Barry Cox told NZ Gardener. A tree enthusiast by trade and a longtime admirer of church architecture, Cox built and recently opened the lush, airy building that so perfectly intermingles his passions: “Tree Church.” (Credit: Tree Church)

A Living Sanctuary
The walls of Tree Church are formed with Leptospermum macrocarpum 'Copper Sheen’, an Australian tea tree with thick, textured foliage. The color cunningly resembles stone. For the roof, the ultra-flexible branches of Alnus glutinosa 'Laciniata’, or cut-leaf alder, bend over the iron frame. The adler’s foliage is sparse, allowing beams of light to filter inside the church. (Credit: Tree Church)

Simply, Leafy Interiors
A grass aisle leads the way to an altar from Cox’s family church in Shannon, New Zealand. It’s made of marble from Lake Como in Italy, where Cox counts ancestors. The church seats about 100 guests. (Credit: Tree Church)

Birch Trees Guard the Church Pathway
Along the walkway to the church lies a stunning double-lined avenue of slender white Betula utilis, or Himalayan birch trees. (Credit: Tree Church)

A Modern Labyrinth With Ancient Origins
Tree Church looks out onto a circular labyrinth with a design based on the walls of the ancient city Jericho in 460BC. It’s a pleasant place to stroll or meditate. (Credit: Tree Church)

Serene Space That Anyone Can Visit
Though originally reluctant to allow outsiders into the church and grounds he’d built as a personal retreat (in his own backyard, no less) Cox now opens his church and grounds to the public two days a week on Sundays and Tuesdays. The church is regularly rented out for weddings on Saturdays, as well. (Credit: Tree Church)

A Meticulously Maintained Garden
The level of upkeep the grounds demand is no easy feat. "It takes me five hours to mow the lawns and at least three hours of final primping to get the gardens and Tree Church to the standard I need to be happy for an event,” Cox told NZ Gardener. (Credit: Tree Church)

Calla Lillies Flourish in the Garden
The property in total is about three acres, including a pond, the extensive gardens, the labyrinth, a canopied area constructed from a military cargo parachute, and Tree Church itself. (Credit: Tree Church)

A Piece of Natural Paradise
The church holds court within a low border hedge of Camellia 'Black Tie’, a dense, low-maintenance plant ideal for a hedge. At the entrance a pair of wrought iron gates, formerly on the Cox family farm, lead the way to and from this sacred, special spot. (Credit: Tree Church) Let Yahoo Makers inspire you every day! Join us on Facebook, Twitter, Instagram, Tumblr and Pinterest.
#slideshow-project-diy-makers-garden#_category:yct:001000624#_uuid:ff38e39a-7aa5-31f6-80b0-e7c5c302cc94#_lmsid:a0Vd0000003sA7XEAU#_revsp:makersmagazine_733
0 notes
Text
The 'It' Colors for Summer: Paint Shades So Hot, You'll Need Sunscreen
ByKerrie Kelly, Zillow
Summer is here! One fun and easy way to get summer-ready is adding pops of color to your spaces with the refreshing tones of citrus via lemon-lime hues.
The zesty palette of lemon and lime can make a home feel instantly fresh and tidy without a lot of effort. See how with some of our favorite design tips.
How have you used citrus tones to refresh your summer space?
Related:
Color of the Month: Sherwin-Williams White Hyacinth
The Best Color Palettes for Your Mid-Century Modern Home
Marsala: Using Pantone’s 2015 Color of the Year in Your Home
Kerrie Kellyis a Northern California interior designer and the founder ofKerrie Kelly Design Lab.She is an award-winning interior designer, multimedia consultant and an author of two books: “Home Décor: A Sunset Design Guide” and “My Interior Design Kit,” with Pearson Professional and Career Education.

Make a splashy entrance
If your front door is less than lively, why not give it a fresh coat of paint? You’ll want to coordinate the hue with your house color, but most neutral homes can handle a pop of color on the front door. To get the look shown here, try a bright yellow on the door with coordinating colors of white and gray. Source: Zillow Digs
Source: Yahoo Makers

Love the limelight
Lime green is a bold hue, but pairing it with shades of white or gray makes a space feel crisp without much color commitment. Try a geometric patterned rug, or have covers made for chairs or pillows. This space leverages a lively green to set off the fireplace surround. Source: Sherwin Williams
Source: Yahoo Makers

Outdoor juice boost
In the backyard or on decks, porches and balconies, citrus colors are a natural addition. A rich neutral background balances the look and sets the stage for summer living. Source: Chris Barrett Design
Source: Yahoo Makers

Energize your bedroom
Artwork, pillows and throws are three of the simplest additions you can make to a space. Coordinate a graphic or landscape print and a pillow or throw blanket for your bed in complementary citrus shades. Source: Zillow Digs
Source: Yahoo Makers
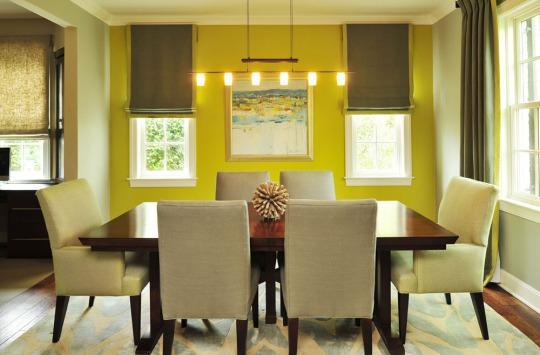
Wake it up
A bright yellow with green undertones livens up a dining room or living space, making it seem modern and renewed. If these walls were simply beige or gray, we would miss the architectural effect and lose the focal point, too. Source: Zillow Digs
Source: Yahoo Makers
#_category:yct:001000624#_uuid:de0f9746-063f-3315-9619-5443f176fe73#_lmsid:a0Vd0000003sA7XEAU#_revsp:makersmagazine_733#slideshow
0 notes
Text
Is Your Battery Dead? We Test a Quick Way to Check
yahoo
(Video: BuzzFeed)
This story is being featured as part of our "Yahoo Best Stories of 2015" series. It was originally published in April 2015.
It’s a television fan’s nightmare: You’re sitting at home watching a show and the battery in your remote dies just when you’re in desperate need of a channel change.
You go digging through your junk drawer and fish out a battery, but then ask yourself: Is this a new battery? Or is it an old battery that I just shoved into my junk drawer instead of discarding?
In the above video, BuzzFeed demonstrates how to find out if you have a fully-juiced AA battery: Rest the battery upright atop a table, pick it up with two fingers (not too far off the table) and then gently drop it. “New batteries tend to stay upright,” says the BuzzFeed video, “Used ones tend to bounce and fall down.”
Does this hack really take the guess work out of gauging your battery life? I decided to get my Galileo on and conduct a little in-office gravity experiment.
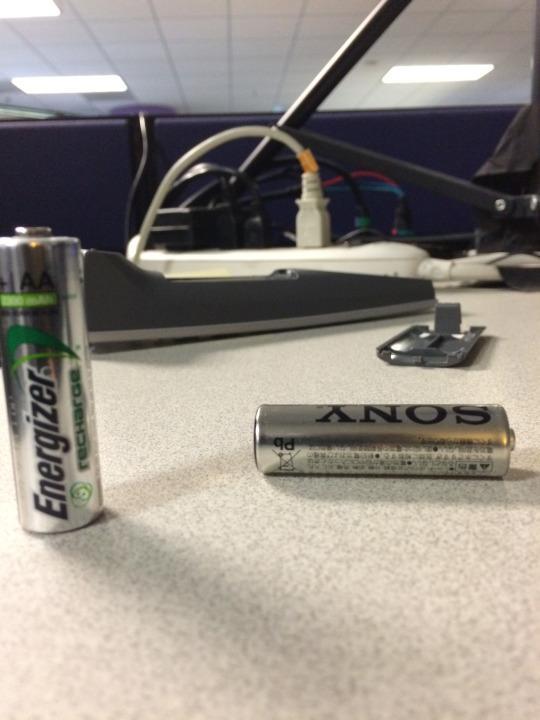
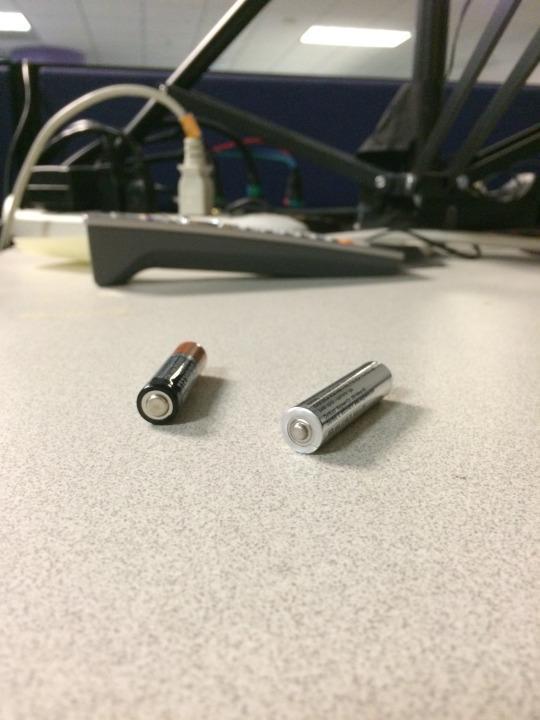
I took a brand new AA battery and a well-worn battery from a remote to one of the office TV monitors (the new battery is on the left, the old battery on the right):
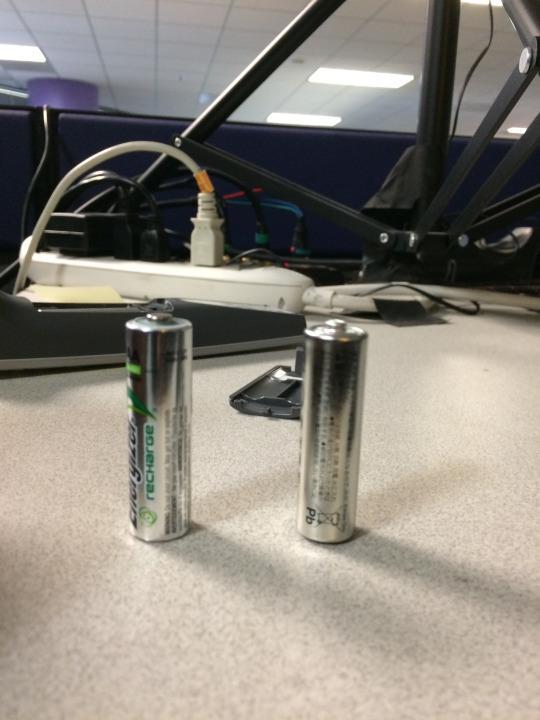
I did simultaneous battery drops to see if, like the video said, the full battery would stand tall while the empty battery wobbled and fell over. The first time, the batteries did just that:
But the very next time, I guess I didn’t do a good drop because both batteries fell over:
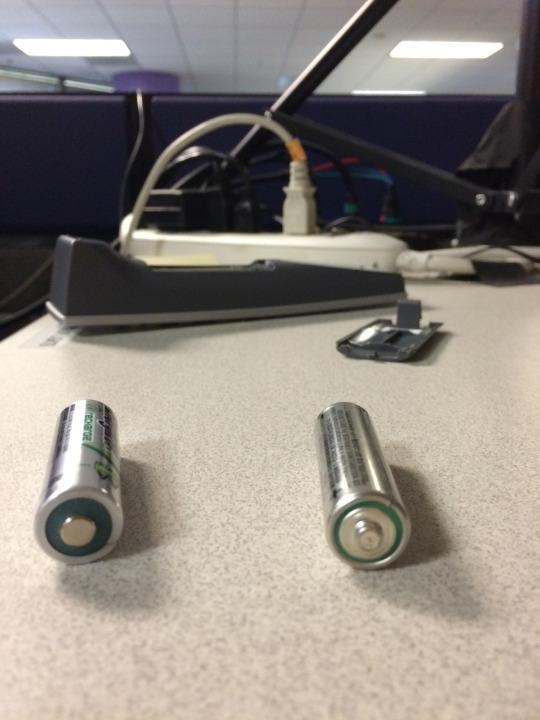
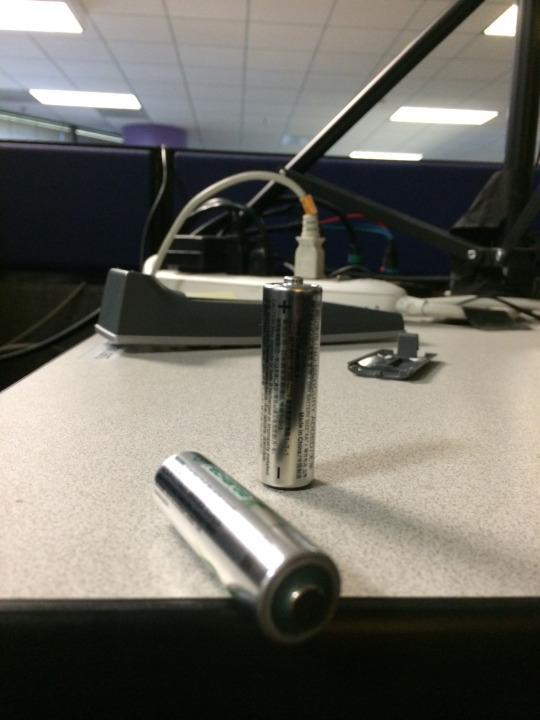
On the third try, the batteries again did as expected: the fully charged one stayed up while the other teetered and fell:

But on the fourth try, it was the fully charged battery that fell over while the depleted battery mysteriously, stubbornly stood tall:
It was around this time that Sarah — my coworker in the next cubicle who’d been trying to get some real work done — came over and very politely asked what I was doing that was making all that noise. I decided to rush through the experiment.
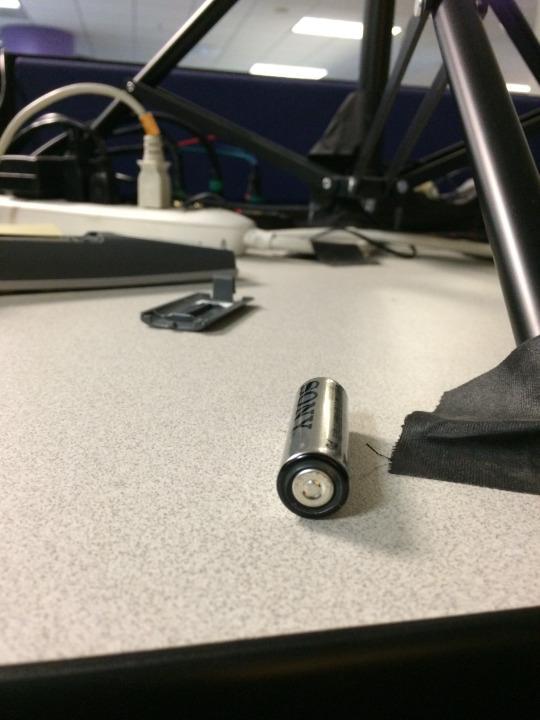
On the next try both batteries toppled. The fully-charged battery actually rolled off the desk. I’m sure that made a lot of noise (sorry, Sarah):
I did the experiment five more times. The final results were as follows:
Charged battery stands/used battery falls over (as in the BuzzFeed video): 5 times
Charged battery falls/used battery stands: 2
Both batteries fall: 3
With numbers like those it’s easy to deem the battery test a failure. But not so fast: in a YouTube video by electrical engineer Lee Hite explains the bouncing battery theory using science. He says chemical reactions that occur within a battery as it’s used reduce its anti-bounce effect, causing depleted batteries to bounce and fall over:
(Video: YouTube)
But he also points out that the bounce test only works on alkaline batteries (neither of the batteries in my experiment was alkaline). And according to the YouTube clip, the bounce test works equally well for AAA, C, D and 9 Volt alkaline batteries.
So I tried the same experiment with two AAA alkaline batteries. Unfortunately, with the AA batteries’ thinner bases those suckers repeatedly (and loudly) kept falling over. I was expecting a call from HR any second, so in the interest of workplace harmony I suspended the experiment.
My conclusion: even though the “dropping battery test” appears scientifically valid enough, my real world application was too inconsistent for me to consider it a foolproof hack. So I think I’ll stick with my simpler way of gauging a battery’s remaining juice: taking a piece of gear that has a battery life indicator — such as my electronic noise-canceling headphones — and using that to test the battery.
But if you swear by the battery drop test, by all means keep doing it. Just be sure to give the noise-canceling headphones to your coworker.
Also on Yahoo Makers:
3 ‘Easy’ Pinterest Projects Put to the Test
Foot Pain Cure Put to the Test
Cool LED Light Project (Not For Amateurs)
Let Yahoo Makers inspire you every day! Join us on Facebook, Twitter, Instagram, Tumblr, and Pinterest.
#video#projects#diy#katie-brown#_category:yct:001000624#_uuid:236fe31c-4fb7-3404-9a6c-cb4829a8c980#_lmsid:a0Vd0000003sA7XEAU#_revsp:makersmagazine_733
3 notes
·
View notes
Text
3 Easy, Elegant Napkin Folds
yahoo
3 Easy, Elegant Napkin Folds
When you’re having guests over for dinner, it’s time to break out the nice linen napkins. We’re all for a paper towel on a regular weeknight, but company makes you go the extra mile. Instead of just laying a plainly folded napkin on top of each plate, take a few extra moments and create a little art. It’s a simple way to make your table that much more festive.
All you need are the napkins you already have!
Materials:
Napkins
Black suede leather cord
Gold ribbon
Evergreen sprigs
Berries
Candy cane
Instructions:
Option 1:
Take a black suede leather cord and cut off a piece, long enough to wrap around a napkin.
Take your napkin and pleat it from corner to corner diagonally.
Tuck the lower half under.
Tie the napkin with the piece of leather cord.
Option 2:
Take a gold ribbon and cut a small strip.
Pleat the napkin horizontally from end to end.
Fold the pleated napkin roll in half.
Tie a ribbon around the napkin to secure it.
Option 3:
Fold the napkin in half.
Fold again just below the end. Repeat one more time.
Turn the napkin over and fold the corners in diagonally.
Then add embellishments to the center such as berries and a sprig of evergreen.
#holiday#diy#katie-brown#video#katie's-how-to's#projects#decor#entertaining#makers-video#_category:yct:001000624#_author:Sarah Essex#_uuid:6ba97ee6-d11b-3ad3-a451-443dd7d75123#_lmsid:a0Vd0000003sA7XEAU#_revsp:makersmagazine_733
1 note
·
View note
Text
Place Settings With Personality
yahoo
A Holiday Place Setting Idea With Personality
We all remember the scene in Pretty Woman when Julia Roberts goes out for a fancy dinner and finds herself confronted with more knives and forks than she could possibly know what to do with! All laid out to the left and right of the plate, it can be a little cumbersome and, well, stuffy and boring. Give those utensils a little personality and take the formality out of place settings. Here are 5 ways to lay out everything from the salad fork to the steak knife.
All you need is a complete set of utensils!
Materials:
Five place settings
Set of utensils
Plates
Instructions:
The Line Up:
Lay the folded napkin horizontally across the plate.
Arrange the silverware on the plate under the napkin.
From right to left: knife, soupspoon, teaspoon, entrée fork, salad fork.
The Sprout:
Place a napkin folded into a triangle on the upper portion of your plate.
Place the knick, soupspoon, and teaspoon under the right side of the plate, slightly angled upward.
Place the entrée fork and salad fork under the left side of the plate, also slightly angled upward.
The Fan:
Place a napkin folded into a triangle to the right of your plate.
Arrange your silverware on your plate with the bottom of each pieces placed at the bottom, center of your plate to form a fan-like shape.
From right to left: teaspoon, soupspoon, knife, entrée fork, salad fork.
The Pile-Up
Place a napkin folded into a rectangle to the ride side of your plate.
Place the knife down the middle of your plate.
Place the teaspoon on top of the soupspoon and arrange that across the top of the knife at an angle.
Place the entrée fork across the knife on the opposite side of the knife as the spoons, also at an angle.
The Star:
Place a napkin folded into a rectangle down the center of your plate.
Place the knife down the center of the napkin.
The spoons will go on top of the knife in an “X” formation.
The forks will also be placed in an “X” across the knife, but upside down.
#video#holiday#entertaining#diy#katie-brown#katie's-how-to's#projects#makers-video#_category:yct:001000624#_author:Sarah Essex#_uuid:9d89d45b-01de-30d3-b5e9-5923bfd54036#_lmsid:a0Vd0000003sA7XEAU#_revsp:makersmagazine_733
1 note
·
View note
Text
Quick Gift For Home Cooks
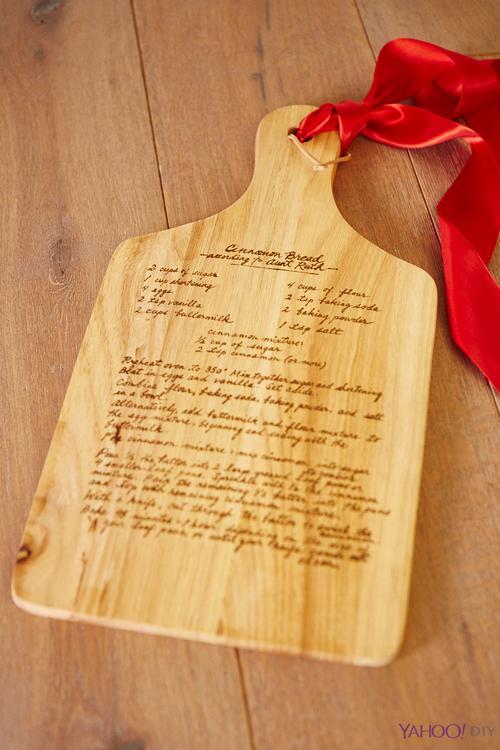
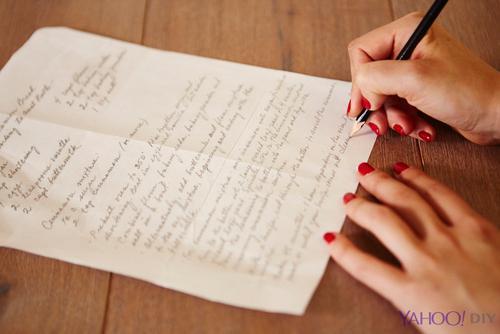
When you come from a family of wonderful cooks, or even a group of good eaters, this would be a great gift for all. Take a Cutting Board, Cheese block, wooden serving platter – you name it. Now, we will show you how to put a delicious time old traditional recipe from your favorite Aunt right on to the wood -that was our way in…. what’s yours?
Materials:
Print out of the recipe
Pen and paper to write out recipe by hand
Wooden chopping board
Red Satin Ribbon
Tools:
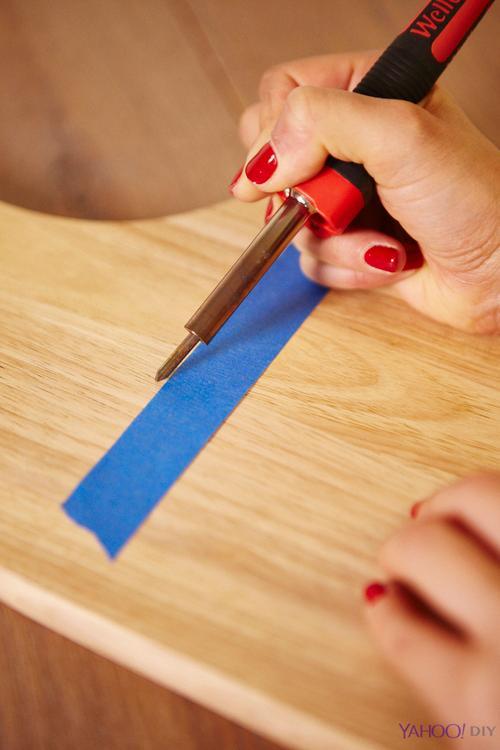
Wood Burning Tool
Handwriting Attachment for Cursive Writing
Masking Tape
Instructions:
1. Handwrite the recipe on paper so that you can see how you will write it out with burning tool.

2. Place a strip of masking tape to give a straight line guide at the top – move it down as you go- and a margin so that it has a tidy appearance.

3. Follow manufacturers directions to heat, and burn, your recipe right into the wood.
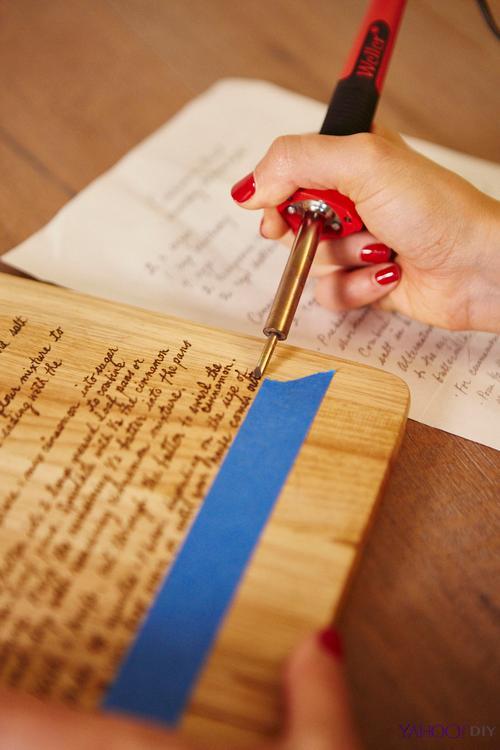
4. Tie a big red satin ribbon around the handle with a slip knot.

#holiday#diy#katie-brown#projects#_category:yct:001000624#_author:Sarah Essex#_uuid:a8e39650-beeb-3bae-8a39-e23c638ddcb1#_lmsid:a0Vd0000003sA7XEAU#_revsp:makersmagazine_733
1 note
·
View note
Text
Your Favorite Workout Brand’s Logo...Only Prettier!

Katie Loves
…the playful way artist James Merry adds embroidered nature scenes to sportswear logos like the the Nike swoop above. See all of his creations on his Instagram @j.t.merry.
#katie-loves#_category:yct:001000624#_author:Katie Brown#_uuid:77669803-8786-33d9-9c2f-5a939a3f75f7#_lmsid:a0Vd0000003sA7XEAU#_revsp:makersmagazine_733
1 note
·
View note
Text
A Stick To Hold Your Potted Plants

Katie Loves
…how blogger Marij Hessel turned a sturdy stick into a hanging plant holder that gives her modern graphic room a hint of the more rustic and natural.
Photo: Marij Hessel, My Attic
#katie-loves#_category:yct:001000624#_author:Katie Brown#_uuid:a44a0cb3-041e-36f1-9918-7acc4004884f#_lmsid:a0Vd0000003sA7XEAU#_revsp:makersmagazine_733
2 notes
·
View notes
Text
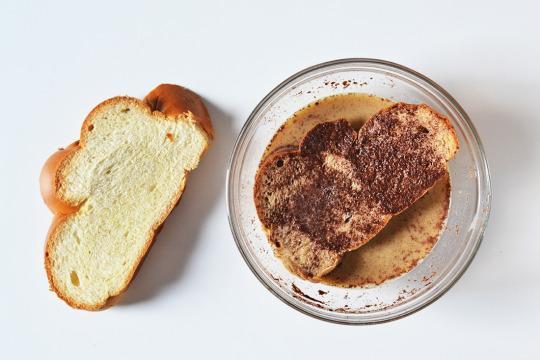
This French Toast Grilled Cheese Sandwich Will Take Breakfast to the Next Level
Sunday is the day we dream about. Yeah, Friday and Saturday are cool, but Sunday is the type of friend we can chill with without speaking a word, in our pajamas, grubbing hard on snacks while binge-watching Netflix (everyone does it, it’s okay).
Speaking of grubbing hard, we have something you can add to your Sunday Funday food list. This sandwich is perfect for when you don’t feel like making a full gourmet meal that Anthony Bourdain would be proud of, but you still need something to satisfy that I-don’t-feel-like-cooking-but-I-need-to-eat hunger. This french toast grilled cheese sandwich is a little bit sweet with a dirty salty side, and we all know that sounds like perfection to our stomachs. So indulge a little bit this Sunday by combing two of our favorite things: grilled cheese and french toast.

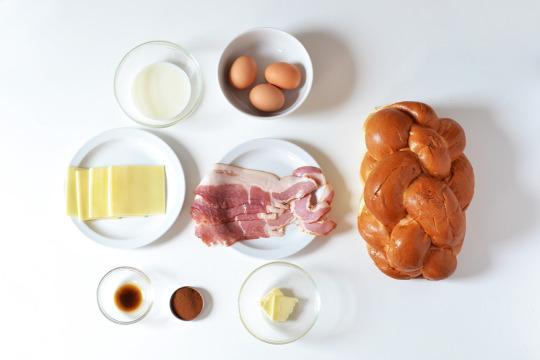
Ingredients: 2 sandwiches — 3 eggs — ½ cup milk — ¼ teaspoon vanilla — 3-4 white cheddar slices — 4 bacon slices — ½ teaspoon butter — 1 teaspoon cinnamon — half a loaf challah bread
Instructions:
1. Slice the challah bread about ¼ – ½ inch thick (depending on how thick you want it).
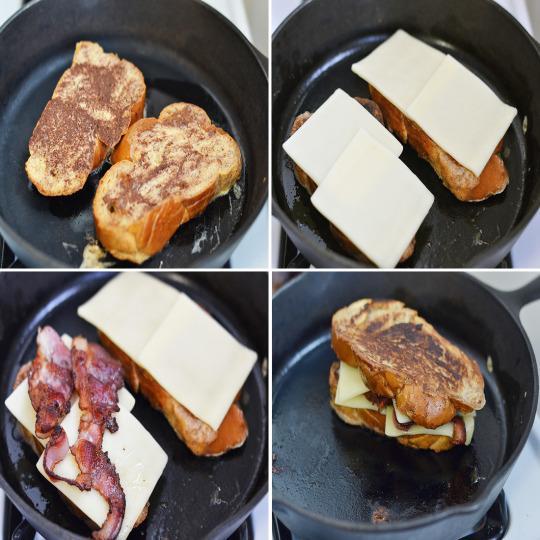
2. Cook the bacon in a frying pan, until crispy. Put the bacon aside when done.
3. Combine the eggs, vanilla, cinnamon and milk in a large bowl and beat until mixed together.
4. On medium-low heat, butter the pan and let it coat the entire surface.
5. While the butter is melting, soak each slice of bread in the liquid mixture on both sides, and place each slice on the surface of the skillet. Slightly cook both sides to precook the egg mixture before placing cheese on top.
6. Now that both sides of the bread are slightly browned, place 3-4 slices of white cheddar on each slice of bread.
7. Add two slices of bacon and put the other half of the sandwich on top.
8. Continue to cook until the cheese starts to melt. Flip it over to help melt other side.
9. When the cheese is fully melted, remove your sandwich from the pan and serve on a plate.
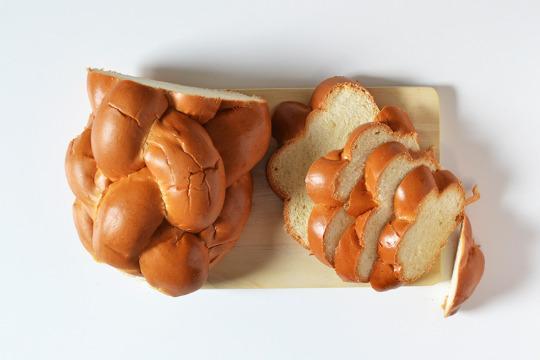
Slice the challah bread about ¼ – ½ inch thick (depending on how thick you want it).

Cook the bacon until crispy in a frying pan. Then put the bacon aside when done.

Combine the eggs, vanilla, cinnamon and milk in a large bowl, and beat until all of the ingredients are mixed together.
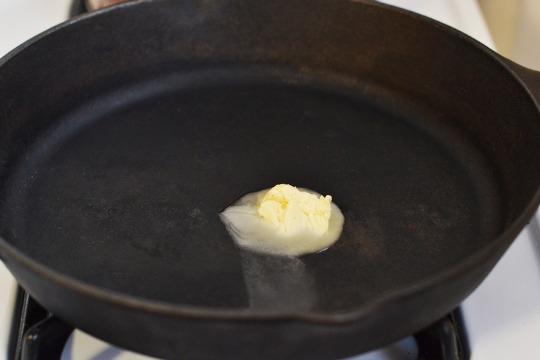
On medium-low heat, butter the pan and let it coat the entire surface.
While the butter is melting, soak each slice of bread in the liquid mixture on both sides, and place each slice on the surface of the skillet. Slightly cook both sides of the bread to precook the egg mixture before placing cheese on top.
Now that all sides of the bread are slightly browned, place 3-4 slices of white cheddar on each slice of bread. Add two slices of bacon and place the other half of the sandwich on top. Continue to cook until the cheese starts melting. Flip it over to help melt other side.
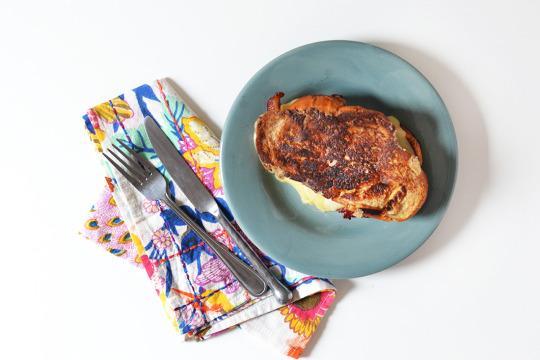
After the cheese is fully melted, remove your delicious sandwich from the pan and serve on a plate.
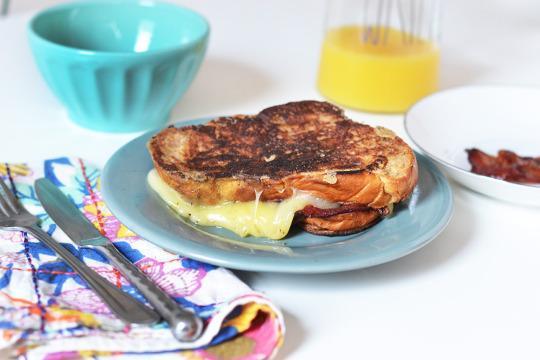
Who needs to go out and pay for brunch when you just found your new Sunday ritual right here? Challah!
Are you thinking of making french toast this Sunday?

#food#hacks#food-hacks#projects#diy#_category:yct:001000624#_uuid:7077a927-c9f0-3307-be98-3b16c10b745c#_lmsid:a0Vd0000003sA7XEAU#_revsp:makersmagazine_733
4 notes
·
View notes
Text
Chores Got You Thirsty? Here’s An Ironing Board Bar Cart
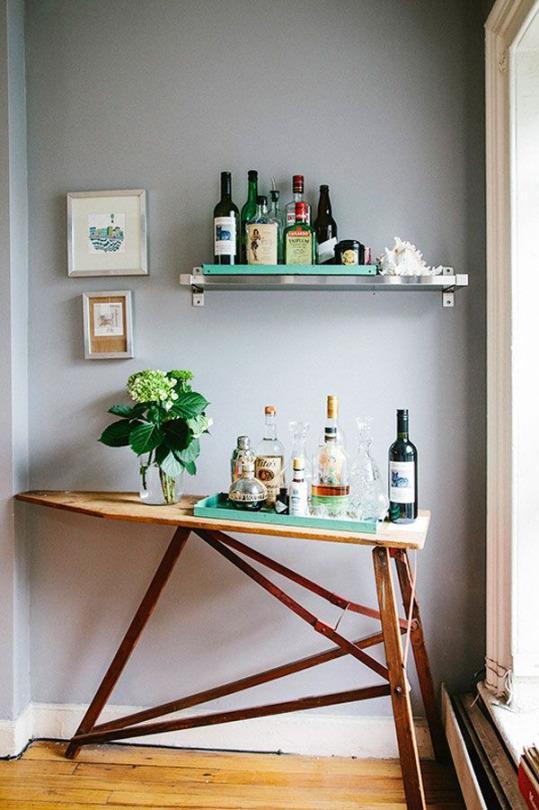
Katie Loves
…a flea market find that can be converted for modern living, like this vintage ironing board that was made into a bar cart for Homepolish designer Danielle’s Brooklyn apartment.
Photo: Daniel Kiyoi via Homepolish
#katie-loves#_category:yct:001000624#_author:Katie Brown#_uuid:6ed04118-9742-3122-a652-a57bddbc1729#_lmsid:a0Vd0000003sA7XEAU#_revsp:makersmagazine_733
1 note
·
View note
Text
This Oversize, Double-Crust Berry Pie Is Perfect For a Crowd
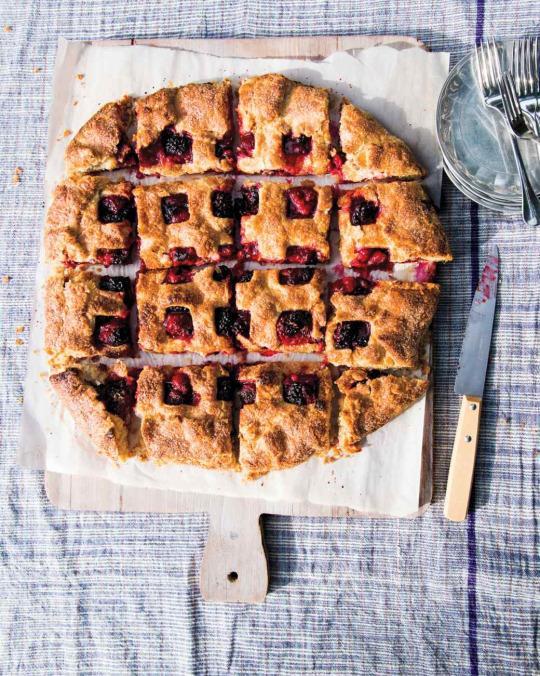
“This is a big-yield pie for crowds,” says food editor Shira Bocar of her free-form dessert, which is twice the size of the average pie; its leftovers are eagerly gobbled up at breakfast the next morning.
All-purpose flour, for dusting 2 recipes Pate Brisee for Double-Crust Berry Free-Form Pie 2 ½ pounds mixed blackberries and raspberries (8 to 9 cups) 3 tablespoons cornstarch ½ cup granulated sugar 2 tablespoons fresh lemon juice 1 large egg, whisked Fine sanding sugar, for sprinkling
See More: 5 Health Benefits of Crafting
1. On a lightly floured piece of parchment, roll out one disk of dough to an 18-inch round. Transfer parchment and dough to a baking sheet and refrigerate until just firm, about 10 minutes. Meanwhile, on another lightly floured piece of parchment, roll out remaining disk of dough to a 15-inch round. Leaving a 1-inch border, punch out squares with a 1-inch square cutter in rows, spaced about ¾ inch apart, to form a grid. Transfer parchment and dough to another baking sheet and refrigerate 10 minutes. 2. In a bowl, toss berries with cornstarch, granulated sugar, and lemon juice. Spread mixture evenly over center of 18-inch dough round, leaving a 3 ½-inch border. Center second dough round on top of berries; brush with egg wash. Fold bottom dough over top, pressing to seal and forming pleats as you go. Brush folded edges with egg wash and sprinkle entire surface with sanding sugar. Freeze until firm, about 30 minutes. 3. Meanwhile, preheat oven to 375 degrees. Bake pie, rotating once, until golden brown and juices are bubbling in center, about 1 hour, 10 minutes. Let cool on a wire rack at least 1 hour before serving.
Cook’s Note: This faux-lattice pie is created using a square cutter instead of by weaving individual strips of dough. A round cutter can also be used. Bake the extra pieces of dough to serve with tea or coffee: Arrange them on a baking sheet, then brush them with an egg wash. Sprinkle with cinnamon sugar or sanding sugar. Bake at 375 degrees until golden brown, about 15 minutes.
youtube
More from Martha Stewart: 10 Steps to Learning How to Knit How to Make a Dip-Dyed Scarf 10 Ways to Get Creative with Candles How to Dye Unexpected Items 36 Kid-Friendly Paper Crafts
#food#cooking#projects#diy#_category:yct:001000624#_uuid:b7926142-375c-37db-95c8-34c798e8888b#_lmsid:a0Vd0000003sA7XEAU#_revsp:makersmagazine_733
1 note
·
View note
Text
A Room With Layered Rugs, Leather and Light

Katie Loves
…the textural melting pot of this room: from layered rugs to leather to geometric accents and classic plaids. Studio McGee knows how to mix it up to perfection!
Photo: Becky Kimball, Studio McGee
#katie-loves#_category:yct:001000624#_author:Katie Brown#_uuid:67818089-609a-3998-829c-019fbb40db93#_lmsid:a0Vd0000003sA7XEAU#_revsp:makersmagazine_733
1 note
·
View note
Text
Got 6 Minutes? You Can Make Homemade Mac 'n' Cheese in A Mug!
By: Perry Santanachote

Credit: Laura Murray/Thrillist
When a food craving hits, I’ve got about 10 minutes to satisfy it before I turn into a raging lunatic. It’s the reason I’m such an angry baker. And probably why my cupcakes look so ugly. On good days, though, my cravings aren’t for sweets, but for something salty and fattening, like mac ‘n’ cheese. They say “necessity is the mother of invention,” which was definitely the case when I successfully made mac ‘n’ cheese in the microwave out of desperation.
Six minutes is all it takes – and it tastes exactly the same as the stovetop stuff. Plus, there are no pots to clean, which is why this should be the only way to cook mac ‘n’ cheese. Ever.
More: Ranking the Best Grocery Store Mac and Cheese

Credit: Laura Murray/Thrillist
Microwave Mac 'n’ Cheese in a Mug Recipe Total Time: 6 minutes Yield: 1 serving
INGREDIENTS:
1/3 cup elbow macaroni noodles
2 tablespoons milk
1 tablespoon unsalted butter
½ cup shredded sharp cheddar cheese
¼ teaspoon kosher salt
1/8 teaspoon ground mustard
Sprinkle of cayenne pepper (or more to taste)
Freshly ground black pepper to taste
DIRECTIONS:
Put pasta and 1/3 cup of water into a 15-ounce mug (or larger). Place the mug on a large plate to catch any overflow and microwave on high for 2 minutes. Stir well and microwave for another 2 minutes.
Carefully remove mug from microwave with oven mitts or a dish towel. Noodles should be nearly cooked at this point and most of the liquid should be absorbed/evaporated. Stir again, add milk and butter, and nuke for 1 ½ minutes. Add cheese, salt, mustard, and cayenne; mix well. Microwave for 30 seconds to melt the cheese; stir again.
Finish with pepper and eat immediately.
More from Thrillist:
15 Boozy Popsicles to Cool Down With This Summer
11 Dishes You Should Be Able to Make By the Time You Hit 30
How to Make Perfect French Toast in Under 10 Minutes
#food#hacks#food-hacks#projects#diy#_category:yct:001000624#_uuid:8b6d2880-eba2-367e-9ede-5dd387969f05#_lmsid:a0Vd0000003sA7XEAU#_revsp:makersmagazine_733
2 notes
·
View notes
Text
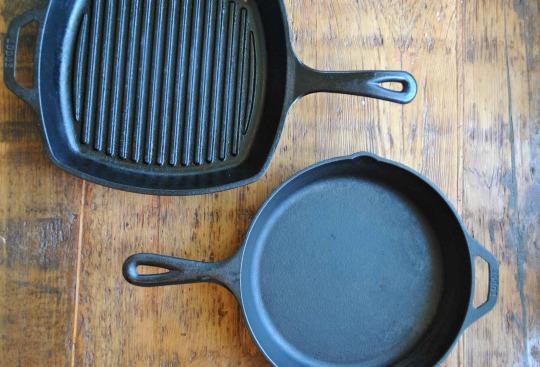
How to Season a Cast-Iron Skillet So Your Food Tastes Soooo Good
By: Perry Santanachote
Credit: Liz Childers/Thrillist
Cast-iron cookware isn’t just the affordable workhorse of the kitchen. It’s also incredibly durable: a properly seasoned and maintained cast-iron pan can last for generations. “Seasoning” is a chemical reaction that happens when oil gets baked and bonded to the iron at a high temperature. This creates a natural, nonstick surface on the pan. The more you cook with it, the better it gets, which means that $30 cast iron will far outlast any expensive nonstick pan, whose coated surface is prone to nicks and cuts, rendering it unusable. With proper care and seasoning, your skillet will even outlive you.
More: 24 Essential Cooking Tools That Are $50 or Less
Credit: Perry Santanachote/Thrillist
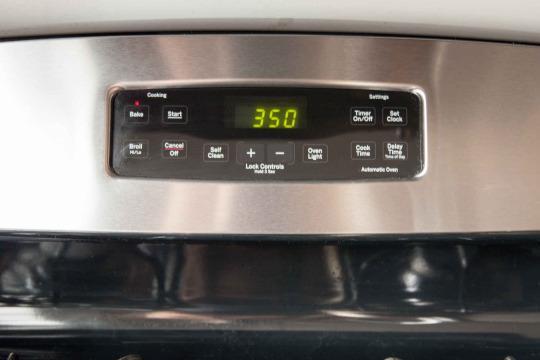
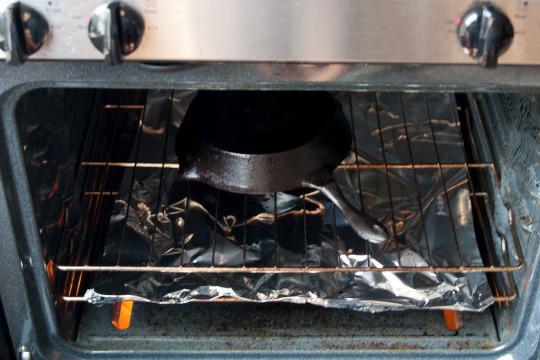
Prep the oven
Preheat the oven to 350°F. Place a layer of aluminum foil on the bottom rack.
More: How to Make Homemade Mac ‘n’ Cheese in a Mug, in 6 Minutes
Credit: Perry Santanachote/Thrillist
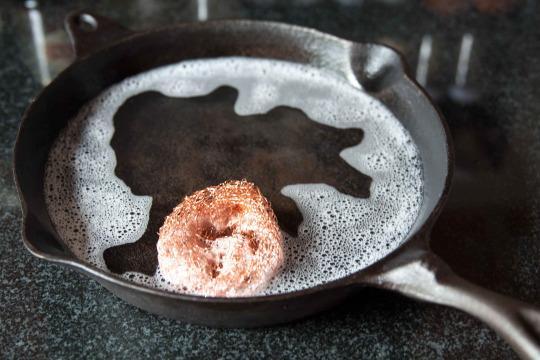
Scrub it
New cast iron may have a manufacturer’s coating that you’ll want to remove, and used cast iron may have dirt and rust, so use soap, water, and a scouring pad to scrub it clean.
After you season your pan, however, be sure to avoid soap and heavy scrubbing because they’ll ruin that seasoning you’re trying so hard to maintain. Don’t fret, germaphobes: cast iron reaches 400ºF in a few minutes and is sterile at only 212º F, so soap isn’t necessary.
More: How to Make Perfect Rice on the Stove

Credit: Perry Santanachote/Thrillist
Oil it
Dry the pan completely then use a cloth or paper towel to apply a very thin, even coating of melted vegetable shortening or lard to all surfaces. Be sure to only use a solid fat and just about a tablespoon of it. Too much oil will result in a sticky finish, as will vegetable oil.
Credit: Perry Santanachote/Thrillist
Bake it
Turn the pan upside down (to prevent pooling) and place it on the top rack of the oven (position it over the foil to catch any drips). Bake for 1 hour, then turn off the oven, and let the pan cool in the oven. For best results, do this 2 or 3 times, but you can use it after only one treatment.
Credit: Perry Santanachote/Thrillist
Use it
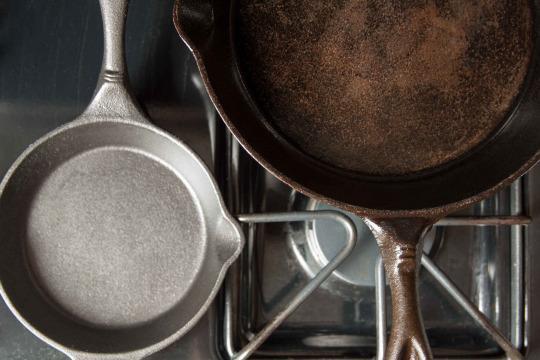
Cast iron is great for everything from pork chops to cornbread to cobbler, and will get better every time you cook with it. With new pans, start off with foods high in fat, like bacon or fried chicken, to help establish the seasoning. Over time, your skillet will develop a dark, smooth surface like the pan pictured on the right.
Credit: Perry Santanachote/Thrillist
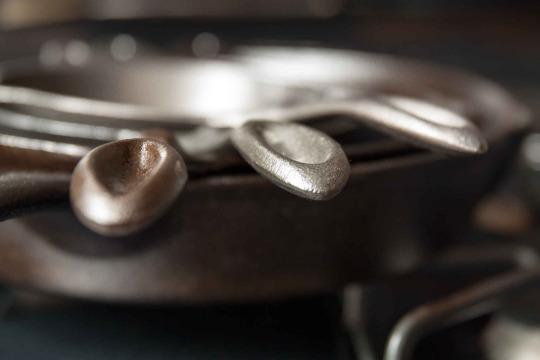
Maintain it
Wash your pan with hot water and a sponge to remove food residue. To scrub off tough bits, pour coarse kosher salt into the skillet while it’s still warm. Scrape the pan with the salt and a sponge or dish towel, then rinse with hot water. Let it dry completely, then use a cloth or paper towel to rub a little vegetable shortening or oil on it. Store it in a dry place and use often. If food sticks to the surface or if the skillet appears dull or rusted, then you’ll know it’s time to re-season.
More from Thrillist:
The Best Way to Cut 10 Vegetables
The 17 Most Wasteful things You Do in Your Kitchen… And How to Stop
You Don’t Need a Campfire for Skillet S'mores
#food#cooking#projects#_category:yct:001000624#_uuid:2d69fb6e-2a7f-3cbb-a80e-f9a7b1559495#_lmsid:a0Vd0000003sA7XEAU#_revsp:makersmagazine_733
1 note
·
View note
Text
A Simple Way to Save $1,000? Make Coffee at Home!
By Sara Ivry
A latte a day will cost you $1,642.50.

More: Our essential coffee-making tips and techniques
Last week I made a payment of more than three grand for my child’s nursery school for next year. Non-refundable. It’s just a quarter of what I owe for the year. (Yes, insane.) I had to take a big breath before executing payment and tell myself that before long he’d be in kindergarten and that’s free and it’ll be okay, it’ll be okay, paying these expenses won’t get us dispossessed.
More: 5 tips for brewing better coffee
I had to dip into savings to make the payment, since my take-home pay doesn’t nearly cover expenses. I realize I’m lucky to have savings to dip into, even while they’re supposed to be adding up for retirement one day out there in a distant, peaceful, financially-secure future. So in the meantime, I do what I can to be frugal and take as little as possible from savings to cover my ample regular expenses: housing, utilities, clothes, coffee.
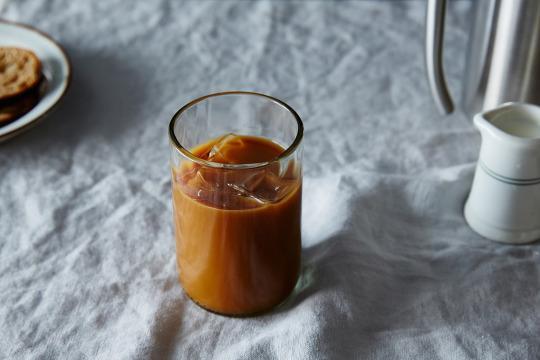
More: How to make iced coffee at the office

Yep, coffee. I’m a relatively modest coffee drinker—most days I have one cup in the morning. And most days it’s a single serving French press I prepare myself with a generous splash of milk or half-and-half. No sweetener. But earlier this year I treated myself to a late-day medium latte at Stumptown for a whopping $4.50. I hate to sound like a fogey (aka a Gen-X’er), but I remember when candy bars cost a quarter. For real.
More: How to brew better coffee
Think about it: If I bought that same latte every day for a year, it’d cost me $1,642.50. Some people buy that kind of drink twice daily, spending more than $3000 annually. That’s the kind of money I could use to start a college savings fund. It’s real money, not random pennies under a pleather cushion in a rec room.
More: How to make cold-brewed coffee

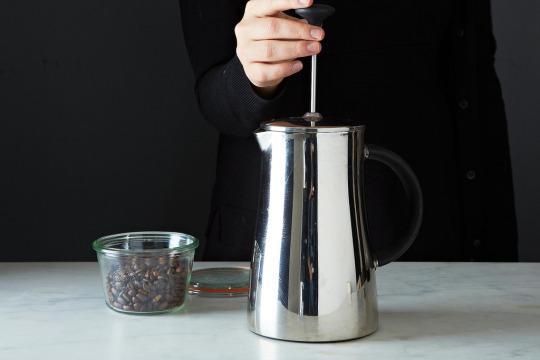
It was several years ago when I started French-pressing at home. There were different reasons for it: I loved (and still do) the suspenseful ceremony of the slow, resistant plunge; I’d long-endured a lack of kitchen counter space in my New York City residency and was grateful for the economy of the device; and, finally, I objected to the cost of a daily caffeine fix from any number of fancy cafés.
My only coffee expense was buying beans. I didn’t even bother getting a grinder; baristas will grind it for free.
But at Stumptown I marveled at the snaking line of customers shelling out cash and decided it was time for a more scientific cost analysis. How much do I actually save in making my own coffee? How much is my self-righteousness worth? And, how much more wasteful would I be if I had never bothered making my own?
So on April 8, I bought two bags of beans from La Colombe for $25. They lasted from April 9 through June 19. That’s 72 days of coffee. In that time period, I also bought approximately $20 worth of creamer—sometimes whole milk, sometimes half-and-half. That totals $45 in at-home coffee expenditures over a two month and change period. By my reckoning, that comes to $.63 a day for my morning kick. It’d have been even cheaper had I not tripled grounds on days that my folks stayed over—but that’s part of the calculus, I suppose, and I’m not so cheap that I’m going to charge my parents for what they consume.
Had I bought a daily medium latte at Stumptown for 72 days, I’d have spent $324. Hopefully, I’d have been sufficiently mindful to use the discount punch card—the one where you get a free cup with every 10 coffee purchases. That would’ve meant essentially paying for 66 medium lattes. Sixty-six medium lattes over a 72-day period will cost $297.
Even if I’d opted for the cheapest drink on their menu—arguably the one most akin to what I make at home: a small regular coffee—at a cost of $2.50, I’d have spent $180 over 72 days, or $165 with consistent discount punch card use. Imagine how much I’d spend if I bought that for an entire year. Or, scratch that—no need to bother imagining a thing. I’ve got a calculator right here. It’d be $912.50, without punch card. Roughly $836 with it. That’s simply too much green for something dark and roasted.
Coffee intake is one small, manageable realm in which I control exactly how much—or little—I spend. I’m sure there are countless other areas in which I could save. Do I really need to buy heirloom tomatoes? Probably not. But knowing that I’m not spending nearly $1000 a year on coffee, and instead am paying more in the ballpark of $230, gives me a sense that I’m not entirely wasteful.
And that sense, on my micro, personal finance level, is priceless.
Photos by James Ransom.
#food#projects#diy#_category:yct:001000624#_uuid:daecc7ac-0879-3894-bc44-784a552de847#_lmsid:a0Vd0000003sA7XEAU#_revsp:makersmagazine_733
1 note
·
View note