
Don't wanna be here? Send us removal request.
Statistics
We looked inside some of the posts by meena-priyeshblogs and here's what we found interesting.
Average Info
Notes Per Post
0
Likes Per Post
0
Reblog Per Post
0
Reply Per Post
0
Time Between Posts
6 days
Number of Posts By Type
Text
17
Last Seen Tumblr Blogs


Fun Fact
Celebrities use Tumblr as well.
Text
Practice 1:Development Project - 1 (Road To Heaven )
Update 7
After everything was completed, I asked my friends to play the game with their feedback I made the necessary changes like slowing the speed of the hurdles, increasing the gap between objects, and making the lighting a little brighter.
The Game is Finally Ready.
Here is the Level Design of the game(I have also uploaded all the videos on rex )
Here is the demo gameplay of the Game.
youtube
While Doing this project I learned lots of things and this was the first ever game I had made and it wasn't an easy project in fact it was the longest project I have done till now. This project helped me to clear my mind about the career I want to pursue after my master's degree.
0 notes
Text
Practice 1:Development Project - 1 (Road To Heaven )
Update 6
To make the level harder and more interesting, I added some motion to the object that will also make it harder to dodge.
For that, I started by creating a construction script in which I used the control point action, variable, and components. Then edit the coordinates according to the map.
Here is the construction script I used

Once, everything is set up. The final things left are to do some lighting and add small elements to enhance the overall look and feel of the game.
0 notes
Text
Practice 1:Development Project - 1 (Road To Heaven )
Update 5
Once, the respawn started working, I also thought about adding the save point in the map So I redesigned the level and made some spaces where I could add save point in it.
Then I started working on the blueprint for save points but even after trying so many times it is only working on the default level and showing an error in my main level. I had to drop the plan of adding the save point in this development project but I will definitely use them in my upcoming projects.
Here is the blueprint I made for Save points

Right now, I set it on the key but the actual plan was to add them to trigger boxes and whenever the player enter the trigger box the game save at that point and restarts from that point if the player dies.
0 notes
Text
Practice 1:Development Project - 1 (Road To Heaven )
Update 4
Logic
I created a blueprint for death and attached it to the collision of the hurdles, So when the character touches the hurldes it will die instantly.
Here is the blueprint for the Death

The concept behind it was simple, I connected the character to the destroy actor whenever the character overlaps any object with collision on it.
Once, that was done the game became playable now.After getting some feedback from my friends. They suggested I should add some Respwan features in the game because currently, I have to start the game manually every time the player dies.
For that, I started doing the research and after watching many videos on YouTube and trying them, I finally found a video by Matt Aspland.
youtube
Here is the Blueprint for respawning and demo gameplay

0 notes
Text
Practice 1:Development Project - 1 (Road To Heaven )
Update 3
Once, the prototype of the map is ready. I started working on technical things.
The first thing I started with was setting up the game mode and adding the third-person character.

I used the default character for this project and set the game mode to third-person view.
I choose to go with the third-person view rather than the first-person view because, in the third-person view, we can show details of the environment effectively.
Once, I set up all the basic things, I started working on the mechanics of the game.
The first thing I do is to create a blueprint for collision and add them to hurdles.

0 notes
Text
Practice 1:Development Project - 1 (Road To Heaven )
Update 1
For the first development Project, my idea was to create a game prototype with a playable character in it.
Concept of the game
Road to Heaven - in this prototype game my idea is to create a level in which to win the game, the player needs to dodge all the hurdles without touching them. If a player touch the object they will die and respawn on the starting point again and they have unlimited life to complete the game.
For this project, my idea is to make a level based on the CANYONS OF UTAH. I started with setting up the level using the Megascans. I found a collection based on the CANYONS OF UTAH on megascan. I made the whole environment using that.
Here is the link for the collection, I used for this project.
Once, I decided on the theme, I circularly made the level, So the player couldn't able to see the end of the game. Here is the rough blueprint.

0 notes
Text
80LvArticle
Unreal Engine is a powerful tool for creating stunning 3D environments, but achieving realistic lighting can be a challenge.
Before you start Lighting the scene, it's important to have a basic understanding of how light works in the real world. Light travels in straight lines, casts shadows, and bounces off surfaces. It also has different properties, such as color, intensity, and temperature.Once you understand these basics, you can start to apply them to your Unreal Engine scenes. For example, you can use directional lights to simulate sunlight, point lights for lamps, and spotlights for flashlights. You can also adjust the properties of your lights to create different effects.
Achieving effective lighting in Unreal Engine involves a series of steps that combine technical settings, artistic choices, and attention to detail. Here's a step-by-step guide to help you get started with lighting in Unreal Engine:
Set Up Your Scene: Begin by creating or importing your 3D environment into Unreal Engine. Ensure your assets have proper materials and textures, preferably using Physically Based Rendering (PBR) materials for realistic light interactions.
Adjust World Settings: Go to the World Settings in the Details panel. Set the overall lightmap resolution for static objects in your scene. Higher resolution values provide more detailed lighting but may impact performance.
Choose the Right Lighting Method: Unreal Engine supports both static and dynamic lighting. Choose the appropriate method based on the nature of your scene. For static lighting, use Lightmass for global illumination. For dynamic lighting, rely on movable lights and dynamic global illumination solutions.
Place Lights in the Scene: Add lights to your scene using the Place Actors panel. Experiment with different light types: Directional Light: Simulates sunlight. Point Light: Omnidirectional light source. Spotlight: Emits light in a cone shape. Sky Light: Captures the sky's appearance for realistic ambient lighting.

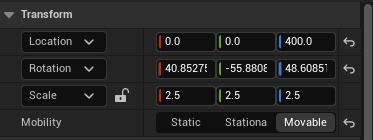
Configure Light Properties: Adjust the light properties in the Details panel: Intensity: Control the brightness of the light. Color Temperature: Set the warmth or coolness of the light. Attenuation Radius: Define how far the light reaches. Source Radius and Length (for Spotlights): Adjust the size of the light source.
Use Light Mobility: Choose the appropriate light mobility based on your scene: Static: Suitable for non-moving lights, offering better performance. Stationary: Good for lights that may move occasionally, with some dynamic shadows. Movable: Suitable for lights that need to move dynamically with dynamic shadows.
Implement Global Illumination: For static objects, enable Lightmass Global Illumination: Adjust Lightmass settings to balance quality and performance. For dynamic objects, consider using dynamic global illumination solutions, such as Distance Field Global Illumination (DFGI) or Screen Space Global Illumination (SSGI).

Manage Shadows: Configure shadow settings for each light: Cascaded Shadow Maps (for Directional Lights): Adjust the number of cascades and their distribution for high-quality shadows. Dynamic Shadows: Enable for movable lights that need dynamic shadowing.
Fine-Tune Post-Processing Effects: Utilize post-processing effects to enhance the overall visual quality: Bloom: Add a glow effect to bright areas. Lens Flare: Simulate light scattering effects. Depth of Field: Emphasize specific focal points. Color Grading: Adjust color tones for a specific mood.


Here is the Example I used this Process in.

0 notes
Text
Development Project -2 ( The Prop Van )
Update 4
After completing the texturing, I am Very happy with the final outcome and I will definitely use this prop in my upcoming project which I will be working on in my second semester in that I am planning to make an open-world vintage theme game.
Here are some final renders for my Developing Project 2


Here, I tried to give it an abandoned look and I learned a lot of new things while doing this project mainly related to modeling and texturing which I will be using in my upcoming project.
Overall, This semester has been very useful in developing my skills and helped me to clear my mind about the practical specialization I wanted to pursue in my career.
0 notes
Text
Development Project -2 ( The Prop Van )
Update 3
Here is the most difficult part of the development project started the texturing. I decided to use Adobe Substance Painter instead of doing the texturing in Maya because I recently started learning Substance Painter and I wanted to test my skills. This is the second project I have ever done in Adobe Substance Painter.
Compared to my previous 3D printing project the size of this model is 3 times bigger because of that the first problem faced was I wasn't able to get the depth of field and the model looked very flat.
To fix this issue I took help from one of my classmates Harsha and he told me to change some settings in Bake Mesh Maps.

Here are the settings I used in Bake Mesh Maps.

Here I changed the Output size to 4k. I have increased the dilation width to 71. After that, I applied diffusion to make the ambient Occlusion smooth.
The second major problem I faced was while adding some elements to the Van. As I wanted to give it an abandoned look. I want to add some graffiti. I am not able to figure out a way to put that image on the Model. After doing some research I came across a video from Will Digital 3D. In that video, he taught about the projection tool setting and he was working on a similar project too.
Here is the link to that Video
youtube
0 notes
Text
Development Project -2 ( The Prop Van )
Update 2
Once, my concept was ready I started the modeling in Autodesk Maya. Modeling is my strong point as I did my graduation in it. So, I don't face any major difficulties doing it.
After Completing the 3D model, the first issue I faced was the ploy count because this prop is for game designing proposes I have to keep the ploy count as low as possible.
Here is this Video from ON MARS 3D (High to Low Poly Workflow in 3D Modeling) Helps me to reduce the polycounts while keeping all the detailing of the model.
youtube
I would highly recommend this video to everyone.
Once, I had done that I was very happy with the outcome, and here is the 3D model.
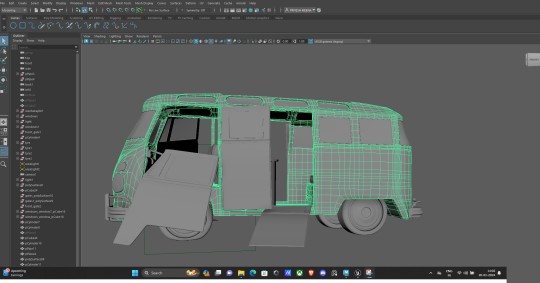
As you can see in the image, I wanted to give it an abandoned Van feel and look. That's why the door is like that. I will explain it further when I start the texturing part.
0 notes
Text
Development Project -2 ( The Prop Van )
UPDATE - 1
After making the game for the first development Project, I made a 3D Model Prop for this project. I got the inspiration for doing that from the 3D printing project I did in week 5 and I wanted to work on my 3d model skills and use all the new techniques I learned during that project.
For the 5th week's project, I made a Vintage Tape recorder and I wanted to carry that theme forward in this project too. So, I wanted to create something antic and old.
I am an automotive enthusiast and I really like cars and I am very passionate about vintage cars.
I started my research by looking for something that I related to vintage cars, but most of the 3D models out there are simply the copy of the original cars. Nothing special that can be used as a prop in any vintage game.
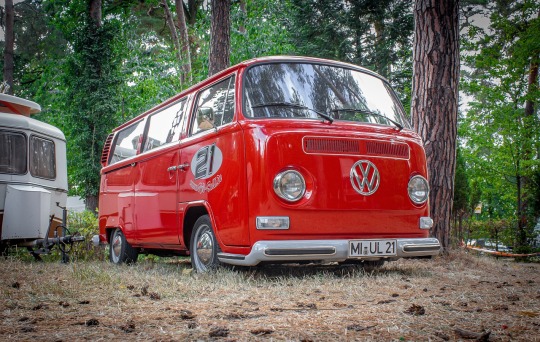
Finally, after looking for many models, I decided to go with the Volkswagen Station Wagon, which was very common in the 1950s worldwide. The reason for choosing this particular van instead of an exotic car is that I wanted to make something that I could use as a prop in my feature games.
Here is the image of the Volkswagen Station Wagon.
0 notes
Text
Light And Shadow
Update 3
It is a studio scene which i am make, So i wanted to focus on the main sitting area where normally the focus are during the broadcast. For that i added some spot light from both the direction on those chair and also add some Rect light from the top and front to softer the overall intensity of the spot light and give it a nature look. As it is closed scene so i didn't add an atmosphere lights in the scene.
Too cutdown the reflections I also added some lights inside those Televisions with very low intensity. In last I added some background light to give the whole scene a depth of view , so the scene don't looks flat.
Baking is one of the hardest part for this project because most of the surfaces are very shinny in the model.
Here is the some images During the Baking Process.

As you can see there are lots of area while the intensity of the light is very low. To solve those thing i add some direct light in the scene. Those makes a significant impact on the whole scene.
After Doing some post productions work Here are some final renders for this Project.

I have learned lots of new things related to lighting during this project which i will showcase in my main developing projects.
0 notes
Text
Light And Shadow
Update 2
Once my concept is ready, I started working on the scene and make some changes in the model. I wanted to play a video on those Television's. So i started searching for them. I found a youtube video by James Luke which helps me to solve this problem.
He teaches about the proper techniques and how to manage the lighting according to the video which are playing inside the scene.
Here is the link of the Video
youtube
I also wants to redo all the texture in the project and make the scene looks like a abandoned Studio but after receiving some feedback from Neil and Wyane I drop the plan and focus only on the lighting for this project.
I will try to redo all the texture and add some zombies in the scene in future and make a better version of this scene for my portfolio during my second semester.
For now, once the scene is ready i started with removing all the current lighting from the scene because i wanted to start from the scratch.
Here I would like to thanks William Faucher for this amazing video I learned a lots of things from this video. It is one of the best videos out there which cover all the points related to lighting.
youtube
0 notes
Text
Light And Shadow
Update 1
For this Project I was really excited, I have a keen interest in lighting. So for this project i want to do something from which i can learn new things about lighting as well as explore this field more.
So I started looking for something in which I use different types of lighting in the same place. I was looking for something smaller and a closed environment. I already made 3 projects before them and all of them are environments.
While Doing my search, I found out a model on marketplace and i really like it because it is something i am personally connected to. It is a broadcast room model By Warren Marshall - Props (https://www.unrealengine.com/marketplace/en-US/product/bafae2f71777417c8864a4cca9f47f2d).
My father is works in All India radio, which is a Indian government official media channel. I had lots of memories from my childhood going there, see the live broadcasting and my father teaches me about those cameras and machine which they used there.

This is the Before scene i used for my project. I wanted to add some element in it to give it a storyline.
Here is my concept which i prepared for this project.

So my idea is to remake the whole scene by changing the light to more colorful and releastic and Add some elements on those Tv they have in the model, make some small props changes too.
0 notes
Text
Memories And Nostalgia
Update 3
Once the environment is completed. The only thing left is the lighting and composition. Here, I would like to explain the reason, why the environment is closed from 3 sides with rocks.
As I mentioned earlier, this environment represents my childhood memories of my grandfather's home. There most of the ponds are covered by 3 sides because it is easier to maintain them and they provide a natural shade during those hot summers.
I wanted to keep it realistic, that's why I covered it from 3 sides. I might make a second version of it as my developing project but I am not sure about it at this point.
Here are some final renders for my Project.

0 notes