
multimediatech
354 posts
Don't wanna be here? Send us removal request.
Statistics
We looked inside some of the posts by multimediatech and here's what we found interesting.
Average Info
Notes Per Post
38
Likes Per Post
38
Reblog Per Post
0
Reply Per Post
0
Time Between Posts
4 months
Number of Posts By Type
Text
15
Video
2
Last Seen Tumblr Blogs


Fun Fact
Tumblr has a 66 index score for customer satisfaction in the US.
Text
6 notes
·
View notes
Text
Covid 19
Covid 19 https://ift.tt/3dwdP4b
Our hearts are with our customers, friends, neighbors across Houston, as together we work to contain COVID-19. At Multimedia Tech, the health and safety of our customers, our team members, and our community remain our top priority. Amid the growing concerns around COVID-19, we are taking additional steps to be extra vigilant. This pandemic is an evolving situation, and we are monitoring it carefully to ensure all proper precautions are being made to keep everyone safe.
We know that the services we provide are critical to maintaining the health and sanitation standards of our community, and we take that responsibility seriously. Our installation teams remain committed to meeting the home service needs of our community with convenience and excellence. We continue to closely monitor and implement the protocols established by the World Health Organization (WHO), the U.S. Centers for Disease Control and Prevention (CDC), and local health departments in regards to COVID-19.
Our daily safety and cleanliness procedures are already comprehensive. However, given the current situation, we are elevating our internal safety practices. These additional measures to minimize health risks include:
Avoiding shaking hands with customers to limit physical contact
Proper handwashing and sanitizing before and after each customer visit
Postponing regularly scheduled team member meetings
Requiring ill team members to stay home until they are cleared to return to work
We also recommend customers follow guidelines issued by the CDC, which can be found at this link. https://www.cdc.gov/coronavirus/2019-ncov/index.html
Should you have additional concerns, please feel free to contact us at any time by emailing [email protected] or calling (281) 402-6777.
We look forward to continuing to serve you and our community. Francisco Hernandez President & Owner
The post Covid 19 appeared first on Multimedia Tech.
via Multimedia Tech https://ift.tt/2i3C0e9 March 26, 2020 at 08:32AM
0 notes
Text
Savant Remote Video
Savant Remote Video https://ift.tt/2LDtjaQ
Why Savant?
Howdy Multimedia Tech fans! This video features the new Savant remote, a Savant product.
Savant Remote Video
Voice Control With Siri
Apple’s Siri Integration this remote makes everything easier.
Use Siri to control your Apple TV and extend the footprint of controllable devices through Apple’s HomeKit.
Home Control
The Savant Remote offers a user experience that’s second to none, with a customizable interface that puts the features you use most front and center.
Put the features you use most front and center with a flexible interface that lets each user customize their experience.
Music Control
Control the soundtrack to your life with easy access to your playlists, stations, and more.
Everything interconnected switching automatically between cables, connectors, and ports for you!
Simply put just a remote that operated everything perfectly.
All The Scenes
Capture, save and recall any combination of services and settings with a single tap, or set your Scene to activate on a schedule, all right from the Remote.
All The Rooms
Display custom room images, browse services by room or pin the remote’s homeroom to the main page.
Select all the rooms throughout your home, especially recommended in a media room with surround sound, a projection screen, a 4k projector, an AV receiver, and home theater seating
Advanced Features
With Savant IP Video Tiling, use the remote to switch services or select from preset Tiling layouts.
TrueImage And Lighting
Select color favorites and get visual lighting feedback in real-time with the award-winning TrueImage interface right on the Remote screen.
Beautiful Design
Elegantly tapered, with sleek contours, soft touchback, and buttons with easy reach.
The Savant remote is designed with perfect contours and sleek design.
Admire how this beautiful smart remote can automate your home lifestyle.
Up until now ease of use and intuitive control have only been available to the only high-end custom programmed system.
Compatible with over 400,000 devices.
Native Sonos compatibility.
Voice commands.
Multiple user profiles capabilities.
The Savant system functionality surpasses others at this price point.
No complicated programming or installation needed.
Communication over Bluetooth and WiFi for easy setup.
Curved high-resolution touch screen.
Easy switching between HDMI Cables
Use It With The Wireless Blaster
Control your devices in closed cabinets by syncing the wireless blaster that lets you reach cables boxes, receivers, and other devices outside the line of sight of your Savant Remote.
Works better With The Savant Host
The core intelligence of the Savant Platform is within the Savant Host.
Through the most sophisticated software in the industry, Savant Hosts are capable of managing the varied technologies within any smart home or property.
And here is the deal:
The systems scale with your needs. (“Add all the electric devices you need”).
Unquestionably Savant has always design products that are beautiful and this remote is no exception.
The post Savant Remote Video appeared first on Multimedia Tech.
via Multimedia Tech https://ift.tt/2i3C0e9 September 18, 2019 at 08:09PM
0 notes
Text
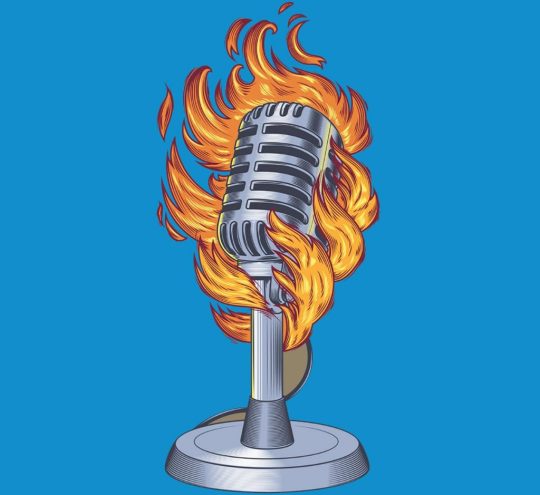
15 Insanely Actionable Wireless Microphone Tips
15 Insanely Actionable Wireless Microphone Tips https://ift.tt/2zTxSqQ
Today you are going to learn 15 actionable wireless microphone tips plus seven bonuses.
In fact:
What to choose depends on the venue layout, the ceiling height, the furniture, the drapes, and even the carpet.
And in general, you also want to learn how to choose a wireless microphone based on its technical aspects.
So, let’s dive in:
1. What’s A “Wireless Microphone”
2. When Do I Need A Microphone?
3. What “Size Audience” Is The Limit?
4. Are Microphones Reliable?
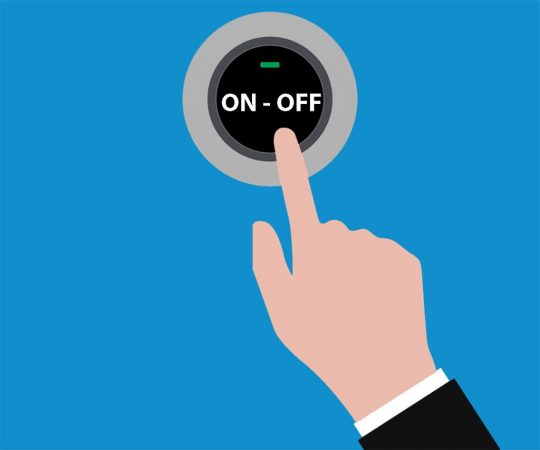
5. Practice “Speaking and Holding”
6. Where Is The On And Off Switch
7. The “Live Test”
8. Watch The Speakers On The Program Before You
9. When It’s Time For You To Be Onstage
10. Energize Your “Voice”
11. How to Handle “Questions” from the Audience
12. Keep It In Front Of You At All Times
13. How To Adjust The Proper Height
14. How To Adjust A “Gooseneck Attachment”
15 Just Practice!
Bonus Tip #1: Practice At A Toastmasters Club
Bonus Tip #2: Don’t Shout to Your Audience
Bonus Tip #3: What To Wear
Bonus Tip #4: “Avoid Things And People”
Bonus Tip #5: Don’t Wear It To The Bathroom Room
Bonus Tip #6: Look Like A Seasoned “Public Speaker”
Bonus Tip # 7: Add Audiovisual Enhancements
1. What’s A “Wireless Microphone”
A “Wireless Microphone” is a handheld component the user uses to SPEAK.
It converts the sound waves into electrical signals which can then be processed and amplified so listeners can hear it.
A Wireless Microphone system consists of three main components:
A handheld microphone with a transmitter (TX) and a receiver (RX)
Here is how it works:

When the speaker talks into the Microphone.
First, the transmitter converts the voice into a radio wave frequency and then transmits it through a channel.
Secondly, the receiver decodes the radio wave frequency coming from the transmitter and changes it back into an electric signal.
Finally, the receiver provides a line-level current that travels to an amplifier that subsequently will play it through a sound system.
(Note: the mic comes with a built-in transmitter in it)
But if you have a (“hands-free”) microphone like a lavaliere or headset then, the transmitter is usually a pack that clips to clothing.
2. When Do I Need A Microphone?
Here is the truth:
It all depends on the venue, that’s it!

It also helps to know:
The square footage of the room
The type of furniture
Room layout
Carpeting or flooring type
Ceiling height
Sources of possible interfering noises
It’s all basic.
But, the reality says choosing wireless microphones can be confusing and at times, an art.
So, also consider all of the following elements before setting up your cordless microphone in the room.
3. What “Size Audience” Is The Limit?
There is no magic number or a silver bullet.
You don’t need a wireless microphone if the “size audience” is 20 spectators and they are around you.
However, sometimes, you do need it for only 20 people if they are far away from you.
The fact is:
It’s always better to USE a microphone.
(“even if you aren’t sure is necessary”)
Like the old saying goes – It’s better safe than sorry.
Think for a moment, if you don’t need it, then you can turn it off.
Well, if you do “need it” and don’t have it, then it is TOO LATE.

4. Are Microphones Reliable?
A wireless microphone is a safer choice, plus it’s very convenient and reliable.

It is a fact:
Cheap corded microphones deliver low sound quality.
Wired microphones hide the AV cords.
Wireless microphones provide mobility
Also, remember, you may encounter a situation where a guest would like to share some crucial comments.
That’s the moment that you realize wireless technology is 100% reliable and makes our lives better.
Comfortably use your wireless microphones.
Make sure to connect it and rubbing against another surface is not an issue.
Look for the perfect place to hook it up, so the audio quality is best.
And don’t worry, wireless microphones DON’T FAIL.
5. Practice “Speaking and Holding”
Learn to transfer it from one hand to the other naturally.
It usually looks best to grip the wireless microphone with the whole hand and not with just the fingers.
Since the antenna is at the bottom of the microphone, hold it near the top.
Your hand can block the signal and make the mic cut in and out.
Relax, and remember:

“Speaking and Holding” it while moving around the room is the best.
6. Where is the On and Off Switch
Find out how the switch works.
Be also aware that some microphones also have a standby switch.
With that said, I recommend to LEARN how to use the switches even with the lights out.
Here is where it gets interesting:
Start your talk with a fully charged battery and have a spare one handy.
Knowing how to replace it in case something unexpected happens is always a plus.
7. The “Live Test”
Have an assistant walk the room to check the volume setting.
The “live test” is useful since it allows you to look for feedback spots.
These feedback spots are usually:
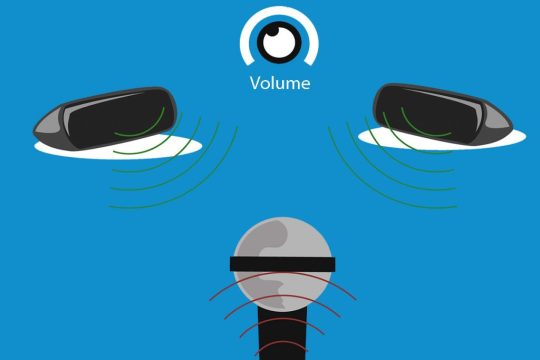
Under and in front of speakers.
Avoid these areas during your talk.
8. Watch The Speakers On The Program Before You
Paying attention to this is especially essential since it provides excellent clues.
How well is their wireless microphone projecting their voice in the room?

Is there something you could learn from how they use the microphone?
Are the speakers before you having mic problems?
These are questions that are good to remember before it is your turn using the mic.
9. When It’s Time For You To Be Onstage
You’ve already tested the cordless microphone.
Don’t tap on it. Don’t blow into it. Don’t say, “Is this thing on?” Or, “Can you hear me?”
Just start talking.

Preparation loves destiny; it’ll be working just fine.
Don’t you know? You’ll soon find out.
Here is a good idea:
It’s a unique idea to have an assistant that can monitor the room and watch for things that aren’t right or can provide technical assistance in any circumstance.
10. Energize Your “Voice”
Here is how it works:
Speak the same as always but with energy.
Don’t speak into the microphone – talk past it.
Let the microphone overhear your conversation.
Speaking into the microphone often causes your Ps to “pop” in the speakers.
Adjust your “voice” and immediately, you’ll sound BETTER.

11. How To Handle “Questions” From The Audience
Want it or not, a member of the audience will have “questions” during your talk.
The critical factor to remember is to go back to the body position you were before the person talked.
For example:

If you were sitting and then you started to ask questions, then you have to stand up.
Address the questions and then return to your sitting position.
That communicates through body language that the unnecessary questions need to stop, and the presentation has to continue.
There are occasions where the attendee asking a question may need a wireless microphone. Have one ready
On the other hand:
You can also encounter the situation where someone that also has a microphone tries to help to answer the questions for you.
It’s okay to include everyone since that adds value and more credibility.
(Note: that if you don’t want anyone interfering with your presentation, it’s better to make sure that all additional microphones are OFF)
12. Keep It In Front Of You At All Times
If you are using a fixed wireless mic, that is on a stand or attached to a podium.
And in case you’re going to look to the right while speaking.
Turn your head to the right; you need first to move your body to the left since figuratively there is an imaginary line to your mic.
In fact:

Imagine there is a string between your nose and the microphone.
13. How To Adjust The Proper Height
Before your introduction to the audience, have someone stablish the proper microphone height:

Also, it helps to practice adjusting the body posture ahead of time.
(“be aware of the way you are looking while delivering your talk”).
Also, remember that some stands are fragile and can break when you are in front of your audience.
Once you start speaking: “Remove the wireless microphones from the stand and engage the audience by walking around the room.”
14. How To Adjust A “Gooseneck Attachment”
Here is the deal:

Do it while talking.
That’s right!
The sound of your voice will help you by covering any squeaking noise resulting from the gooseneck.
We all know it a “gooseneck attachment” is an unexpected problem sometimes.
And nobody wants to be EMBARRASSED about dealing with it.
15. Just Practice!
Which leads me to finalize with the essential piece of advice: “Speaking with a wireless microphone needs to become a natural part of you.”

Practice makes perfection, and attention to small details gives you a competitive advantage.
And as promised here are the bonus tips:
Bonus Tip #1: You Can Practice At A Toastmasters Club
There is nothing better than having an audience of peers how can provide you great feedback about your presentations.
Toastmasters is where you can polish your skills and advance your experience handling a mic.

Additionally, professional working adults will provide all the possible challenges you’ll face when using a microphone in a real-life presentation.
Bonus Tip #2: Don’t Shout To Your Audience
Many public speakers use wireless microphones but don’t know how to select the appropriate type, and mistakenly think they don’t need a wireless microphone.
“I’m a REAL speaker. I don’t need a wireless microphone. I’ll shout my speech!”
Don’t make that MISTAKE.
The “microphone” is your friend and allows you greater flexibility in your vocal variety.
And if you are delivering an important message, then a microphone is crucial.

Vocal variety adds spice to your words, and the audience needs to hear your punch-lines.
A microphone helps you meet both needs.
Bonus Tip #3: What To Wear
When you aren’t wearing the proper CLOTHING to accommodate a clip-on power pack can be an issue.

(Note: Some straps can be used to hold the power pack in place)
Bonus Tip #4: “Avoid Things And People”
Avoid hugging someone since they can unclip your power pack.
In other words, be aware of the things you are holding since they can disconnect the cords.
Bonus Tip #5: Don’t Wear It To The Bathroom Room
Well, this one I believe I don’t have to explain too much 🙂

Just make sure to turn the microphone off when using the bathroom…
… you don’t want to regret eating nachos and drinking beer for the rest of your life.
Bonus Tip #6: Look Like A Seasoned “Public Speaker”
Place the podium behind you, so it doesn’t stay between you and your audience.
And then as you are about to finalize your talk.
Move the stand back in front of you, and place the microphone where it was before you say your final words.

You’ll look like a “public speaker” trust me.
Bonus Tip # 7: Add “Audiovisual Enhancements”
Add “audiovisual enhancements” to your presentation to keep your audience engaged throughout your performance with your mic.

The best tip for your company presentation is to synchronize a work laptop with the projector installed in the conference room and show slides using a Business Google Drive Account.
These simple audiovisual enhancements may look simple but are always overlooked
Did I Miss Anything?
Now I’d like to hear from you:
Which concepts from today’s post are you going to try first?
Or maybe I forgot to include one of your tips.
Either way, let me know by leaving a comment below right now.
The post 15 Insanely Actionable Wireless Microphone Tips appeared first on Multimedia Tech.
via Multimedia Tech https://ift.tt/2i3C0e9 September 04, 2019 at 06:10PM
0 notes
Text
TV Cables, Connectors and Ports
TV Cables, Connectors and Ports https://ift.tt/2KNNRN9
To begin with, let’s mention that new televisions come with different types of TV cables, connectors, and ports.
As a result, figuring out what connects where can be confusing.
Additionally, there is a logic behind all those peculiar cables and connectors that connect to the television ports.
As a matter of fact, let’s define first their functionalities and then their designed differences.
Cables
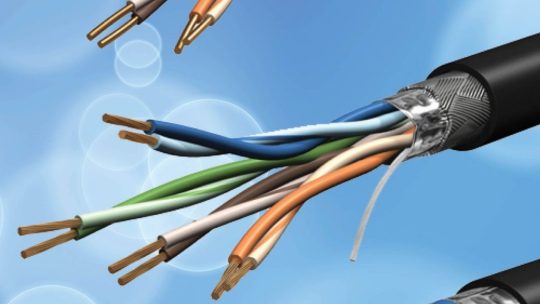
Cables
Firstly, all different types of cables transmit analog and digital electronic signals.
Not to mention that these cables come with an exterior layer of insulation that keeps the signal from spilling to other conducting wires.
Therefore, several conductors inside a cable can have their own functionality and technical specification.
In other words, all cables include the connectors, conductors and insulating coating and connectors.
Connectors

Connectors
Secondly, connectors are the electromechanical devices that connect terminations and create an electrical circuit.
For this reason, it is important to know that connectors are the same as plugs and that have a male gender.
Ports

Ports
Thirdly, all ports allow the connection of peripherals electronic system through input or output ports.
Consequently, keep in mind that ports are the same as sockets and have a female gender.
HDMI cables

HDMI Cables
High Definition Multimedia Interface or HDMI cables transmit audio, video, control signals, low voltage power, ethernet and copyright protection (HDCP).
Optical cables

Optical Cables
The latest trend is optical cables use a fiber optical cable to transmit a digital audio signal.
Ethernet cables
Ethernet cables connect a TV to the internet. A hardwired connection is faster and more reliable.
USB cables

USB Cables
The main function of USB cables is to transfer audio, video, data and even charging components.
Component Video Cables
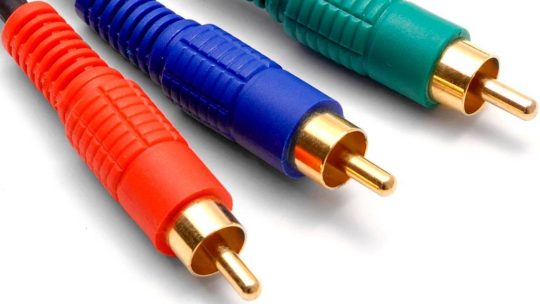
Component Cables
Red, blue and green component video cables transmit high-quality analog video. Commonly referred to as analog HD.
Composite Video Cables

Composite Cables
Commonly composite video cables transmit analog video in standard definition (SD). Commonly referred to as analog HD.
RCA audio cables
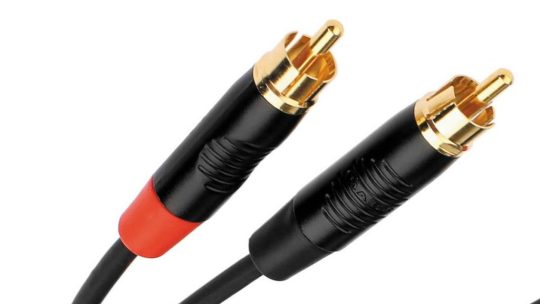
RCA Audio Cables
As far as RCA audio cables transmit analog audio signals mostly with the stereo format.
Auxiliary cables
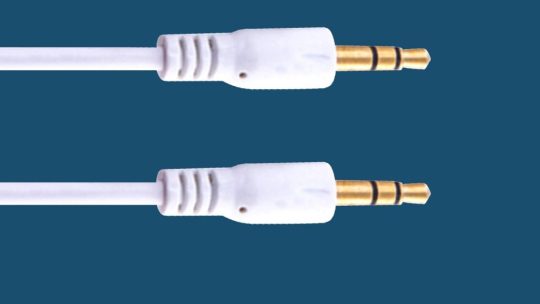
Auxiliary Cables
Remember auxiliary cables transmit analog audio signals using a 3.5 mm connector.
One Connect Cables
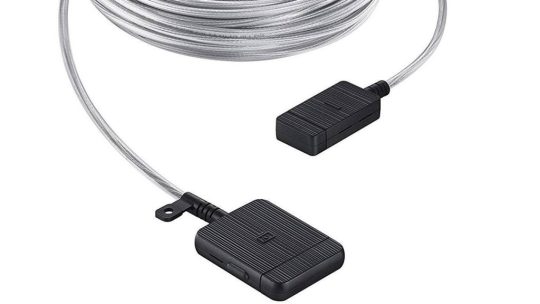
One Connect Cables
Uniquely made, One Connect cables transmit audio, video, and infrared signals through a single fiber optic cable.
Also, the Samsung One Connect Box is a media receiver with a built-in TV tuner.
In addition, it minimizes cable clutter by functioning as a hub for connecting all the compatible devices.
TV Cables, Connectors, and Ports Infographic
In the light of looking for more info check this very powerful infographic called cables, ports, and connectors infographic.

TV Cables, Connectors, and Ports
For instance, this infographic shows how to integrate audio, video, control, low power, and data integration with a new television.
Similarly, these are all the ports and connectors that new televisions come with.
In conclusion, understanding what cables to use and what is compatible with what when setting up a television can be frustrating.
The post TV Cables, Connectors and Ports appeared first on Multimedia Tech.
via Multimedia Tech https://ift.tt/2i3C0e9 August 22, 2019 at 07:00AM
0 notes
Text
How to Mount a TV on 8 Types of Walls
How to Mount a TV on 8 Types of Walls https://ift.tt/30iDSF4
Understanding the 8 types of walls the TV can be mounted on is especially important when tasked with mounting a television.
The fact that a TV install can be done on almost any type of surface sometimes provides unexpected unique challenges that require specific solutions.
Gaining deep insights into the types of walls is a very good way to ensure the TV is safely mounted and is not going to fall off the wall.
Drywall Walls
Drywall, also known as sheetrock, wallboard, plasterboard, LAGYP and gypsum board, is a sheet manufactured mostly from gypsum plaster that is hard-pressed between two thick sheets of paper.
It is used to make interior walls and ceilings. Generally used in most homes in the United States, the product is sold under the trademarks Sheetrock.
Fortunately, television mounting on these types of walls is accomplished somewhat easier than some other types of surfaces since the only requirement necessary to ultimately mount a television on the drywall walls is to find the wooden stud inside the wall.
Brick Walls
It is made of kneaded clay-bearing soil, lime, sand, concrete material, or a combination of all of them.
Frequently fire hardened or air dried, utilized in brickwork construction.
Installing a television on the wall when faced with a brick wall normally requires the use of brick or concrete anchors and is advised that it is only done by a professional TV installer.
Concrete Walls
Concrete walls are manufactured from a combination of pulverized stone, sand, cement and water that solidifies to a stone-like mass.
To mount a television on a concrete wall is always recommended to the installers with the best experience.
It may require a powerful cordless drill, plastic or metal anchor for the bolts and a strong person to drill the holes since reinforced concrete is mostly used in most homes and is exponentially challenged to get the TV level without drilling additional holes for adjustments.
Stone Walls
It is frequently crafted from different materials varying from granite, sandstone, marble, slate, tile, travertine to limestone or flint.
TV mounting on stone walls may require diamond drill bits and extra anchors for the bolts that will hold the wall plate against the wall.
It is especially recommended that only a professional installation company like Multimedia Tech with over 10 years of experience gets a project of this type done since these types of walls to tend to crack if the wrong technique is used when drilling holes.
Wood Walls
Wood walls are a structure that is positioned on the edges of foundations or platforms and must be supported by 2 pillars if possible.
This type of wall is pretty much the easiest to use to mount a TV since no matter the position pretty much every surface on the wall is a fair game.
Siding Walls
Siding walls often found in most newer homes and are often made from synthetic options such as cement board, aluminum, and vinyl.
This kind of wall is mostly seen outdoors to protect against the elements and for decorative purposes.
A TV installation on this kind of wall can be challenging since even the most advanced stud finders in the market have difficulties providing accurate location of the studs inside the wall.
Also, since most of the time siding is used for exterior walls, waterproofing with silicone after all the drilling is done is highly recommended.
Interior Walls
An interior wall is built from 2 inches by 4 inches or 2 inches by 6-inch wall studs and framing.
Commonly covered with panels of drywall that are screwed or nailed to the framing.
In most cases, interior walls do not have any insulation inside them which makes installing wiring for the tv installation project less complicated and readings provided by a stud finder more accurate.
Exterior Walls
An exterior wall is an external wall or vertical enclosure of a construction.
This type of wall structure provides mostly a decorative finish and waterproofing capabilities.
It is because of these different purposes that exterior walls are well insulated with different layers of insulating materials.
This makes the installation of low voltage cables more complicated for a television install and makes virtually impossible getting accurate location of the wooden stud by the stud finder.
Gaining Total Understanding of all Types of Walls
It is advised that additional considerations and precautions are taken before mounting a television on any type of walls.
Gaining a total understanding of all the kinds of walls that can be used to mount a television is a very important step.
However, keep in mind that this is only one piece of the puzzle since there are additional steps needed to be mastered before successfully completing a project of this kind.
The post How to Mount a TV on 8 Types of Walls appeared first on Multimedia Tech.
via Multimedia Tech https://ift.tt/2i3C0e9 August 19, 2019 at 01:50PM
0 notes
Text
Home Theater System Types
Home Theater System Types https://ift.tt/2KIvSqd
Home Theater System Types
Home theater system types more than ever have nearly unlimited sources for top quality home theater entertainment.
More and more TV shows broadcast in HD, 4K, 8K and especially in surround sound.
There is an endless list of titles of CDs and DVDs, Blu-rays, 4K Blu-rays – which by the way is the best and latest possible HD performance in the market at the moment.
And the good news is you will not need a separate player for each type of disc, 4K Blu-ray player will play them all! but the biggest content is where you are now, online!
You can probably find almost anything you want including Hollywood features in HD with high-quality surround sound and Internet radio that let you customize playlists.
So how do you get this in your home theater?
First, broadband Internet connection looks for a speed of at least 5 Mb per second.
Then one of your home theater components should have Internet capabilities like a Smart TV, Blu-ray player, AV receiver or game console.
Note that many of these specifications can be seen in their features list and many also include direct access to popular online services that connect directly to the Internet or your home network so a computer is not necessary even if your other components do not have net access built-in!
There are many internet-enabled devices available that will provide it.
Think of them as doorways to huge entertainment stores that will let you shop from the couch some offer access to multiple services like Netflix, Facebook, Hulu or Amazon Prime while others are dedicated to one service online entertainment which is evolving very rapidly.
Faster connections new technologies and expanded capabilities, your home theater installation is a key to online exploring.
Types of Home Theater Audio System
You can choose from the following basic types of home theater audio systems:
Home theater in a Box (HTIB) Systems
Usually five surround sound speakers, a subwoofer, and a disc player/amplifier. Sold as a unit, in one box (hence the name). Includes all wiring.
Soundbars
A long, thin bar containing several loudspeaker units.
Offers virtual surround sound. Usually designed for mounting on a wall below a flat-panel TV, which sometimes can be synchronized with a wireless subwoofer that can be placed anywhere around the allowed connectivity range.
Component Systems
Your choice of an audio/video (A/V) receiver, speakers, and any source components (such as a 4K Blu-ray player).
Separates
Component systems with separate preamplifier/processor and power amplifiers that replace the receiver.
Which should you choose? Well, your considerations should include:
Your Budget
Sound systems are available in a range of prices; here are general guidelines.
Price Ranges
$200–$1,000: Home theater in a box (HTIB) systems. A few deluxe models are priced much higher. HTIB systems usually have small speaker systems.
$250–$2,000: Soundbars offer an alternative when you simply do not have space for a surround sound system. Many include a separate wireless subwoofer.
$1,000–$3,000: Component home theater systems, based on an A/V receiver.
$3,000 and above: Component home theater systems with top-of-the-line receivers or preamplifier/amplifier separates, and large speakers.
Essentially, for all equipment, more money can buy more features and higher maximum listening levels.
If you’re planning a component system, save about 50 percent of your budget for the speakers.
Your Room
Where you plan to set up your system can dictate what you’ll need. A large speaker system can overwhelm a small room. And a soundbar will not be able to fill a large room with sound. When planning, remember to prepare routes for the wires to the surround speakers, furniture, and electrical power.
The Right System for Your Room
Here are some equipment guidelines for room sizes and functions:
Dorm room or similar:
Look for HTIB systems or a soundbar.
Component systems with small speakers may also be suitable.
Apartment living room:
HTIB, soundbar, or small component system.
This will depend on how well the system fits with your furniture (and your neighbors).
Larger living room:
Component system.
To create a separate home theater area in the room, an HTIB or soundbar may be adequate.
Den or “man cave”:
Component system.
Create a dream system just for you.
Dedicated home theater room:
Design the best component system you can fit and afford.
The ideal is to have a dedicated home theater room, where a home theater system is installed and you will enjoy.
Multiple Home Theater System Types
Since there are multiple home theater types, it can be confusing to find the appropriate home theater system that fits all the specific needs, bugets, prices, and room layouts.
However, understanding how these systems work and their main applications help gain greater insights about how they can be included in our living spaces.
The post Home Theater System Types appeared first on Multimedia Tech.
via Multimedia Tech https://ift.tt/2i3C0e9 August 13, 2019 at 04:34PM
0 notes
Text
DIY Surround Sound Audio System
DIY Surround Sound Audio System http://bit.ly/2MaQ5cp
DIY Surround Sound System
The idea of whether or not to install your surround sound audio system yourself has come to your mind and maybe against all common sense advice it has landed on deaf ears or maybe you have stubbornly decided to address this DIY home installation project by yourself.
Good for you! you go! You start by watching a DIY speaker calibration video on Youtube. Then decide to explore your sizzling home attic just to find out that it looks like more like an alien planet with all the structured cabling that you do not know what it does.
It Is Not Rocket Science but It Is Hard to Professionally Install a Home Theater System
Then, the horrible picture of your lower part of your body hanging from the ceiling crosses your mind and you maybe realize that it is going to take a lot more than what you originally thought to properly install the home theater system.
You re-evaluate the idea of hiring a home theater professional installer but still push ahead and tell yourself this is not rocket science, anyone can do it, it is just cables, an audio and video receiver and some speakers and a subwoofer.
A Home Theater Installation Company Can Install The Speakers, Cables and Audio Receiver for You
Where to really start this home theater project clouds your mind. Then once again, a second thought about the idea of maybe the smart decision is to reconsider all the hard work needed, all the tools necessary to get it done right, all the technical aspects to evaluate when installing the speakers and the receiver so maybe then you search online for reliable and professional home theater installation service by a reputable company that can install you speakers, speaker cabling and your audio and video receiver.
Then at that moment, you are realize that the sales guy at the home theater store possibly made you purchase a home theater audio system that may be too advanced, technologically speaking, than what you initially thought and it may be an impossible task to install it.
Do It Yourself
Protect the furniture
Then you finally make up your mind and decide you can do it. You start by actually pre-ing the work area to protect your furniture from any accidents and moving all the heavy furniture out of the way before beginning the actual installation process.
Read The User’s Manual
Then you open the user’s manual for more specific clues that likely came along with the home theater audio system package you purchased and 200 pages later after trying to read the instructions in Spanish, French, Japanese, Portuguese and Korean you finally land on the pages that are in English.
Speaker Installation
Place The Speakers Correctly
We highly advise when installing a audio system is to keep in mind that with a surround sound audio system or a surround system installation nothing at all is going to work if the folks seating in the room do not get that immersive feeling an audio system delivers by locating the speakers correctly which varies depending of the room layout.
Install The Speaker Cables Inside The Wall
After several hours stuck in the attic breathing in all that insulation (and wondering if you are scratching more than your pooch since the fiberglass is all over your neck and arms). You manage to safely install all the speaker cables inside the wall without breaking a water pipe, burning the house, or cutting the romex cables (power cables) and or the alarm cables for the alarm system. Now are ready to to connect the audio and video receiver. But wait there’s more! how do I install my in-ceiling in-wall speakers you ask yourself.
In-wall and On-wall Speaker Installation
You proceed to make several more trips to the attic, then you realize the speakers need to be perfectly aligned and symmetry is important for optimal audio performance. You start by measuring the room and then continue by measuring the ceiling from some reference points that you think may work. Then, after a little prayer, you end up with a ceiling that now has a few extra speaker holes that make it look more like swiss cheese as you tell yourself “Everything is okay because you finally installed the speakers” (as you now you realized you now are gonna have to call a painter who is gonna have to fix the holes, re-texture and repaint the entire ceiling. Now you finally move to connect the audio and video receiver while you clean all that drywall dust and insulation from your eyes.
AV Receiver Installation
Placement of The AV receiver
You may start by placing the audio and video receiver in the entertainment center or in the AV rack. Then you realize that somehow now you need to run the oxygen free speaker cables inside the wall.
The Back of The AV Receiver
You start by quickly visually inspecting the back of the audio video receiver. You tell yourself “what happened to the IN and OUT inputs” You proceed by wondering “What’s with RS232, ARC, HDMI, Assignable, Monitor and all these colorful RCA ports?” then you say “Where are my connections for my white, red and yellow cables?” “Was I supposed to run an internet line to this receiver? should I call my internet service provider since this needs to be connected to the internet?”
Where Do I Connect the Speakers?
Then you try to connect your speaker cables to the speaker ports but you are not sure which cable goes where and why you have more speaker posts than the number of speaker lines.
5.1 Surround Sound Receiver?
Once you have the amplifier connected you begin connecting the speakers. If you went with the standard 5.1 home theater stereo system the receiver should have 6 speaker ports consisting of 2 front speakers, 2 rear speakers, 1 center speaker and 1 subwoofer.
Positioning 5.1 Speaker System
A 5.1 receiver is a decent entry level audio receiver. You begin searching for all the guidelines for the positioning of the 6 speakers for a 5.1 sound system as well as possibly those instructions to expand the secondary zone later.
5.1 Speakers and The Space Between the Rear and Front Speakers?
It is important to keep in mind that with a 5.1 AV receiver you want to have enough separation between the rear speakers as well as front speakers to let the audio waves expand. And remember that the front speaker go where the screen is and the rear speakers or surround speakers go in the back of the room.
7.1 Audio System?
If the receiver you bought allows you to install additional speaker and you are at that point. Think about upgrading from a 5.1 to a 7.1 surround sound system or maybe use the audio and video receiver as a 5.1.2 Atmos system. If you decide to go for a 7.1 system then you will need to additionally install the 2 middle speakers in the middle of the room to obtain that extra layer of audio delivered by those to additional channels of audio.
Zone 2?
Guess what! maybe the sales person at the home theater store sold you a receiver that had an additional zone since you mentioned you may add an extra audio zone when you where you done mastering installing your home audio system and he simply could not pass the extra commision and the pat on the back from the store manager by up-selling you the most expensive receiver in the store.
AVR with All The Whistles?
Particularly since you are a rookie, you thought you were saving money by installing it yourself and specially since this is your very first audio system. You went ahead and purchased a super advanced AV receiver that comes with Atmos and Bluetooth capabilities, WiFi, online apps to connect to Spotify, Pandora and XM Internet radio plus all the whistles.
The Audio and Video Receiver Comes with a Several Ports
Then you realize that the AVR has a lot of ports! yes a lot! and now wonder if you are using the correct slots. Fortunately, a lot of devices have the ‘slots’ properly tagged depending of the different functions they provide.
TV Installed On The Wall or Projection System with My Audio System?
Positioning of the speakers is crucial and depends of the room layout, placement of the projection screen is important when installing an audio system and applicable if the audio system will be integrated with a video system. Do not what a video system is? basic installation of a video system can be a projection screen or a television. One of our main specialities is providing the best TV installation service all over Houston. While these really are not excessively complex installations you will be blown away by the amount of people who do not know if they want to have their sound system integrated with a television mounted on a wall using a low profile tv mount or a projector screen with a projector.
Spending Money in an Audio System
If you are making the investment in an audio system and then think a DIY surround sound audio system is for you and a DIY project for the weekend is suitable for you. Then, please put in the time read the user’s manual, protect your furniture, place the speakers correctly, install the speaker cables inside the wall, learn how to connect the av components that need to be connected to the audio and video receiver, understand the basic differences between a 5.1 or a 7.1 system, know if you would like to integrate a video system with your audio system and try to spend the money wisely to get your money’s worth from your investment. Now you can kick back, relax and appreciate your brand new surround sound system.
We Are Your Local AV Company in Houston Texas:
Inside The 610 near Downtown Houston:
Downtown Houston
Sam Houston Park
Theatre District
Hermann Square
Alley Theatre
Jones Hall of Performing Arts
JW Marriott Houston Houston Downtown
Wells Fargo Plaza
Skyline District Houston
Toyota Center
Hilton Americas Houston
Discovery Green
Minute Maid Park
George R Brown Convention Center
University of Houston-Downtown
610 West Loop:
Midtown
Montrose
Rice Military
River Oaks
Greenway
Upper Kirby
Uptown
The Galleria
Hyde Park
Highland Village
iPic Theatre
River Oaks District
Washington Ave
University of Saint Thomas
River Oaks Country Club
Spotts Park
Eleanor Tinsley Park
Fourth Ward
The Galleria Mall
Memorial Park
Southwest 610 Loop
Texas Medical Center
TMC
West University Place
Braeswood Place
Southside Place
Bellaire
Boulevard Oaks
NRG Stadium
The Houston Zoo
Rice University
Museum District
Museum of Fine Arts
The Houston Museum of Natural Science
Children’s Museum of Houston
Hermann Park
Northwest 610 Loop
Woodland Heights
Greater Heights
The Heights
Lazybrook
Timbergrove
Houston Heights
South 610 Loop
Greater Third Ward
McGregor
South Central Houston
OST
South Union
Texas Southern University
University of Houston
East 610 Loop
East Downtown
Second Ward
Lawn Dale
Wayside
Magnolia Park
Harrisburg
Manchester
Pleasantville Area
Greater Fifth Ward
Kashmere Gardens
Denver Harbor
Port of Houston
Warehouse District
BBVA Compass Stadium
West Houston – Between 610 and Highway 6:
Hunters Village
Piney Point
Hedwig Village
Woodlake
Briar Meadows
Westchase District
Westchase
Tanglewood
City Center
Memorial
Energy Corridor
Briar Forest
Royal Oaks
Sweet Lakes
Hilshire Village
Spring Branch East
Brighton Place
Spring Valley Village
Spring Branch West
Spring Branch Shadows
Terry Hershey Park
Royal Oaks Country Club
Bear Creek Pioneers Park
Addicks Reservoir
Northwest Houston – Between 610 and FM 1960:
Fairbanks
Cypress Fair
Carverdale
Northwest Crossing
Fairbanks Heights
Greater Inwood
North Houston Gardens
Acres Homes
Sam Houston Race Park
North Houston – Between 610 and FM 1960:
Northside
Northline
Eastex
Jensen
Aldine
Greater Greenspoint
George Bush Intercontinental Airport
(IAH)
Greenspoint Mall
Northeast Houston – Between 610 and FM 1960:
Atascocita
Trinity
Houston Gardens
East Houston
Eagle Creek
Sunrise Pines
Golf Club of Houston
Tour 18 Golf Course
East Houston :
Channelview
Lynchburg
Northshore
CloverLeaf
Galena Park
San Jacinto Monument
Southeast Houston:
Pasadena
South Houston
Deer Park
Edge Brook
Friendswood
Clear Lake
League City
Seabrook
La Porte
Ellington Airport
Baybrook Mall
Bay Oaks Country Club
University of Houston Clear Lake
Space Center Houston
Johnson Space Center
Kemah Boardwalk
South Houston:
Southeast Side
Sunny Side
South Acres
Crestmont Park
Southwest Central
Pearland
Fresno
Brookshire Village
Shadow Creek Ranch
Fort Bend Houston
William P Hobby Airport
(HOU)
Pearland Town Center
Wildcat Golf Club
Southwest Houston: Between 610 and Hwy 6
Gulfton
Meyerland
Bellaire
Sharpstown
Chinatown
Braeburn
Greater Fondren Southwest
Southwest Houston
Westwood
Alief
Meadow Place
Greenbriar West
Houston Baptist University
Installation Available Around The Following Cities:
Houston
Katy
The Woodlands
Cypress
Bellaire
Spring
Tomball
Sugar Land
Richmond
Friendswood
Clear Lake
Atascocita
Kingwood
Humble
West University Place
Cinco Ranch
Jersey Village
Bunker Hill Village
Greatwood
Pecan Grove
Fulshear
Brookshire
Missouri City
Stafford, Alief
Alvin
Bay City
Baytown
Dickinson
Manvel
Freeport
Fresno
Galena Park
Texas City
Seabrook
Bacliff
Rosenberg
Galveston
Kemah
Lake Jackson
Hempstead
La Porte
League City
Magnolia
La Marque
Huntsville
Montgomery
Pasadena
Pearland
Pinehurst
Crosby
Channelview
Beaumont
San Jacinto City
Santa Fe
Mission Bend
Webster
Conroe
New Territory
Houston Heights
Sienna Plantation
Hitchcock
Piney Point Village
Hockley
Waller
Rose Hill
Hufsmith
Egypt
Sealy
Wallis
Sienna Plantation
Angleton
Galveston Island
Jamaica Beach
Beach City
Anahuac
Dayton
Lake Houston
New Caney
Porter Heights
Lake Conroe
Houston Premium Outlets
Katy Mills Mall
West Houston Airport
George Bush Park
Installation Available Around The Following Counties:
Harris County
Fort Bend County
Waller County
Montgomery County
Liberty County
Chambers County
Galveston County
Installation Services Available For The Following Cities and Zip Codes around:
Alief , Texas Zip Code Service Coverage Map (TX) Zip Code 77411
Alvin, Texas Zip Code Service Coverage Map (TX) Zip Code 77511 77512
Angleton, Texas Zip Code Service Coverage Map (TX) Zip Code 77515 77516
Atascocita, Texas Zip Code Service Coverage Map (TX) Zip Code 77346
Bacliff, Texas Zip Code Service Coverage Map (TX) Zip Code 77518
Baytown, Texas Zip Code Service Coverage Map (TX) Zip Code 77520 77521 77522
Bayview, Texas Zip Code Service Coverage Map (TX) Zip Code 77530 77015 77049 77562
Beach City, Texas Zip Code Service Coverage Map (TX) Zip Code 77520
Beaumont, Texas Zip Code Service Coverage Map (TX) Zip Code 77706 77707 77708 77710 77713 77720 77725 777026
Beillare, Texas Zip Code Service Coverage Map (TX) Zip Code 77401 77081 77096 77005 77027
Brookshire, Texas Zip Code Service Coverage Map (TX) Zip Code 77423
Channelview, Texas Zip Code Service Coverage Map (TX) Zip Code 77530
Cinco Ranch, Texas Zip Code Service Coverage Map (TX) 77494
Clear Lake, Texas Zip Code Service Coverage Map (TX) Zip Code 77058 77059 77062 77258 77505 77507 77565 77573 77586 77598
Conroe, Texas Zip Code Service Coverage Map (TX) Zip Code 77301 77302 77303 77304 77305 77306 77384 77385
Crosby, Texas Zip Code Service Coverage Map (TX) Zip Code 77532
Cypress, Texas Zip Code Service Coverage Map (TX) Zip Code 77410 77429 77433
Deer Park, Texas Zip Code Service Coverage Map (TX) Code 77536
Dickinson, Texas Zip Code Service Coverage Map (TX) Zip Code 77539
Friendswood, Texas Zip Code Service Coverage Map (TX) Zip Code 77546 77549
Fulshear, Texas Zip Code Service Coverage Map (TX) Zip Code 77441
Galena Park, Texas Zip Code Service Coverage Map (TX) Zip Code 77547
Galleria Houston, Texas Zip Code Service Coverage Map (TX) Zip Code 77056
Galveston, Texas Zip Code Service Coverage Map (TX) Zip Code 77550, 77551, 77552, 77553, 77554, 77555
Houston, Texas Zip Code Service Coverage Map (TX) Zip Code 77001 77002 77003 77004 77005 77006 77007 77008 77009 77010 77011 77012 77014 77016 77017 77018 77019 77020 77021 77022 77023 77024 77025 77026 77027 77028 77029 77030 77031 77032 77033 77035 77036 77037 77038 77039 77040 77041 77042 77043 77045 77046 77047 77048 77050 77051 77052 77054 77055 77056 77057 77060 77061 77063 77064 77065 77066 77067 77068 77069 77070 77071 77072 77073 77074 77076 77077 77078 77079 77080 77081 77082 77083 77084 77085 77086 77087 77088 77090 77091 77092 77093 77094 77095 77096 77097 77098 77099 77201 77202 77203 77204 77205 77206 77207 77208 77210 77212 77213 77215 77217 77218 77219 77220 77221 77222 77223 77224 77225 77226 77227 77228 77229 77230 77231 77233 77235 77236 77237 77238 77240 77241 77242 77243 77244 77245 77246 77247 77248 77249 77250 77251 77252 77253 77254 77255 77256 77257 77260 77261 77262 77263 77265 77266 77267 77268 77269 77270 77271 77272 77273 77274 77275 77276 77277 77278 77279 77280 77282 77284 77285 77286 77287 77288 77290 77291 77292 77293 77294 77296 77297 77299
Houston Heights, Texas Zip Code Service Coverage Map (TX) Zip Code 77008 77007
Humble, Texas Zip Code Service Coverage Map (TX) Zip Code 77373 77379 77380 77381 77382 77383 77386 77387 77388 77389 77391 77393
Katy, Texas Zip Code Service Coverage Map (TX) Zip Code 77449 77450 77491 77492 77493 77494
Kingwood, Texas Zip Code Service Coverage Map (TX) Zip Code 77235 77339 77345 77346
La Porte, Texas Zip Code Service Coverage Map (TX) Zip Code 77571 77572
Lake Jackson, Texas Zip Code Service Coverage Map (TX) Zip Code 77566
League City, Texas Zip Code Service Coverage Map (TX) Zip Code 77573 77574
Magnolia, Texas Zip Code Service Coverage Map (TX) Zip Code 77353 77354 77355
Memorial Houston, Texas Zip Code Service Coverage Map (TX) Zip Code 77024
Mission Bend, Texas Zip Code Service Coverage Map (TX) Zip Code 77083, 77407
Missouri City, Texas Zip Code Service Coverage Map (TX) Zip Code 77459, 77489
Pasadena, Texas Zip Code Service Coverage Map (TX) Zip Code 77058 77059 77582 77503 77504 77505 77506 77507 77536 77571 77586
Pearland, Texas Zip Code Service Coverage Map (TX) Zip Code 77584 77581 77588
Richmond, Texas Zip Code Service Coverage Map (TX) Zip Code 77406 77407 77469
River Oaks, Texas Zip Code Service Coverage Map (TX) Zip Code 77027
Rosenberg, Texas Zip Code Service Coverage Map (TX) Zip Code 77471
South Houston, Texas Zip Code Service Coverage Map (TX) Zip Code 77587
Spring, Texas Zip Code Service Coverage Map (TX) Zip Code 77373 77379 77380 77381 77382 77383 77386 77387 77388 77389 77391 77393
Sugar Land, Texas Zip Code Service Coverage Map (TX) Zip Code 77459 77469 77477 77478 77479 77498
The Woodlands, Texas Zip Code Service Coverage Map (TX) Zip Code 77380 77381 77382 77384 77385 77354 77375 77389
Tomball, Texas Zip Code Service Coverage Map (TX) Zip Code 77573 77377
West University Place, Texas Zip Code Service Coverage Map (TX) Zip Code 77005 77030 77025 77027 77098
Installation Services Available For The Following Cities in Texas
Houston TX
Katy TX
The Woodlands TX
Cypress TX
Bellaire TX
Spring TX
Tomball TX
Sugar Land TX
Richmond TX
Friendswood TX
Clear Lake TX
Atascocita TX
Kingwood TX
Humble TX
West University Place TX
Cinco Ranch TX
Jersey Village TX
Bunker Hill Village TX
Greatwood TX
Pecan Grove TX
Fulshear TX
Brookshire TX
Missouri City TX
Stafford, Alief TX
Alvin TX
Bay City TX
Baytown TX
Dickinson TX
Manvel TX
Freeport TX
Fresno TX
Galena Park TX
Texas City TX
Seabrook TX
Bacliff TX
Rosenberg TX
Galveston TX
Kemah TX
Lake Jackson TX
Hempstead TX
La Porte TX
League City TX
Magnolia TX
La Marque TX
Huntsville TX
Montgomery TX
Pasadena TX
Pearland TX
Pinehurst TX
Crosby TX
Channelview TX
Beaumont TX
San Jacinto City TX
Santa Fe TX
Mission Bend TX
Webster TX
Conroe TX
New Territory TX
Houston Heights TX
Sienna Plantation TX
Hitchcock TX
Piney Point Village TX
Hockley TX
Waller TX
Rose Hill TX
Hufsmith TX
Egypt TX
Sealy TX
Wallis TX
Sienna Plantation TX
Angleton TX
Galveston Island TX
Jamaica Beach TX
Beach City TX
Anahuac TX
Dayton TX
Lake Houston TX
New Caney TX
Porter Heights TX
Lake Conroe TX
Houston Premium Outlets TX
Katy Mills Mall TX
West Houston Airport TX
George Bush Park TX
Installation Available Near The Following Heliports & Airports
Astrodome Airport – Houston, TX ICAO Code (JMA)
Houston Executive Airport – Houston, TX ICAO Code (KTME)
David Wayne Hooks Memorial Airport – Houston, TX ICAO Code (DWH)
West Houston Airport – Houston, TX ICAO Code (IWS)
Ellington Airport – Houston, TX ICAO Code (EFD)
Weiser Air Park Airport – Houston, TX ICAO Code (EYQ)
Houston Executive Airport – Houston, TX ICAO Code (TME)
North Houston Airport – Houston, TX ICAO Code (9X1)
Dan Jones International Airport – Houston, TX ICAO Code (T51)
Houston Fort Bend Airport – Houston, TX ICAO Code (2H5)
Flyin’ B Airport – Houston, TX ICAO Code (39R)
Aldine Heliport – Houston, TX ICAO Code (67TS)
Allied Northborough Heliport- Houston, TX ICAO Code (84TA)
B & S Warehouse Heliport – Houston, TX ICAO Code (6TA6)
Ball Park Heliport – Houston, TX ICAO Code (83XS)
Bear Creek Heliport – Houston, TX ICAO Code (10TA)
Cathexis Heliport – Houston, TX ICAO Code (TS93)
Channel Two Heliport – Houston, TX ICAO Code (12TA)
Charter Bank Building Heliport – Houston, TX ICAO Code (27TX)
Clear Lake Metroport – Clear Lake, TX ICAO Code (CLC)
Conoco Heliport – Houston, TX ICAO Code (11TA)
Cypress Fairbanks Medical Center Heliport – Houston, TX ICAO Code (21TA)
Dailey Inc Heliport – Houston, TX ICAO Code (3TS8)
Delta Mechanical Inc Heliport – Houston, TX ICAO Code (9TA9)
Drv Downtown Houston Aquarium Heliport – Houston, TX ICAO Code (XA19)
Eckels Heliport – Houston, TX ICAO Code (TA45)
First Bank Plaza Garage Heliport – Houston, TX ICAO Code (TS17)
First City Financial Center Heliport – Houston, TX ICAO Code (4TS0)
Gateway Helistop Heliport – Houston, TX ICAO Code (62TS)
Gellhorn Pad Heliport – Houston, TX ICAO Code (82TA)
General Plumbing Contractors Heliport – Houston, TX ICAO Code (22XA)
George Bush Intercontinental Airport – Houston, TX ICAO Code (IAH / KIAH)
Goodson Honda Heliport – Houston, TX ICAO Code (9XS8)
Graco Mechanical Inc Heliport – Houston, TX ICAO Code (XS26)
Gray Steel Heliport – Houston, TX ICAO Code (22TS)
Greenway Plaza Heliport – Houston, TX ICAO Code (JGP)
Gulf Tower Heliport – Houston, TX ICAO Code (TS82)
Gws Inc Construction Heliport – Houston, TX ICAO Code (TS19)
Harris County Clay Road Courthouse Heliport – Houston, TX ICAO Code (TS37)
Harris County Courthouse Heliport – Houston, TX ICAO Code (0TS6)
Hearthstone Heliport – Houston, TX ICAO Code (39TS)
Hickory Hollow Heliport – Houston, TX ICAO Code (97TA)
Hl&p South Houston Helistop Heliport – Houston, TX ICAO Code (5TX3)
Houston Heliport – Houston, TX ICAO Code (0TS3)
Houston Metropolitan Area – Houston, TX ICAO Code(QHO)
Houston Police Command Station Heliport – Houston, TX ICAO Code (9TX0)
John S Dunn Heliport – Houston, TX ICAO Code(38TE)
Johnson Space Center Heliport (72TX)
Kemah Waterfront Heliport – Houston, TX ICAO Code (7TX6)
Khou-Tv Heliport – Houston, TX ICAO Code (66TS)
Kriv Fox 26 Television Heliport – Houston, TX ICAO Code (XA76)
Ktrk Tv Station Heliport – Houston, TX ICAO Code (1TA9)
Kurio Heliport – Houston, TX ICAO Code (38TA)
Landry’s Seafood House Heliport – Houston, TX ICAO Code (XA13)
Landry’s Warehouse Heliport – Houston, TX ICAO Code (XA20)
Lewis Electric Apparatus Repair Inc Heliport – Houston, TX ICAO Code (TS16)
Life Flight North Fuel Heliport – Houston, TX ICAO Code(1XA9)
Life Flight/Refuel Heliport – Houston, TX ICAO Code (TE11)
Lift Crane Heliport – Houston, TX ICAO Code (7XS8)
Lone Star Heliport – Houston, TX ICAO Code (40XA)
Marine Consultants Inc Heliport – Houston, TX ICAO Code (85XS)
Memorial City General Hospital Heliport – Houston, TX ICAO Code (8TS4)
Methodist Hospital Alkek Heliport – Houston, TX ICAO Code (TX86)
Metro Heli-Pad Heliport – Houston, TX ICAO Code (0TA5)
Ne Police Station Nr 2 Heliport – Houston, TX ICAO Code (35TE)
Nw Police Station Nr 5 Heliport – Houston, TX ICAO Code (36TE)
Palm Petroleum Corporation Heliport – Houston, TX ICAO Code (4TS4)
Papa Heliport – Houston, TX ICAO Code (42TS)
Parkview Center Hospital Heliport – Houston, TX ICAO Code (26TE)
Pin Oak Stables Heliport – Houston, TX ICAO Code (4TS1)
Police Headquarters Heliport – Houston, TX ICAO Code (43TE)
Police Helicopter Patrol Heliport – Houston, TX ICAO Code (24TE)
Porta-Kamp 12th Street Heliport – Houston, TX ICAO Code (80TA)
Post Oak Central Heliport – Houston, TX ICAO Code (81XS)
Post Oak Manor Airport – Houston, TX ICAO Code (QPO)
Guest Qtrs – Houston, TX ICAO Code (JGQ)
Shell I C Heliport – Houston, TX ICAO Code (TS83)
Spl Heliport – Houston, TX ICAO Code (45TA)
Spring Branch Medical Center Heliport – Houston, TX ICAO Code (TE53)
St Joseph Medical Center Heliport – Houston, TX ICAO Code (XA67)
St Luke’s Episcopal Hospital Heliport – Houston, TX ICAO Code (64TS)
St Luke’s Hospital At The Vintage Heliport – Houston, TX ICAO Code (20XA)
Star Houston Heliport – Houston, TX ICAO Code (87TS)
Steeplechase Heliport – Houston, TX ICAO Code (38TS)
Southeast Texas Regional Airport – Houston, TX ICAO Code(BPT / KBPT)
Sugar Land Regional Airport – Houston, TX ICAO Code (SGR / KSGR)
Sw Police Station Nr 4 Heliport – Houston, TX ICAO Code (33TE)
Tenneco Lab Helistop Heliport – Houston, TX ICAO Code (31TE)
Tex-Star Heliport – Houston, TX ICAO Code (TS33)
Texas Children’s Hospital West Campus Heliport – Houston, TX ICAO Code (0TA1)
Texas Commerce Bank Building Heliport – Houston, TX ICAO Code (3TE2)
The America Tower Heliport – Houston, TX ICAO Code (63TS)
The Huntingdon Heliport – Houston, TX ICAO Code (TS26)
Town & Country Heliport – Houston, TX ICAO Code (TS81)
Transco Tower Garage Heliport – Houston, TX ICAO Code (TS31)
Tsj Heliport – Houston, TX ICAO Code (33TX)
Uscg Port Safety Station Heliport – Houston, TX ICAO Code (6XS6)
Veterans Affairs Medical Center Heliport – Houston, TX ICAO Code (04TE)
West Houston Airport – Houston, TX ICAO Code (IWS / KIWS)
West Houston Medical Center Heliport – Houston, TX ICAO Code (29TS)
Westchase Heliport – Houston, TX ICAO Code (TS24)
Westchase – Houston, TX ICAO Code (JWH)
William P. Hobby Airport – Houston, TX ICAO Code (HOU / KHOU)
Wilshire Place Heliport – Houston, TX ICAO Code (4TS2)
Woodcreek-Shell Heliport – Houston, TX ICAO Code (TS34)
All Our Services and Installation:
3D TV Installation
4k TV Installation
OLED TV Installation
Audio Video Installation
Articulating Wall Bracket
Articulating Wall Mount
Bose Home Theater
Bose Cinemate Home Theater Speaker
Conference Room TV Installation
Custom Home Theatre
Custom Home Theatre Design
Custom Home Theater Install
Custom Home Theater Installation
Custom Home Theater Photos
Custom Home Theater System
Home Theater Design
Home Theater Installation
Home Theatre Installations
Home Theater Installer
Home Theatre Installers
Custom Made Home Theater Furniture
Design Home Theater System
Digital Home Theater Systems
HDTV Installation
CCTV Installers
Custom Audio Video Installer
Custom Home Theater Seating
Custom Home Theater Rooms
Custom Home Theaters
Best Home Theater System
Flat Panel Installation
Flat Panel Installers
Flat Panel TV Installation
Flat Screen Installation
Flat Screen Wall Mount Installation
Full Motion Wall Bracket
Full Motion Wall Mount
HDTV
HDTV Installation
Home Automation
Home Automation Installation
Home Automation Design
Home Theater Bargains
Home Theater Cable
Home Theater Cable Management
Home Theater Components
Home Theater Controls
Home Theatre Custom
Home Theater Custom Design
Home Theater Designers
Home Theater Gadgets
Home Theater Installation
Home Theater Installation Tools
Home Theater Installation TV Plasma Video And Audio Sale
Home Theater Installers
Home Theater Showroom
Home Theater System
Home Theater LCD
Home Theater Loudspeakers
Home Theater Speaker System
Home Theatre System Installation
Home Theater Wood Cabinets
Home Theater Set
Installation LCD
LCD Installation Houston
LCD Installation Services
LCD Tilting Wall Bracket
LCD Tilting Wall Mount
LCD TV Installers
LCD TV Installation Guide
LCD Wall Bracket
LCD Wall Mount
LED Installers
LED Installation
LED Sign Installation
Lighting Control
Low Voltage Wiring
Plasma Installation
Plasma TV Installation
Plasma Installation Houston
Plasma Tilting Wall Bracket
Plasma Tilting Wall Mount
Plasma Wall Bracket
Plasma Wall Mount
Office TV Installers
On-Wall Tv Installation
Over Fireplace TV Installation
Projector Installation
Remote Control Programming
Restaurant Bar TV Installation
Satellite Television Installation
Set Up Home Theatre System
Sports Bar Tv Installation
Surround Sound
Surround Sound Installation
Sound System Home Theater
Surveillance Camera Installation
Speaker Wiring
Speaker Installation
Structured Wiring
TV Flat Screen Installation
TV Home Theater
TV Install
TV Installs
TV Installers
TV Installation
TV Installations
Video System Surveillance
Wall Mount TV Install
Whole House Audio
Whole Home Audio Video
Nothing Better Than a TV Installation Done The Same Day:
TV Installation Anahuac
TV Installation Angleton
TV Installation Alief
TV Installation Alvin
TV Installation Atascocita
TV Installation Bacliff
TV Installation Bay City
TV Installation Baytown
TV Installation Beach City
TV Installation Bellaire
TV Installation Brenham
TV Installation Brookshire
TV Installation Bunker Hill Village
TV Installation Channelview
TV Installation Clear Lake
TV Installation Cinco Ranch
TV Installation Conroe
TV Installation Crosby
TV Installation Cypress
TV Installation Deer Park
TV Installation Dickinson
TV Installation Galena Park
TV Installation Dayton
TV Installation Downtown Houston
TV Installation Galveston
TV Installation Galveston Island
TV Installation Galleria
TV Installation Greatwood
TV Installation Egypt
TV Installation Fulshear
TV Installation Freeport
TV Installation Fresno
TV Installation Friendswood
TV Installation Heights
TV Installation Hempstead
TV Installation Hitchcock
TV Installation Hockley
TV Installation Houston
TV Installation Houston Heights
TV Installation Hufsmith
TV Installation Humble
TV Installation Jamaica Beach
TV Installation Jersey Village
TV Installation Katy
TV Installation Kemah
TV Installation Kingwood
TV Installation La Marque
TV Installation La Porte
TV Installation Lake Houston
TV Installation Lake Jackson
TV Installation League City
TV Installation League City
TV Installation Magnolia
TV Installation Manvel
TV Installation Memorial
TV Installation Mission Bend
TV Installation Missouri City
TV Installation Montgomery
TV Installation New Caney
TV Installation New Territory
TV Installation Pasadena
TV Installation Pearland
TV Installation Pecan Grove
TV Installation Pinehurst
TV Installation Piney Point Village
TV Installation Porter Heights
TV Installation Richmond
TV Installation Rose Hill
TV Installation Rosenberg
TV Installation Santa Fe
TV Installation San Jacinto City
TV Installation Seabrook
TV Installation Sealy
TV Installation Sienna Plantation
TV Installation Spring
TV Installation Stafford
TV Installation Sugar Land
TV Installation Texas City
TV Installation The Woodlands
TV Installation Tomball
TV Installation Waller
TV Installation Wallis
TV Installation Webster
TV Installation West University Place
TV Installation Woodlands
The post DIY Surround Sound Audio System appeared first on Multimedia Tech.
via Multimedia Tech http://bit.ly/2i3C0e9 May 25, 2019 at 04:00AM
0 notes
Text
Home Theater Installation – TV Installation Tips
Home Theater Installation – TV Installation Tips http://bit.ly/2SRaGVn
Download home theater installation – tv installation tips PDF Now
Home Theater Installation – TV Installation – Tips – pdfDownload


The post Home Theater Installation – TV Installation Tips appeared first on Multimedia Tech.
via Multimedia Tech http://bit.ly/2i3C0e9 February 12, 2019 at 09:41AM
2 notes
·
View notes
Video
youtube
Martin Logan Motion 8i Center Speaker - https://youtu.be/0t6JfObqViA
19 notes
·
View notes
Video
youtube
Commercial TV Mounting for Lobby Area - https://youtu.be/YEZKEOX2JdI
1 note
·
View note
Text
Speaker Connections
Speaker Connections http://ift.tt/2E3Hkcj
With so many options when integrating audio systems, speaker connections can be incredibly confusing. But there is logic behind all those different cables connected to the audio equipment. In this speaker connections infographic, Multimedia Tech covers all the kinds of parts, then explains their functionality in simple ways to understand how the electronics systems are integrated.
Today’s new audio components are equipped with different types of speaker connections. Figuring out how to connect the speakers, amplifiers, receivers and mixers where can be confusing.
Speaker Connections Definition
Binding terminals secure bare speaker wire and banana plugs.
Speaker Connections Binding Terminals
Speaker wire transmits audio signals through copper cables.
Speaker Connections Speaker Wire
A banana plug is used to firmly connect a speaker wire to a binding terminal.
Speaker Connections Banana Plug
Dual banana plugs firmly connect speaker wires to binding terminals.
Speaker Connections Dual Banana Plug
Binding connectors firmly connect speaker wires to spring clip terminals.
Speaker Connections Pin Connectors
Spade connectors connect speaker cables to binding terminals.
Speaker Connections Spade Connectors
An XLR connector has 3 conductors (positive, negative and ground). And it is mostly associated with professional audio equipment because of its balanced audio interconnectivity.
Speaker Connections XLR Connector
RCA connectors transmits audio signals through RCA cables.
Speaker Connections RCA Connectors
Source: Multimedia Tech. TV Speaker Connections Infographic URL: mymultimediatech.com/2018/speaker-connections/
Speaker Connections Source Multimedia Tech
These are all the speaker connections that new audio systems come with. Understanding what speaker cables to use and what is compatible with what when integrating an audio system can be frustrating. We hope that this infographic will assist you to better visualize how speaker connections can be connected. And how make sure that audio is transmitted better.
The original post Speaker Connections appeared first on Multimedia Tech.
via Multimedia Tech http://ift.tt/2i3C0e9 January 23, 2018 at 12:22PM
4 notes
·
View notes
Text
TV Connectors and Ports Infographic
TV Connectors and Ports Infographic https://mymultimediatech.com/2018/tv-connectors-ports-infographic/
With so many types of choices when purchasing a new television, TV connectors and ports can be incredibly confusing. But there is logic behind all those different cables connected to the back of the television. In this TV connectors and ports infographic, Multimedia Tech covers all the kinds of connections, then explains their functionality in simple ways to understand how the electronics systems are integrated.
Infographic showing 8 different TV connectors and ports
Today’s new televisions are equipped with different types of connectors and ports. Figuring out what connects where can be confusing.
TV Connectors and Ports Definition
HDMI cables transmit audio, video, control signals, low voltage power, ethernet and copyright protection (HDCP).
TV Connectors and Ports HDMI
An optical cable uses a fiber optical cable to transmit a digital audio signal.
TV Connectors and Ports Optical Digital Cable
An ethernet cable is used when connecting a TV to the internet. A hardwired connection is faster and more reliable.
TV Connectors and Ports Ethernet Cable
USB is used to transfer audio, video, data and even charging components.
TV Connectors and Ports USB Cable
Component Video Cables transmit high quality analog video. Commonly referred as analog HD
TV Connectors and Ports Component Video Cable
A composite video cable transmits analog video signals.
TV Connectors and Ports Composite Video Cable
RCA audio cables transmit analog signals. Mostly with stereo format.
TV Connectors and Ports RCA Audio Cables
An Auxiliary cable transmits analog audio signals using a 3.5 mm connector.
TV Connectors and Ports Auxiliary Cable
Source: Multimedia Tech. TV Connectors and Ports Infographic URL: mymultimediatech.com/2018/tv-connectors-ports-infographic/
TV Connectors and Ports Source Multimedia Tech URL: mymultimediatech.com/2018/tv-connectors-ports-infographic/
These are all the ports and connectors that new televisions come with. Understanding what cables to use and what is compatible with what when setting up a television can be frustrating. We hope that this infographic will assist you to better visualize how ports and connectors integrate with a new television. And how make sure that audio, video, control, low power and data are transmitted better.
The original post TV Connectors and Ports Infographic appeared first on Multimedia Tech.
via Multimedia Tech https://mymultimediatech.com January 16, 2018 at 01:00AM
0 notes
Text
Power Relocation Kit Infographic
Power Relocation Kit Infographic http://ift.tt/2CQITMJ
In an industry where knowing exactly how to get a TV mounted on the wall is murky at best, installation standards can be incredibly alluring. But there is danger in believing every TV installation provider you find, and wisdom in looking at it with a critical eye. In this power relocation kit infographic, Multimedia Tech covers all the parts of the puzzle, then shares a few smart ways to understand the task at hand.
Power Relocation Kit Infographic
Hide The Ugly Cables:
HDMIs, opticals, coaxials, ethernet, RCAs & power.
Power Relocation Kit Video Power Audio
Mounting a TV on the wall and hiding the audio and video cables provides an aesthetically pleasing experience. A professional installer should be able to install the power relocation kit where there are no studs or firestuds and fish all the power and AV cables inside the wall.
Power Relocation Kit Infographic TV Studs AV Power
Remember to ask for a power relocation kit that meets NEC (National Electric Code) and UL standards (Underwriters Laboratories)
Power Relocation Kit Infographic NEC and UL Standards
This is all the information that a power relocation kit is useful for. Hiding the ugly cables, especially for in-wall concealment or power plug relocation can be very misleading when a wall is not prewired by the home builder for a TV installation. We hope that this will help you to better understand how to request the installation of a kit that meets National Electric Codes and UL standards. And how to get an project done that does not become a fire hazard.
The original post Power Relocation Kit Infographic appeared first on Multimedia Tech.
via Multimedia Tech http://ift.tt/2i3C0e9 January 08, 2018 at 03:07PM
2 notes
·
View notes
Text
Fireplace TV Installation Infographic
Fireplace TV Installation Infographic http://ift.tt/2CcpthL
A fireplace TV installation is aesthetically pleasing, fully functional and adds to the decor of the room. This infographic shows how understanding the type of walls and all the different kinds of TVs provide better design considerations and improves safety measurements.
Fireplace TV Installation Infographic
Some of the most common types of walls are made out of drywall, brick, stone, wood, concrete and tile. And, some of the typical TV types are 8K, 4K, QLED, LED, AND LCD. Careful evaluation of these factors is important since TV size and viewing distance play an important role when installing the TV above the fireplace.
The original post Fireplace TV Installation Infographic appeared first on Multimedia Tech.
via Multimedia Tech http://ift.tt/2i3C0e9 January 02, 2018 at 11:12AM
2 notes
·
View notes
Text
TV Mount Types Infographic
TV Mount Types Infographic http://ift.tt/2q96CT4
Choosing the right TV mount type is one the main aspects of ensuring the desired functionality and aesthetics are met when mounting a TV.
TV Mount Types Infographic
Depending of the TV size and viewing distance, televisions are the focal point of the room. TV mounts are come in different types of designs:
Tilting: Move up and down +/- 0 to 30 degrees.
Flat: No tilt allowed.
Articulating: Combine Tilting, flat and angle capabilities.
Ceiling: Combine Tilting, flat and rotating capabilities while attached to the ceiling.
Motorized: Integrate a small engine capable of adjusting the TV mount to the desired tilt, angle, and rotation.
Video Wall: Designed for commercial applications, video wall mounts allow to perfectly align several TVs horizontally, vertically or a combination of both.
The original post TV Mount Types Infographic appeared first on Multimedia Tech.
via Multimedia Tech http://ift.tt/2i3C0e9 December 31, 2017 at 02:52AM
0 notes
Text
HDR Infographic
HDR Infographic http://ift.tt/2q7oZYt
This HDT TV infographic shows how an image is initially captured by a recording device. Then, it demonstrates how through capture, production post, mastering and distribution the image gets processed by a flat screen display to finally replicate an image that is as close as possible to the color and contrast perceived by the human eye.
HDR Infographic
Additionally, this infographic demonstrates the comparison between HDR TV (High Dynamic Range Television) mostly available in 4K and 8K TVS and SDR TV (Standard Dynamic Range) where the most obvious difference is the improvement of contrast and the color spectrum delivered by HDR TVs.
The original post HDR Infographic appeared first on Multimedia Tech.
via Multimedia Tech http://ift.tt/2i3C0e9 December 26, 2017 at 04:50AM
2 notes
·
View notes