
Hi! I'm Paige ~ Video tutorials on my YouTube channel @ paigeecrochets. I am not active on tumblr, it is only for posting written patterns. If you want to contact me please do it on instagram @ paigeecrochets <3
Don't wanna be here? Send us removal request.
Statistics
We looked inside some of the posts by paigeecrochetskpop and here's what we found interesting.
Average Info
Notes Per Post
4K
Likes Per Post
4K
Reblog Per Post
600
Reply Per Post
27
Time Between Posts
2 months
Number of Posts By Type
Text
3
Photo
14
Last Seen Tumblr Blogs


Fun Fact
The “We are the 99%” Tumblr blog became the slogan for the Occupy Wall Street movement.
Text


TXT LIGHTSTICK CROCHET
VIDEO TUTORIAL: https://youtu.be/jk8uWy4yzmQ
4 mm hook
I Love This Yarn
“White”
“Ocean”
“Jelly Bean”
“Peacock”
“Yellow”
“Light Gray”
White, light turquoise, green, blue, yellow, grey
BASE
USING LIGHT GRAY
Rnd 1: 6 sc in magic circle (6)
Rnd 2: inc in each st (12)
Rnd 3: [sc 1, inc 1] rpt to end of rnd (18) (dont sl st join)
Cut yarn, sew invisible join
Join yarn in behind loops (NOT back loops)
Rnd 1: [sc 7, dec 1] rpt to end of rnd (16)
Rnd 2: sc in each st (16)
Switch to White
Rnd 3-20: sc in each st (16)
Stuff the project
Switch to Light Gray
Rnd 21: [sc 3, inc 1] rpt to end of rnd (22)
Rnd 22: [sc 4, inc 1] rpt to end of rnd (26)
Rnd 23: [sc 5, inc 1] rpt to end of rnd (dont sl st join) (30)
Cut yarn, sew invisible join
HEAD
USING WHITE
Rnd 1: 8 sc in magic circle (8)
Rnd 2: inc in each st (16)
Rnd 3: [sc 1, inc 1] rpt to end of rnd (24)
Rnd 4: [sc 2, inc 1] rpt to end of rnd (32)
Rnd 5: [sc 3, inc 1] rpt to end of rnd (40)
Rnd 6: [sc 4, inc 1] rpt to end of rnd (48)
Rnd 7: [sc 5, inc 1] rpt to end of rnd (56)
Rnd 8: [sc 6, inc 1] rpt to end of rnd (64)
Rnd 9: [sc 6, dec 1] rpt to end of rnd behind loops only (56)
Rnd 10: [sc 5, dec 1] rpt to end of rnd (48)
Rnd 11-12: sc in each st (48)
Rnd 13: [sc 5, inc 1] rpt to end of rnd (56)
Rnd 14: [sc 6, inc 1] rpt to end of rnd (64)
Rnd 15: behind loops only [sc 6, dec 1] rpt to end of rnd (56)
Rnd 16: [sc 5, dec 1] rpt to end of rnd (48)
Rnd 17: [sc 4, dec 1] rpt to end of rnd (40)
Rnd 18: [sc 3, dec 1] rpt to end of rnd (32)
Rnd 19: [sc 2, dec 1] rpt to end of rnd (24)
Rnd 20: [sc 1, dec 1] rpt to end of rnd (16)
Rnd 21: dec in each st (8)
Leave long tail for sewing, close remaining hole. sew the head to the body
X
USING LIGHT GRAY
Start with an adjustable slip knot
[Ch 7 + 1 for turning ch
Sc 7 along the chains, sl st in adjustable slip knot] x4
ch 1
[sc 7, sl st 7] x4
Leave tail for sewing
Make another X for backside
T
USING OCEAN (LIGHT TURQUOISE)
[Ch 10 + 1 for turning chain
sc 10, sl st in very first ch] x2
Ch 6 + 1 for turning chain
sc 6, sl st in very first ch
Ch 10 + 1 for turning chain
sc 10, sl st in very first ch
ch 1, [sc 10, sl st 10] x2
sc 6, sl st 6
sc 10, sl st 10
Make another T for backside
BUTTONS
sew with yellow, jelly bean (green), and peacock (blue) yarn. use light grey yarn to sew a box around the buttons
92 notes
·
View notes
Photo

GIANT KOYA CROCHET PATTERN
VIDEO TUTORIAL: https://youtu.be/4jQpHRgN8FY
4 mm hook
I Love This Yarn (4 medium, 100% acrylic)
Turquoise, White, Black, Glacier (optional), Grape
{blue, white, black, light blue (optional), dark purple)
Abbreviations
rnd: round
sc: single crochet
inc: increase
dec: decrease
st: stitch
rpt: repeat
FO: fasten off
sk: skip
ch: chain
HEAD in “Turquoise”
Rnd 1: 6 sc in magic circle (6)
Rnd 2: inc in each st (12)
Rnd 3: [sc 1, inc 1] rpt to end of rnd (18)
Rnd 4: [sc 2, inc 1] rpt to end of rnd (24)
Rnd 5: [sc 3, inc 1] rpt to end of rnd (30)
Rnd 6: [sc 4, inc 1] rpt to end of rnd (36)
Rnd 7: [sc 5, inc 1] rpt to end of rnd (42)
Rnd 8: [sc 6, inc 1] rpt to end of rnd (48)
Rnd 9: [sc 7, inc 1] rpt to end of rnd (54)
Rnd 10: [sc 8, inc 1] rpt to end of rnd (60)
Rnd 11: [sc 9, inc 1] rpt to end of rnd (66)
Rnd 12: [sc 10, inc 1] rpt to end of rnd (72)
Rnd 13: [sc 11, inc 1] rpt to end of rnd (78)
Rnd 14-24: sc in each st (78)
Rnd 25: [sc 11, dec 1] rpt to end of rnd (72)
Rnd 26: [sc 10, dec 1] rpt to end of rnd (66)
Rnd 27: [sc 9, dec 1] rpt to end of rnd (60)
Rnd 28: [sc 8, dec 1] rpt to end of rnd (54)
Rnd 29: [sc 7, dec 1] rpt to end of rnd (48)
Rnd 30: [sc 6, dec 1] rpt to end of rnd (42)
Rnd 31: [sc 5, dec 1] rpt to end of rnd (36)
Rnd 32: [sc 4, dec 1] rpt to end of rnd (30)
Rnd 33: [sc 3, dec 1] rpt to end of rnd (24)
Rnd 34: [sc 2, dec 1] rpt to end of rnd (18)
Rnd 35: [sc 1, dec 1] rpt to end of rnd (12)
Rnd 36: dec in each st (6)
FO, the remaining hole will be covered later so no need to sew
EARS in “Turquoise”
Rnd 1: 6 sc in magic circle (6)
Rnd 2: inc in each st (12)
Rnd 3: [sc 1, inc 1] rpt to end of rnd (18)
Rnd 4: [sc 2, inc 1] rpt to end of rnd (24)
Rnd 5: [sc 3, inc 1] rpt to end of rnd (30)
Rnd 6: [sc 4, inc 1] rpt to end of rnd (36)
Rnd 7-12: sc in each st (36)
Rnd 13: [sc 4, dec 1] rpt to end of rnd (30)
Rnd 14: [sc 13, dec 1] rpt to end of rnd (28)
Leave tail for sewing, FO
Make 2 ears
Fold ears in half, they should curve inwards a little
Sew ears to head
BODY in “Turquoise”
Rnd 1: 6 sc in magic circle (6)
Rnd 2: inc in each st (12)
Rnd 3: [sc 1, inc 1] rpt to end of rnd (18)
Rnd 4: [sc 2, inc 1] rpt to end of rnd (24)
Rnd 5: [sc 5, inc 1] rpt to end of rnd (28)
Rnd 6-10: sc in each st (28)
FO, rpt rnd 1-10, you should be working on second leg now
Rnd 11: sc 12, on first leg sc 24, on current leg sk 4, sc 12 (48)
Rnd 12-15: sc in each st (48)
Rnd 16: [sc 6, dec 1] rpt to end of rnd (42)
Rnd 17-18: sc in each st (42)
Rnd 19: [sc 5, dec 1] rpt to end of rnd (36)
Rnd 20: sc in each st (36)
Leave tail for sewing, FO
Stuff the body
Sew between legs to close the hole, then sew to head
ARMS in “Turquoise”
Rnd 1: 6 sc in magic circle (6)
Rnd 2: inc in each st (12)
Rnd 3: [sc 1, inc 1] rpt to end of rnd (18)
Rnd 4: [sc 5, inc 1] rpt to end of rnd (21)
Rnd 5-12: sc in each st (21)
Leave tail for sewing, FO
Make 2 arms
Stuff the arms, sew between body and head
EAR PIECE in “Glacier” (blue lighter than turquoise, or white)
Ch 4, +1 for turning ch
Row 1: inc 1, sc 2, inc 1 (6)
Row 2: inc 1, sc 4, inc 1 (8)
Row 3-8: sc in each st (8)
sc around the perimeter of the ear piece, except for the last row
Leave tail for sewing, FO
Make 2 ear pieces
Sew ear pieces to inside of ears
BELLY in “White”
Same as ear piece pattern
Sew belly to body
NOSE in “Grape” (dark purple)
Rnd 1: 6 sc in magic circle (6)
Rnd 2: inc in each st (12)
Rnd 3: [sc 1, inc 1] rpt to end of rnd (18)
Rnd 4: [inc 2, sc 6, inc 3, sc 6, inc 1] (24)
Leave tail for sewing, FO
Sew nose to head (tail should be centered, either top or bottom of the nose), before closing stuff lightly
FACE in “Black”
Cut a length of yarn (22-26 inches)
Tie a triple knot at one end, thread the other end and sew the face
350 notes
·
View notes
Photo


WE BARE BEARS Crochet pattern
3.5 mm hook
I Love This Yarn (4 medium, 100% acrylic yarn)
ICE BEAR
BODY
In white
Rnd 1: 6 sc in magic circle (6)
Rnd 2: inc around (12)
Rnd 3: [sc, inc] repeat around (18)
Rnd 4: [sc 2, inc] repeat around (24)
Rnd 5: [sc 3, inc] repeat around (30)
Rnd 6-17: sc around (30)
Rnd 18: [sc 3, dec] repeat around (24)
Rnd 19: [sc 2, dec] repeat around (18)
Rnd 20: [sc, dec] repeat around (12)
Rnd 21: dec around (6)
Sew remaining hole shut
SNOUT
In White
Rnd 1: 6 sc in magic circle (6)
Rnd 2: inc around (12)
Rnd 3: [sc, inc] repeat around (18)
Rnd 4: sc around (18)
Leave tail for sewing
LEGS
In White
Rnd 1: 6 sc in magic circle (6)
Rnd 2: [sc, inc] repeat around (9)
Rnd 3: sc around (9)
Rnd 4-5: sl st 4, sc 5 (9)
Leave tail for sewing
Make 4 legs
EARS AND TAIL
In White
Rnd 1: 4 sc in magic circle (4)
Rnd 2: sc around (4)
Leave tail for sewing
PANPAN
BODY
In Graphite
Rnd 1: 6 sc in magic circle (6)
Rnd 2: inc around (12)
Rnd 3: [sc, inc] repeat around (18)
Rnd 4: [sc 2, inc] repeat around (24)
Rnd 5: [sc 3, inc] repeat around (30)
Rnd 6-8: sc around (30)
Switch to White
Rnd 9-12: sc around (30)
Switch to Graphite
Rnd 13-16: sc around (30)
Switch to White
Rnd 17: sc around (30)
Rnd 18: [sc 3, dec] repeat around (24)
Rnd 19: [sc 2, dec] repeat around (18)
Rnd 20: [sc, dec] repeat around (12)
Rnd 21: dec around (6)
Sew remaining hole shut
SNOUT
In White
Rnd 1: 6 sc in magic circle (6)
Rnd 2: inc around (12)
Rnd 3: [sc, inc] repeat around (18)
Rnd 4: sc around (18)
Leave tail for sewing
LEGS
In Graphite
Rnd 1: 6 sc in magic circle (6)
Rnd 2: [sc, inc] repeat around (9)
Rnd 3: sc around (9)
Rnd 4-5: sl st 4, sc 5 (9)
Leave tail for sewing
Make 4 legs
EARS AND TAIL
In Graphite
Rnd 1: 4 sc in magic circle (4)
Rnd 2: sc around (4)
Leave tail for sewing
GRIZZ
BODY
In Toasted Almond
Rnd 1: 6 sc in magic circle (6)
Rnd 2: inc around (12)
Rnd 3: [sc, inc] repeat around (18)
Rnd 4: [sc 2, inc] repeat around (24)
Rnd 5: [sc 3, inc] repeat around (30)
Rnd 6-17: sc around (30)
Rnd 18: [sc 3, dec] repeat around (24)
Rnd 19: [sc 2, dec] repeat around (18)
Rnd 20: [sc, dec] repeat around (12)
Rnd 21: dec around (6)
Sew remaining hole shut
SNOUT
In Toasted Almond
Rnd 1: 6 sc in magic circle (6)
Rnd 2: inc around (12)
Rnd 3: [sc, inc] repeat around (18)
Rnd 4: sc around (18)
Leave tail for sewing
LEGS
In Toasted Almond
Rnd 1: 6 sc in magic circle (6)
Rnd 2: [sc, inc] repeat around (9)
Rnd 3: sc around (9)
Rnd 4-5: sl st 4, sc 5 (9)
Leave tail for sewing
Make 4 legs
EARS AND TAIL
In Toasted Almond
Rnd 1: 4 sc in magic circle (4)
Rnd 2: sc around (4)
Leave tail for sewing
364 notes
·
View notes
Photo

CROCHET ONE FINGER FASHION GLOVES
3.5 mm hook
I Love This Yarn
Ch 1+1
Row 1: sc (1)
Row 2: sc (1)
Row 3: inc (2)
Row 4-6: sc 2 (2)
Row 7: inc 2 (4)
Row 8-10: sc 4 (4)
Row 11: inc, sc 2, inc (6)
Sc along side to row 1, ch 8, sc along side back to row 11
Sc 8 count as Row 12
Ch 21, remove hook, insert in first sc from row 12, hook back in working yarn and pull through
Rnd 1: sc 8 along row 12, sc 21 along chains (29)
Rnd 2: ch 4 (count as dc and 1 ch space), sk 1, dc, [ch 1, sk 1, dc] 3 more times
Ch 2, sk 2, sl st, [ch 3, sk 2, sl st] repeat 5 times, ch 2, sk 2, sl st in third chain
Rnd 3: continue pattern (line up dcs and chain spaces)
Ch 3, sk a space, sl st, [ch 3, sl st in next space] repeat to second to last space, ch 3, sk a space, sl st in third chain
Rnd 4: continue pattern (line up dcs and chain spaces)
Sl st in space, ch 3, sl st in next space, [ch 4, sl st in next space] repeat to second to last space, ch 3, sl st in the last space, sl st in third chain
Rnd 5: continue pattern (line up dcs and chain spaces)
Ch 3, sl st in space, [ch 4, sl st in next space] repeat to last space, ch 3 sl st in third chain
Rnd 6: continue pattern (line up dcs and chain spaces)
Sl st in space, [ch 4, sl st in next space] repeat to last space, sl st in third chain
Rnd 7: continue pattern (line up dcs and chain spaces)
Ch 1, sl st in space, [ch 4, sl st in next space] repeat to last space, ch 1, sl st in third chain
Rnd 8: as rnd 6
Rnd 9: as rnd 7
Rnd 10: sc in each dc and ch space. 1 sc in small spaces, 3 sc in big spaces
Rnd 11: picot = ch 3, sl st next st. picot all around
21 notes
·
View notes
Photo

CBB – CROCHET BUNNY BUDDY <3
PIN CUSHION AND HOOK HOLDER


“I Love This Yarn” - 4 medium acrylic yarn
3.5 mm hook
HEAD
Using fur color
Rnd 1: 8 sc in magic circle (8)
Rnd 2: inc around (16)
Rnd 3: [sc, inc] repeat around (24)
Rnd 4: [sc 2, inc] repeat around (32)
Rnd 5: [sc 3, inc] repeat around (40)
Rnd 6: [sc 4, inc] repeat around (48)
Rnd 7: [sc 5, inc] repeat around (56)
Rnd 8: sc around (56)
Rnd 9: sc 18, [sc 3, inc] 5 times, sc 18 (61)
Rnd 10-13: sc around (61)
Rnd 14: sc 18, [sc 3, dec] 5 times, sc 18 (56)
Rnd 15-16: sc around (56)
Rnd 17: sc 14, [sc 2, dec] 7 times, sc 14 (49)
Rnd 18-19: sc around (49)
Rnd 20: sc 12, [sc 3, dec] 5 times, sc 12 (44)
Rnd 21: [sc 9, dec] repeat around (40)
Rnd 22: [sc 3, dec] repeat around (32)
Rnd 23: [sc 2, dec] repeat around (24)
Rnd 24: [sc, dec] repeat around (16)
Rnd 25: dec around (8)
Sew remaining hole shut
HAIR
Using hair color
Rnd 1: 6 sc in magic circle (6)
Rnd 2: inc around (12)
Rnd 3: [sc, inc] repeat around (18)
Rnd 4: [sc 2, inc] repeat around (24)
Rnd 5: [sc 3, inc] repeat around (30)
Rnd 6: sc 12, ch 1 and turn
Row 1: sc 12 (12)
Row 2: sc 11, sc 3 same st, sc 1 on side of rows, sl st in next st from Rnd 5
Row 1: inc, sc 16, inc (20)
Row 2: inc at the ends and middle (3 times) (23)
Row 3: inc 2 (25)
Row 4: inc at the ends and middle (3 times) (28)
Row 5: inc 2 (30)
Row 6: inc at the ends (2 times) (32)
Row 7-10: sc across (32)
Row 11: dec at the ends (30)
Row 12-13: sc across (30)
Row 14: dec at the ends (28)
Row 15: dec at the ends and middle (3 times) (25)
Row 16: dec3tog at the ends (21)
Row 17: dec3tog at the ends (17)
Sc around the entire work (2 sc in same st for corners)
Leave tail for sewing
EARS
Using fur color
Rnd 1: 6 sc in magic circle (6)
Rnd 2: inc around (12)
Rnd 3: sc around (12)
Rnd 4: [sc, dec] repeat around (9)
Leave tail for sewing
BUN
Using hair color
Rnd 1: 6 sc in magic circle (6)
Rnd 2: inc around (12)
Rnd 3: [sc, inc] repeat around (18)
Rnd 4: [sc 2, inc] repeat around (24)
Rnd 5: [sc 3, inc] repeat around (30)
Rnd 6: [sc 4, inc] repeat around (36)
Rnd 7: [sc 5, inc] repeat around (42)
Rnd 8-12: sc around (42)
Rnd 13: [sc 5, dec] repeat around (36)
Leave tail for sewing
BUNNY EARS
Using fur color
Rnd 1: 6 sc in magic circle (6)
Rnd 2: inc around (12)
Rnd 3: [sc 5, inc] repeat around (14)
Rnd 4-12: sc around (14)
Leave tail for sewing
EAR PIECE
Using inner ear color
Ch 6+2
Row 1: hdc 5, hdc 3 same st, turn, hdc 5
Leave tail for sewing
SHIRT
Using under shirt color
Leave beginning tail for sewing later
Ch 36, sl st join
Rnd 1: sc around (36)
Rnd 2: [sc 8, inc] repeat around (40)
Rnd 3-4: sc around (40)
Rnd 5: [sc 9, inc] repeat around (44)
Rnd 6-9: sc around (44)
Cut yarn
Pin in place and sew to the head
OVERALLS
Using overall color
Leave beginning tail
[Ch 1+1
Row 1-3: sc 1 (1)
Sc down the side (2 sc in same st for corners)] – strap
Ch 7, make another strap
Ch 1 and turn
Row 1: inc at the ends (each strap counts as 2 sts) (13)
Row 2: inc at the ends (15)
Row 3: sc aross (15)
Row 4: inc at the ends (17)
Row 5: sc across (17)
Row 6: inc at the ends (19), ch 4
Ch 1, cut yarn to fasten off
Repeat entire thing for backside, but DON’T fasten off
Put the pieces together, we’ll connect them and work in the round
Sl st on front piece, count as end of round
Rnd 1-2: sc around (46)
Rnd 3: inc twice evenly (48)
Rnd 4-6: sc around (48)
Rnd 7: [sc 11, inc] repeat around (52)
Rnd 8: sc around (52)
Rnd 9: sc around FLO (52)
Rnd 10: [sc 12, inc] repeat around (56)
Rnd 11-13: sc around (56)
Cut yarn, hide end
Do a round of sc around the perimeter
Rnd 1: 8 sc in magic circle (8)
Rnd 2: inc around (16)
Rnd 3: [sc, inc] repeat around (24)
Rnd 4: [sc 2, inc] repeat around (32)
Rnd 5: [sc 3, inc] repeat around (40)
Rnd 6: [sc 4, inc] repeat around (48)
Rnd 7: [sc 11, inc] repeat around (52)
Leave tail for sewing (but don’t yet)
FEET
Using fur color
Rnd 1: 6 sc in magic circle (6)
Rnd 2: inc around (12)
Rnd 3: [sc, inc] repeat around (18)
Rnd 4-5: sc around (18)
Leave tail for sewing, sew to the circle
Sew the circle to the back loops from Rnd 8 of the overalls
ARMS
Using fur color
Rnd 1: 6 sc in magic circle (6)
Rnd 2: inc around (12)
Rnd 3: [sc, inc] repeat around (18)
Rnd 4-13: sc around (18)
Switch to under shirt color
Rnd 14-16: sc around (18)
Rnd 17: [sc 4, dec] repeat around (15)
Rnd 18-19: sc around (15)
Rnd 20: [sc 3, dec] repeat around (12)
Leave tail for sewing (sew arms down to keep in place)
(optional) do one round of surface crochet at the color change
POCKETS
BIG POCKET
Ch 6+1
Row 1: inc at the ends (8)
Row 2: inc at the ends (10)
Row 3: inc at the ends (12)
Row 4: inc at the ends (14)
Row 5-12: sc aross (14)
One round of sc around the perimeter
Leave tail for sewing
SMALL POCKET
Ch 4+1
Row 1-9: sc across (4)
Sc around 3 edges, leave the top
Leave tail for sewing
Sew face and complete!
46 notes
·
View notes
Text

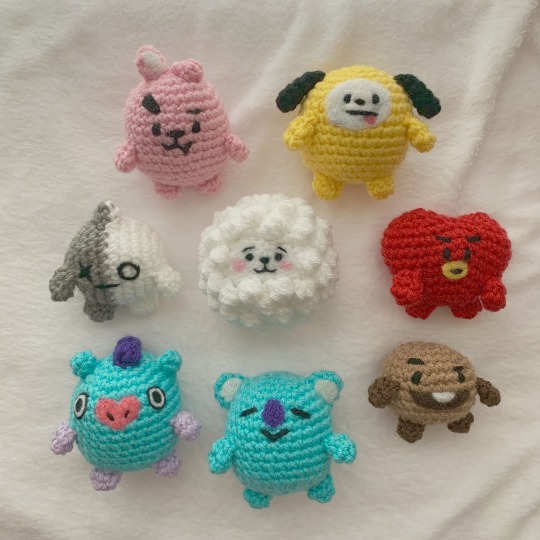
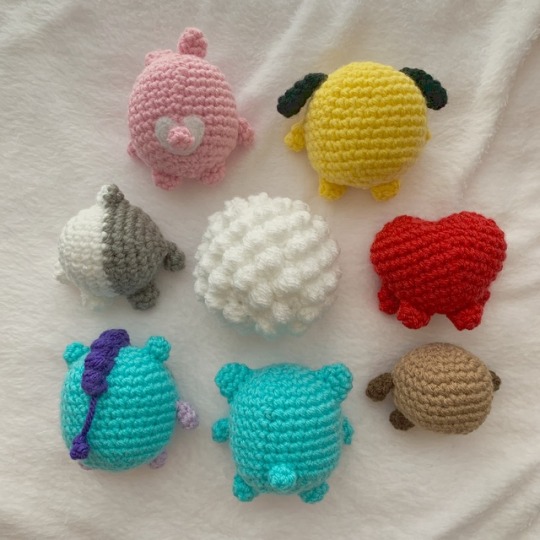
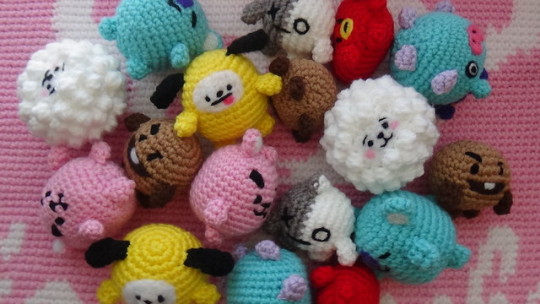
Mang, Koya & Cooky amigurumies 💓
thanks so much to @paigeecrochetskpop for the pattern💜
82 notes
·
View notes
Photo

BLACKPINK LIGHTSTICK CROCHET PATTERN
E 3.5 mm hook
I Love This Yarn in Pink and Black
BASE
Using Black
Round 1: 6 sc in magic circle (6)
R2: inc around (12)
R3: [sc, inc] repeat around (18)
R4: [sc 2, inc] repeat around (24)
Cut yarn
Join yarn in behind loops
Round 1: [sc 4, dec] repeat around (20)
R2: [sc 3, dec] repeat around (16)
R3: [sc 2, dec] repeat around (12)
R4: sc around (12)
R5: [sc 5, inc] repeat around (14)
R6-9: sc around (14)
R10: [sc 6, inc] repeat around (16)
R11-18: sc around (16)
R19: P – sc 2, B – sc 5, P – inc, sc 2, B – sc 5, P – inc (18)
R20: P3, B3, P6, B3, P3 (18)
R21: P18 (18)
R22: B2, P6, B3, P6, B1 (18)
R23: B3, P4, B5, P4, B2 (18)
R24-25: sc around (18)
R26: [sc 8, inc] repeat around (20)
R27: [sc 4, inc] repeat around (24)
R28: [sc 3, inc] repeat around (30)
R29: [sc 4, inc] repeat around (36)
R30-32: sc around (36)
R33: [sc 4, dec] repeat around (30)
R34: [sc 3, dec] repeat around (24)
R35: sc around (24)
R36: [sc 2, dec] repeat around (18)
R37: [sc, dec] repeat around (12)
R38: dec around (6)
Cut yarn, sew remaining hole shut
HEART
Using Pink
Round 1: 6 sc in magic circle (6)
R2: [sc, inc] repeat around (9)
R3: [sc 2, inc] repeat around (12)
R4: [sc 3, inc] repeat around (15)
R5: [sc 4, inc] repeat around (18)
R6: [sc 5, inc] repeat around (21)
R7: [sc 6, inc] repeat around (24)
R8: [sc 7, inc] repeat around (27)
R9: [sc 8, inc] repeat around (30)
R10: [sc 9, inc] repeat around (33)
R11: [sc 10, inc] repeat around (36)
R12: inc, sc 10, inc, [sc 11, inc] repeat around (40)
R13: sc 10, sc in 10th st from beginning of rnd, sc 9, sl st join (20)
R14: [sc, dec] repeat to last 2 sts, sc 2 (14)
R15: dec around (7)
Cut yarn, sew remaining hole shut
Join yarn on other half
R1: sc around (20)
R2: [sc, dec] repeat to last 2 sts, sc 2 (14)
R3: dec around (7)
Cut yarn, sew remaining hole shut
Make six hearts
CONNECTION PIECE
Using Pink
Leave beginning tail
Ch 23, sl st join
Round 1: sc around (23)
Leave tail for sewing
Sew piece to the base using beginning tail
Sew piece to heart using ending tail – stuff before closing
Attach yarn and sew 2 more hearts
Repeat for other side
BUTTON
Using Pink
Round 1: 6 sc in magic circle (6)
Leave tail for sewing
109 notes
·
View notes
Photo


MINÚSCULO BT21 ESPAÑOL
“I Love This Yarn”
3.5 mm aguja
vídeo tutorial:
https://youtu.be/FAhiL-Mqvvs
Abreviaturas:
punto bajo – pb
aumento – aum
disminucion – dis
cadeneta – cad
punto enano – pe
COOKY
Hilo: Pink, Black
Pelusa: White
CUERPO
Usando Pink
Ronda 1: 6 pb anillo (6)
R2: aum todos (12)
R3: [pb, aum] repetir restante (18)
R4: [pb 2, aum] repetir restante (24)
R5: [pb 3, aum] repetir restante (30)
R6-13: pb todos (30)
R14: [pb 3, dis] repetir restante (24)
R15: [pb 2, dis] repetir restante (18)
R16: [pb, dis] repetir restante (12)
R17: dis todos (6)
Cortar el hilo, coser el agujero restante cerrado
OREJAS
Usando Pink
Cad 1+1
Ronda 1: 4 pb (4)
R2: [pb, aum] repetir restante (6)
R3: pb todos (6)
Dejar la longitud para coser
Coser la oreja izquierda hacia abajo
Usando "pelusa" White para el detalle del oído
Cosa la cara de Cooky usando Black
BRAZOS
Usando Pink
Cad 1+1
Ronda 1: pb 4 (4)
R2: [pb, aum] repetir restante (6)
R3: [pb, dis] repetir restante (4)
Dejar la longitud para coser
PIERNAS
Usando Pink
Cad 1+1
Ronda 1: pb 4 (4)
R2: [pb, aum] repetir restante (6)
Dejar la longitud para coser
COLA
Usando Pink
Cad 1+1
Ronda 1: pb 4 (4)
R2: pb todos (4)
Dejar la longitud para coser
Use "pelusa" blanca para hacer el corazón alrededor de la cola
CHIMMY
Hilo: Yellow, Black
Pelusa: White, Tropical Pink
CUERPO
Usando Yellow
Ronda 1: 6 pb anillo (6)
R2: aum todos (12)
R3: [pb, aum] repetir restante (18)
R4: [pb 2, aum] repetir restante (24)
R5: [pb 3, aum] repetir restante (30)
R6-13: pb todos (30)
R14: [pb 3, dis] repetir restante (24)
R15: [pb 2, dis] repetir restante (18)
R16: [pb, dis] repetir restante (12)
R17: dis todos (6)
Cortar el hilo, coser el agujero restante cerrado
OREJAS
Usando Black
Cad 1+1
Ronda 1: pb 4 (4)
R2: [pb, aum] repetir restante (6)
R3-4: pb todos (6)
R5: [pb, dis] repetir restante (4)
Dejar la longitud para coser
Usa "pelusa" White para hacer la cara de Chimmy
Use hilo Black para coser detalles de la cara ("pelusa" Tropical Pink para la lengua)
BRAZOS
Usando Yellow
Cad 1+1
Ronda 1: pb 4 (4)
R2: [pb, aum] repetir restante (6)
R3: [pb, dis] repetir restante (4)
Dejar la longitud para coser
PIERNAS
Usando Yellow
Cad 1+1
Ronda 1: pb 4 (4)
R2: [pb, aum] repetir restante (6)
Dejar la longitud para coser
TATA
Hilo: Fire Red, Black
Pelusa: Yellow
CUERPO
Usando Fire Red
Ronda 1: 6 pb anillo (6)
R2: aum todos (12)
R3: [pb 2, aum] repetir restante (16)
R4: [pb 3, aum] repetir restante (20)
R5: [pb 4, aum] repetir restante (24)
R6: [pb 5, aum] repetir restante (28)
R7: [pb 6, aum] repetir restante (32)
R8-9: pb todos (32)
R10: pb 16, cad 2, pe primero punto (nuevo final de ronda) (18)
R1: [pb, dis] repetir restante (12)
R2: dis todos (6)
Coser el agujero restante cerrado, adjuntar hilo otra mitad
R1: pb todos (18)
R2: [pb, dis] repetir restante (12)
R3: dis todos (6)
Coser el agujero restante cerrado
Use "pelusa" Yellow para la boca
Coser la cara con hilo Black
BRAZOS
Usando Fire Red
Cad 1+1
Ronda 1: pb 4 (4)
R2: [pb, aum] repetir restante (6)
R3: [pb, dis] repetir restante (4)
Dejar la longitud para coser
PIERNAS
Usando Fire Red
Cad 1+1
Ronda 1: pb 4 (4)
R2: [pb, aum] repetir restante (6)
Dejar la longitud para coser
KOYA
Hilo: Turquoise, Black
Pelusa: Grape, Arctic Ice
CUERPO
Usando Turquoise
Ronda 1: 6 pb anillo (6)
R2: aum todos (12)
R3: [pb, aum] repetir restante (18)
R4: [pb 2, aum] repetir restante (24)
R5: [pb 3, aum] repetir restante (30)
R6-13: pb todos (30)
R14: [pb 3, dis] repetir restante (24)
R15: [pb 2, dis] repetir restante (18)
R16: [pb, dis] repetir restante (12)
R17: dis todos (6)
Cortar el hilo, coser el agujero restante cerrado
OREJAS
Usando Turquoise
Cad 1+1
Ronda 1: pb 4 (4)
R2: [pb, aum] repetir restante (6)
R3: [pb 2, aum] repetir restante (8)
Dejar la cola para coser
Use Arctic Ice "pelusa" para detalles del oído
Use Grape "pelusa" para la nariz
Coser la cara usando Black
BRAZOS
Usando Turquoise
Cad 1+1
Ronda 1: pb 4 (4)
R2: [pb, aum] repetir restante (6)
R3: [pb, dis] repetir restante (4)
Dejar la longitud para coser
PIERNAS
Usando Turquoise
Cad 1+1
Ronda 1: pb 4 (4)
R2: [pb, aum] repetir restante (6)
Dejar la longitud para coser
COLA
Usando Turquoise
Cad 1+1
Ronda 1: pb 4 (4)
R2: pb todos (4)
Dejar la cola para coser
MANG
Hilo: Turquoise, Grape, Orchid, Black
Pelusa: Tropical Pink, Black, White
CUERPO
Usando Turquoise
Ronda 1: 6 pb anillo (6)
R2: aum todos (12)
R3: [pb, aum] repetir restante (18)
R4: [pb 2, aum] repetir restante (24)
R5: [pb 3, aum] repetir restante (30)
R6-13: pb todos (30)
R14: [pb 3, dis] repetir restante (24)
R15: [pb 2, dis] repetir restante (18)
R16: [pb, dis] repetir restante (12)
R17: dis todos (6)
Cortar el hilo, coser el agujero restante cerrado
OREJAS
Usando Turquoise
Cad 1+1
Ronda 1: pb 4 (4)
R2: pb todos (4)
Dejar la cola para coser
MELENA
Usando Grape
Mota: [lazada, hacer hebilla, salir adelante 2] repetir 4 veces (5 hebilla), salir adelante todos
Cad 10+2
Vuelta 1: [mota, pe] x5
Dejar la cola para coser
COLA
Usando Grape
Cad 1+1
Ronda 1: pb 3 (3)
Dejar la cola para coser
Cosa el agujero cerrado, coloque la cola
Use Tropical Pink "pelusa" para la nariz del corazón
Usa “pelusa” White y Black para los ojos
Usa hilo Black para coser detalles de la nariz
BRAZOS
Usando Orchid
Cad 1+1
Ronda 1: pb 4 (4)
R2: [pb, aum] repetir restante (6)
R3: [pb, dis] repetir restante (4)
Dejar la longitud para coser
PIERNAS
Usando Orchid
Cad 1+1
Ronda 1: pb 4 (4)
R2: [pb, aum] repetir restante (6)
Dejar la longitud para coser
SHOOKY
Hilo: Toasted Almond, Brown, Black
Pelusa: Brown, White
CUERPO
Usando Toasted Almond
Cad 4+1
Ronda 1: pb 3, aum, girar el trabajo, pb 3 (8)
R2: aum 2, pb, aum 3, pb, aum (14)
R3: R2 excepto reemplazar “aum” con “[pb, aum]” (20)
R4: R2 excepto reemplazar “aum” con “[pb 2, aum]” (26)
R5-9: pb todos (26)
R10: R2 excepto reemplazar “aum” con “[pb 2, dis]” (20)
R11: R2 excepto reemplazar “aum” con “[pb, dis]” (14)
R12: R2 excepto reemplazar “aum” con “dis” (8)
Cortar el hilo, coser el agujero restante cerrado
Usa Brown y White "pelusa" para la boca de Shooky
Utilizar Black hilo para ojos y cejas
BRAZOS
Usando Brown
Cad 1+1
Ronda 1: pb 4 (4)
R2: [pb, aum] repetir restante (6)
R3: [pb, dis] repetir restante (4)
Dejar la longitud para coser
PIERNAS
Usando Brown
Cad 1+1
Ronda 1: pb 4 (4)
R2: [pb, aum] repetir restante (6)
Dejar la longitud para coser
RJ
Hilo: White
Pelusa: Black, Pink, White
CUERPO
Usando White
Mota: [lazada, hacer hebilla, salir adelante 2] repetir 4 veces (5 hebilla), salir adelante todos
Ronda 1: 6 pb anillo (6)
R2: [mota, 3 pb mismo punto] repetir restante (12 punto, 3 mota)
R3: [mota, aum] repetir restante (18 punto, 6 mota)
R4: [aum, pb, mota] repetir restante (24 punto, 6 mota)
R5: [mota, pb] repetir 4 veces, pb 6, [mota, pb] repetir 5 veces (24 punto, 9 mota)
R6: [pb, mota] repetir 4 veces, pb 6, [pb, mota] repetir 5 veces (24 punto, 9 mota)
Repita R5-6 una vez más
R9: [mota, pb] repetir restante (24 punto, 12 mota)
R10: [dis, pb, mota] repetir restante (18 punto, 6 mota)
R11: [mota, dis] repetir restante (12 punto, 6 mota)
R12: [mota, dis 3 juntos] repetir restante (6 punto, 3 mota)
Cortar el hilo, coser el agujero restante cerrado
Use White “pelusa” para cubrir la cara de RJ
Use Black “pelusa” para hacer detalles de la cara
Use Pink “pelusa” para sonrojar
VAN
Hilo: White, Greybeard, Black
Pelusa: Black
CUERPO
Usando White
Ronda 1: 6 pb anillo (6)
R2: aum todos (12)
R3: [pb, aum] repetir restante (18)
R4: [pb 2, aum] repetir restante (24)
R5-7: pb todos (24)
Cambiar el color Greybeard
R8-10: pb todos (24)
R11: [pb 2, dis] repetir restante (18)
R12: [pb, dis] repetir restante (12)
R13: dis todos (6)
Cortar el hilo, coser el agujero restante cerrado
SOMBRERO
Usando Greybeard
Ronda 1: anillo pb 2, cambiar el color White, pb 2, cambiar el color Greybeard, pe (4)
R2: pb, aum, cambiar el color White, pb, aum, cambiar el color Greybeard, pe (6)
Deja cola White y Greybeard para coser
Cosa la cara de Van usando Black hilo – use Black "pelusa" para el círculo
BRAZOS
Usando White para el brazo izquierdo, Greybeard para el brazo derecho
Cad 1+1
Ronda 1: pb 4 (4)
R2: [pb, aum] repetir restante (6)
R3: [pb, dis] repetir restante (4)
Dejar la longitud para coser
PIERNAS
Usando White para pierna izquierda, Greybeard para pierna derecha
Cad 1+1
Ronda 1: pb 4 (4)
R2: [pb, aum] repetir restante (6)
Dejar la longitud para coser
281 notes
·
View notes
Photo
MINI BT21 CROCHET PATTERN
“I Love This Yarn”
3.5 mm hook
Make “fluff” by brushing out acrylic yarn with a pet slicker brush, for clearer instructions you can find the video tutorial on my Youtube Paigee
https://youtu.be/FAhiL-Mqvvs
COOKY
Yarn: Pink, Black
Fluff: White
BODY
Using Pink
Rnd 1: 6 sc in magic circle (6)
R2: inc around (12)
R3: [sc, inc] repeat around (18)
R4: [sc 2, inc] repeat around (24)
R5: [sc 3, inc] repeat around (30)
R6-13: sc around (30) R14: [sc 3, dec] repeat around (24)
R15: [sc 2, dec] repeat around (18)
R16: [sc, dec] repeat around (12)
R17: dec around (6)
Cut yarn, sew remaining hole shut
EARS
Using Pink
Chain 1+1
Rnd 1: sc 4 (4)
R2: [sc, inc] repeat around (6)
R3: sc around (6)
Leave tail for sewing
Sew left ear down
Use White fluff for ear detail
Sew Cooky’s face using Black
ARMS
Using Pink
Chain 1+1
Rnd 1: sc 4 (4)
R2: [sc, inc] repeat around (6)
R3: [sc, dec] repeat around (4)
Leave tail for sewing
LEGS
Using Pink
Chain 1+1
Rnd 1: sc 4 (4)
R2: [sc, inc] repeat around (6)
Leave tail for sewing
TAIL
Using Pink
Chain 1+1
Rnd 1: sc 4 (4)
R2: sc around (4)
Leave tail for sewing
Use white fluff to make heart around tail
CHIMMY
Yarn: Yellow, Black
Fluff: White, Tropical Pink
BODY
Using Yellow
Rnd 1: 6 sc in magic circle (6)
R2: inc around (12)
R3: [sc, inc] repeat around (18)
R4: [sc 2, inc] repeat around (24)
R5: [sc 3, inc] repeat around (30)
R6-13: sc around (30) R14: [sc 3, dec] repeat around (24)
R15: [sc 2, dec] repeat around (18)
R16: [sc, dec] repeat around (12)
R17: dec around (6)
Cut yarn, sew remaining hole shut
EARS
Using Black
Chain 1+1
Rnd 1: sc 4 (4)
R2: [sc, inc] repeat around (6)
R3-4: sc around (6)
R5: [sc, dec] repeat around (4)
Leave tail for sewing
Use white fluff to make Chimmy’s face
Use black yarn to sew face details (tropical pink fluff for tongue)
ARMS
Using Yellow
Chain 1+1
Rnd 1: sc 4 (4)
R2: [sc, inc] repeat around (6)
R3: [sc, dec] repeat around (4)
Leave tail for sewing
LEGS
Using Yellow
Chain 1+1
Rnd 1: sc 4 (4)
R2: [sc, inc] repeat around (6)
Leave tail for sewing
TATA
Yarn: Fire Red, Black
Fluff: Yellow
BODY
Using Fire Red
Rnd 1: 6 sc in magic circle (6)
R2: inc around (12)
R3: [sc 2, inc] repeat around (16)
R4: [sc 3, inc] repeat around (20)
R5: [sc 4, inc] repeat around (24)
R6: [sc 5, inc] repeat around (28)
R7: [sc 6, inc] repeat around (32)
R8-9: sc around (32)
R9: sc 16, ch 2, sl st in first st of round (count as new end of rnd) (18)
R1: [sc, dec] repeat around (12)
R2: dec around (6)
Sew remaining hole shut, join yarn on other half
R1: sc around (18)
R2: [sc, dec] repeat around (12)
R3: dec around (6)
Sew remaining hole shut
Needle felt mouth with yellow fluff
Sew face with black yarn
ARMS
Using Fire Red
Chain 1+1
Rnd 1: sc 4 (4)
R2: [sc, inc] repeat around (6)
R3: [sc, dec] repeat around (4)
Leave tail for sewing
LEGS
Using Fire Red
Chain 1+1
Rnd 1: sc 4 (4)
R2: [sc, inc] repeat around (6)
Leave tail for sewing
KOYA
Yarn: Turquoise, Black
Fluff: Grape, Arctic Ice
BODY
Using Turquoise
Rnd 1: 6 sc in magic circle (6)
R2: inc around (12)
R3: [sc, inc] repeat around (18)
R4: [sc 2, inc] repeat around (24)
R5: [sc 3, inc] repeat around (30)
R6-13: sc around (30) R14: [sc 3, dec] repeat around (24)
R15: [sc 2, dec] repeat around (18)
R16: [sc, dec] repeat around (12)
R17: dec around (6)
Cut yarn, sew remaining hole shut
EARS
Using Turquoise
Chain 1+1
Rnd 1: sc 4 (4)
R2: [sc, inc] repeat around (6)
R3: [sc 2, inc] repeat around (8)
Leave tail for sewing
Needle felt ear details with Arctic Ice fluff
Needle felt nose with Grape fluff
Sew face using black
ARMS
Using Turquoise
Chain 1+1
Rnd 1: sc 4 (4)
R2: [sc, inc] repeat around (6)
R3: [sc, dec] repeat around (4)
Leave tail for sewing
LEGS
Using Turquoise
Chain 1+1
Rnd 1: sc 4 (4)
R2: [sc, inc] repeat around (6)
Leave tail for sewing
TAIL
Using Turquoise
Chain 1+1
Rnd 1: sc 4 (4)
R2: sc around (4)
Leave tail for sewing
MANG
Yarn: Turquoise, Grape, Orchid, Black
Fluff: Tropical Pink, Black, White
BODY
Using Turquoise
Rnd 1: 6 sc in magic circle (6)
R2: inc around (12)
R3: [sc, inc] repeat around (18)
R4: [sc 2, inc] repeat around (24)
R5: [sc 3, inc] repeat around (30)
R6-13: sc around (30) R14: [sc 3, dec] repeat around (24)
R15: [sc 2, dec] repeat around (18)
R16: [sc, dec] repeat around (12)
R17: dec around (6)
Cut yarn, sew remaining hole shut
EARS
Using Turquoise
Chain 1+1
Rnd 1: sc 4 (4)
R2: sc around (4)
Leave tail for sewing (sew around)
MANE
Using Grape
Bobble: [y/o, pull up loop, pull through 2] repeat 4 times (5 loops), pull through all
Chain 10+2
Row 1: [bobble, sl st] x5
Leave tail for sewing
TAIL
Using Grape
Chain 1+1
Rnd 1: sc 3 (3)
Leave tail for sewing
Sew hole shut, attach tail
Use tropical pink fluff for heart nose
Use black and white fluff for eyes
Use black yarn to sew nose details
ARMS
Using Orchid
Chain 1+1
Rnd 1: sc 4 (4)
R2: [sc, inc] repeat around (6)
R3: [sc, dec] repeat around (4)
Leave tail for sewing
LEGS
Using Orchid
Chain 1+1
Rnd 1: sc 4 (4)
R2: [sc, inc] repeat around (6)
Leave tail for sewing
SHOOKY
Yarn: Toasted Almond, Brown, Black
Fluff: Brown, White
BODY
Using Toasted Almond
Chain 4+1
Rnd 1: sc 3, inc, turn, sc 3 (8)
R2: inc 2, sc, inc 3, sc, inc (14)
R3: R2 but replace “inc” with “[sc, inc]” (20)
R4: R2 but replace “inc” with “[sc 2, inc]” (26)
R5-9: sc around (26)
R10: R2 but replace “inc” with “[sc 2, dec]” (20)
R11: R2 but replace “inc” with “[sc, dec]” (14)
R12: R2 but replace “inc” with “dec” (8)
Cut yarn, sew remaining hole shut
Needle felt shooky’s mouth with brown and white fluff
Sew shooky’s eyes and eyebrows with black yarn
ARMS
Using Brown
Chain 1+1
Rnd 1: sc 4 (4)
R2: [sc, inc] repeat around (6)
R3: [sc, dec] repeat around (4)
Leave tail for sewing
LEGS
Using Brown
Chain 1+1
Rnd 1: sc 4 (4)
R2: [sc, inc] repeat around (6)
Leave tail for sewing
RJ
Yarn: White
Fluff: Black, Pink, White
BODY
Using White
Bobble: [y/o, pull up loop, pull through 2] repeat 4 times (5 loops), pull through all
Rnd 1: 6 sc in magic circle (6)
R2: [bobble, 3 sc same st] repeat around (12 sts, 3 bobbles)
R3: [bobble, inc] repeat around (18 sts, 6 bobbles)
R4: [inc, sc, bobble] repeat around (24 sts, 6 bobbles)
R5: [bobble, sc] repeat 4 times, sc 6, [bobble, sc] repeat 5 times (24 sts, 9 bobbles)
R6: [sc, bobble] repeat 4 times, sc 6, [sc, bobble] repeat 5 times (24 sts, 9 bobbles)
Repeat R5-6 once more
R9: [bobble, sc] repeat around (24 sts, 12 bobbles)
R10: [dec, sc, bobble] repeat around (18 sts, 6 bobbles)
R11: [bobble, dec] repeat around (12 sts, 6 bobbles)
R12: [bobble, dec3tog] repeat around (6 sts, 3 bobbles)
Cut yarn, sew remaining hole shut
Use white fluff to cover RJ’s face
Use black fluff to make face details
Use pink fluff for blush
VAN
Yarn: White, Greybeard, Black
Fluff: Black
BODY
Using White
Rnd 1: 6 sc in magic circle (6)
R2: inc around (12)
R3: [sc, inc] repeat around (18)
R4: [sc 2, inc] repeat around (24)
R5-7: sc around (24)
Change to Greybeard
R8-10: sc around (24)
R11: [sc 2, dec] repeat around (18)
R12: [sc, dec] repeat around (12)
R13: dec around (6)
Cut yarn, sew remaining hole shut
HAT
Using Greybeard
Rnd 1: in magic circle sc 2, switch to White, sc 2, sl st with grey (4)
R2: sc, inc, switch to white, sc, inc, sl st with grey (6)
Leave white and grey tail for sewing
Sew Van’s face using black yarn – use black fluff for circle
ARMS
Using White for left arm, Greybeard for right arm
Chain 1+1
Rnd 1: sc 4 (4)
R2: [sc, inc] repeat around (6)
R3: [sc, dec] repeat around (4)
Leave tail for sewing
LEGS
Using White for left leg, Greybeard for right leg
Chain 1+1
Rnd 1: sc 4 (4)
R2: [sc, inc] repeat around (6)
Leave tail for sewing
413 notes
·
View notes
Text

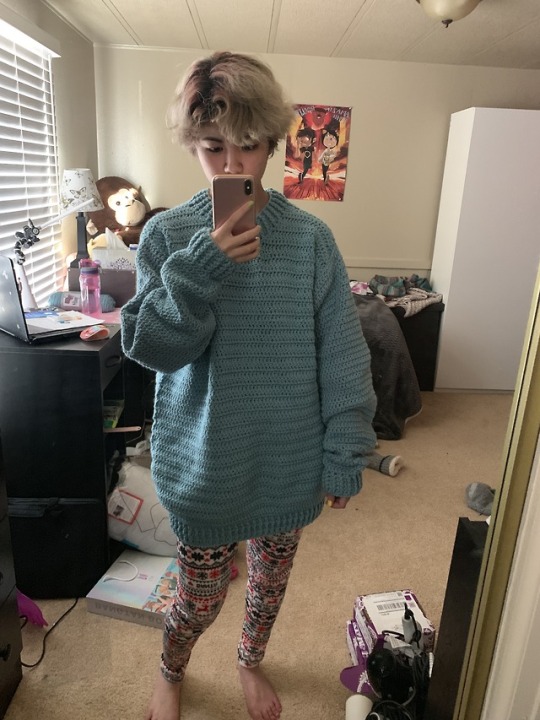
The crop top was only the beginning of my terrifying journey into clothes making!
@paigeecrochetskpop is the person who did the tutorial for this sweater
I learned a lot more about crocheting clothes and I can’t wait to do even more (ღ˘⌣˘ღ)
77 notes
·
View notes
Photo


PAJAMAS COOKY CROCHET PATTERN
I Love This Yarn in Pink, White, Yellow, Orchid, Black
E – 3.5 mm hook
BODY
Using “Pink”
Rnd 1: 6 sc in magic circle (6)
R2: inc around (12)
R3: [sc 3, inc] repeat around (15)
R4: sc around
Switch to “Yellow”
5-6: sc around (15)
Cut off, repeat for left leg
R7: sc 8, on right leg sc 15, on left leg sc 7 (30)
R8-12: sc around (30)
R13: [sc 4, dec] repeat around (25)
R14: sc around (25)
R15: [sc 3, dec] repeat around (20)
Leave tail for sewing
SLIPPERS
Using “Orchid”
Chain 1+1
Row 1: inc (2)
R2: inc 2 (4)
R3-8: sc 4 (4)
R9: sc on side of row 6, sc 4 along side rows, inc, sc in chain 1, inc, sc 5, sl st in first st to end round (19)
Leave tail for sewing
Using “White”
Chain 22, leave tail for sewing
Brush out to make fluffy then sew to the edges of slipper
HEAD
Using “Pink”
Rnd 1: 6 sc in magic circle (6)
R2: inc around (12)
R3: [sc, inc] repeat around (18)
R4: [sc 2, inc] repeat around (24)
R5: [sc 3, inc] repeat around (30)
R6: [sc 4, inc] repeat around (36)
R7: [sc 5, inc] repeat around (42)
R8: [sc 6, inc] repeat around (48)
R9-16: sc around (48)
R17: [sc 6, dec] repeat around (42)
R18: [sc 5, dec] repeat around (36)
R19: [sc 4, dec] repeat around (30)
R20: [sc 3, dec] repeat around (24)
R21: [sc 2, dec] repeat around (18)
R22: [sc, dec] repeat around (12)
R23: dec around (6)
Cut off, sew remaining hole closed (optional)
EARS
Using “Pink”
Rnd 1: 6 sc in magic circle (6)
R2: inc around (12)
R3: [sc, inc] repeat around (18)
R4-8: sc around (18)
R9: [sc 4, dec] repeat around (15)
R10: sc around (15)
R11: [sc 3, dec] repeat around (12)
R12: sc around (12)
Leave tail for sewing
Repeat for other ear, don’t fold yet (headband comes first)
EAR PIECE
Using “White”
Chain 3+1
Row 1: inc, sc, inc (5)
R2-5: sc 5 (5)
R6: dec, sc 3 (4)
R7: sc 4 (4)
R8: sc 2, dec (3)
Leave tail for sewing
HEADBAND
Using “Yellow”
Chain 6+1
Row 1: sc 6 (6)
R2-40: sc 6 BLO (6)
Fasten off, leave tail for sewing
Put headband around the head and sew in place
Fold left ear down over headband and sew in place
Sew Cooky’s face with black yarn
Make face mask out of white felt
ARMS
Using “White”
Rnd 1: 6 sc in magic circle (6)
R2: inc around (12)
R3: sc around (12)
Switch to “Yellow”
R4-9: sc around (12)
Leave tail for sewing
Repeat for other arm
Sew body to head and sew hole between legs
Sew arms to body
COLLAR
Using “Yellow”
Leave beginning tail for sewing
Chain 23 + 3 (don’t count as dc)
Row 1: dc, hdc, sc 19, hdc, dc (23)
Fasten off, hide tail
Sew collar to the body around the neck
Continue using the tail to sew details of shirt
TAIL
Using “Pink”
Rnd 1: 6 sc in magic circle (6)
R2: sc around (6)
Leave tail for sewing
Brush out white yarn to make fluff
Use fluff to make cloud details on Cooky’s clothes
202 notes
·
View notes
Photo

GIANT CHIMMY CROCHET
Hook: E – 3.5 mm
Yarn:
“I Love This Yarn” in Yellow, Black, White, and Desert Glaze
Or any medium 4 yarn, you’ll need a yellow, black, white, and orange
Other materials:
Yarn needle and scissors
Pet slicker brush to make fluffy material from yarn and felting needle to attach OR,
Felt and hot glue
Abbreviations:
rnd = round
sc = single crochet
inc = increase
dec = decrease
BLO = back loop only
HEAD
Using white yarn
Rnd 1: 6 sc in magic circle (6)
R2: inc around (12)
R3: [sc, inc] repeat around (18)
R4: [sc 2, inc] repeat around (24)
R5: [sc 3, inc] repeat around (30)
R6: [sc 4, inc] repeat around (36)
R7: [sc 5, inc] repeat around (42)
R8: [sc 6, inc] repeat around (48)
R9: [sc 7, inc] repeat around (54)
R10: [sc 8, inc] repeat around (60)
R11: [sc 9, inc] repeat around (66)
R12: [sc 10, inc] repeat around (72)
R13: [sc 11, inc] repeat around (78)
R14-29: sc around (78)
R30: [sc 11, dec] repeat around (72)
R31: [sc 10, dec] repeat around (66)
R32: [sc 9, dec] repeat around (60)
R33: [sc 8, dec] repeat around (54)
R34: [sc 7, dec] repeat around (48)
R35: [sc 6, dec] repeat around (42)
R36: [sc 5, dec] repeat around (36)
R37: [sc 4, dec] repeat around (30)
R38: [sc 3, dec] repeat around (24)
R39: [sc 2, dec] repeat around (18)
R40: [sc, dec] repeat around (12)
R41: dec around (6)
Cut off
Sew remaining hole close (optional)
HOODIE
Using yellow yarn
Rnd 1: 6 sc in magic circle (6)
R2: inc around (12)
R3: [sc, inc] repeat around (18)
R4: [sc 2, inc] repeat around (24)
R5: [sc 3, inc] repeat around (30)
R6: [sc 4, inc] repeat around (36)
R7: [sc 5, inc] repeat around (42)
R8: [sc 6, inc] repeat around (48)
R9: [sc 7, inc] repeat around (54)
R10: [sc 8, inc] repeat around (60)
R11: [sc 9, inc] repeat around (66)
R12: [sc 10, inc] repeat around (72)
R13: [sc 11, inc] repeat around (78)
R14: [sc 12, inc] repeat around (84)
R15-29: sc around (84)
R30: [sc 12, dec] repeat around (78)
R31: [sc 11, dec] repeat around (72)
Put hoodie on head, then continue crocheting
R32: [sc 10, dec] repeat around (66)
R33: [sc 9, dec] repeat around (60)
R34: [sc 8, dec] repeat around (54)
R35: [sc 7, dec] repeat around (48)
Cut off, hide tail
CHEEKS
Using yellow yarn
Rnd 1: 6 sc in magic circle (6)
R2: inc around (12)
R3: [sc, inc] repeat around (18)
R4: [sc 2, inc] repeat around (24)
R5: [sc 3, inc] repeat around (30)
R6: [sc 5, inc] repeat around (35)
Cut off, leave long tail
Sew to the hoodie, stuff lightly
Make 2 of these
EARS
Using black yarn
Rnd 1: 6 sc in magic circle (6)
R2: inc around (12)
R3: [sc, inc] repeat around (18)
R4: [sc 2, inc] repeat around (24)
R5: [sc 5, inc] repeat around (28)
R6: sc around (28)
R7: [sc 6, inc] repeat around (32)
R8: [sc 7, inc] repeat around (36)
R9-23: sc around (36)
R24: [sc 7, dec] repeat around (32)
R25: sc around (32)
R26: [sc 6, dec] repeat around (28)
Cut off, leave long tail
Fold in half and flatten, sew to the hoodie
Make 2 ears
BODY
Using yellow yarn
Rnd 1: 6 sc in magic circle (6)
R2: inc around (12)
R3: [sc, inc] repeat around (18)
R4: [sc 2, inc] repeat around (24)
R5: [sc 3, inc] repeat around (30)
R6: sc around in BLO (30)
R7-13: sc around (30)
Cut off, repeat for left leg
R14: sc 15, on right leg sc 30, on left leg sc 15 (60)
R15-24: sc around (60)
R25: [sc 8, dec] repeat around (54)
R26: sc around (54)
R27: [sc 7, dec] repeat around (48)
R28: sc around (48)
R29: [sc 6, dec] repeat around (42)
Cut off, leave long tail
Stuff, sew to the head
ARMS
Using white yarn
Rnd 1: 6 sc in magic circle (6)
R2: inc around (12)
R3: [sc, inc] repeat around (18)
R4: [sc 5, inc] repeat around (21)
R5-7: sc around (21)
Change to yellow yarn
R8-16: sc around (21)
Cut off, leave long tail
Stuff decently lightly, sew to body
Make 2 arms
HOODIE STRINGS
Using orange yarn
Start with slip stitch
Chain 3, skip first chain, pull up loops through next 2 chains
*Carefully remove hook from first two loops
Pull yarn through loop on hook
Insert hook in second loop, pull yarn through
Insert hook in third loop, pull yarn through*
Repeat *…* until string is long enough
Pull yarn through all 3 loops, chain 1
Cut off, leave long tail
Hide the beginning tail
Sew string just under the head
Make 2 of these
790 notes
·
View notes
Photo

ARMY BOMB CROCHET PATTERN
Hook:
E – 3.5 mm
Yarn:
Size 4 medium, 100% acrylic
Black, white, light grey, and hot pink yarn
“I Love This Yarn” – Light Gray
“I Love This Yarn” – Black
“I Love This Yarn” – White
“I Love This Yarn” – Tropical Pink
Other materials:
Scissors, yarn needle, stuffing
Light grey felt - to make bts symbol (alternative option is sewing symbol with light grey yarn)
Felting needle - to attach felt (alternative option is hot glue or sewing)
Abbreviations:
Rnd = round
Sc = single crochet
Inc = increase
Dec = decrease
BLO = back loop only
ARMY BOMB
Using light grey
Rnd 1: 6 sc in magic circle (6)
R2: inc around (12)
R3: [sc, inc] repeat around (18)
Cut yarn, no tail needed
Using black
Attach yarn in behind loop (not the back loop, the loop that sits behind the V of the stitch)
Rnd 1: *working in behind loops* [sc 7, dec] repeat around (16)
R2-20: sc around (16)
R21: [sc 3, inc] repeat around (20)
R22: [sc 4, inc] repeat around (24)
R23: [sc 2, inc] repeat around (32)
**In next rnd, attach white yarn by completing the stitch before you want the color change with white instead of black. Do not cut the white or black yarn, you’ll use both for this rnd**
R24: [sc 4 black, sc 4 white] repeat around (32)
**Cut the black yarn now, you’ll use only white**
R25: [sc 7, inc] repeat around (36)
R26: [sc 5, inc] repeat around (42)
R27: [sc 6, inc] repeat around (48)
R28: [sc 11, inc] repeat around (52)
R29-35: sc around (52)
R36: [sc 11, dec] repeat around (48)
R37: [sc 6, dec] repeat around (42)
R38: [sc 5, dec] repeat around (36)
R39: [sc 7, dec] repeat around (32)
R40: sc around (32)
R41: [sc 2, dec] repeat around (24)
R42: [sc 4, dec] repeat around (20)
R43: [sc 3, dec] repeat around (16)
R44: dec around (8)
Cut yarn, leave tail then sew remaining hole closed
HAT
Using black
Rnd 1: 6 sc in magic circle (6)
R2: inc around (12)
R3: [sc, inc] repeat around (18)
R4: *working in BLO* sc around (18)
Cut yarn, leave long tail
Sew hat to the top of the army bomb, slightly down towards the right
LITTLE NUB
Using pink
Rnd 1: 4 sc in magic circle (4)
Cut yarn, leave long tail
Sew the nub to the center of the hat
TOP BUTTON
Using black
Rnd 1: 4 sc in magic circle (4)
Cut yarn, leave long tail
(make sure army bomb is facing front) Sew top button at rnds 16-18, a few rnds below our first increase rnd
BOTTOM BUTTON
Using black
Rnd 1: 6 sc in magic circle (6)
Cut yarn, leave long tail
Sew bottom button at rnds 13-15, a few rnds below top button
BTS SYMBOL
Cut 2 trapezoid shapes from light grey felt to make the BTS symbol. Attach the pieces using a felting needle at rnds 2-4.
Repeat this again for the closed door symbol on the back
209 notes
·
View notes
Photo
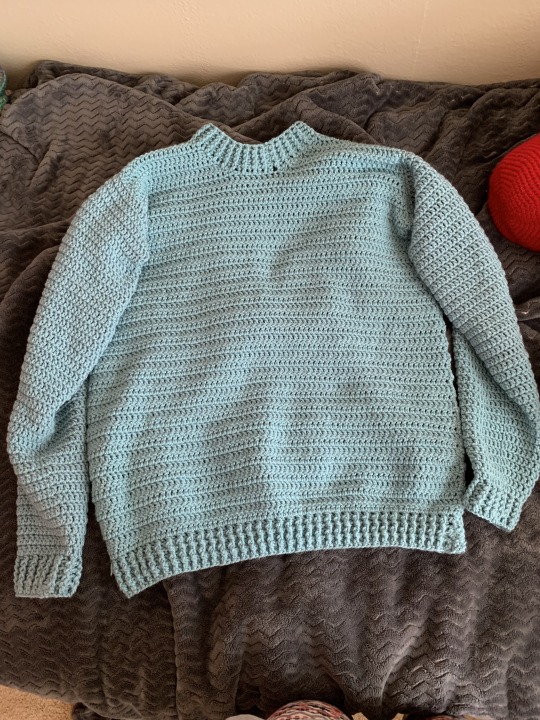
SWEATER PATTERN
I / 5.5 mm hook
“I Love This Yarn” – 4 medium
About 4-5 skeins
(p - ) = my personal sweater measurements (I’m 5′2′’ and my sweater fits me very long and is over-sized)
Abbreviations:
dc = double crochet
BP = back post
FP = front post
st = stitch
sts = stitches
dec = decrease
sl st = slip stitch
inc = increase
BODY
Row 1: dc in continuous chain until long enough to wrap from one hip to the other (with your preferred slack) (p – 75)
*[BP, FP] repeat to end of row* repeat *…* until ribbing is desired length (p – repeat 4 times)
*dc in each st across* repeat *…* until under the arm where you want the sleeve to start (p – repeat 36 times)
*dec, dc to last 2 sts, dec* repeat *…* until just under the collar bone, considering how much rib you want for the neck (p – repeat 8 times)
SHOULDER PIECE
Find middle 6-10 sts (based on how wide you want the neck) (p – 7 sts), place 2 stitch markers on either side, making sure it’s even on both sides (p – 26 sts each side)
*dec, dc to last 2 sts, dec* repeat *…* until the length reaches the top of your shoulder (p – repeat 6 times)
Cut off, leaving a tail for sewing. Join yarn on other side and repeat steps for other shoulder piece
Repeat entire pattern for second sweater piece, you don’t have to leave tails at the shoulders this time
NECK
Sew the 2 sweater pieces together at the shoulders using the tails you left
Join yarn in first of the 6-10 sts on the back side of the sweater
Rnd 1: dc 6-10 (p – dc 7), put 2 dc along the side of each row (p – dc 24), dc 6-10 (p – dc 7), put 2 dc along the side of each row (p – dc 24) (p – total st count 62)
*[BP, FP] repeat to end of round* repeat *…* until desired length of ribbing (p – repeat 4 times)
SLEEVES
Calculate your total sts for the sleeve:
”total” refers to count from BOTH sweater pieces
(total dec rows from body + total rows from shoulder pieces) x 2 = total sts for your sleeve
(16 + 12) x 2 = 56
Chain long enough to wrap decently tightly around wrist (p – 30 chains), sl st in first chain
Rnd 1: dc in each st around
*[BP, FP] repeat to end of round* repeat *…* until desired length of ribbing (p – repeat 4 times)
*Rnd 1: dc in each st around
Rnd 2: (current st count ÷ 2 – 1 = x) [dc x, inc] repeat 2 times*
Repeat *…* until you have your total st count you calculated earlier (p – repeat 13 times)
*dc in each st around* repeat *…* until sleeve is desired length (p – repeat 16 times)
Cut off, leave very long tail for sewing
Pin the first decrease row from both sweater pieces together. Sew the sleeve to the hole that is now formed, 2 dc along the side of each row. Continue sewing down the sweater to connect the front and back pieces
Repeat all steps for your second sleeve
1K notes
·
View notes
Photo

KAKAO FRIENDS – NEO
HOOK
E/4 – 3.50mm
YARN
“I Love This Yarn” – Medium Blue
“I Love This Yarn” – Pink
“I Love This Yarn” – White
“I Love This Yarn” – Black
“I Love This Yarn” – Light Gray
ABBREVIATIONS
Rnd = round
Sc = single crochet
Inc = increase
Dec = decrease
Ch = chain
Cc = change color
St = stitch
Sl st = slip stitch
PATTERN
*it is recommended that you join rounds with a sl st and ch 1 for this pattern
LEGS/BODY
“Pink”
Rnd 1: 6 sc in magic circle, cc “White” (6)
Rnd 2: inc around (12)
Rnd 3: [sc, inc] repeat around (18)
Rnd 4: sc around (18)
Rnd 5: sc 4, dec 5, sc 4 (13)
Rnd 6: sc 5, dec 2, sc 4, cc “Medium Blue” (11)
Rnd 7-10: sc around (11)
Cut off, repeat for right leg
Rnd 11: sc 4, ch 1, sc in the 3rd st from the sl st on the left leg, sc 10, sc in the ch 1, sc 7 on right leg (24)
Rnd 12: sc 14, cc “White”, sc 5, cc “Medium Blue”, sc 5 (24)
*cc switching between “White” and “Medium Blue” for the rest of the body
Rnd 13: sc 13, cc, sc 7, cc, sc 4 (24)
Rnd 14-16: sc 12, cc, sc 9, cc, sc 3 (24)
Rnd 17: sc 13, cc, sc 7, cc, sc 4 (24)
Rnd 18: sc 14, cc, sc 5, cc, sc 5 (24)
Rnd 19: [sc 2, dec] repeat around (18)
Rnd 20: [sc, dec] repeat around (12)
Leave tail for sewing
HEAD
“Medium Blue”
Ch 4+1
Rnd 1: sc 3, inc, turn, sc 3 on other side of the chains (8)
Rnd 2: inc 2, sc, inc 3, sc, inc (14)
Rnd 3: [sc, inc] x2, sc, [sc, inc] x3, sc, [sc, inc] (20)
Rnd 4: [sc 2, inc] x2, sc [sc 2, inc] x3, sc, [sc 2, inc] (26)
Rnd 5: [sc 3, inc] x2, sc, [sc 3, inc] x3, sc, [sc 3, inc] (32)
Rnd 6: [sc 4, inc] x2, sc, [sc 4, inc] x3, sc, [sc 4, inc] (38)
Rnd 7: sc around (38)
Rnd 8: [sc 5, inc] x2, sc, [sc 5, inc] x3, sc, [sc 5, inc] (44)
Rnd 9-15: sc around (44)
Rnd 16: [sc 5, dec] x2, sc, [sc 5, dec] x3, sc, [sc 5, dec] (38)
Rnd 17: [sc 4, dec] x2, sc, [sc 4, dec] x3, sc, [sc 4, dec] (32)
Rnd 18: [sc 3, dec] x2, sc, [sc 3, dec] x3, sc, [sc 3, dec] (26)
Rnd 19: [sc 2, dec] x2, sc, [sc 2, dec] x3, sc, [sc2, dec] (20)
Rnd 20: [sc, dec] x2, sc, [sc, dec] x3, sc, [sc, dec] (14)
Rnd 21: dec around (7)
Cut off
Sew the body to the head
ARMS
“White”
Rnd 1: 6 sc in magic circle (6)
Rnd 2: sc around, cc “Medium Blue” (6)
Rnd 3-9: sc around (6)
Leave tail for sewing, repeat for second arm
Sew the arms to the body
HAIR
“Black”
Rnd 1: 6 sc in magic circle (6)
Rnd 2: inc around (12)
Rnd 3: [sc, inc] repeat around (18)
Rnd 4: [sc 2, inc] repeat around (24)
Rnd 5: [sc 3, inc] repeat around (30)
Rnd 6: [sc 4, inc] repeat around (36)
Rnd 7: [sc 5, inc] repeat around (42)
Rnd 8: [sc 6, inc] repeat around (48)
Rnd 9-12: sc around (48)
Row 13: sc 36, turn (36)
Row 14-17: sc 36 (36)
Leave tail for sewing
Sew hair lines using “Light Gray”
Sew the hair to the head
SNOUT
“White”
Rnd 1: 6 sc in magic circle (6)
Leave tail for sewing, repeat for second half of snout
Sew the snout pieces to the head
EARS
“Medium Blue”
Ch 2+1
Rnd 1: sc, inc, turn, sc in other side of chain (4)
Rnd 2: inc, sc, inc, sc (6)
Rnd 3: inc, sc 2, inc, sc 2 (8)
Leave tail for sewing
Sew the inside of the ear using “Pink” or make with pink felt, repeat for second ear
Sew the ears to the hair
Make the nose and eyes using black felt
66 notes
·
View notes
Photo

KAKAO FRIENDS: RYAN
I Love This Yarn!
“Yellow”
“White”
“Black”
LEGS/BODY
Rnd 1: 6 sc in magic circle (6)
Rnd 2: inc around (12)
Rnd 3: [sc, inc] repeat around (18)
Rnd 4-10: sc around (18)
Cut off, repeat for another leg
Rnd 11: sc 9, on right leg sc 18, on left leg sc 9 (36)
Rnd 12: sc 6, *white* sc 6, *yellow* sc 24 (36)
Rnd 13: sc 5, *white* sc 8, *yellow* sc 23 (36)
Rnd 14: sc 4, *white* sc 10, *yellow* sc 22 (36)
Rnd 15-17: sc 3, *white* sc 12, *yellow* sc 21 (36)
Rnd 18: sc 3, *white* sc 3, *yellow* sc, *white* sc 4, *yellow* sc, *white* sc 3, *yellow* sc 21 (36)
Rnd 19: sc 4, *white* sc, *yellow* sc 3, *white* sc 2, *yellow* sc 3, *white* sc, *yellow* sc 22 (36)
Rnd 20: sc around (36)
Rnd 21: [sc 4, dec] repeat around (30)
Rnd 22: [sc 3, dec] repeat around (24)
Leave tail for sewing
HEAD
Rnd 1: 6 sc in magic circle (6)
Rnd 2: inc around (12)
Rnd 3: [sc, inc] repeat around (18)
Rnd 4: [sc 2, inc] repeat around (24)
Rnd 5: [sc 3, inc] repeat around (30)
Rnd 6: [sc 4, inc] repeat around (36)
Rnd 7: sc around (36)
Rnd 8: [sc 5, inc] repeat around (42)
Rnd 9: [sc 6, inc] repeat around (48)
Rnd 10: [sc 7, inc] repeat around (54)
Rnd 11-19: sc around (54)
Rnd 20: [sc 7, dec] repeat around (48)
Rnd 21: [sc 6, dec] repeat around (42)
Rnd 22: [sc 5, dec] repeat around (36)
Rnd 23: sc around (36)
Rnd 24: [sc 4, dec] repeat around (30)
Rnd 25: [sc 3, dec] repeat around (24)
Rnd 26: [sc 2, dec] repeat around (18)
Rnd 27: [sc, dec] repeat around (12)
Rnd 28: dec around (6)
Cut off
ARMS
Rnd 1: 6 sc in magic circle (6)
Rnd 2: inc around (12)
Rnd 3: [sc 2, inc] repeat around (16)
Rnd 4-13: sc around (16)
Leave tail for sewing
EARS
Chain 2+1
Rnd 1: sc, sc 3 in same st, turn, inc (6)
Rnd 2: inc, sc 2, inc, sc 2 (8)
Rnd 3: inc, sc 3, inc, sc 3 (10)
Leave tail for sewing
TAIL
Rnd 1: 6 sc in magic circle (6)
Rnd 2: sc around (6)
Leave tail for sewing
SNOUT
Rnd 1: 6 sc in magic circle (6)
Rnd 2: [sc 2, inc] repeat around (8)
Leave tail for sewing
NOSE
Rnd 1: 4 sc in magic circle (4)
Leave tail for sewing
Embroidery face details
42 notes
·
View notes
Photo

KAKAO FRIENDS – APEACH PATTERN
Hook – E/4 – 3.50 mm
YARN
I Love This Yarn! – “Pink”
I Love This Yarn! – “White”
I Love This Yarn! – “Tropical Pink”
ABBREVIASIONS
Ch: chain
Sc: single crochet
Inc: increase
Dec: decrease
HEAD - Pink
Ch 4+1
Rnd 1: sc 3, inc, turn, sc 3 (8)
Rnd 2: inc around (16)
Rnd 3: [sc, inc] repeat around (24)
Rnd 4: [sc 2, inc] repeat around (32)
Rnd 5: [sc 3, inc] repeat around (40)
Rnd 6: [sc 4, inc] repeat around (48)
Rnd 7: sc around (48)
Rnd 8: [sc 5, inc] repeat around (56)
Rnd 9-13: sc around (56)
Rnd 14: [sc 5, dec] repeat around (48)
Rnd 15-16: sc around (48)
Rnd 17: [sc 4, dec] repeat around (40)
Rnd 18: sc around (40)
Rnd 19: [sc 3, dec] repeat around (32)
Rnd 20: sc around (32)
Rnd 21: [sc 2, dec] repeat around (24)
Rnd 22: sc around (24)
Rnd 23: [sc, dec] repeat around (16)
Rnd 24: dec around (8)
Rnd 25: dec around (4)
Sew remaining hole close
BODY - White
Rnd 1: 6 sc in magic circle (6)
Rnd 2: [sc, inc] repeat around (9)
Rnd 3-5: sc around (9)
Cut off, repeat for left leg
Rnd 6: sc 4, ch 2, on right leg sc 9, sc 2 along chains, on left leg sc 5 (22)
Rnd 7-12: sc around (22)
Rnd 13: [sc 3, dec] repeat x4, sc 2 (18)
Leave tail for sewing
ARMS - White
Rnd 1: 6 sc in magic circle (6)
Rnd 2-6: sc around (6)
Leave tail for sewing
Sew the back details in Tropical Pink, and make the face in felt
50 notes
·
View notes