
Don't wanna be here? Send us removal request.
Statistics
We looked inside some of the posts by rainhorn6-blog and here's what we found interesting.
Average Info
Notes Per Post
0
Likes Per Post
0
Reblog Per Post
0
Reply Per Post
0
Time Between Posts
3 days
Number of Posts By Type
Text
17
Last Seen Tumblr Blogs


Fun Fact
Tumblr has a low social media market share in South America.
Text
Ford’s Filling Station Butterscotch Pudding
Today’s 5 star secret recipe is for a yummy dessert served at Ford’s Filling Station in Los Angeles. Chef Ben Ford created a deliciously rich butterscotch pudding topped with a light, slightly tangy mascarpone cream and toasted candied pecans.
To get that incredible butterscotch flavor, chef Ben Ford caramelizes brown sugar, which he then combines with heavy cream, milk, eggs and cornstarch to form a velvety custard base. He then stirs in a little dark rum just to gild the lily.
Enjoy!
=-=-=-=-=-=-=-=-=-=-=-=-=-= Bone Broth Secret Recipes Did you know bone broth is an amazing superfood that improves digestion, reduces inflammation, boots your immune system and more? Discover over 80 tantalizing bone broth recipes absolutely loaded with nutrients: Go Here =-=-=-=-=-=-=-=-=-=-=-=-=-=
=-=-=-=-=-=-=-=-=-=-=-=-=-= New 5 Star Secret Recipe =-=-=-=-=-=-=-=-=-=-=-=-=-=
Ford’s Filling Station Butterscotch Pudding
Mascarpone cream: ½ cup heavy cream ¼ cup fine granulated sugar 1 teaspoon vanilla extract 8 ounces mascarpone cheese
In the bowl of a stand mixer, or in a large bowl using a hand mix, whip the heavy cream with the sugar and vanilla to soft peaks. In a separate bowl, whip the mascarpone until loosened and fluffy. Carefully fold in the whipped cream. Set aside.
Butterscotsh pudding and assembly: 2 ¼ cups cream 1 cup plus 2 tablespoons milk 1 egg 3 egg yolks 6 tablespoons cornstarch 1 cup plus 2 tablespoons brown sugar 1 1/8 teaspoons salt ¼ cup water 3 ¾ tablespoons butter 1 ½ ounces dark rum (not spiced) Prepared mascarpone cream, recipe above ¼ cup (about 1 ounce) crushed candied pecans
In a bowl, combine the cream and milk. Set aside.
In a separate bowl, whisk together the egg, yolks and cornstarch until smooth. Set aside.
In a large pot, combine the brown sugar and salt, along with the water. Heat mixture on high heat until sugar has caramelized, 5 to 7 minutes, gently stirring with a spatula.
When the sugar mixture is caramelized, whisk in the milk and cream mixture until smooth. Bring to a boil. Meanwhile, place the butter in a strainer set over a metal bowl which is placed in a larger bowl of ice water.
Once boiling, stir a little of the hot cream mixture in with the eggs and cornstarch to temper, then add the egg/cornstarch mixture to the pot. Continue whisking in the pot until the pudding has thickened.
Remove from heat and immediately strain into the metal bowl set over a bowl of ice water to stop the cooking. Stir in the rum, then continue gently stirring the pudding until it has cooled.
Remove the metal bowl from the bowl of ice water, cover with plastic wrap and chill.
To serve, spoon the pudding into serving dishes or bowls, top with a dollop of mascarpone cream and a sprinkling of candied pecans.
Makes 4 Cups
Source: LA Times
Until Next Time… Be Well!
Kind Regards,
Ron
PS- Join us on Facebook and get more recipes and freebies: Go Here
PPS- Forward this email to a friend or tell them to sign up here.
=-=-=-=-=-=-=-=-=-=-=-=-=-=
Source: https://www.recipesecrets.net/blog/recipes/fords-filling-station-butterscotch-pudding/
0 notes
Text
Off Topic: Thermoworks Thermapen 2014 Giveaway!
Sorry, I dropped the ball this week and only just realized a couple hours ago that Thermoworks offered to give away a Thermapen if I ran a giveaway contest that ended this Saturday (tomorrow)! I think this will be the third year in a row that I'll be able to give away the best thermometer I've ever used for cooking. This post will be short so I can get it up quickly, but read on to see how to enter the drawing which will take place on the evening of December 13, 2014. I think I've written more about the Thermapen than any other single thing on my site. Partly that's because Thermoworks has been very generous in letting me give them away each year (in 2012 and in 2013 when I managed to get Emma to pose adorably with my red one), but also because it's a really, really good thermometer (back in 2005 I tested a variety of different thermometers and the older Thermapen came out on top). It takes accurate readings in less than 4 seconds, is splash-proof, and has more than once saved an expensive cut of meat.
Yes, the Thermapen is expensive at nearly $100 (currently they are selling for $96), but if you cook a turkey, a beef tenderloin, filet mignon, rack of pork, or any other expensive cut having a fast and accurate thermometer is well worth the investment. I trust a Thermapen so much that I will often travel with one just in case I'm asked to cook something.
I should mention that for the last couple years, Cooking For Engineers has been an affiliate of Thermoworks - we get a small percentage of each sale that comes from a link from Cooking For Engineers. This money is used to help pay for some of the serving costs and maintenance of the site. I don't recommend Thermapens because of the affiliate program though. If there was a better thermometer that I've used, I'd be recommending that one instead. I recommend (and so do many other trusted food experts like American's Test Kitchen/Cook's Illustrated, Alton Brown, Rose Levy Beranbaum, Thomas Keller, and others) the Thermapen because it's currently the best cooking thermometer (and one of the best tools to have) out there. Thermapens come in a variety of colors. If you win, you can pick a red one like the one Emma is holding in the picture above or any of the other standard colors listed on Thermowork's website. (That picture of Emma is from last year... I'm going to try my best to get an picture of her with a Thermapen taken tomorrow and posted to this article before the contest ends.)
Update Dec. 13, 2014 at 2:20pm Central: My home internet is down so I'm having to connect via tethering through 3G cell service which is spotty. I did manage to take a few pictures of Emma this morning with my black Thermapen, but I had trouble picking one to post... so here are a few.
Here are the giveaway instructions:
You need to be in the United States or Canada to qualify for this giveaway (Thermowork's shipping requirements).
Join Cooking For Engineers (through the forums) and post a comment telling me you really want a chance to win the Thermapen. I need you to join so, if you win, I'll have an email address to contact you with to get your mailing info so Thermoworks can send you the DOT. I won't have contact information for guest/anonymous posts so I can't include your entry unless you are logged in. (If you are an existing member, be sure to double check your email address on file to make sure it's accurate.)
At some time after 10pm Central Standard Time on December 13, 2014, I'll post a comment signifying the end of the contest. All entries (where I have contact info) above my comment will be eligible to win.
I'll number the participants and generate a random number which will determine the winner and post the winner as well as contact them via email. If there is no response within 24 hours of my email, then I'll pick another number and winner (and so on).
?> Source: http://www.cookingforengineers.com/article/338/Thermoworks-Thermapen-2014-Giveaway

0 notes
Text
Gluten-Free Funfetti Blondies
If you like buttery, chewy and dense blondies that are speckled full of sprinkles and also happened to be gluten-free with a dairy-free paleo option, then you are going to love these Funfetti Gluten Free Blondies! They’re so ridiculously tasty, and come to you today to celebrate Lexi’s Clean Kitchen turning 6 years old this month!
Funfetti Gluten Free Blondie Bar Recipe
Lexi’s Clean Kitchen just turned SIX. Where has the time gone? Six years of recipes, cleaner living, healing journeys together, and so much more. Remember when I quit my teaching job? Or when I shared this epic birthday cake to celebrate 5 years? To say I’m grateful for our amazing community is an understatement. So let’s celebrate! These Funfetti Blondies are the perfect treat to celebrate any occasion, but especially LCK’s 6th birthday! They’re pretty easy to make and are SO, SO, SO GOOD!
Here’s what you need to make them:
Butter or coconut oil
Almond butter
Maple sugar
Egg
Vanilla extract
Almond flour
Coconut flour
Baking powder
Salt
Sprinkles (see below for the brands we recommend)
A note about sprinkles
We stay away from artificially dyed sprinkles at all cost. Lucky for us there are so many good brands out there for naturally dyed sprinkles derived from fruits, vegetables and herbs. And for a true funfetti look try to avoid sanding sugars or nonpereils, the best kind of sprinkles here are the classics.
Here is a list of some of the ones we’ve tried and liked:
India Tree
ColorKitchen Foods
Let’s Do Organic: This one will add some color to the blondies but are similar to nonpareils. We’ve added this to the list because this brand can be purchased at a few natural grocery stores and Whole Foods and might be easier to find, though these would be our last choice.
If you like this birthday inspired recipe, check out these others:
Thank YOU for being a part of the LCK family. We couldn’t do all that we do here without each and every one of you!
Funfetti Gluten-Free Blondies
Directions
Preheat the oven to 350ºF and prepare an 8" baking dish by greasing it and lining it with a parchment paper sling.
Add the butter and the almond butter to a small pan. Melt together over low heat and whisk to combine, and set aside to cool slightly.
To a large bowl add maple sugar, egg, vanilla extract. Whisk until combined. Slowly pour in melted butter, a little bit at a time while whisking until it is all combined.
Add in the almond flour, coconut flour, baking powder and salt and combine until it comes all together.
Fold in the sprinkles and place better into the prepared pan. The batter will be thick. Using an spatula press the batter down evenly into the pan and smooth over the top. Add more sprinkles to the top of the batter.
Bake for 18-20 minutes, or until the blondies have puffed up throughout.
Remove from oven and let cool slightly. Remove the blondies from the pan and let cool on a rack.
Cut into 9 portions and enjoy.
Store in the refrigerator or freezer.
Loading nutrition data...
There may be affiliate links in this post! By clicking on them, or purchasing recommended items I may receive a small compensation, at no cost to you! However, I only recommend products I absolutely love and use in my own home! Thank you for supporting Lexi's Clean Kitchen when you shop! See my privacy policy for more information about this, the information we save, and more!
Source: https://lexiscleankitchen.com/gluten-free-funfetti-blondies/
0 notes
Text
Greek Dip with Hummus and Tzatziki
<![CDATA[ .tasty-recipes-quick-links text-align:center; .tasty-recipes-quick-links a padding: 0.5rem; ]]>
This Greek dip has so much flavor, with a layer of smooth, savory hummus, a layer of cool, herby tzatziki, and toppings like feta cheese, chopped fresh cucumbers, sweet tomatoes, and briney capers and olives.

This post is sponsored by Stonyfield. All opinions are my own.
If you’ve had hummus—and I’m guessing you have—you know that it’s a chickpea purée with savory, slightly nutty flavor. Here I’ve paired it with Mediterranean staples like yogurt (tzatziki), feta, and fresh herbs to make one fragrant and flavorful Greek dip.
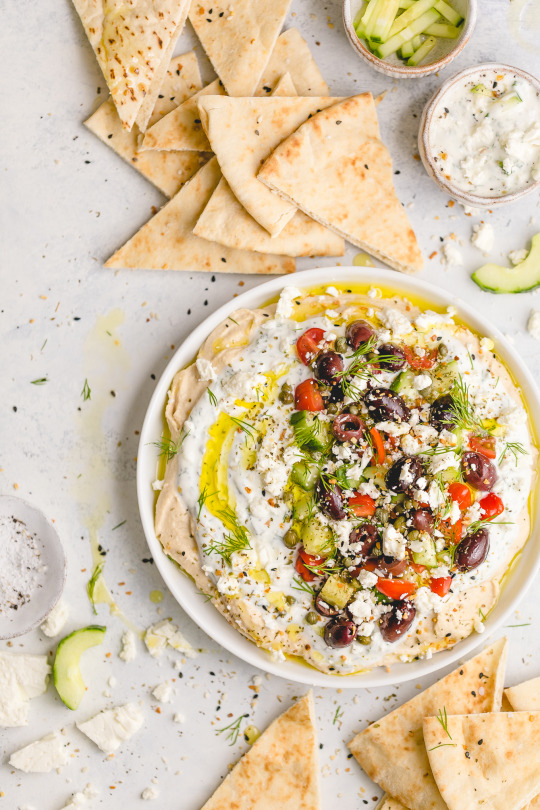
The rich hummus layer is balanced and brightened by the zippy yogurt tzatziki layer. If you’re not familiar with it, tzatziki is a mix of yogurt, grated cucumber, fresh mint, dill (optional), and garlic. It’s fragrant and refreshing and happens to be an excellent match for the toppings I use in this Greek dip: creamy crumbled feta cheese, chopped cucumber and sweet grape tomatoes for freshness, and briney capers and olives.
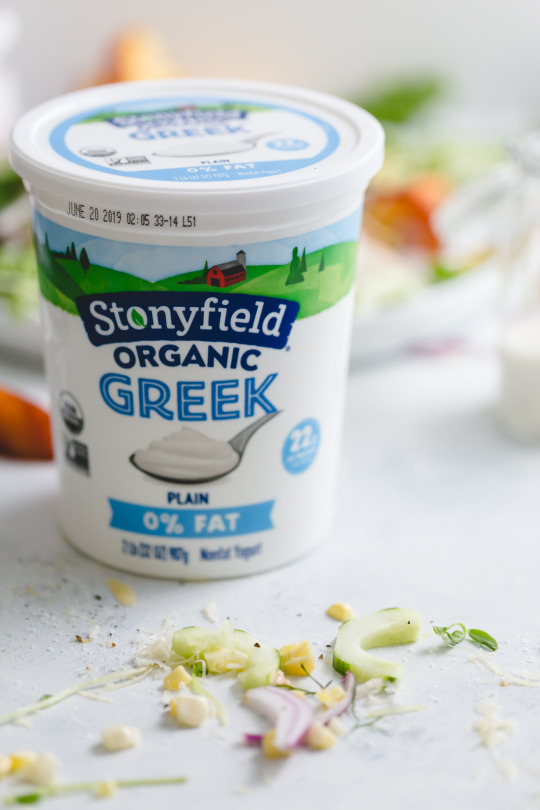
What Kind of Yogurt To Use for Tzatziki
Since the yogurt is the base of tzatziki, it matters which kind you use. You want a thick and creamy Greek yogurt with a smooth, mild tang. That signature tang is part of what makes Greek yogurt taste brighter and fresher than other kinds of yogurt (it’s also much thicker than traditional yogurt since it’s strained), and I really enjoy it, but sometimes nonfat Greek yogurt, specifically, is a little too tangy—so tangy that it flat-out overpowers other flavors and yogurt mix-ins. But not Stonyfield nonfat Greek yogurt. Stonyfield’s nonfat Greek yogurt is creamy and perfectly balanced, rich and refreshing without any sort of dominating tartness. When I first tried it, I went back to the fridge to check the container, thinking I had gotten whole milk yogurt by mistake—that’s how rich and creamy it is.

“Organic” Makes a Difference
Last month I took a three-day trip up to Vermont with Stonyfield—the brand whose yogurt I bought for the first time thirteen years ago, just after I had lost 135 pounds and started caring about what kinds of food I was putting into my body. And before I left for the trip, my best friend asked me if I was planning to tell the Stonyfield team that I was their number one consumer in 2006 and 2007 (and beyond, but we lived together in those years so she saw firsthand how obsessed I was with their yogurt). I laughed at the time she asked, but then yes of course I told them.

Truth is, there are three things I’ve always liked about Stonyfield’s yogurt: the taste, the simplicity of ingredients, and the fact that all of their yogurt is organic. Those first two are easy and understandable, but the third—the organic piece—is something that I didn’t know as much about as I thought I did, until I got the chance to explore the organic dairy farms that produce the milk Stonyfield uses to make their yogurts. Like a lot of us I’m sure, my concept of “organic” was more of a list of things that organic foods DON’T have.
NO toxic persistent pesticides NO synthetic fertilizers NO GMOs NO artificial growth hormones or antibiotics in the animals NO artificial colors NO artificial flavors NO artificial preservatives
There’s a lot more to it. During my time in Vermont, I visited two dairy farms: Wonder Why Farm and Molly Brook Farm—both of which are certified organic. You might have heard by now that when it comes to food, the word “Natural” has no regulated definition. “Organic,” on the other hand, is defined and regulated by the USDA—and that certification means a lot. From the land on which an organic product is grown to the producers growing it, from the post-harvest facilities preparing the product to the processing and handling facilities transforming the product, each step must be certified to federal organic standards. Once an operation is certified, organic producers and handlers undergo annual reviews and inspections.

Organic Milk from Organic Cows All certified organic dairy products come from cows that are pasture-raised. The organic milk in all of Stonyfield’s products comes from family farms with an average herd size of 75-90 cows.

The organic standard requires that all dairy cows get 30% of their Dry Matter Intake from pasture and actively graze at least 120 days a year. The farmers feed their livestock only organic feed, hay, or pasture and maintain conditions to accommodate the health and natural behavior of the animal. The animal welfare is the piece of the organic label that mattered most to me. I loved that visiting these farms allowed me to see these cows being treated well and hearing from the farmers that, as long as they come in to be milked regularly, the cows are free to pasture as much they like. (Bonus: when cows are actively grazing on pasture, their milk contains 62% higher levels of omega-3 fatty acids than conventional milk.)

Organic Farming and the Environment
Organic agriculture is based on practices that not only protect environmental health, but also strive to improve it. Organic farmers enrich soil and control pests with crop rotation, cover crops, beneficial insects, and compost. By prohibiting the use of petroleum-based fertilizers and absorbing carbon dioxide from the air, organic agriculture helps to reduce our carbon footprint and combat climate change.


My Takeaway
Stonyfield has integrity, a kind of integrity you hear about all the time from businesses and brands, but don’t often see put into practice. It’s clearer to me now than ever that they really do think about the impact of everything they do—from the care they provide to the farmer families and their cows to the ingredients in their yogurt, the packaging it’s in, and how it gets to our grocery stores. I can’t applaud that enough. They make me feel good about the products I’m choosing—especially the yogurt I’m giving to James (he’s a major fan of the YoBaby Veggie purple carrot flavor)—and I like knowing that when I buy their products, I’m in some incredibly small way supporting a greater wellness for all of us.

Print
<![CDATA[ .tasty-recipes-image float: right; .tasty-recipes-yield-scale border: 1px solid #979599; border-radius: 2px; color: #979599; margin-left: 3px; padding: 0 4px; font-size: 0.7rem; .tasty-recipes-scale-container float: right; padding: 0 0 1rem; .tasty-recipes-scale-container .tasty-recipes-scale-label text-transform: uppercase; font-size: 0.6rem; color: #979599; .tasty-recipes-scale-container button background: transparent; border: 1px solid #979599; border-radius: 2px; color: #979599; margin-left: 5px; padding: 2px 4px; .tasty-recipes-scale-container button.tasty-recipes-scale-button-active color: #353547; border-color: #353547; .tasty-recipes-scale-container button:focus outline: none; .tasty-recipes-print-button background-color: #666677; display: inline-block; padding-left: 1em; padding-right: 1em; padding-top: 0.5em; padding-bottom: 0.5em; text-decoration: none; a.tasty-recipes-print-button color: #fff; a.tasty-recipes-print-button:hover color: #fff; .tasty-recipes-equipment display: flex; flex-wrap: wrap; justify-content: space-evenly; .tasty-recipes-equipment > h3 flex: 0 0 100%; .tasty-recipes-equipment .tasty-link-card flex: 0 0 50%; padding: 1.5rem 1rem; text-align: center; @media screen and (min-width: 500px) .tasty-recipes-equipment .tasty-link-card flex: 0 0 33%; .tasty-recipes-equipment .tasty-link-card p font-weight: bold; font-size: 1em; margin-bottom: 0; .tasty-recipes-equipment .tasty-link-card p a color: initial; .tasty-recipes-equipment .tasty-link-card span font-size: 0.9em; .tasty-recipes-rating.tasty-recipes-clip-10 -webkit-clip-path: polygon(0 0, 10% 0%, 10% 100%, 0% 100%); clip-path: polygon(0 0, 10% 0%, 10% 100%, 0% 100%); .tasty-recipes-rating.tasty-recipes-clip-20 -webkit-clip-path: polygon(0 0, 20% 0%, 20% 100%, 0% 100%); clip-path: polygon(0 0, 20% 0%, 20% 100%, 0% 100%); .tasty-recipes-rating.tasty-recipes-clip-30 -webkit-clip-path: polygon(0 0, 30% 0%, 30% 100%, 0% 100%); clip-path: polygon(0 0, 30% 0%, 30% 100%, 0% 100%); .tasty-recipes-rating.tasty-recipes-clip-40 -webkit-clip-path: polygon(0 0, 40% 0%, 40% 100%, 0% 100%); clip-path: polygon(0 0, 40% 0%, 40% 100%, 0% 100%); .tasty-recipes-rating.tasty-recipes-clip-50 -webkit-clip-path: polygon(0 0, 50% 0%, 50% 100%, 0% 100%); clip-path: polygon(0 0, 50% 0%, 50% 100%, 0% 100%); .tasty-recipes-rating.tasty-recipes-clip-60 -webkit-clip-path: polygon(0 0, 60% 0%, 60% 100%, 0% 100%); clip-path: polygon(0 0, 60% 0%, 60% 100%, 0% 100%); .tasty-recipes-rating.tasty-recipes-clip-70 -webkit-clip-path: polygon(0 0, 70% 0%, 70% 100%, 0% 100%); clip-path: polygon(0 0, 70% 0%, 70% 100%, 0% 100%); .tasty-recipes-rating.tasty-recipes-clip-80 -webkit-clip-path: polygon(0 0, 80% 0%, 80% 100%, 0% 100%); clip-path: polygon(0 0, 80% 0%, 80% 100%, 0% 100%); .tasty-recipes-rating.tasty-recipes-clip-90 -webkit-clip-path: polygon(0 0, 90% 0%, 90% 100%, 0% 100%); clip-path: polygon(0 0, 90% 0%, 90% 100%, 0% 100%); .tasty-recipes-nutrition ul list-style-type: none; margin: 0; padding: 0; .tasty-recipes-nutrition ul:after display: block; content: ' '; clear: both; .tasty-recipes-nutrition li float: left; margin-right: 1em; .tasty-recipes-plug text-align: center; margin-bottom: 1em; display: flex; align-items: center; justify-content: center; .tasty-recipes-plug a text-decoration: none; box-shadow: none; .tasty-recipes-plug a img width: 150px; height: auto; margin: 5px 0 0 8px; display: inline-block; @media print .tasty-recipes-no-print, .tasty-recipes-no-print * display: none !important; ]]>
This Greek dip has so much flavor, with a layer of smooth, savory hummus, a layer of cool, herby tzatziki, and toppings like feta cheese, chopped fresh cucumbers, sweet tomatoes, and briney capers and olives.
Author: Andie Mitchell
Prep Time: 40 minutes
Total Time: 40 minutes
Yield: Serves 10 1x
Category: Appetizers
Cuisine: Greek
Scale 1x2x3x
Ingredients
For the Tzatziki: ½ medium cucumber, peeled, halved lengthwise, and seeded 1 cup Stonyfield plain nonfat Greek yogurt 2 tablespoons extra-virgin olive oil 1 tablespoon finely chopped fresh mint leaves 1 tablespoon finely chopped fresh dill 1 small garlic clove, very finely minced Pinch salt Pinch freshly ground black pepper
Hummus and Toppings: 1 (10-ounce) container prepared hummus ½ medium cucumber, peeled and chopped ⅔ cup Grape tomatoes, quartered 2 heaping tablespoons capers (from a jar of capers in water) ½ cup kalamata olives, pitted and chopped 2 ounces feta cheese, crumbled (1/2 cup)
Instructions
Using the large holes on a box grater, grate the cucumber. Wrap the grated cucumber in paper towel and squeeze gently to remove excess moisture.
In a medium bowl, mix the grated cucumber, yogurt, olive oil, mint, dill, garlic, salt, and pepper. Cover and refrigerate for 30 minutes. (The tzatziki can be stored in the refrigerator for up to 2 days.)
Spread the hummus on the bottom of a large shallow bowl, layer the tzatziki over the hummus, and sprinkle the toppings over the tzatziki: chopped cucumber and tomatoes, capers, olives, and crumbled feta cheese. Serve with pita bread (cut into triangles) or pita chips.
Nutrition
Serving Size: 1/3 cup
Calories: 134
Sugar: 4g
Sodium: 431mg
Fat: 10g
Saturated Fat: 2g
Carbohydrates: 9g
Fiber: 1g
Protein: 5g
Cholesterol: 6mg
Did you make this recipe?
Tag @andiemmitchell on Instagram and hashtag it #andiemitchell
Source: https://www.andiemitchell.com/greek-dip/

0 notes
Text
frozen watermelon mojitos
There is no time like a heat wave to unlearn everything you thought you knew about watermelon. I don’t need to tell you that a slice of fresh watermelon cold from the fridge is one of life’s perfect things. But most of my attempts to bake with it or turn it into drinks, with this exception, have had limited success, because there is a mildness, a gentleness to watermelon that gets smothered under other things. “So, just eat it fresh and be done with it,” would be a reasonable, rational takeaway. The watermelon has spoken; it has told you its limits. But I don’t want to be reasonable nor rational, and I’ve been pining for a frozen watermelon mojito for a couple summers now and been stuck at the impasse of knowing once I added the requisite ice, simple syrup, or club soda, the watermelon-y impact would be all but diminished. I’m not sure why it took me as long as it did to have my a-ha moment but the solution was, well, right next to the ice cubes in the freezer.
Freezing your watermelon in cubes and foregoing the ice cubes is summer drink brilliance. It actually tastes like watermelon because you haven’t diluted it in any way. The texture is fantastic enough that you might skip the club soda too (but adding a splash basically makes it a grown-up Slurpee; you’re welcome). Simple syrup, and the water involved in making it, is never necessary if you can just dissolve sugar in your lime juice. I’ve made it as straight frosty watermelon lemonade and limeade (no rum; keep the mint if you wish) but as a heatwave balm of a summer drink that takes approximately 65 seconds* to make, it’s downright revolutionary.
* because you had the forethought to go ahead and freeze watermelon right now. Go! Make a giant bag of cubes and have this at the ready all summer. I promise you’ll thank you later.
Previously
One year ago: Corn Fritters and Bourbon Peach Smash Two years ago: Hummus Heaped with Tomatoes and Cucumbers Three years ago: Corn, Bacon and Parmesan Pasta Four years ago: Tomato and Fried Provolone Sandwich Five years ago: Easiest Fridge Dill Pickles and Grilled Peach Splits Six years ago: One-Pan Farro with Tomatoes and Hot Fudge Sundae Cake Seven years ago: Bacon Corn Hash Eight years ago: Whole Wheat Raspberry Ricotta Scones Nine years ago: Mango Slaw with Cashews and Mint, Thai-Style Chicken Legs, Peach Blueberry Cobbler, and Scalloped Tomatoes with Croutons Ten years ago: Light Brioche Burger Buns, Blueberry Boy Bait, and Lemony Zucchini Goat Cheese Pizza Eleven years ago: Chocolate Sorbet Twelve years ago: Double Chocolate Layer Cake
And for the other side of the world: Six Months Ago: Chocolate Puddle Cakes 1.5 Years Ago: Korean Braised Short Ribs 2.5 Years Ago: Small-Batch Tiramisu 3.5 Years Ago: Hot and Sour Soup and Belgian Brownie Cakelets 4.5 Years Ago: Oven-Braised Beef with Tomatoes and Garlic and Pecan Sticky Buns
Frozen Watermelon Mojito
Servings: 2
Time: 5 minutes, plus freezing time
Source: Smitten Kitchen
Print
This makes an absolutely fantastic frozen watermelon limeade or lemonade too, simply skip the rum, leave the mint if you wish. It makes two drinks in an 11 to 12-ounce glass (I’m using these).
Let’s talk about sweetness: A thing I noticed making a few rounds of these is that the level of sweetness that tastes exactly right out of the freezer/blender (2 tablespoons) tastes a bit sweet for my tastes as it defrosts. That’s why there’s a range here; you’ll find your sweet spot (sorry) when you make it. For lemonade for the kids, I usually go up to 3 tablespoons of sugar per pitcher. Sweetness will of course vary by the ripeness of the melon.
Let’s talk about booze: 1 shot (3 tablespoons or 1.5 ounces) per glass makes a gentle cocktail but we found an extra splash (1 tablespoon or so) to be the right level for the size drinks we made.
1 pound (a scant 4 cups) watermelon in 1-inch cubes (from about 2 pounds with rind on)
1/2 cup fresh lime juice (from 2 to 3 limes), plus wedges for serving
1 to 2 tablespoons granulated sugar
3 to 4 ounces (6 to 8 tablespoons) white rum
Leaves from 1 to 2 sprigs of fresh mint, plus extra for garnish
Two splashes of seltzer (optional)
Spread watermelon cubes on a tray lined with plastic wrap or parchment (for easiest removal) and chill in freezer until frozen. Add sugar to lime juice and stir to combine; sugar should dissolve in a minute or two. Place frozen watermelon, sweetened lime juice, and rum in blender and blend until thick but smooth. Add mint and pulse a few more times, so that is chopped but not pureed. Pour into two glasses. Top with a splash of seltzer if you wish, finish with lime wedges and extra mint. Repeat all summer.
Source: https://smittenkitchen.com/2019/07/frozen-watermelon-mojitos/

0 notes
Text
Italian Sausage Frittata with Peppers and Onions Video
My mom is the queen of April Fool’s. And that doesn’t just mean making sausage frittatas that taste like pizza.
Sometimes I think we might as well skip the Mother’s Day festivities, since she already gets so much joy at our expense the month prior. I’ve inheriting this sadistic love of pranks to some extent, along with my father’s perverse love of watching people trip. He sent me this video a few weeks ago and I could just picture him sitting at his computer giggling like a 5th grader. But my mom takes sick pleasure at someone else’s expense to a whole other level on April Fool’s Day.
One year she told me that the closet in my childhood bedroom had flooded and all my clothes were covered in mold, so would probably be ruined. Enough time elapsed before I realized it was April 1st for me to have a full meltdown. My mother has learned to wait long enough for tears to materialize before putting us out of our misery.Another year, my dad spent the entire day thinking that the workman on Martha’s Vineyard had accidentally bulldozed through our house. When she finally let him down, he was so furious he didn’t speak to her for several days.
I got the in-person treatment another year. And had my intercom not had video capabilities, my mother might have gotten away with something equally perverse. But I guess I’ll never know what tricks she had up her sleeve. What this did mean though was that I got to have an impromptu lunch date with my mom.
Luckily, I had been re-testing this Italian sausage frittata recipe, because mom just so happens to be the frittata queen She said that her slice tasted just like a pizza, which was exactly what I was going for (April Fools?). Her presence also meant that there was still time to get Charlie, who thanks to our collective foolsing prowess, for a brief hour thought that he was going to be the new face of Just Salad’s promotional campaign for VIP blue bowl members. In case you were wondering, my mom laughed for three straight hours afterwards.
I’m still trying to think up what to get my mother this year. I have a few ideas, but I’m not dumb enough to link to them in this post. So for now, you’ll just have to settle for this Italian sausage frittata recipe with peppers and onions. It might not fool anyone into thinking it’s a pizza, but it’s so delicious that during the other 364 days of the year, it won’t matter.
Make sure to read on for the sausage frittata recipe, and for the new how-to video I made!
With health and hedonism,
Phoebe
This easy sausage frittata recipe is a breakfast spin on a classic Italian peppers and onions dish. It's a make ahead meal and one of the best quick dinner ideas around. It's also gluten-free, paleo, whole30 friendly.
Ingredients
2 tablespoons olive oil divided
½ pound hot Italian chicken or turkey sausage casings removed
1 small sweet onion halved and thinly sliced
1 orange pepper thinly sliced
1 red pepper thinly sliced
1 teaspoon sea salt divided
8 large eggs
2 teaspoons fresh oregano leaves
Instructions
Preheat the broiler.
In a large (15-inch) oven-proof skillet, heat 1 tablespoon of the oil. Cook the sausage over high heat, breaking it apart with your spatula into 1-inch pieces (or smaller), until browned, about 5 minutes. Remove to a plate.
Add the remaining oil to the skillet. Saute the onion and peppers over medium heat, scrapping up any brown bits from the bottom of the pan, until very soft and caramelized, about 10 minutes.
Meanwhile, in a large mixing bowl, beat the eggs with 1/2 teaspoon salt until the yolk and whites are very well combined.
Add the sausage back to the pan and stir to combine. Season the mixture with the remaining ½ teaspoon salt and arrange the veggies in an even layer. Reduce the heat to low and pour the eggs over the sausage and vegetables, making sure the pan is evenly coated with eggs. Cook until the sides are set and there’s just a shallow layer of uncooked eggs on the top, about 5 minutes.
Sprinkle the oregano over the top, if using, and transfer the pan to the broiler. Cook for 2 minutes, until the top is cooked and beginning to lightly brown. Remove from the oven and allow the frittata to sit in the pan for at least 5 minutes before slicing. Cut into wedges and serve warm alongside a simple salad as breakfast, lunch, or dinner.
Need help finding lifestyle changes that last? Let’s work together to find your path forward. My 4 Weeks to Wellness Course might just change your life.
FIND OUT MORE HERE
Source: https://feedmephoebe.com/sausage-pepper-and-onion-frittata-recipe/
0 notes
Text
Delicious Green Soup
Sunday raid
Sundays everywhere tend to be quiet but here in Médoc, especially in winter, they are extra quiet. All the stores are closed, there are no markets after lunch, there is nothing. Of course we always have good food around the house so I know we won’t starve, that would take weeks, but while we usually plan our Friday and Saturday meals, Sunday is a wild card – I like to see what happens, challenge myself to cook with what we have. And I must admit we probably always have more food than most people, even on Sundays. It’s an exercise in flavors rather than survival. Sometime after breakfast this morning (which was avocado and smoked salmon with flax-seed and a good cup of tea) I ventured into the “boucherie” (named after the old butcher’s table) that serves as our pantry. The boucherie is always cool but in February it’s very cold and perfect for vegetables who want to stay young. It’s also a bit of an Aladdin’s cave for me, I don’t go in there everyday and some of the stuff has been brought in by my husband without my knowledge. This morning I was delighted to find a fresh bundle of watercress, a little bit of chervil and some Jerusalem artichokes amongst all the regulars, such as celery, carrots and onions.
The first weeks of the year have been calm and replenishing, a little too wet perhaps for my taste and my roof but a good if uneventful start to the year. It’s always healthy to take a step back once in a while, spend time with your loved ones, catch up on sleep. And to think.
I’ve also been thinking more about being and eating healthy than usual and while I think we generally eat very well it’s always good to step up your game. We all know the rules, a little less baguette, a little more vegetables, take it easy on the meat and pasta, again a little more vegetables. A little less wine a little more water.
Little tweaks to get ready for summer, small steps to look and feel better. I don’t believe in extremes, but I do believe in extremely good food.
We are still planning to launch our new website this Spring but I do miss you all so I’ve decided to post random recipes that feel appropriate or inspiring – I’ll try to do one a week until the new site is up and running. So that we can all keep in touch.
In other news we had so many bookings and so many requests for the Summer Abundance workshop in June that we decided to add a second Summer abundance workshop the following week – June 27th to June 29th. We are just starting to take bookings but it’s already filling up so if you’re interested please don’t hesitate to write.
Did you that watercress has more calcium than milk, more iron than spinach and boosts your complexion? This is a must to make this cold season, so simple and delicious. I loved slicing vegetables with a mandoline, it makes everything easier and cook faster. Adding the Jerusalem artichokes chips mixed with the crispy chervil makes this soup so luxurious, and I love the peppery taste the watercress gives. I’ve added extra spices like turmeric, cloves and ginger to give that boost which we all need this winter.
Watercress soup with Jerusalem artichokes and chervil chips
2 bunches of watercress (chopped, including stems) 1 onion, sliced finely 2 small russet potatoes, sliced finely with a mandoline 475 ml/ 2 cups chicken or vegetable stock, 150 ml cream/ crème entière (optional) 3 cloves, crushed A small cube-sized piece of fresh ginger, grated A teaspoon of turmeric Salt & a dash of black pepper
For the chips: 300 ml vegetable oil for frying 2 Jerusalem artichokes, sliced as finely as possible with a mandoline A small bunch of fresh chervil A sprinkle of fleur de sel
Pour the stock into a large saucepan and bring to a boil.
Slice (with a mandoline) the potatoes and onion, and drop them into the stock. Cover and cook for 5 minutes, lower the heat then add the watercress, ginger, turmeric, cloves, salt and pepper. Cover again and cook for another 6 to 8 minutes, or until all the ingredients are tender.
Purée the soup in the blender and add the cream.
Heat the oil in a heavy medium-size pot until hot and ready, make a test by throwing in a slice of Jerusalem artichoke and if it sizzles, the temperature is ready for frying. Add Jerusalem artichoke slices to the oil in small handfuls, turning gently with a wire skimmer, until pale gold and crisp, about 45 seconds to a good minute. Transfer chips to paper towels to drain, and sprinkle with salt. Repeat the same with the chervil, for less than 15 seconds or so. Add them to the plate of chips so they get to mix, this will create a great flavour.
Reheat the soup on a low heat and ladle the soup into bowls. Scatter the chips and chervil on top and serve immediately.

Source: http://mimithorisson.com/2018/02/04/delicious-green-soup/
0 notes
Text
Key Lime Ice Cream
Hi! I'm Stef Pollack. Welcome to Cupcake Project, where everyone from novice bakers to professional pastry chefs can find sweet and savory recipes to inspire and treasure.
Just about all of the photography and videography is done by my husband, Jonathan, and baking assistance and taste testing are provided by our son, Myles. It's a family affair!
This blog has been around since 2007 and my readers have always felt like family. Thanks for being a part of my online home!
Learn more »
Source: https://www.cupcakeproject.com/key-lime-ice-cream/
0 notes
Text
Cream Cheese and Cherry Swirl Blondies
Classic recipes are classic for a reason – they’re the kind of easy sweets everyone loves. But even the most beloved classics need an occasional upgrade, and that’s where these cream cheese and cherry blondies come in.
Somewhere between the perfect cookie and a cheesecake, these blondies have a chewy, molasses-infused crumb with a tangy layer of cream cheese and flecks of cherry jam. Best of all, this recipe is simple to make and comes together in just a few steps.
For best results, be sure to allow all the dairy and eggs to come to room temperature. This will allow the butter and cream cheese to fluff up perfectly.
Makes: 16 servings
16 tablespoons unsalted butter, room temperature
6 ounces cream cheese, room temperature
3 eggs, room temperature, divided
1/4 cup sugar
1 1/2 cups dark brown sugar
1 tablespoon vanilla extract
2 cups all-purpose flour
1 teaspoon sea salt
1/4 cup cherry jam or preserves
Step 1 An hour or more before baking, set out butter, cream cheese, and eggs to come to room temperature.
Step 2 Preheat oven to 350 degrees F. Line an 8-inch square brownie pan with parchment and butter generously.
Step 3 In a medium bowl or the bowl of a stand mixer fitted with the whisk attachment, beat cream cheese until light and fluffy. Add sugar and 1 egg, and beat 3 minutes more. Set in the fridge while you make blondie batter.
Step 4 In a small bowl, whisk to combine flour and sea salt.
Step 5 In a large bowl or the bowl of a stand mixer fitted with the paddle attachment, cream butter and brown sugar until light and fluffy, about 5 minutes. Add eggs and vanilla, and beat 2 minutes more. With mixer on low, fold in dry ingredients, and mix just until combined.
Step 6 Spoon two-thirds of the batter into the prepared brownie pan, pressing batter up the corners.
Carefully spread a layer of all but 2 tablespoons of the cream cheese mixture on top.
Dot with all but 1 tablespoon of the jam.
Using a silicone spatula, gently swirl the jam into the cream cheese. Spoon the remaining blondie batter on top, pressing into place. Drizzle remaining cream cheese and jam on top, swirling just a bit.
Step 7 Bake 50 – 55 minutes, or until blondies are completely set when you shake the pan. (Note that the traditional toothpick test doesn’t work here, so just look for blondies to be completely set up.) Cool a full 2 hours on a wire rack before serving, then slice, serve, and enjoy!
Notes: Cut blondies into 9 squares for a sating dessert (and top with vanilla ice cream, if you like!) For bite-sized treats, cut blondies into 16 smaller squares.
Enjoy!
Source: https://www.handmadecharlotte.com/cream-cheese-cherry-swirl-blondies/
0 notes
Text
Mini German Pancakes – Flashback Friday
This look back is at one of my most popular recipes. It’s a mini version of German pancakes made in muffin cups. My family actually likes them more than the full sized version.
If you haven’t had German pancakes before you must understand that the pancakes themselves aren’t sweet. Just like with a pate a choux dough used for eclairs and cream puffs, the dough isn’t super flavorful on it’s own. The fillings is what makes them amazing. The topping for these pancakes is what makes them great. The topping needs to be sweet to bake the pancake what it needs to be.
Mini German Pancakes
Source: https://www.realmomkitchen.com/mini-german-pancakes-flashback-friday/

0 notes
Text
Instant Pot Vegan Chili (Fast & Easy!)
This Instant Pot Vegan Chili is fast and easy, thanks to the help of the electric pressure cooker. You simply “dump” the ingredients into a pot, press a button, and walk away! It doesn’t get easier than that.
Instant Pot Vegan Chili
What I love about this Instant Pot Vegan Chili is that it’s naturally gluten-free and packed with plant-based protein. The pressurization process brings out extra flavor from the vegetables, without the need to sauté them first. This saves you time and lowers the overall calorie content, since you don’t need to add any oil to this recipe.
Vegan Chili Recipe with Lentils & Beans
I use red lentils in this recipe, because they naturally thicken the chili and cook faster than other varieties. For convenience, I also like to add some canned beans for extra texture and protein, but you can use any other add-ins you like. Using canned beans means this recipe needs just a 10-minute pressure cooking cycle.
Cooked Beans vs. Dried Beans
You’d have to extend the cook time and add more water if you want to use dried beans instead of pre-cooked ones, so I don’t recommend making that substitution without some research first. (There’s a vegetarian chili recipe using dried beans in The Fresh & Healthy Instant Pot Cookbook if you’d like guidance on that.)
This recipe makes a great dinner one night, and then you can enjoy the leftovers as an easy lunch the next day. For a properly combined meal, try serving some of this leftover chili over a baked potato and some vegan cheese sauce for a “chili cheese” night.
This INSTANT POT VEGAN CHILI is as fast & easy as it gets. Just "dump" the ingredients in the pot, press a button, and walk away! Ready in about 30 minutes.
Keyword: beans, lentils, soup, vegan
1 red onion , diced
3 carrots , diced
3 celery stalks , diced
1 red bell pepper , diced
3 cloves garlic , minced
1 (28 oz.) can diced tomatoes , with juices
1 cup red lentils
1 cup water
1 (15 oz.) can black beans , drained and rinsed
1 (15 oz.) can red kidney beans , drained and rinsed
1 tablespoon chili powder
2 teaspoons ground cumin
1/2 teaspoon smoked paprika
pinch cayenne pepper
fine sea salt , to taste
fresh lime slices , for serving
Add the onions, carrots, celery, bell pepper, garlic, tomatoes, lentils, water, black beans, kidney beans, chili powder, cumin, paprika, and cayenne pepper to the Instant Pot. Stir well, but keep in mind that there won't be a lot of liquid in the pot. (The veggies will release more liquid as they cook.) Do not add salt at this point, to ensure fast cooking of the lentils.
Secure the lid and move the steam release valve to Sealing. Press the "manual" or "pressure cook" button, and cook at high pressure for 10 minutes. The pot will take 10-15 minutes to come to pressure before the cooking cycle begins.
When the cook cycle is over, let the pressure naturally release for 10 minutes. The Instant Pot screen will read LO:10 when the natural release time has passed. Move the steam release valve to Venting to release the remaining pressure in the pot.
When the floating valve in the lid drops, it's safe to remove the lid. Give the chili a stir to make sure all of the lentils dissolve in the chili, thickening it. Season the chili with salt and fresh lime juice to taste. I usually start with 1 1/2 teaspoons of salt and a teaspoon of lime juice, then adjust by adding more to taste. (If your diced tomatoes are already salted, start with less salt.)
Serve warm, with your favorite toppings. Sliced avocado, chopped green onions, and shredded cheese (if you're not vegan) are popular options with my family. Leftovers can be stored in an airtight container in the fridge for up to 5 days.
Per serving (without toppings): Calories: 106, Fat: 0g, Carbohyrdates: 19g, Fiber: 8g, Protein: 6g
Recipe Notes:
This recipe is easily adaptable to use anything you happen to have on hand. Sometimes I use fire-roasted tomatoes with green chilies to replace the diced tomatoes (for extra spice), and sometimes I leave out a can of beans if I don’t have them on hand. Either way, this recipe makes quite a bit of food for the week!
–
Reader Feedback: Have you tried this Instant Pot Vegan Chili yet? Please leave a comment below letting me know what you think of it! If you make any modifications, please share that, too. We can all benefit from your experience!

Source: https://detoxinista.com/instant-pot-vegan-chili/

0 notes
Text
What I Read: July 2018 | Recommendations for Books to Read
If you’re looking for a good book to read, you’ve come to the right place. This post is part of my monthly “What I Read” series, featuring the books I read the previous month with lots of recommendations for you! All of these book pair perfectly with donuts, cookies, pasta, or pizza… And always a glass of wine.
Have you heard of Tsundoku? It’s a Japanese term used to describe the art of buying books and then not reading them. If you saw the piles of books in my house, you would totally know that I practice tsundoku in a major way. So much so that my husband sent me this article and was like “um hello, this is you.” But it’s not like I’m over here just collecting books. I promise! I only buy books I truly want to read and I have every intention of reading every book that’s currently on my bookshelf or sitting in a pile around my house… At some point. The problem is, the piles keep growing and my reading time is not expanding. Nine books in a month sounds like a huge amount to some people, but at this rate, I’ll never get through all of the books I want to read. I also get a lot of books sent to me and absolutely love reading new releases, so sometimes I have to remind myself to go back and grab something from one of my piles. Oh, and let’s not even talk about my “virtual piles” of electronic books. You can’t see them, so as far as you’re concerned, they don’t exist, OK?
Anyway, in this month of reading, most of my books are “newbies,” but I did grab two older books, one that I actually re-read (Crazy Rich Asians) and one that has been on my to read list for a long time (The Song of Achilles). I’m going to start making even more effort to read some of the “older” books I’ve been collecting, instead of simply grabbing the new shiny things!
Do you have an insane amount of books at your house or apartment, too? Or do you have more self-restraint than I do?
In any event, I’m excited to share my July month of reading with you! (Just an FYI that links to some of the books below are affiliate links. Thank you for supporting WANM!). And don’t forget to follow my book Instagram account (bookstagram!) at @booksontheside!
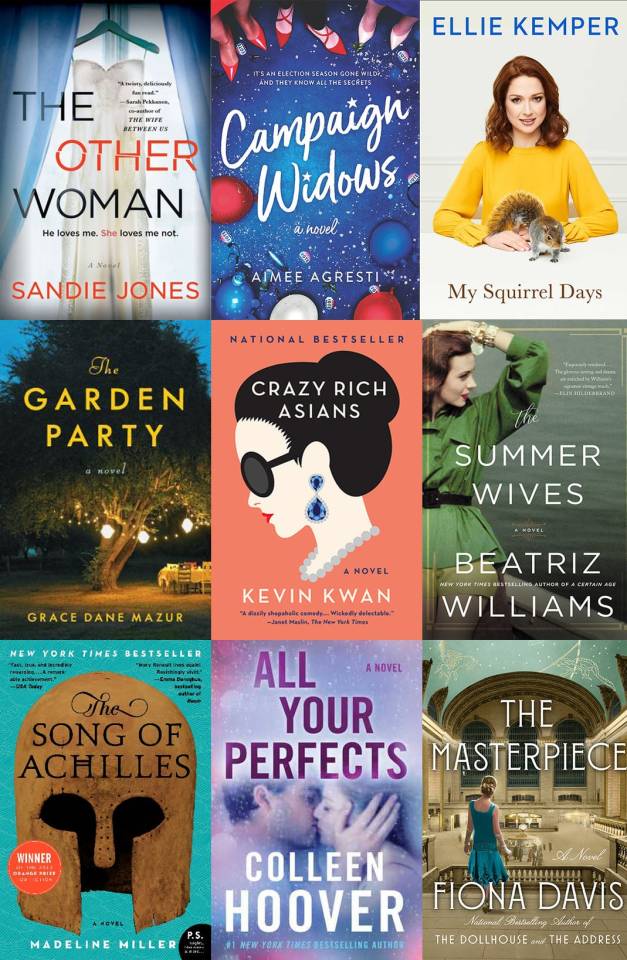
The Other Woman by Sandie Jones: If you think you have an evil mother-in-law, you need to meet Pammie. Yikes! When Emily meets Adam, she quickly falls in love with him… But then she meets his mom. Pammie is that kind of evil that is veiled behind sweetness, so not everyone sees it. She’s absolutely horrible to Emily, but in ways that make Emily question whether she’s paranoid or being overly petty. This was a page turner for me because Pammie’s behavior is so ridiculous and I couldn’t wait to see what she’d do next. But honestly, I had a hard time justifying why Emily put up with so much! Her love for Adam wasn’t totally believable to me, at least not to the point where she’d put up with Pammie’s antics. I wanted to jump into the book and shake her. I also didn’t love the ending and felt like it was a little rushed… But overall, this is a fun not-too-scary, but still suspenseful thriller perfect for a light read. Also, if you have issues with your mother-in-law, this book may end up making you thankful for her! The Other Woman’s official pub date is August 21, but you can pre-order it now. (thanks to the publisher for my copy of this book!)
Campaign Widows by Aimee Agresti: OK, I have some mixed feelings about this one. I enjoyed it because it’s a fun (very fictional) look inside a presidential campaign, showcasing what the presidential campaigns experience is like for spouses of candidates, staff members, journalists, etc. It follows five self-proclaimed “campaign widows” during a presidential election season. The main widow is Cady, who has picked up her whole life to move to DC to be with her boyfriend (turned fiancé) who is working for a presidential hopeful. As a producer on a news program, Cady covers much of the election and is also thankfully thrown into a group of other campaign widows who can commiserate with one another. My main issue with the book is that there are so many characters, it was a bit hard for me to keep them all straight and get fully sucked into the story. But I still enjoyed the story and feel like this is another one of those light fun summer books that’s perfect to read on vacation. (thanks to the publisher for my copy of this book!)
My Squirrel Days by Ellie Kemper: It’s hard not to love Ellie Kemper (in case you’re like “huh? who?? You probably know her as either a) Erin on The Office, b) Kimmy Schmidt, or c) Becca in Bridemaids). I’ve been a fan of Ellie for a long time, but was slightly worried about this book because I feel like she’s so typecast and has such a voice that, while endearing, can also be a tad bit annoying. Her memoir ended up showing me that she basically has all the good parts of her characters in her real personality (sweet, kind, quirky), but is also so much more (smart, down-to-Earth). Her “Kimmy Schmidt voice” (how I refer to it!) definitely comes out at times, but not to the point of ridiculousness. I loved this book because I learned so much about Ellie that I had no idea about, including the fact that she had such a seemingly normal childhood and one that I could relate to in many ways. She always loved performing, but wasn’t a child actor and didn’t even really get into acting until doing improv in college (after quitting the field hockey team). She’s just so normal, likable, a humble. I didn’t love every single essay in the book and have definitely laughed more reading other memoirs, but still really enjoyed the book… And now want Ellie Kemper to be my bff. My Squirrel Days’ official pub date is October 9, but you can pre-order it now (thanks to NetGalley for my copy of this book!)
The Garden Party by Grace Dane Mazur: This definitely wasn’t my favorite book of the month, but I do think it’s beautifully written and I loved the concept of it from the moment I read the description- two families come together for the wedding rehearsal dinner of their children. The families are quite different (though seem much more alike than they think!) and both have worries and apprehensions about the dinner. I think many people can relate to this as there are always some nerves involved when bringing together the families of significant others. I love that this novel takes place all in one evening and that we get peeks into each unique character’s lives. But this is another book with a ton of characters that are tough to keep straight and some I thought could have been cut all together. However, I have to mention again that the prose is beautiful (though in some spots a little too flowery) and I think this is the kind of book I’d enjoy much more were I to read it a second time and really let myself sink into every sentence, reflecting on its full meaning. If you have time to sink into this book, do so, but just know that it may leave you wanting more. (thanks to the publisher for my copy of this book!)
Crazy Rich Asians by Kevin Kwan: OK, this was actually my second time reading this book, but with the movie coming out this month, I had to read it again! Also, I let over a year go by between reading the first and second books of the series and realized that I had forgotten way too much needed to brush up. It actually kind of felt like I was reading it for the first time… So, I guess that’s one of the benefits of my normal book amnesia (LOL). I also read this along with a reading group I’m in on Instagram and that made it even more enjoyable as we got to discuss it as we read. The story follows multiple characters of a (very!) wealthy Asian family, but really centers on Nick and Rachel. After college, Nick left his family in Singapore and moved to New York City, where he meets Rachel, an American Chinese girl from a “normal” family. She has absolutely no idea of his extreme wealth (and crazy family) until he takes her to visit his family where everyone is ridiculously rich and obsessed with money and status. Sure, the book is a little bit outrageous at times and incredibly un-relatable, but that’s also what makes it fun. Now I’m even more excited for the movie and two followup books!
The Summer Wives by Beatriz Williams: I pretty much always enjoy novels from Beatriz Williams and will likely forever read her new releases, though my biggest criticism about them is that they aren’t always super memorable to me. But they are enjoyable and in many cases, that’s exactly what I want when I’m reading (as I’ve mentioned before, I’m not great at retaining lots of info about all the books I read anyway). This book jumps between a few time periods. One in the early 1950s when 18-year-old Miranda Schuyler arrives on Winthrop Island with her mother who is set to marry the wealthy Hugh Fisher. Miranda gets to know the island with her new step-sister Isobel and lobsterman Joseph Vargas. We also jump to the late 1960s when Miranda is returning to the island after some sort of accident and a long time away from the island. In between these scenes, we go back to the 1930s and learn some of the happenings and relationships on the island during those times. The Summer Wives is the kind of book that had me quickly turning the pages wanting to know how everything would tie together and what exactly happened in the various phases of Miranda’s life. Even though I haven’t been thinking about it a ton since I finished it, I still thoroughly enjoyed reading it! (thanks to the publisher for my copy of this book!)
The Song of Achilles by Madeline Miller: This one has been on my must-read list for forever since I’ve heard so much good stuff about it. I’m happy to say that it didn’t disappoint, though it’s definitely a bit different than my normal book loves and may not be for everyone! I admit, it isn’t really the type of book I’d usually pick up; war stories with lots of battle scenes aren’t quite my thing. But The Song of Achilles is about so much more than battle scenes and has such a focus on relationships and emotions that I couldn’t help but get sucked in. The book left me feeling all kinds of things and wanting to take a seriously deep dive into Greek mythology… So, I’m calling it a definite win. The story revolves around Patroclus, his childhood, and how he first comes to meet Achilles. I love how the book is set up and I feel like all the details Miller includes are so intentional and essential to the story and our emotions. As his relationship with Achilles grows, the feelings between them feel so believable and real. The decisions they make are often heart-wrenching and they deal with situations I can’t imagine myself in. Yes, there are plenty of battle scenes (how the heck did this war last for so long?!), but they’re also quite intentional and everything always goes back to the relationships. This is one that I definitely want to re-read at some point and I think I’ll gain something new from it every time I do! And now I’m extra excited to read Miller’s next book Circe (which is sitting on my shelf waiting for me!).
All Your Perfects by Colleen Hoover: I know so many people who are obsessed with Colleen Hoover books; I’m pretty sure she has some of the biggest super fans around. I definitely wouldn’t say I’m obsessed with her, but I do really enjoy her books and am happy to grab her new releases as soon as I can. Sometimes her books just feel way too dramatic to me… But I’m happy to say All Your Perfects is my favorite from her thus far. In true Hoover fashion, it’s a very dramatic book… But in ways that feel really realistic and right. The book bounces back and forth from the past (about 7 years ago) to the present. It starts with Quinn heading to her fiancé, Ethan’s apartment, only to run into a random guys sitting in front of Ethan’s apartment door. Why was he there? Well, because his girlfriend was inside Ethan’s apartment in bed with him (I promise I’m not spoiling anything). Flash forward more than seven years and we learn that Quinn and this mystery man Graham are now married (so cute!), but seem to be on the brink of divorce in large part due to trouble with infertility. The book feels so powerful because in the sections that take place in the past, we can easily see how crazy deep in love Quinn and Graham are… In some ways, you think “how could a couple like this ever want to leave each other?” But then in the sections that take place in the present, we gain a very clear understanding of why their marriage is struggling so much. This is definitely an emotional book and one that may be difficult for some people to read if only because it’s so real and spot-on. Hoover does an excellent job dealing with a very tough subject matter that’s relevant to so many people. And even if it’s not relevant to you, you’ll still be able to feel for this couple and get completely immersed in their story. If you haven’t read any Hoover yet, make this your first one. (thanks to NetGalley and the publisher for my copy of this book!)
The Masterpiece by Fiona Davis: You know this book is going to be up my alley because it’s historical fiction that takes place in NYC. For some reason, this is the first book from Fiona Davis I’ve read, but now I definitely want to check out her other releases. This story bounces back and forth between two time periods- the 1920s and 1970s- and focuses on the art school that once lived within Grand Central Terminal. In the 1920s, it’s a popular and respected place to take art classes. In the 1970s, it’s completely abandoned and not many people even know it was ever there. The school really did exist, though the story Fiona Davis tells in The Masterpiece is fictional. We follow Clara Darden, a teacher at the school in the 1920s and and blossoming illustrator striving to get her fashion-focused illustrations published in Vogue and the like. We also follow Virginia Clay, a recently divorced mother, struggling to make ends meet in the 1970s, with a new job at the Grand Central Station information booth who discovers the abandoned art school. The women are incredibly different, but both ambitious and determined and I felt immediate connections with both of them. I love how Davis intertwined the two time periods and how she managed to bring everything together at the end (with a bit of a twist I definitely wasn’t expecting!). It’s the kind of book that has you missing the characters once you’re done reading it. It also has me wanting to take a trip to NYC to wander around Grand Central Station and learn more about its history. (thanks to the publisher for my copy of this book!)
And that was my July in books! Spoiler alert… I know we’re not even two weeks in, but I think August is going to be my favorite reading month of 2018 so far! I’m also off on vacation later this week and am hoping to get some seriously good reading time in.
Tell me what you’ve been reading lately!
If you’re looking for more book recommendations, feel free to take a look at my other book review posts from so far in 2018:
What I Read in January What I Read in February What I Read in March What I Read in April What I Read in May What I Read in June
Pin
Tweet
Share
Yum
Stumble
Shares 0

Source: https://wearenotmartha.com/what-i-read-july-2018-recommendations-for-books-to-read/
0 notes
Text
Those Froot Loops doughnuts at Carl's Jr. have returned
If you didn’t have a chance to try them the first time, never fear — Carl’s Jr.’s brightly colored Froot Loops Mini Donuts have returned! The five fluorescent sugar cereal-flavored doughnuts will be available at participating Carl’s Jr. and Hardee’s locations nationwide beginning the week of February 25.
The Best Doughnut Chains in America, Ranked
These doughnuts — which taste exactly like Froot Loops aka the most popular cereal from your youth — originally launched in August of 2018 and promptly sold out. According to Daily Meal editor Carolyn Menyes who tried them, the sweet treat tastes identical to Kellogg’s sugary, loopy rainbow cereal and looks just as brightly hued.
“They taste exactly like the cereal. It was creepy. They were also like so colored — like lime green. It was nuts,” she said.
Just like your childhood, these rainbow-tinted Carl’s Jr. and Hardee’s Froot Loops Mini Donuts won’t last forever. They’re only available for a limited time while supplies last for $1.99 at participating Carl’s Jr. and Hardee’s restaurants.
Did you know that all the colors of Froot Loops cereal are actually the exact same flavor? Learn that and more with things you didn’t know about the 16 most popular breakfast cereals.

Source: https://www.thedailymeal.com/eat/carls-jr-froot-loops-mini-donuts-return/021919
0 notes
Text
Black Truffle Almonds + Roasted Shiitake Mushroom Mix
This post was created in partnership with Blue Diamond Almonds
It’s been freezing here in the Bay Area. Okay, that might be slight exaggeration but after a bout of hot, summery weather, we’ve been hit with chilly, dreary weather all week long. And as much as it might sound like I’m complaining, I’m actually welcoming this reprieve from the heat – especially since this week also marked the first week of Kindergarten for our little guy. School has started, it feels like Fall, my emotions are all over the place and heck, I’m trying my best to embrace it all. In desperate need of some comfort, I thought this was the perfect time to build a little cheese platter to celebrate this transitional time. I’ve been obsessed with Blue Diamond Crafted Gourmet Almonds in the Black Truffle flavor and had the idea to mix it up with the addition of another personal favorite, roasted shiitake mushrooms. If you’re a mushroom lover, you’ll love this earthy, umami, and fragrant combination. A handful of this, paired with your favorite cheese and some truffle honey and figs and wow, all those worries and sorrows seem to just wash away.
To roast shiitake mushrooms, you just clean them with a wet paper towel. Don’t wash them under water, you want them as dry as possible when roasting. Cut them into thick slices and toss them with some olive oil, garlic, salt and thyme. Place them on a parchment paper lined baking sheet and bake for 20-25 minutes at 400° F. It’s important to toss them at least twice, with a wooden spoon, during baking. I personally like to slightly overcook mine for that bit of crunch! Once they’ve cooled, mix them with the Black Truffle almonds and enjoy!
(Photography by HonestlyYUM. This post was created in partnership with Blue Diamond Almonds. All opinions are our own. Thank you for supporting the brands that keep HonestlyYUM cooking!!)

Source: https://honestlyyum.com/24363/black-truffle-almonds-roasted-shiitake-mushroom-mix/
0 notes
Text
Fattoush Salad with Mint Dressing
Fattoush Salad Recipe with Mint Dressing - Cookie and Kate
"cookieName":"wBounce","isAggressive":false,"isSitewide":true,"hesitation":"5","openAnimation":false,"exitAnimation":false,"timer":"","sensitivity":"","cookieExpire":"14","cookieDomain":"","autoFire":"","isAnalyticsEnabled":true

Source: https://cookieandkate.com/2018/fattoush-salad-recipe-with-mint-dressing/
0 notes
Text
Chicken Pesto Pasta (VIDEO)
Creamy Chicken Pesto Pasta is an easy 30-minute dinner loaded with juicy chicken and tender asparagus!
We love creamy pastas like our Chicken Alfredo or Creamy Shrimp Pasta. Adding pesto takes Alfredo sauce to the next level!
Pesto Pasta!
This Chicken Asparagus Pesto Pasta was shared by one of our readers, Katie N., and it was love at first bite – an instant hit! You won’t believe how easy it is with a very short list of ingredients. Thank you Katie for generously sharing your amazing recipe with all of us!
What is Pesto?
Pesto is a creamy blended bright green sauce originally from Italy. The ingredients in a good pesto are typically: basil, nuts (often pine nuts), parmesan, garlic and olive oil. Click here for a homemade pesto recipe. Adding pesto to the cream sauce adds amazing flavor.
If you’re looking for a good store-bought pesto, our favorite is the Kirkland signature pesto (Amazon affiliate link) from Costco. Whether you make or buy pesto, you can use the rest to make chicken pesto roll-ups, or freeze portions to make pesto pasta another day.
Types of Pasta that Work:
You can use your favorite pasta which is what we love about this recipe. We use what we have on hand but these are pasta varieties that work well with cream sauce pastas:
Fettuccini noodles
Linguine pasta
Spaghetti
Penne pasta
Pappardelle
Rigatoni
Can I Substitute Asparagus?
Yes! You can omit the asparagus altogether and the recipe will still work well. You can also try
Broccoli Florets
Snap Peas
Blanched green beans
Frozen peas (or add cooked peas at the end)
2 cups halved cherry tomatoes (added at the end)
How to Reheat Creamy Pasta:
The general rule of thumb for reheating a creamy sauce is LOW and SLOW. Warm the pasta on low heat, stirring often or in short intervals in the microwave. If you overheat, the cream can separate and seem oily. To make the sauce creamier, add a splash of water, milk, half and half or cream before heating.
More 30 Minute Meals to Try:
Watch Natasha Make Creamy Pesto Pasta:
If you enjoy our videos, please subscribe to our Youtube Channel and click the bell icon so you’ll be the first to know when we post a new video. THANK YOU for subscribing! We love spending time with you on our Youtube Channel.
Chicken Pesto Pasta
Prep Time: 10 minutes
Cook Time: 20 minutes
Total Time: 30 minutes
Creamy Chicken Pesto Pasta is an easy 30-minute dinner loaded with juicy chicken and tender asparagus!
Author: Natasha of NatashasKitchen.com
Skill Level: Easy
Cost to Make: $8-$12
Keyword: chicken pesto pasta, pesto pasta
Calories: 535 kcal
Servings: 8 people
1 lb chicken breasts trimmed
1 tsp salt (divided)
1/4 tsp black pepper
1 lb asparagus ends trimmed and cut into 2" pieces
2 cups heavy whipping cream
4 Tbsp pesto
4 Tbsp olive oil
12 oz fettuccini pasta (or linguine)
Cook pasta in a pot of salted boiling water according to package instructions to your desired doneness. While pasta is cooking, proceed with the recipe then add drained cooked pasta to the sauce in step 5.
Cut chicken breasts in half lengthwise and season all sides with 1/2 tsp salt and 1/4 tsp black pepper. Heat a large, deep skillet over medium heat with 2 Tbsp olive oil. When oil is hot, add chicken in a single layer and saute until fully cooked through (3 min per side). Remove from pan and rest 5 minutes, then slice into bite-sized strips.
Add 2 Tbsp olive oil to the same pan with asparagus pieces. Sautee stirring occasionally for 2-3 minutes or until crisp tender.
Add 2 cups heavy whipping cream, bring to a simmer and cook 3 minutes, stirring occasionally. Stir in 4 Tbsp pesto then add chicken breasts and cook 2 minutes. Season sauce with 1/2 tsp salt or to taste.
Add cooked pasta, stirring to coat noodles in sauce. Remove form heat and serve right away.
Nutrition Facts
Chicken Pesto Pasta
Amount Per Serving
Calories 535 Calories from Fat 315
% Daily Value*
Total Fat 35g 54%
Saturated Fat 15g 75%
Cholesterol 154mg 51%
Sodium 459mg 19%
Potassium 472mg 13%
Total Carbohydrates 34g 11%
Dietary Fiber 2g 8%
Sugars 2g
Protein 20g 40%
Vitamin A 30%
Vitamin C 5.1%
Calcium 8.2%
Iron 12.9%
* Percent Daily Values are based on a 2000 calorie diet.
If you make this recipe, I’d love to see pics of your creations on Instagram, Facebook and Twitter! Hashtag them #natashaskitchen

Source: https://natashaskitchen.com/chicken-pesto-pasta/
0 notes
Text
Mini Chicken Pot Pies
Mini Chicken Pot Pies consist of a quick and easy chicken pot pie filling in a buttery biscuit cup. This wonderfully easy southern meal can be on the table in under 30 minutes. Serve it with a green salad for a full meal the whole family will love.
Rotisserie chicken, frozen mixed vegetables, refrigerated biscuits, and canned soup make this recipe a cinch to make. These individually portioned Chicken Pot Pies are pure comfort food.
This is a great recipe for using up leftover chicken. If you don’t have leftover chicken, use rotisserie chicken.
I use frozen mixed vegetables with carrots, peas, green beans, and corn. You could use a mixture of just peas and carrots if you wish. The vegetables do need to be defrosted before hand which you can easily do in the microwave.
You should be able to get these Mini Chicken Pot Pies out easily if you coat your muffin tray well with cooking spray. Let them cool for a minute of two once you remove them from the oven and then run a knife around the edges.
If you can’t find regular flaky layers biscuits, you can use any type of Grands biscuits. You can even use crescent roll dough. Just cut it to fit the muffin cups.
If you’re looking for an easy weeknight meal that is family-friendly, you can’t beat these Mini Chicken Pot Pies.
More Chicken Pot Pie Recipes
Mini Chicken Pot Pies consist of a quick and easy chicken pot pie filling in a buttery biscuit cup. This wonderfully easy southern meal can be on the table in under 30 minutes.
Keyword: easy dinner recipe
1 cup cooked, diced chicken breast
1 cup frozen mixed vegetables, thawed
1 cup shredded cheddar cheese
1 (10.5-ounce) can cream of chicken condensed soup
1/2 teaspoon garlic powder
1/2 teaspoon onion powder
1/4 teaspoon poultry seasoning
1/4 teaspoon pepper
1 (16.3-ounce) cans flaky layers refrigerated biscuits
Preheat oven to 375 degrees and grease 8 muffin cups.
Add all ingredients except biscuits to a medium bowl. Stir to mix well.
Place a biscuit in each muffin cup. Press it into the bottom and up the sides.
Divide filling evenly between the muffin cups. Bake for 15 to 18 minutes or until golden and bubbly. Let rest for a few minutes and then run a knife around the edge of each one and lift them out.
* Percent Daily Values are based on a 2000 calorie diet.
Source: https://spicysouthernkitchen.com/mini-chicken-pot-pies/
0 notes