
Don't wanna be here? Send us removal request.
Statistics
We looked inside some of the posts by raystrevide-blog and here's what we found interesting.
Average Info
Notes Per Post
0
Likes Per Post
0
Reblog Per Post
0
Reply Per Post
0
Time Between Posts
1 month
Number of Posts By Type
Photo
14
Last Seen Tumblr Blogs


Fun Fact
The Tumblr app for Google Glass was released on May 16, 2013.
Photo

One-sheet dining chair from year 2 at Rycotewood Furniture College
0 notes

Photo


Nearing the end of the making schedule, I needed to tidy up the oil rig model and start putting finishing touches to it. As part of this was the green perspex sheet that i had previously fabricated to replicate the sea level. I needed to accurately cut the holes in this for the legs to be inserted by using a 15mm forstner bit in a pillar drill. These holes were a little too snug for the legs so i had to file them out a bit for a better fit. To secure the perspex at the right level i used a glue gun to adhere it to the copper piping. By doing so i discovered that the glue gave the effect of water lapping against the legs so i decided to put add more glue to the rest of the panel on the underneath to simulate the waves on the sea.
I then secured the prefabricated shipping containers with the same glue gun method onto the platforms in various positions and levels. I wanted to add some greenery to the top level to simulate a garden rooftop so mulled over what would be the most suitable materials. I considered things like cotton wool & rolled paper to make little trees, and upturned plant roots but the simplest and most effective choice was to distress and colour a scouring pad to represent a lawn.
Next up was to install a mickey mouse fence using some square wire mesh. I tried with a number of other meshes but this one was ideal as the spacing of squares fitted perfectly with the holes on the the circuit board, so all they needed was cutting to size and length and slotting into place - wunderba! With the same mesh, noticing it’s ladder type appearance, i decided to install mini ladders between the platforms to represent the way people would move from level to level. The only slight reservation with this was using a glue gun to attach it as the glue was particularly obvious after application. Perhaps a silver solder would have been more effective.
0 notes
Photo


With only 2 more weeks of making left, I had to work on building up the oil rig to near completion. The first thing was to prepare the MDF blocks which i had cut on the band saw, by priming them with some white acrylic paint. This helped as the MDF tends to soak up moisture and the paint wouldn’t be as vibrant on the surface. I used acrylic; a paint pigment with plastic, as this was most suitable for the material, durability and look of the piece. I wanted these blocks to resemble shipping containers, as these would be used to accommodate the people living on the rig. The bandsaw marks created a very apt corrugated look when I applied the coloured 2nd coat with a dry brush. I then added some burnt sienna guache paint in small amounts to represent the presence of rust. These came out relatively successfully. If I had had more time, I would have added various logos to these containers to improve their authenticity, but alas, it wasn’t to be dear Watson. So, onto the next job which was adding a similarly weathered and aged look to both the heat sink (also taken from the circuit boards) and the circuit boards themselves. Using a mixture of acrylic paint colours, namely blue, yellow and black to create a dark green, and the burnt sienna, I managed to create a suitably rusty old looking surface. I found this was most successful when applying the paint with a very dry brush and using a couple of coats but in very small amounts to create the patchy effect as seen in the photos.
I also added another tier to the rig to make the final platform. I attached this by using the same plastic supports that i used on the other platforms, which had been affixed using screws straight into the board. This, in turn needed the same finish applying to it. I added the heat sink to the lower platform to mimic an industrial power storage unit which would theoretically link up to the hydroelectric wheel and wind turbine. I also started preparing the wind turbine by adding the same finish and sourcing some wire mesh which i could use as fencing for the platforms.
0 notes
Photo


This week, I focused on affixing the silver-soldered cross braces that I had done the previous week. I had to carefully mark out on the copper tube legs where the braces would meet before drilling 1.5mm holes on both the braces and legs using a pillar drill. Care was taken to make sure that the tubes were not crushed in the vice when hammering a pilot ‘dent’ in the metal to help the drilling process. I then used thin copper wire to make split pins and use these to fix the braces to the tubes. This was harder than expected because it was difficult to locate the end of the split pin when it was inserted into the tube. I ended up using a flathead screwdriver to bend the pin on the inside of the tube, a bit hit and miss, but seemed to work. Once all the braces were fitted I then needed to attach the legs to the base. I did this by using the existing hardware on the circuit board as mounts for the legs to slot over (see pic). Luckily these were the perfect circumference and didn’t even need the masking tape that i had envisioned needing to create a snug fit.
I then looked at preparing the circuit board panel for its paint finish by sanding the surface with 400 grit paper to both give it a aesthetically appropriate look and for better adhesion of the paint finish.
0 notes
Photo


Continuing the process of experimentation of materials for my piece, I have been working with trying to achieve a weathered look since the oil rig will be a reclaimed from abandonment. So, taking some recycled copper tubing which will be the legs, I sanded the paint and silicone off to make them clean then annealed the tubes to red hot and kept them there for approx 20 secs til they became black with oxide. I left them to cool dry, since quenching may have left an undesired patina. The result once cleaned of oxide was a suitably grimy effect reflecting the weathering on the oil rig’s metal structure.
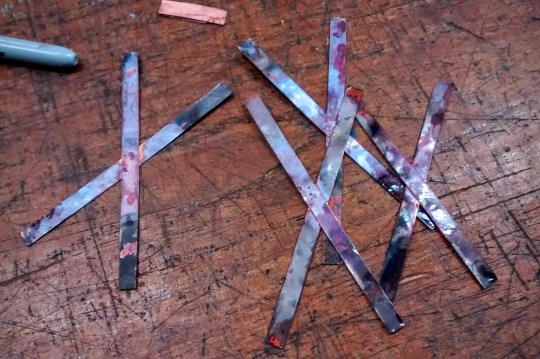
Similarly, i used copper strips to represent the braces between the legs which needed a matching ‘old’ look to them. I first joined the strips in a cross using silver soldering which involved sanding and fluxing to clean the joint, before heating the solder to join the two together. Four pairs were made in total to span the legs which had to be joined and cut at precise angles so they would meet matching points on the legs. I used a paper template to measure and achieve the correct angles for this.
To represent the sea level, I found a panel of perspex which had a green film backing to it and cut the panel to just oversize of the legs. I wanted to create an opaque effect so i experimented with various grades of sandpaper to abrade the film surface. I found 400 grit to be a bit harsh so ended up with using 1200 to create a suitably smooth but hazy finish. I will need to drill holes in this next week for the legs to fit through using a forstner bit on the pillar drill.
0 notes
Photo

After some consideration, I have decided to change from using traps as my project focus to designing and building an off-shore living quarter for a displaced population. I came to this decision after reevaluating what environment I would use to contextualise my project. The context that most attracted me to work on was the prospect of flooding due to rising sea levels as a consequence of global warming. The idea struck me to create a structure that would be able to accommodate and sustain a small population of people for long periods of time in sea waters as the current amount of inhabitable land could well disappear in the next 20 years or so. I made several designs based on this hypothesis which ranged from elliptical ‘bubble’ formations made out of glass to pyramidal steel structures that were somewhat more industrial than the sleek and fluid designs i first came up with. Considering the extreme circumstances that these structures would be used in, I again reevaluated the use of new materials to using reclaimed materials after coming across a housing project called the Miele space station in the publication ‘Big Ideas Small Buildings’ (Richardson, 2007, London, Thames & Hudson). The project involved recycling electrical appliances like fridges and washing machines as their core material. this was cost efficient, environmentally friendly and most of all, resourceful and ingenious use of waste material. This inspired me to think of adapting existing structures instead of creating new ones. After consultation with my project tutor, I decided to focus on using abandoned oil rigs as the basis for these off shore dwellings. It meant quicker construction, more resourceful, cheaper and made more sense than creating new structures.
There have been others who have thought of this idea already, as my research shows above. However, the particular details that I have included haven’t been in any other designs that i have seen, eg, a mini-city with self-sufficient energy sources and food production. The details of my design include accommodation, made from old shipping containers, gardens, both for vegetable production and for leisure. In addition, the community will have spaces for work; offices, kitchens, and for leisure: a library, refectory, games and film rooms. hopefully the unit will be able to accommodate people in relative comfort.
0 notes
Photo


My piece is largely based on adapting reclaimed oil rigs, since there are so many of them abandoned in the world, they could be turned into living quarters for displaced communities suffering from flooding or other extreme circumstances. In the spirit of recycling, I have decided to use reclaimed materials as the main source for constructing my project; ie, circuit boards and computer components. These objects lend themselves very well to this scale model project as they mimic the shapes, functions and items that the modified oil rig would use. So far I have found components which can mimic a wind turbine, a water wheel (for hydroelectricity) and solar panel; all important features of the scale project. Experimenting with the materials I found that the ‘breadboard’ circuit board was an ideal base for the platforms, both in size and the fact I could install or remove various components to it to represent the various features on the oil rig. However, the top photo shows that the plastic material was thermoset, which meant i couldn’t heat it in order to bend it. (unlike perspex which is thermoplastic). After heating, the breadboard just snapped. I’ve also used tin sheet to form brackets by cutting and bending the metal to the desired shape. I’ve distressed the material by using the texture block to help create a more realistic look to the oil rig living quarter aesthetics.
0 notes
Photo


After the talk given by Maya, we were then let loose to wander around the museum to see which objects would most inspire us to create an object for this project. I was drawn to a selection of odd looking objects on the 2nd floor which all related to the theme of traps. The photos show a number of ingenious designs of traps for different purposes. Some were for vermin, like mice and rats, and others were for hunting for meat. The conical rat traps made from weaved natural fibres were impressive because they were so simple; inside was a thorny branch from a tree which prevented the pest from escaping. Others, like the triangular wooden trap found in an old English house, housed complex mechanical features to cleverly trap mice. Other ones included a sprung loaded bow and arrow type traps which, when triggered by movement, impaled the creature. A lot of these ones had been made with limited resources and simple tools to hunt animals for food.
The trap which appealed to me most was one made in India from recycled materials, in this case, misprinted tin for Fuji film canisters. This made the rat trap both environmentally friendly, resourceful and very ingenious! It was a spring-loaded mechanism and also the material gave it a lot of character, an excellent example of adapting to environment. I think combining reclaimed materials with the theme of traps will be my focus for the project.
0 notes
Photo


This week we were given an talk by the Pitt Rivers Museum to introduce the context of where our project will be put and further clarify our brief. Our host and guide, Maya, first showed us a number of objects relating to adaptation to environment that had been crafted in a variety of different cultures. These included flip flops made from used car tyres; a good example of modern recycling and resourcefulness in an environment where there was limited amount of resources available. Also, a rattle made from the hooves of an animal, and a primitive example of goggles/snow shades made Reindeer bone used in arctic conditions by local tribes. These items showed that whatever sources of material are available, can usually be used in some manner to fashion a useful tool or implement to help make life easier. The last two photos here show a selection of tools that have been made for very particular purposes like making shoes with only naturally occuring materials.
0 notes
Photo


In addition to our work in the 2nd week we looked in particular at hot joining methods with solder. The photos above show two wire pieces of copper and brass which are kept clean with a flux, in this instance, borax. The solder is also fluxed. Placed on fire blocks, the wire pieces are pre-heated with the bench torch. Then the little ball of solder is placed onto the join, making sure the two pieces are touching, and heated until the solder melts and drops into the join. Once this happens, heat is removed as too much heat will burn off the borax.
Another interesting technique is twisting wire. When a loop of copper wire, in this instance copper, is clamped in a vice and twisted using a bar at the loop end, it creates an attractive pattern. This changes as the twists are multiplied. The picture above shows a twisted wire where the loop end has been forged to create a flat end.
0 notes
Photo


For our 2nd week in the metal workshop, we continued with experimenting with working with metals. We started this time with bending, folding, forging (hammering flat), sinking (hammering onto a concave surface) and twisting (wire). Most of these were pretty straight forward but for me the most interesting results were from twisting (photos on next blog post) as the pattern was very attractive.
The photos above show a number of processes, one of which is cutting tin with snips. With each cut, the metal has a tendency to curl. This can be exploited and cutting in different directions and in curves produces very interesting results.
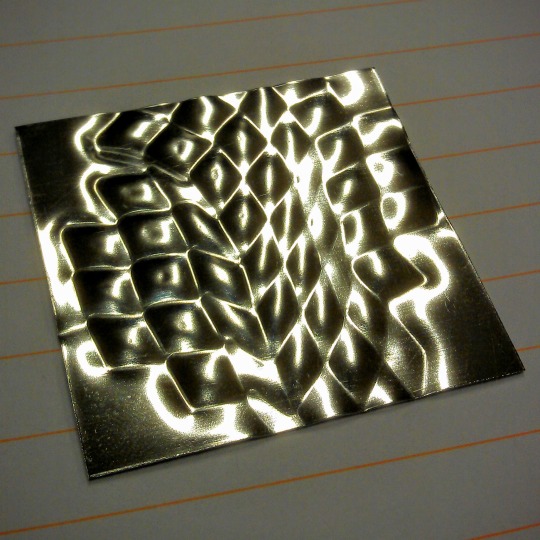
Experimenting with the fly press produced two embossed images from different sources. By placing items such as nuts, washers, wire or aluminium mesh onto a tin strip and pressing it in the fly press, it created appealing effects as seen above.
An example of hot joining methods, we experimented with the spot welder. This worked by placing to pieces of steel wire between two contacts and letting a very large current create an instantaneous spot weld to fix the metal together. With this method, it was a bit alarming to see red hot sparks fly out but quite satisfying when you got used to it.
0 notes
Photo


For the main part of the introduction to metal working, our tutor, Peter Child, explained to us briefly the project for the Pitt Rivers Museum. Essentially the theme for this year is Adaptation to the Environment. It is up to us to interpret this as we feel appropriate and to create a piece that reflects this theme. We were told that we would get much more detail and guidance on the project in the following weeks and especially when we visit the Pitt Rivers Museum itself.
Peter then gave us an introduction to various types of metals, categorised mainly under ferrous and non-ferrous (with iron and without iron). The best way to identify this aspect is to test if the metal is attracted to a magnet. If it is, then it is a ferrous metal. They were then sub-divided under ‘precious’, ‘inert’ and ‘exotic’ as can be seen in one of the whiteboard photos above. He also explained the differing costs for these metals and basic properties. It was surprising to learn what a big difference there is in price between common metals like copper, brass and steel, and with precious/exotic metals like gold, platinum and rhodium!
We then started with practical tasks, first of which was to try a ‘wax resist’ acid etching. This involved applying wax with a crayon onto a strip of brass in certain patterns. When this was left in an acid bath for roughly an hour, the acid will have etched into the metal that was left exposed but not covered by the wax. This created interesting patterns. The strip could then be cleaned with sandpaper and polished on two separate polishing machines with rotating brushes to make the strip gleam.
We then experimented with working with strips of copper, steel and brass in the forging room. This involved using various techniques to create patterns on the metal using metal hammers and leather mallets on wooden blocks and steel anvils to see what happened. The photos show the interesting results and difference in softness of metal.
We then experimented with ‘annealing’ which was to heat the metal to red hot and then quench the strips to see what happened. With copper, the metal became even softer but with brass and steel it did the opposite.
0 notes
Photo


One of our first jobs in becoming acquainted with the metal workshop was to familiarise ourselves with the health and safety signs scattered around the walls and next to the relevant machines. The photos show only a selection of these, which include the regulation European health and safety signed, namely for ear and eye protection. The others show the ‘Safe systems of work’ notices which are particular for this workshop. These give safety rules and guidance on using machinery with the proper procedures to avoid injury or illness. Examples of hazards include acid baths, rotating machinery, gas and fire.
0 notes