
Don't wanna be here? Send us removal request.
Statistics
We looked inside some of the posts by risevessel4-blog and here's what we found interesting.
Average Info
Notes Per Post
0
Likes Per Post
0
Reblog Per Post
0
Reply Per Post
0
Time Between Posts
3 days
Number of Posts By Type
Text
17
Last Seen Tumblr Blogs


Fun Fact
The Tumblr office adopted Tommy, an 11-year-old Pomeranian.
Text
Wüsthof 2-Piece Mini Asian Knife Set Review & Giveaway
posted by Jaden
This review for the Wüsthof 2-Piece Mini Asian Knife Set includes both PROs and CONs of the product. We tested the knife set for 2 months prior to this review.
We’ve been using the Wüsthof 5″ Hollow Edge Santoku and the 3″ Flat Cut Paring Knife (both from the Wüsthof 2-Piece Mini Asian Knife Set), putting it through the rigors of prepping everyday family meals and constant recipe testing at Steamy Kitchen.
Two Versions of the Mini Asian Knife Set
There are 2 versions of this knife: Classic and Classic IKON.
Same blade, same durable, non-porous polyoxymethylene material handle. Here are the differences:
Classic
Traditional, best-selling Wüsthof collection
Square-ish finish on handle
PRO: This set sells for around $99 at both Williams Sonoma and Sur La Table, about $40 cheaper than the Classic IKON
Classic IKON
*Note, the Classic IKON is different from the plain IKON, which is made from real African Blackwood.
PRO: Ergonomic, curvy handle. Feels good in hand.
CON: This set sells for around $139 at Williams Sonoma and Sur La Table. Is the handle design worth nearly half the price of the Classic? My answer is “no,” and I’ll tell you why in just a bit. First, let’s talk about the blade.
The Blade Specs
The Wüsthof 2-Piece Mini Asian Knife Set is made from with X50CrMoV15 stainless steel, with Precision Edge Technology. Yes, technology is the spot-on word to describe this German knife company that began in 1814.
Wüsthof’s computer-controlled robotic machines sharpens each knife for a smoother, sharper edge than any other method. The result is an edge that stays sharp, 2x longer, according to Wüsthof.
Rockwell Hardness of 58.
PRO: A finer, sharper edge angle, which is traditional of most Asian knives. The blade stays sharp, twice as long as their competitors.
Let’s go into each knife:
5″ Santoku Hollow Edge Knife
The scalloped or hollow edge is great for cutting thin slices of vegetables, to reduce friction and stick. Vegetables fall off the blade, and onto the cutting board for faster and more efficient cutting.
Much of Asian cooking, especially stir-fries require even, thin slices of ingredients, so that everything cooks evenly. That’s why Santoku knives are so designed with the hollow edge and flat blade (vs. curved blade made for “rocking” motion of mincing). The flat blade helps you slice in one even motion.
The angle of edge is 10º on each side.
PRO: Wüsthof’s Santoku is light. About 4 ounces, which is a great weight for cutting small vegetables and fruit. The lightness makes the knife makes you more nimble and your hands less tired when cutting for everyday cooking. In contrast, traditional European style knives have a thicker blade, and are heavier. Heavier knives are great for mincing using the rocking motion, and for cutting through thin, small bones.
The blade of this knife is 5″ long. It’s perfect for smaller vegetables and fruit: skinny carrots, apples, broccoli, garlic slices, shallot, green onion, Asian leafy greens etc. The knife is not made for cutting larger vegetables and fruit, like fat potatoes, daikon, melons, squash. Choose a longer, larger santoku knife for those ingredients.
PRO: The thin, super sharp blade at 10º on each side lets you cut paper-thin slices with amazing precision.
CON: All of Wüsthof’s Santoku knives’ hollow edge comes very close to the blade’s edge. In my opinion, too close. When you sharpen a blade, you are actually creating a new edge – which means removing steel. As you sharpen over time, the hollow indents will come even closer to the edge, and may even become the edge.
Wüsthof 3″ Asian Paring Knife
This paring knife has a flat edge that comes to a beak-like point. Actually, both the santoku and this paring knife have the “sheepsfoot” point. The blade is 3″ long.
This knife is sharpened to 14º on each side.
PRO: The shape of the blade is perfect for peeling in-hand. The blade’s edge cuts evenly and maximizes the amount of blade cutting your ingredient. In contrast, if you use a European style paring knife with a “belly” curve to peel an apple, your blade’s belly is the only part that’s cutting. Great for peeling garlic, shallots, onion skin. Perfect for slicing strawberries.
PRO: The handle is a generous 4″ long. Some paring knife handles are just too short and end up digging into my palm.
PRO: Light! The knife weighs 2.4 ounces. This makes it easier for hand-work and delicate cutting.
Why I recommend the Classic instead of Classic IKON
Wüsthof’s Classic line is aptly named, it’s a classic design that professional chefs and cooks worldwide have been enjoying since 1814.
The Classic IKON shape is just a little more comfortable, ergonomic. It fits my hand a little better. Both handles are made of same material. Is it worth an additional $40 for the handle shape?
In my opinion, no. Not for the 5″ santoku, which is meant for smaller vegetables and fruit, prepping for everyday meals.
The handle shape of the Classic is just fine for me. I am not slicing 10 pounds of carrots everyday, and I am not peeling a bushel of apples. Hey, if professional chefs have been using Wüsthof Classic for 200 years without complaint, so can I! 🙂
If I happen to be tasked with 10 pounds of carrots to slice, I’d use a food processor or a mandolin (this one is my favorite). If I had to choose a knife to slice 10 pounds of carrots, I’d use a larger, longer santoku knife that weighs a bit more, maybe a 9″ knife and allow the weight of the knife to help me get through all the carrots.
Save your $40 and get a another knife! Here’s another great Wüsthof knife that we reviewed recently and that I also use everyday.
Wüsthof will send the winner 2-piece Mini Asian Classic Knife set.
** Please add [email protected] to your contacts to help prevent email notifications from going into spam folders.
Never miss another Steamy Kitchen Giveaway!
Subscribe to our Giveaway Notifications to keep up to date on all of our giveaways! We will even throw in a special gift when you confirm your subscription!
List of Past Winners.
DISCLAIMER & OFFICIAL RULES: The giveaway product is provided by the sponsor of the giveaway and will be shipped from the sponsor directly. No purchase necessary to enter or win. Giveaway is open to people who are 18 years of age at time of entry and open to people worldwide. Steamy Kitchen and its sponsors only ship physical prizes to United States addresses. However, Steamy Kitchen reserves the right to provide an Amazon.com or Amazon.ca gift card for the value of the prize (at time of publishing) in lieu of shipping physical product due to shipping costs and logistics, especially for our international winners. Steamy Kitchen assumes no responsibility for late or misdirected entries due to SPAM, technological, or e-mail filtering issues or for prizes lost in transit. Winner will be notified by email, and must respond within 5 business days, otherwise winner will forfeit the prize and another winner may be drawn. For this giveaway, entrants can enter the designated number of times per e-mail address per day. The use of any system, robot, agent, or software to automatically submit entries in connection with this Giveaway is prohibited. Winners of giveaways are published on Steamy Kitchen, and winner's name and city/state/country are announced in Steamy Kitchen email newsletters. See rest of the Official Giveaway Rules.
Comments Off on Wüsthof 2-Piece Mini Asian Knife Set Review & Giveaway
Source: https://steamykitchen.com/47439-wusthof-2-piece-mini-asian-knife-set-review-giveaway-2.html
0 notes
Text
Cute Chickens Made with Quail Eggs
Hi, Have you ever tried hard boiled quail eggs before? Our second son, Logan loves them so much that he can eat a bunch of them at once. They taste very similar to normal eggs, but the texture is softer and the flavor seems milder. To make them even better, you can be creative by making these lovely chicks with them. Kids will love to eat these since they are so cute. We normally use these chicken-shaped quailed eggs in lunch boxes in Korea. I am giving you a hint for my next post by saying that. 😉 Try these cute and yummy snacks someday.
Yield: 6 Pieces
Short Korean Lesson
PokSeol (폭설) = Snow Storm
PokU (폭우) = Heavy Rain
Video Instructions
Main Ingredients:
6 Quail Eggs
Some Water
Some Carrot
Some Black Sesame Seeds
Directions
Get some quail eggs. I will cook 6 of them today.
Pour some water into a pot and add the quail eggs in it. Once it starts to boil, cook it for 5 minutes on high.
After 5 minutes, put the cooked quail eggs in ice water or cold water. Set them aside for few minutes while preparing the beaks and combs for the chicks.
First, cut a piece of carrot into thin pieces. For the beaks, cut the thin pieces into ¼-inch strips. Then cut the strip into 6 right-angled triangle pieces. For combs, cut a thin piece of carrot into about ½ x ⅓ inch rectangular pieces. Then cut each piece like a crown like this. (You can watch the video instruction for this step.
Once the quail eggs cooled down, peel off the shell.
Each quail egg needs a beak and a comb.
Slice the top of the quail egg a little.
And then, put the carrot comb into it. Push it in gently.
For the beak, poke your knife into the egg a litte.
Gently push the carrot beak into it. You can see which direction of the triangle that went in.
In the same way, make little tiny holes for the cute eyes with a knife. Then, use a black sesame seed for each eye.
Maybe your cute chick is too cute now.
My first son, Bryson, who doesn’t like to eat hard-boiled eggs anymore liked this and asked me to pack these quail egg chicks for his lunch someday. Perhaps, he wants to show these cute chicks to his friends. 🙃 I was so happy to see our boys enjoying these nutritious snacks.
Source: http://aeriskitchen.com/2019/01/cute-chickens-made-with-quail-eggs/
0 notes
Text
Best Blueberry Streusel Muffins
August 20, 2018
This post may contain affiliate links, which won’t change your price but Barbara Bakes will receive some commission.
These really are the Best Blueberry Streusel Muffins! They’re big, beautiful, and tender muffins, loaded with blueberries and crowned with a sweet crunchy streusel topping.
Do you have a recipe you consider the best? My good friend Becky, Vintage Mixer, posted several of her best recipes lately, and I couldn’t resist baking “the best blueberry muffins that you’ll ever sink your teeth into.”
This recipe was given to her by the chef at Communal, and it is a big, beautiful muffin that rises over the top of the muffins cups. It’s loaded with 2 cups of blueberries, which don’t sink to the bottom of the muffin because of the thick, coffee-cake-like batter.
Our family loves a streusel topping on muffins so I added an easy to make sweet/sandy streusel topping. Muffins without a streusel topping are kind of like cupcakes without frosting. Delicious without it, but irresistible with it.
Making The Best Blueberry Streusel Muffins
I use a scoop to perfectly portion out the muffins, and I love using If You Care Baking Cups. They’re the best muffin / cupcake papers. The muffin pulls away so easily from the paper – no wasted muffin. You can also bake them without the muffin papers, but clean up is so much easier if you use papers.
Making the streusel topping with oil gives it a great sandy texture, but if you prefer, you can substitute butter for the oil.
Baking Tip:
When baking something that comes together as quickly as muffins, it’s especially important to have all your ingredients gathered together and ready to go (mis en place). If you have everything assembled, from scratch muffins don’t take much more time than muffins from a box.
This recipe uses 1/2 cup (1 stick) of room temperature butter. To quickly warm up your butter, cut it into slices and let it sit in the bowl while you assemble all your ingredients.
I like to make the streusel topping first so that it’s ready to sprinkle on and I don’t get lazy and leave it off.
Update: These really are the best muffins! It’s become one of my most popular recipes. If you haven’t made them yet, definitely give them a try.
If you have a recipe you consider THE BEST, I’d love to hear about it!
Best Blueberry Streusel Muffins

Ingredients:
2 cups all purpose flour
1 1/2 teaspoons baking powder
1/2 teaspoon salt
1/2 cup (1 stick) unsalted butter, softened
1 cup sugar
2 large eggs
2 teaspoons vanilla extract
1/2 cup whole milk
2 cups blueberries, fresh or frozen
Streusel Topping
4 tablespoons sugar
1 tablespoon flour
2 teaspoons vegetable oil
Directions:
Preheat oven to 350º. Lightly grease a muffin tin with cooking spray or vegetable oil, or line with paper muffin liners.
Prepare streusel topping and set aside.
In a small bowl, whisk together flour, baking powder and salt and set aside.
In a large bowl, beat butter and sugar until light and fluffy. Add eggs, vanilla and milk. Add flour mixture and stir until just combined.
Stir in blueberries.
Divide batter evenly into 12 muffin cups. Sprinkle muffins with streusel topping.
Bake at 350º for 20 to 25 min, until a tester inserted into the center comes out clean.
When muffins are done, cool for a few minutes in the muffin pan before removing to cool on a wire rack.
Streusel Topping
In a small bowl, whisk together sugar and flour. Add oil and mix until mixture has a sandy texture.
Other best muffin recipes:
How to Make the Best Muffins/One-Bowl Oatmeal Muffins, Simple Bites Whole Wheat Apple Muffins, Smitten Kitchen Banana Bread Muffins, Barbara Bakes Chunky Monkey Banana Muffins, Barbara Bakes
Pin It:

Source: https://www.barbarabakes.com/best-blueberry-streusel-muffins/
0 notes
Text
Paris Restaurants, Bistros, Cocktail Bars and Bakeries
Not a day goes by when I don’t get a message requesting a restaurant recommendation in Paris. (Curiously, I also get asked for restaurant recommendations in cities I’ve never lived in, or even visited.) My promise to you is that I’ll only write up or recommend places I’ve been to, and with apologies to all who’ve asked for restaurant recommendations on social media, if I answered every request and message, I wouldn’t have time to write up this list for you. Or even go out to eat myself.
I do update my Paris restaurant list when I find a place I like. Similarly, when a restaurant or bistro isn’t what it used to be, I remove it. When I do a more extensive write up of a place, you’ll find it listed in my Paris restaurant categories. But other times, when I’m just going out to dinner, not toting my camera with me (and not remembering all the details the next day), I’ll give it a more general shout-out on my Paris restaurant page. But here’s a little more to add to that list, as well as some sweet shops and cocktail bars that are worthy of being on your radar.
Brasserie Bellanger (140, rue du Faubourg Poissonière, 10th) is one of the newest of the low-priced bistros that have popped up in Paris over the last few years. The young owners promise everything is fresh and fait maison (homemade), which was a criticism rightly leveled at some of the old-school bistros that lost their luster, noting that the brasserie sources things directly from producers, which allows them to keep prices modest. Our vegetable-centric pollack was perfectly cooked, served on a heap of vegetables. There were no fancy sauces or ornamentation. The frites we ordered alongside – because man cannot live by fish alone – were some of the best I’ve had in town. Often they’re soggy or soft, and these were cooked until bronzed and crispy. In short, the kind of fries that are worth polishing off. We finished with an Île flottante filled with mango puree and an excellent Paris-Brest. Super friendly staff and tables outside (although other diners waiting for tables may be smoking nearby), but still, the outside is a rather pleasant place.
Another place that I’ve been enjoying, where I’ve not taken a picture at, is Le Mermoz (16, rue Jean Mermoz, 8th). This starkly-decorated bistro allows you to focus on the food, which isn’t just beautifully-presented, but it’s perfectly prepared. A recent lunch started with a plate of lightly blanched green beans with fresh almonds and pickled apricots. Dessert was softly cooked cherries bathed in sabayon with cubes of Gâteau de Savoie and a sprinkling of fresh elderflowers. The focus is on quality of ingredients and preparation, rather than portion size, at least at lunch, when I’ve dined there. But it’s usually enough for me.
I’ve written about les routiers before, French truck stops known for serving honest, no-nonsense fare, hearty enough for truckers, who need a decent meal to break up the monotony of being on the road. Aux Bons Crus in Paris probably doesn’t get that many truckers, but locals like it because it serves honest French food without a lot of fuss. Recently three women next to us were thrilled to be able to get kidneys, while we shared a Frisée salad with lardons (bacon), rillettes (not my favorite dish on the menu), and œufs mayo, before digging into mains of straightforward French fare, everything intentionally priced to please camionneurs (truckers), and the rest of us.
Yup, I know it’s not called Bo Bun, but that’s what they call it in France. (And yes, in France, it’s also café express, not an espresso.) If you have a problem with the language, take it up with the Académie Française. Whatever you call it, Bo Bun has become as popular at the Apérol Spritz around town, especially with the twenty-something set. But the one at Lux Café (73, rue Saint-Maur, no website) is different than others. The grilled rolls and pork (although it’s available with fried tofu, and yes, with grilled pork the dish is traditionally referred to as Bun Cha) are on a bed of curled up sheets of noodles, rather than the traditional strands of vermicelli.
There’s only one thing on the menu and the prices are higher than the other places around town, but I think it’s worth it. If you want to walk up to Belleville, Dong Huong has a pretty good one, too. Actually, at Dong Huong I always get B12 on the menu, do-it-yourself rice paper rolls that you roll up with grilled chicken, fresh herbs, carrots, and rice noodles. It took me a while to get the hang of it; an older Vietnamese waiter saw me struggling the first time and came over to show me how it’s done. Now, I’m almost a pro, although when I was in Vietnam, when I saw how deftly everyone make their rice paper rolls, and realized how much I still have to learn.
Also on my radar has been Poulette, perhaps the prettiest restaurant in Paris. We went for lunch and started with asparagus bathed in a Chartreuse-tinged mousseline and œufs mayo, then moved on to an outstanding plate of quail in a sauce of d’Anjou white wine with green peppercorns and fingerling potatoes. Happily, Poulette has fresh fruit juices made to order at the bar, if you’re on lunch break and don’t want to drink wine, but if you come in the evening (or if you’re up for a little day-drinking), there’s an especially strong list of house-made cocktails.
It was late afternoon when we arrived at Cravan (17, rue Jean de la Fontaine, 16th), so was happy to have a sip of one of the libations of Franck Audoux, the owner of this truly hole-in-the-wall café. But what a hole! Designed by Hector Guimard, who designed many of the art nouveau Paris métro stations, everything at Cravan is pretty, and perfect. I’ve not been during mealtime but I’ve tried a number of the small plates, which are a quite a change from the bowls of peanuts or potato chips served around town. (However, these aren’t free.) I’ve loved everything I’ve had here, from the straightforward cocktails that focus on French spirits, like the Cognac-forward Boulevardier I had last week, but the snacks have always been excellent. The café is rather cozy, but the expansive terrace is a gorgeous place to sit in the warmer months.
I went shortly after it opened and Double Dragon (52, rue Saint-Maur, 11th) had a few kinks to work out. They didn’t take reservations so we got there when they opened at 7pm, and there was already a line. The other was the music, which was pretty loud. Thankfully both have calmed down, however they still don’t take reservations, and Double Dragon offers up Asian fare quite a few steps above the other places around town. Opened by the two sisters that operate Le Servan down the street, you’ll find little pepper icons on the menu to let you know something is spicy. The server warned us against a few of those things on the menu, then heard my accent, and let me go ;)
The fritters (above) are tofu beignets lined with Comté cheese, served with a mayo-based XO sauce. The thrice-cooked beef with celery was very good, and the Sichuan noodles were, indeed, very spicy. But we both slurped them up.
An old favorite that I hope never changes is Le Petit Vendôme, known for having some of the best sandwiches in town. True, there are places to sit, but if you want to feel like a local, order a sandwich, saddle up the bar, order a glass of Burgundy, and enjoy the atmosphere…and le sandwich. The classic jambon-beurre here is renown.
On the other end of the spectrum is La Fontaine de Belleville, a spiffy, well-polished French café, owned by Belleville Brûlerie, pioneers of the quality coffee movement in Paris. It’s been restored and serving the legendary coffee that’s roasted not far from the café, and you can also get a classic jambon-beurre sandwich and a Croque Monsieur, then finish up with one of the excellent house-made desserts. The Pain d’épice, shown above, goes great with a p’tit crème.
Further up the hill in Belleville, is La Cave de Belleville, a natural wine bar. Often these kinds of wine bars attract a hip crowd, who seems more interested in jumping out of their seats to grab a smoke outside, or check their Likes, rather than doing any serious eating. (I’m always amazed when a server puts down plates of hot food in front of people, and at that moment, they run outside.) Here, everyone stays put as the plates of cheese and charcuterie are hard to walk away from. The one shown (above) was dinner for three of us, along with a plate of burrata that was better than most versions around town. Wines are available by the glass or bottle, and the wine prices are remarkably reasonable.
On the sweet side, I went to a launch party for Aqua Vitae chocolates from Edwart. Edwin, the owner and chocolatier, loves liqueurs and spirits and his new collection of chocolates brilliantly incorporates them. Sometimes when people add liqueurs, they can be too faint to fully appreciate. But each chocolate in this assortment, which includes one blended with Glenfiddish whisky aged in IPA barrels, Del Maguey mezcal and Venezuelan chocolate, and the elusive Chartreuse végétal elixir (unavailable in the U.S., but comes in a handy wooden box for travel), boldly go where few chocolates dare to go. The collection is available for a limited time only.
The sign outside says “Depuis Hier,” nothing that they’ve been open “since yesterday,” The French Bastards have arrived on the Paris pastry scene. There are babkas and cruffins, as well as a formidable lemon meringue tart (which is meant to be for one, but I think it’d feed four), but their regular vienoisserie, the croissants and pains au chocolat (above), are outstanding. One day the exceptionally friendly bâtards called me into the kitchen and sliced into a slew of trial batches, to taste. Their croissants are larger than others around town, but as buttery flakes and shards flew around while we sampled, I learned that they’ve hit their stride and this is a bold new addition to the pâtisseries of Paris.
Starting a meal with a drink is a French tradition, during l’heure de l’apéro, or apéritif hour. This Kiss & Fly (above) at Mino was a refreshing twist on the spritz, a blend of Pimm’s, lemon, ginger cordial, finished off with grapefruit soda and prosecco. While this is a very competent cocktail bar with friendly bartenders, the food is quite good, too. The menu changes frequently but the flavors (and decor) continue to be drawn from the Mediterranean.
Staying by the sea, the nautical theme at Copper Bay will take you away from being in a bustling city center, along with a line-up of seasonal cocktails shaken and stirred up by the friendly staff. There may be a Tipsy Tea, their interpretation of a Pimm’s No. 1 Cup, or a Tzatziki, made with dill-infused vodka, basil, cucumber, and mastic spirit. You can also get artisan sparkling apple cider or pastis (with or without orgeat syrup), served by the glass, carafe, or even frozen.
Considered the oldest cocktail bar in Paris, Gallopin has expanded to the space next door, for the more casual La Rôtisserie Gallopin featuring cocktails on tap, created by one of the best bartenders in Paris, Stan Jouenne. His coffee-fueled Negroni combines Grand Brûlot coffee-Cognac liqueur, Salers (gentian) and Dolin vermouth, all from France, as the bar only uses French spirits. I haven’t eaten at their rôtisserie yet (it just opened this week), but if this drink is any indication, we might both want to check out the food.
Someone requested the recipe for these Socca Chips on social media, which are available at the Fédération Française de l’Apéritif, which is like asking the recipe for Fritos. It’s not going to happen, at least in anyone’s home. (If you do have a recipe for Fritos, please forward it to me!) But as I often say, everything doesn’t need to be available everywhere, all the time. It’s often best just to go somewhere and enjoy it there, which holds especially true for the FFA, as this apéritif bar is called. Only French products line the shelves, including buckwheat galette (crêpe) chips, that are also “Recipe, please” worthy, and a changing selection of cheese and meats to go with whatever you’re drinking.
Combat may seem like an unusual name for a Parisan bar (in my next book, I explain why), but you don’t need to know why right now, you just need to go to what is one of my favorite cocktail bars in Paris. The drinks aren’t over-the-top (thank you…) but straightforward, and delicious. For some reason, the bar height and size works perfectly for me; I always feel like I’m dining (or drinking) in someone’s home, rather than in a bar. The cocktail I prefer is the Perfect Serve, above, with whiskey, dried pear, sherry, ume liqueur, and a touch of absinthe. The name is spot-on.
While I avoid the term “industry favorite,” a number of bartenders in Paris have told me they like Sherry Butt. They’ve got a beguiling list of drinks, which changes, but I recently enjoyed a Ronin (above), with Japanese whisky, madiera infused with pandan (a tropical plant), oloroso sherry, Champagne, smoked sea and – whew – black salt. It sounded more complicated than it was, and I’m always amazed when a bartender can add a curiously diverse list of ingredients to a glass, and make it taste like simple liquid. That’s a skill worth raising a glass to, which we did.

Source: https://www.davidlebovitz.com/bakery-bistro-paris-restaurants-cocktail-bars-and-bakeries/

0 notes
Text
Easy Chicken Pot Pie
Sharing is caring!
A super easy Chicken Pot Pie made with Rotisserie Chicken and refrigerated pie crusts. This recipe is perfect for a weeknight meal.
I don’t know what the weather in your neck of the woods is doing, but after a week of near summer-like temperatures, it was down right cold and damp today. It’s the kind of weather that makes me crave a warm, hearty meal straight from the oven.
Chicken Pot Pie had been one of my favorite comfort foods since I was a child. This Pot Pie is loaded with shredded chicken, potatoes, carrots, and peas. With a layer of pie crust on the bottom and one on top, you’ll definitely get your pie crust fix.
If you serve this pot pie with a large salad, you can easily get two meals out of it for a family of four. I like to put one of these together on a Sunday afternoon and have leftovers on Monday or Tuesday. If you’re not ready to bake it right away, you can refrigerate it for a few hours covered in plastic wrap.
Our local market usually has rotisserie chickens on sale on Sundays, making this a very economical meal.
I like a really thick and hearty pot pie so I make my filling so thick it holds its shape when cut. If you like a looser filling, just add a little extra milk or chicken broth.
Be sure to use a deep dish pie pan. There is a lot of filling!
Chicken Pot Pie is a wonderfully delicious and comforting meal the whole family will enjoy! One bite and you’ll never want a frozen one again.
More Chicken Pot Pie Recipes:
Sign up HERE for the Spicy Southern Kitchen Newsletter.
Watch the video below to see how easy this recipe is to make!
This easy to make Chicken Pot Pie utilizes refrigerated pie crusts and rotisserie chicken to make a super delicious and comforting pot pie loaded with chicken, potatoes, peas, and carrots.
1 cup peeled and diced potato
3/4 cup sliced carrot
1/2 cup butter
2/3 cup diced onion
1 1/4 teaspoon salt
1/2 teaspoon ground pepper
1/4 teaspoon dried thyme
1/4 teaspoon poultry seasoning
1/2 cup all-purpose flour
1 1/2 cups chicken broth
1 cup milk
3 cups shredded chicken from a rotisserie chicken
1 cup peas
2 refrigerated pie crusts
1 egg beaten together with 1 tablespoon water to make an egg wash
Preheat oven to 425 degrees.
Place potatoes and carrots in a small saucepan, cover with water, and bring to a boil for 5-8 minutes to soften. Drain.
Melt 1/2 cup butter in a large sauté pan. Add onions and sauté for 2 to 3 minutes.
Add salt, pepper, thyme, and poultry seasoning. Sprinkle flour on top and cook for 1 minute, stirring to evenly cook the flour.
Gradually whisk in chicken broth and then milk. Add potatoes and carrots and let simmer for a few minutes to thicken. Check for seasoning and add more salt and pepper if desired.
Stir in chicken and peas. Turn heat off.
Fit 1 pie crust into the bottom of a deep dish pie plate. Pour filling into pie shell.
Place second pie crust on top and trim excess. Press the two pie crusts together to seal and crimp edge using your fingers.
Brush egg white on top of the pot pie and use a knife to cut 4 slits to let steam escape.
Place on a baking sheet and place in oven and bake for 30 minutes.
You can easily double the recipe and freeze one for later.
* Percent Daily Values are based on a 2000 calorie diet.
Best Southern Cookbooks
Disclosure: This post contains affiliate links.

Source: https://spicysouthernkitchen.com/easy-chicken-pot-pie/
0 notes
Text
Five Ingredient Breakfast Egg Cups
Five Ingredient Breakfast Egg Cups
This post is sponsored by The National Frozen & Refrigerated Foods Association.
My friends, you know all about quick and simple meals and I have loved working with the National Frozen & Refrigerated Foods Association and bringing you some fun meals that come from our freezer and refrigerator!
I made you these little breakfast egg cups, you bake them in a nonstick cupcake pan and you can totally make them ahead. With just five ingredients, I’m not counting the salt and pepper! 🙂 What I love about them is you can serve them at your next holiday brunch or make them on Sunday and have them for breakfast the entire week. They are so versatile!
Here’s what I’m using. When I asked Curtis to pick up the Jimmy Dean Heat ‘n Serve Original Sausage Links in the freezer aisle, he was so excited about these. We can easily make breakfast with these on the weekends or during the week.
Cascadian Farms Organic HashBrowns and Spinach, I’m so excited to find these at my local grocery store. I love the hashbrowns, they are so good!
And NestFresh Free-Range Organic Large Eggs, we have a new favorite brand. We love that they are cage free too!
First thing you’re going to do besides turn the oven on is defrost the spinach. Take it out of the paper box and put the plastic bag in a bowl of cold water.
Next, I defrost the Jimmy Dean sausage links in the microwave using my defrost setting.
You want to cut these into little pieces so when you bite into the breakfast egg cups, you’ll get sausage in almost every bite!
Stick with me, look at the photo, I cut the sausage length-wise and then in half length-wise again. (I’m all about being efficient in the kitchen as possible!)
And then, I cut them into little pieces. Instead of cutting them into little pieces and then cutting those slices into littler pieces.
And then you’re done!
Chop up the red pepper.
And then, we’re back to the spinach. You’re going to squeeze all of the water out of the spinach. I use a potato sack dish cloth or you can use paper towels.
Squeeze and wring out the water.
And that’s the spinach you have left.
Beat the NestFresh Free-Range Organic Eggs in a measuring cup. That way it’s easy to pour the eggs into the muffin pan!
Generously spray your cupcake pan. And make sure you’re using an actual nonstick cupcake pan. Don’t make the same mistake as I did!
I have everything lined up and ready to go!
Add the hash browns to the bottom of each muffin cup.
Then, layer with sausage links and spinach.
And red pepper. And repeat. I did notice I had some spinach left over and you probably will too. You can use it make this spinach artichoke dip!
Pour the beaten eggs into the muffin pan.
You’re only filling them about halfway or a little bit more than half way. Be sure not to over fill them!
Bake them and then use spatula to make sure the sides are not stuck to the muffin pan.
Look how beautiful!
They are so so good and I know you’ll love them for your next holiday party. I totally didn’t even intend to make them festive looking but the green and red are so festive in the egg cups, aren’t they?
They are great for that party or even that quick breakfast to go on those busy weekday mornings! Don’t forget to check out the video that I made for this recipe too!
I would love to know if you have made little egg cups or omelettes with your muffin pan before?
Be sure to follow the National Frozen & Refrigerated Foods Association on facebook and instagram for easy home meals that you can make for your family!
Recipe
Yield: 12 egg cups
Prep Time: 20 minutes
Cook Time: 20 minutes
Total Time: 40 minutes
Five Ingredient Breakfast Egg Cups
Ingredients:
10-ounce package Cascadian Farm Organic Cut Spinach (frozen)
6 Jimmy Dean Heat ’n’ Serve Original Sausage Links from 23.4-ounce package (frozen)
1/2 red pepper, chopped small
About 1/2 of 16-ounce Cascadian Farm Organic HashBrowns package (frozen)
7 to 8 NestFresh Free-Range Organic Large Eggs, beaten
Salt and pepper
Directions:
Heat oven to 425 degrees F.
Prep the ingredients. Open the Cascadian Farm Organic Cut Spinach package and remove the plastic bag with the spinach place into a bowl and add cold water until it’s covered This will take about at least 15 minutes (you can make it go a little faster by changing the water a couple of times).
While the spinach is defrosting, remove the Dean Heat ’n’ Serve Original Sausage Links from the bag and defrost in the microwave for a few minutes, just so you can cut them up. Cut up the sausage links into small pieces (into 5 pieces and then each piece in half or quarters).
Chop up the red pepper.
Prep your nonstick muffin tin/cupcake pan and spray each muffin cup with nonstick cooking spray.
Back to the spinach. Remove from packaging and squeeze inside a of kitchen towel to remove the moisture.
Add about 1 tablespoon of Cascadian Farm Organic HashBrowns to each muffin cup. Layer in pieces of Jimmy Dean Heat ’n’ Serve Original Sausage Links, the Cascadian Farm Organic Cut Spinach and the red pepper. Repeat until all of the muffin cups are filled up. (You will probably have some spinach left over
Take the beaten NestFresh Free-Range Organic Eggs and add salt and pepper to them. Then, pour into each muffin cup, you’re only filling them about half way (be careful to not over fill).
Bake for 15 to 17 minutes at 425 degrees F or until the eggs are cooked to your liking.
Notes:
Store them in a tightly sealed container in the refrigerator. It’s easy to reheat them. Put them on a microwave-safe plate and cover, microwave for about 30 seconds and add 15 seconds at a time until heated through.
Guess what? You can totally make these ahead and freeze them! Place them on a lined baking sheet separated (not touching) and place them in the freezer for at least 30 minutes. Then, place them into a zippered plastic bag. That way when you store, them they won’t stick together and freeze together. To reheat, heat oven to 400 degrees F (while the oven is reheating, remove them from the freezer and place on the counter). Bake for 16 to 17 minutes, or until heated all the way through.
Disclosure: This post is sponsored by The National Frozen & Refrigerated Foods Association. I always share with you my own opinions and I only work with brands that I love.
Posted on November 28, 2018
Stay Connected
Sign up today to receive exclusive content and news from The Little Kitchen:
Source: https://www.thelittlekitchen.net/five-ingredient-breakfast-egg-cups/

0 notes
Text
Quick Cheese Burgers with Chipotle Mayo

Quick Cheese Burgers with Chipotle Mayo
I’ve always loved the idea of cheese burgers but generally don’t bother to make them at home because it always seems like a hassle to get the cheese melted ‘just right’ while you’re cooking the burger patties. Then a few weeks ago I had the idea to add parmesan to the meat.
Cheese inside the burger!
So you get all they lovely cheesy complex flavours without the pressure of melted cheese perfection. Win!
Oh and this chipotle mayo is seriously the business. I love it with these burgers but it’s also brilliant with chicken or fish or for adding a flavour explosion to your tacos or your breakfast eggs for that matter :)
Ingredients
100 g (3.5oz) chipotle chillies in adobo sauce
100 g (3.5oz) mayo + 2-3 tablespoons extra for slaw
450 g (1lb) minced (ground) beef
50 g (2oz) grated parmesan, plus extra
1/4 medium cabbage
small bunch coriander cilantro
Instructions
First make the mayo by chopping chipotle chillies and mixing with the mayo. Taste and season with salt if needed.
Combine beef and parmesan and form into 4 burger patties. Heat a large frying pan on a medium high heat. Add a little oil. Reduce heat to medium and then cook the burger patties for 4-5 minutes on each side, or until well browned on the outside and no longer pink in the middle.
While the burgers are cooking, shave the cabbage using a mandoline or sharp knife. Finely chop coriander stems and coarsely chop the leaves. Toss shaved cabbage and chopped coriander in a bowl with the 2-3 tablespoons of extra mayo.
When the burgers are cooked, divide chipotle mayo between two plates smearing into an off centered circle. Top with cooked burger patties. Add slaw on the side and finish with an extra grating of parmesan.
WINE MATCH: A cold Eos Eqquis beer or a glass of Tempranillo.
Variations & Substitutions
no chipotle chillies in adobo sauce – replace with 2 teaspoons tomato paste, 1-2 teaspoons smoked paprika and dried chilli powder to taste (1/2 to 1 teaspoon).
short on time – skip the slaw and serve with green salad instead.
vegetarian – chickpea burgers.
more substantial (carb lovers) – burger buns and fries or roast sweet potato.
more substantial (low carb) – almond burger buns. Or add some roast nuts to the slaw. I love it with roast walnuts.
Low FODMAP – use the no chipotle option to flavour the mayo (the adobo sauce contains onions). And use low fodmap cabbage (white or red, not savouy).
family-friendly – skip the chipotle mayo or serve tomato ketchup instead. And serve with burger buns.
Waste Avoidance Strategy
chipotle chillies in adobo sauce – keep it in the pantry.
mayonnaise – unopened in pantry or once opened will keep for months in the fridge.
minced (ground) beef – freeze it.
parmesan – wrap in waxed paper or baking paper and store in the fridge in a sealed paper bag or airtight container. Will keep for months. Can be frozen if you’re going away.
cabbage (white) – will keep in a plastic bag in the fridge for weeks, even months. Can be frozen but will have a wilted texture once defrosted.
coriander (cilantro) – best to use for another meal. Can be frozen but will wilt when defrosted.
Prepare Ahead
You can but I do think burgers are nicer when freshly cooked. Leftover burgers will keep in the fridge for 2 weeks or can be frozen. Leftover mayo and slaw will keep in the fridge for up to a week for the salad and up to 2 weeks for the mayo but neither of these can be frozen. To serve, I would warm the patties in the oven so they don’t over brown (200C / 400F for 10 minutes or so).

More Simple Burger Recipes
Have fun in the kitchen!
With love, Jules x
Tags: burgers, cabbage, cheese, chipotle, mayo, mayonnaise, parmesan, quick, simple, slaw
Source: https://thestonesoup.com/blog/2019/02/11/quick-cheese-burgers-with-chipotle-mayo/

0 notes
Text
Our 10 Most Popular Recipes from Instagram — Recipes from The Kitchn
Kitchn's Instagram is a treasure trove of drool-worthy food photos and recipe inspiration. (By the way, are you following us yet?) Curious to know which of our recipes inspired our followers to hit that heart button the most, we pulled a list of our top 10 most popular recipes on Instagram.
Here are the Insta-famous recipes in all their glory. If you make any, don't forget to take a photo, post it on Instagram, and use the hashtag #thekitchn!
1. Creamy Parmesan Garlic Mushroom Chicken
This easy weeknight meal comes together in one skillet, which means it's super easy to make and clean up afterwards! Think of it as the grown-up take on the chicken casseroles you ate growing up — with no cream of mushroom soup in sight.
2. 2-Ingredient Watermelon Sherbet
Yes, you can make creamy, dreamy sherbet (in a perfect millennial pink hue) with only two ingredients — watermelon and sweetened condensed milk — and without an ice cream maker. But act fast, because summer is almost over!
3. Butter Roasted Sweet Potatoes
This method turns ordinary sweet potatoes into rich, caramelized morsels of heaven on a sheet pan. After you roast the sweet potato rounds with butter and salt for about 40 minutes, you'll have a melt-in-your-mouth side dish everyone is sure to fight over.
4. Cilantro Lime Pork Chops
If you think sad, dry, and bland when you think pork chops, this recipe is here to change all that. With zesty lime and bright cilantro, this quick skillet meal is basically a party in your mouth. Serve with rice or quinoa to round things out!
5. Easy Miso-Citrus Dressing
Having a good, go-to dressing recipe up your sleeve is the key to never being bored in the kitchen. And this two-ingredient — miso paste and fresh citrus juice — flavor powerhouse is a strong contender. You can play around with the miso paste and citrus varieties so you never get bored, either. Win-win!
6. Garlicky Parmesan Sweet Potatoes
Another roasted sweet potato recipe! This time with a coating of garlic and Parmesan — a combination you can't possibly go wrong with. If you're feeling extra fancy, sprinkle on some fresh chopped herbs right before serving.
7. Creamy French Mustard Chicken
Anything with French in the title is usually a winner in our book. The fact that this recipe also comes together in 30 minutes in one skillet makes it even better. At the end you'll be left with crispy-skinned chicken swimming in a creamy, mustardy sauce.
8. How To Make No-Knead Bread
This recipe is a total classic for a reason. It's the simplest bread to bake at home, and it requires no stand mixer, no starter, no special knowledge, and, as the name implies, no kneading.
9. Shaved Brussels Sprouts Salad with Apples, Hazelnuts & Brown Butter Dressing
PSA: Thanksgiving will be here before you know it. And this salad is a guaranteed crowd-pleaser that should be on your holiday table. The key is the nutty brown butter dressing that really takes these simple ingredients over the top.
10. Slow Cooker Chicken Enchilada Soup
This soup is like a warm hug in a bowl. It takes a little effort upfront because you're making your own enchilada sauce, but it's totally worth it. After you've made your sauce, you just add corn, beans, and chicken and let the slow cooker do the rest of the work. Don't forget lots of sour cream, avocado, and tortilla chips for serving!

Source: https://www.thekitchn.com/most-popular-instagram-recipes-262503
0 notes
Text
Fairlife Milk Horror
Fairlife milk has become a horror story for the dairy industry. I have been critical for a while and now it is being pulled off the shelves in the Midwest.
Fairlife is distributed by Coca-Cola and is ultra-filtered to have less lactose and more protein. You used to be able to find it in stores around the nation.
In my 2015 post - Fairlife Milk Is So Deceitful That I Can’t Stand It - I brought up what I believed to be a misleading marketing campaign.
My initial problem was “Grass to Glass” as I knew that one of their farms (Fair Oaks Farm) with 30,000 cows was not pasturing their animals. I have been on dairy farms with 2,000 animals and they can’t efficiently pasture them and milk them three times per day.
Look at the logo on the front of the packaging! None of those cows are reaching down like that.
Photos on the Fairlife website included beautiful grassy fields (before the scandal).
The image in a consumer’s mind of a cow eating grass is below.
This beautiful dairy cow is near my house. You can see the family farmhouse behind her. She is chewing on grass. Fairlife cows did eat alfalfa - a kind of grass - but not on a pasture. I did not think that (unless you knew a lot about the dairy industry) consumers would understand that the cows were not happily chewing and traipsing about a field like the cow above.
But, that point about “grass to glass” turns out to be minor in comparison to the blatant falsehood of the first claim on the container - “Extraordinary care for our cows.”
This is what extraordinary care looks like. Look closely at this photo.
Her name is Giselle. Anyone want to try to name 30,000 cows?
Given the scale of the operation, extraordinary care would have been incredible. But, not only was the care NOT extraordinary but the cows were mistreated - from the Today Show article - Fairlife Animal Cruelty Controversy:
Employees were observed slapping, kicking, punching, pushing, throwing and slamming calves. Calves were stabbed and beaten with steel rebars, hit in the mouth and face with hard plastic milking bottles, kneed in the spine, burned in the face with hot branding irons, subjected to extreme temperatures, provided with improper nutrition, and denied medical attention,” ARM (Animal Recovery Mission) said in a statement accompanying the video that was posted on Facebook and Vimeo.
I’m not going to link to the video because it is truly awful. You can find it easily if you want to watch it.
Fairlife milk is now facing two federal lawsuits for (wait for it) FRAUD.
It took a group of activists that worked on Fair Oaks farm and documented abuses for Fairlife to face the music.
I know it isn’t possible for everyone to visit the farm that they buy milk from BUT don’t believe the hype of a company like Coca Cola when it comes to something as important as animal care.
I try to buy my milk from local family farms because I can visit and see happy cows like Giselle. Isn't she adorable?
Have you heard about the Fairlife milk scandal? What do you think?
Other posts you might like:

Source: https://snack-girl.com/snack/fairlife-milk-horror/
0 notes
Text
Chicken and Vegetable Dumpling Soup
Surprisingly easy to make at home, this chicken dumpling soup (loaded with veggies!) is hearty, wholesome and so incredibly delicious!
I don’t know why, but for many years of my life, the thought of plopping homemade dumplings into a from-scratch chicken/veggie soup was always super intimidating. Like, why even go there when you have chicken noodle soup and chicken pot pie and chicken noodle stew and other chickeny, vegetabley favorites? Know what I mean?
It wasn’t until I tried my Aunt Marilyn’s amazing chicken dumpling soup (loaded with veggies) that I kind of got it. A) it was actually embarrassingly easy to make emphasizing all the lost years of my life I had lived in intimidation and B) it’s pretty much one of the best soups ever.
My family can attest to that. They go crazy over this soup. It’s easily one of their favorite meals of all time, and I’m sitting over here thrilled that I can fulfill all of their wildest winter soup dreams with minimal effort.
This recipe has lived on my site for nearly eight years, and I figured it was high time to do a little refresh action and catapult it back into the spotlight (plus, I added a few necessary recipe notes). Many of you have made this soup over the years and have declared it a favorite, too.
Here’s a quick comment from the thread below: I just wanted to let you know that…my family of 5 all loved it, including my picky 8-year-old who claims to not like any soup that doesn’t come out of a can! I was nervous about the dumplings, I’ve never made anything like that before, but they came out great! Thanks for once again saving dinner in my house!
So basically this chicken dumpling soup is saving picky eaters (or rather, their parents) one bite at a time. 🙂
I’m including a few tips to help you if you’ve also been in the intimidated-by-homemade-dumplings camp.
The dumplings are made from a soft one-bowl batter. Similar to muffins, you don’t want to overmix the batter or the dumplings might be kind of dense and heavy. The recipe has always used 1 cup flour for the dumplings, but I’ve added a note below that if you want sturdier dumplings (vs super-de-duper soft), add another 1/4 cup flour to the dumpling dough.
I use my small cookie scoop aff. link to drop the dumplings into the hot soup. The best piece of advice I can give for chicken dumpling soup is to LET GO OF PERFECTION. The dumplings are going to be rustic looking. Not uniform in size or shape. And quite honestly, just a little bit homely in appearance.
That’s the comfort and joy of dumpling soup. It’s meant to be a down home comfort food that pleases the soul and the tummy without giving a flip about what an Iron Chef would say about it.
As the dumplings are dropped into the simmering soup, they’ll immediately start puffing up and expanding. That’s ok! Just work as fast as you can; all will be well in the end.
The biggest key to success in this recipe is to put a lid on the soup while the dumplings cook, and let the dumplings cook for the full amount of time. Try to summon all your self control and don’t lift the lid while the dumplings cook!
I’m kind of against soggy foods in general, but when the dumplings in this soup are fully cooked, they are incredibly yummy. Soft on the outside and fluffy on the inside. Undercooking (or underflouring) the dumplings will result in soggy dumplings, though. So dumpling ploppers everywhere beware.
Using a wider pot vs. a tall, narrow pot will increase the surface area for the dumplings, so keep that in mind, too.
You’ll notice from the recipe that you can cook raw chicken in the first steps of the recipe OR use already cooked chicken, adding it later. Having made this soup dozens and dozens of times over the years, my preference is to use already cooked chicken. Maybe it’s just me, but I find I always end up overcooking the chicken if I simmer it with the veggies (probably a personal problem).
I usually have rotisserie chicken meat hanging out in recycled sour cream containers in my freezer, and often, I’ll plop the whole frozen lump of chopped up, cooked chicken in this soup and let the heat of the soup thaw the tender, flavorful chicken.
If this soup has been a long standing favorite of yours, I haven’t changed anything fundamental in the recipe below – just added a few recipe notes. But if you haven’t made this soup yet, what better time than mid-January for us northern hemispherers, huh? Chicken dumpling soup was meant to be winter’s soup.
One Year Ago: Lemon and Garlic Grilled Chicken Two Years Ago: Super Moist Fudge Bundt Cake
Yield: 6 servings
Prep Time: 15 minutes
Cook Time: 30 minutes
Total Time: 45 minutes
Ingredients
Soup:
1-2 teaspoons olive oil
2-3 stalks celery, chopped, about 1 cup
2-3 large carrots (or 8-ish baby carrots), chopped, about 1 cup
1 medium yellow onion, chopped, about 1 cup
1 teaspoon salt (I use coarse, kosher salt)
1/2 to 1 teaspoon dried thyme
1/4 teaspoon pepper
8 cups chicken broth (I use low-sodium)
1 1/2 pounds boneless, skinless chicken breasts (2-3 medium) or 3-4 cups cooked chicken (see note)
1/2 cup water + 1/4 cup all-purpose flour to thicken
1/2 cup frozen peas
Dumplings:
1 cup all-purpose flour (use 1 1/4 cups flour for sturdier dumplings)
2 teaspoons baking powder
1/2 teaspoon salt
1/4 teaspoon dried thyme or sage
1/2 cup sour cream
1/2 cup milk
1 tablespoon vegetable or canola oil
Instructions
In a large pot, heat the oil over medium heat. Add the celery, carrots, onions, salt, pepper and thyme. Cook for 2-3 minutes, stirring often, until the vegetables start to soften. Add the chicken broth and chicken (if using uncooked chicken). Bring to a simmer and cook for 10-15 minutes until the chicken is just cooked through and/or veggies are tender. Remove the chicken to a plate and cut into small pieces.
In a small bowl (or blender), combine the 1/2 cup water and 1/4 cup flour until smooth. Whisking vigorously, slowly add the flour mixture into the hot broth and stir until well combined. Stir in the frozen peas and cooked chicken and bring the soup back to a simmer.
For the dumplings, in a medium bowl, stir together the dry ingredients. Add the sour cream, milk and oil. Stir just until combined (don’t overmix).
Drop teaspoon-sized amounts (the dumplings should be fairly small, they’ll expand while cooking) of dumpling dough into the boiling soup, covering the entire surface of the soup. I use a #60 small cookie scoop. Cover the pot and simmer the soup and dumplings for 12-15 minutes. Do not lift the lid of the pot while the dumplings cook! Add time if the dumplings haven't cooked all the way (or if they are bigger in size than teaspoon-sized portions).
When the dumplings have cooked fully, remove the lid and gently stir the dumplings to break them apart, if needed. Serve.
Notes
Very often, I make this with leftover chicken or turkey. I just omit cooking the chicken in the broth and water at the beginning and add the leftover, cooked chicken with the peas.
The original version of this recipe used 1 full teaspoon dried thyme; sometimes I find that flavor overpowering, so I've given the option in the ingredients list to use 1/2 teaspoon. Also, over the years, I use all chicken broth for the liquid base, but if you have followed the original recipe and want to keep doing so, it is 4 cups broth + 4 cups water.
Recipe Source: adapted from my Aunt Marilyn Recipe originally posted February 2010; updated with new pictures, recipe updates commentary
Disclaimer: I am a participant in the Amazon Services LLC Associates Program, an affiliate advertising program designed to provide a means for me to earn fees by linking to Amazon.com and affiliated sites.
Posted on January 21, 2019 by Mel
Source: https://www.melskitchencafe.com/chicken-and-vegetable-dumpling-soup-3/
0 notes
Text
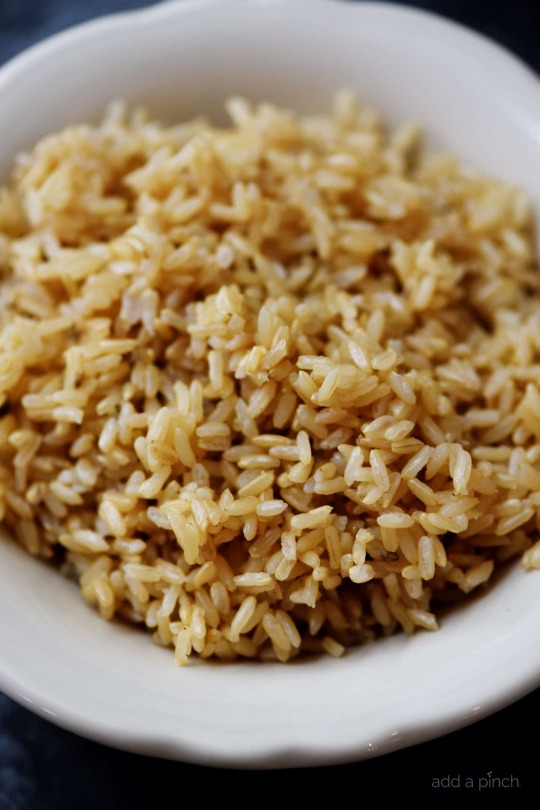
How to Make Rice in the Microwave
[Photographs: Vicky Wasik]
I know plenty of folks who condemn the microwave as an instrument of evil, a tool that's only fit for spitting out somber Hungry Man dinners and stale Bagel Bites. But the microwave can be useful for countless tasks beyond the usual popcorn and reheating of leftovers. In just minutes, it can dry herbs while preserving their flavor and bright color, and it can evenly toast nuts in a fraction of the amount of time it takes for you to preheat a large oven. A microwave is even a great tool for cooking up small portions of fluffy white rice when you’re caught without a stovetop or rice cooker or just can’t be bothered with a pot.
Cooking rice in the microwave doesn’t take any less time, but it's convenient for other reasons. It’s a supper-saver in my tiny two-burner kitchen, freeing up space for sauté pans and Dutch ovens. It’s also ideal for small portions if you cook just for one or two. Best of all, there’s one less dish to clean because I can cook and eat my rice right out of the same bowl—and I’ll never argue against easier clean-up.
The microwave method works best for a half to two cups of dry rice. I start out with short-, medium-, or long-grain white rice* that I thoroughly rinse with warm tap water. Using warm tap water to rinse the rice helps it cook up evenly, as it begins hydrating during the rinsing process.
* Brown rice takes more time and liquid to cook, and therefore isn’t well-suited to microwave cooking.
I next add the amount of liquid as directed on the package; the ratios of rice to water can vary depending on the particular varietal. Although tap water is fine, if I want to dress things up I’ll reach for stock or instant dashi, along with salt, butter, or other seasonings. I also add an additional splash of water—about two tablespoons—to account for the extra evaporation that occurs in the microwave versus a tightly covered pot or rice cooker.
I then cover the rice with a clean dish towel or paper towel before cooking on high for ten minutes, followed by 15 more minutes on medium. The towel covering the rice absorbs excess steam, preventing the rice from growing soggy, while also keeping the top layer of rice from drying out. A tight-fitting lid will only cause the water to boil over, making a mess of the microwave and throwing off your liquid to rice ratio.
Now all that’s left to do is fluff it with a fork and dig in!
This post may contain links to Amazon or other partners; your purchases via these links can benefit Serious Eats. Read more about our affiliate linking policy.

Source: https://www.seriouseats.com/2018/09/how-to-steam-rice-in-a-microwave.html
0 notes
Text
Cinnamon Fried Calamari
Because of complexities with the new General Data Protection Regulation (GDPR), Tasting Table is temporarily unavailable in the European Union (EU). We are currently working on making our web site compliant with GDPR and expect to be available again in the near future. Thank you for your patience!
If you think you reached this page in error, please click here to let us know.

Source: https://www.tastingtable.com/entry_detail/chefs_recipes/27496/Cinnamon_Fried_Calamari.htm?referrer=rss_feedly
0 notes
Text
Mexican chocolate fudge
At Christmastime my senior year of high school, I had a classmate who was going through a tough time, so another friend and I thought it would be nice to share with him something sweet. After much deliberation, we decided to make him fudge.
Now, neither one of us was much of a cook nor had we made fudge before, but like most Texans we’d certainly grown up eating it. All over the state, you’ll see slabs of fudge for sale at rest stops, cafés, and gift shops. You’ll also, of course, see it in people’s homes.
While fudge doesn’t have a season, this time of year it’s especially popular and squares of it jostle for position amongst the trays laden with cookies, candies, and pralines. Fudge comes in an infinite variety of flavors, as you can combine anything with the creamy, sugary base, so you’ll see peanut butter fudge, cranberry fudge, pistachio-cranberry fudge, and, my favorite, chocolate fudge.
Fudge is qualified as a candy, as it’s prepared by heating sugar to a set boiling point to transform it from liquid into something more solid. There are many ways to go about this, but the recipe that my friend and I used back in 1986 was perhaps the easiest way to begin your fudge-making journey: we made it with marshmallows.
What makes this method so appealing is its simplicity. You melt marshmallows along with sugar, butter, half and half, and chocolate, then spread it into a pan. After chilling for a couple of hours it hardens, then you slice and serve. And that’s it! There’s no need to use a candy thermometer so it’s an excellent way for inexperienced cooks or young people to make candy.
For some purists, this method may be cheating but I think it’s a smart hack as marshmallows are a sugar confection as well, so melting them to form a foundation for the candy saves you a step. It’s also not a new-fangled recipe as fudge made with marshmallows has been in practice for over 100 years. On the East Coast, it was once popularly known as Wellesley fudge, as students at the eponymous Massachusetts college were said to prepare the fudge in their dorm rooms. Though in a 1910 article in the Jacksboro (TX) News, a recipe appeared under the name marshmallow fudge.
For mine, I enjoy stirring in chocolate and pecans, while adding cinnamon, vanilla, and small pinch of cayenne, which gives it the flavor profiles of Mexican hot chocolate. I call it Mexican chocolate fudge. Other welcome additions to the marshmallow and chocolate mixture would be a spoonful of espresso powder, dried fruit, or walnuts instead. It’s a solid base open to anything.
That afternoon 33 years ago was a revelation as my friend and I spent time in my family’s kitchen whipping up our batch of candy. While I had been concerned about tackling something so complicated, as we stirred the pot and watched it all come together, I was amazed at how easy it was to make prepare. When we shared the fudge with our friend, he loved it, and I know that your loved ones will feel the same, too.
Ingredients
4 tablespoons unsalted butter
1 cup brown sugar
2/3 cup half and half
4 cups mini marshmallows
2 cups semi-sweet chocolate chips
1 tablespoon vanilla extract
1 teaspoon ground cinnamon
½ teaspoon kosher salt
Pinch cayenne (optional)
1 cup chopped roasted pecans
Instructions
Lightly grease an 8-inch square pan and line with parchment paper.
In a medium saucepan, while stirring, heat the butter, sugar, and half and half on low heat until melted and well combined.
Stir in the marshmallows, turn the heat up to medium, and while continuing to stir bring to a boil and cook for 5 minutes until all the marshmallows are melted and well combined. The mixture should be thick and a little stringy.
Turn off the heat and stir in the chocolate chips, vanilla, cinnamon, cayenne, salt, and pecans until well combined. The chocolate chips should melt immediately and the mixture will be thick.
Spread the fudge evenly into the prepared pan and refrigerate covered for 2 hours or until set. To serve, lift the fudge out of the pan and cut into 16 (or 32, if you prefer) pieces.

Source: https://www.homesicktexan.com/2018/12/mexican-chocolate-fudge.html
0 notes
Text
la petite colombe winter menu
On Friday I had the privilege of eating at La Petite Colombe in Franschhoek for the first time. I was invited to experience their winter special menu which runs until 31 August and I was blown away. Every course was inspired and utterly delicious. You are taken on a eating journey that tantalizes every tastebud and it was hard to pick out a favourite. But you don’t need to because they are all quite different and rattle your mind as much as your palate. The dessert brought tears to my eyes because I was so happy to be experiencing something so incredible and sad at the same time as I am unlikely to every eat this exact dish again. They change the dishes on their menu fairly often to keep it fresh.
The restaurant offers a novel ‘ meet the chefs’ courses where guests are invited up to a table in front of the pass that is decorated like a forrest floor. You get to see whats happening the open plan kitchen while tasting their take on ‘egg & soldiers’. Essentially crispy brioche wafers with foi gras sandwiched in the middle. You dip into a sublime porcini broth. This course is an add on to the winter special and is delightful.
We enjoyed the winter menu with the wine pairing and I can highly recommend this. The wines were straight out the top drawer and paired perfectly with every dish. Having this duel experience of the food and the wine takes your senses to the next level. So much work goes into selecting which wine goes with each dish, it is a real treat not to have to think about it.When you are dining at the top end of the spectrum, you can totally hand over the decision reigns to the restaurant and I love to sit back and enjoy whatever is put in front of me.
The service was nothing short of perfect and if I think back on the whole lunch it was flawless and the best fine dinging meal I’ve had in two years. It is one that has set a benchmark and will stay with me for a long time.
La Petite Colombe is going straight into my comprehensive Guide to eating out in Cape Town
This is what the lunch looked like:Winter Menu R395 / with wine pairing R795
Caraway sour dough, home churned butter, sesame and roasted yeast
Poached oyster, pernod, grapefruit, verjuice, dill, apple, celery Colmant Brut Chardonnay 2006-2013 (Franschhoek)
Or Yellowfin tuna, aubergine, miso, kalamansi, avocado Mullineux ���Old vines’ 2016 (Swartland)
Quail, red cabbage, sultana, five spice, bourbon Chamonix ‘Troika’ 2015 (Franschhoek)
“Meet the chefs” R70 supplement
Palate cleanser
Linefish, soubise, smoked mussel, squid, endive, chorizo, creamed leeks Rickety Bridge ‘Paulina’s Reserve’ Semillion 2015 (Franschhoek)
OR Chalmar beef, beetroot, turnip, spinach, mustard and sherry Haut Espoir Cabernet Sauvignon 2008 (Franschhoek)
Foxenberg goat’s cheese, goats milk caramel, kouign amann, guava, tamarind Vonderling ‘Sweet Carolyn’ 2007 (Voor-Paardeberg)
Or Valrhona Itakuja crémeux, pineapple, mango, macadamia, passionfruit, lemongrass Thelema ‘Late Harvest’ Semillon 2014 (Stellenbosch)
La Petite Colombe Treasures
I was delighted to meat the talented young Cape Town chef, John Norris-Rogers, who heads up the kitchen. La Petite Colombe only opening in August 2017 but if it doesn’t make the Eat Out Awards Top 10 this year I will be very surprised.
When John was asked what his passion and vision for the cooking industry is, he says, “I love the fact that the industry is constantly evolving – especially at a fine dining level. There is always a chef somewhere in the world doing something unique and special at any given time. This keeps everyone on their toes and keeps everyone pushing the boundaries and making new discoveries in the cooking world. It’s incredibly exciting! The world of food is so dynamic. I hope to never lose sight of how important and refreshing it is to keep discovering new foods, trends, flavours, cultures, techniques, and thereby inspiring creativity!” Norris-Rogers admits that he also has a great appreciation for the classics and going back to what he learnt as the fundamentals of cooking. A believer in great produce, he loves coming across a food item that is of the most superior quality, and he loves the fact that many suppliers take as much pride in their produce as chefs do in their food. In closing, John says, “My vision for the future is to never stop learning and discovering, without ever losing the importance of flavour.”
My Complete Guide to Eating Out in Cape Town
Find me on Instagram
Source: https://drizzleanddip.com/2018/08/13/la-petite-colombe-winter-menu/
0 notes
Text
potential for rainbows

Rome in June. It was hot, the air heavy with the tastes and smells of summer pleasures to come, school finished for Luca and I wrote about pasta with beans. Sicily in July. It was even hotter, scorched really, the sky hard hard blue, the sun at its most powerful. We settled into life there, dried tomatoes on the roof, took Nonna’s ashes to the cemetery, and I wrote about stuffed pie and stuffed tomatoes (not for the first time and probably not the last). Now, Dorset in August. It is sunny, but also rainy – so lush with potential for rainbows. I am drinking lots of tea, talking to pigs up the lane, and I have just written about chicken with peppers.
Only not here. I miss it here.
Having spent six weeks at our house in Sicily, I didn’t pass go, but came straight to my parents in Dorset to finish this second book. In the bedroom at the top of the house, a great plastic bag of my childhood paintings behind the bed, I am trying to loop it all together, the kitchens in Rome and Gela, and here I suppose, trying to find the words to describe the drive along the coast to Scoglitti and the smell of wild oregano (without sounding a wally). Every now and then I bash my head repeatedly on the table, or I thud down the stairs three at a time to make tea, or to double check that the chicken really does need 50 minutes in the oven, to see if something has risen, or not.
Then came the rainbow, and I picked it. I spent half an hour trying to find the most descriptive shade of yellow for chard, googling damn paint charts – buttercup, Tuscan roof tile, Sultan’s trousers, before telling myself to get a grip and call it yellow. Next Tuesday you can read it all about the chard and the chickpeas in The Guardian, it goes on-line at about 12 30. The book will take a bit longer, 40 weeks on Tuesday if all goes well.
For now, I am here, with tea, possibly in my dressing gown, typing. I hope you are having a good summer? More soon.


Source: https://racheleats.wordpress.com/2016/08/21/potential-for-rainbows/
0 notes
Text
Skinnytaste Meal Plan (May 27-June 2)
posted May 25, 2019 by Gina
A free 7-day flexible weight loss meal plan including breakfast, lunch and dinner and a shopping list. All recipes include calories and WW SmartPoints®.
If you’re new to my meal plans, I’ve been sharing these free, 7-day flexible healthy meal plans (you can see my previous meal plans here) that are meant as a guide, with plenty of wiggle room for you to add more food, coffee, beverages, fruits, snacks, dessert, wine, etc or swap recipes out for meals you prefer, you can search for recipes by course in the index. You should aim for around 1500 calories* per day.
There’s also a precise, organized grocery list that will make grocery shopping so much easier and much less stressful. Save you money and time. You’ll dine out less often, waste less food and you’ll have everything you need on hand to help keep you on track.
Lastly, if you’re on Facebook join my Skinnytaste Facebook Community where everyone’s sharing photos of recipes they are making, you can join here. I’m loving all the ideas everyone’s sharing! If you wish to get on the email list, you can subscribe here so you never miss a meal plan!
Also, if you don’t have the Skinnytaste Meal Planner, now would be a great time to get one to get organized for 2019! There was a print error last year, but it’s perfect now! You can order it here!
THE DETAILS:
Breakfast and lunch Monday-Friday, are designed to serve 1 while dinners and all meals on Saturday and Sunday are designed to serve a family of 4. Some recipes make enough leftovers for two nights or lunch the next day. While we truly believe there is no one size fits all meal plan, we did our best to come up with something that appeals to a wide range of individuals. Everything is Weight Watchers friendly, I included the updated Weight Watcher Freestyle Points for your convenience, feel free to swap out any recipes you wish or just use this for inspiration!
The grocery list is comprehensive and includes everything you need to make all meals on the plan. I’ve even included brand recommendations of products I love and use often. Cross check your cabinets because many condiments you’ll notice I use often, so you may already have a lot of them.
And last, but certainly not least, this meal plan is flexible and realistic. There’s plenty of wiggle room for cocktails, healthy snacks, dessert and dinner out. And if necessary, you can move some things around to make it work with your schedule. Please let me know if you’re using these plans, this will help me decide if I should continue sharing them!
MONDAY (5/27) B: 2 scrambled eggs (0) with 1 ounce avocado (1) L: Honey Sriracha Chicken and Broccoli Meal Prep Bowls* (7) D: Cream of Zucchini Soup (1) with 2 Easy Garlic Knots (4)
Totals: Freestyle™ SP 13, Calories 851**
TUESDAY (5/28) B: Greek Yogurt with Berries, Nuts and Honey (5) L: Honey Sriracha Chicken and Broccoli Meal Prep Bowls (7) D: Madison’s Favorite Beef Tacos (9)
Totals: Freestyle™ SP 21, Calories 1,061**
WEDNESDAY (5/29) B: 2 scrambled eggs (0) with 1 ounce avocado (1) L: Honey Sriracha Chicken and Broccoli Meal Prep Bowls (7) D: LEFTOVER Madison’s Favorite Beef Tacos*** (6) over 2 cups romaine (0) with Zesty Avocado Cilantro Buttermilk Dressing (2)
Totals: Freestyle™ SP 16, Calories 945**
THURSDAY (5/30) B: Greek Yogurt with Berries, Nuts and Honey (5) L: Honey Sriracha Chicken and Broccoli Meal Prep Bowls (7) D: Slow Cooker Chicken and Sausage Creole (4) with ¾ cup brown rice (5) Totals: Freestyle™ SP 21, Calories 1,087**
FRIDAY (5/31) B: 2 scrambled eggs (0) with 1 ounce avocado (1) L: LEFTOVER Slow Cooker Chicken and Sausage Creole (4) with ¾ cup brown rice (5) D: Shrimp, Peas and Rice (8)
Totals: Freestyle™ SP 18, Calories 943**
SATURDAY (6/1) B: Spinach Ricotta Quiche (5) with an orange (0) L: California Grilled Chicken Avocado and Mango Salad (4) D: DINNER OUT!
Totals: Freestyle™ SP 9, Calories 545**
SUNDAY (6/2) B: LEFTOVER Spinach Ricotta Quiche (5) with 1 cup grapes (0) L: The Skinny Tuna Melt (4) (Recipe x 2) with 8 carrot sticks (0) D: Baked Chicken Milanese with Arugula and Tomatoes (4) with Skinny Buttermilk Mashed Potatoes with Chives (5)
Totals: Freestyle™ SP 18, Calories 980**
*Prep Sunday night, if desired. **This is just a guide, women should aim for around 1500 calories per day. Here’s a helpful calculator to estimate your calorie needs. I’ve left plenty of wiggle room for you to add more food such as coffee, beverages, fruits, snacks, dessert, wine, etc.
***Omit taco shells.
**google doc
Shopping list:
Produce
4 medium oranges
1 medium lemon
1 medium lime
2 medium mangos
1 ½ pounds seedless grapes (red or green)
1 small jalapeno
1 medium head broccoli
3 medium zucchini
2 pounds (6-7 medium) Yukon Gold potatoes
1 large head baby Red Butter or Bibb lettuce
1 (5-ounce) bag/clamshell baby arugula
1 small bunch fresh baby spinach
2 large heads Romaine lettuce
1 medium bunch scallions
1 pint fresh berries (your choice)
1 small and 1 medium red bell pepper
1 medium green bell pepper
1 small (4-ounce) and 2 medium (5-ounce) avocados
1 medium bunch carrots
1 small bunch celery
1 large head garlic
1 small bunch fresh Italian parsley
1 small container/bunch fresh basil
1 small bunch fresh cilantro
1 small container/bunch fresh chives
1 small red onion
6 medium vine-ripened tomatoes
2 plum tomatoes
1 dry pint cherry or grape tomatoes
2 small yellow onions
Meat, Poultry and Fish
2 pounds 93% lean ground beef
4 pounds (8) boneless, skinless chicken breasts
1 ½ pounds boneless, skinless chicken thighs
1 ¼ pounds peeled and deveined shrimp
9 ounces chicken Andouille sausage
Grains*
1 large package dry brown rice (or about 9 cups pre-cooked)
1 small bag all-purpose or white whole wheat flour
1 package corn taco shells
1 small loaf whole wheat bread
1 small container whole wheat Italian seasoned breadcrumbs
Condiments and Spices
Extra virgin olive oil
Cooking spray
Olive oil spray (or get a Misto oil mister)
Kosher salt (I like Diamond Crystal)
Pepper grinder (or fresh peppercorns)
Sesame oil
Honey
Sriracha sauce
Seasoned rice vinegar
Black and/or white sesame seeds
Cumin
Chili powder
Paprika
Oregano
Bay leaves
Creole seasoning
Cayenne pepper
White balsamic vinegar
Light mayonnaise
Red wine vinegar
Balsamic vinegar
Dairy & Misc. Refrigerated Items
1 ½ dozen large eggs
1 (9-inch) refrigerated pie crust
1 (15-ounce) container part skim ricotta cheese
1 (8-ounce) tub reduced fat sour cream
1 pint low-fat buttermilk
1 package (or 4 slices) reduced fat cheddar cheese
1 small box butter
1 small wedge Pecorino Romano cheese
1 small wedge Parmesan cheese
1 (8-ounce) bag part skim mozzarella cheese
1 (8-ounce) bag shredded cheddar cheese
1 (32-ounce) container nonfat Greek yogurt (I like Fage)
1 (8-ounce) container skim milk
Frozen
Canned and Jarred
1 (32-ounce) carton reduced sodium chicken (or vegetable) broth
1 (32-ounce) carton low sodium chicken broth
2 (4.5-ounce) cans tuna in water
1 (15-ounce) can tomato sauce
1 (6-ounce) can or (4.5-ounce) tube tomato paste
1 (14.5-ounce) can diced tomatoes
Misc. Dry Goods
Corn starch
Baking powder
1 small bag chopped walnuts
*You can buy gluten free, if desired
posted May 25, 2019 by Gina
Source: https://www.skinnytaste.com/skinnytaste-meal-plan-may-27-june-2/

0 notes
Text
The Only Green (Herby, Avocado) Sauce You Need
Sarah Copeland, author of The Newly Wed Cookbook and Feast, has a new book out: Every Day is Saturday. It’s filled with recipes and strategies for cooking every day of the week, the goal being to keep that weekend-cook mentality going strong all week long.
I have made one and only one recipe, but it’s a good one: The Only Green Sauce You Need.
It’s a mix of herbs, olive oil, lemon juice, garlic, and something with body: avocado, miso, nuts or tahini. I went the avocado route and took Sarah’s suggestion to smear if over toast, which I then topped with a 7-minute egg and sea salt. No regrets.
I’ve since used it another toast with sliced, mashed avocado — avocado on avocado is never a bad thing, right? I’ve also smeared it over — wait for it — more toast, which I then topped with salted cucumber ribbons and dukkah (see below).
But the uses for this sauce extend far beyond toast ..
How To Use This All-Purpose Green Sauce
Use this green sauce as…
… a dip for veggies.
… a spread in sandwiches.
… a sauce for grilled fish or shrimp.
… a condiment for fried eggs.
… a flavor swirl (that’s a thing, right?) in savory yogurt bowls.
… a dressing for roasted vegetables or chicken.
… and, of course, a smear for toast.
There is nothing you won’t want to slather this sauce on all summer long.
Here’s the three-step play-by-play: 1. Gather your ingredients. Roughly chop the herbs, juice the lemon, peel the garlic, scoop out some avocado flesh.
2. Throw the ingredients in a food processor or blender.
3. Pulse till blended but with a bit of texture. Adjust flavor as needed.
How to use it? The possibilities are endless, but I highly recommend you start here: olive oil toast + jammy eggs.
Then here: Olive oil toast + salted cucumber ribbons + dukkah.
Sarah Copeland’s Every Day is Saturday:
Print
The Only Green Sauce You Need
Author: Alexandra Stafford
Prep Time: 5 minutes
Total Time: 10 minutes
Yield: 3/4 cup sauce
Description
From Sarah Copeland’s: Every Day is Saturday.
I love the versatility of this sauce — I find myself dipping carrots into it when I need a snack to slathering it over toast for lunch to tossing it with grilled shrimp for dinner.
Avocado: I love the creaminess the avocado lends here, but in place of it you could use something, as Sarah says, “with body.” She offers miso, nuts, and tahini as alternatives to the avocado. I’ve been cutting 1 avocado in half and using the smaller half for this recipe.
Ingredients
For the green sauce:
1 bunch (about 3 cups, 3 ounces) fresh parsley, cilantro, arugula, mustard greens or a mix, roughly chopped
1 small bunch chives (about 1 ounce), roughly chopped
Juice of 1 lemon or lime (about 2 tablespoons), plus more to taste
1 clove garlic, peeled
1/4 cup olive oil, plus more to taste
1/4 cup avocado (see notes above)
3/4 teaspoon sea salt
1/2 teaspoon freshly cracked black pepper
For the eggs + toast:
eggs, however many you need
extra-virgin olive oil
good bread, sliced thickly
flaky sea salt
Instructions
To make the sauce: Add the greens (stems and all), chives, lemon juice, garlic, olive oil, avocado, salt, and pepper to a blender or food processor. Pulse until broken down — add water by the tablespoon as needed to thin and get the blade whirring. Scrape down and pulse again until the sauce is broken down and easy to dollop with a spoon. Taste. Adjust taste as needed with more lemon, olive oil, salt, and pepper. Adjust consistency with more water or olive oil by the tablespoon.
To make the toast: bring a small (or large depending on how many eggs you are cooking) pot of water to a boil. Prepare an ice bath. Carefully lower the eggs into the pot of boiling water. Adjust heat so water is gently simmering. Cook 7 minutes. Transfer eggs to ice bath.
Meanwhile, heat a skillet over medium-high heat. Add a tablespoon (or more depending on how many slices of bread you are toasting) of olive oil. Toast bread on each side for 1-2 minutes, checking often to ensure the slices are browning evenly. Remove toast when the slices are golden and crisped to your liking.
Smear green sauce over a slice of toast. Peel an egg. Cut it directly over the slice of toast into quarters. Sprinkle with sea salt. Repeat with any remaining slices of toast and eggs.
Category: Sauce
Method: Food Processor
Cuisine: American
Keywords: sauce, green, herbs, avocado
Posted By: alexandra · In: Chives, cilantro, CSA, Herbs, Parsley, Sauces, dressings, jams & spreads
Source: https://alexandracooks.com/2019/06/07/the-only-green-sauce-you-need/
0 notes