My favorite resources, which i never want to lose) I'm happy to share this with you)
Don't wanna be here? Send us removal request.
Statistics
We looked inside some of the posts by rovena-art-source and here's what we found interesting.
Average Info
Notes Per Post
20K
Likes Per Post
14K
Reblog Per Post
6K
Reply Per Post
11
Time Between Posts
3 months
Number of Posts By Type
Note
4
Photo
7
Text
6
Last Seen Tumblr Blogs


Fun Fact
Tumblr’s website traffic is steadily declining.
Note
hey neve, how did you do the shiny text in your beautiful pinned gifset? :)
hey, thank you for being so nice!! i’m gonna try and explain this half-decently lmao so bear with
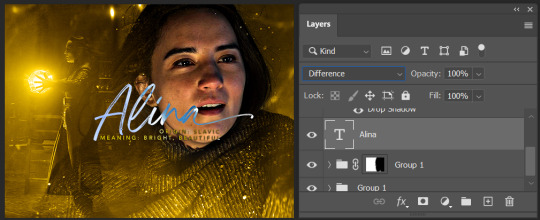
so, start with your white text layer like this (it does need to be white):

then, in the blend modes, set it to ‘difference’ so it looks like this:
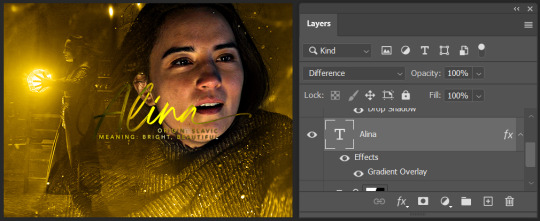
now, clicking the little ‘fx’ tab at the bottom, i selected ‘gradient overlay’ which opens this panel:

you have to change the blend mode of the gradient overlay. for this one, i used ‘linear light’ which usually creates the kind of shiny effect. multiply and others are good too, it depends on the scene sometimes.
now it looks like this:
now, for me this wasn’t shiny enough and it had some green moments that i wasn’t a fan of. so, i went back into the ‘fx’ tab and selected ‘colour overlay’

i chose the shade of yellow/gold i wanted and set this blend mode to ‘colour’ and that was it! we ended up with this:

for the small text, i decided to forgo the gradient and just added a colour overlay instead. i repeated this with different colours for the rest of the set :)
hope this was clear enough for you anon!! <3
733 notes
·
View notes
Note
How do you make your gifs?
Hello hello! I love talking about gifmaking, so thank you for giving me the chance to ramble.
Instead of a detailed step-by-step walkthrough, I will link tutorials and resources written by the wonderful Tumblr creators on here along the way. Everyone has their method and preferences, and there’s no right or wrong way to make gifs. I’m going to share techniques and resources I picked up along the way that work best for me—they may or may not be suited to your preferences, but I hope you’ll find some helpful things here.
(Warning: screenshot/image heavy)
USEFUL TUTORIALS AND RESOURCES
Here are some tutorials and resources that I found very useful when I got back into gifmaking:
Gifmaking tutorial using video timeline by @hope-mikaelson is identical to my own process
Gifmaking and coloring tutorial by @kitty-forman, whose process is very similar to my own
Giffing 101 by @cillianmurphy, an incredibly detailed tutorial that covers everything you need, including a step-by-step guide to using HandBrake
Gifmaking and coloring tutorial with 4K HDR footage by @sith-maul, another incredibly detailed tutorial with many useful tips
Gifmaking tutorial by @jeonwonwoo, incredibly comprehensive and covers so many aspects of gifmaking from basics, sharpening, captioning, and text effects
Gifmaking/PS tips and tricks by @payidaresque
Action pack by @anyataylorjoy, the Save action is especially a true life-saver
@usergif and @clubgif are amazing source blogs with many tutorials on gifmaking, color grading, and gif effects, can’t be thankful enough for the members for their work curating and creating for these blog!
TOOLS
Adobe Photoshop CS6 or higher, any version that supports video timeline. @completeresources has many links to download Photoshop, have a look!
Photopea is a free alternative to Photoshop, but it has a slightly different UI, check out these tutorials for gifmaking with Photopea
HandBrake or any other video encoder, especially if you’re working with .MKV formats
4Kvideodownloader for downloading from YouTube, Vimeo, Instagram, etc.
OBS Studio or any other similar screen capturing software. To prevent duplicate frames in gifs that prevents your gifs from looking smooth, try to match the recording frame rate (FPS) with the source.
IMPORTING FOOTAGE AND WORKING IN VIDEO TIMELINE
I work exclusively in video timeline instead of importing video frames to layers or loading files into stack. For videos that don’t require converting/encoding using HandBrake, especially ones that are already in .MP4 format, I tend to open the video directly on Photoshop, and trim the videos around directly.
As mentioned above, this gifmaking tutorial using video timeline is exactly how I make gifs. I find it more efficient, especially if you’re making multiple gifs from the same video/the same scene with little to no change in lighting conditions You can simply slide around sections of gifs you want to save, and they will all be the same length.
Another thing also covered in the tutorial linked is the ability to change video speed in video timeline mode. Right click on the video and set the speed before proceeding with cropping/resizing. This is also very useful when you’re making blended gifs where you need the footage to have the same length.
Slowing footage down.
As mentioned in this post, changing the FPS before slowing down the gif results in smoother gifs. Doubling the frame rate before slowing down your gifs usually yields the best result.
Speeding footage up.
I love using this to speed up slow motion B-rolls to make the speed slightly more natural. It will result in nice, smooth gifs:

(B-roll footage, normal broadcast speed)
(200% speed)
Subject won’t stay in frame?
Another feature of the video timeline mode. Keyframes are your best friend. This tutorial by @kangyeosaang covers everything you need to know about panning gifs. I use this technique regularly, it’s a life-saver.
COLORING
Here are some coloring tutorials I found very useful:
Coloring tutorial by @brawn-gp beloved, their coloring style is second to none
Mega coloring tutorial by @yenvengerberg, for stylized /vibrant coloring
Understanding Channel Mixer by @zoyanazyalensky
Coloring rainbow gifs by @steveroger, which delves deep into Channel Mixer
I tend to go for neutral-saturated coloring in general, especially for minimalist gifsets with no effects (blending/isolated coloring/overlays etc.), but the possibility is endless for stylized coloring. Here’s what my adjustment layers look like for the example gifs above.
The base footage for this Charles gifset is incredibly desaturated. I started with a Curves layer to bring contrast to the gif, as well as do some color-correcting to bring the base footage to a more neutral tone. To bump contrast, I also like to add a black and white Gradient Map layer with a Soft Light blending mode at 10%-30% opacity:
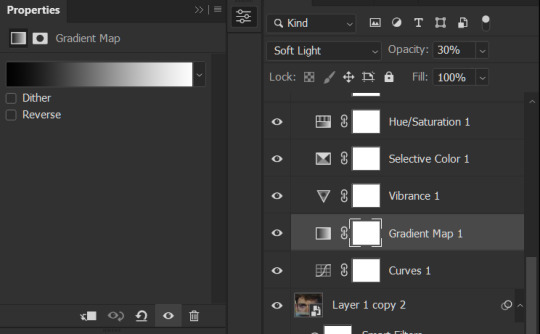
The Vibrance layer is then used to lift the saturation of the base footage, with the Selective Color, Hue/Saturation, and Channel Mixer layers to help remove the green/yellow tint to his skintone.
An underrated adjustment layer/preset in my opinion is the Color Lookup. You can layer in pre-loaded .LUT color grading presets to help speed up your process. For this gif, it’s simply a base preset Soft Warming Look to achieve a warm, pink-tinted tone.
In hindsight I feel like this gifset is too saturated, his skintone is skewing very red/pink, I could’ve bumped down the lightness of the reds with a Selective Color layer or a Hue/Saturation layer. Try to err on the side of neutral for skintones. Experiment with layer orders—there’s no right or wrong! Remember that each layer build up on the one before it.
The base footage of the Jalen gif is already quite nicely color-graded, but it’s still muddy and underexposed. As with the Charles gif, I started with a Curves layer to bring the gif to a better baseline contrast. Then I focus on brightening the gif with the Brightness/Contrast and Exposure layers.
The Hue/Saturation and Selective Color layers are to color-correct Jalen’s skin tone—it’s something I spend most of my time coloring gifs and focus a lot on, especially when color grading BIPOC skintones. Putting a Vibrance layer, upping the Vibrance and Saturation, and calling it a day would make his skintone skew very, very yellow/orange.
Focus on the reds and yellow for skintone, play around with the Saturation and Lightness sliders, use the Hue slider with caution.
It can be tricky to achieve the right skin tone when working with sports footage vs the higher quality, higher dynamic range footage of films or TV shows, but I try to keep it as close to the subject’s natural skintone as possible.
Here are some of tutorials with tips and tricks on coloring BIPOC:
How to fix orange-washed characters by @zoyanazyalensky
How to prevent pink-washing and yellow-washing by @jeonwonwoo
Coloring tutorial by @captain-hen
Changing lighting conditions?
Fret not—this is why I love working in video timeline. I’ll take this gifset as an example: it’s a deceptively difficult one to color. The footage is 720p and the sunlight shifts throughout the video, so matching across gifs was tricky.
My solution was to split the clips in sections with consistent lighting, and apply adjustment layers to the individual sections before applying general color grading layers on top of everything.
We can make use of the Fade Transition effect for sections where the lighting changes within the gif section we want to color.

(without vs with Fade on the Brightness/Contrast layer)
The difference is subtle in this example, but the brightness in the right gif is noticeably more consistent throughout. You can also add the Fade Transition effect to the beginning for a fade in, of course.
SHARPENING AND OPTIMIZING GIF QUALITY
This tutorial by @anya-chalotra covers everything you need to know about optimizing gifs for Tumblr.
Sharpening.
Sharpening is essential to making crisp gif images. Here’s another ask I answered re: my own sharpening settings and maximizing gif quality.
(base footage, unsharpened)

(color graded, unsharpened)
(color graded, sharpened)
The final gif is sharpened with Smart Sharpen, 500% at 0.3px and 10% at 10px (my standard sharpening settings).
Here are some tutorials and resources on sharpening:
Sharpening process by @anya-chalotra
Sharpening tutorial with added gaussian blur by @haleths
Sharpening action by @daenerys-stormborn
Size your gifs for Tumblr correctly.
This is essential: full width gifs are 540px wide.Two side-by-side gifs should be 268px wide. Here’s a handy post on gif size guide for Tumblr.
Incorrectly sizing your gifs will take away the quality of your gifs: undersizing your gifs will especially make them grainy, blurry, and /or pixelated, and won’t display correctly on many people’s desktop theme. Oversizing usually isn't as dramatic as undersizing, but it will make the gifset glitch when displayed, and the file size will be unnecessarily bloated.
Work with HD footage if possible.
Media fandoms (films/TV shows) are luckier than us in the sports trenches—we have to work with what we have. Broadcast footage is usually subpar: lacks contrast, pixelated, very desaturated, the list goes on. But it’s possible to still make high quality gifs from subpar footage. Here are a couple of tutorials to mask low source footage quality:
low quality video ➜ “HD” gifs tutorial by @userbill
Sharpening low quality footage by @everglow-ing
(This gifset I made is from a 480p footage with horrendous lighting conditions and colors, and the end result is decent I’d say)
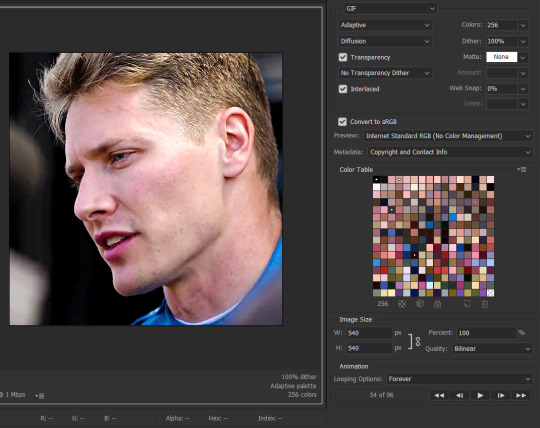
Save for Web (File > Export > Save for Web (Legacy) or Ctrl + Alt + Shift + S) settings.
I default to Adaptive + Diffusion but also use Adaptive + Pattern from time to time. Any combination of Adaptive or Selective + Diffusion or Pattern will give you a good result. In my experience some gifs will need the Selective color table for the colors to display correctly.
Here are my default settings:
SAVING AND EXPORTING FOR TUMBLR
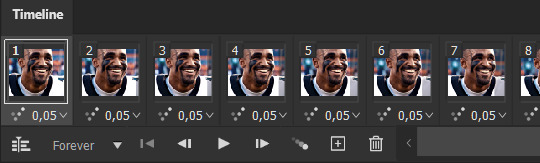
Converting to frames and adjusting the gif speed.
If possible, avoid exporting your gif and reopening it to adjust the frame speed. I used to do this sometimes when I’m lazy, I have to admit, but this is where this Action as mentioned at the beginning comes in very handy. It converts all visible layer into smart object, then converts it back to frame animation.
Step-by-step:
1. Select all layers
2. Right click > Convert to Smart Object
3. Go to the Timeline menu (≡) > Convert Frames > Flatten Frames into Clips
4. Go to the Timeline menu again (≡) > Convert Frames > Convert to Frame Animation
5. In the same menu (≡), select Make Frames from Layers
6. Delete the first frame (it’s a duplicate) then set your frame speed

Now you can adjust the frame speed before exporting it (Save for Web).
Pay attention to the source framerate.
The frame delay of 0.05 s is usually the default to make gifs for TV shows and films, and it is preferred by most gifmakers. This stems from the fact that most movies and TV shows are 24 or 25 FPS. This may not be the case for all source videos: you might get 30 FPS footage, and sports or gaming footage can be 50 or 60 FPS. Gif speed also depends on the FPS of your original file. Play around with gif speed and see what feels most natural to you.
My rule of thumb is the frame delay Photoshop gives you + 0.01 s. For example, 50 FPS footage will give you 0.02 s frame delay (25 FPS gives you 0.04, 30 FPS gives you 0.03, etc.), so set it to 0.03 s. I usually err on the side of a faster frame delay for smoothness in in-game sports footage, anything else (interviews, press conferences, B-rolls) can get away with being slowed down. Again, experiment and see what you think looks best!
Keep gifs under the Tumblr file size limit (10 MB).
Cut down the number of frames. My gifs are usually around 60-70 frames for 540px full-width gifs, but depending on the coloring, sometimes you can get away with more. 268px gifs can go up to 200+ frames.
Crop your gifs. Remember to keep full-width gifs at 540px wide, but if necessary, you can crop the height. My go-to sizes are 540x540, 540x500, 540x450, and 540x400.
Amp up the contrast of your gifs. Flat colors like black cut down gif size.
The Grain filter or Noise filter, though beautiful for aesthetics or simply necessary sometimes to mask low source footage quality/pixelating, may bloat your gif size.
Play your gifs back before exporting.
Pay attention to duplicate frames or glitches, you might need to get rid of them!
Hope this is helpful! Don’t hesitate to send an Ask or DM if you need any help, I will happily answer all your questions and send over PSDs. (I’m also on Discord—just shoot me a message if you need my tag!) Happy creating :]
1K notes
·
View notes
Photo
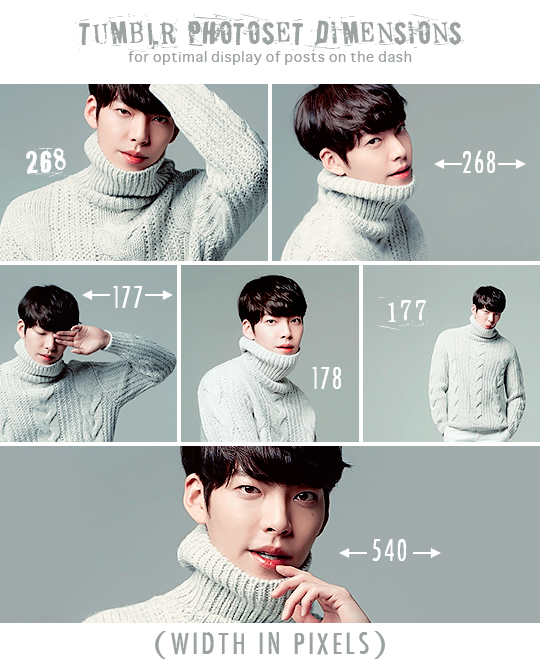
Use these sizes for Gifs & Edits, for the best display of your creations. (▰˘◡˘▰)
268 | 268 / 177 | 178 | 177 / 540 pixels
with a 2 mb file size limit for gifs.
**updated feb. 23, 2017 : it’s now 3 mb for gifs. wheeee ヽ( ´ ∇ ` )ノ
Footnote 1: There are height limits too but they’re not as important since ppl don’t often make graphics in those sizes, but the 540 x 810 max for photo posts is the one that will come up the most. And so you know, the white little spaces (margins) between gifs are 4 pixels.
Footnote 2: In the triple set, if you don’t use the 178 pixel width for the middle piece, it will be blurry. This is slightly new adjustment by Tumblr to compensate for the leftover pixel. 177 x 3 = 531 then + 8 for the margins = 539. 1 extra pixel. Phew math, hard.
Footnote 3: About 24-30 frames usually can be stuffed into full width gifs, 30-70+ in double and triple gifs. I don’t recommend skipping frames, unless it’s really warranted. Skipping frames is gauche.
Footnote 4: There are some stubborn graphic-makers who still stick with the old dimensions, (245/160/500). Largely this is to do with the lack of theme help from Tumblr to adjust to the new sizes they forced on us a couple years ago. However, Tumblr supports the gifs with the new sizes on the dash now, so it’s actually better to use the new sizes. - What happens within the dashboard is infinitely more important than on blog pages. The dash and tag pages are where the majority of notes come from. (ノ◕‿◕)ノ*:・゚✧・
4K notes
·
View notes
Text
So you just joined Tumblr?
Tumblr basics + Fandoms/Gifmaking
Congratulations, you just landed at Tumblr! This hellsite (affectionate) can seem intimidating and complicated at first, but once you grasp the basics of it it’ll quickly turn into your own personal little hut in the forest. Tumblr is a website where you and only you curate your dashboard, you’ll see the content that you seek on your own. In this post, I’ll explain the basics of Tumblr and the basics of how fandoms function here with the help of Bob. Okay, let’s get started.
1. Blog customization
The first thing you should do as soon as you land on Tumblr is add a profile picture and header before you interact with people. You want to be distinguishable from bots and therefore avoid getting blocked. You can also add anything to your bio, there's no character limit. Some folks add their name and pronouns, but there are no rules about that. There are also no rules about profile pictures. It can be a picture of you, a picture of your dog, a picture of a rock, or a picture of your favorite character. If you plan on staying on the fandom side, you might notice that a lot of fandom blogs have colorful-looking icons (a cutout of a character on a colorful background), for these icons and also headers I suggest checking out source blogs that make those icons. For starters, @iconheadersource is a goldmine where you definitely going to find something that’d suit you and your blog.
Tumblr on mobile and Tumblr on desktop are two different creatures when it comes to customization. On the desktop, you can customize your blog with coding (HTML + JS). Now Bob will demonstrate to us some examples of blogs on desktop.


If you want to customize your desktop blog, I suggest checking out @phantomcodes and @glenthemes for the codes.
Tutorial on how to install themes
Using javascript on Tumblr pages
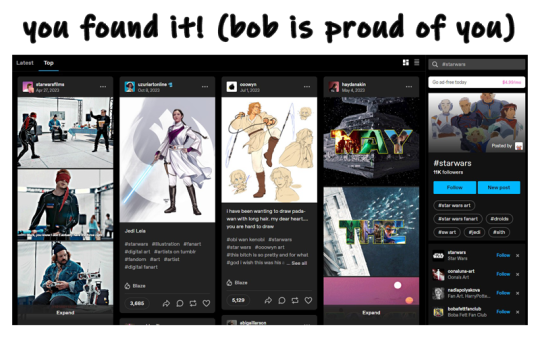
2. Search Engine
Nice! You've made your blog look pretty! Now, let's shift our focus to the search engine and ways to discover content. As mentioned earlier, you curate your dashboard by looking for things you enjoy and like. Search using hashtags or the names of your interests (TV shows, movies, birds, music, etc.) to find your piece of cake. For instance, folks who create posts about TV shows you like use tags to ensure their posts reach others interested in the same thing. So, let's go ahead and search for something right now.

Once you search for that specific tag, you are redirected to the corresponding tag page. Here, you can see that posts are sorted by "Latest" or "Top" (indicating posts with the most notes). On the right side, you will find related tags and blogs which are frequently using the searched tag. By following the tag, both the tag itself and the posts tagged with it will automatically appear on your dashboard in the "Your tags" section. You have the option to filter tags according to your preferences. In the settings, you can choose to block specific tags if you prefer not to see content related to some particular topics.
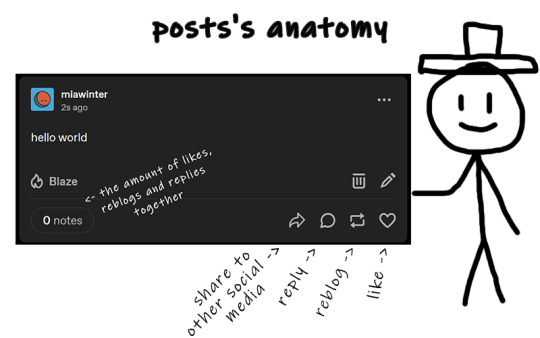
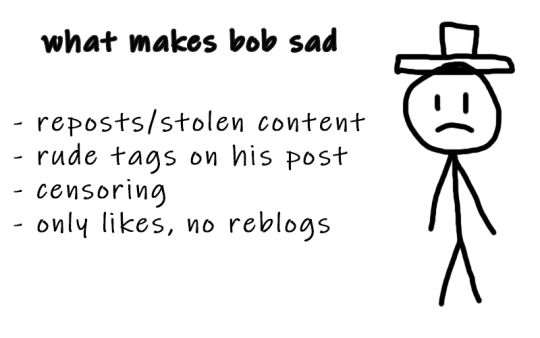
The only method for sharing posts and content on this website is through reblogging. On Tumblr, reposting others' content, including art, gifs, and fics, is not accepted. Reposting means downloading art, gifs, etc., creating your own post, and then sharing it. And that's a big no-no, strongly discouraged. Your likes essentially function as bookmarks, and you have the option to set them to be private. When you save something, it doesn't appear on your friends' dashboards.
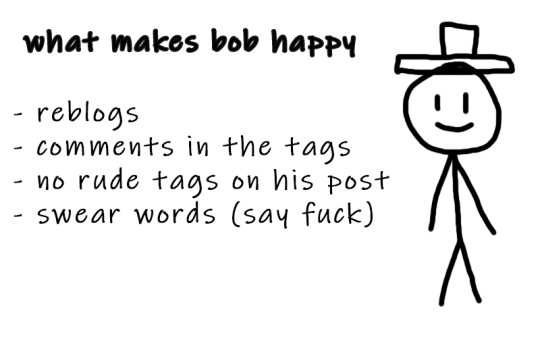
We don't censor things here, and I advise you not to do so too. If you need to mention a word that might be potentially triggering or could be flagged on another social media, feel free to say it. Many users have specific topics and tags filtered out, so if you use variations like "K!tKat" instead of "KitKat" in the tags, it can bypass the tag filter, potentially causing more harm as people will see content that triggers them. And remember to always tag posts that have flickering or flashing!!!
If you want to organize your reblogs or make comments on a reblog, use the tags section and not the comments section itself. This is called "#add tags." Feel free to type whatever you want, but keep in mind that the original poster receives notifications when someone reblogs their post and adds tags. Yes, all tags are visible to us.
Okay, so let's quickly recap this information with the help of our dear friend, Bob.
3. Social interactions
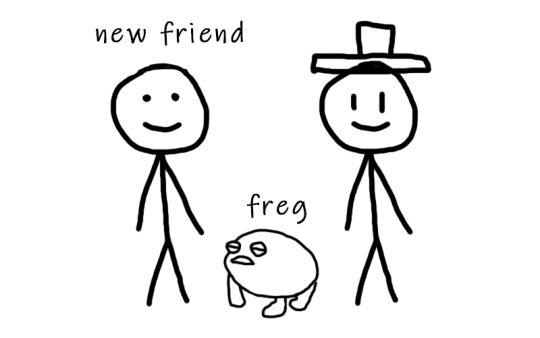
So let's move on to one of the crucial topics - how to make friends on Tumblr? Personally, I don't think there's one particular formula for that. Sometimes you just see a funny bloke posting about something as random as desert rain frogs, grab them, and go "You're my friend now" and that's how you become mutuals.
However, there are other, more common ways to become friends with someone. You can start by reblogging someone's post, adding tags to the reblog, and then following the person. Create your own posts, tag them to ensure they reach the folks who are interested in the same things as you, and participate in fandom events and challenges if you're into that. Interact with people you want to befriend, message them, send them asks. You will eventually find your crowd. You'll also find swifties, and fans of supernatural who never moved on from that destiel love confession four years ago, they also can be your friends, at some point, you will become friends and chill with each other. Be open to new interests to make sure your dashboard is not dull and boring.
Tumblr doesn't have the supposed hierarchy, and you don't have to listen to anyone who tells you otherwise, you curate your own experience and blocking is pretty normalized here. Notes and followers (which are private for everyone) don't really matter, stick to your beliefs and your vibe and you'll be fine. We're all equal losers here.
4. Fandom / Gifmaking
Fandoms play a significant role on Tumblr, they're closely tied with gifmaking. As a fellow creature of fandom, I'm adding this part because we don't gatekeep - more gifmakers and fandom enthusiasts mean a better fandom experience. As I mentioned earlier, everything has its tag, making it easy to find your favorite TV show fandom by searching for the tag. This is also how you can connect with people who share an interest in that specific TV show. Upon entering the tag, you'll stumble upon numerous moving pictures – these are GIFs. People create GIFs of everything, from their "blorbo" (the term for favorite character) to beloved ships and favorite moments. There are also plenty of creative GIFs with different coloring and complicated effects. And the best part? You can do it too!
There are a lot of ways to make GIFs. Some people use Photoshop, and some use Photopea which is an excellent accessible option. I'll be linking posts for Photoshop under this text. For Photopea tutorials and guides, please check out @photopeablr.
I've been making GIFs for three years at this point, and those are the tutorials I used when I was just starting out:
how to make a gif:
comprehensive guide 101
basic gif making tutorial + mvp player installation
gifmaking for beginners
how to install MVP player on a PC
film downloading & screen-capping tips
correct photoset dimensions
coloring
how to fix orange-washed characters
how to: coloring east & southeast asian celebs
channel mixer
colored background
color manipulation
vibrant coloring
how to brighten dark scenes
color isolation
effects
glitch effect
blending
crossfade transition
gradient effect in the text
gradient text
red colour accent on the b&w gifs
how to add a gif in a template
blurring gif backgrounds
using templates
text
text tutorial 1
font resources
understanding fonts and typefaces
split text
subtitles
other
icon tutorial
gif headers
For more tutorials, inspirations, and resources - please check out @usergif. It's a good source blog for all gifmakers.
Wait but what's a source blog? These are blogs that center around a specific theme, creating content for a particular topic. They are managed by multiple editors, these blogs track their own tags to reblog content related to the theme. They can be source blogs dedicated to gifmaking (just like @usergif), a TV show, a movie, a character, a celebrity, a sports team, or literally anything else. Typically, these blogs incorporate terms like "network," "source," "central," "creators," "hub," or "daily" in their usernames, making them easily distinguishable from regular personal blogs. Examples of source blogs that come to my mind right now are @dailyanakin, @heartstoppercentral, and @nancywheelercentral.
Let's also talk about tracking tags, which are often included in blogs's bios, whether they're from source blogs or solo gifmakers. You can add these tags to your posts when creating a gifset related to a specific source blog or something you know a particular gifmaker would appreciate. Basically, the gifmaker can search their tracking tag, much like a regular Tumblr tag, and view the most recent sets in which someone used their tag.
The last thing I want to talk about are usernames, and main and side blogs. On Tumblr, we have two types of blogs: the main blog and the side blog. The main blog is the initial blog created when you sign up for your account. This blog has full functionality and all features, allowing you to follow other blogs, like posts, and send asks to other blogs. In addition to the main blog, you can create side blogs on your account. Side blogs lack some of the features of main blogs; you can't like posts, follow other blogs, or send asks from a side blog. They have slightly different functionality – a side blog can be password-protected, have multiple users, and allow you to send direct messages to people. Other users can follow your side blog, and you can receive asks from them.
Many people use side blogs as URL holders. For instance, when a new TV show is announced, someone might be the quickest to save all canonical character names. You can then message that empty side blog to inquire if they're willing to trade that specific URL or if it's available for a giveaway. Canonical URLs are often challenging to obtain, so many people add letters in between or at the end or use symbols like "-", and they also mix names and surnames of different characters.
5. The End
Okay, so we've just covered how Tumblr works, how fandoms operate, and how to get into gifmaking. I hope this guide by me and Bob has been helpful to you. If you have any questions, feel free to send them to my ask box or simply ask Bob. I hope you enjoy your stay here, and that your experience with this website will be a positive one.

795 notes
·
View notes
Text
how to make part of a gif black and white and the rest colour
@scottymcalls requested a tutorial based on this gifset (particularly how i made allison black and white but kept the rest of the gif in colour). i hope it helps!
˗ˏˋ download the psds here ˎˊ˗
Читать дальше
114 notes
·
View notes
Text
gif tutorial;
requested by @emmaslovebug

from this gifset - the method for each of the lyric gifs is the same; this one had two coloured layers instead of one, so i thought this would be the best example! (I’m going to make it exactly the same - without adding the text.)
so let’s begin!
Читать дальше
50 notes
·
View notes
Note
hi i really like the matrix edit!! and i'm curious as to what you did to get the paper tearing effect if you don't mind sharing
Hi! Thank you!! It’s really easy, actually :)
original post
Keep reading
616 notes
·
View notes
Photo
so an anon requested i make an icon tutorial and though i have a few posted i thought it would be good to make an updated one since i changed the way i make them a bit
Afficher davantage
925 notes
·
View notes
Photo
→ ( 002. ) TEXTURE PACK + TUTORIAL BY ASTRAEAWRITES
So, I’ve noticed that the trend of having these snazzy animated textures over your graphics or edits and I love it! Of course, I knew I had to make something and seeing as how I’ve just reached 400 followers, why not? I’m super excited about these and I hope you all love it just as much as I do! But first, let’s go over a few of what the pack and this post will contain:
1 camcorder animation, 1 camera flash animation, 1 dust animation, 1 film grain animation, 3 fire animations, 1 fireworks animation, 2 ink animations, 3 smoke animations, 3 snow animations, 4 sparkle animations, 3 star animations, and 2 static screen animations making it a grand total of 25 animated textures
all of them are large ( 1000x563 ) just in case you’re working on a larger canvas. you can free transform it to your liking
under the cut, you’ll find a detailed tutorial on how to use these textures but first, please like/reblog if you found this helpful & don’t claim as yours!
mf.
Keep reading
7K notes
·
View notes
Text
HUD/Tech Graphic Pack
because I’ve had a lot of requests for these, here are HUD/tech style gifs for you to use in your overlays, graphics or backgrounds - or just as they are! i did not make the original graphics, i’ve only made the gifs from Youtube resources. please like or reblog if you intend to use - many thanks… [ if people do like - i may make another set o_O ]
Octomoosey <3


4K notes
·
View notes
Text
okay so coloring tutorial (requested by a lovely anon)
this
to this
Читать дальше
11 notes
·
View notes
Note
how do you colour your gifs?
okay here’s a tutorial.
how to go from this:

to this:

Читать дальше
288 notes
·
View notes
Text
Gif tutorial + psd
an anon wanted me to do an updated version of my gif tutorial so I’m going to be showing you how I make my gifs and how I went from this:
to this:
and this:
Читать дальше
123 notes
·
View notes
Photo
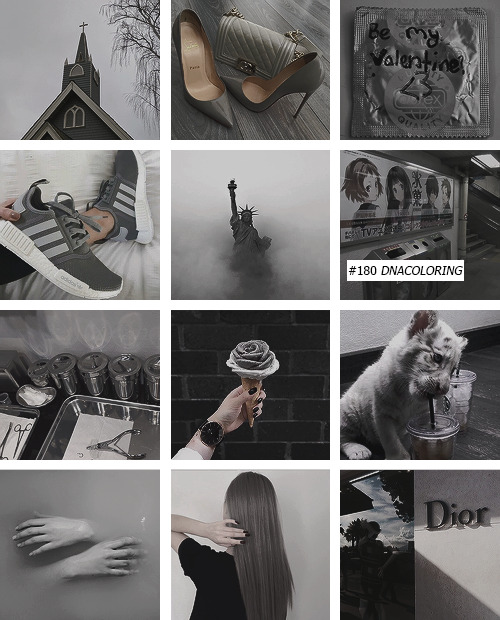
Psd#180. by dnacoloring
Like or reblog this post if you download;
Don’t repost or claim as your own.
Download CloudApp (more psds)
274 notes
·
View notes
Photo
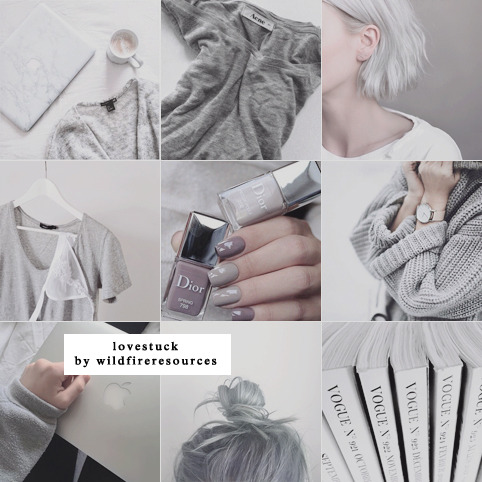
psd #24 [lovestuck] by wildfireresources.
do not reupload or claim as your own;
you may need to adjust some layers, so feel free to do that;
please like/reblog this post if you download! [deviantart / cl.ly]
35 notes
·
View notes
Photo

AMETHYSTPASTEL coloring.eighteen; “Wear something black.” (.psd)
i. like or reblog this post if you download it; ii. adjust the layers or add if you need; iii. and please, don’t redistribute or claim as your own.
49 notes
·
View notes