
Don't wanna be here? Send us removal request.
Statistics
We looked inside some of the posts by sdizdar and here's what we found interesting.
Average Info
Notes Per Post
3
Likes Per Post
2
Reblog Per Post
1
Reply Per Post
0
Time Between Posts
7 months
Number of Posts By Type
Text
17
Last Seen Tumblr Blogs


Fun Fact
Average visit duration of Tumblr.com is 10 mins and 25 secs.
Text
Mixtile Edge 2 Kit– AI based bee detection and tracking
Here I describe usage of Mixtile Edge 2 Kit in agriculture, bee detection, which can be essential for health and survival of bees.
Story
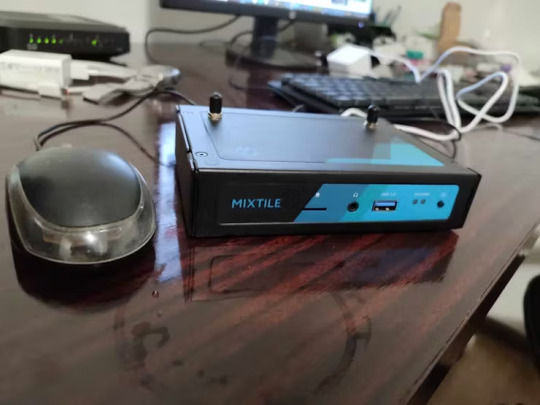
Mixtile is professional IoT hardware solution provider specialized in Linux and Android-based embedded systems.Mixtile Edge 2 Kit is high-performance ARM single board computer. It comes in variants of 2GB of LPDDR4 DRAM and 16GB eMMC Flash storage, or 4GB of LPDDR4 DRAM and 32GB eMMC Flash storage. This single board computer comes with preinstalled Android 11, and it runs Ubuntu Linux operating system in Android container. It comes with large connectivity options (Bluetooth, 4G/5G Cellular, GPS, and Lora, Zigbee and Z-Wave). For those, you will need module, but it comes with default onboard Wi-Fi connectivity, Gigabit Ethernet Port (RJ45) and Serial Port (RS-485). Because it comes with RS-485 port, which is industrial standard, and it comes within a strong metal case, it seems to me that it can be really used in industrial projects. I used official Raspberry Pi 5 power supply in order to power up my Mixtile Edge 2 Kit.So, an idea came to me why not to use it in agriculture, bee detection, which can be essential for health and survival of bees.This project will cover setting up Mixtile Edge 2 Kit, and custom photo dataset form video in order to train custom YOLOv5 bee detection model. YOLOv5 models must be trained on labelled data in order to learn classes of objects in that data.I gathered data from video and trained model on my PC.To train a model, I used python and typed in command line:
python train.py --img 640 --batch 16 --epochs 3 --data coco128.yaml --weights best.pt
My training results are summarized in the following table:
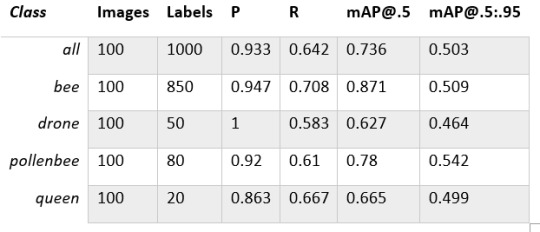
Training results
From this table you can see that images are divided into 4 detection classes:
Bee
Drone
Pollenbee
Queen
Example for each class is summarized in a table below:

Bee classes
1. Getting started
First, I will write about software part of the project, and later on steps of starting the recognition.
1.1 What is YOLOv5?
If you have been in the field of machine learning and deep learning for some time now, there is a high chance that you have already heard about YOLO. YOLO is short for You Only Look Once. It is a family of single-stage deep learning-based object detectors. It was written using Python language, and the framework used is PyTorch.
To ease control, I connected usb mouse to the one of three Mixtile Edge 2 Kit USB3 port. I used Ubuntu Linux for this project. Ubuntu on container is installed in Android system of Mixtile Edge 2 Kit by default. When you boot Mixtile Edge 2 Kit, you get Android OS. Since I wanted to access Edge 2 Kit remotely, and get easier control, I installed droidVNC server from this link:
It is an Android VNC server using Android 5+ APIs. It does not require root access.
I started the VNC server, connected with VNC Viewer and I got the following Android 11 screen:

Android 11
After that, I installed SimpleSSHD from this link:
SimpleSSHD is a SSH server Android app, based on Dropbear.It allows user access (user ssh) or full root access (by setting the login shell to /system/xbin/su) (if root is allowed).
After I installed SSH server, I connected to it via putty SSH terminal. Username and Password are root/root.
Com.hubware.ubuntu is ubuntu on a container and we are connected to it immidiately.
Now we are going to install required software.
First, you will need to upgrade Ubuntu by typing in the command: apt-get upgrade.
Second, I installed python by typing: apt-get install python.
You will also need pip, the package installer for Python.
2. Installing the YOLOv5 Environment
To start off we first clone the YOLOv5 repository and install dependencies. This will set up our programming environment to be ready to running object detection training and inference commands.
Install git: apt-get install git
Clone YOLOv5 repository:
git clone https://github.com/ultralytics/yolov5
Move to YOLOv5 folder:
cd yolov5
Install dependencies:
pip install -r requirements.txt
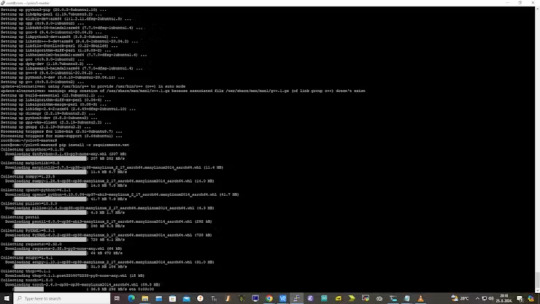
Wait some time to download and install all requirement packages, I waited 25 minutes, because there are a lot of python packages to install besides YOLOv5. YOLOv5 needs numpy package, scipy, OpenCV, etc.
The putty connection and installation process looks like below:
I transferred my model best.pt to the yolov5 installation folder via SCP, with MobaXterm.
You can simply download my model immidiate by typing:
wget https://github.com/sdizdarevic/beedetectionyolov5/raw/main/best.pt
Also, download original video by typing:
wget https://sdizdarevic.typepad.com/cr/bees-orig.mp4
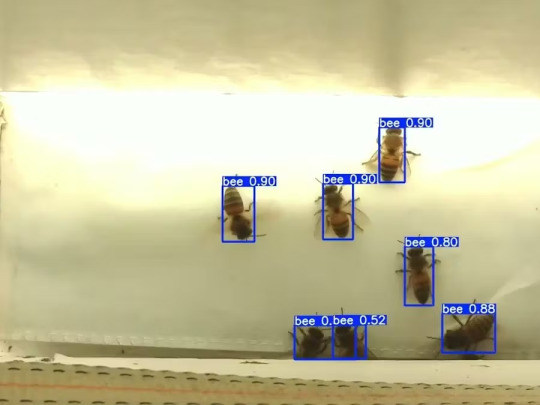
Now, the final step is detection, and we are interested in the “result” content video.
python3 detect.py --weights best.pt --source bees-orig.mp4
The process of detection looks like below:

In the last lines from last picture we can see the detected number of bees at any point in time.
The summarized short steps to follow are below:
git clone https://github.com/ultralytics/yolov5
cd yolov5
pip install -r requirements.txt
wget https://github.com/sdizdarevic/beedetectionyolov5/raw/main/best.pt
wget https://sdizdarevic.typepad.com/cr/bees-orig.mp4
python3 detect.py --weights best.pt --source
Demonstrated videos are on urls with detection finished completely on Mixtile Edge 2 Kit. Output video is in folder runs/detect/exp2.
Original video:
youtube
Result video:
youtube
Last, but not less important: If you want to safely turn off your Mixtile Edge 2 Kit, I recommend you to install Shutdown (no Root) application: https://play.google.com/store/apps/details?id=com.samiadom.Shutdown&hl=en.
3.Conclusion:
After testing I found out that the Mixtile Edge 2 Kit is designed with wide range of applications, from industrial applications, IOT devices, smart home automation, to more than capable AI and edge detection. It is low powered device, with a lot of built-in connectivity options.
I would like to thank amazing Mixtile people for creating this amazing peace of hardware and especially for sending me the Mixtile Edge 2 Kit. Also, Mixtile nurtures the open source values and software, and I believe more people and companies will be involved in making projects with this board.
All in all, I recommend this board for implementing types of projects I described here.
0 notes
Text
Arduino UNO
When I won Arduino UNO R4 development board from Oemsecrets, an idea came to me why not use new UNO R4 in my IoT project.
Oemsecrets is a free to use search engine and comparison website for electronic parts and components. When a user enters part number of any component, Oemsecrets will provide stock availability and prices from various global electronic distributors. Oemsecrets partners are Mouser Electronics, Arrow, Avnet, RS, Farnell, Nordic semiconductor etc. Also, Arduino and Oemsecrets have partnered together to launch new feature on Arduino website, which gives you on one place store availability for various Arduino boards, from global distributors, when the Arduino store has no stock.
Arduino UNO R4 has a 32-bit Arm® Cortex®-M4 Renesas RA4M1 microprocessor which offers more speed, connectors, memory and WiFi / Bluetooth connectivity options in contrast to the original Arduino UNO. The best prototyping board is now ready for IoT - based projects.
The new features you get with Arduino UNO R4 are:
WiFi / Bluetooth support
Qwiic connectors
12x8 LED matrix
The most diverse new feature is a cute LED matrix, so when I won this development board from Oemsecrets, an idea came to me why not reuse it in my IoT project.
In order to get started programming UNO R4, you need to install R4 library. Form Arduino IDE, open Boards Manager, enter R4 in the search box to install the board definitions, and you are ready to go.
My IoT project is to display current temperature in my city on LED matrix, by utilizing web API via WiFi connectivity.
The web API I am using is Open Meteo API.
In this firmware, I used JSON library, because API response from Open meteo API is in JSON format, and also WiFiS3 (for enabling WiFi connectivity).
You can check the source code on my GitLab.

0 notes
Text
Raspberry Pi, MQTT and RealVNC
When I got Sensecap S2103 LoRaWAN® CO2, Temperature, and Humidity Sensor, I was thinking to integrate it with commercial Scada HMI system. One of the reasons is because Sensecap S2103 is a set of sensors which are applicable in industrial applications. Later, an idea came to me why not to use Raspberry PI with screen - Human Machine Interface together with RealVNC to make Industrial – grade reusable application.
The best thing in this project Remote Access for your Raspberry Pi from Anywhere in the world via VNC connection, meaning you have Scada HMI system anywhere, on any device.
In this post I am going to show how to integrate Sensecap S2103 sensor and display collected data on Raspberry Pi display.
Since picture is worth a thousand words, block schematics below shows architecture of my project.

I will show data from SenseCap S2103 sensor on Home Assistant which is installed on reTerminal . I will not go step-by-step on configuration/installation of Home Assistant on reTerminal, but you can see great guide on seeedstudio wiki here https://wiki.seeedstudio.com/reTerminal_Home_Assistant/.
I used the guides from link above and Home Assistant Supervised installation/configuration method in order to have data displayed on reTerminal LCD.
Home Assistant acts as a central smart home controller hub by combining different devices and services in a single place and integrating them as entities. That means you can integrate various sensors and variouts services in one single place.
Process of installing Home Assistant Supervised on reTerminal is like following:
I am assuming that you already have installed Raspberry PI OS.
Install RealVNC https://www.realvnc.com/en/
Install docker
Visit Home Assistant OS Agent page, and install Home Assistant Agent V1.3.0. and also Home Assistant-Supervised
Install Portainer Docker management platform
On portainer dashboard make sure that Home Assistant primary containers are up and running
On a web browser, type the following URL homeassistant.local:8123
If everything is installed without problems, you can view Home Assistant Dashboard UI on your web browser and proceed with making your account
RealVNC server should come preinstalled no your SD card with Raspbian OS. If, for any reason this is not case with you, below are informations on how to Install the RealVNC for Raspberry pi.
How to Install the RealVNC on Raspberry Pi
Update the system repositories:
Open the terminal if you have direct access. Or, take an SSH session to the Raspberry Pi CLI. $ sudo apt-get update && apt-get upgrade
2. Install the RealVNC server:
$ sudo apt-get install realvnc-vnc-server.
3. Enable VNC server:
$ sudo raspi-config Got to Interfacing options Select VNC Answer Yes Select Finish to quit (or ESC)
Note: VNC runs on port 5900. You should open this port on all the middle devices to work the communication from your PC to the Raspberry Pi.
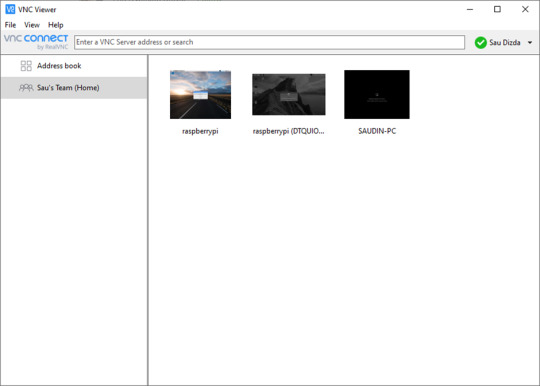
On PC side, you must install RealVNC Viewer, in ordes to access HMI remotely. Below is how RealVNC viewer loooks after installation.
First big part of the project is finished. Now we are going to configure SenseCAP sensor by using Sensecap MATE Android application. Again, amazing guideline can be followed on Seed's wiki: https://wiki.seeedstudio.com/Cloud_Chain/SenseCAP_Mate_APP/SenseCAP_APP/
The next step is to configure mqtt integration with Home Assistant and subscribe to SenseCAP data.
First, what you need to know is SenseCAP account API ID, Organization ID, and Access API keys. Nice quickstart can be found on sensecap page.
https://sensecap-docs.seeed.cc/data_openstream_quickstart.html
Got to https://sensecap.seeed.cc/portal/#/security, in order to create Access Key and view information about Organization ID.

By clicking on API ID, you can also see API keys information.
So, your important connectivity informations for Home Assistant, which will be important in order to connect to MQTT, are as below:
Host: sensecap-openstream.seeed.cc
User: org-<OrgID> (here you replace OrgID with your Organization id-example for this parameter will be org-428131654987987)
Password: here you insert your Acces Key which is in form XBA6E65464 (a combination of letters and numbers).
Client ID: org-<OrgID>-quickstart (example: org-428131654987987-quickstart)
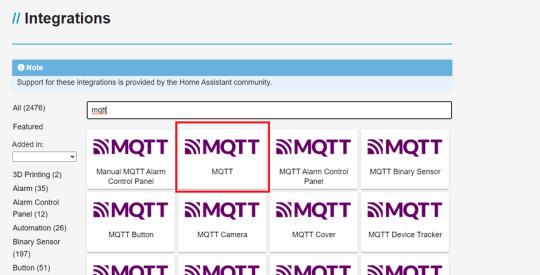
After this, go to https://www.home-assistant.io/integrations/, which allows integration with a lot of services. You will need, of course MQTT. Enter MQTT in search box, and choose MQTT, as shown below:
In Home Assistant now go to Settings->Devices & Services, Click add integration button and search MQTT. Now you enter the informations from above for MQTT connectivity:
Username= OrgID, password= client ID

Now, in order to test that MQTT connectivity works, click the CONFIGURE button and listen to the topic : device_sensor_data/OrgID/+/+/+/+
(example: device_sensor_data/428131654987987/+/+/+/+).
After few seconds, you will have response: vaule and timestamp in JSON format.
Since we want to show values of temperature, CO2 and humidity, we need to add multiple entities to store aquired sensor data, by editing the Home Assistant configuration file.
Go to the settings, click to Add-ons,search for File Editor, modify the YAML file /config/configuration.yaml by entering:
mqtt:
sensor:
- name: "Air Temperature"
state_topic: "/device_sensor_data/<orgID>/<DeviceEUI>/1/+/4097"
unit_of_measurement: "℃"
value_template: "{{ value_json.value }}"
- name: "Air Humidity"
state_topic: "/device_sensor_data/<orgID>/<DeviceEUI>/1/+/4098"
unit_of_measurement: "%RH"
value_template: "{{ value_json.value }}"
- name: "Air CO2"
state_topic: "/device_sensor_data/<orgID>/<DeviceEUI>/1/+/4100"
unit_of_measurement: "ppm"
value_template: "{{ value_json.value }}"
DeviceEUI is Unique identification of device eg. 2CF7F12000000001, and it can be found on the sensor itself.
Now the last step is create dashboard.
go to overview and find the "Edit Dashboard"

You can add cards as much as you want. I have added Gauge card, and subscribed to entities (temperature, CO2 and humidity).
Finally, the IoT dashboard is shown on your reTerminal Home assistant main screen.
Here below are few pictures for you to see how it looks like:


0 notes


Text
Working with EEPROM on PIC16F877a
EEPROM (Electrically Erasable Programmable Read-Only Memory) is a type of non-volatile memory which can be programmed, erased, and re-programmed electrically while it is on the circuit board. The main problem of FLASH and RAM memories is in fact that they are not capatible for storing data which will be stored after loss of the electric power. A majority of PIC microcontrollers (for example PIC16F877a) come with some built-in EEPROM which is a great place to store data that should not be lost when the system is powered down. Actually, FLASH can be used for that purpose, but it is a little bit complicated and for data access you need to write a special software called Bootloader. PIC16F877 has a 256 bytes of EEPROM memory. A good example for EEPROM is a digital lock system where the access code can be stored in the EEPROM of microcontroller so that the contents remain intact even after the power supply has been removed. For more clearer example, you can use internal EEPROM to store the measured temperature values. Reading and writting to EEPROM is pretty straightforward, and it’ relativelly easy.
To read EEPROM you need to:
1.Write an address of EEPROM you want to read into EEADR register
2. Set EEPGD bit from EECON1 register to 0 so the next operations can refer to EEPROM (and not FLASHROM)
3. Set RD bit from EECON1 register to begin EEPROM reading
4. The data is stored in EEDATA register.
Sample code is below:
void delay(char n) { //function that inserts delay 5ms char i; // we need it because we will send data from EEPROM to LED OPTION=7; // diodes which are on PORTB do { clrwdt(); i=TMR0+39; while(i!=TMR0); }while(–n>0); } void main(void){ TRISB=0; EEADR = 0; EEPGD = 0; // 0 enables to read write from EEPROM-a ..
// EEPGD=1 means that we want read/write access to FLASHROM unsigned char eeprom_address = 0; for(eeprom_address = 0; eeprom_address< 0xFF; eeprom_address++) { // for loop for reading EEPROM and displaying it on PORTB EEADR=eeprom_address; while(RD); //wait to finish EEPROM reading delay(50); PORTB=EEDATA; if(eeprom_address==0xFF) eeprom_address=0; } }
I will write about writting to EEPROM in next post.
0 notes

Text
Rumi
Rumi - poezija
Medznun i Lejla
Od tebe sam udaljen onoliko koliko ti to zelis, a ako si tuzna, pogledaj, i ja sam takodje. Nema vjetra bez tvoga mirisa, niti u meni ista pjeva a da to nije Lejla, ni jedno sjecanje u meni nije traga ostavilo jer je u tebi svo moje bice nestalo…
Ko sam ja? Jedan prosjak, koji pjeva zbog tebe, voljena, tako daleko, blizu, cujes li me? Od robovanja zivotu ja sam slobodan, pa je moja bol takodje i moja sreca. Jedan utopljenik, zedan u oluji bola i uzitka, jedan nocni slijepac sam ja, koji se suncu nada… Moja dusa si ti, a ja sam tvoja, dvje duse smo mi, a ipak smo samo jedna, dvje zagonetke, a jedno rjesenje za oboje, da svako na zemlji za drugim pati. Ovaj put smo deset koraka odvojeni, premda smo jedno u drugom prepoznatljivi. Ipak ovde, sto je jedno, mora se kao dvoje pojaviti, i ne smije se vec sada u jedno udruziti. Nema puta koji tijelo drugom tijelu vodi, samo dusa dusi moze putovati… Srce je vjecno, jer tebe voli, smrt je tamo, gdje ti nisi. Ja ostajem zdravo, dokle god si ti u meni, jer dio mog vjecnog zivota, to si ti…
2 notes
·
View notes
Text
Ananke evaluation kit
Ananke is DSP evaluation kit from Usound designed primary to test their MEMS speakers.
The Ananke evaluation kit comes in a beautifull box which contains the following:
Ananke 3.0 evaluation board
USound earphones (The right-side earphone can be identified by the red mark.)
5 V power supply
3.5 mm stereo jack cable for input
Ear tips in different sizes

The USound earphones which comes with the kit are simmilar to the USound product MEGACLITE In-Ear Earphones, so I
can't find any differences in the product other that MEGACLITE is set of USB-C earphones, and USound earphones are using tiny XLR connector.
After powering the board, and plasing USound earphones, you can simply connect the board with the Bluetooth and play music from your phone. There is also possibility to "send" music to the board with 3.5 mm stereo jack cable for input, or even play music from both sources simultaneusly.
The DSP firmware comes preloaded with filter set of parameters stored in EEPROM.
DSP chip which Ananke kit uses is the one from Analog devices, ADAU1401A.
The ADAU1401A is a complete, single-chip audio system with 28-/56-bit audio DSP, ADCs, DACs, and microcontroller-like control interfaces.
Practically, this DSP has 1024 instructions/cycle in the program RAM and 2k words of data memory.
For programming your own filter, it is possible to use SigmaStudio, all-in-one solution for generating a program by programming with blocks, and without writing low-level code.
SigmaStudio includes a library of low-level signal processing functions, such as adders, multipliers, feedback, and delays.
These can be wired together to create a custom algorithm within SigmaStudio without having to write line-level code.
All in all, it is really simple to use the board, everything follows the "plug-and-play" philosophy. I recommend this board not only for audio lovers, but also DSP hackers. In the next post, I am going to write a way how to programm your own generated hex file from SigmaStudio by using Arduino SPI communication.
For more information visit: https://www.usound.com/product/ananke/
0 notes
Text
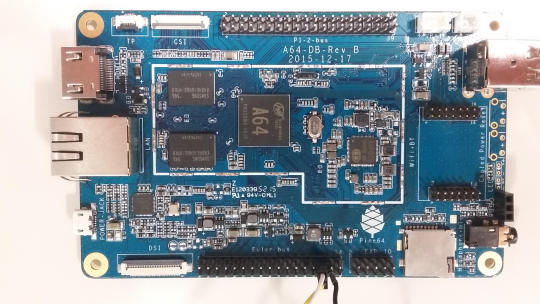
PINE64
PINE64 has so far raised over $1.4 million in its Kickstarter campaign for their tiny, yet versatile, $15 computer. The Pine A64 has a 1.2Ghz board, 10/100Mbps Ethernet Port, 3.5 MM Audio/Mic Output, 4K HDMI and 2 USB ports.
Most important, PINE64 is an open source platform from both hardware to software.
PINE A64 is the world's first 64-bit expandable Quad Core 1.2Ghz supercomputer,and it is really powerfull.
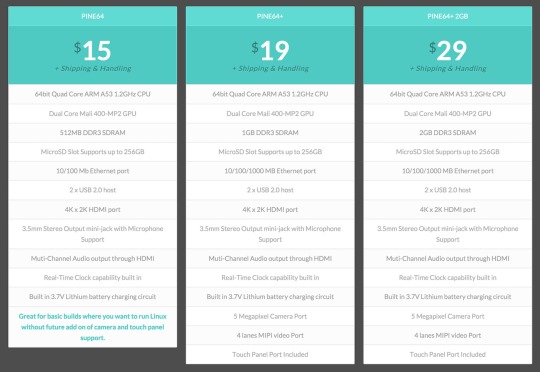
PINE64 is available as three different models -- the PINE A64, PINE A64+ and PINE A64+ 2GB -- that offer more memory, connectivity and features for a little extra money. You can see the specs of this board below:
0 notes
Text
EEweb Europe Electronics forum
EEWEb Europe is an electronic forum that offers electrical and electronic design articles and resources in one place. Electronics and Electrical Engineering design articles and resources in the area of RF design, analog design, embedded design, PCB design, test and measure.
Link: http://www.eeweb.de/forums
Join us, and share your thoughts and ideas with other European Electronics and Electrical Engineers, and Hobbyists.

0 notes
Text
My Firefox OS apps
Firefox OS is the new mobile operating system developed by Mozilla, based on Linux and Firefox's powerful Gecko rendering engine. It is a Linux kernel-based open-source operating system for smartphones and tablet computers and is set to be used on smart TVs.
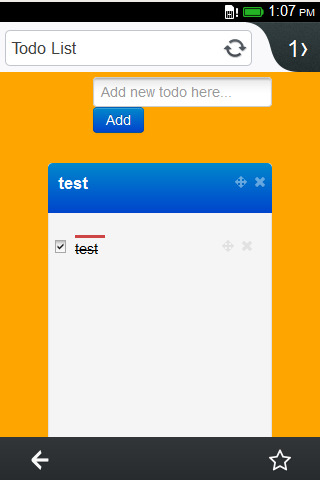
The first app I have created for Firefox os is tapko aka whack a mole.


The second one is a Notes app. You add notes in grouped tasks which are organised! Features: - Add and change notes colors - Check / unchech finished note - Todoko adds workspace to organize projects and tasks, rather than just a simple list. - It doesn't require internet connection, stores all information on your mobile phone using storage api. More features to come.
0 notes
Text
Imagination touts cheap Firefox OS MIPS slab to Chinese kitmakers
From:theregister.co.uk
youtube
No longer content to cede the mobile processor market to ARM, British chip firm Imagination Technologies has unveiled a new reference tablet design powered by a CPU based on its MIPS architecture.
Although designed to cost less than $100, the 9.7-inch device is more demo than actual product. Built by Chinese ODM Ingenic, its specs are basic, including Micro USB and Mini HDMI ports, 802.11n Wi-Fi, Bluetooth 4.0, front and rear cameras, and a display with 1,024-by-768 resolution.
What sets this unit apart from other bargain basement Chinese slabs, though, is that its processor is not an ARM derivative, but Ingenic's homebuilt JZ4780, a 32-bit MIPS design.
MIPS, a RISC-based architecture, competed against the likes of DEC Alpha and Sun Sparc during the heyday of RISC-based Unix systems in the 1990s and early 2000s. But Imagination, which acquired MIPS in 2013, has mostly peddled the processors for use in the likes of routers, LTE access points, and embedded systems.
Although Android has been running on MIPS since as far back as 2009, the architecture never caught on with smartphone vendors, who have all but standardized on ARM. That's something that Imagination would like to change, with the help of Ingenic and other members of its "prpl" development foundation.
The Reg got its first close look at the JZ4780 earlier this month, when we put Imagination's CI20 development board through its paces. The short description is that it combines two 1.2GHz MIPS processor cores with Imagination's PowerVR SGX540 GPU.
Although the JZ4780 is fully capable of running Android 4.4 KitKat, however, another quirk of the reference tablet is that it also supports an experimental version of Mozilla's Firefox OS, an operating system based on web technologies that has lately found its way onto a variety of low-cost phones, tablets, and TVs.
Imagination was kind enough to provide a video of Firefox OS running on its MIPS-y fondleslab, and while no one here at Vulture West was wowed by the device's performance, it's nice to see some variety in what has essentially become a commodity product category.
0 notes
Text
Mega New Year Give Away 2015
Again that time of the year has come. Christmas is here, New Year 2015 is around the corner. And one more reason to be happy, this is the time Numato hosts the largest give away of the year. That is right! We hosted our 2014 Christmas/New Year give away during December 2013/ January 2014 time and we saw overwhelming response from our readers. We gave away random gifts to every single person participated in the event, 250+ electronics enthusiasts. We hope that everyone who received the gifts put it to good use and learned something from it.
A year gone by since the last Mega Give Away and now this is time to give all our customers, readers and followers (social media followers that is!) an opportunity to grab a gift for themselves. And this probably is the best time to ask you for a little help. As you all know, our business relies on good people who spread the word about our company and our products. So this time we are asking you to share this message, spread the word and let your friends, twitter followers and blog readers know about the giveaway. This year anyone who shares this message will receive a random gift absolutely free, including free shipping.
How do I share this and participate?
There are different ways to share this post. We will post this message on Facebook so you can share the post directly from Facebook, you can re-tweet from our twitter feed or share this message on your blog. We can directly find out who shared the Facebook post and who re-tweeted this message. But if you choose to spread the word some other way, please comment below with the link to blog post or other information to enter the give away(make sure to create an account at numato.cc and log in before commenting, there is no way to find out and include anonymous commenters to the give away). Also this year you can make a wish for a specific product or product category as well. Make sure to mention in the comment what you would like to receive as the gift. Please note that although we will try allocate you a gift that would be in line with your wish, we can not guarantee you will receive any specific product. In fact you may even end up receiving a product that is very different from what you wished for.
Well, that is not the whole story yet. Two random lucky winners will receive Waxwing Spartan 6 FPGA Development Board.
Another five lucky winners will receive Mimas V2 Spartan 6 FPGA Development Board.
And ten lucky winners will receive PIC18 Microcontroller Development Board.
You will receive a guaranteed gift from Numato just for participating in the event and if you are lucky, you may receive one of the above boards as well. Your help with sharing this message will help our business and hopefully help us host even better give away program next year. This Give Away is open until end of day 5th January 2015.
Also you may want to check out our newly redesigned website. Any feedback is welcome and really appreciated.
Wish you all a Merry Christmas and a Happy New Year. Thanks to you all for being part of Numato family.
-- Team Numato
gift Box image by Zeus Box (Kuswanto) ([1]) [GFDL (http://www.gnu.org/copyleft/fdl.html) or CC-BY-SA-3.0 (http://creativecommons.org/licenses/by-sa/3.0/)], via Wikimedia Commons
0 notes
Text
Saturn - Spartan 6 FPGA Development Board
This week Numato is giving away Saturn - Spartan 6 FPGA Development Board with DDR SDRAM (http://numato.com/saturn-spartan-6-fpga-development-board-with-ddr-sdram) to three lucky participants. Please share this post on Facebook, Twitter or your blog and leave a short comment below about your share to take part in this give away. Thanks for sharing and best of luck.
0 notes
Text
Bitcion donate
I need money to pay the domain and hosting. If you are willing, pay me bitcoin to this address:
14bovvVWCwBmEEHR5eBGyp6SHYpD3xuWt3
0 notes
Text
My Xamarin IDE favourite features
I was using Visual Studio as IDE in my education, then later, because I like Open source began to use Monodevelop IDE. After that, I started to develop apps for Android using Android SDK, but because I don't have too much free time, I needed some IDE which will reduce the time for developing android apps, but with simmilar or all Visual Studio features and using C#. Here are my top Xamarin IDE features:
Side by Side Editing I have always wanted to edit files side by side when developing applications for Android in Android SDK. Xamarin provides a convenient way for viewing the source files side by side allowing to edit and see the changes when you make some design changes.
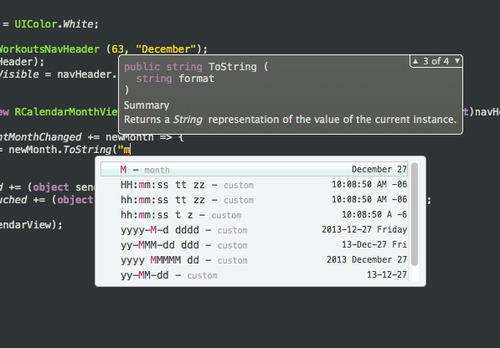
Contextual Insights + Automatic Code insertion
I like this feature, because it is very simmilar to Visual Studio and its IntelliSense. Place your cursor over any member for type information and other details, helping you explore foreign and familiar APIs alike.
These two features are listed below:
Contextual Insights:
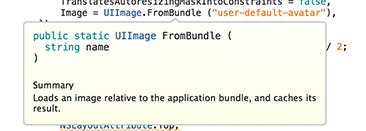
Automatic Code insertion + info:
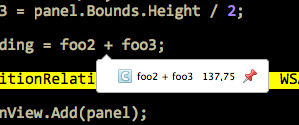
More, the is also autoamtic variable calculation, just position your mouse to varialble and it will show you the result.
Manage Nuget packages
Visual Studio NuGet package manager is managed with the help of the the dialog box, as shown below:
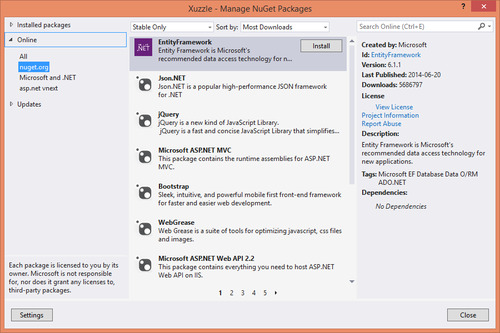
NuGet package is a tool for adding, updating, deleting additional libraries which you can do easily within this dialog.
All in all, these Xamarin features are by my opinion the best , , of course Xamarin Studio, has are many other nice features. By my opinion, Xamarin is the useful open source IDE !
0 notes