
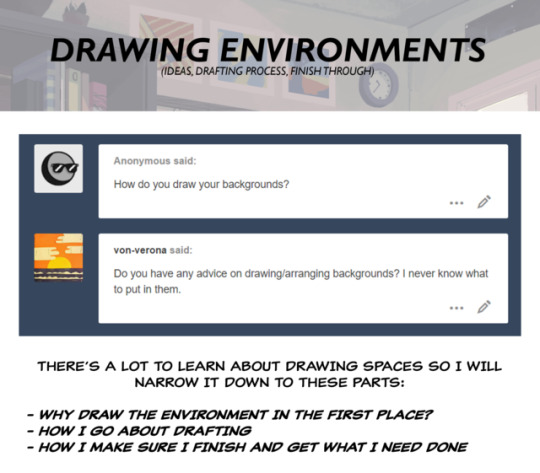
Hello I am artist. This is my art blog and I draw my ocs a lot.
Don't wanna be here? Send us removal request.
Statistics
We looked inside some of the posts by sharkdip-blog and here's what we found interesting.
Average Info
Notes Per Post
540K
Likes Per Post
344K
Reblog Per Post
195K
Reply Per Post
123
Time Between Posts
20 days
Number of Posts By Type
Photo
12
Video
1
Text
2
Note
2
Last Seen Tumblr Blogs


Fun Fact
In Q3 of 2020, 31% of US users access the Tumblr app daily.
Photo


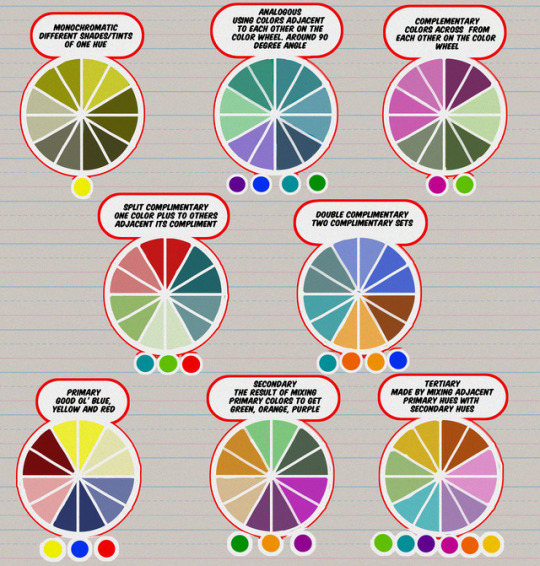
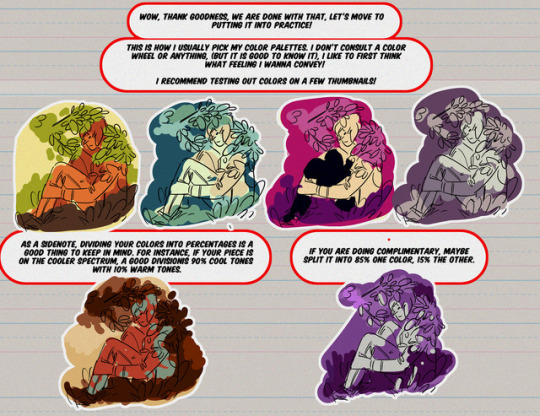
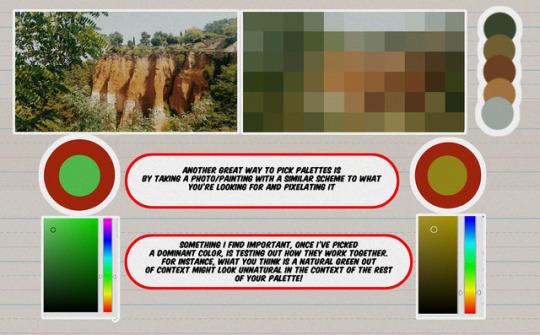
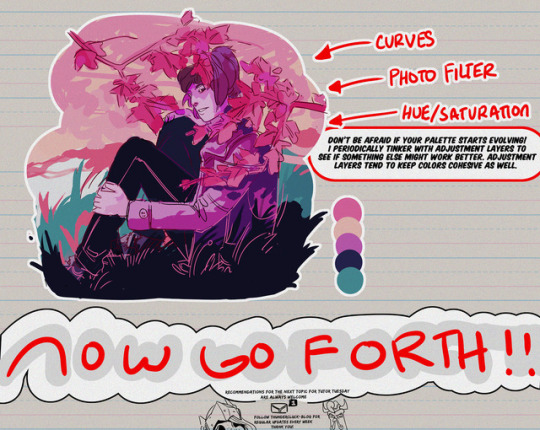
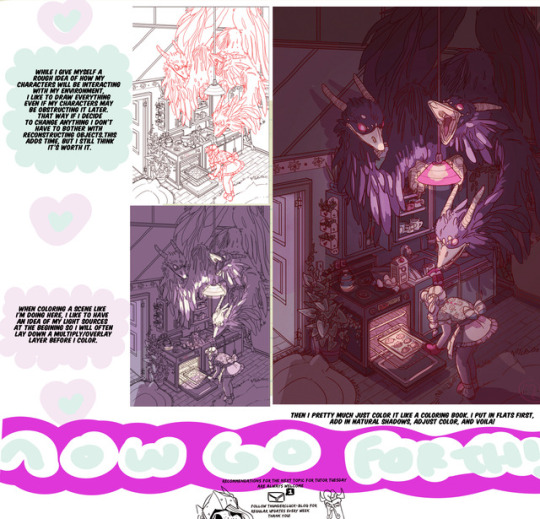
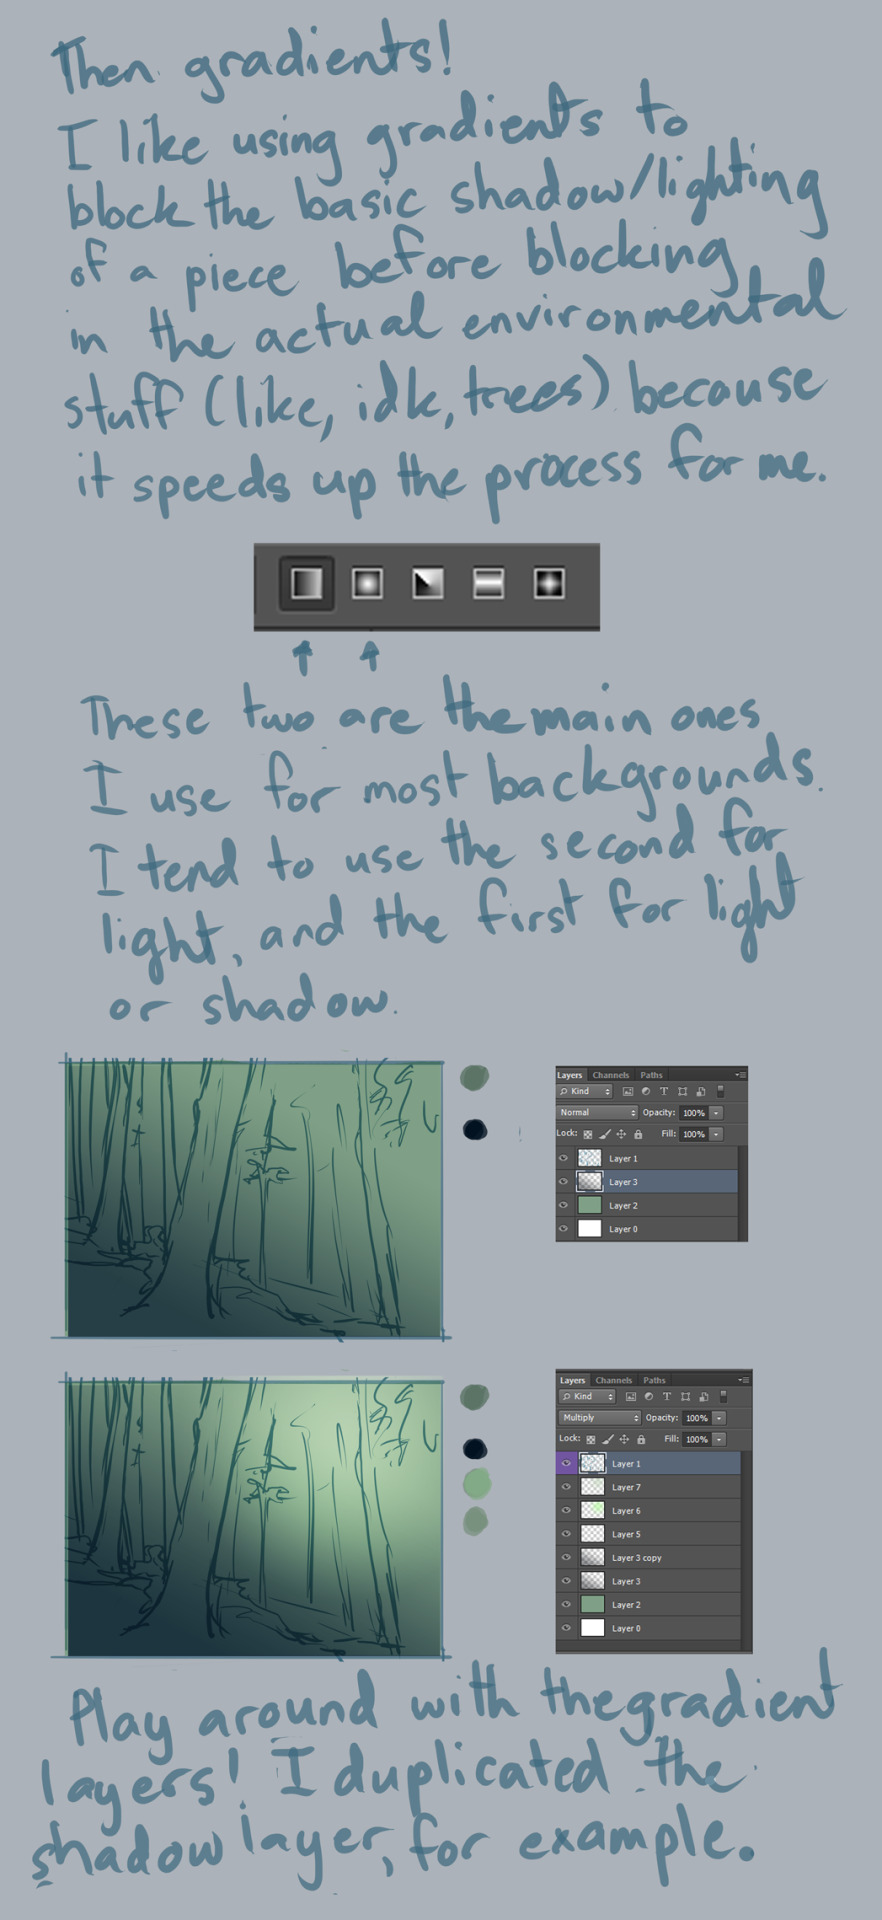
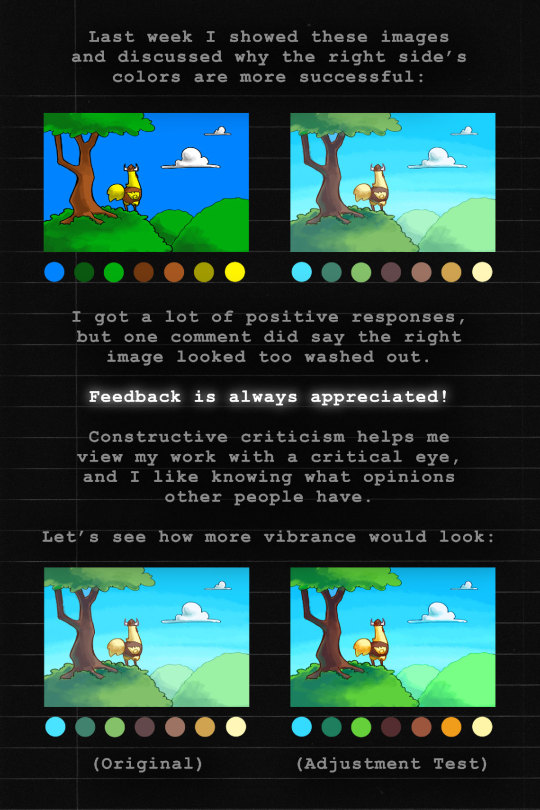
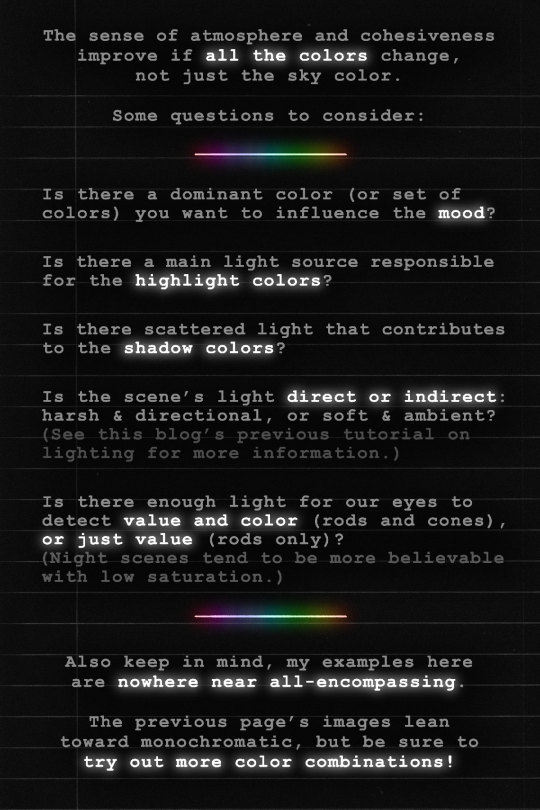
Color palette tutorial time!
This is by no means the Only Way To Pick Colors–it’s just a relatively-simple method I use sometimes. I���ve found it works pretty well, almost regardless of what colors you pick–as long as you can keep them organized by those light/dark warm/cool categories, and make sure one category takes up a significantly higher proportion of page space, it usually turns out pretty good!
94K notes
·
View notes
Photo

Hey friends!
Meg here for TUTOR TUESDAY! Just a quick beginning look at colors and some color theory! I’ve had a few recommendation for color palette stuff, so I hope this is a start! Paul has done some on color as well! If you have any recommendations send ‘em in here or my personal! Keep practicing, have fun, and I’ll see you next week!
58K notes
·
View notes
Photo
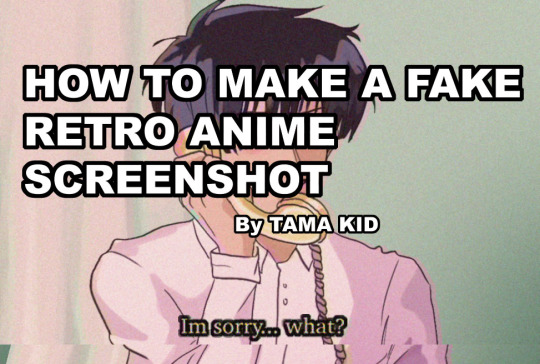
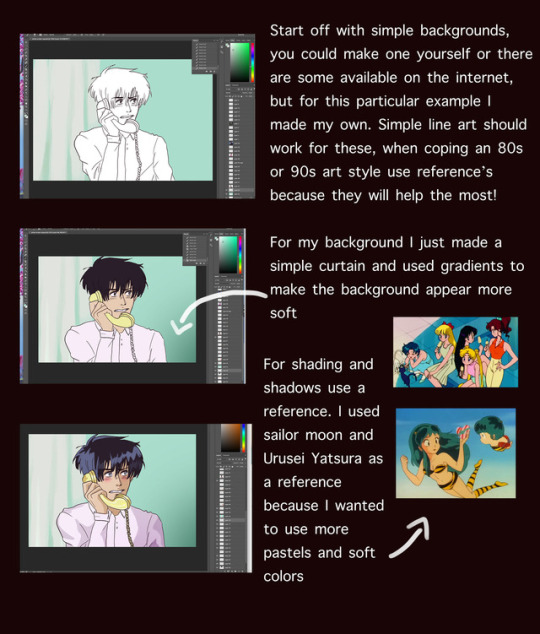


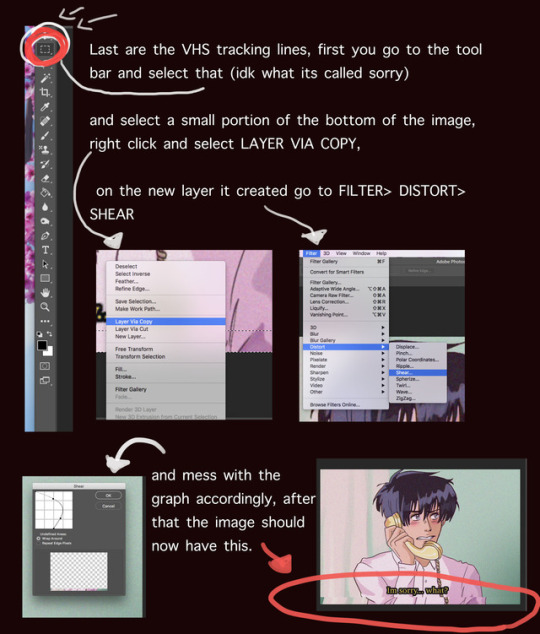

I got a lot of asks about this so I made a tutorial on how I was able to emulate the 80s aesthetic, please keep in mind I’m not an expert and what I put here is just what I personally did. I hope you guys like it and hope it helps
go crazy kids
130K notes
·
View notes
Photo
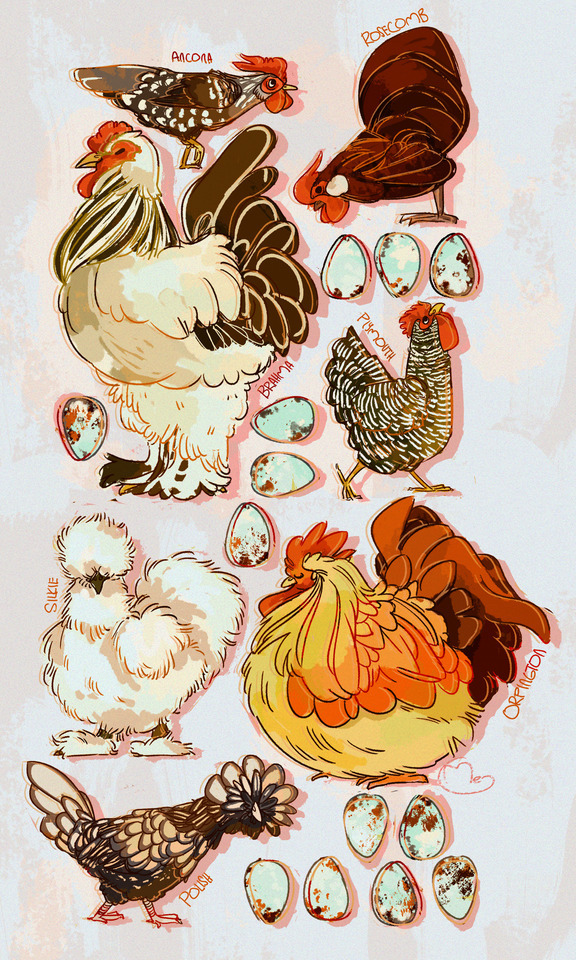
Hey! Meg here for FEATHERED FRIDAY! Have some sweet, sweet chickens!
3K notes
·
View notes
Video
tumblr
I wanted to try out screen recording for future tutorials, this was a bit of a messy attempt, but I thought you guys might be interested in seeing process work, I know it’s helped me before. -Meg
390 notes
·
View notes
Text
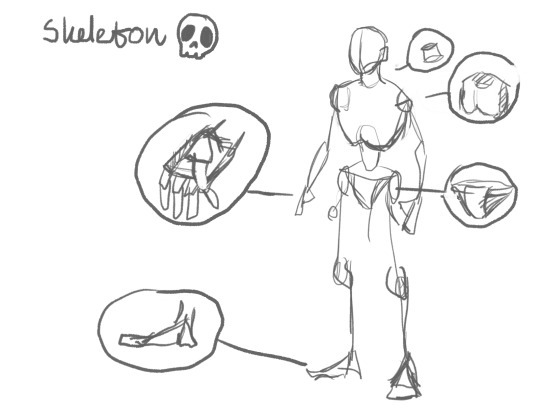
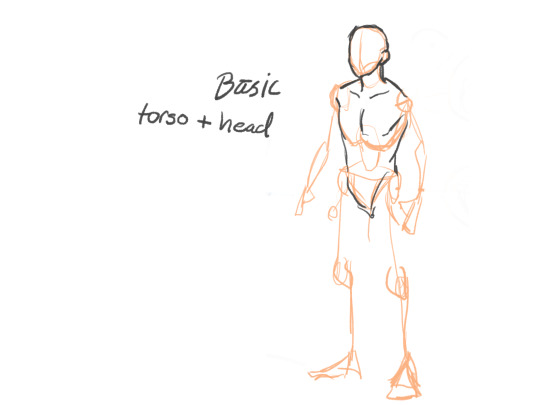
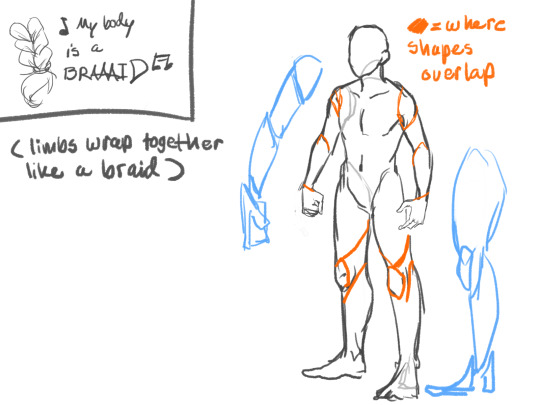
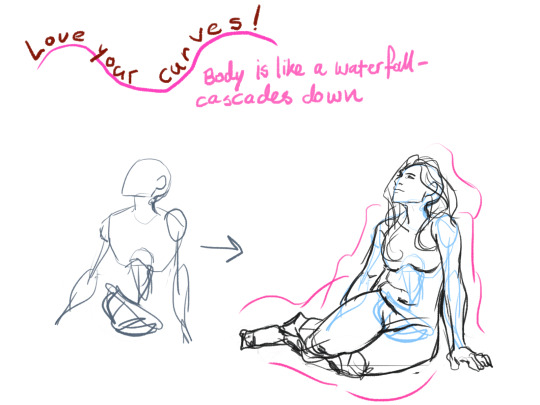
Here’s a small little body tutorial for some friends. Maybe someone else will find it helpful!
707 notes
·
View notes
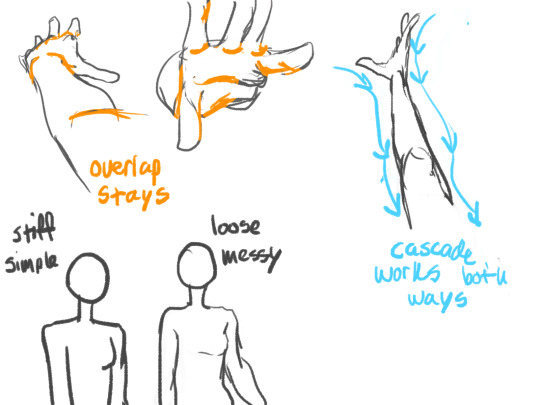
Note
hi- I was wondering if u had any process gifs of your background art? like how do you go about adding the textures? is it at the final stage that you do it? I'm also interested in working as a bg artist after I graduate and you're a really big source of inspiration!
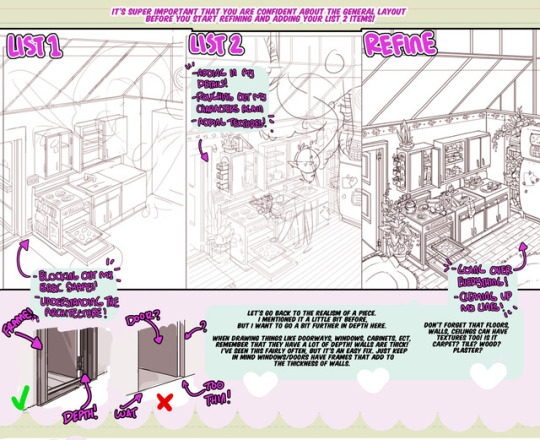
hello! i dont have any process gifs but i put together a little tut for you, i feel like im overdue for a proper one :8) i want to make a more in depth tutorial on background painting (maybe a video?!!?!) but for right now i’ll just address your questions on texture if that’s okay!
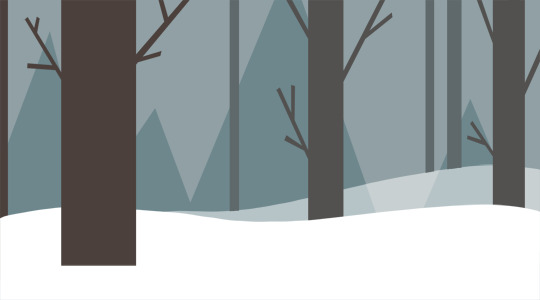
here is an ultra basic bg we’re gonna spruce up. keep in mind i’m not going to talk about lighting and composition really so, try to put that out of your mind for now. anyway, there is no texture or edge difference in this yet. everything is smooth and samey (but there is a little bit of atmospheric perspective in the color). the most important thing at this stage is that every unique shape or plane is on its own layer. this is because all texture and lighting will be clipped to the corresponding layer.

sorry this is kind of ugly but this is how i arrange my layers LOL. everything is arranged on planes. i think of it like cut paper stacked on top of each other.

make a clipping mask for the texture you’ll put on each shape. i talk a bit about clipping masks and how to use them here. normally i’d have a clipping mask for texture, shadow, and light, so it can get a little crazy when you have a lot of layers but it’s invaluable for experimenting and getting things just right.
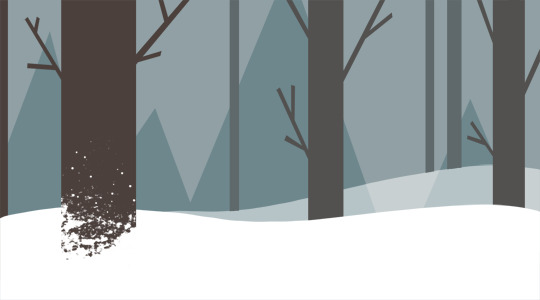
ALRIGHT SO LETS TALK ABOUT ACTUAL TEXTURE. i think about texture as having two functions: 1. to draw the viewer’s eye to where you want it to be, and 2. to describe the material/feel of objects. for our very first texture, we’re going to put some snow on the front tree. im using a variety of brushes, please check my FAQ for a full list. since i want the viewer to focus mostly on the front tree, i’m going to put the most texture on it. to answer your question about when i add texture, i usually just kind of follow my intuition and use it when i feel it’s needed. i will almost definitely go back and add/take away throughout the process of the image. a lot of things change and it’s cool to change your mind throughout. i don’t really follow solid “steps” for every piece, they’re always different for me!

now i am just continuing to add texture here and there. the middle ground trees get a bit of snow, but it’s subdued enough to not be the focal point. as well, i added some texture to the snow because i wanted the front plane to be the one you look at the most. everything behind the middle ground trees is wholly untouched. now we have a nice contrast between smooth/textured going on! and contrast/opposites is the key to guiding a viewer’s eye.
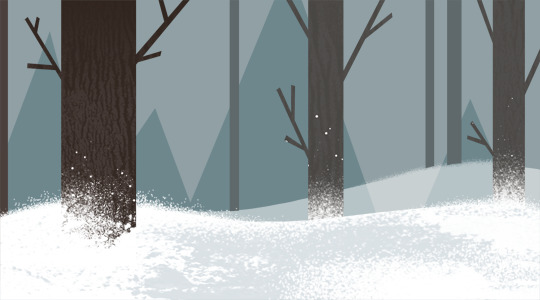
after all that i decided at last minute that the front plane could use some texture to differentiate it. but looking at it now, i’d probably go back and rethink it. that’s life.

finally! i added some color corrections and some gradients to push back the mountains and trees. i also added some falling snow and an overall paper texture to simulate a snowy feel without having to paint it all. the paper texture is behind the front plane, again to push everything behind it back. i would be very careful about putting a texture over everything, it can really flatten everything or make it look fake/gimmicky. clip it to shapes or erase where necessary.
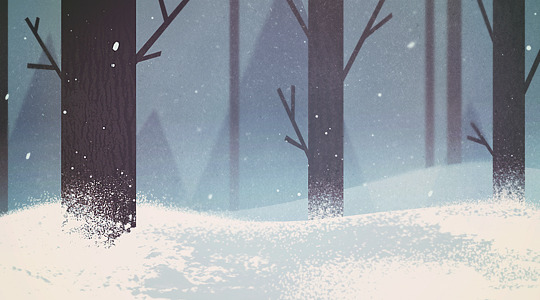
lastly, a short word about more contrast. here, i am trying to push the contrast between soft and sharp. the only difference between this image and the last step is that i blurred and sharpened some planes. there are multiple ways to think about this, but for me, the photographic approach is easiest to understand and it’s just how i like my art to look. basically, i try to always make my focal point sharp and in focus, and blur other elements.
this felt a bit all over the place….sorry!! but, i hope it helped. i would like to do more in-depth tutorials in the future so please hang with me til then. thanks for the ask!!
13K notes
·
View notes
Photo

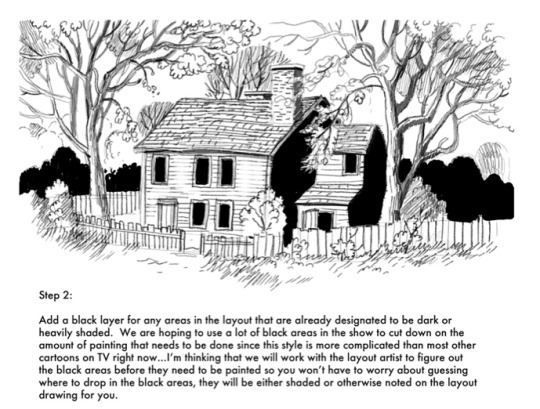


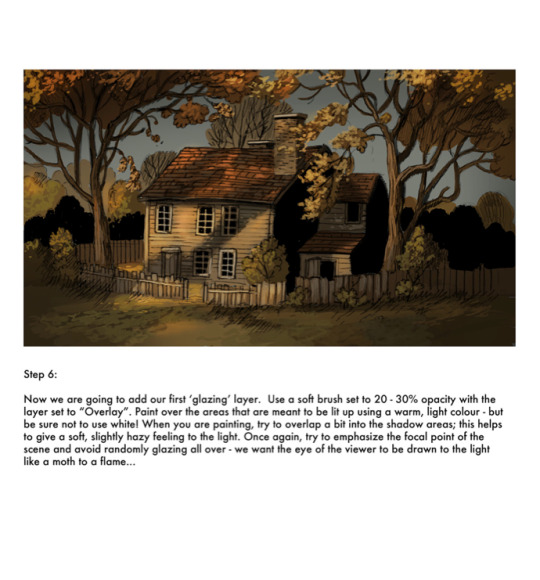
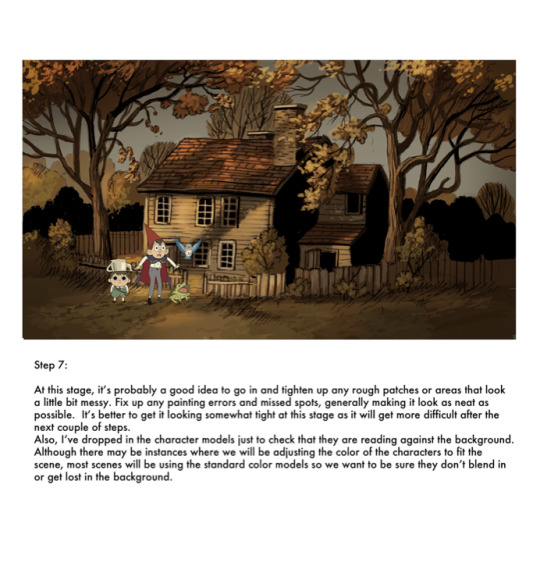
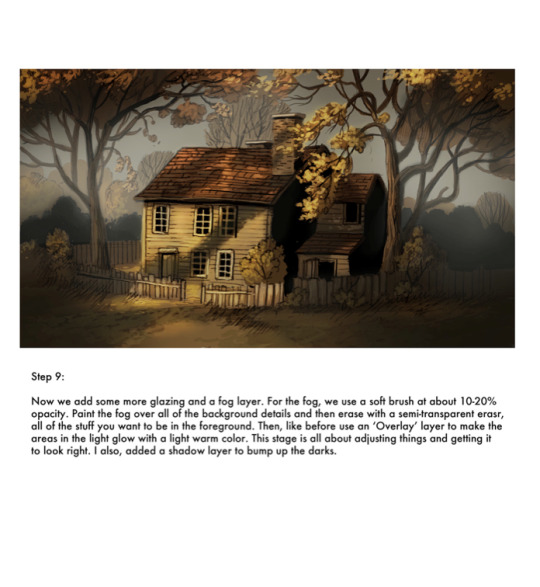
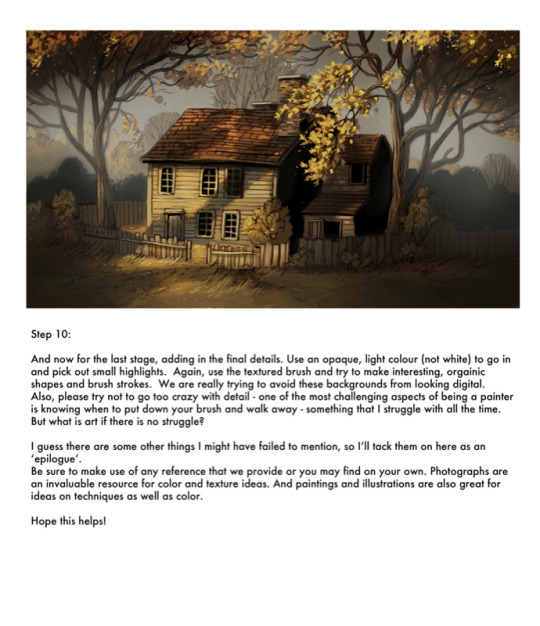
Here’s a background tutorial that was intended to hand out to the painters on Over the Garden Wall…I’m actually not sure if I ever did (maybe German or Levon can chime in on this) Anyway, I whipped this up super fast in the early days of pre-production and it might be of interest or help to some aspiring digital painters out there.
EDIT: It was just pointed out to me that there’s a missing step 8…that was a typo in the original document…sorry about that.
66K notes
·
View notes
Photo

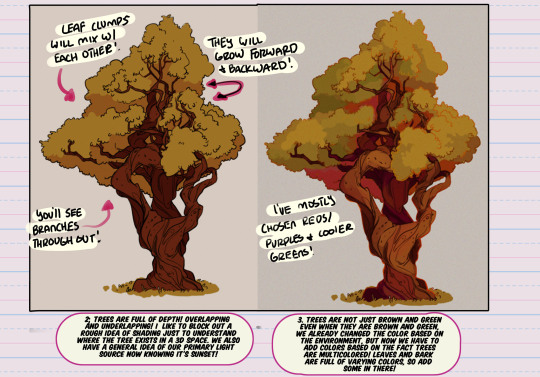
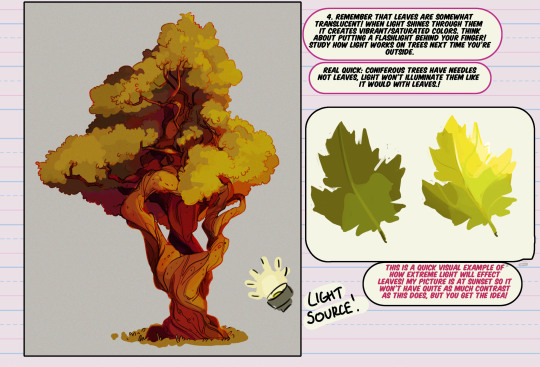
Hey friend!
It’s Meg for TUTOR TUESDAY! Today we look at Part 2 of last weeks tutorial! Let’s take a gander at painting trees this time! Here is Part 1 for anyone interested! If you have any tutorial recommendations lemme know here or my personal! Keep practicing, have fun, and I’ll see you next week!
18K notes
·
View notes
Photo


Hey friends!
It’s Meg here for TUTOR TUESDAY! Today is part one of drawing trees. I’ll do a tutorial on painting trees next time! This was a recommended tutorial, and if you have any tutorials you’d like to see just send em in here or at my personal! Have fun, keep practicing, and I’ll see you next week!
50K notes
·
View notes


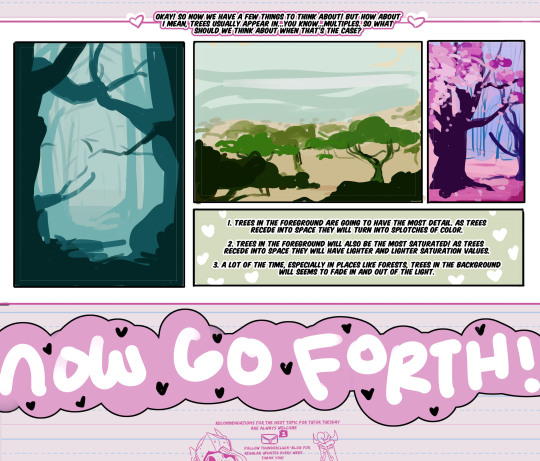
Photo
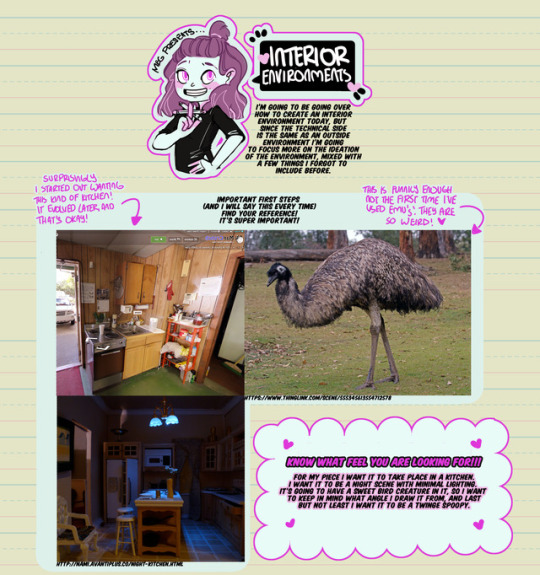
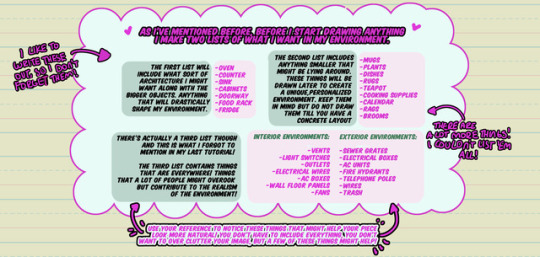
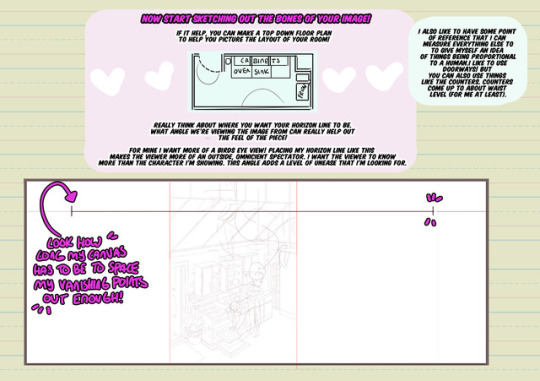
Hey friends!
It’s Meg for this week’s TUTOR TUESDAY! If you missed them, these three tutorials explain more on the perspective aspect of creating environments! Today we are looking more at the ideation process and how to create natural looking settings! If you have any recommendations send ‘em in here or to my personal! Keep practicing, have fun, and I’ll see you next week!
4K notes
·
View notes
Note
Do you have advice on drawing backgrounds with characters?
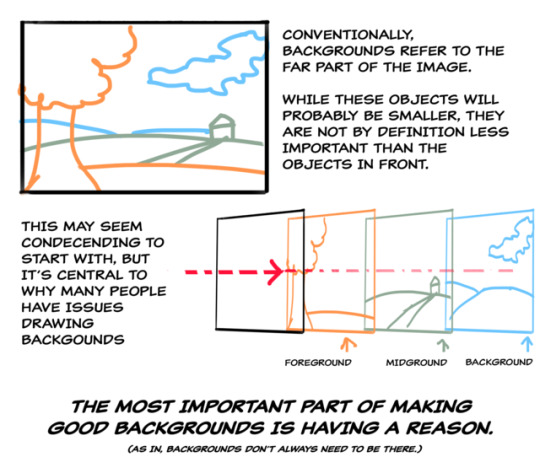
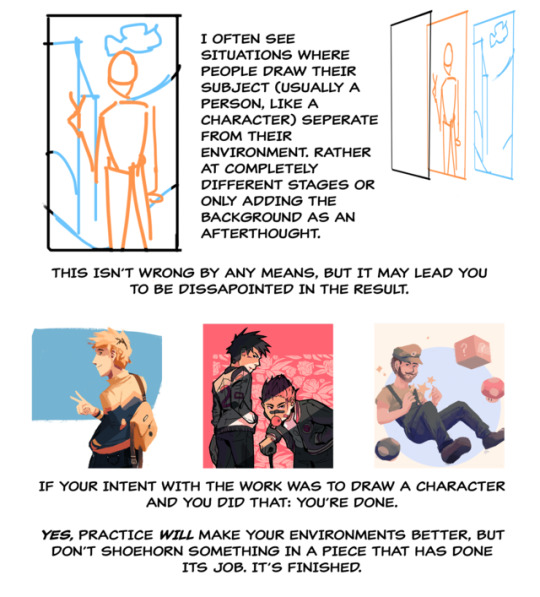
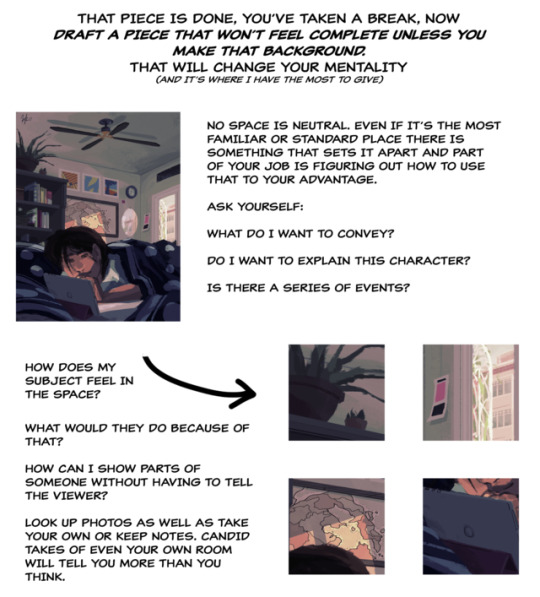
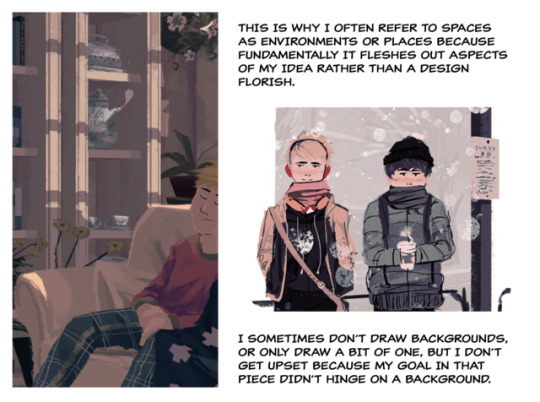
First, don’t imagine backgrounds as “backgrounds,” like some kind of giant placard you place behind characters on a stageplay. Think of them as “environments!” A place where your characters interact, make conversation, eat food, sleep, grab stuff, jump around on, fight, etc. The environment is just as important to the visuals as the characters, nobody exists in a void.
The most important thing to do is to plan to draw the character(s) IN the background/environment, not as an afterthought.
I also like imagining myself as a cinematographer in my own comic, somebody with a camera, who is on the set with the characters. I think about the best way to “shoot” the characters doing what they’re doing based on what they’re doing and the tone. Is it a happy scene? A sad scene? I also think about the environment they’re in and what are some interesting ways to frame the character.
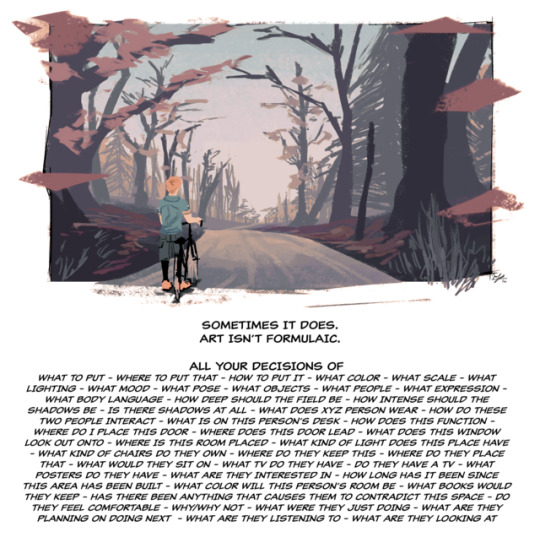
I’ll give a quick and dirty example. Say you Character1 is waiting at a bus stop. It’s a very boring and normal bus stop. It’s got a bush, a tree and a bus sign on a sidewalk.
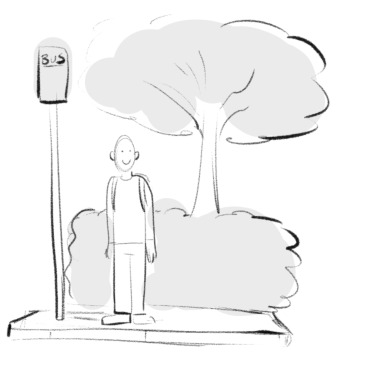
Not a very exciting drawing, but it establishes what Character1 is doing and where at. Notice I used the underside of the tree and the bus sign to make a little “window” around Character1′s head. It puts the viewer’s attention right on them. But what if Character1 is really anxious? How would you convey that?
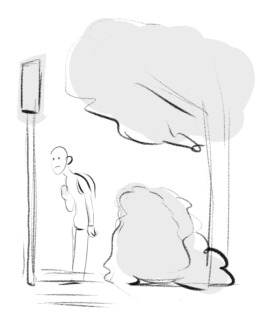
Now, the “camera” moved to the side. It puts Character1 more on the bottom-left corner of the drawing, making them look more on edge. Once again, notice that I used the tree, bush, and sign to frame around Character1.

Now the camera is behind the bush AND tree, so we’re now looking at Character1′s back. Maybe you don’t want people to know what Character1 is thinking.
Or what if Character1 is having an existential crisis while waiting for the bus? Here, I’m shooting upward on them and dutch angled the drawing (which means tilting the camera) to give it a jarring, disoriented feeling.
These are just some ways to draw the environment with the characters in it. And note, this works best if you’re doing comics or storyboarding, but it might not be necessarily true for some illustration styles. This is just the way I do it. :)
3K notes
·
View notes
Photo


Background Tutorial
requested by ion4ever. sorry it took me so long to do this for you but hopefully I was of some help?
Notes:
I use CS6, and this was mostly done with default hard round brush at around 50% opacity or higher, 100% flow, and size pressure on. I made some random brushes for the greenery by modifying the default ones.
always use a large canvas. I go about 3000px x 3000px.
with enough practice, painting backgrounds like this will be a fairly quick affair. this one, for example, took about 30 minutes? it’s just a matter of time/experience. :)
So yeah, good luck doing backgrounds, and have fun!! :D
32K notes
·
View notes
Photo

friday night tutorial time
this post is massive but i tried to cover both the conceptual and technical side, hopefully it’s somewhat coherent
continued under cut
Keep reading
50K notes
·
View notes
Photo
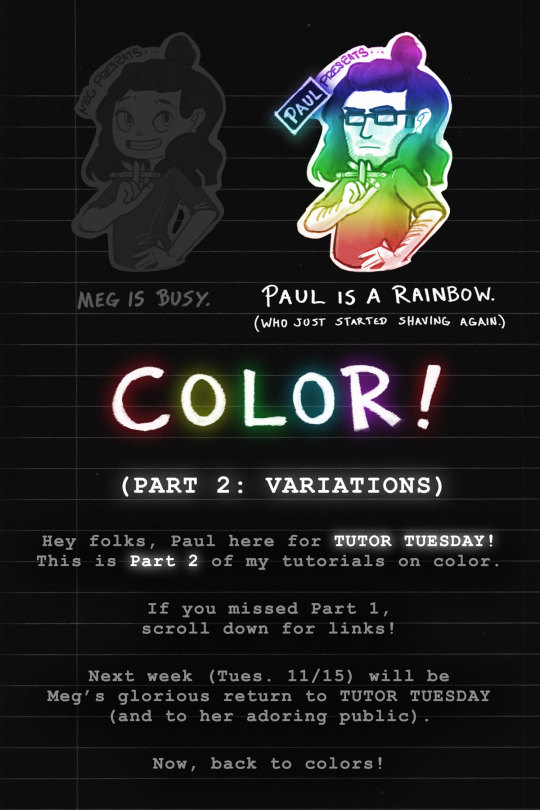
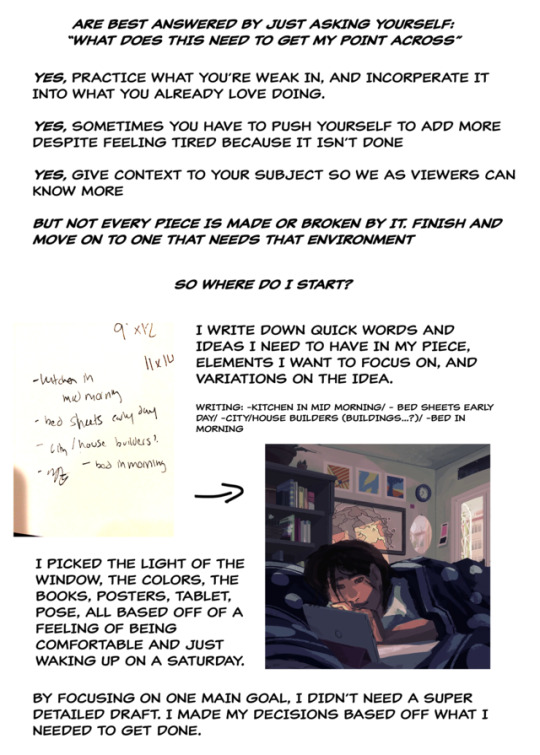
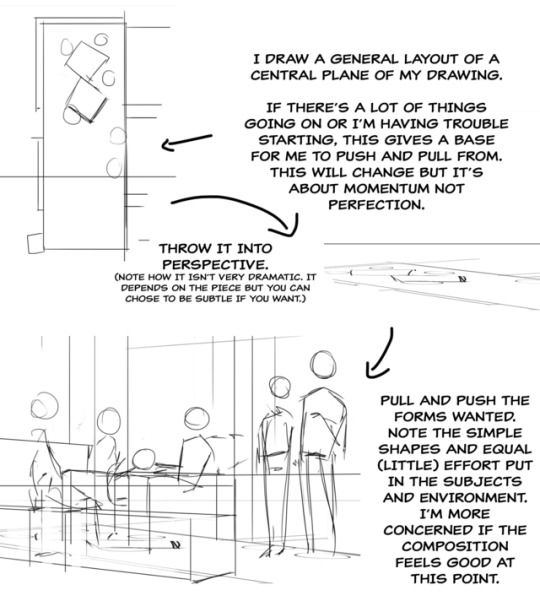
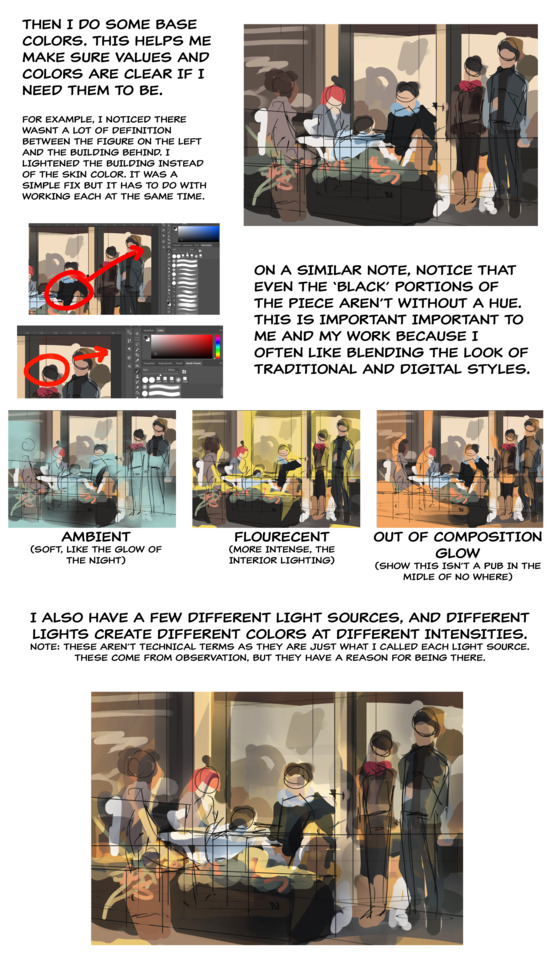
Hey folks, Paul here for TUTOR TUESDAY–this is my last one before Meg returns next week!
Here are links to the previous tutorials referenced:
Color Tutorial, Part 1
Lighting Tutorial, Part 1
Lighting Tutorial, Part 2
Thanks for reading, everyone! See you next time,
Paul
2K notes
·
View notes
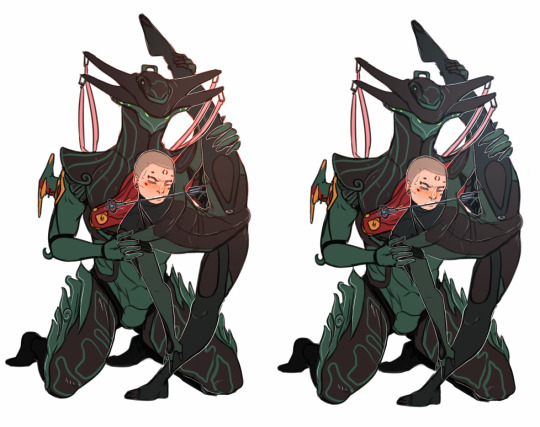
Text
ART TIP: blinging up doodles
So in case you are like me with art, meaning rather lazy and procrastinating a lot when it comes to most work. And you also feel like posting same-level of doodle art lot of the time is getting boring and it looks very same-y, not very impressive etc etc …
Here’s a few simple ways to bling up a doodle to make it look bit better and virile that every new or moderate artist should at least try, so we can all fake like we have some actual quality in our art.
30% of the time, these work everytime.
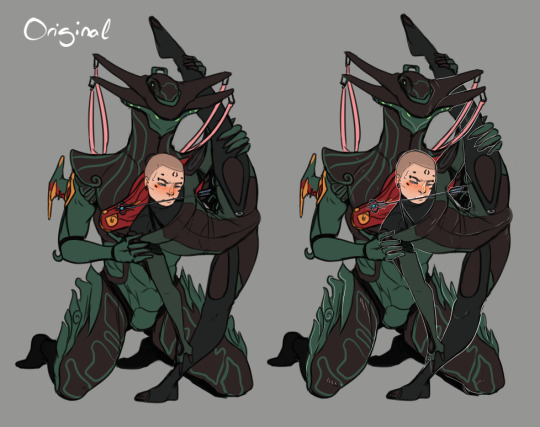
1) White lines - very simple and widely used. When one needs to make borders pop out more or when there is need to differentiate between objects/characters in the piece, like here, as the colorpalette on two characters is very similar.
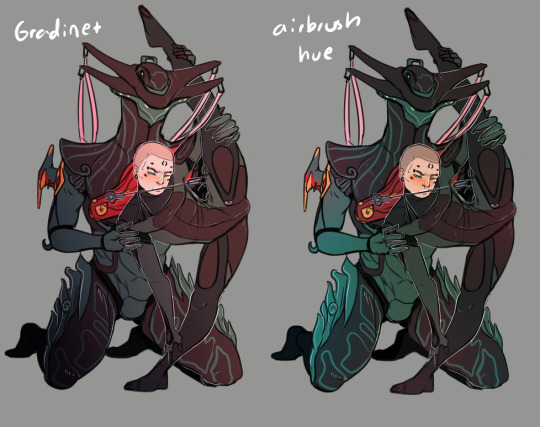
2) Hues - just adding simple hue or gradient level on top of the colors makes it a lot cooler. Used with Overlay-layer setting, though you are free to test out others- Don’t overdo the hue, as that is very easy to do.
(color hues and gradients are also good way to give certain air to the piece. Certain emotion or atmosphere, depending on colors you use.)
3) Actually 2 combined. Lightsource and colored lines. Giving the piece a very simple lightsource with just airbrush and add - layer setting makes it look very nice.
Also throwing some color to certain parts of the lineart makes it look more live as well. If you’re not sure what strategic places to add it on, the most basic rule is to color lines inside outlines. Meaning that, all linework that is in straight contact with background color remain black, while lines inside it (like clothes lines) can be colored.
482 notes
·
View notes