
sickchickenstudios-blog
11 posts
Don't wanna be here? Send us removal request.
Statistics
We looked inside some of the posts by sickchickenstudios-blog and here's what we found interesting.
Average Info
Notes Per Post
8
Likes Per Post
5
Reblog Per Post
3
Reply Per Post
0
Time Between Posts
4 months
Number of Posts By Type
Text
10
Photo
1
Last Seen Tumblr Blogs


Fun Fact
130K people were victims of a chain letter scam that affected Tumblr in May 2011.
Text
Voiceover Editing Workflow
Howdy,
Due to popular request, I thought I would elaborate a little on my audio process when editing voiceover recordings for use in my narrative driven point and click adventure, Guard Duty.
This process may seem a little like overkill, but I assure you it's worth laying down the ground work rather than jumping straight in and cutting and exporting dialogue lines individually. That sort of workflow is perfectly suitable for smaller projects (say, 100-500 lines) but for larger game projects it can be incredibly intimidating.
Editing audio is a pretty tedious process at the best of times and I think us adventure game developers have it the worst, with our game relying heavily on large word counts and dialogue needing to be exporting on a per-line basis.
Anyway, let's get started:
The first thing you want to do is plan early, go into the recording booth thinking about the export process. Keep in mind that you're going to be using Adobe Audition (or Audacity)'s diagnostics feature to determine which bits of your audio are speech and which are simply gaps between lines. This means recording the dialogue with large pauses between lines. The pauses need to be 3-4x longer than any pauses there may be in a line of speech (dramatic pauses, contemplation etc).
I will be referring to a 'line of speech' a few times throughout this mini-tutorial, just to clarify: A line of speech is a single line, shown on screen as text in real-time. Something like: "That looks... disturbing." or "I'm off to see the wizzard!". Typically these lines would be linked to a single audio file. In the first example, the ... represents a pause in the speech, as it is in the single line of speech it would still only be the one audio file. *This* is why you need large pauses between lines when recording.
To make things easier for myself, I try to edit the audio on the fly. I cut out any bad takes whilst recording and keeping only one take of each line. This is can prove difficult sometimes, depending on your recording arrangement, or you may with to keep multiple takes so that you can chose the best one at a later date. For the 'super hacky but-it-works auto-numbering process' you will need to have only ONE take of each line before you start the diagnostics step.
Okay, this is all getting a bit wordy. Let me break it down:
Step 1: Record your VO with long pauses between each line.
Step 2: Go through and remove and clicks, mic knocks, lip smash and general unwanted noise in your recording.

Audition’s ‘Spectral Frequency Display’ helps with this process.
Step 3: EQ, Compress, Normalise and Noise Reduce the audio: Follow this tutorial but skip the Parametric EQ part (personal preference)
https://www.youtube.com/watch?v=fknmkG0mPzw
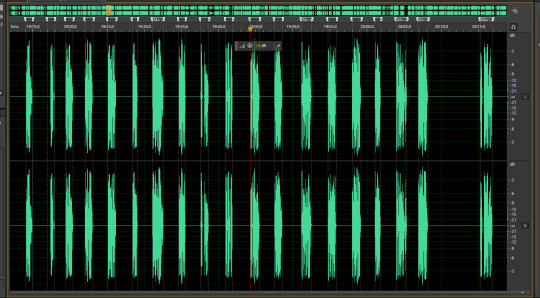
Step 4: Check db of gaps between lines.
Step 5: Use the gap db as a reference threshold for a Dynamics pass: See this video:
https://www.youtube.com/watch?v=rEskFn392yM
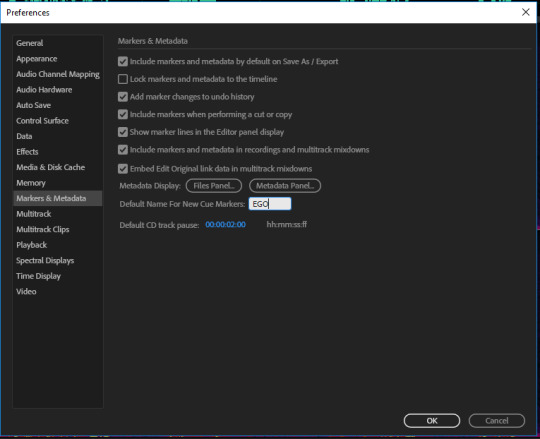
Step 6: Use Audition CC's preferences to set default Marker name.
Step 7: If you have previously recorded dialogue for this character, place blank markers at 00:00 equal to the amount of lines you have already recorded. (600 lines = 600 markers, yikes).
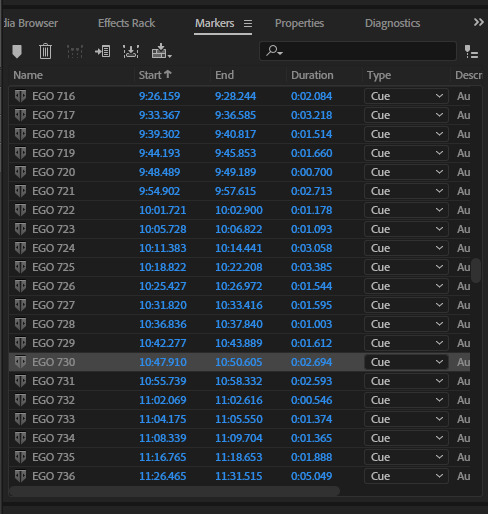
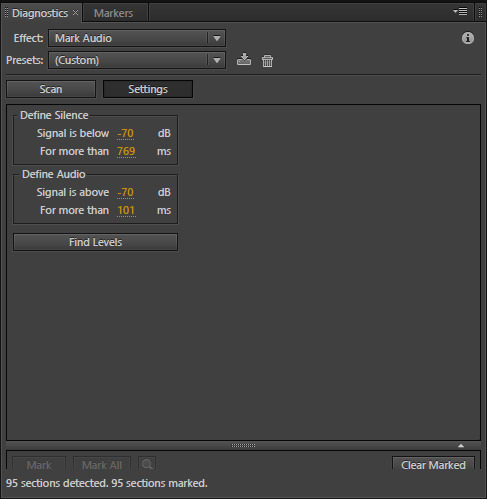
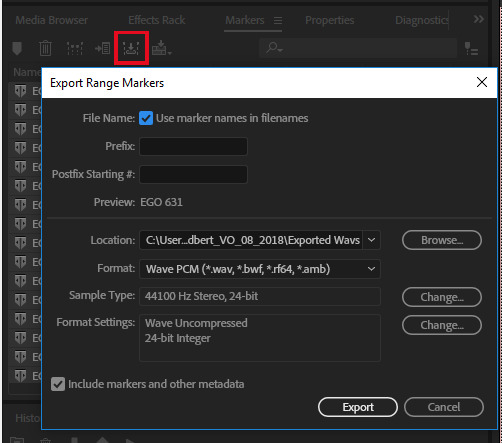
Step 8: Use diagnostics to place Range Marker Cues on speech lines, ignoring silent gaps:
See this tutorial:
https://www.youtube.com/watch?v=XNoOIL-vzIE
These are the settings that worked best for me:
Step 9: Select all markers and Export Range Markers in bulk. Audacity will hang in a ‘not responding’ state when doing this with lots of markers, I’ve tested it with around 2,500 markers and it did end up working, I just had to wait 10 minutes or so. Be patient!
Step 10: Batch process the file names to remove the space. (sadly, audition will always add a space between your marker prefix name and the number.) You can batch process these files to rename them, removing the space but retaining the prefix and number.
Create a new text document in the folder that contains your exported audio files (you only want the individual lines as .wav files in this folder, nothing else).
Edit the text document and paste this script:
:renameNoSpace @echo off setlocal disableDelayedExpansion if /i "%~1"=="/R" ( set "forOption=%~1 %2" set "inPath=" ) else ( set "forOption=" if "%~1" neq "" (set "inPath=%~1\") else set "inPath=" ) for %forOption% %%F in ("%inPath%* *") do ( if /i "%~f0" neq "%%~fF" ( set "folder=%%~dpF" set "file=%%~nxF" setlocal enableDelayedExpansion echo ren "!folder!!file!" "!file: =!" ren "!folder!!file!" "!file: =!" endlocal ) )
Rename the text document ‘renameNoSpace.bat’ overwriting the .txt extension too.
You should now have a batch file within the folder.
Again: Make SURE you only have the individual exported lines in .wav format in the folder, anything else that is in this folder will have the spaces removed too!
Run renameNoSpace.bat.
A command line window will open and run through all the files, removing the space. Voila!
Note: .bat files only work on Windows, have a google around for the mac alternative!
---
Now, you will probably find that when using diagnostics it will sometimes fail and pick up a single line as two lines, or you may have a cough or stutter that you've missed that it will pick up as an additional line. This is completely reliant on your initial recording and clean-up process. If the diagnostics pick up an additional unwanted line, or consider two lines as one it will screw with your file names on export. After the diagnostics have placed the markers down you can double click them to skip to that part of the audio file, skip through the markers one by one until you find one that doesn't match the line number, you will now see the culprit and be able to fix it. Sadly, due to the somewhat hacky way we're using markers for file names you will now have to delete ALL the markers, save the file, quit Audition, delete the .pkf file (which will be in the same folder as the wav you're editing) re-open the wav in Audition and repeat the process from the diagnostics stage, re-adding the markers.
That's it! Bit of a fiddly process but it's about 3-4x quicker than manually exporting every dang line of audio. If you have any questions about the process feel free to drop me a DM on twitter @sickchickstudio.
Cheers!
0 notes
Text
Guard Duty: A Development Retrospective - Devblog #7
Howdy all!
It feels like forever since I’ve had a chance to write one of these blog posts, so long in fact that this is just a Kickstarter update pretending to be a Devblog. Shh, don’t tell anyone!
Progress on the game has being going very well. Sadly I haven't found the time to put out a new 'Behind the Gates' video, I've discovered at this stage there is just a lot of stuff to work on, it's been more than keeping me busy. I'm handling all of the marketing, logistics and promotional side of things on my own and it's a lot to keep track of.
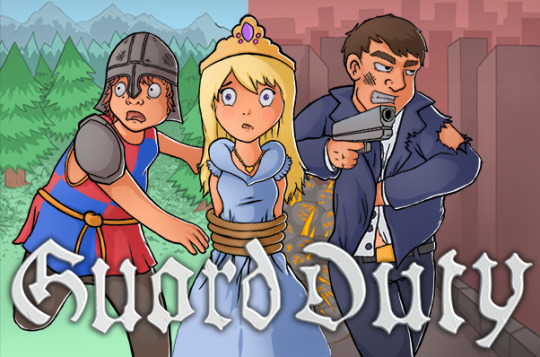
We have recently commissioned some lovely artwork from the incredibly talent Exit Mothership, this is the final artwork to be used across promotional media and also for the box art! I hope you like it, I'm really happy with what he has created as it captures the mood of the game perfectly:
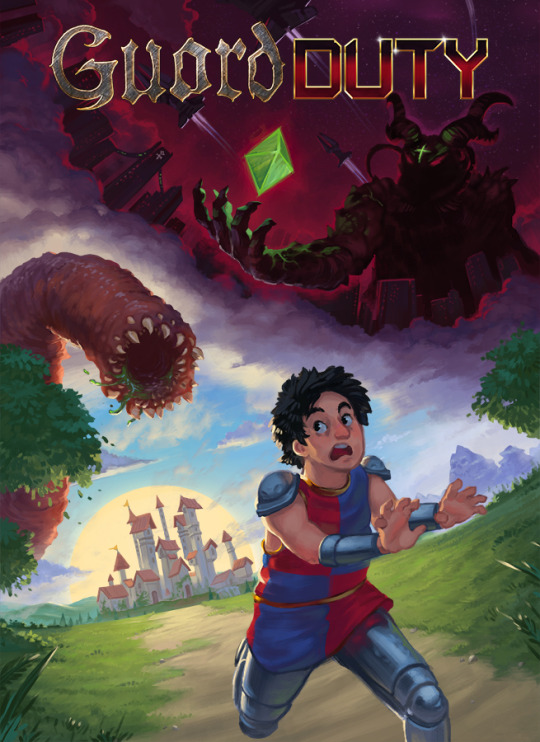
You may notice Guard Duty has a new logo too! I knocked that one together, trying to covey the two time zones in the fonts used.
In case you missed it, I gave a brief run through of some of things we have been working on in the comments section, I've pasted the relevant bits below:
We're gradually making the move over to the more business focused side of the game's development. That means working out a safe and reliable way of handling the beta testing,updating our website and incorporating a bug tracking system, preparing press kits and promotional material, booking convention dates, talking to PR specialists - basically lot's of things! We're internally testing at the moment (playing, finding bugs, fixing, repeat.) and I'm happy to say the game is now playable up to the final cutscene (the ending cutscene is still to be created) with around 90% of the assets in-game.
What does that mean exactly? Sadly, it doesn't look like we're going to make our original June release window as estimated on the Kickstarter campaign. As much as I would love to ship the game and start work on my next project I just can't bring myself to release a product that isn't in line with our original vision. If I was to get this shipped for June it would be missing those final finishing touches that make a game feel complete. I owe it to myself and all of you to make sure Guard Duty is the best darn game it can possibly be. That said, we are still very much on track for a 2018 release date, I will let you know as soon as we have a good idea of when that will be.
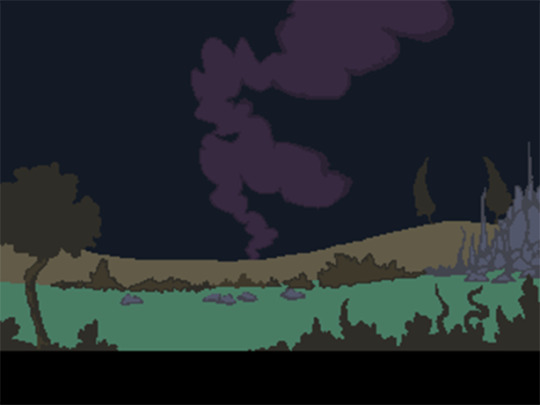
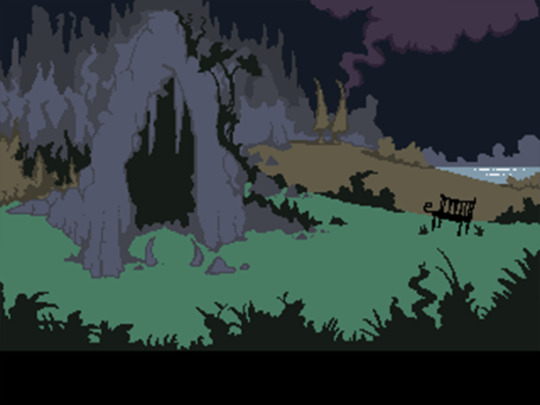
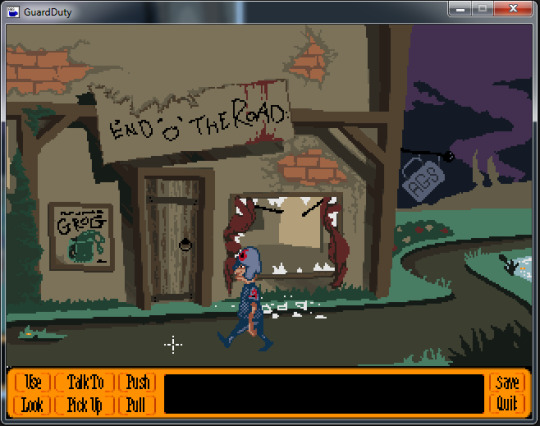
All this doesn't mean you're going away empty handed, I'm in the process of getting the sound and final bug fixes sorted for the first Act of Guard Duty, ready to send it over to those who have backed the beta access tier. I'm really excited to see what you all make of Wrinklewood and it's inhabitants, we won't have full speech in this beta but it is something that we hope to include in the retail release.
The super-fans amongst you may have noticed we've also now updated our website, we've decided to go for a more conventional layout and professional look. This also sets the groundwork for some of the community inclusive things we're planning leading up to the release. You will be the first to know once we have a dedicated public Discord server, backer exclusive chat channels and forum for those included in the beta.
On top of all this I'm now in the final stages of editing our official trailer, a lot of things have been improved upon since our Kickstarter trailer, the game looks so much more polished now with updated UI, 3/4 character views, updated backgrounds, animations - The game is looking so good now! I can't wait to share the new trailer with you all.
Remember that business-y stuff I mentioned?
Guard Duty has been picked for the Indie Prize finals, showcase at Casual Connect London 2018 at QEII Centre, London, United Kingdom on May 29-31st, 2018
Indie Prize will provide some much needed exposure for us and should make for a great opportunity to network, events like this are key to getting more mainstream coverage of of the game. Here's hoping we can woo the right folks to get GD onto some of the bigger gaming websites.
We're also showcasing at Norwich Games Festival again this year, the event will be held at The Forum, Norwich from Monday 28 May – Sunday 3 June 2018. Guard Duty will be showcasing on the Saturday and Sunday (2nd and 3rd of June).
We're looking to release the trailer, along with a Steam wishlist page towards the end of the month, ready for these conventions. Coverage of Guard Duty has been a little lacking in some of the more popular indie game websites and I'm hoping this new trailer will change that!
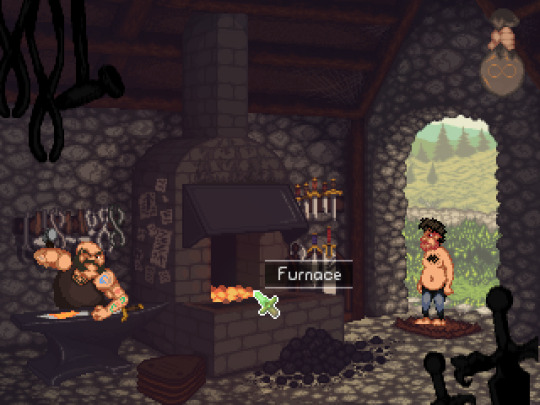
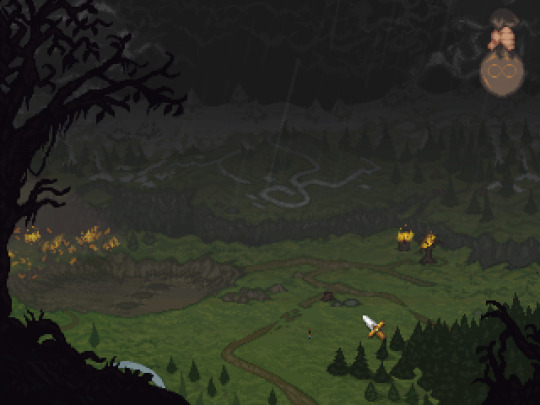
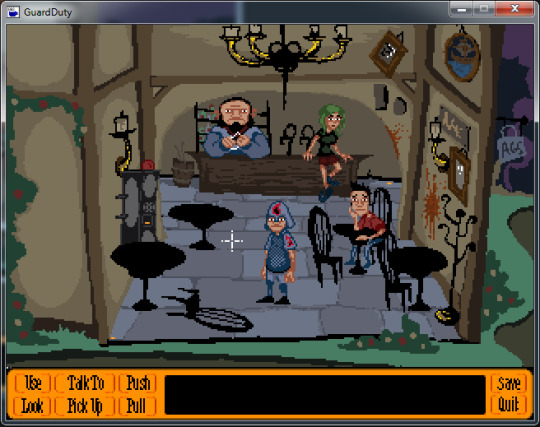
As always, we'd love to hear from you in the comments section or if you'd like a more personal chat feel free to send up a PM. We'll have lots more content coming across the next few months but for now, here are some new screenshots!
6 notes
·
View notes
Text
Guard Duty: A Development Retrospective - Devblog #6
Workin' 9 til 5 (or more like - 10 til midnight)
About six months ago I decided it was time I quit my day job to work on this project full time, I'd been paying off bills and scraping together savings for a few years and after some negotiations with a close friend I managed to wangle cheap rent in his spare room. I *could* have blown all my savings on a fancy car, or a sweet VR setup and a mountain of cola and crisps but I was sensible. Well, as sensible as you can be when giving up work to persue your niche video game project with an art style that's 30 years too late.
Thanks to a successful Kickstarter campaigning bringing in some additional funding I had the extra push needed to take my pipe dream into reality. I decided to quit working my day job and focus on getting Guard Duty finished as quickly and efficiently as possible. It was a pretty scary prospect and not one everyone is in a position to do, but an opportunity like this doesn't come by often so I figured it was about time I left my safety net and took the plunge.
So, six months on... Well, things have been going pretty damn well. It's amazing how focused you can get with a project when it's something you are truly passionate about. One of the most common questions I was asked when talking to friends about leaving my job was 'are you sure you're going to be able to focus?' I mean, being left to my own devices for 24 hours a day and having no boss breathing down my neck could have been a recipe for disaster. But it wasn't, things actually couldn't be more perfect. Somewhere in our lifetime someone decided that a typical 9-5 (or for most people, 7-6 by the time you've got to work and returned home) was a 'good' working pattern, but it's not. Not for me at least. I get up in the morning at 9 or 10, have breakfast, check my dailies and then start work. Most days I'll work 'til the late evening, or if I'm on a role It'll be early into the next morning. I still allow myself some evenings for seeing friends and playing the odd game here and there but in general I'm working pretty much every day, for most of my waking hours. I guess I do have some sort of looming pressure, If I don't get this done before I run out of savings then It’s back to the 9-5. It can be hard to allow yourself downtime when that's the case, so I have to be pretty cautious about not burning out. Look after yourself, kids!
I've been working on Guard Duty for almost four years now, most of that has been spent working as a hobby project but as I've started taking this more seriously I've realised how important time management can be. As mentioned in my previous blog post, it's really important to look at the feasibility of your project and to design things with this in mind. Guard Duty was never going to work as a hobby project, the scope of the game was far too big for me to finish it in my spare time, thankfully i'm now at a point where I've made more progress over the past 6 months than I ever did in the three years prior to that. Weird, right? I'm not saying you need to go full time to finish your project, not at all, just it's important not to overshoot in the planning stages and to be aware of how much actual development time you have to work on things. This is my first 'full length' adventure game and there's a lot more involved than just creating some locations and writing a story. For things to really sit well together you need to have complimentary animations, a-b backgrounds, audio cues, self-referential dialogue, characters with personality and a strong continuity to the gameplay. It's not easy and I'm certainly no expert, but I think I'm slowly getting the hang of making the game flow in a way that is satisfying to play through.
I'm writing this post a little retro-actively, there's been a fairly large gap since my last and I'm trying to cover a lot of stuff but I genuinely feel like I've made some huge steps since the last time I added to this retrospective. Steps in the overall game development, not just certain scenes but the experience as a whole. It's something you can't really get the feel for until you've got a big chunk of the gameplay locked down but you start to notice the gaps, areas in the game where things don't quite sit together. In my case, I can normally patch these with some sort of bespoke animation or by adding a scripted cutscene but these gaps aren't simply missing content, they're missing polish and there's a big difference. Polish is something that comes afer the content, something you can't really work on until you've done the leg work with the foundation. It's actually really fun, because these tasks normally don't take more than a day to polish up and are *super* rewarding when you go back and play through the segment, seeing these new animations or bits of gameplay after only a few hours work. I guess what I'm getting at is that we're starting to see the finish line and that alone is such an exciting prospect, giving me even more motivation to work hard to see this finished.
So we're getting there, the first two acts of Guard Duty are finished (albeit missing a few bits of dialogue) and I've started putting together a new press pack to show off some of the improvements that I've been making along the way. We've got a few convention spaces booked already this year and are waiting to hear back on a couple more. We're expecting the game to be released around Q3 (July/August time) if all stays on track and are really excited about what lies ahead in 2018.
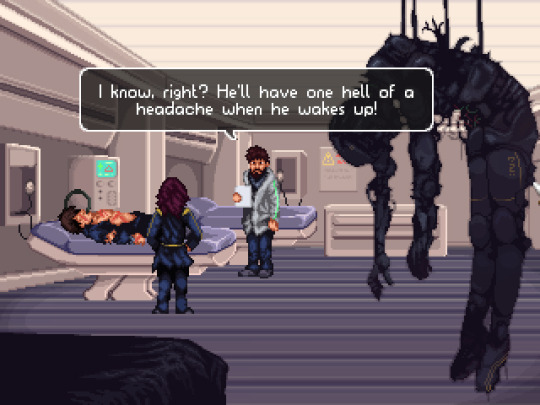
For now, I'll leave you with a couple of animated screenshots from one of the revamped Sci-Fi cutscenes, those of you who have been paying attention will notice our antagonist has had a bit of a redesign and the cutscenes no longer have letterbox bars at top and bottom. On top of that, things are much more colourful and detailed than they were in our Kickstarter video, also - new text boxes! Huzzah!
Thanks for your continued support folks. As always, if you'd like to keep up to date you can follow us on Twitter or Facebook.
0 notes
Text
Guard Duty - Now on Kickstarter and Steam Greenlight
In case you didn’t catch it on our other social media platforms, let's recap. This weekend we launched two campaigns, a new trailer, a gameplay teaser and a selection of new screenshots from the game.
At the bottom of this post you can watch our Kickstarter trailer showcasing a who bunch of cool stuff from the game.
You can also find lots of new information about the game on our Kickstarter page:
https://www.kickstarter.com/projects/2108195294/guard-duty-point-and-click-through-time-and-space
If you have a Steam account, please consider voting for Guard Duty on Steam Greenlight:
http://steamcommunity.com/sharedfiles/filedetails/?id=869710250
...and here’s the gameplay teaser:
https://www.youtube.com/watch?v=ntzK4GvSMiY
It’s been an incredibly successful start to the campaign and we’ve been truly overwhelmed by the positive response from everyone. We can’t thank you enough for your support!
So err, thanks! Again!
-Nath & Andy
youtube
0 notes
Text
Guard Duty: A Development Retrospective - Devblog #5
Ambition versus execution
Today’s post is all about motivation, self discipline and making good use of time. That ever looming presence that weighs on our subconscious, the thing that rudely awakens us each morning. Not the alarm clock! No, the clock is simply a vessel for time, you should never blame the messenger.
For any of you that are following us on social media you will have a much better idea of where we're at with our current build, for those who are not (Go! Go now and follow all things Chicken-y!) I will first bring you up to date.
I can now confidently say that we’ve reached the halfway mark. I would say that somewhere around 60% of the game’s art assets are complete, I’ve still got some of the Northern Region and most of the dystopian future locations to detail *but* the majority of the background scenes for Wrinklewood and the Wildlands are now finished. We’ve been working hard at optimising the gameplay through the first act and a good portion of the second act is now playable too. Andy has put together some really neat puzzle back end stuff, like a Mini-map for one of the dungeon-esque locations and an AI system where a character will follow Tondbert through multiple rooms, losing interest after a set distance if not provoked.
I digress, today’s post is about time management after all.
The most important skill that comes into play when working as an independent game developer is that of self discipline, something that I have never been particularly good at. If there’s anything that this project has taught me it’s that I waste FAR TOO MUCH TIME on Reddit and that simply starting work is often the most important part of making progress. You see, there is this golden window of opportunity where you know you have a certain amount of time available to work and you sit with a project before you (be it a blank photoshop canvas, design document or game client) and you are SO READY to start work that you actually struggle to get stuck into it. It’s those first minutes that can turn into hours of procrastination if you’re not careful. This goes for pretty much every area of life, it’s far too easy to sit around thinking about doing something, rather than actually doing it.
So if I may make a suggestion: If you are sat at your computer, reading this blog post having browsed the web looking for inspiration to work on your own project - press Alt-f4 now! Right now! Ditch Chrome and open AGS, or Unity or whatever and just do something on your project. It doesn’t have to be something huge, just adding a line of dialogue can often lead to another line and before you know it you’ve spent the last hour writing a dialogue conversation you’ve been putting off for days. I often find that it’s these little things that lead to big development sessions that make you late for work the next day (just one more feature before bed!) It’s really important to try and make some sort of progress each day, even if it’s something super simple.
I guess you didn’t hit alt-f4, or you’re reading this on mobile and couldn’t find the function keys. Well, in that case I’ll continue.
Another lesson I’ve learned over the course of developing Guard Duty is one of ambition, that is, not to be too ambitious. I’ll spare you the history lesson (see my first Weblog for that) and skip to the current iteration of Guard Duty. When I started work on the game I was more than a little over ambitious, I had this neat idea revolving around a lovable dysfunctional protagonist who ends up travelling through time in an attempt to put right the wrongs he has caused. A neat concept with an infinite scope for storytelling. Where does he go? Who does he meet? How many time periods? Jeez, it’s a lot of stuff to think about. I put my head down and drafted out the story, planning each significant beat in the story structure whilst trying to envision how the game would play out. It wasn’t long before I realised that the story would have to be a little more grounded, it was far too much work so I decided to go with just one alternate time period rather than several.
I figured I would have the most fun creating two polar opposite ‘worlds’ for the player to explore, one in the old medieval-esque era and one a more futuristic setting, similar to some of my favourite films (Blade Runner, Akira, GitS etc). Admittedly, this took a lot of brainpower to get the initial story draft finished, I was trying to do something new (to me) and pretty ambitious for a video game. It meant that I had to do a LOT of rewriting of the story until I had something that felt coherent, after all I was trying to connect two storylines that were hundreds of years apart.
My shortcoming came when I had finished this draft, I had the story planned out and a rough idea of a few of the puzzles along the way, but this wasn’t anywhere near enough. I went straight ahead and started drawing out backgrounds, designing characters and creating the ‘world’ that the player would experience. Word of advice - don’t do this.
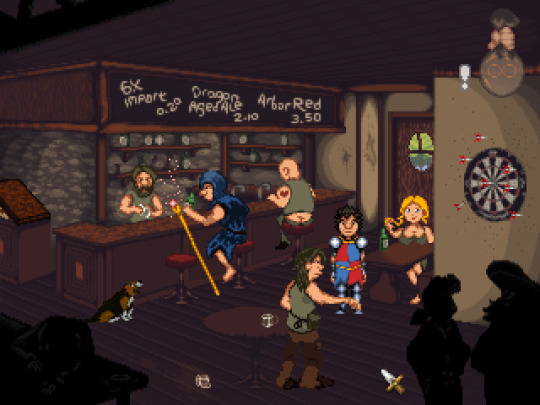
This is the important bit and the best advice I can give anyone looking to take on a large scale adventure game project; Create a rough (very rough) skeleton ‘game’. By this I mean a playable template of your entire game, from start to finish using crappy programmer art. There has been nothing more valuable in GD’s development than this step. By creating the game using mere sketches for backgrounds has allowed me to focus entirely on the story, dialogue and gameplay. You are able to get a feel for how long the game will be, you know exactly how many locations will be in the game and you can get a feel for where you need to add cutscenes, animations and any extra story elements. This also helps immensely for productivity, prior to this step I was getting caught up over trying to get the visual style to a finished quality, taking days or weeks perfecting all the art and animations for single locations (like the town pub, or town square) when I should have been working on getting a playable game together. When you’re using sketchy, half arsed programmer art you no longer worry about these things and can solely focus on getting the game playable, which is a lot more satisfying and feels like you’re making a lot more progress.
Here’s a great example, this is from one of the later sections in the game. It took me an evening to put together and was actually easier to tweak because the rope doesn’t get lost in the background.
youtube
So, don’t be a dummy like me. The ‘skeleton game’ should be your first priority after you’ve decided on the story and overall plot points, it’s a really rewarding process when you can go back and play through last week’s work, feeling like you’ve made substantial progress.
...and on that note I should get back to work! Thanks for reading, ‘til next time.
-Nath
0 notes
Text
Guard Duty: A Development Retrospective - Devblog #4
The Art of Guard Duty - Pixel Practices
Howdy. Today I would like to take some time to talk to you about my process when creating art for Guard Duty. I’m going to be focussing on pixel art and practices you need to be mindful of when creating your art. Hopefully this will give you a bit of an insight into my process for creating the many pixel packed locations in Guard Duty.
Let’s start with a few basic things you’ll need to keep in mind when working with pixels. My advice here is geared around creating pixel art in Photoshop, but most of the rules will apply to other art packages.
First thing’s first - Decide upon a resolution and stick to it.
The problem I see a lot of people run into when starting in pixel art is in consistency of resolution, that is they often mix different resolutions within the image (or game). Mostly called ‘mixed resolution’, it is a where pixels in the image are not all of a consistent size, often leading to an undesirable look. Traditional pixel art is based on the foundation of a grid, where each pixel acts like a grid square. The pixels are unable to be placed outside of these grid squares, therefore keeping a consistency throughout the image. The hardware used to render pixel art in it’s heyday was unable to handle high resolutions, meaning that each pixel had to be carefully placed to make up the intended image.
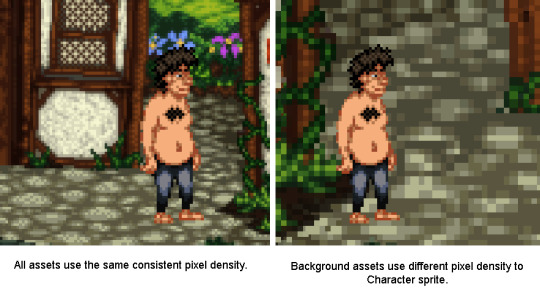
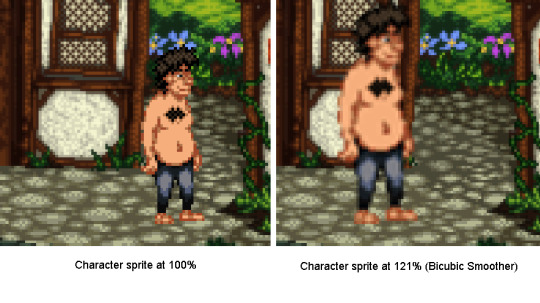
See this graphic for example, the image on the left is using a consistent pixel density whereas the one on the right is using a different density between the character sprite and the background (mixed resolution).
You see the difference? The larger pixels on the right-hand image look messy compared to it’s counterpart, this not only looks a bit strange but does not keep with the traditions of creating pixel art. You want to stick to the resolution you started with. There are some examples of modern games which used mixed resolution pixel art successfully, but these are normally used sparingly and are scaled in-engine, mostly to benefit gameplay.
Platformers often use sub-pixel movement to make gameplay smoother, which can lead to character sprites not lining up correctly with background assets. Sprites however are very rarely scaled in engine as this is far more jarring to look at.
Either way, you will save yourself a lot of hassle if you decide on your game’s resolution at the start and stick to this resolution throughout. Guard Duty uses a similar resolution to many of the early LucasArts and Sierra titles using a 4:3 ratio of 320 x 240px. It might not sound like much but that’s 76,800 pixels you’re going to have to wrangle. More than enough for me!
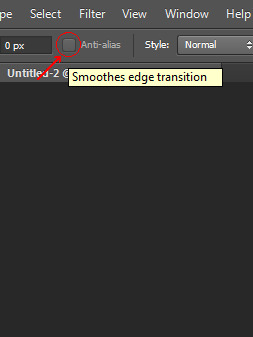
Moving on - Do not use anti aliased tools
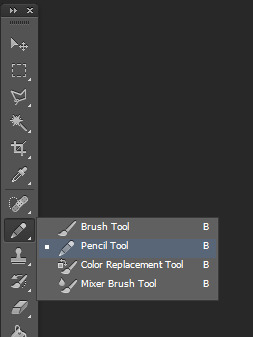
Another problem I see that newcomers often run into is the temptation to use tools designed for high resolution artwork, things like the brush tool, smudge, burn/dodge and gradient fill are all inherently anti-aliased and will give you a heap of extra clean-up work. These tools create way too many pixels, with a massive array of shades and colours. You’ll find that tweaking your artwork becomes increasingly harder when using these tools. So just forget them, resist temptation to smudge your wall texture, or use your neat grass brush, It’s really not worth it if you want to create pixel art. The easiest way to keep track of anti-aliasing is to use (almost exclusively) the pencil tool, the pencil tool can be found by click-holding the brush in the toolbar and selecting the pencil from the drop-down menu.
I also recommend turning off the anti-alias setting on the marquee selection tool, transform tool, paint bucket tool and magic wand tool. All of these can be used in pixel art, but with the anti-alias checkbox active you will find that they create a lot of different coloured pixels around the edge of your selection, again causing issues when flood filling areas, or otherwise editing the image.
So as a general rule, make sure each pixel that is going onto your canvas is intentional. Photoshop isn’t really geared towards creating pixel art and you want to make sure it doesn’t do anything without your permission. Bad Photoshop! Behave!
Try to avoid scaling your pixel art
This is similar to my first point, but can often catch you off guard. Once you’ve drawn something on the pixel grid you may find that it doesn’t fit in a scene you’ve created previously, despite both images having the same resolution. You’ve drawn the sprite too small and although the pixels are consistently sized, it just looks tiny in the scene. Well, you’re probably going to have to redraw it, somewhat.
When you scale pixel art Photoshop will try to scale the pixels to match the resolution’s pixel grid, anything under a 200% scale will result in only some of the pixels being larger than others (some will become rectangular) and at 200% the pixels will be twice as big, but still fit into the grid. This is because Photoshop has to keep to the bounds of the canvas resolution and doesn’t know what to do with the new space between pixels.
You can see from the image that some of Tondbert’s upscaled pixels have stayed 1px wide/tall whilst others are now 2px wide or tall. His eyes, nose and left shoulder have suffered the most. Poor Tondbert. This is because Photoshop doesn’t know what to do with the pixels, at the chosen scaling it only has ‘small’ (1px) or ‘big’ (2px).
Anyway, to combat these issues you should always draw your pixel art with other assets in mind. When working on a game you don’t want to have to be scaling the character sprites differently between locations, so you should paste your character sprite into the blank canvas for the new location, so you’ve got something to reference the size. If you stick to a consistent resolution with all your art and be mindful of other assets you’re intending to use together you shouldn’t run into any of these problems.
When scaling pixel art, always use Nearest Neighbour interpolation and scale in multiples
Pixel art is kinda small and most modern computers are displaying a 1920x1080 resolution or higher. This means when showing off your pixel art on a website, it can often look reeeeeally tiny. So, you want to be aware of your image resize settings. You need to make sure the image is scaled in exact multiples of itself, 2x bigger 3x bigger etc. So if your canvas is 320 pixels wide and 240 pixels tall, the upscaled image would need to be 640 pixels wide and 480 pixels tall. To keep it simple scale the image to either 200%, 300% or 400% depending on how big you want it, but never 250% or 225%.
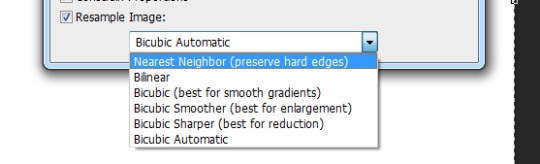
There is also a setting at the bottom of the ‘Image size’ box in Photoshop that has a drop down list of interpolation types, next to the ‘Resample Image’ checkbox. Set this to drop down to Nearest Neighbour(preserve hard edges). It will make sure that your pixels always stay crisp when resizing.
There is a similar drop down box when using the transform controls which you will also need to change, if you do not your sprites will become blurred.
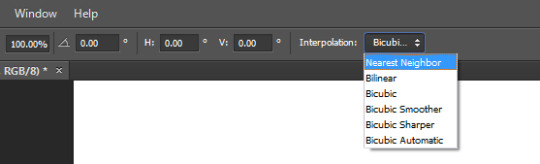
Note the amount of pixels Photoshop has added when trying to smooth out the sprite to 121%, this would make the sprite near impossible to modify beyond this point. Using the Nearest Neighbour interpolation solves this issue.
Stick to a limited palette
When starting out with an image I try to keep the colour count to a minimum, this way you won’t get bogged down with tweaking the finer details and can focus on the bigger picture. It also makes tolerance selecting bits of the image a lot easier. Try to keep to three or four colours per texture, dark, mid and highlight colours. You can add extra colours later if needed but removing colours is a bit of a pain.
Now we’ve gone over the basics, let’s get started on a creating a scene.
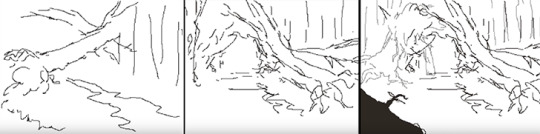
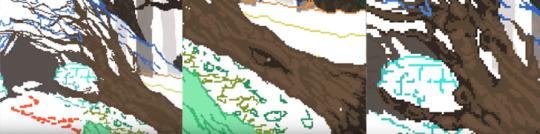
Start with a basic thumbnail sketch
This technique applies to both sprite and background creation, but for the purpose of this post we’re going to work with a background.
I like to sketch out a few different compositions for the scene before committing to one. I usually find I get something decent by the third sketch but it may take longer, just stick with it. Each sketch shouldn’t take more than a minute or two, we’re just establishing where the shapes in the scene are going to sit. I use a black 1px brush for this stage but the colour is mostly irrelevant (we will be changing that later). I liked the composition in the second sketch and decided to make the opening more central, adding a fallen tree to the left similar to the first sketch.
Develop the thumbnail sketch
I was pretty happy with this so decided to roll with it. The next image shows how I developed the detail in the image, sticking to the sketchy black lines for now. I occasionally use a dark grey colour to show objects that are further back in the frame.
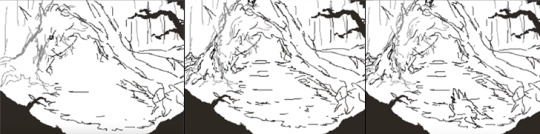
Establish clean 1px outlines
In the next step I set my sketch layer to semi-transparent (20-40%), lock it and create a new layer then begin to outline each of the individual elements. Remember to use a 1px brush and the pencil tool. About 80% of the time I’m holding shift whilst click two points on the canvas to draw a 1px line between the two points. This saves a lot of time and really helps when drawing straight lines, or long curved ones. At this point in the process you want to keep your pixels as clean as possible, avoiding ‘double pixels’ where the line becomes more than 1 pixel wide.
For the time being I’m using a different colour for each of the elements in the scene, this will make it easier to colour them in the next step and helps to cut down on having lots of layers at this early stage. It’s not necessary, but if you’re drawing everything on the same layer I would recommend it. Plus this is probably the only time you’ll get to use bright pink, vomit green and orange in the same scene!

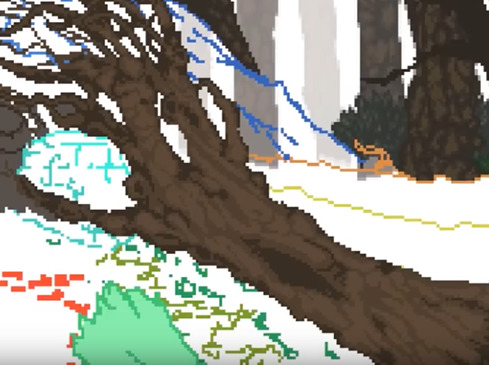
Separate the outlines and block in the colours
Once I’ve outlined the each of the elements in the scene I pick one and start detailing! I don’t worry about the finer details, I just aim to block out the main shapes and colours. What I have done below is use the magic wand tool (anti-alias turned off) with the tolerance set to 0 and contiguous turned off. This way it will select just that colour from the scene. I cut out the element and paste it into a new layer.
I decide upon a highlight colour and start blocking out the parts of the trunk that are raised, drawing these on the same layer as the trunk outline. Underneath on a new layer I am able to fill in the darker base colour of the trunk, as seen in the third image. This leaves the outline and highlights intact and allows me to use a larger brush size to block in the colour underneath.
You can see where I’ve added some trees and foliage from another background in the top right of the image, this is to get a feel for the colours used in those backgrounds, to help consistency between scenes and because I’m too lazy to draw new trees.
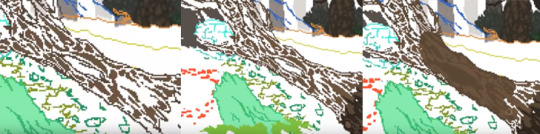
Apologies for the slightly blurry images, they were pulled from the timelapse video.
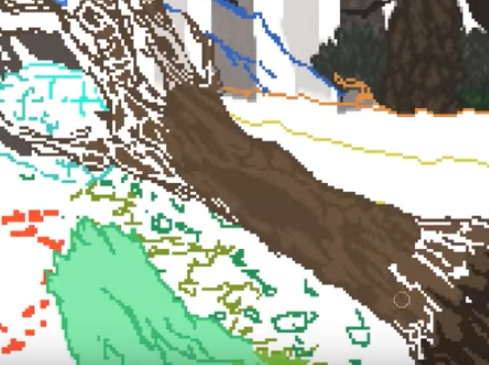
Add definition with shadows and fine highlights
This is the fun part, giving the object volume. First you want to add another layer above both of your previous layers. Then by carefully placing your shadow colour you can add heaps of definition to the shape. Here I’ve used it to bring out the cracks in the wood, as well as help the branches stand out against whatever will be behind them.
Thanks to having the colours on separate layers I am then able to tweak the balance between the three colours, ready for adding an extra fourth colour for fine highlights.
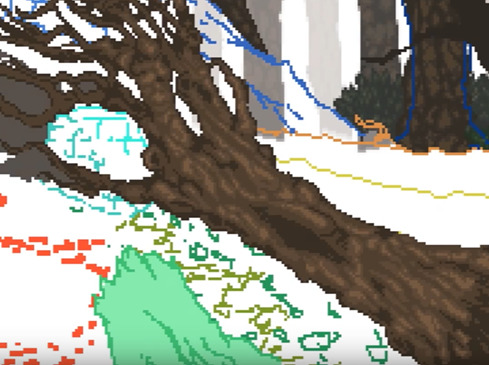
After adding the fourth colour we’re about done, the object has a nice shape to it with a decent amount of detail. You could work on it further from this point, maybe adding a second dark colour for shadows but I tend to leave it here. Remember, every step of this process was done with the pencil tool and a 1px brush, the only exception was the use of a 10 pixel brush for blocking in the colour. You can use this technique for everything in your scene, I like to merge the layers once I’m finished on each object but that’s personal preference. If you do decide to merge them you have the option of using a Brightness/Contrast or Hue/Saturation adjustment layer to tweak the contrast between the highlights and midtones etc, this won’t affect the pixels or add any anti-aliasing.
Okay! That’s about it. There’s nothing particularly fancy going on once you’ve setup Photoshop to handle pixels appropriately, you just need to follow the process I’ve laid out above and you’ll be creating rad pixel art in no time. If you’ve got any questions feel free to drop me a line on one of our social links or email me on the contact form @ www.sickchicken.com.
Here’s the finished image:
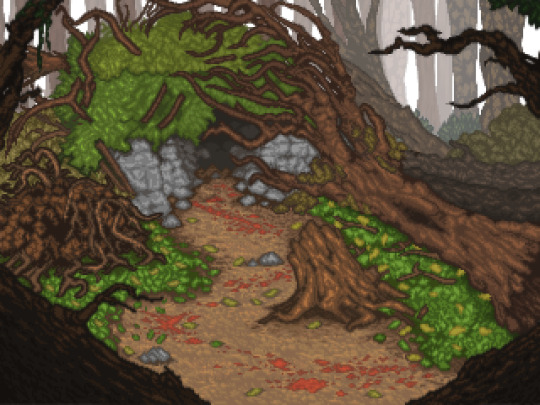
You can watch a timelapse of the process on Youtube here:
youtube
For a bit of additional learning, I highly recommend watching the ‘8bit & 8bit-ish’ Graphics GDC talk by Mark Ferrari:
youtube
Cheers!
-Nath
0 notes
Text
Guard Duty: A Development Retrospective - Devblog #3
Source Control Strategy
Howdy! This post is a bit of a techy one – seeing as I’m more an artist than programmer I’ll try to briefly summarize the process before handing over to Andy to explain the gritty details of it all.
Source control is super important when working in a team: it allows you to keep track of all the changes made to the game files and, if needed, revert back to previous versions of each individual file. It also means that more than one member of the team can be working on the project simultaneously. However, AGS has some of its own hurdles when it comes to that.
We use a service called BitBucket to host all of the core game files for Guard Duty, with the help of a front end client/application called SourceTree. SourceTree is an application that communicates with the BitBucket server, making it easy to keep track of all the changes to the files and allowing us to push updates after making them and pull updates from one another.
Due to the nature of how AGS works, there are occasional issues we run into with conflicting files, mainly the acsprset.spr and game.agf files, both rather large files that store global data not specific to individual locations, cutscenes etc. Andy is mostly able to fix these issues when they crop up with some sort of black magic wizardry, but it is something we have to be aware of when we’re both working on the game simultaneously.
On that note, I will hand over to Andy to go into a little more detail:
---
Getting Guard Duty working with BitBucket
I was really happy with how easy it was to set up, get the game files in and make a couple of test changes. The point of this post is to give you a quick crash course in source control (in particular Source Tree, which is the Windows/Mac client that works best with BitBucket).
So, without further ado:
Terminology
BitBucket
Online source control server where every version of Guard Duty is stored. Includes an automatic changelog and comparisons between the old and new versions of every file between every update.
SourceTree
The Windows/Mac client that lets you Pull things from BitBucket and Commit/Push things to there.
Repository
(Also known as Repo) Basically a project – a collection of files. Guard Duty is our Repository.
Clone
The act of making a copy of a Repository – either from the server to your machine or vice versa (you’ll probably only need to do this once, unless you want a copy on Windows and another on OSX).
Pull
The act of taking something from BitBucket. This could be a single file that you didn’t have before (eg because I added it) or an updated version of a file that you did have. This is how you stay up to date with changes in the Master copy.
Commit
Think of this as ‘Save game’. When you’ve made a change that you’re happy with, you Commit it. This takes your working copy and adds the changes to the version SourceTree knows about.
Generally, a Commit will be a single packet of changes for a specific thing. Let’s say you added backgrounds for the mountain pass and also added dialog for the Drunken Monk – these are separate things so should ideally be Committed separately. This makes it easier for others to see what’s happened and also easier to roll back specific changes without affecting anything else.
Push
Committing changes saves them to your SourceTree copy of the game files. When you’ve Committed one or more changes, you’ll see a number next to the Push button in SourceTree. This indicates how many Commits are waiting to be Pushed to the shared copy of the game – you need to push them before I’ll be able to see them.
In most cases you’ll probably want to Push immediately (there’s a checkbox in SourceTree that lets you do that when Committing) but sometimes you might want to wait until you’ve made a few Commits before Pushing (eg, you might want to add backgrounds, characters, objects and dialog for a certain area before any of it’s available to me).
Once Commits have been pushed they’ll b e uploaded to BitBucket and will then be available for everyone to Pull and see for themselves.
Add
Add a file you’ve created to the SourceTree copy (takes effect after you’ve Committed and Pushed the change).
Remove
Remove a file from your copy and the SourceTree copy (takes effect after you’ve Committed and Pushed the change).
Add/Remove
Adds any files you’re missing compared to the SourceTree copy, and Removes any files you’ve deleted locally from the SourceTree copy.
Branch
You might sometimes hear about making branches, or see them in BitBucket. This is a way of creating a duplicate of everything so you can safely work on experiments without affecting the Master copy (you can then merge them into Master afterwards if you want). Branching is especially useful when working on more than one distinct thing at a time, as it lets you concentrate on your own work without seeing all the changes going on everywhere else. Merging branches is normally straightforward, but it’s at the point of merging that you might get conflicts (where one change would overwrite another one), and you’ll have to choose which one to keep.
---
Those are the main terms you’ll come across regularly and the ones we use for Guard Duty.
Step-by-step
So now, here’s a step-by-step to joining BitBucket, getting SourceTree installed and a hooked-up copy of your game onto your machine.
1. Join BitBucket and create a team (let’s call it ‘yourteam’ for now). Then create a ‘yourgame’ repo (where ‘yourgame’ is the name of your project). If you make the project private, only people you invite will be able to access it.
Go to https://bitbucket.org/yourteam/yourgame
Get the rest of your team mates to sign up as well. Once they’re in you can invite them to join the team.
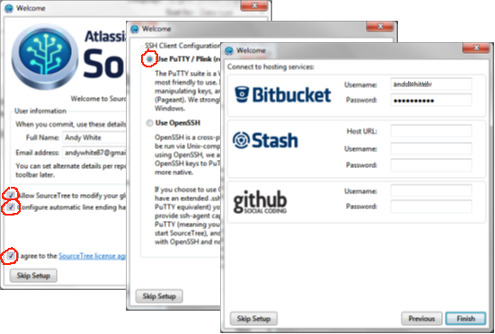
2. Install SourceTree
Go to http://www.sourcetreeapp.com/ and download the Windows/Mac version
Open the installer, follow the instructions...
Use these settings when the questions come up:
3. Pull the yourgame Repo into SourceTree
At https://bitbucket.org/yourteam/yourgame, go to Clone and choose Clone in SourceTree.
Your browser might ask you for permission to make an external protocol request – let it.
SourceTree should open at the Clone menu.
3-A. Set the Destination Path to somewhere new on your machine (this is where your game project will be stored).
3-B. Create a bookmark called yourgame.
3-C. Hit Clone.
3-D. SourceTree will start downloading everything to the destination path. Now you’ll have a copy of all your game files that are hooked up to BitBucket. SourceTree will stay updated with the files and will show you what’s changed – it keeps itself refreshed. It’s best to keep SourceTree open all the time so you don’t have to wait to see review changes, Pull files or Commit and Push.
4. Merge your changes to the BitBucket version (This step will bring BitBucket up to date with your local copy, keeping the server copy in sync)
4-a. Pretty simple – work on your game as you would normally.
4-b. Be sure that you are updating the game files in the BitBucket folder we have just setup.
4-c. Switch back to SourceTree and you should see a bunch of changes in the Working Copy Changes pane. Changed files will have a yellow marker instead of a green tick like this:
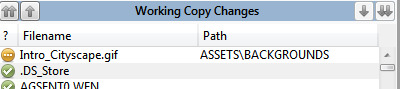
Green tick = unchanged, up to date with BitBucket Yellow dots = changed, not update in BitBucket until you Commit and Push Red stop sign = removed, but still in BitBucket until you Commit and Push Blue question mark = untracked (you should Add these)
4-d. There might be lots of yellow dots, maybe even all of them are now yellow, but that’s okay for this time.
4-e. If there are any blue question marks, highlight them and click the Add button. You’ll see a progress bar and then they’ll change to green ticks.
4-f. Highlight something in the Working Copy Changes pane, press Ctrl+A to select all, and then click the Commit button. The Commit window will appear and you should see that all the files you modified or added have their boxes checked.
4-g. Enter a message that makes it obvious what the Commit is for (eg ‘Bringing BitBucket repo up to date’) and hit Commit.
4-h. Cue progress bar. It might take a little while depending on how big the committed files are.
4-i. When that’s done, click the Push button (should now have a ‘1’ by it).
4-j. When that’s done, revisit https://bitbucket.org/yourteam/yourgame to see your Commit in the Recent activity feed.
---
Et voila! Hopefully that went smoothly and you now know all you need to use BitBucket and SourceTree! Happy creating!
0 notes
Text
Guard Duty: A Development Retrospective - Devblog #2
New name, same game!
Much like the masses of health-junkies determined to reinvent themselves with each new year that passes, I too take a guilty pleasure in bringing a shiny new 'me' to the table. I was never particularly happy with our previous moniker 'Clicknpoint', the naming was a rushed decision made many moons ago whilst trying to get business cards printed in time for a convention. Besides, it's a bit of a mouthful and has a 'n' in the name, which is just confusing.
So with the whole English Dictionary at our fingertips, which word (or combination thereof) best describes us?
Sick Chicken, apparently.

It’s silly, It’s easy to say and is (hopefully) memorable. I didn’t stray too far from my roots with this one and thankfully Andy was happy to go along with my strange attachment to our plump feathery friends. You see, with my original AGS handle and personal email address being ‘OversizedChicken’ I later adopted the nickname ‘Chicky’. Despite half of the internet thinking I was a girl, the name stuck and with that the tradition was well and truly ingrained. So I went for something similar and Andy liked it, win!
So, about the game...
The further we get into development the more serious this feels (this project has completely taken over my life), me and Andy both felt a decent web presence was in order. Luckily, Andy happens to be a bit of a whizz when it comes to making fancy websites, in super quick time too. With a few mock-up images in hand I sent him to work on a website to showcase our work and In double time he came back with a fancy adaptive web/mobile site. Good lad.
You can check out our new website by following this link: www.sickchicken.com
We’re planning on starting a Greenlight page in the new year and will be putting some form of trailer/gameplay video out around the same time, as many of my fellow Adventure Game developers will know, a trailer is a particularly tricky thing to get right. I don’t want to give away too much of the game before people have had a chance to play it, whilst at the same time a trailer consisting of just walking and talking to NPC’s wouldn’t be very exciting. So before I can think about trailers or gameplay examples, I want to have a bit more of the game polished and featuring the final graphics, sound effects and music etc.
In regards to our progress, I was (*cough*) a little ambitious with my initial predictions for how long this beast would take. The whole process has been as huge learning curve, the amount of tiny details that make up the big picture is something I simply didn’t see coming. It’s one thing drawing up a nice background location but to get that location to feel alive and to feel lived in takes a lot of work. I’m determined to have every last pixel in the game accounted for, with an interaction animation for every possible action the player takes and with each asset feeling consistent throughout the journey. Guard Duty is still a long way from being finished but I'm chuffed to bits with what we have achieved over the past two years. This is truly a passion project, with no evil producers or shareholders breathing down our necks. We’re able to take as much time as is needed on each area of development, sometimes even longer than is needed!
We’ve been working pretty hard behind the scenes, recently we've reworked our gameplan, removing some sections of the game that were unnecessarily drawn out, reworking puzzles to allow for more player satisfaction and less backtracking, that sort of thing. We also have lots of cool things implemented that I'm really proud of and we've (fingers crossed) managed to keep a consistent quality throughout every location. We're at the point where I'm finally happy to call it the second 'act', that is, the player can progress through the entirety of the first act, with *almost* all of the assets in place and all of the core puzzles.
I've finished the majority of the background assets for the second act and am now starting to put the locations together in AGS with placeholder characters and objects. Thankfully I've spent some time creating some of the larger cutscenes for the penultimate act, but do still have a lot of animating ahead of me.
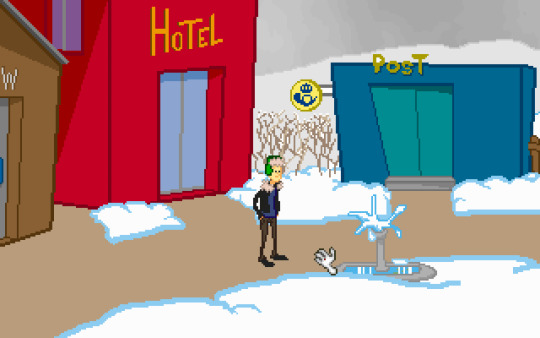
So, to finish off this post. Here are a few animated images taken from our current build, I hope you like them and please feel free to drop us a comment or DM on one of our social media pages.
Cheers!
-Nath
0 notes
Text
When a teenage apprentice stumbles upon his father’s collection of Demonic literature he learns of a long forgotten ancient ritual, a recipe for destruction, death and the promise of immortality.
With evil in his eyes and a charcoal dusting underneath, the apprentice embarks on the journey of a lifetime, one reaching far across the depths of time and space.
‘An exchange of royal virgin blood for an eternity on the throne, to be king of the underworld, ruler of the mortal realm.’
Gameplay
Take control of the first dynamic duo with a heritage line spanning multiple millennia! Destiny speaks of two men that can stop the young soon-to-be ruler of the world, well, more like one and a half men:
Agent Starborn, time travelling Lieutenant General of the Guardians of New Haven!
...and Tondbert, Night’s Watchmen of Wrinklewood, part time drunk and three quarter dwarf.
As you puzzle your way through this unique three act story you will get to do things like: Catapulting across large open spaces, saving a Knight from a giant Sandworm and even, TRAVELING THROUGH TIME AND SPACE.
Guard Duty is a point and click adventure taking place across a rich and diverse fantasy setting. The game will be released as a stand-alone title with hundreds of animations, a handful of full motion cutscenes and a charming variety of voice actors.
Guard Duty is currently in production, release date TBC.
Art, story and game design by Nathan Hamley Programming and additional game design by Andy White
0 notes
Photo

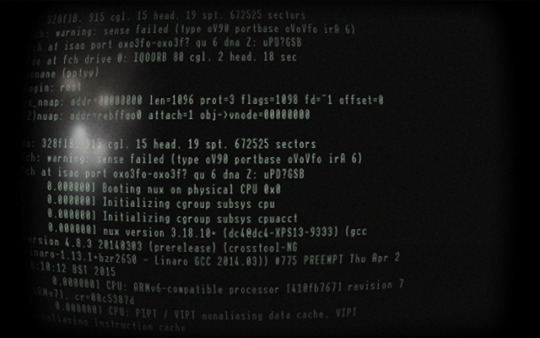
---
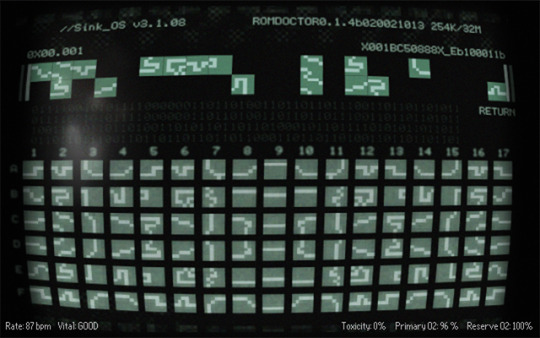
Hack your way through complex folder structures in an attempt to bring down a mysterious organisation. Set in a hostile world with limited oxygen, Bitstream features a unique sense of claustrophobia and panic.
Created for the August 2015 MAGS competition by Nathan @ Sick Chicken Featuring Music by Alfonso Gordon and LostTrainDude.
You can download Bitstream at the following link:
https://www.dropbox.com/s/jaqa9w1xnxo48hn/Bitstream.zip?dl=0
Mirror:
https://drive.google.com/file/d/0B79NVQD8PurzU2tUSV8ySi15eFk/view
1 note
·
View note
Text
Guard Duty: A Development Retrospective - Weblog #1
Art direction and the history of Guard Duty
aka 'omg all my other backgrounds look rubbish now, time to redraw them'
--
Howdy! Welcome to the first devlog from us here at Clicknpoint. This one focuses on art direction and the struggles that come with being an aspiring (and unpaid) artist, so on that note i'm going to take the reins.
Hey, i'm Nath (second intro! (⌐■_■) ) I've been working on Guard Duty, on and off since 2003. Yup, tooo long. I was 15 at the time and super excited to release a game with this cool underground game making tool i'd found online (AGS, represent.).
I'd dabbled with a whole bunch of ambitious idea in the years prior to this and my pixel art was at a somewhat presentable level, so I went ahead and started pixelin'. It took a while to land on something I was comfortable with, I'd spent a lot of time trying to nail this simplistic style with only a few colours that still looked really clean and trendy. Mostly because I was obsessed with the AGS game Permanent Daylight by 2ma2, it was a big inspiration to me, kinda like a cheatsheet. I thought to myself 'this is it, this is what I need to make, I need this style of outline, this shading, about six or seven rooms and i'll have an awesome game!'.
Permanent Daylight by 2ma2 - dem pixels!
I was going to make my own story, setting and puzzles but Permanent Daylight was a really polished game and it showed me that you didn't have to make something super ambitious to make it enjoyable.
That was all well and good, but this is where a pattern of habit started, one I still suffer with today (edgy!). It was about 6 months into trying to make this game 'Guard Duty' that I hit the first hurdle, I had a long street background and a pub,medieval themed and not looking half bad. I'd drawn up a character and iirc, a few of the pub patrons.
I'd started dabbling in swapping pc hardware at the time and somehow managed to kill a Hard Drive, this was at a time where as far as I knew, hard drive data recovery wasn't even allowed outside of the FBI. So I sucked it up and took this opportunity to start fresh on a different project, different name and story - something even more awesome!
That new project lasted a couple of months, but nothing was really working and I already had a story line planned out for Guard Duty.
So it started. I went back to Guard Duty.
Maybe 6 months later and I have 5 or so backgrounds, with three you can walk around and two for an intro.
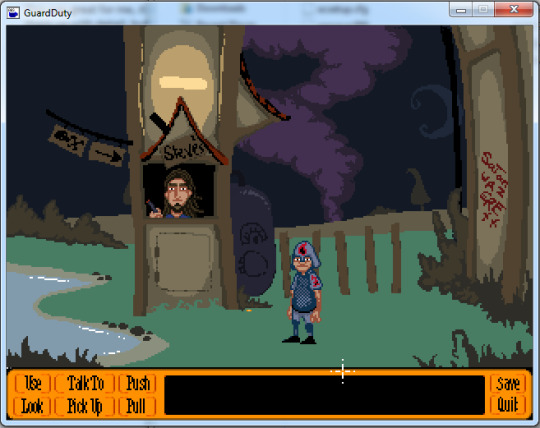
So I present to thee, Guard Duty V2:

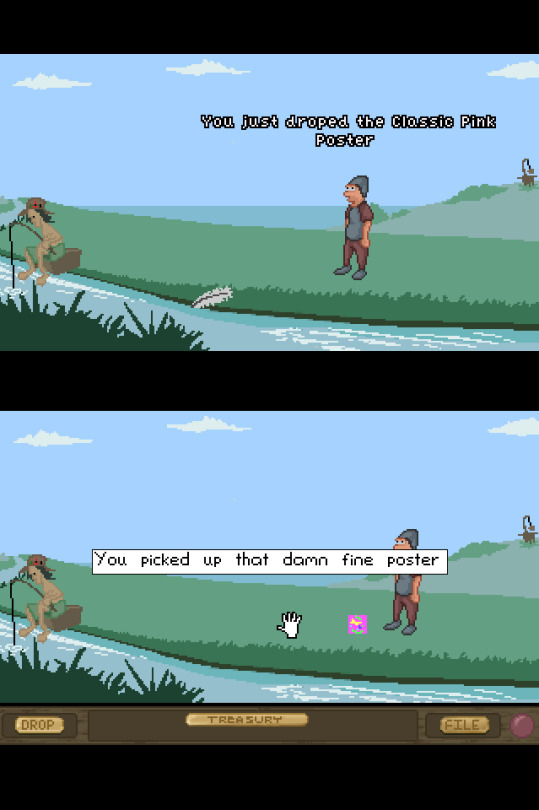
It wasn't half bad, and you could drop items wherever you wanted!
Disclaimer: I'm fairly sure I had a LOT of help getting that to work from the folks on the AGS forums, i'm a terrible coder.
I was happy with the art style and I was pretty well set into making my first game, but alas, things happened in real life and I got a bit distracted.
So time went on, I got drunk a lot, did teenagery things. Then in 2005 I decided that Guard Duty needed to come back! With a BADASS SUBTITLE!
Note: This was a terrible idea. Just, terrible.
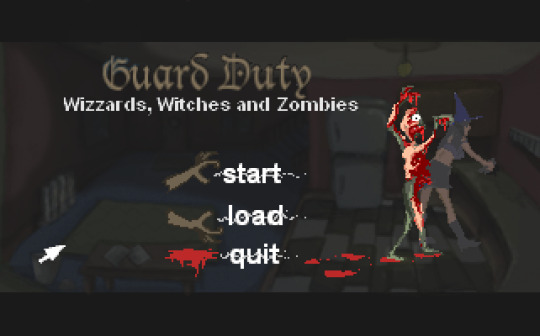
Oh god. Is that a... refrigerator? ...and I’m pretty sure that’s just a hooker wearing a wizard’s hat.
Guard Duty: Wizzards (heh), Witches and Zombies. Yup, totally did the 'add zombies to your game for more bro points' thing before it was a 'thing'.
This is pretty embarrassing. It's worse than when they did that HD remake of SoMI.
Discworld: Missing Presumed is one of my favorite adventure games and once I got my hands on a scanner I realised I could do something that 'kinda' looked like Discworld... right?
Not really.
This was also shaming all the work I had put into trying to replicate the clean style seen in Permanent Daylight, so after a few months working on this, again I gave up.
Now you see the habit forming.
For a while I decided Guard Duty was dead, that I wasn't going to revisit the idea ever again. It was cursed or something. I tried working with a team on a few competitions but being an unreliable mid-teenager, I was ambitious but never realistic.
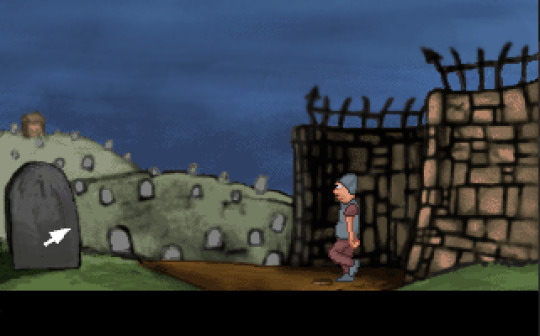
Jump to 2009, King of Pop Michael Jackson dies three days after my birthday and I decide to relapse. That is, revisit Guard Duty! (hurrah!)
I was older now, more edgy. This meant that Guard Duty was too.
There's an elephant in the room.
Heh.
This is where I hit a big milestone, I had started to grasp the elements which make up a good composition and I was quickly learning how to implement them.
This was great for me, it meant that I could revisit any of the backgrounds later on and spruce them up with detail, but still being able to continue work on the game. No more restarts, just reworkings. I learnt that if the composition was solid, it didn't matter if the detail was low or messy.
I got to the point where I had about 7 locations with a couple of puzzles and five characters running and playable and I then realised the importance of fabled 'game design document'.
'Pah, I don't need one of them. My game's short, I just need to do the art, then the puzzles and characters will fit right into the world!'
Nope, turns out having a plan for your game -before- making all the art is something you should definitely do. At least, for an adventure game where the puzzles and story are first and foremost.
I'd made a puzzle in the pub because I thought it was cool, but I had no idea how it was going to add to the endgame, I didn't know what the endgame was. So again, I hit a hurdle, struggled with it for a few months and eventually the game went on the backburner.
I took a break from making games, worked on my art skills a bunch and took a liking to film making. It was a LOT quicker to make something go from an idea to a short film. I wen't to uni and studied Digital Arts, and there learnt skills in videography.
I think in the long term, this was the point where I learnt how to stick with a creative project through to the end. I'd made a couple music videos, a handful of short films and written a whole bunch of scripts.
I needed something to sink some time into, I like to keep busy so hey, why not, one last shot.
So with my years of err, wisdom. I decided to try my hardest to do things right this time. I wrote out a design document, decided on key story arcs using a somewhat bastardised version of the 'hero’s journey' (a storytelling technique often used in film making).
After I had a decent enough plan, I started work on the art. Here's where the importance of the initial background composition comes into play. A lot of people use 'programmer art' which is a basic sketch of the layout of the room, normally limited to black and white. This is used so the programmer can continue and implement elements of the game without having the wait for the artist. I find this approach a bit boring, art being my 'thing', so i found a middle ground.
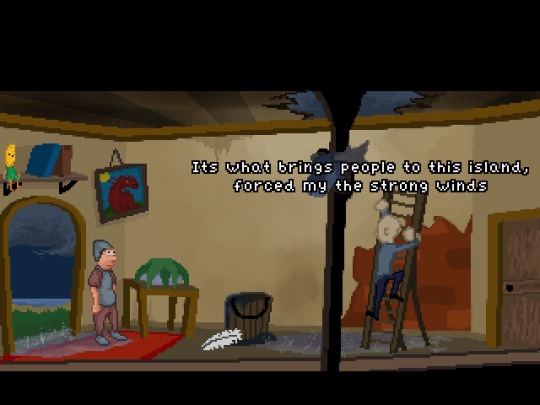
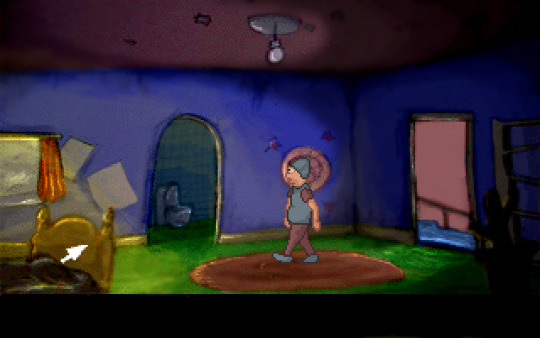
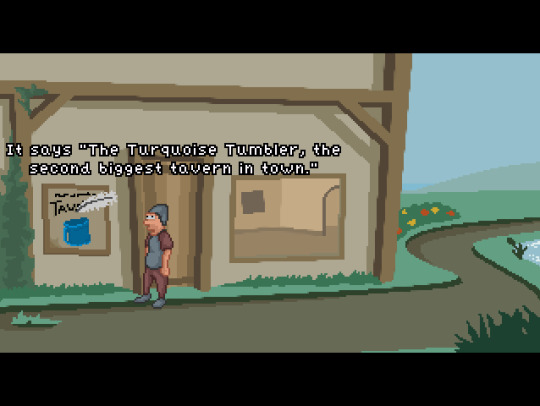
Take this background for example, Tondbert's bedroom.
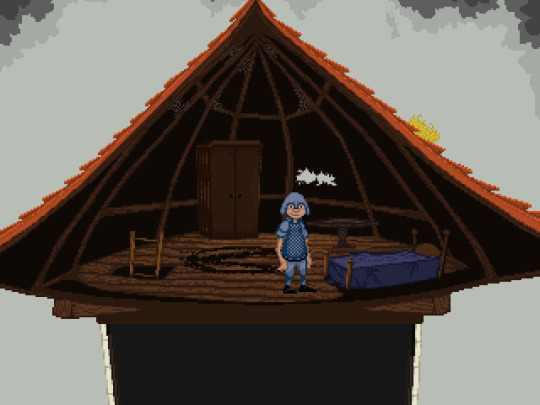
The background initially started as this, just the essentials. It was functional and gave me a good feel for the room.
Now as the game has developed and puzzle elements have come into play the background now looks like this:
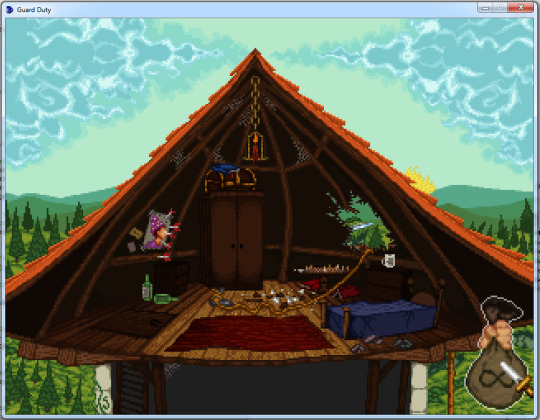
The foundation was there to add all the tiny elements that make up an interesting scene.
It's worth noting that didn’t happen overnight. 3 years have passed between these two screenshots, I've learnt a fair but about colour balance detailing in that time.
After about a year and a half of development (on and off, in my spare time) I decided that the struggle of my ego was over, I suck at programming and someone else could do a much better job and much faster.
It just so happened that I had the perfect man for the job, my good friend and old school (literally) game making buddy, Andy, now lead programmer.
Andy helped a lot by setting up a Trello project board for us to work from (amazing thing that organised people use) it's a pinboard where you can put tasks and add checklists and notes and stuff. We make a card for each room, have a list of the assets needed and a list of all coding tasks.
It's kinda like a race, except you're playing leapfrog.
I make a bunch of sprites, Andy implements them, meanwhile i'm making the next bunch of sprites, Andy is already waiting because he is super fast, Andy implements them. Before you know it, you've completed that card. Fun!
Organised fun!
However, we both work full time, so it takes me ages to get some lists finished, but it's even more rewarding when it happens.
On the plus side, we're independent. Two guys making a game, so we don't really have any time constraints. The game will be released when it's ready, whenever that is :)
So that's it really, a look into how Guard Duty has grown to be the game it is today. We're still a long way off finishing this, but we're both way to deep to turn back now.
Thanks for reading my pixel life story, until next time.
Nath
1 note
·
View note