
Just some guy being unhindged on main he/they - old enough to drink but not rent a car in america
Don't wanna be here? Send us removal request.
Statistics
We looked inside some of the posts by songsb4bed and here's what we found interesting.
Average Info
Notes Per Post
4M
Likes Per Post
1M
Reblog Per Post
3M
Reply Per Post
3K
Time Between Posts
16 days
Number of Posts By Type
Text
12
Photo
5
Last Seen Tumblr Blogs


Fun Fact
Average visit duration of Tumblr.com is 10 mins and 25 secs.
Text
I’m about to save you thousands of dollars in therapy by teaching you what I learned paying thousands of dollars for therapy:
It may sound woo woo but it’s an important skill capitalism and hyper individualism have robbed us of as human beings.
Learn to process your emotions. It will improve your mental health and quality of life. Emotions serve a biological purpose, they aren’t just things that happen for no reason.
1. Pause and notice you’re having a big feeling or reaching for a distraction to maybe avoid a feeling. Notice what triggered the feeling or need for a distraction without judgement. Just note that it’s there. Don’t label it as good or bad.
2. Find it in your body. Where do you feel it? Your chest? Your head? Your stomach? Does it feel like a weight everywhere? Does it feel like you’re vibrating? Does it feel like you’re numb all over?
3. Name the feeling. Look up an emotion chart if you need to. Find the feeling that resonates the most with what you’re feeling. Is it disappointment? Heartbreak? Anxiety? Anger? Humiliation?
4. Validate the feeling. Sometimes feelings misfire or are disproportionately big, but they’re still valid. You don’t have to justify what you’re feeling, it’s just valid. Tell yourself “yeah it makes sense that you feel that right now.” Or something as simple as “I hear you.” For example: If I get really big feelings of humiliation when I lose at a game of chess, the feeling may not be necessary, but it is valid and makes sense if I grew up with parents who berated me every time I did something wrong. So I could say “Yeah I understand why we are feeling that way given how we were treated growing up. That’s valid.”
5. Do something with your body that’s not a mental distraction from the feeling. Something where you can still think. Go on a walk. Do something with your hands like art or crochet or baking. Journal. Clean a room. Figure out what works best for you.
6. Repeat, it takes practice but is a skill you can learn :)
74K notes
·
View notes

Photo

help me manifest blue pennsylvania
like to charge reblog to cast
59K notes
·
View notes

Text

i know we joke about cis artists having the weirdest sense of anatomy, but also even when the anatomy is fine, no one seems to want to draw women doing normal things
175K notes
·
View notes
Text
So... I found this and now it keeps coming to mind. You hear about "life-changing writing advice" all the time and usually its really not—but honestly this is it man.
I'm going to try it.

102K notes
·
View notes
Photo

If you see this on your dashboard, reblog this, NO MATTER WHAT and all your dreams and wishes will come true.
232K notes
·
View notes
Photo
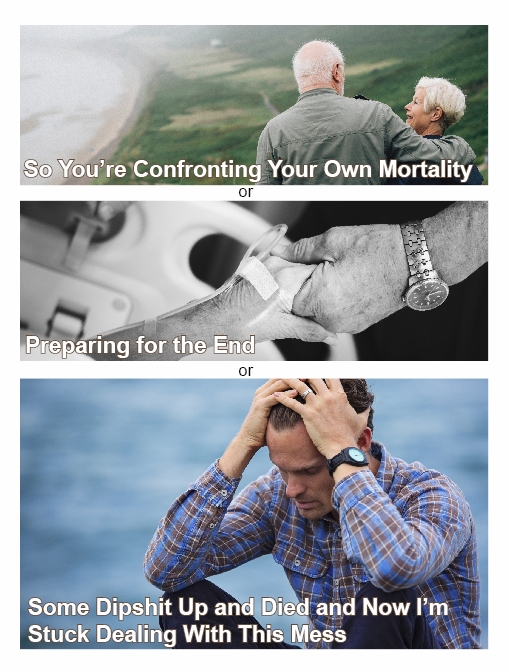
Hey you know how I said I was going to make a workbook on the kind of bullshit you need to do when someone you love dies? I actually did that.
HERE IS THE VERSION WITH LOTS OF SWEARING AT THE USELESS, SHITTY SITUATION YOU’RE IN.
HERE IS THE VERSION WITH A FAIR AMOUNT OF BLACK HUMOR BUT NO CURSEWORDS.
Featuring Helpful Sections such as:
Death Certificates – What you need, why you need them, and how to get them
Prepare to spend a long and miserable time on the phone
What the Everloving Fuck is Probate
Some Simple Dos and Don’ts
Shitty Mad Libs – Templates for writing Obituaries and Memorials
How to plan a non-religious death party
So you suddenly have to become some sort of hacker or some shit
This is an eighteen page book that you can print out, download, share, and give away; it is meant to be used to collect information about funeral planning and account management after a death OR you can use it BEFORE you die and give people information so they’re not stuck playing Nancy Fucking Drew while trying to keep seventeen cousins who crawled out of the woodwork from gutting each other in front of the fucking casket as they argue about who’s inheriting grandma’s favorite dentures.
It’s not exactly cheerful and it’s full of things that are probably going to feel really fucking raw if you’re processing a fresh death.
I’m sorry! I love you! Death is shitty! I’m trying to laugh about it a little and I hope you can laugh a little too because otherwise we’re all just going to cry together.
Good luck!
(in memory of my weirdo mother and her weirdo siblings who all died too fucking young and left me holding this flaming bag of dogshit)
135K notes
·
View notes
Photo

This is money cat. He only appears every 1,383,986,917,198,001 posts. If you repost this in 30 seconds he will bring u good wealth and fortune.
632K notes
·
View notes
Text
Stuff I Learned at My Writing Workshop (That I’m Kicking Myself in the Head for Not Realizing Sooner):
- The difference between a book that grabs you from the beginning vs. one that you’re on the fence about tossing out the window is winning your trust. It’s why it’s “easier” to read books by authors you already know, or fanfic where you’re familiar with the characters. Winning the reader’s trust as quickly as possible should be your first goal as a writer when you’re going back and editing your first draft. This can be accomplished by things like: speaking authoritatively about the subject (even if it’s utter bullshit), graceful prose, or establishing quickly in the story what it’s about. For example,“Character A had a problem. Character B didn’t love them back, so Character A was going to kidnap them so they would.” Maybe it’s not a story you want to read, but you are now firmly couched in what you signed up for in this story and the promise the author is going to deliver on before the end.
- Characters need goals. They need goals in every moment and in every scene. Every character needs a goal in every moment and in every scene. Maybe they’re not directly pursuing that goal right this very moment but it’s probably always at the back of their mind. Romances and detective stories are the easiest to deliver on this need. Character A wants to win their love. Detective A wants to solve the case. Even when they’re having tea with grandma, their thing is at the back of their mind. Keeping your character and your story focused on this thing they want helps pull your reader along and keeps them engaged on the “So what?” and “Why are we reading this scene?” questions of why they should keep reading.
- Characters shouldn’t just have things they like, they should have obsessions. This is the one I’m kicking myself for. The scientists in Pacific Rim are eccentrically obsessed with studying their thing. Thorin in the Hobbit is obsessed with regaining his home. Katniss Everdeen is obsessed with protecting her sister. Every crazy whackadoodle fandom darling character is obsessed with something. What do they have in common? They’re intensely obsessed with the thing that they care about. We love characters who are obsessed with things beyond reason, whether it’s reclaiming their home stolen by a dragon, or building artisanal bird houses, saving your sister, or studying monsters. Everyone “likes” things, but people and characters who are obsessed with something fascinate us. Examine the characters you’re most attracted to writing in fanfic, and examine your original characters if you’re trying to build those, and figure out what are they obsessed with and how does that inform their character. That’s the thing that’s going to make readers care about them.
(Was this advice helpful? Consider donating to my Ko-fi!)
31K notes
·
View notes
Text
Writing a novel when you imagine all you stories in film format is hard because there’s really no written equivalent of “lens flare” or “slow motion montage backed by Gregorian choir”
170K notes
·
View notes
Text
hey did you know that uhh
i. the monster's body is a cultural body
ii. the monster always escapes
iii. the monster is the harbinger of category crisis
iv. the monster dwells at the gates of difference
v. the monster polices the borders of the possible
vi. fear of the monster is really a kind of desire
vii. the monster stands at the threshold… of becoming
67K notes
·
View notes
Text
Can't afford art school?
After seeing post like this 👇

And this gem 👇
As well as countless of others from the AI generator community. Just talking about how "inaccessible art" is, I decided why not show how wrong these guys are while also helping anyone who actually wants to learn.
Here is the first one ART TEACHERS! There are plenty online and in places like youtube.
📺Here is my list:
Proko (Free)
Marc Brunet (Free but he does have other classes for a cheap price. Use to work for Blizzard)
Aaron Rutten (free)
BoroCG (free)
Jesse J. Jones (free, talks about animating)
Jesus Conde (free)
Mohammed Agbadi (free, he gives some advice in some videos and talks about art)
Ross Draws (free, he does have other classes for a good price)
SamDoesArts (free, gives good advice and critiques)
Drawfee Show (free, they do give some good advice and great inspiration)
The Art of Aaron Blaise ( useful tips for digital art and animation. Was an animator for Disney)
Bobby Chiu ( useful tips and interviews with artist who are in the industry or making a living as artist)
Second part BOOKS, I have collected some books that have helped me and might help others.
📚Here is my list:
The "how to draw manga" series produced by Graphic-sha. These are for manga artist but they give great advice and information.
"Creating characters with personality" by Tom Bancroft. A great book that can help not just people who draw cartoons but also realistic ones. As it helps you with facial ques and how to make a character interesting.
"Albinus on anatomy" by Robert Beverly Hale and Terence Coyle. Great book to help someone learn basic anatomy.
"Artistic Anatomy" by Dr. Paul Richer and Robert Beverly Hale. A good book if you want to go further in-depth with anatomy.
"Directing the story" by Francis Glebas. A good book if you want to Story board or make comics.
"Animal Anatomy for Artists" by Eliot Goldfinger. A good book for if you want to draw animals or creatures.
"Constructive Anatomy: with almost 500 illustrations" by George B. Bridgman. A great book to help you block out shadows in your figures and see them in a more 3 diamantine way.
"Dynamic Anatomy: Revised and expand" by Burne Hogarth. A book that shows how to block out shapes and easily understand what you are looking out. When it comes to human subjects.
"An Atlas of animal anatomy for artist" by W. Ellenberger and H. Dittrich and H. Baum. This is another good one for people who want to draw animals or creatures.
Etherington Brothers, they make books and have a free blog with art tips.
As for Supplies, I recommend starting out cheap, buying Pencils and art paper at dollar tree or 5 below. For digital art, I recommend not starting with a screen art drawing tablet as they are more expensive.
For the Best art Tablet I recommend either Xp-pen, Bamboo or Huion. Some can range from about 40$ to the thousands.
💻As for art programs here is a list of Free to pay.
Clip Studio paint ( you can choose to pay once or sub and get updates)
Procreate ( pay once for $9.99)
Blender (for 3D modules/sculpting, ect Free)
PaintTool SAI (pay but has a 31 day free trail)
Krita (Free)
mypaint (free)
FireAlpaca (free)
Libresprite (free, for pixel art)
Those are the ones I can recall.
So do with this information as you will but as you can tell there are ways to learn how to become an artist, without breaking the bank. The only thing that might be stopping YOU from using any of these things, is YOU.
I have made time to learn to draw and many artist have too. Either in-between working two jobs or taking care of your family and a job or regular school and chores. YOU just have to take the time or use some time management, it really doesn't take long to practice for like an hour or less. YOU also don't have to do it every day, just once or three times a week is fine.
Hope this was helpful and have a great day.
116K notes
·
View notes
Text
Advice for writing relationships
Ship Dynamics
How to create quick chemistry
How to write a polyamorous relationship
How to write a wedding
How to write found family
How to write forbidden love
Introducing partner(s) to family
Honeymoon
Date gone wrong
Fluffy Kiss Scene
Love Language - Showing, not telling
Love Language - Showing you care
Affections without touching
Giving the reader butterflies with your characters
Reasons a couple would divorce on good terms
Reasons for breaking up while still loving each other
Relationship Problems
Relationship Changes
Milestones in a relationship
Platonic activities for friends
Settings for conversations
How to write a love-hate relationship
How to write enemies to lovers
How to write lovers to enemies to lovers
How to write academic rivals to lovers
How to write age difference
Reasons a couple would divorce on good terms
Reasons for having a crush on someone
Ways to sabotage someone else's relationship
Ways a wedding could go wrong
Arranged matrimony for royalty
If you like my blog and want to support me, you can buy me a coffee or become a member! And check out my Instagram! 🥰
30K notes
·
View notes
Text
A beginners guide to improve your phone photos
Now even though most of my recent pictures are taken on a proper camera, I very much started taking pictures using just my phone and the natural light I had, so this is very much aimed at people who don’t have any “expert” equipment.
Anyway… Lights, Camera, ACTION! A quick introduction to what you’re working with.
Lights - Lighting (and it’s playful friend shadow) is the most important thing you will need - even the most basic of camera phones can take a decent picture if things are well lit, but the best camera in the world will struggle to make anything out of something that isn’t. My advice with lights is to stop thinking of them as a specific thing, but rather as relative levels, because that is what creates shadows and makes things look more interesting. So if the light one one side of you is more bright than the other then you’ll get some pretty shadows. If you are standing nearer a light source than the background you’ll be much brighter than it will be. etc
The sun is your friend as it’s a massive free light source, however it’s a bit hard to control, as it slowly moves around (OK so technically we move, but… you know what I mean), varies in intensity and sometimes disappears behind clouds. Depending where you are in the world, the sun’s position in the sky varies not only throughout the day but how high it is in the sky. There are some shots I can only manage at certain times of day during the winter because it’s the only time the suns hits parts of my bedroom at the right angle.
As a rule direct sunlight, unless it’s early in the morning or in the evening is quite difficult to control - because it’s so much brighter than anything else you can end up having very harsh shadows (you can do things like hold a thin white sheet over a window to diffuse the lighting, but I want to keep this simple).
But really any light source works, so long as it’s brighter than your other surroundings.
Camera - without getting too technical, basically a camera can change three different variables (which I’ll get onto later) to adjust how much light it lets in. In automatic modes, both on professional cameras, and your phone it adjusts these automatically to get the results. These tend to be geared towards the type of shots most people take, which is usually pictures of people’s faces, so they aren’t always so great at capturing the human body - this is why I prefer to use the manual settings (it might be called something like Pro mode on your phone). These aren’t usually available on the “selfie” camera so you’ll probably have to use the front facing camera (which will take better pictures anyway, it will just take a bit more practice to get right).
Another important feature taking self portraits is using a timer, or as I prefer to do if your camera has it, a voice activation mode, or both - so you can say “capture” and your phone will take an image. I think this is a feature on Android phones but might require something to be downloaded on Apple devices.
Action - this is where you get involved! It’s important to try lots of things - don’t be afraid to try lots of different poses to see what works. Move around in the light and see what works - don’t be afraid to move the camera up or down a little bit so it changes the angle it’s looking at you. My best pictures are nearly always ones I haven’t planned, but I just tried standing in a different position to normal, or used a prop in a different way and I liked the results.
So now you know all that, here’s a quick step by step guide to taking some nice pictures.
Set your phone to selfie mode (or take a video and watch it back). Find somewhere to balance it (or just use duct tape to tape it to a wall or object). Generally I find if you hold one hand in the direction of the main light source and one hand towards the camera you want your hands to be at a 90 degree angle or less. Move your body around and look at the results of the video (or the selfie screen if you can see it - if it looks quite good then you’re ready to go, if not just try adjusting things until you find somewhere that works. Remember the place you stood to get the best results (if in doubt use a bit of tape on the floor to mark the spot).
Change the phone to manual mode - you only really need to worry about changing two things - the shutter speed and the ISO (phones tend to have a fixture aperture - or in non technical speak how much of the shot is in focus, or even more simply the background blur thingie, so we don’t need to worry about the final variable) . As a rule you want to keep the ISO as low as possible (usually around 100) as on phones it’s essentially just a “auto enhance in low lighting” mode, so the higher the setting the grainier the picture will end up looking. Set the shutter speed to around 1/50 second (if you are standing still this should avoid you looking blurry). If the image is too bright, then keep lowering the shutter speed (1/100. 1/200 etc) until you are happy with how it looks - if it’s too dark at 1/50 still, then start to raise the ISO).
If you are using the timer, set it (I usually find 5 seconds is about right to get into position). This method requires much more patience as you have to go back to the phone each time to take a new picture. With voice activation you can get into position and just shout “Capture” at your phone like a lunatic and take a whole load (although I would recommend checking the first few to just make sure things are looking great).
And that’s it really. But really the most important things are patience and being willing to experiment and try different things. You don’t need to know much to get going - just try lots of different poses and positions and eventually you’ll find something that works for you. Sometimes you just need to get lucky with the time of day when you’re using the sunlight, or a nice thin cloud can create beautiful lighting. Move the camera position around. Move yourself around and look at how the light moving changes how the shadows fall over your body.
805 notes
·
View notes
Text

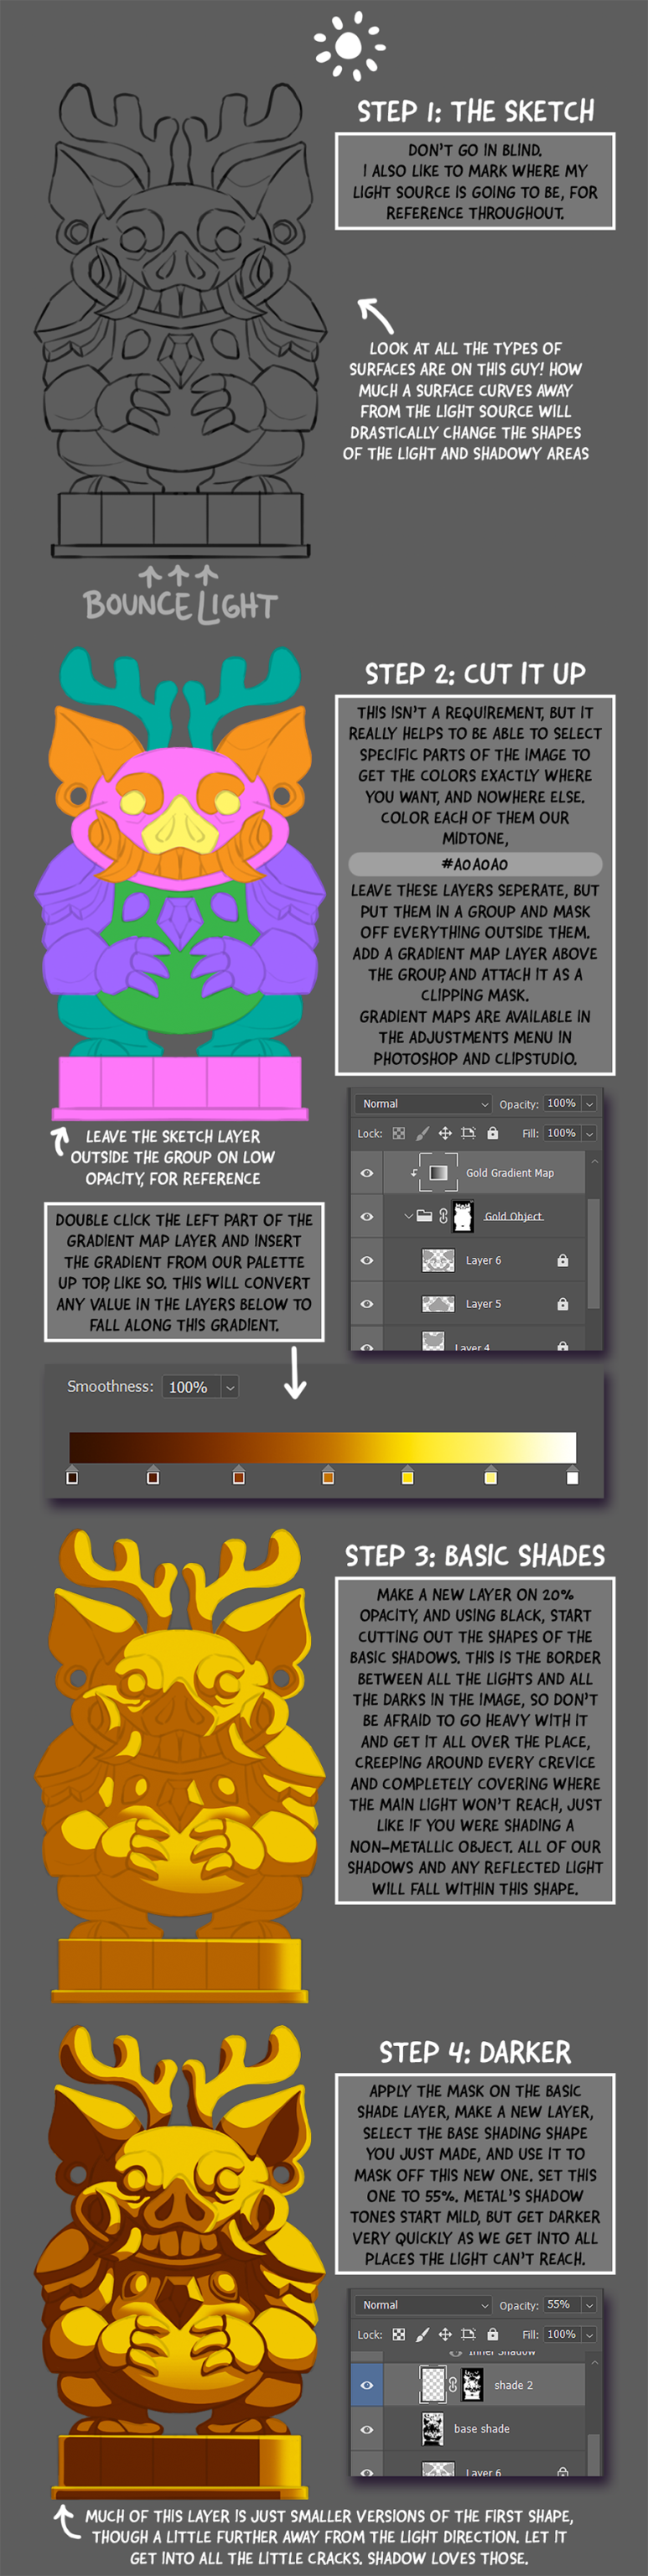
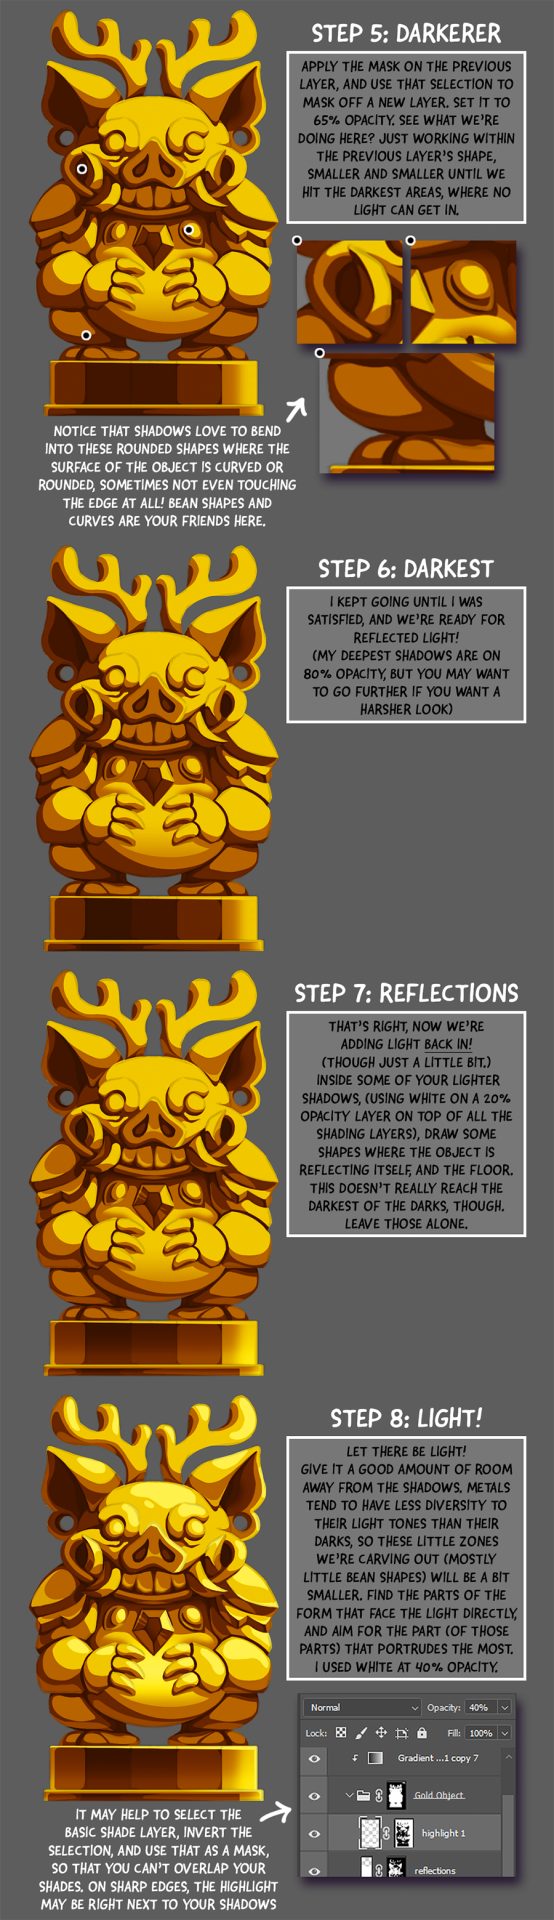
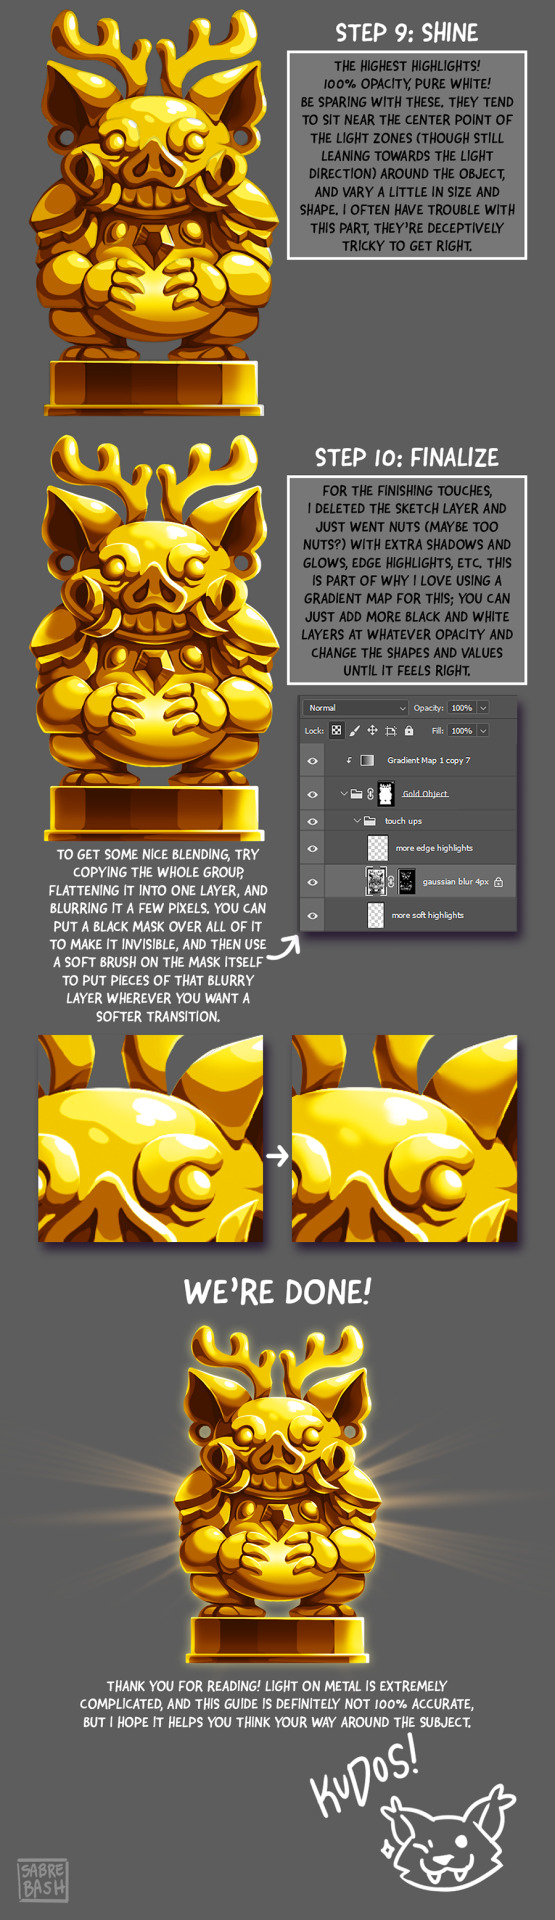
I have to draw a lot of gold and metal for my work, but wasn't happy with any of the metal tutorials i could find around. I prefer really specific instruction, so after some research i put together what i think works as a generalist's guide/tutorial. Not perfectly accurate, but i hope it's helpful!
31K notes
·
View notes
Text
534K notes
·
View notes