
Statecyclist.com is your go-to place for all things cycle. Our passion lies in building a community of cyclists where we bring you any kind of information, reviews, insights, or stories related to riding.Whether you ride for the occasional fun stroll around the neighborhood, for keeping yourself fit, or for the aim to be a professional cyclist, we’ve got you covered. We go at lengths to let you know everything you need to know about cycling. You can find collections of the best bikes to look out for from in-dept reviews, find new and exciting places to go riding on, learn different tips and tricks on how to enhance your current setup or just get updates on what’s new and exciting in the amazing world of cycling.Our team goes at lengths to ensure that we get details about every story. We then get some of the best photographers to give life to the story with their stunning imagery. What it results in is nothing short of a celebration of the life, the gear, the cyclists and the stories that make pedaling so great. Statecyclist.com hopes that you can have as much fun being a part of our community as you do when you ride. If you have any queries or thoughts to share, head over to our Contact us page for details on getting in touch with us.
Don't wanna be here? Send us removal request.
Statistics
We looked inside some of the posts by statecyclist and here's what we found interesting.
Average Info
Notes Per Post
1
Likes Per Post
1
Reblog Per Post
0
Reply Per Post
0
Time Between Posts
7 days
Number of Posts By Type
Text
5
Last Seen Tumblr Blogs


Fun Fact
130K people were victims of a chain letter scam that affected Tumblr in May 2011.
Text
Best Noseless Bike Seat Reviews
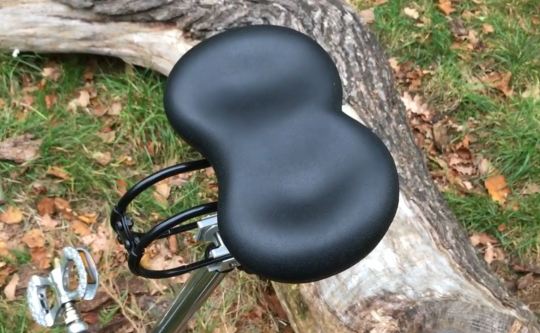
The foremost thing you need to know about me, I am a heart and soul bicyclist. From work to vacation, my bike is my partner for life. Some of my friends call it my second wife. Well, it is more like my wife. More often, it used to hurt when I took long rides. The seat structure was so uncomfortable that I would often end up standing beside the road for a while.
In the meantime, I also went through several articles and discovered that normal seats are unhealthy. They damage our private parts. Now, bikes might be my second wife, but it shouldn’t stop me from destroying my future generation.
So, I went to the bike shops looking for some solutions. One particular bike shop suggested me to consider a noseless bike seat. Now, no nose bike seat was a very new alternative. I started researching more on those noseless saddles. I discovered some of the amazing topics online and wanted to write them down.
I often come across many riders who have given up biking just because of these uncomfortable seats. I believe, after reading this article you’ll also know more about the noseless bike saddle and will be able to chose the best noseless bike seat for you.
5 Best Noseless Bike Seats
ISM PR 3.0 Noseless Saddle (Performance Recreational)
ISM Touring Noseless Bike Seat (For City)
ERGO The Seat by Lycra Gel Saddle (Hornless)
Hobson Easyseat II (Split Design)
Schwinn No Nose Saddle (Budget)
See the link below for detailed reviews.
Noseless Saddle Buying Guide
A saddle can create a tour to heaven or even be a nightmare in your life. So, I prefer spending much more time studying different types of saddles before buying one. Some of the key features that I would urge you to consider are described below.
The Science Behind Noseless Bike Seats
Often people claim a lot of things and have no scientific evidence behind them. I actually want to go down deeper on my words and explain to you what I am suggesting. Hornless bike seats are different from regular bike seats mainly by their appearance. They don’t have the horn in front of the seat.
Imagine, you’re riding a bike for more than 3 hours a week. You can have erectile dysfunction. Again, it is scientifically proven that bike seat nose creates high pressure on your perineal area. Now, all humans have a pudendal nerve on the frontal side of their pelvis. When you are sitting on a regular bike seat, you are actually pressing your pubic area against the seat. The pressure falls on the pudendal nerves and pubic arch. It would be okay if the pressure stayed there only for a short while. Constant biking increases the pressure and damages it.
Read the full article here - https://www.statecyclist.com/best-noseless-bike-seat/
0 notes
Text
Bike Chain Size Guide And Chart

There is no universal bike chain that would fit all types of bikes. Bike chain sizes vary based on several factors. In my previous article, I already have discussed the types of standard bike chains. Anyhow, I thought that we need a separate article on bicycle chain sizes.
If you are replacing your bike chain by yourself, you need to be aware of the differences between bicycle chains.
In this article, we will be discussing different lengths and widths of bike chains. We’ll also discover an equation for determining the proper length of a standard bike chain, review a chart of bike chain sizes, and finally, we’ll answer some of the burning questions.
So, let’s start with the bicycle chain size chart and size guide.
Bike Chain Size Variables
Link Lenght (Pitch)
The bike chain link pitch (distance between pin centers) is standardized and equals 1/2 inch or 12.7 millimeters. Historically there were also other pitch sizes, but the 0.5-inch pitch is standard these days.
Length (Total Length)
The total length of the bike chain is calculated by multiplying the number of links with a 1/2 inch link pitch.
I have seen chains with 100 up to 126 links.
I analyzed a list of best-selling bike chains on Amazon and found out that the most popular chain length is 116 links.
You can always shorten your bike’s chain. But it is not easy to increase the length of a bike chain. So, try to find an adequate size.
Internal Width
There are 4 sizes of the internal width of the bike chain – 1/8″, 3/32″, 11/128″, and 5/32″:
1/8″ (3.18 mm) – some of the bikes with a single rear sprocket
3/32″ (2.38 mm) – some of the bikes with a single rear sprocket, bikes with 5-8 rear sprockets, and derailleurs
11/128″ (2.18 mm) – bikes with 9-12 rear sprockets and derailleurs
5/32″ (4.0 mm) – freight bicycles and tricycles.
A simplistic way how to estimate your bike chain size:
If you have a heavy-duty cargo bike or tricycle, you need a 5/32″ chain.
If your bike is equipped with the derailleur, you need a 3/32″ or 11/128″ chain.
If you have a single-speed or internally geared bike, you need either 1/8″ or 3/32″. You should get the correct size, but if it is impossible, you can use the 1/8″ chain because it has limited compatibility with the 3/32″ sprocket.
External Width
When you are shopping for a new chain for your multi-speed derailleur bike, the external width is another factor you should keep in mind. The proper width is determined by the number of rear sprockets your bike has – the more rear sprockets are spaced close together, the narrower chain should be used.
The external width of the chain is not something you should worry about in the case of a single-speed or single rear cog bike.
Read the full article here - https://www.statecyclist.com/bike-chain-size-chart/
0 notes
Text
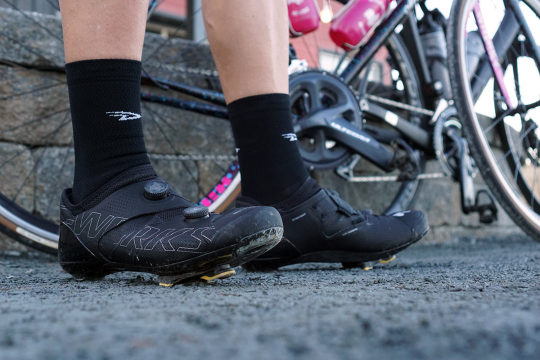
When to Replace Cycling Shoes
When to replace cycling shoes? This is a question many cyclists ask, and the answer is always the same. Unfortunately, there is no black-and-white rule for when to replace cycling shoes, so it's recommended that you replace your cycling shoes when they start feeling uncomfortable.
However, if you are experiencing pain, numbness, or tingling, you should replace your cycling shoes immediately.
In this blog post, we will explore some of the common warning signs that your cycling shoes need to be replaced.
When should you replace your cycling shoes?
When it comes to cycling, one of the most important pieces of equipment is the footwear you choose. Not all cycling shoes are created equal, and choosing the right pair can make a world of difference in your overall riding performance.
The question is, when should you replace your cycling shoes? The answer can vary depending on the type of cycling you do, but there are a few general guidelines you can follow.
For recreational cyclists, the lifespan of a cycling shoe can be anywhere from 6 months to 2 years. If you ride frequently and your shoes start to show signs of wear and tear, it may be time to replace them. This is especially true if you notice that the soles are starting to become worn down or the heel cup is not providing the same level of support it once did.
Additionally, if you’re riding in wet and muddy conditions, your shoes may not be able to provide the same level of grip and traction as new shoes, so it’s important to replace them when needed.
On the other hand, for competitive cyclists, the lifespan of a cycling shoe can vary even more. Race-level cycling shoes are designed to be more lightweight and aerodynamic than recreational shoes, so they may need to be replaced more often. In addition, race-level shoes will often feature a stiffer sole and a more comfortable fit, so they may need to be replaced even sooner if they start to feel loose or uncomfortable.
Ultimately, it’s important to keep an eye on your cycling shoes and replace them as needed to ensure you get the best performance out of your ride.
How often should you replace your cycling shoes?
When it comes to cycling, your footwear is incredibly important. Cycling shoes are designed to provide you with a secure connection to your bike, allowing for efficient power transfer, comfort, and durability. Knowing when to replace your cycling shoes is essential for improving your performance on the bike, as well as for your overall safety.
The frequency of cycling shoe replacement depends on your individual cycling habits and the quality of the shoes. Generally speaking, if you cycle regularly, your shoes can last anywhere from 400 to 600 miles. If you cycle often and over longer distances, you may need to replace your shoes more frequently.
If you are an occasional cyclist, you may be able to keep your shoes for much longer. It is important to take note of any signs of wear and tear, such as holes or tears in the material or soles, or damage to the cleats. If your cycling shoes are showing signs of wear, it is important to replace them in order to ensure the best performance and safety on the bike.
It is also important to consider the quality of your cycling shoes. Higher quality shoes will tend to last longer than lower quality shoes, and may be able to withstand more miles before needing to be replaced.
If you are looking for cycling shoes that will last, it is worth investing in a higher quality pair. However, it is important to remember that all shoes will eventually wear out, no matter the quality.
Know when to replace your cycling shoes to ensure maximum performance
Cycling is a popular form of exercise and recreation, and having the right footwear is essential for a successful rid. Knowing when to replace your cycling shoes can help you get the most out of your ride and stay safe on the road.
The lifespan of cycling shoes can vary depending on the type of material used. Generally, cycling shoes made of synthetic leather or mesh material tend to last longer than those made of leather or suede.
To make sure you are getting the most out of your cycling shoes, it's important to inspect them regularly. Check for any signs of wear and tear, such as broken seams, frayed laces, or worn-out soles. If your shoes show any of these signs, it's time to replace them with a new pair.
Additionally, if you experience any discomfort while riding, it could be a sign that your shoes are not providing the support your feet need and should be replaced. Taking the time to replace your shoes, when necessary, can help you ensure maximum performance and comfort on every ride.
Understanding the Different Types of Cycling Shoes and When to Replace Them
Cycling shoes are specially designed to provide a snug fit and improved power transfer for increased speed, agility, and comfort. There are a variety of different types of cycling shoes available on the market, each with its own advantages and drawbacks.
In general, cycling shoes are divided into three categories: mountain biking, road biking, and triathlon.
Mountain biking shoes are designed for off-road terrain and feature a stiff sole with a flat or slightly curved profile and a protected toe box.
Road biking shoes are designed for roads and feature a stiff sole with a curved profile and a stiff heel cup for increased power transfer.
Triathlon shoes are similar to road shoes but with a more aerodynamic design and lightweight construction to help with transitions between biking and running.
The lifespan of cycling shoes depends on how frequently they are used and the type of cycling they are used for. Mountain biking shoes typically last longer than road or triathlon shoes due to their more rugged construction, while road and triathlon shoes should be replaced once their soles have worn down or their uppers have become damaged.
It is also important to replace cycling shoes when the fit has become too loose, as this can impede performance and cause discomfort.
Conclusion
In conclusion, cycling shoes are designed to improve the grip of the foot on the pedal, giving the cyclist better control and a more comfortable ride. The sole of cycling shoes should be stiff enough to increase power transfer while still providing some flexibility. Lastly, the right cycling footwear should provide good breathability and fit the rider's feet perfectly, allowing them to concentrate on the ride and enjoy the experience.
youtube
0 notes
Text
How to Paint Bicycle Rims
Painting bicycle rims is easier than you may think. All you really need is a few cans of spray paint, a brush and some patience.
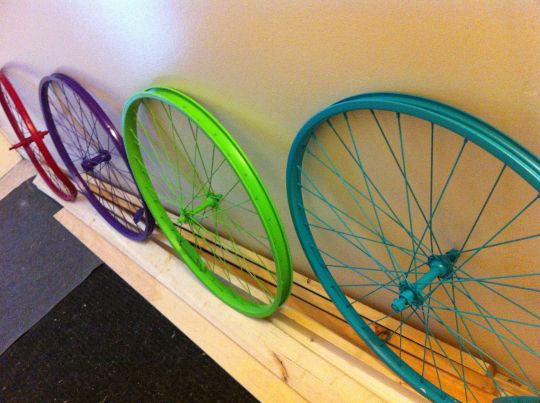
In this blog post, I'll show you exactly how to paint bicycle rims with step-by-step photos. Keep reading to learn more!
How to prepare bicycle rims for painting.
Preparing bicycle rims for painting is an important step in the custom paintwork process. It is essential to ensure that the surface is clean, free of dirt and grease, and ready for paint.
The first step is to thoroughly clean the bicycle rims. Use a brush and a detergent solution to remove any dirt and grime. Be sure to rinse the rims off with clean water. Then, sand the rims with a medium-grade sandpaper to remove any rust or corrosion.
The next step is to apply a primer to the bicycle rims. Primer prevents the paint from peeling off and helps the paint adhere to the rims. Make sure to allow enough time for the priming to dry before moving onto the next step.
Finally, spray the bicycle rims with an even coat of paint. Be sure to allow enough time for the paint to dry before riding the bicycle.
How to paint bicycle rims.
Painting bicycle rims is a great way to add a personalized touch to your bike. It can change the look of your bike and make it stand out from the crowd. The steps to paint your bike rims are fairly simple and can easily be completed in a day.
First, you need to make sure that the surface of the rims is clean and free from dirt and dust. A good way to do this is to use a wire brush, followed by a wet cloth. Next, you need to apply a primer to the rims. This should help the paint stick on better and last longer. After the primer is dry, then you can start applying the paint.
You can use spray paint or brush it on depending on your preference. Make sure to use even strokes and an even amount of paint. Once the paint is dry, you can apply a clear coat layer to add shine and protect the paintwork.
Finally, you can go over the rims with a sponge or a soft cloth to ensure a smooth finish. Following these steps will help you to create a nice looking and durable paint job on your bicycle rims.
How to clear coat bicycle rims.
Clearing coat bicycle rims is a great way to keep your bike looking its best. It is a simple process that will give your bike a new, glossy finish.
The first step to clear coating your bicycle rims is to ensure the surface is clean and free from any dirt or debris. Use a soft cloth to wipe away any dust or dirt before you start painting.
Once the surface is clean, you can apply the clear coat. Use a brush or roller to evenly apply the clear coat to the rims. Make sure to cover the entire surface, including around any spokes or other details.
Afterwards allow the clear coat to dry completely before adding a second coat. If a second coat is necessary, make sure to apply the same amount of pressure and coverage as the first coat.
When the final coat is dry, you can check to make sure everything is smooth and even. After the clear coat is dry, you can reinstall your bike rims and enjoy your newly painted wheels.
Clear coating your bicycle rims is a great way to add a professional look to your bike and protect your paintwork from the elements. With proper preparation and care, you can have beautiful, clear-coated bicycle rims that will last for years to come.
How to care for painted bicycle rims.
Paintwork on bicycle rims is delicate, so it's important to keep your bike clean to protect the paint and keep it looking fresh.
To do this, start by wiping down the rims with a damp cloth and some mild soap. Make sure the rims are completely dry before you start any other maintenance or repairs. When cleaning the rims, use a soft brush to remove dirt and debris that has built up.
In order to help protect the paint, apply a thin layer of wax over the rims after every ride. This will help protect the paint against any dirt or grime that may build up.
If there are any chips or scratches in the paintwork, it's important to repair them as soon as possible. To do this, you can use a touch-up paint that matches the original color of the rims. Use a small brush to carefully apply the paint, making sure to fill in any scratches or chips. Once the paint has dried completely, you can use a clear coat to seal it and help protect against further damage.
Finally, it's important to inspect your bike's rims regularly for any signs of wear or damage. If any paint chips or scratches are found, it's important to take action immediately to repair them.
Tips for painting bicycle wheels - to ensure a perfect finish.
Painting bicycle wheels can be a great way to give your bike a unique and personalized look. However, to ensure a perfect finish, there are some key tips that you should follow.
Firstly, use a degreaser to remove any dirt, grease, and oil that may have built up on the surface of the wheel. Make sure you use an appropriate paint for bicycle wheels and carefully apply the paint evenly. Once the paint has dried, it's important to apply a sealant to the wheels to protect the paintwork from the elements.
Finally, when the sealant has set, you can begin to reattach the wheel to the bike. By following these tips, you can ensure that your paintwork is perfect and your bike looks great!
Conclusion
In conclusion, painting bicycle rims is an effective way of giving your bicycle wheels a new look. With the right preparation, type of paint, and tools, you can achieve a professional-looking paintwork. Doing this will ensure that the paint job is durable and your bicycle will look great for years to come.
youtube
0 notes
Text
Welcome to StateCyclist
Welcome to the Statecyclist cycling blog, the best cycling resource on the internet!
While we are working on reviews and tips articles, please check out main website at statecyclist.com!
1 note
·
View note