
Don't wanna be here? Send us removal request.
Statistics
We looked inside some of the posts by sweeetchillies and here's what we found interesting.
Average Info
Notes Per Post
5
Likes Per Post
4
Reblog Per Post
1
Reply Per Post
0
Time Between Posts
10 days
Number of Posts By Type
Text
16
Last Seen Tumblr Blogs


Fun Fact
Tumblr was named as a finalist in Lead411’s New York City Hot 125 in Aug 2010.
Text
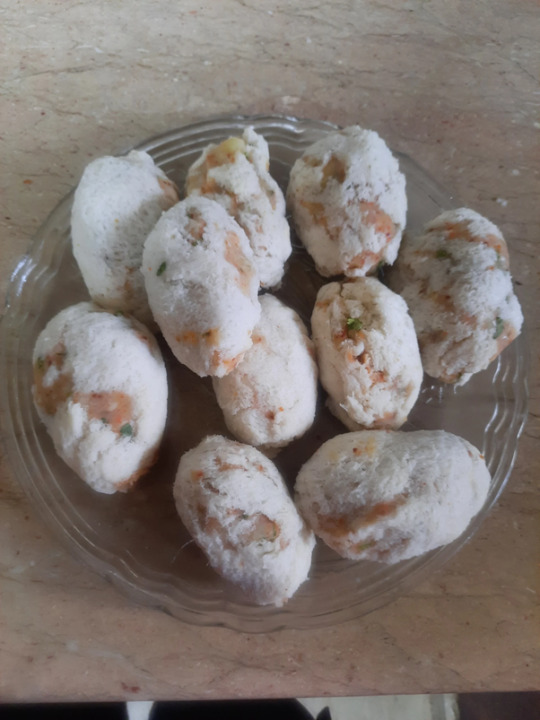
BREAD ROLLS
A popular deep-fried snack recipe made with leftover sandwich bread slices and potato stuffing. It is an interesting appetizer or even a party starter recipe that would be appreciated by all age groups. It is simple and easy to make and can be made within minutes while delivering a mouth-watering evening snack.

Bread snacks have become an integral part of many Indian households. There are many snacks that can be made with leftover bread slices and also mimic other snacks with these bread slices. One such popular street food snack is the bread roll recipe made with spiced and mashed potatoes, onions, and/or peas and paneer stuffing.
I remember when I used to have class parties or picnics, and then these rolls were my top call and luckily my mom and dad made them the best.
I was drooling so much over the dip in tomato ketchup that my cravings began while I was writing.
Preparing a quick and healthy breakfast is always challenging for me; hence, I usually bring sandwich slices. The issue with the sandwich is, you get bored soon and start craving some authentic South Indian breakfast. So you always end up with some left-over bread slices that need immediate attention. What better option is it to finish it off as an evening snack?
Well, bread rolls are one such unique deep-fried snack appreciated by not only kids but also by all age groups. Personally, I make it with any mashed potatoes and onions. Having said that, it does not take much time to cook and mash the potato stuffing anyway.
I always refrigerate boiled potatoes for these quicker recipes.
INGREDIENTS
1 onion (finely chopped)
1 tsp green chilli (finely chopped)
3 potato / aloo (boiled & mashed)
½ tsp Kashmiri red chilli powder
½ tsp garam masala
½ tsp amchur / dry mango powder
½ tsp salt
2 tbsp coriander (finely chopped)
6 slice bread(white )
Oil for deep frying
STEPS OF COOKING
First, take bread slices and with the help of scissors, cut out the corners from all four sides.
Now take a big bowl and add boiled and mashed potatoes along with chopped green chillies, coriander leaves, and onions.
Also add ½ tsp chilli powder, ½ tsp garam masala, ½ tsp amchur, and ½ tsp salt.
Mix well until the spices are well combined.
Dip the bread slice for a second in the water and squeeze out the excess water.
Make sure to squeeze the bread slice completely, or else it will absorb oil while deep frying.
Place the cylindrical-shaped prepared stuffing.
and wrap the bread, making sure to pinch the edges and secure it tightly. If you are unable to hold the shape, dip your finger in water and make the bread flexible to hold and roll.
Further, with the help of both hands, roll and make a cylindrical shape.
Deep fry the prepared bread roll in the hot oil. Make sure to fry in hot oil, or else the bread will absorb oil and turn soggy.
Stir and fry occasionally on medium flame till it turns golden brown. If you’re watching your weight, bake the bread until golden brown.
Finally, serve the stuffed bread roll hot, along with ketchup or a mint dip. (Highlight mint dip and create a link to the page where we have a mint dip recipe.)
TIPS
Firstly, use the white or brown bread of your choice.
Also, add vegetables of your choice to make the stuffing more healthy and tasty.
Additionally, fry in hot oil. Otherwise, the bread will absorb the oil.
Finally, the bread roll recipe tastes great when served hot but turns soggy once cooled.
I would heavily recommend using white flat sandwich bread slices for this recipe. Do not use wheat, multi-grain, or even brown bread, as you may not get the same desired result.
Secondly, if you are preparing the stuffing freshly, ensure to cool it down before using it in the bread. Once it is cooled down, you will find it easy to shape and roll it.
Lastly, do not forget to dip and squeeze the bread slices in water before stuffing them. Also, press the bread slice gently, making sure all the excess water is drained off. This would ensure it would absorb less oil while deep frying.
Did you make this recipe?
Please let me know how it turned out for you! Leave a comment below and share a picture on INSTAGRAM with the hashtag #sweeetchillies
Leave a comment below:
Your comments make my day. Thank you! If you have a question, please skim the comments section—you might find an immediate answer there. If you made the recipe, please choose a star rating, too.
To know more about SWEEET CHILLIES do follow us on Facebook, Instagram and Twitter
SWEEET CHILLIES tries to bring recipes to your kitchen step from every nook-corners of the streets.
Sweeet chillies recipes let you stand out from the crowd, always and let you not just taste delicious food, but make an experience out of it! Contact us at [email protected]
“This content is monitored by Scrrum Labs. For any complaints, please write to us at [email protected]“
0 notes
Text
CHOLE RICE

Chole Chawal is a typical North Indian street food made with rice and chickpeas, which makes a delicious and healthy meal.
Every market in Delhi is always crowded, with both wide and narrow lanes. One could spot hawkers every two minutes. It is unbelievable, but true. From rich to poor, everyone would crowd up these hawkers and eat their favourite food. There are many perfect places to explore the flavours of street food.
There are many chole walas in the market, but this one in the Gaffar market in Karol Bagh is one of the best. His stuff sells like hotcakes. The rice is made with some peas and tiny cubes of paneer. It is beautifully decorated with tomatoes, chillies, paneer, etc. The interesting part of this dish is the cottage cheese, where the vendor fills a plate with rice, tops it with chole, and then tops it with some spicy spinach. The spinach is topped with a slice of cottage cheese and some freshly made mango or carrot pickles, depending on the season.
One achieves a great sense of satisfaction after eating this protein-rich bowl. a street food bowl with high chilly content, low oil, fresh green spicy spinach that tastes like chutney, crunchy onions, tangy mango pickles to bite in between, and if you get that sharp chilly taste, bite into the paneer piece…wow…can you absorb the flavours?
Chole chawal, also known as chole rice, is my all-time favourite north Indian dish, and it can be found in almost every household during weddings, parties, or festivals. 80% of the people you meet will have this on their favourite menu.
Since I am very talkative so as not to waste much of your time, I will bring to you my Mom’s Secret recipe straight from her kitchen!!!!

INGREDIENTS
RICE
1 cup of rice
1 large cardamom
2 small cardamoms
1 or 2 bay leaves
cumin
1 teaspoon oil
1/2 teaspoon cumin seeds
Salt to taste
Chole/Chickpeas
1 /2 cup chickpeas , soaked overnight
Salt to taste
4 tablespoons oil
2 tbsp Ghee
3-4 cloves
2 bay leaves
1 tsp cumin seeds
2 green chilly, slit into two
3 medium tomatoes , puréed
1 tomato, chopped
2 tsp coriander powder
1 tsp red chili powder
1 tsp red pepper powder or Kashmiri red chili powder
1 tsp black pepper powder
1 tsp. amchur powder
½ asafoetida
½ garam masala
Fresh coriander leaves for garnishing
Rice
In a large mouth vessel, heat 1 tablespoon of oil.I chose this so that the grains of rice can get enough space to spread and cook.
Add the bay leaves, cloves, cardamom, and cumin.
Roast till we get an amber colour.
Add 2 cups of water. We took one cup of rice, so we always took twice as much water as rice.
Let boil, and add salt.
Add rice and cook till it’s done.
(You may also add peas at the point when the rice is 80% cooked, cover, and cook on a slow flame till done .)
Chole
Pressure Cook the chickpeas with bay leaves (you may also add tea bags, gooseberry tied in muslin cloth) salt for 4-5 whistles or until completely done. (Remove the tea bags and gooseberries, once boiled.) .
Purée three tomatoes and chop one tomato.
Add the slit green chili to the hot oil.
Next, add the puréed tomatoes, and as soon as you add the puree, add salt to taste.
(Remember your boiled chickpeas’ water also contains salt, so add accordingly.)
Add red pepper powder/Kashmiri red chilli powder, amchur powder, black pepper powder and pomegranate powder.
(NOW IT’S TIME FOR THE SECRET INGREDIENT.)
On a hot tawa, take coriander powder, cumin, and cloves, and on low flames, roast them until they change colour and turn aromatic.
Remember not to burn it.
Then combine them with the tomato puree and cook until the oil separates.
This gives a good black and brown colour to your chickpeas.
(You can use tea bags and soda together while)
Add the drained chana and simmer for 5–10 minutes.
Turn off the heat.
Did you make this recipe?
Please let me know how it turned out for you! Leave a comment below and share a picture on INSTAGRAM with the hashtag #sweeetchillies
Leave a comment below:
Your comments make my day. Thank you! If you have a question, please skim the comments section—you might find an immediate answer there. If you made the recipe, please choose a star rating, too.
To know more about SWEEET CHILLIES do follow us on Facebook, Instagram and Twitter
SWEEET CHILLIES tries to bring recipes to your kitchen step from every nook-corners of the streets.
Sweeet chillies recipes let you stand out from the crowd, always and let you not just taste delicious food, but make an experience out of it! Contact us at [email protected]
“This content is monitored by Scrrum Labs. For any complaints, please write to us at [email protected]“
0 notes
Text
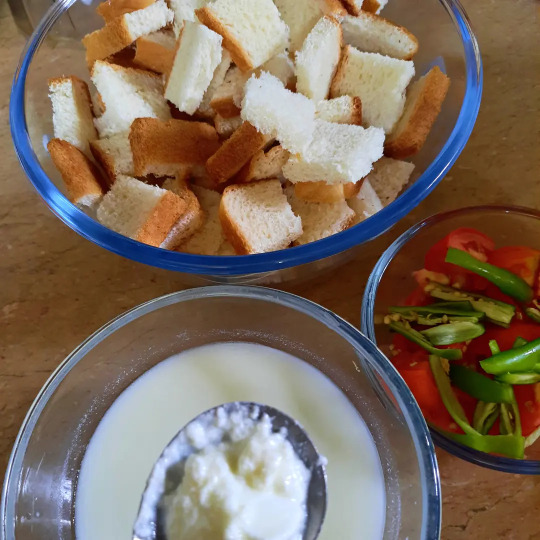
BREAD UPMA

Bread upma recipe | South Indian bread upma recipe is a simple, easy, and tasty snack recipe that can also be served as a breakfast recipe. Basically, bread masala upma is prepared from leftover bread which involves beaten thin curd mixed with mild spices and then sauteed in tomatoes and green chillies and garnished with coriander.
This quick upma can be an instant hit at your next kitty party and is certainly loved by kids and even adults.
I had actually bought these sandwich bread so that I could prepare a sandwich or Bombay sandwich. However, for some reason, I was occupied with other recipes and I forgot to cook those. Meanwhile, the bread slices were about to expire and I had to finish them quickly. I was running out of recipes, and I asked my husband who suggested cutlets. But I had already shared this recipe, hence I wanted something new. Fortunately, I got this idea to prepare bread upma for my breakfast as a bachelor’s recipe and somehow I managed to finish it.
While the preparation is extremely simple, some important steps for a perfect bread upma recipe. Firstly, I would heavily recommend toasting the bread first and then frying them with spices and veggies. Otherwise, the bread slices may turn soggy and spongy. Secondly, the recipe can be improvised further by adding veggies. Lastly, as an alternative, add maggie hot and sweet tomato sauce instead of tomatoes to make it more spicy and sweet bread upma.
INGREDIENTS
6 slices bread (white/wholemeal)
3 tsp oil
½ tsp mustard seeds
few curry leaves/kadi Patta
2 medium-sized tomatoes (roughly chopped)
1 green chilli (slit lengthwise)
½ tsp turmeric / Haldi
1 tsp Kashmiri red chilli powder / lal mirch powder
Salt to taste
2 tbsp water (if required)
3 tbsp coriander leaves (finely chopped)
Method of cooking
Take as many slices of bread as you want, then, with the help of a knife, scissors, or pizza cutter, cut them into small square shapes and keep them on the side till the moisture in the bread dries up.
Chop the tomatoes and set them aside, and slit the green chilies from the centre and set them aside as well.
Then take some curd and whisk it so that no granules or lumps are in it, and add some water to make it smooth and liquidy.
Take a large Kadai and heat some oil in that vessel.
Add mustard seeds and let them crackle in the hot oil.
Once you start hearing the crackling sound, add your washed and patted curry leaves. Be careful not to burn them. Keep your flame at medium.
Now, at this time, add your bread pieces, followed by tomatoes, green chillies, salt, turmeric, and red peprika powder, and pour the entire curd on it.
Give it a good mix, and then garnish with some dessicated coconut and some chopped coriander leaves.
Finally, serve this dish as your party appetiser and let everyone enjoy this easy, simple, and healthy breakfast.
Did you make this recipe?
Please let me know how it turned out for you! Leave a comment below and share a picture on INSTAGRAM with the hashtag #sweeetchillies
Leave a comment below:
Your comments make my day. Thank you! If you have a question, please skim the comments section—you might find an immediate answer there. If you made the recipe, please choose a star rating, too.
To know more about SWEEET CHILLIES do follow us on Facebook, Instagram and Twitter
SWEEET CHILLIES tries to bring recipes to your kitchen step from every nook-corners of the streets.
Sweeet chillies recipes let you stand out from the crowd, always and let you not just taste delicious food, but make an experience out of it! Contact us at [email protected]
“This content is monitored by Scrrum Labs. For any complaints, please write to us at [email protected]“
0 notes
Text
PANEER TIKKA RECIPE
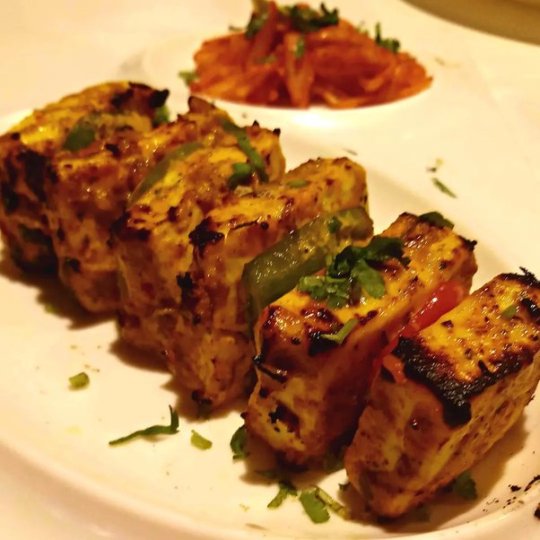
Tikka basically means anything that is marinated and then baked, grilled or fried, and paneer tikka is a popular vegetarian tikka dish. This tasty homemade version is similar to the dish served in restaurants, but I would say it actually tastes better!
The Indian spice powders, mixed with the yoghurt (curd), make a flavorful marinade that is soaked up by the porous paneer cubes. Grilling the skewers then produces a nice, slight crispiness on the paneer.
For newbies to Indian food, tandoori style cooking is when marinated ingredients or Indian flatbreads, in this case, paneer cubes, have been threaded on a skewer and grilled in a tandoor, which is a cylindrical clay oven.
This produces a subtle charcoal flavour and is a popular way of cooking in Indian restaurants. In this homemade version, we grill the paneer skewers in the oven, although you can even bake them.
Most of the time, for tikka recipes, the yoghurt-based marinade is made, which is unique to the tandoori style of grilling.
This restaurant-style paneer tikka can be easily made at home. In this delicious recipe, paneer cubes are marinated in a spiced yoghurt-based marinade, arranged on skewers, and grilled or baked in the oven.
This spicy snack is a dry dish, meaning it is not in a gravy sauce, but the paneer cubes themselves are juicy and succulent.
Bell peppers (capsicum) and onions have been added to the skewers in this recipe. The veggies add flavour and nutrition, and you can add as many as you like. This vegetarian dish makes great appetisers or sides.
INGREDIENTS
Cottage Cheese-200g
Hung curd: 2 tablespoons
Ginger-garlic paste
Kashmiri Mirch powder or paprika.
Turmeric powder
1 teaspoon dry mango powder (amchur)
Black salt
salt
1 teaspoon chaat masala
Dried Kasturi leaves
Garam masala powder
Lemon juice: half a lemon
Green capsicum: 1
Onion- 1
Tomato: 1
Melted butter
Coriander leaves, chopped
1 teaspoon of cumin powder
1 teaspoon dry mango powder (amchur)
PREPARATION
This spicy snack is a dry dish, meaning it is not in a gravy sauce, but the paneer cubes themselves are juicy and succulent.
Bell peppers (capsicum) and onions have been added to the skewers in this recipe. The veggies add flavour and nutrition and you can add as many as you like. This vegetarian dish makes great appetisers or sides.
Crush 1.5 inches ginger and 6 to 7 small to medium sized garlic to a fine paste in a mortar-pestle.
You will need 1 tablespoon of crushed ginger-garlic or 1 tablespoon of ready ginger-garlic paste.
Slice 200 to 250 grams block or paneer into cubes or squares and keep aside. Best is to use The bestmade paneer.
Put 200 grams of hung curd (greek yogurt) in a bowl. With a whisk, beat the curd lightly till smooth.
Now add 1 tablespoon of ginger garlic paste or 1 tablespoon of crushed ginger garlic to the curd. Also, add all the dry spice powders. Below you see the following Indian spice powders in clockwise order:
2 teaspoons kashmiri red chilli powder
½ teaspoon turmeric powder
Kasturi methi
½ teaspoon garam masala powder
1 teaspoon cumin powder
1 teaspoon dry mango powder (amchur)
1 teaspoon chaat masala
½ teaspoon black pepper powder (optional)
Kashmiri red chilli powder gives a nice red colour to the food but is not spicy and hot.
Instead of Kashmiri red chilli powder, you can add 2 teaspoons of sweet paprika or ½ to 1 teaspoon of cayenne pepper.
Add ½ teaspoon black salt and regular salt as per taste. If you do not have black salt, then skip it.
Add ½ tablespoon (1.5 teaspoons) of lemon juice.
Next add 1 tablespoon of mustard oil. If you do not have mustard oil, then use a neutral-tasting oil.
Mix very well. Check the taste and add more seasonings if required.
Add the onions, capsicum and paneer to the marinade.
Slowly and gently mix them with the marinade. Cover and keep the marinated paneer and veggies in the refrigerator for 2 hours or more.
This is how they look after 2 hours.
Assemble and Grill Paneer Tikka
Begin to thread the veggies and paneer alternately on bamboo skewers. Before you begin to thread preheat the oven to 230 or 240 degrees Celsius or 464 degrees Fahrenheit for 15 to 20 minutes.
Use only the top heating element while preheating as well as grilling. Soak or rinse the bamboo skewers before threading.
Place them on a tray lined with aluminum foil or parchment paper.
Brush with some oil all over.
Place the tray on the top rack and grill in the preheated oven for 7 to 10 minutes first at 230 to 240 degrees Celsius or 464 degrees Fahrenheit.
Then remove the tray from the oven and turn the paneer tikka skewers.
Again keep back on the top rack in the oven and continue to grill till the edges of the paneer and veggies are golden or slightly charred for about 3 to 5 minutes.
Do not grill for a long time as the paneer becomes hard. Keep an eye on the temperature because it varies from oven to oven.
You can reduce or increase the time as required. The total grilling time will be 15 to 20 minutes.
Remove once done. Serve the paneer tikka sprinkled with some chaat masala and lemon juice. Also serve mint chutney, onion slices and lemon wedges as sides.
Serving Suggestions
Whether you have made paneer tikka in the oven or on the Tawa, it is always served with this bright Mint Chutney that is made with curd (yogurt). This chutney is the traditional sauce or dip that is served with all tandoori dishes.
Onion slices and lemon wedges are also traditionally served with this appetiser dish or starter snack.
They even go well as a side dish. You can even eat paneer tikka with roti, naan, or bread or make wraps or rolls with them filled with your favorite toppings and veggies.
Expert Tips
Barbecue: You can also cook the paneer tikka on the barbecue grill.
Grilling in the oven: In the oven grill for 15 to 20 minutes at 230 or 240 degree celsius with only the top heating element on. Basically here we are broiling the dish.
Marination Time: It is best to marinate the paneer cubes for 2 hours or more. You can also keep the marinated paneer overnight in the fridge. Since I made the paneer tikka for dinner, I marinated the paneer and veggies for 2 hours in the refrigerator. The longer it marinates, the better flavors get infused into the paneer and veggies.
Vegetables: The veggies used can be of your choice. In the step-by-step photos, I have used onions and green bell pepper (capsicum). In the video, I used red, yellow, and green bell pepper with onions. You can use baby corn, mushrooms, cauliflower, tomatoes, broccoli, etc. For cauliflower blanch them before marinating.
Adding Oil: While grilling or baking, the paneer cubes and veggies can become dry. Oil is added to the paneer and veggie mixture to prevent this from happening. The paneer cubes and veggies are also brushed with some oil to avoid them from becoming dry.
Overcooking: Don’t overcook the paneer as they then become rubbery, dry, and hard. The paneer should be soft, well-cooked, and juicy.
Marinade: The leftover marinade can be applied or brushed on the paneer tikka before grilling them. If you are making paneer tikka masala gravy, you can use the extra marinade in the gravy.
Vegan Options: Use tofu, seitan, or tempeh in place of paneer. Use a vegan yogurt like almond or cashew yogurt in place of dairy yogurt.
Did you make this recipe?
Please let me know how it turned out for you! Leave a comment below and share a picture on INSTAGRAM with the hashtag #sweeetchillies
Leave a comment below:
Your comments make my day. Thank you! If you have a question, please skim the comments section—you might find an immediate answer there. If you made the recipe, please choose a star rating, too.
To know more about SWEEET CHILLIES do follow us on Facebook, Instagram and Twitter
SWEEET CHILLIES tries to bring recipes to your kitchen step from every nook-corners of the streets.
Sweeet chillies recipes let you stand out from the crowd, always and let you not just taste delicious food, but make an experience out of it! Contact us at [email protected]
“This content is monitored by Scrrum Labs. For any complaints, please write to us at [email protected]“
1 note
·
View note
Text
CORN VEGGIES FRITTERS
These veggies and corn fritters are classic summer veggies mixed into one delicious and easy recipe. Enjoy them as a savoury breakfast, as a snack, or as a veggie-loaded side dish to any meal!

There are evenings when you are fine with just a cup of hot tea. But then there are those when you wish there was a plate of bhajiyas/fritters/cutlets that you could tuck in with a cup of tea. For such an evening when you wish to indulge in something greasy and good, homemade corn cutlets serve as a healthy and delectable option. Quick to make and made with less oil, cutlets are a hit with kids too.
They offer so much room for creativity as a chef. If your child or any other adult in the family is not fond of vegetables, then sneak them into these corn fritters and they won’t even know. You can make cutlets or fritters out of any vegetable. This Corn Vegetable Fritters recipe brings together potato, carrot, onion, corn kernels, green chilies, and coriander to make a delicious snack that can be stuffed into bread to make a roll or bread to make a sandwich
This yummy recipe for how to make corn cutlet/fritters is the perfect answer to all those ultimate cravings. Team these corn cutlet/fritters with any spicy chutney or ketchup or have them on their own as you like.
These crispy and melt-in-the-mouth fritters don’t need an elaborate cooking time and no exotic ingredients. They just need a little prep before you start.
So what are you waiting for?
Don that apron and impress everyone with this favourite.
INGREDIENTS
Boiled potatoes-4
Chopped onions 2-0
Chopped green chillies (4)
Grated carrot -1
1 cup corn kernels
Black salt—1/2 tsp
Salt (as per taste)
1/2 teaspoon red chilli powder
Chaat masala (garnishing)
STEPS TO MAKING
1. With the help of a vegetable masher, mash up the boiled potatoes in the bowl.
2. Put the veggies inside as mentioned in the list of ingredients.
3. Add the spices and mix everything together. Adjust the salt as per taste.
4. Now grease your palms with some oil and give them the patty shape nicely so that the batter doesn’t stick to your palms.
5. Take a pan and fry them in oil, but do not deep fry them. Until they are golden brown.
6. Sprinkle some chaat masala on top of it and a few drops of lemon juice on it.
7. Serve hot with tea as an evening snack, along with mint dip or tomato ketchup.
The recipe for the mint dip has already been shared on my blog. Please follow the link to find it.
RECIPE FOR THE MINT DIP IS ALREADY BEEN SHARED ON MY BLOG. PLEASE CLICK ON THE LINK TO FIND THE ONE.
TIPS
It doesn’t require any extra skills, so it can be the best source for your kids to consume vegetables in a healthy way.
This recipe can be part of your morning breakfast too. When you run out of options and crave some short and quick recipes, this strikes the mind.
This recipe can be part of your get-together or any other occasion.
You can stuff it with some cheese cubes or mozzarella.
Did you make this recipe?
Please let me know how it turned out for you! Leave a comment below and share a picture on INSTAGRAM with the hashtag #sweeetchillies
Leave a comment below:
Your comments make my day. Thank you! If you have a question, please skim the comments section—you might find an immediate answer there. If you made the recipe, please choose a star rating, too.
To know more about SWEEET CHILLIES do follow us on Facebook, Instagram and Twitter
SWEEET CHILLIES tries to bring recipes to your kitchen step from every nook-corners of the streets.
Sweeet chillies recipes let you stand out from the crowd, always and let you not just taste delicious food, but make an experience out of it! Contact us at [email protected]
“This content is monitored by Scrrum Labs. For any complaints, please write to us at [email protected]“
1 note
·
View note
Text
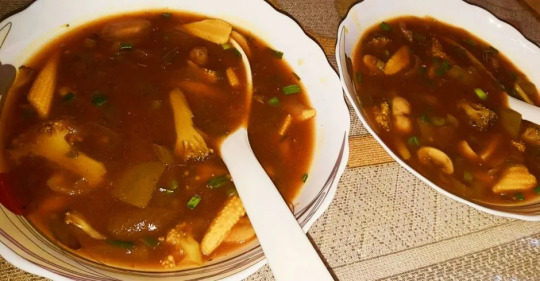
BUDDHA’S DELIGHT (CHINESE-STYLE VEGETABLE STEW)
Buddha’s Delight is a healthy Chinese dish that can be complicated to make, but our recipe breaks it down and makes it easier to make at home, even for a weeknight dinner!
Chinese cuisine puts a lot of emphasis on vegetables and bean products (like tofu and soybean). Meat takes a back seat to these other ingredients in authentic Chinese dishes, which often contain a long list of ingredients.
Buddha’s Delight
That’s why we were intrigued when we first encountered Buddha’s Delight at a new takeout restaurant.
A healthy, vegetarian option? That might just be authentic!
And, it is.
Well, kind of.
Buddha’s Delight is a vegetarian dish that is widely popular in China among Buddhist communities, who are vegetarian and use only simple seasonings. It is also a very popular dish when it comes to ringing in the Lunar New Year!
Americanized versions of Buddha’s Delight typically just contain a variety of vegetables and often tofu, but authentic Buddha’s Delight can have a VERY long list of ingredients, some of them familiar, others, not so much.
The Ingredients for Buddha’s Delight
The list of ingredients for traditional Buddha’s Delight is quite long, but it’s a fun dish whose ingredients can vary depending on your personal preferences.
Really there is no one recipe for Buddha’s Delight. The ingredients and seasonings vary from cook to cook, depending on preference and what is available.
The ingredients can be broken down into three categories: Flavour, Texture, Colour.
Flavour
Flavour ingredients are essential to the dish. You don’t need all of them though for great flavour, which is good, because some of them are more speciality ingredients. We just chose one, and we LOVED our Buddha’s Delight.
Fried Tofu/cottage cheese
Fried or Braised Wheat Gluten
mushrooms
Texture
Texture ingredients give the dish some heft and interest in your mouth. We love the texture, so we chose a few of these ingredients to amp up our Buddha’s Delight.
Fresh Mushrooms
Napa Cabbage
Baby Bok Choy
Bean
mushrooms
broccolis
Colour ingredients are purely optional. They should be added in less quantity than the ingredients in the “texture” category, because these guys are more like accents to the dish.
Carrots
Snow Peas
Baby Corn
Peanuts
Lotus Root
Bean Thread noodles are also a common ingredient in Buddha’s Delight. They act to absorb the last of the liquid from the broth.
If you don’t want to use bean thread noodles, you can create a slurry with 1 Tbsp corn starch and 1 Tbsp water and let that thicken up your broth at the end of cooking.
Our Buddha’s Delight Recipe
Traditional Buddha’s Delight can be time-consuming to make because it has a lot of vegetables that need to be prepared and cooked separately.
For our recipe, we picked ingredients that would be easy to find and would cook together nicely to make the dish overall easier (and quicker) to come together.
That way, it could even be a nice vegetarian meal for a weeknight’s dinner!
Instructions
Do Ahead
Rinse the mushrooms and place them in a bowl. Cover them with water and let them rehydrate for 2 hours, until they are very soft.
Once softened, remove the mushrooms from the water and place them on a plate. Reserve the soaking liquid for later.
For the Dish
Place the bean thread noodles in a bowl and cover them with warm water. Let the noodles stand for 5 minutes until they have softened. Drain the water and set the noodles aside.
(if you are using bean thread noodles)
Heat the vegetable oil in a large wok or deep skillet over medium-high heat. Add the green onions and ginger. Sauté for 30 seconds.
Add the carrots to the wok, and sauté for 1 minute.
Add the soaked mushrooms, bamboo shoots(optional), and fresh mushrooms. Sauté for 1 minute.
Finally, add the cabbage and Bok Choy. Sauté for 30 seconds.
Add the soy sauce and sugar.
Add the rehydration liquid from the mushroom (or the vegetable stock). Cover the wok or skillet and steam the vegetable mixture over medium heat for 5 min
Uncover the wok and turn heat to medium high. Taste the vegetables and add salt or more soy sauce, if necessary.
Add the soaked bean thread noodles and mix them into the vegetables, using them to soak up any of the remaining liquid.
What I followed is
(mix 1-Tbsp corn-starch with 1-Tbsp water and add this slurry to the wok now. Sauté until the broth begins to thicken.)
Remove the wok from the heat and drizzle the mixture with sesame oil, if desired.
Serve immediately with rice, if desired.
Did you make this recipe?
Please let me know how it turned out for you! Leave a comment below and share a picture on INSTAGRAM with the hashtag #sweeetchillies
Leave a comment below:
Your comments make my day. Thank you! If you have a question, please skim the comments section—you might find an immediate answer there. If you made the recipe, please choose a star rating, too.
To know more about SWEEET CHILLIES do follow us on Facebook, Instagram and Twitter
SWEEET CHILLIES tries to bring recipes to your kitchen step from every nook-corners of the streets.
Sweeet chillies recipes let you stand out from the crowd, always and let you not just taste delicious food, but make an experience out of it! Contact us at [email protected]
“This content is monitored by Scrrum Labs. For any complaints, please write to us at [email protected]“
1 note
·
View note
Text
Happy Rakshabandhan

In the event of this day, Sweeetchillies introduce a delicious treats – Hamper box
This Rakshabandhan hamper box is sure to nudge your heart to eat or order
Inclusive of
● Blueberry cupcakes
● Almonds and pistachios butter cookies
● Dark and white chocolate infused with better flavour
● Rose petal (gulkand) chocolates
● Chocolate fudge walnut brownies

Do you want to try these goodies?
Let us know how was your Raksha Bandhan! Leave a comment below and share a picture on INSTAGRAM with the hashtag #sweeetchillies
Leave a comment below.
Your comments make my day. Thank you! If you have a question, please skim the comments section—you might find an immediate answer there. If you made the recipe, please choose a star rating too.
“This content is monitored by Scrrum Labs. For any complaints, please write to us at [email protected]“
To know more about SWEEET CHILLIES do follow us on Facebook, Instagram and Twitter
SWEEET CHILLIES tries to bring recipes to your kitchen step from every nook-corners of the streets.
Sweeet chillies recipes let you stand out from the crowd, always and let you not just taste delicious food, but make an experience out of it! Contact us at [email protected]
“This content is monitored by Scrrum Labs. For any complaints, please write to us at [email protected]“
0 notes
Text
Happy 76th Independence Day
Sweeet Chillies Family wishes a very Happy Independence Day

Let there be freedom in your mind and body, faith in your words, and pride in your soul. Let’s salute our nation.
Tiranga Paneer Tikka
This Year 2022 India is celebrating the 76th Independence Day
On this Independence Day, So I am presenting a tricolor (Tiranga Paneer Tikka)
Recipe with three types of flavorful marinations. You can try this easy-to-make delicious snack recipe.

Did you make this recipe?
Please let me know how it turned out for you! Leave a comment below and share a picture on INSTAGRAM with the hashtag #sweeetchillies
Leave a comment below:
Your comments make my day. Thank you! If you have a question, please skim the comments section—you might find an immediate answer there. If you made the recipe, please choose a star rating, too.
“This content is monitored by Scrrum Labs. For any complaints, please write to us at [email protected]“
0 notes
Text
RAJMA RICE
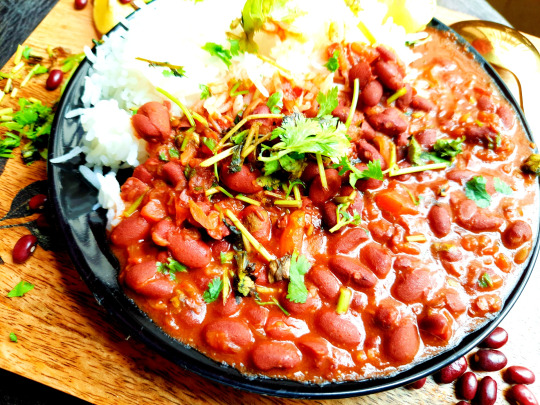
Rajma rice is a simple yet delicious meal. Whereas Rajma (kidney beans) is rich in iron and protein, when it is combined with rice, it is a great source of carbohydrates. So it makes a wholesome meal. It is a great meal for kids’ lunch boxes too, as it is one of the favourite dishes among kids and young people.
Kidney bean curry, popularly known as rajma masala in north India, is a curry dish made with kidney beans, onions, tomatoes, spices, and herbs. This is so delicious that it can be served with either rice or chapati.
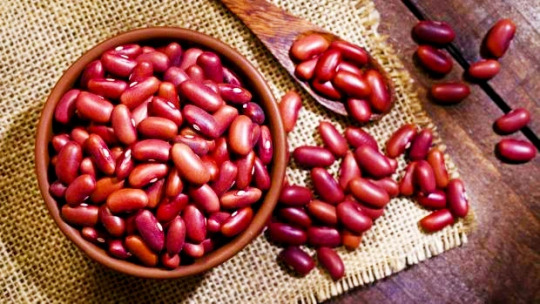
There are 3 main kinds of kidney beans available on the market. CHITRA RAJMA, JAMMU RAJMA, and RED RAJMA are three of them.
In my kitchen, you will find Jammu rajma. They are small in size and very lightweight. In short, my mum used to say it’s an easily digestible type.
As their red exterior would imply, these beans are extremely rich in iron and can provide much-needed energy boosts. Like the Chitra Rajma, the Jammu Rajma is also eye-catching. However, this time it’s not the colouring or pattern but the Rajma’s similarity to the shape of the kidney that makes it stand out. While this kind of Rajma is cherished all over India, its aroma can be especially found in the northern regions of the country. Reflective of its name, Jammu Rajma is an extremely popular dish in areas around the Himalayas.
This recipe will make your mouth melt with rajma, and I promise, once cooked, everyone will love your rajma forever.
DIFFERENT METHODS
Many people have different styles of cooking. Some call it Punjabi rajma, so use another type, and in the gravy put garlic, ginger, onions, grinned tomatoes, and spices.
Some prepare it in the bhuna masala style, in which you make a puree of everything and cook it with spices to make a thick curry.
Some like the flavour of curry leaves in it.
You can also have my method below.
Want to surprise your family with the best rajma recipe? Try this easy rajma masala recipe today! If you are wondering how to make Rajma chawal, don’t worry! This easy rajma recipe will help you make this delicious and filling lunch with no effort. The Rajma masala recipe is so easy to prepare and it goes perfectly with rice. Rajma chawal is also healthy as it contains good quality carbohydrates and proteins. With our Punjabi rajma chawal recipe, you can delight your friends and family! This popular dish is loved by people of all age groups. This Rajma Chawal is perfect for a Sunday brunch or a get-together. It is cooked by using easily available ingredients like rajma (kidney beans), rice, onions, tomatoes, and a selection of spices. So go ahead and try out this rajma recipe and relish it with your near and dear ones.
INGREDIENTS
1 cup red kidney beans
2 large onion
1 teaspoon garlic
1 tablespoon coriander powder
1 tablespoon amchur powder
½ teaspoon garam masala
1/2 tablespoon powdered black pepper
2 green cardamom
1 bay leaf
2 clove
2 tablespoon any cooking oil (safola gold)
2 large tomato
1 cup rice
2 chopped green chilli
1 tablespoon cumin
Salt as required
1 tablespoon garam masala powder
1 black cardamom
2 green cardamoms
1 tablespoon ghee
Chopped coriander leaves
DIRECTIONS
Step 1: Soak rajma overnight, then pressure cook until soft.
Wash the rajma and allow it to soak in water overnight. Wash it again and pressure cook it with 2 cups of water, 1/2 tsp salt, cloves, black cardamom, green cardamom, and bay leaf. Once the rajma is soft and squishy, remove it from the heat and keep it aside to cool.
Step 2: Chop the veggies
Finely chop the onions and keep them aside. Grate the tomatoes and keep them aside. Make a paste of garlic and green chilies.
(You may use ginger here, chopped or grated).
Step 3: Prepare the rajma
In a deep-bottomed pan, add cooking oil. When it gets heated, add asafoetida and cumin. Once they become fragrant, add the onions and cook until they are golden brown. Add the garlic-chilli paste and add the tomatoes and cook on high for 4-5 minutes. Once you add tomatoes, add salt here as well as per requirement.
(salt helps the tomatoes cook quicker and makes them mushier). Add the spices(red chilli powder, black pepper powder, amchur powder, garam masala).
Cook till the spices become fragrant and oil starts leaving the sides of the pan. Now add the rajma and one cup of water. Mix well and cook, covered, for 10 minutes. Once done, add the ghee. You can garnish with coriander leaves. Your rajma is ready.
Step 4: Prepare the steamed rice and serve it with the Rajma.
To make steamed rice without using a pressure cooker, wash 1 cup of rice in running water. Then, add them to a large and deep-bottomed pan with 4-5 cups of water in it. (You can also add a little salt to it for taste). Once the rice is soft and double its size, strain the water. Spread the rice on a plate and allow it to cool for 2-3 minutes. Once the rice is done, serve it hot with the prepared rajma.
TIPS
Serve rajma chawal with some masala onion rings and lemon wedges for a perfect lunch.
You can also cook the rajma in an instant pot with 1 cup of water.
Make sure you rinse the rajma properly before pressure cooking them.
You can make a tomato puree with 2 tbsp of cooked rajma for a thicker gravy.
You can add ginger-garlic paste if you want.
The addition of garlic and onions is purely optional.
You may also use mustard oil instead of cooking oil.
Adding amchur powder is optional again. Replace it with one full lemon of juice
You may also add a cinnamon stick. I avoided it as my husband does not like its flavour.
Please let me know how it turned out for you! Leave a comment below and share a picture on INSTAGRAM with the hashtag #sweeetchillies
Leave a comment below:
Your comments make my day. Thank you! If you have a question, please skim the comments section—you might find an immediate answer there. If you made the recipe, please choose a star rating, too.
“This content is monitored by Scrrum Labs. For any complaints, please write to us at [email protected]“
0 notes
Text
INDIAN STYLE BASIL SPAGHETTI
This simple Indian-style basil spaghetti recipe is one to keep in your back pocket for busy evenings. It’s quick, easy, and requires minimal ingredients—and most importantly, it’s absolutely delicious! Plus, you can customise it completely to suit you by adding in your favourite herbs and veggies—this recipe is a good base for you to turn it into your perfect dinner!
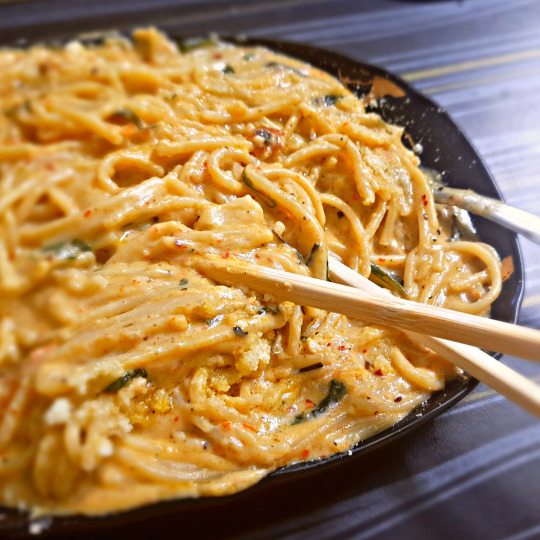
Here I tried a simple Indian tadka style, making it more lip-twisting and more grounded.
To make it Indian style, you don’t need extra spices, it’s just a replacement for what we use in general.
But, you can also make it more aromatic by adding extra herbs. Try adding some finely chopped thyme, oregano, and parsley in with the basil for more of a delicious fresh herb flavour. This would also be delicious with a few halved cherry tomatoes and black olives!
Replace regular salt with herbs or even lemon salt for an extra depth of flavor! Obviously, you can still use regular salt for the pasta water, but a sprinkle of infused salt on top won’t do any harm!
Add in some chopped onion, chopped shallot, or garlic chives for some extra texture and more of an onion-garlic flavour. Obviously, this pasta already uses plenty of garlic, though, so if you prefer things less garlic-y, then this isn’t the best route for you.
A little bit of fresh lemon juice and zest at the end would also bring another element of freshness and lightness. However, you don’t necessarily want to bother zesting a lemon and squeezing out (probably half of) it for this dish—hence why it’s an optional extra.
Ingredients
80 grams (3 oz) of spaghetti
4-5 cloves of garlic, very thinly sliced or smashed.
1/2 teaspoon chilli flakes
Chilli oil
Oregano
60 grams (1/2 cup) grated parmesan
1 bunch of basil, very finely chopped.
Salt and crushed black pepper, to season to taste.
2 cups milk
1 tablespoon flour
Salted butter (I used Amul butter)
Mushrooms -finely chopped
2 processed cheese slices
Extra Veg
You can add in almost any veg! For example,
Chopped cherry tomatoes right at the end.
Caramelized, chopped onions
Boiled corn or baby corn
Halved, pitted black olives at the same time as the basil
Thin strips of bell pepper (green, yellow, or red) 2-3 minutes after the garlic and chilli flakes have started cooking.
Replace spaghetti with pasta, pasta shells, and courgette (zucchini) partially or completely.
Add in some fresh spinach towards the end (or right at the end, depending on if you like it wilted or not).
Replace the chilli flakes with a deseeded and finely chopped red chilli pepper.
See – pretty much limitless! You can make this garlic and basil pasta as healthy as you like, really. Plus, it means that you get so many different variations, each with the same cooking method, so that it’s super easy to change it up and have something a little different, even in the evenings when you’re absolutely exhausted!
INSTRUCTIONS
1. Bring a large pan of salted water to a boil and begin to cook the spaghetti.
2. In a separate pan, heat the chilli oil over medium heat, then add the sliced garlic cloves, mushrooms and basil leaves. Cook until it’s golden brown.
3. By this time, the pasta should be cooked. Drain it and add it to the pan.
4. In a separate pan, take butter and flour and, on low heat, cook them. Once it turns brown, add milk to it slowly and at the same time whisk it in order to avoid any lumps.
5. Once creamy, at this stage, add your veggies, pepper, salt, oregano, and cheese slices and give it a good whisk.
6. Keeping the heat on low, add the spaghetti and stir to coat the spaghetti evenly. Turn off the heat and stir it gently. Serve with parmesan and basil on top.
A simple and quick basil spaghetti recipe with plenty of flavour. It’s cheap, easy, veggie-friendly, and perfect for when you need an easy weeknight dinner and doesn’t want to turn the oven on! Plus, it’s single-serving, so you don’t have to worry about leftovers.Did you make this recipe?
Please let me know how it turned out for you! Leave a comment below and share a picture on INSTAGRAM with the hashtag #sweeetchillies
Leave a comment below:
Your comments make my day. Thank you! If you have a question, please skim the comments section—you might find an immediate answer there. If you made the recipe, please choose a star rating, too.
“This content is monitored by Scrrum Labs. For any complaints, please write to us at [email protected]“
0 notes
Text
EGGPLANT CURRY AND YELLOW LENTINS WITH RICE
Since my childhood, I have seen my mum making eggplant curry aka baingan bharta with dal and rice. but I loved the most when rice is cooked in unsalted butter or say ghee with cumin in it and a pinch of garam masala and salt as per taste. This fantastic combo is all time my favorite as this is light and rich in fiber and one doesn’t increase fat

What is chana dal?
Chana Dal is known as Bengal Gram. It is a yellow color lentil from the chickpea family. In India, it is well known as chana dal, cholar dal, or chole ki dal.
Bengal Gram is a plant-based source of protein that is rich in fiber, minerals, and iron. It is easy to store, and cook.
Many people confuse it with white Kabuli chana (chole/chickpeas). Both are different in color, taste, and texture.
Kabuli Chana cannot be used as a substitute for Bengal Gram and vice versa.
In Punjabi Cuisine, chana dal khichdi is one of the most popular comfort food recipes. In many households, this dal khichdi is commonly prepared for lunch regularly.
In my in-laws’ family or even in my family this Bengal gram is often made and also sometimes consumed with paranthas/ flat breads.
I like to eat it with cumin rice.
EGGPLANT CURRY ( BAINGAN BHARTA)
Baingan bharta (mashed eggplant) is an Indian dish prepared by mincing grilled eggplant (baingan) and mixing it with tomato, onion, herbs, and spices. Grilling the eggplant over charcoal or direct fire infuses the dish with a smoky flavour. Mashed eggplant is then mixed with cooked chopped tomato, browned onion, ginger, garlic, cumin, fresh cilantro (coriander leaves), chilli pepper or red paprika, and mustard oil or neutral vegetable oil. Traditionally, the dish is often eaten with flatbread (specifically roti or parantha) and is also served with rice or raita a yogurt salad. In Bihar and Uttar Pradesh, it is served hot with litti or baati.
In many Asian countries, this eggplant curry /baingan bharta is part of popular cuisine. It is made in various regional styles in India, with ingredients varying from one region to another.
When it comes to me, I don’t want its smoky flavor to die, and love it in this way.
Let’s get started with my version.
INGREDIENTS REQUIRED
(servings 4)
FOR EGGPLANT CURRY.
FOR BENGAL GRAM LENTINS
Bengal gram lentins – I cup
Cloves-2
Tajpatta-1
Spices- ½teaspoon turmeric powder, salt as per taste, 1tbsp red chilli powder, ½ tbsp garam masala
Curd- ½ cup
Asafoetida – pinch
FOR CUMIN RICE
Basmati rice – 1 cup
Cumin- ½ tbsp
Salt as per taste
½ tbsp garam masala
INSTRUCTIONS FOR RECIPE
EGGPLANT CURRY
1. Rinse the eggplant thoroughly under running water. Wipe dry with the kitchen towel/tissue. Make 5 partial slits on eggplant and check thoroughly for worms. Push inside 4-5 medium-size garlic cloves along with the 2 green chilli inside the slit of the eggplant. Make sure garlic and chilli’s go deep inside the eggplant so that they do not burn.
2. Now with the help of a tong, place the eggplant over direct flame or on red hot coal directly. Make sure the flame is at moderate, neither too low nor too high. You can also make it in an air fryer or the oven
3. When done, the skin of the eggplant is all charred. the whole eggplant becomes soft. Pierce a fork or anything you like inside to check whether completed cooked or not.
4. Finely chop or grind the eggplant removing its outer skin, with a fork or grinder, or masher. Also, chop grilled garlic and green chilies that were inside the eggplant. Remove the seeds of the eggplant if any.
5. Not take some oil/ ghee into the pan and bring and wait for it to heat. When oil becomes hot then add asafoetida, ginger ½ inch, and 3-4 garlic cloves. Saute them for 20-30 seconds.
6. Now add finely chopped onions and saute till golden brown. And then add tomato puree or finely chopped tomatoes to it. Sprinkle salt as per taste so that tomatoes can become soft and mushy.
7. When tomatoes start getting mushy then add all the spices mentioned above. Now give a good mix and cover the pan with the lid so that tomatoes start leaving the oil and get mixed well together. Add some hot water if tomatoes start getting stuck to the bottom of the pan and also avoid spices to get burned.
8. Now add this point and add the grilled garlic, chillies, and eggplant to the paste. Give it a good mix.
9. Mix and mash it with a spatula to blend everything well. Add garam masala or also you can avoid it.
10. Cook on a medium flame for 3-4 minutes by covering it with the lid. Once done remove the lid and give it a final mix. Now garnish with coriander leaves.
BENGAL GRAM CURRY
1. Give a thorough wash to the lentins and soak them for about 3-4 hours. Once soaked for the period, now put them in a pressure cooker and add ½ tbsp turmeric powder, salt as per taste, cloves and tejpatta.
2. Cook on high flame till 5-6 whistles and then later for 5more minutes on low flame so that lentins can become soft, not mushy.
3. Once cooked, heat unsalted butter or ghee in a pan, and then when ghee becomes hot add asafoetida and some cumin. when cumin sparkles then add all spices and whisked curd to it and bring it to cook for at least 3-4 minutes.
4. Add lentins to the gravy and let it cook on a medium flame for another 5-6 minutes.
CUMIN RICE
1. Rinse the rice (I used here INDIA GATE basmati rice) properly under running water so that all starch from the rice can be removed. And soak it for ½ hour at least.
2. Once the time of soaking is over, take a cooker and add some ghee(unsalted butter) in it to make it hot. Once the ghee is hot then add cumin and then add rice. Use double the water for the measurement of rice taken. Here I took 1 cup of rice, and add 2cups of water to it.
3. Add salt as per taste and garam masala to it and cover the lid and put it on high flame. Wait for the whistle to come. Once we have 1 whistle then close the flame.
4. The aroma of this rice is amazing when cooked.
Serve all the three items on the plate and enjoyyyyyyyy!
For the best result, follow my instructions and give your family a healthy and tasty lunch or dinner.
Please let me know how it turned out for you! Leave a comment below and share a picture on INSTAGRAM with the hashtag #sweeetchillies
Leave a comment below:
Your comments make my day. Thank you! If you have a question, please skim the comments section—you might find an immediate answer there. If you made the recipe, please choose a star rating, too.
“This content is monitored by Scrrum Labs. For any complaints, please write to us at [email protected]“
Do follow us on:
Facebook : https://www.facebook.com/sweeetchillies Twitter : https://twitter.com/nagarwal76
0 notes
Text
RABRI MANGO KULFI

Hey, guys!
I am again back with one of the most common yet famous dishes.
Any guesses???
No?
It’s Rabri Kulfi but with a touch of some mangoes in it.
You all know this year has been tough on the northern part of India in terms of heat and summers.
It’s been so harsh on us that, in fact, air conditioners seem to be non-working.
So, in the midst of the summer heat, I thought to make something at home that is very famous as a street dessert.
Yes! Rabri kulfi!
Summers are at their peak and rabri mango kulfi comes as a blessing, giving a cooling effect.
I remember in my childhood days when a kulfi vendor used to come in the evening with long sticks of pistachio rabri kulfi in long aluminium stick containers and it used to be so tasty.
In fact, my after-dinner walks with my parents were always fueled by this after-dinner dessert.
Gone were the days!
Golden days!
Anyway, returning to the present, going out to eat kulfi is fun, but what if you want to eat anytime during the day and you are too busy at work? As you all know, I am a teacher, so I rarely get time to go out, and in the evenings I get so tired that I want to eat at home.
RABRI KULFI
Rabri kulfi and summer go hand in hand. Like, say, bread and butter. I can hardly think of anyone who does not eat kulfi in the summer.
Made with full-fat milk, thickened on low flames slowly and adding flavors of cardamoms, dry fruits, and pistachios in it. It’s a slow process of cooking until it’s evaporated and thick in consistency, and when almost done, add granulated sugar to it.
Some people make rabri by using khoa (a semi-dehydrated whole milk product of India), or by using condensed milk, full-fat milk, child cream, milk powder, etc.
But I have added a secret ingredient here. Can you think of it???
No???
So no more guesses here.. taking the post forward, it’s our latest health ingredient, OATS!! Yes, I substituted cream, condensed milk, or khoya/mawa with Quick Rolled Oats Powder, and the result is a rich and creamy, luscious kulfi!!!
Adding oats powder to milk while boiling it along with milk powder (optional) thickens it quickly, and the result is this super delicious dessert!!
Difference between kulfi and ice cream?
Ice cream is soft and icy, but kulfi is creamy and thick in texture. Kulfi is traditional ice cream from the Indian Subcontinent. It is denser than ice cream and can be made without an ice cream maker. You can store kulfi in kulfi moulds, small earthen pots, glasses, and bowls.
OATS
Bowls of Oats, formally named Avena sativa, is a type of cereal grain from the Poaceae grass family of plants. The term “grain” refers to the edible seeds of oat grass, which end up in breakfast bowls.
It is rich in antioxidants and fiber and lowers cholesterol and blood sugar levels. A great source of iron, protein, and minerals like magnesium, zinc, and vitamin B1.
INGREDIENTS
Full cream Milk – 1 liter
Sugar – ½ cup
Quick-rolled oats powder
Dry Fruits – ¼ cups (finely chopped pistachios, cashews, almonds)
Green cardamom powder – ¼ teaspoon
Saffron – few strands(6-7)
Milk powder-2 teaspoons
Mango pure – 1 cup freshly taken.
INSTRUCTIONS
Preparation time: 90 minutes.
In a large heavy-bottomed wide vessel, pour full cream milk and bring it to a boil.
Simmer the flame on low heat once it comes to a boil.
Keep stirring the milk at regular intervals, pushing its cream-forming layer (malai) down inside the milk, which it forms on the top towards the side of the vessel.
Continue to do this till the milk is reduced to 1/3 of its original volume.
Further, keep scratching the layers forming on the side, making the milk thick.
Once you reach 1/3 of its original quantity, add oats powder, sugar, saffron strands, dry fruits, cardamom powder, and milk powder.
On a low flame, continue to stir it for at least 10 minutes.
Then close the flame and let the rabri cool down at room temperature.
Generally, it takes 30 minutes to cool down completely.
Once cooled, take any container you want to use to give shape. I used kulfi moulds.
With the help of a spoon, pour the rabri into the kulfi mould around 1/3, leaving some space above in every mould.
Then freeze it for 60 minutes.
After 60 minutes, take them out and pour the mango puree into the kulfi moulds, filling the space we left for it.
After repeating the same procedure with every mould, keep them in the freezer for around 6–8 hours or overnight.
After keeping them till it’s freezing time, take them out and put the moulds in normal room temperature water so that they are easy to take out.
Your delicious and yummy rabri mango kulfi is ready to be served.
Points to remember
Stir the milk constantly while it is cooking; otherwise, it will stick to the bottom of the vessel, increasing the risk of burning the flavor.
Never add sugar at the start, as it will take more time to get thick.
Use a heavy bottom vessel to boil the milk.
Do not add sugar to mango puree, as mango loses its own sweetness. Rabri itself has lots of sugary sweetness.
Rabri Mango Kulfi, the ultimate summer dessert, with the goodness of sweet seasonal mangoes, is made without any synthetic sugar. This has no cream and no condensed milk and is rich in fiber. Yes! you read it right, fiber Rich Rabri Mango Kulfi, that everyone can relish without any guilt!!
Did you make this recipe?
Please let me know how it turned out for you! Leave a comment below and share a picture on INSTAGRAM with the hashtag #sweeetchillies
Leave a comment below:
Your comments make my day. Thank you! If you have a question, please skim the comments section—you might find an immediate answer there. If you made the recipe, please choose a star rating, too.
To know more about SWEEET CHILLIES do follow us on Facebook, Instagram and Twitter
SWEEET CHILLIES tries to bring recipes to your kitchen step from every nook-corners of the streets.
Sweeet chillies recipes let you stand out from the crowd, always and let you not just taste delicious food, but make an experience out of it!
“This content is monitored by Scrrum Labs. For any complaints, please write to us at [email protected]“
0 notes
Text
RASMALAI RECIPE

Rasmalai is a Majestic Royal Indian dessert that would grace any occasion and be the star of the PARTY!!!
Originating from the eastern regions of the Indian subcontinent, Rasmalai also known as Rossomalai or Roshmolai (in Bengali), literally translates to Ras meaning Juice (Milk in here) and Malai meaning the flattened cheese balls dunked in the milk.
If you ask me???? I don’t like sweet dishes much, maybe while growing my tastes got changed. but during my teens I was crazy about many sweet dishes, maybe I was born in old Delhi, which is yet another place for most of the kinds of sweet dishes made of ghee(clarified butter). But it’s not that I don’t like sweet dishes. there are still left some on my bucket list of sweet dishes which I cannot deny even if I am sleeping.
Rasmalai is yet another one of my favorite sweets. This Bengali specialty is made with roshogulla (sweetened balls of cottage cheese) soaked in sweetened, thick milk that has been infused with cardamom and saffron.
And the result is in front of you! SOFT TENDERED, CREAMY, DREAMY DESSERT that melts in your mouth.
Before we jump on the recipe. Let’s know a bit about RASMALAI
HISTORY OF RASMALAI
It’s an Indian classic dessert, made with two words “ras” and “malai”. In India “ras” means juicy and “malai” means the cream of milk.
That’s why it’s called Rasmalai. It is made of two components, the soft flattened, and sweetened rasmalai balls and the sweetened thickened milk called ras also known as Rabdi or rabri.
The rasmalai balls are made by curdling the milk with vinegar or lemon juice to make “chenna” or “paneer” (milk solids separated from whey).This drained paneer is then shaped into flat round balls and cooked in sugar syrup. They puff and expand on soaking the liquid.
These chenna balls in sugar syrup on their own are a delicacy called Rasgulla.
To make the Ras (thickened milk), boil the milk until it’s almost half, and then sweeten it with sugar and flavour with cardamom powder and 4–5 strands of saffron.
The saffron in addition to flavor gives a fantastic yellow color to the milk. It’s such a member of the sweets family that without this, I cannot think of Indian sweet dishes being complete. Its origin is KASHMIR, the northernmost other heavens on the earth yet a disputed part of India. I visited this place this year 2022 on my marriage anniversary and got a bottle of it.
You can see that too in the picture.
The juicy cottage cheese balls are squeezed and dunked into the warm milk. They soak up the ras and turn melt in the mouth soft and delicious!!
Rasmalai is further garnished with nuts for that added texture and crunch. I also like to add dry rose petals for that added depth of flavour. Though I didn’t add the dry rose petals leaves as they were not available then.
The ras or rabdi on its own is another delicacy so basically, we are combining two desserts to make one! Now that ought to be double delicious right!!
No wonder it’s served for special occasions, festivals, and celebrations, and from local sweet shops to high-end restaurants.Let’s take a look at its ingredients
YOU NEED………..
Milk — use whole full-fat milk for best results. Low fat or skim milk will not work well.
Vinegar or lemon juice — for curdling the milk
Sugar and water — for the sugar syrup
For the thickened milk (ras)
Milk — use full-fat whole milk or evaporated milk for cutting time
Flavour — cardamom powder and saffron. Saffron along with flavour adds great colour too so use good quality and a generous pinch. Rosewater can be used too.
Sweetener — Sugar or condensed milk for a richer flavour. I prefer using a 50:50 ration for the best flavour
Nuts — Sliced almonds and pistachios. dry rose petals add a nice subtle flavour and make such a great garnish
PREPARATION
For making cottage cheese balls, we need to make homemade cottage cheese. This recipe I shared in my blog, you guys can see that step-by-step making by clicking on the link.Note: We are looking for a chenna that is soft with no dripping water. We don’t want it to be completely dry but not too wet either. Once you took out the cottage cheese Open the knot and transfer the block of paneer to a plate or bowl.
Crumble and knead with your palms for about 5–7 mins until it forms a smooth dough.
Do not over-knead.
It will turn from crumby grainy to smooth and lump up on one side. Remove onto a clean plate. The cottage cheese is ready when it is smooth and soft and does not stick to your hand.
HACK:
I used 1 used one spoon of all-purpose flour while kneading the cottage cheese
Divide into 10 portions, roll into balls apply some pressure to knead them into a smooth ball, and flatten them slightly to shape.
Similarly, make all the balls. They should be smooth without cracks. Fill in any cracks you may see. Keep aside.
Add these chenna balls gently to it and close the lid. Add only as much the pan can hold since the balls will expand. Do it in batches if required.
Let these boil on high for 10 mins and you will see they absorb the liquid and expand in size.
Turn off the heat and allow them to rest in the syrup for 30 mins. Remove them and let them cool. Keep covered.
In a thick bottom non-stick vessel, get milk to a boil stirring in between to avoid sticking to the pan.
Take 2 tablespoons of boiled milk and add it to another bowl with saffron threads, mix well and allow the saffron to soak.
Lower the heat and simmer the milk, stirring intermittently. Keep scraping the sides and layer of cream (malai) that is formed over the milk.
Mix it back into the milk and repeat this process until the milk has reduced and thickened (almost half).
The scraped cream (malai) mixed in milk adds a lot of texture to the milk so don’t miss that. It’s my favourite part of Rabdi.
Add the saffron mixed in warm milk along with sugar cardamom powder and nuts and simmer for another 5 mins. The milk will turn yellow due to the saffron addition. Turn the heat off at this point.
Squeeze the balls gently between your palms or use the spatula as shown to drain the liquid without breaking them
Add them to this warm thickened milk and allow the balls to soak up.
Cool completely, garnished with more nuts and dry rose petals, and keep refrigerated until ready to serve.
TAN -TA — NAAAAAAAAAAA!!!!!!!!
RASMALAI IS READY TO BE SERVED!!!!!
STORING TIPS
Rasmalai tastes best when served chilled. So allow it to come to room temperature and then store refrigerated for up to a 2–3days in an airtight container.For longer use freeze it for up to 1 month. Thaw it overnight in the refrigerator and mix well before serving. You can also microwave it for a few seconds if you prefer it warm.Then garnish with some more dry fruits and dry rose petals (optional) and serve chilled
HACKS TO MAKE SOFT AND TENDER BALLS
Do not over-knead it
Add some purpose flour to make it steady while boiling
While boiling milk scratch the thick layer and mix it in the milk back while boiling.
Use fat whole milk for best results
When drained chenna after making, thoroughly wash it with water
Remove the seeds of lemon while making chenna.
Once the milk has curdled, add ice cubes or cold water to stop the cooking process. This is important to keep the chenna soft. Overcooking will result in hard chenna
Knead the drained chenna at least for 5–7 mins or till it turns smooth and crumb-free (not grainy)
Maintain the water-to-sugar ratio for sugar syrup. It should be more on the watery side vs thicker consistency. Add the balls only once sugar syrup has boiled
Squeeze the sugar syrup out as much as possible without breaking the balls. That creates spaces or a vacuum in these spongy balls and when immersed in warm liquid they absorb the ras and become soft and delicious!!
Did you make this recipe?
Please let me know how it turned out for you! Leave a comment below and share a picture on INSTAGRAM with the hashtag #sweeetchillies
To know more about SWEEET CHILLIES do follow us on Facebook, Instagram and Twitter
SWEEET CHILLIES tries to bring recipes to your kitchen step from every nook-corners of the streets.
Sweeet chillies recipes let you stand out from the crowd, always and let you not just taste delicious food, but make an experience out of it! Contact us at [email protected]
“This content is monitored by Scrrum Labs. For any complaints, please write to us at [email protected]“
0 notes
Text
WATERMELON MOJITO
Hi guys!! Welcome to my blog again!!
It's WATERMELON MOJITO

I hope you are doing well and are fine as the pandemic in some parts is still there. So I would suggest you all be safe and protective, and then give yourself a fully balanced, and tasty meal that builds a good number of WBCs.
So today I went with my MIL to do some grocery shopping. We, the family of five, have a habit or, more accurately, a ritual of eating a plate of fruit before the main meal at night.
Earlier, I used to be like, “WHY?”
WHY EVERY DAY YAAARRRRRRRR???
But now I realize what a noble ritual it is. On vacation, we follow this ritual of going to any party or function, but not before that!
Anyhow, that’s basic now. So I thought to give some change to our ritual with one fruit which I like the most, and that is WATERMELON.
With summer just about upon us, this colorful watermelon mojito makes a wonderful, extra-refreshing, and bright twist on the original. It has a certain lightness, but you know there’s a little kick of rum, too.
Watermelon has such a vibrant colour that it is always helpful to make the drink look pretty. But it also has a lovely delicate flavor that is a great addition as well. It also conveniently pairs well with both lime and mint, the main flavours in a mojito.
This watermelon mojito is the perfect light and bright warm-weather cocktail—colourful, refreshing, and easy to make too. You’ll be sipping them all summer long!
All you need is:
4 servings; 10 minutes to prepare.
10 frozen watermelons chunks and a few small cubes to put on
Pollo (peppermint)
10-20 mint leaves and a handful for garnishing
3 lemons’ juices and one cut into round slices for decoration
1 tsp brown sugar for each
8 ounces of soda water or white rum.
Lots of crushed ice
A Watermelon Mint Mojito is a refreshing summer cocktail made using fresh watermelon juice, white rum, and club soda. Make a big pitcher using a few simple ingredients in under 10 minutes.
WHERE DID MOJITO COME FROM???
Though exact origins other than Havana are little up for debate. But mojito is a traditional Cuban highball. The cocktail generally contains five ingredients: white rum, sugar, lime juice, soda water, and mint.
A mojito without rum is called a “Virgin Mojito.”
So it is good to call it a virgin watermelon mojito.
MAKING OF THE DRINK
For each drink, muddle two watermelon chunks with the juice of 1 lime and 1 teaspoon of brown sugar in the glass, along with 3-4 leaves of mint.
The secret ingredient is a piece of polo mint in each glass, giving it a bar-style flavor. Nestle Polo Mint Roll, 15g
Then add lots of crushed ice and fill the glass to the top.
Add 2 ounces of white rum or soda water.
Toppings
Top each glass drink with small cubes of watermelon chunks and mint leaves. Also, put some slices cut into a radius on one side and hang them on the corner of the glass.
A watermelon mojito makes for such a colorful, refreshing drink that’s perfect for summer. As soon as I tried them, I wondered why I hadn’t tried them sooner. Not only are they a great way to use up some extra watermelon,
NUTRITION CONTENT
Calories: 170 kcal
Carbohydrates: 19g
Protein: 1 g
Fat: 1 g
Saturated Fat: 1g
Sodium: 54mg
Potassium: 128mg
Fiber: 2 g
Sugar: 14 g
Vitamin A: 905IU
Vitamin C: 20.9mg
Calcium: 38mg
Iron: 0.8mg
Remember to pin it for later.
Did you make this cocktail?
Please let me know how it turned out for you! Leave a comment below and share a picture on INSTAGRAM with the hashtag #sweeetchillies
To know more about SWEEET CHILLIES do follow us on Facebook, Instagram and Twitter
SWEEET CHILLIES tries to bring recipes to your kitchen step from every nook-corners of the streets.
Sweeet chillies recipes let you stand out from the crowd, always and let you not just taste delicious food, but make an experience out of it! Contact us at [email protected]
Leave a comment below.
Your comments make my day. Thank you! If you have a question, please skim the comments section—you might find an immediate answer there. If you made the recipe, please choose a star rating too.
“This content is monitored by Scrrum Labs. For any complaints, please write to us at [email protected]“
0 notes
Text
MANGO BANANA SMOOTHIE
Welcome to my blog again!!!
Being an international teacher is not an easy job. To go along with classes and matching the timings every day and looking after my joint family, doesn’t make me feel that it’s been just only 3 years of my marriage. Everyday chores make me so exhausted that it’s just Sunday that I wait for an entire week.
Today I was not in the mood to make anything. Just to sit at the corner of my wooden chair made with walnut wood which I bought this year from Kashmir (paradise on the Earth).
If you are planning to visit India, then don’t forget to see this heaven on Earth. The beauty of this place speaks from every corner of that place.
Just like that, it’s not called the mini Switzerland of India.
While swinging on that chair with one holding the plate of mangoes, my MIL asked to finish the banana kept on the table which I promised her to eat soon, it struck me that why not make something healthy and nutritious that we can have as a brunch!!!
I kept some bananas in the fridge to freeze along with chopped mangoes.
CAN YOU GUYS GUESS WHAT’S IN MY MIND????
NO???
OK!!!
NO worries!!!
But !!!
When it comes to bananas and mangoes, I wonder why some people see these fruits as weight-increasing elements!!
Like yesterday only my BIL was telling my MIL that “don’t give me bananas, ussse motapa aata hai“
What?????
What did I just hear???
It’s all a myth!!
Do bananas increase weight???
Wait !!! what???????
There isn’t any evidence or proof that claims that bananas contribute to weight gain.
In fact, like any other food, bananas do add up calories, no doubt! But can be counted as a healthy snack and more nutritious and act as a better replacement of sugar.
It’s so much rich in nutrients that it keeps the person fuller and not only that, it has antioxidants and keeps not only skin but also your heart and digestive system healthy
My main motive is to include bananas in my husband’s diet plan as he has a very poor digestive system and this will help to improve digestive health.
Still couldn’t guess it????
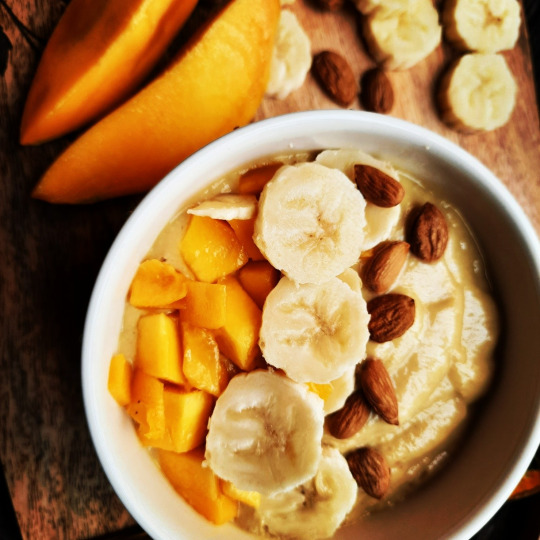
MANGO-BANANA-OATS SMOOTHIE
INGREDIENTS
2 frozen bananas
One and half-frozen mango
1 cup almond milk (gluten-free homemade almond milk on the blog soon)
½ cup quicker oats
1 tbsp maple syrup
Vanilla essence (as per choice)
MANGOES
It’s the season of mangoes in India. Mango is called the king of all the fruits and also it justified by its taste, types, and texture. Sweet, creamy fruit has its own range of possible health benefits.
Firstly, it’s low in calories
Although one of the best ways to enjoy the sweetness of the mango is by dicing or slicing it without adding any extra ingredients.
But today I used it in my smoothie and trust me guys, you won’t regret this form of mango and banana smoothie.
OATS
Here to give it an awesome texture and since it is counted to be the main ingredient of my smoothie.
Here I used oats from quacker oats https://www.quakeroats.com/
Oats are among the healthiest grains on the earth. They’re a gluten-free whole grain and a great source of important vitamins, minerals, fiber, and antioxidants. It also helps in reducing cholesterol and maintaining weight and energy to keep you going.
Please let me know how your mango-banana-oats smoothie turns out in the comments.
I love hearing from you..
ON whole I mean to say you won’t regret trying this out!!!
PREPARATION TIME: 10min
Blend all the ingredients together in the blender to make a smooth and creamy one.
Check if too thick then add more almond milk
Make sure it’s not too thick or too runny
Take out the smoothie in the bowl and top it with more of the mango cubes and banana slices
Serve with love and eat with a full heart♥
Oats aren’t just for bowls! Try incorporating them into breakfast drinks like this smoothie, which calls for fruits including banana and mango that yield a fresh, tropical flavor.
Nutritional content – Nutrition per serving:
Calories: 210; Total Fat: 3.1g;
Saturated Fat: 1.4g; Monounsaturated Fat: 0.4g;
Cholesterol: 8.8mg; Sodium: 113.8mg;
Carbohydrate: 42.5g; Dietary Fiber: 3.8g;
Sugar: 26.7g; Protein: 10g
Did you make this recipe?
Please let me know how it turned out for you! Leave a comment below and share a picture on INSTAGRAM with the hashtag #sweeetchillies
To know more about SWEEET CHILLIES do follow us on Facebook, Instagram and Twitter
SWEEET CHILLIES tries to bring recipes to your kitchen step from every nook-corners of the streets.
Sweeet chillies recipes let you stand out from the crowd, always and let you not just taste delicious food, but make an experience out of it! Contact us at [email protected]
Leave a comment below:
Your comments make my day. Thank you! If you have a question, please skim the comments section—you might find an immediate answer there. If you made the recipe, please choose a star rating, too.
“This content is monitored by Scrrum Labs. For any complaints, please write to us at [email protected]“
0 notes
Text
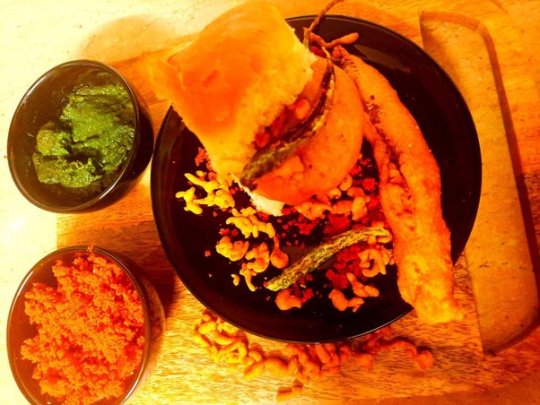
🍔VADA PAAV RECIPE🍔
I am glad that I could manage to bring this recipe to you guys!
Many of you must be aware of “vada pav” and many must have heard about it for the first time.
Ok! So let me introduce it to you guys.
Here comes my all-time favourite vada pav, which is a spicy, tangy, and breathtaking dish. It comes from the suburbs of Mumbai streets, aka
“BATATA WADA PAO”, which is a VEGAN fast food dish native to the state of Maharashtra, India.
It’s basically buns stuffed with deep-fried potato dumplings, salted and slitted green chillies🌶 and served with several dips like spicy garlic dip, coriander dip, or tamarind dip. In some parts, they serve it with a coconut dip.
I personally have different combinations.
And that’s what I am here with.
It perfectly turned out as an evening snack for me. And that’s the one evening my taste buds were triggered and, on top of that, my idea got wings due to rain!!!
Oooh!!!! What a perfect scenario for my dish to justify my mood at its best!
For this, you do need to have extra in your kitchen. You all must have seen lots of videos of it on youtube and must have tried it, and I won’t deny that for many, it must have turned out to be a better version than the original.
But my version was a bit typical and turned out to be finger-licking.
So let’s take a look at the basic things we need to keep ready:
🌟 POTATO DUMPLINGS
➡ 3–4 medium-sized boiled potatoes
➡ 3 cups of chickpea floor
➡ 1 tbsp red chilli powder
➡ ½ tbsp salt
➡ 1 teaspoon baking soda
Here, instead of making a spicy garlic dip, I preferred making dry garlic powder.
🌟 Garlic powder
🔥 4–5 cloves of garlic
🔥 crispy chickpea boondi
🔥 powder of chilli peppers
🔥 salt as per taste
And I made two dips, which can be taken up as per preferences.
🌟 Tamarind dip
½ cup seedless tamarind — tightly packed (imli)
75 cups of water or add as required.
12 teaspoon cumin seeds
½ teaspoon ground ginger powder (saunth powder)
1pinch asafoetida (hing)
14 teaspoon red chilli powder or cayenne pepper
½ cup chopped jaggery or as required — adjust as per your taste
1teaspoon oil — any neutral tasting oil
rock salt (edible and food grade) (sendha namak) or black salt or regular salt as required.
🌿 Coriander dip
🕃 A handful of coriander leaves
🕃 4–5 green chillies
🕃 4–5 garlic cloves
🕃 salt as per taste
Though it doesn’t come in the category of a very healthy diet as it contains deep-fried potato dumplings.
BUT BUT BUTTTTTTTTTTTT!!!!!!!!!!!
Wait, why make your heart short?
Who said we cannot have vada pav while counting our calories.???????
If it cannot be a part of your healthy diet food family, then can’t it be part of your CHEAT MEALS🍴 ???? 😉 😝
So here is the chart displaying and breaking down the calories you will gain from one serving of vada pav.
I personally believe, and I am sure you guys will not deny it, that keeping yourself healthy and fit is a must, as the body is a temple which needs to be worshiped, as it is said in India. But where is it written that killing your taste buds can lead you to admire other foods?
See, we get one life, and in that, we dream of achieving many things, but what’s the fun of achieving that when you don’t celebrate it.
Enjoy every meal, but yes, you should know how to balance food with health and lifestyle.
VADA PAV RECIPE - Sweeet Chillies
🍔VADA PAAV 🍔 I am glad that I could manage to bring this recipe to you guys! Many of you must be aware of “vada pav” and many must have heard about it for the first time. Ok! So let me introduce it to you guys. Here comes my all-time favourite vada pav, which is a spicy, tangy, and breathtaking dish.
It comes from the suburbs of Mumbai streets, aka ” BATATA WADA PAO”, which is a VEGAN fast food dish native to the state of Maharashtra, India. It’s basically buns stuffed with deep-fried potato dumplings, salted and slitted green chillies🌶 and served with several dips like spicy garlic dip, coriander dip, or tamarind dip. In some parts, they serve it with a coconut dip. I personally have different combinations.
And that’s what I am here with. It perfectly turned out as an evening snack for me. And that’s the one evening my taste buds were triggered and, on top of that, my idea got wings due to rain!!! Oooh!!!! What a perfect scenario for my dish to justify my mood at its best!
For this, you do need to have extra in your kitchen. You all must have seen lots of videos of it on youtube and must have tried it, and I won’t deny that for many, it must have turned out to be a better version than the original. But my version was a bit typical and turned out to be finger-licking. So let’s take a look at the basic things we need to keep ready:
🌟 POTATO DUMPLINGS
➡ 3-4 medium-sized boiled potatoes
➡ 3 cups of chickpea floor
➡ 1 tbsp red chilli powder
➡ ½ tbsp salt
➡ 1 teaspoon baking soda
Here, instead of making a spicy garlic dip, I preferred making dry garlic powder.
🌟 Garlic powder
🔥 4-5 cloves of garlic
🔥 crispy chickpea boondi
🔥 powder of chilli peppers
🔥 salt as per taste
And I made two dips, which can be taken up as per preferences.
🌟 Tamarind dip
½ cup seedless tamarind – tightly packed (imli)
75 cups of water or add as required.
12 teaspoon cumin seeds ½ teaspoon ground ginger powder (saunth powder)
1pinch asafoetida (hing)
14 teaspoon red chilli powder or cayenne pepper
½ cup chopped jaggery or as required – adjust as per your taste 1teaspoon oil – any neutral tasting oil
rock salt (edible and food grade) (sendha namak) or black salt or regular salt as required.
🌿 Coriander dip
🕃 A handful of coriander leaves
🕃 4-5 green chillies
🕃 4-5 garlic cloves
🕃 salt as per taste Though it doesn’t come in the category of a very healthy diet as it contains deep-fried potato dumplings.
BUT BUT BUTTTTTTTTTTTT!!!!!!!!!!! Wait, why make your heart short? Who said we cannot have vada pav while counting our calories.??????? If it cannot be a part of your healthy diet food family, then can’t it be part of your CHEAT MEALS🍴 ???? 😉 😝
So here is the chart displaying and breaking down the calories you will gain from one serving of vada pav. I personally believe, and I am sure you guys will not deny it, that keeping yourself healthy and fit is a must, as the body is a temple which needs to be worshiped, as it is said in India. But where is it written that killing your taste
https://sweeetchillies.com/vada-pav-recipe/
You’ll find step-by-step photos and the full recipe below, but here’s why this recipe works so well:
Chickpea flour batter
Whisk the batter by adding its ingredients properly by whisker and beat the batter until it turns out to be extremely fluffy and creamy. When you see the batter changed its colour and has risen a bit to extremely fluffy and creamy, then keep it aside for at least 30min(must!!).
2) Getting ready potato dumplings shaped oval or circle
Aim for two to three medium size boiled potatoes, mashed with the masher properly. When these are prepared before hand , then the ingredients inside starts releasing its aroma inside making it taste every bit of spice added in it and delicious 😋
3) Ready your spicy garlic powder
Preheat the oil properly. When these are prepared before hand , then the ingredients inside starts releasing its aroma inside making it taste every bit of spice added in it and delicious 😋
4) Getting ready green garlic dip with lots of chillies
Aim for giving authentic typical old time tastes , I used a mortar-pestle. Though it’s an era of using gadgets and modern electrical appliances but THIS???? This turned out to be beyond my imagination. (Although using this took out lots of sweat . 😰 , but worth it 😍)😋
5) Sweet pepper fritters
Yes!!!! You read right! This was the twist which I brought to my recipe and trust me guys it turned my dish to another level. You will find people using green sweet peppers in almost the same way but I gave it the new form and it was beyond the level I expected.
Please let me know how your vada paav turns out in the comments. I love hearing from you.
INSTRUCTIONS
Take chickpea flour in a large bowl and add few carom seeds just for taste , add salt as per taste and baking powder to it. Gradually add the water to the mixture and give a firm whisk is the start and beat the batter until soft, creamy and foamy. Make sure the consistency of batter is neither too thick nor too liquid. Once done keep it on rest for minimum 30min.
In a pan add cooking oil, bring it to heat and add mustard seeds , cumin seeds, chopped garlic, grated ginger, chopped green chillies , add curry leaves 🍃 and sauté in oil for one or two minutes, then add turmeric powder and sauté that too, and add your mashed potatoes to it and give a good mix. Mix them well so that all the ingredients mix evenly and add salt as per taste and half lemon juice to it and keep it aside to cool it down
Take the sweet green chillies and slit them partially from the center and apply salt and mango powder inside properly. And dip in the chickpea batter we prepared and deep fry it.
In the same oil, take small green chillies 🌶 and slit them too and fry them for 1 min in oil and keep it on tissue paper to soak extra oil. Then later toss it into some salt
Dip your fingers into chickpea batter and drop the drops of batter in oil making it form small boondies of batter and fry till it turns crispy. At last, fry one full bowl and let it cool down. Meanwhile, take some garlic cloves and pierce it with a toothpick so that it doesn’t pop out from oil while frying and keep that aside too. Then take some boondies we prepared leaving some behind in the mixer and add fried garlic cloves,salt and red chilli powder to it and do the coarse grinding(This prepares my GARLIC POWDER DIP).
Finally, make small patties in the shape of my potato mixture we made and dip it in chickpea batter and fry them until brown or changes colour.
IT’S TIME TO SERVE!!!!!
Take the paav and slit it from between and apply green dip on one side and garlic powder on the other side of paav and on the same side put potato dumpling and salted green chillies.
Serve it with sweet chilli fritters along with green chilli dip and tamarind dip.
Did you make this recipe?
Please let me know how it turned out for you! Leave a comment below and share a picture on INSTAGRAM with the hashtag #sweeetchillies
To know more about SWEEET CHILLIES do follow us on Facebook, Instagram and Twitter
SWEEET CHILLIES tries to bring recipes to your kitchen step from every nook-corners of the streets.
Sweeet chillies recipes let you stand out from the crowd, always and let you not just taste delicious food, but make an experience out of it! Contact us at [email protected]
Leave a comment below:
Your comments make my day. Thank you! If you have a question, please skim the comments section — you might find an immediate answer there. If you made the recipe, please choose a star rating, too.
“This content is monitored by Scrrum Labs. For any complaints, please write to us at [email protected]“
2 notes
·
View notes