#☆ C:\Program Files\WHAT I USED TO BE . Past
Explore tagged Tumblr posts
Visit Tumblr Blog
Explore Tumblr blogs with no restrictions, modern design and the best experience.
Last Seen Tumblr Blogs


Fun Fact
The Tumblr app for Google Glass was released on May 16, 2013.
Text
Got jumpscared by my own full legal name showing up in my email notifications bc I forgot I emailed my code to myself today just in case my VM ends up stopping working again (I got nervous & didn't wanna lose my progress lol)
Goldfish level memory retention
& the funny thing is that the email itself is just. This

Full Legal Name code • hi
#speculation nation#title 'code' email is just 'hi'. with the .c file attached of course#honestly i had a very productive day in lab today. i got the core structure of the program down and made sure it all worked#testing it with One of the sorting algorithms. and it worked!!#the lab is to code functions for different kinds of sorts. like bubble sort selection sort and uhh. some other shit idr rn#and have the functions take timestamps from before and after they run the sorts to calculate the elapsed time#and we have to run this for array sizes of like. 10 50 500 etc etc up to like 50000 or smth? if i remember right.#and then once all that's done we take the output and graph the time elapsed for each type of sort/search per array sizes#so today at lab i made the random array generator function. a swap function. the execution function. bubble sort. and main.#main calls the execution function passing in the array sizes. execution(10); execution(50); etc#execution defines the array of that size. then calls the random number generator to populate the array. then passes it to the sort functions#tested with my one bubble sort function. which finished in like 0.00003 seconds or smth for array size 10#BUT taking the time stamps was tricky. there are a lot of ways to do that. and time(); in c is in full seconds#i ended up asking the TA if he had a recommendation for what to use bc theres a LOT of time functions out there#and full seconds isnt precise enough for this purpose. & he recommended clock()!!#records number of clock ticks which is NOT the same as seconds. but when u divide it by uh. forgetting it rn but it's a constant#that will turn it into actual seconds. clock tics per sec?? smth like that.#so anyways very productive 👍 i just need to set main up to call execution function for all the different array sizes#and then write all the functions for the different sorts/searches. but i have the core structure down with the bubble sort function#(specifically with the time stamps and the print function after) that i will copy-paste for all the other functions#and then inside them i put the basic code. none of it's complicated. all can be found on the internet easy.#SO!!!!! honestly i think itd take me less than an hour to finish. tho plotting out that graph is going to be annoying#something like 6 sizes per 5 sort/search functions. painstakingly copy pasting each one into excel or smth lol#but yea im content with how much ive gotten done. yippee!!!!#now i just need to finish my web programming lab before sunday night. blehhhhh
2 notes
·
View notes
Text
Installing Scriptorium for Legacy Users
So you're a Sims 2 Legacy player who wanted to install some modular stairs? Maybe a lighting mod? You installed Scriptorium and you enter your game and suddenly your foundation is missing or crashes your game whenever you try to place it. Or maybe your pools and rooves have fences in them?


(images sourced from Lazy Duchess Discord server)
WTF did I do?
You've broken your script files!
Currently they look like this:

When they should look like this:

What do the script files do?
They give the game instructions and settings for certain build items that are generated by the game engine such as walls, foundations, pools, modular stairs, fireplaces, rooves, awnings and more. Lighting also uses scripts for some things. Some of these items require the scripts to display in catalog or at all.
How did this happen??
So i've seen two different ways, firstly, the auto installer installs in the wrong location. So what does the player do? They moves the files into the correct location.
The issue with this is the script files that Scriptorium creates when it can't find your game files are missing ALL of the original script lines. Then when you replace your existing script files with these, you basically are replacing your script files with a blank one (minus the Scriptorium lines).
Second way, when manually installing, the player deletes the contents of the original script files and replaces it with the Scriptorium lines.
This results in the same outcome shown in the example script.
Why does this affect only Legacy players?
Legacy uses different file paths. Scriptorium was last updated after M&G came out. The auto installer was made to work with the discs in both their original and compilation file paths. For example, Double Deluxe\Base or Sims 2, or Fun with Pets\SP9 etc. All other versions up until this point have used these paths so they never experienced this issue. EA decided to do something different this time and go by EP/SP numbers. So the installer gets confused and places them in the wrong place.
How do I fix this??
A few options, reinstall or repair your game, or replace the broken script files with the ones below. Place them in your C:\Program Files\EA Games\The Sims 2 Legacy\Base\TSData\Res\Catalog\Scripts folder. You may need to delete the files first that you are replacing and cut and paste the new ones in.
Download Original Scripts
But I still want to use Scriptorium?
Once you have replaced your broken scripts, follow these manual instructions that I have modified from the original Scriptorium post for Legacy users.
Go to C:\Program Files\EA Games\The Sims 2 Legacy\Base\TSData\Res\Catalog\Scripts
And open the fireplaces.txt and copy and paste the line below at the bottom of this file without deleting the existing text.
wildInclude "Scriptorium_Fireplaces*.*"

Then save.
If you have issues with saving due to permissions, cut and paste the files to desktop while you are editing them and move them back after
Next open modularstairs.txt and add the text below
wildInclude "Scriptorium_ModularStairs*.*"
Then open walls.txt and add the text below
wildInclude "Scriptorium_Walls-Fences-Arches*.*"
While remaining in your Scripts folder, Create 3 new folders and call them
Scriptorium_Fireplaces Scriptorium_ModularStairs Scriptorium_Walls-Fences-Arches
Select these 3 folders and right click and choose copy.
Now go to Documents\EA Games\Sims 2 Legacy\Downloads (if you do not have a Downloads folder, create one)
Then right click and press paste shortcut
If you want to use custom lights as well, follow these steps
If your lighting.txt is also empty, this is a copy of the original version
Download Lighting Script
Go to C:\Program Files\EA Games\The Sims 2 Legacy\Base\TSData\Res\Lights
Open lighting.txt and add
wildInclude "Scriptorium_CustomLights*.nlo"
While still in the Lights folder Create a folder called Scriptorium_CustomLights If you already have a folder called CEP3_CustomLights, rename it to Scriptorium_CustomLights
Right click on this folder and copy it
Then go to Documents\EA Games\Sims 2 Legacy\Downloads and paste shortcut
And you are all done :D
If you have any issues, feel free to leave a comment or send a message!
115 notes
·
View notes
Text
Okay so here's the rundown of everything that happened with the radio station because omg is it some drama.
In the 90's, there were a lot more independently-run radio stations. There wasn't IHeartRadio and there wasn't SiriusFM or JackFM. A dude could just have a radio station frequency and start a radio station as long as they complied with FCC regulations. And one of these radio stations in Columbus was an alternative station called CD101.
That frequency was sold to a classical station, which is fine because the exchange was friendly. And then the station moved to a different frequency, CD102.5.
So I know it may seem like radio DJ's are just weirdos with microphones and that's just not true- they are TALENTED weirdos with a microphone. You have to be personable, you have to know about the music you're playing, you have to be enthusiastic. And this station was pretty good about programming- they played local music, they played deep cuts, they played weird shit. There were programs for oddball and punk and goth music. They ran charities, they were at local festivals, they were in parades. Their radio station even had a small concert venue attached to it and they would invite visiting musicians to play. Like it really was about community.
But.
Radio stations are expensive, and they get more expensive every year, and in 2020 they were unable to renew their FCC license.
And then a couple months later, they were back again under CD 92.9. A radio station rented out the frequency to them and they were able to get back on the air. It was like nothing ever happened.
I'm not going to know what happened between the owner the frequency (Mark) and the owner of the station (Randy) because there's a lot of people talking about Mark overcharging on rent and Randy being late or short on payments.
An agreement was drawn up to have Randy buy the frequency over a period of (I think) 5 years. But the price was high and the terms of termination were brutal (if he was even one day late on a payment, it constituted termination of the contract). And Randy found those terms to be unreasonable.
So, they announced that the radio station would be going off the air February 1, 2024. And we're all pretty upset! Like, not to be like 'this station saved my life,' but this was a pretty consistent source of event news for me and its how I learned about a lot of concerts and artists. They played one of my friend's bands pretty often and its like 'hell yeah, I know that flutist!'
The DJs of CD92.9 said their good-byes on Facebook.
Meanwhile...
The new DJ of the new station announced that it was always his destiny run the station, and that the new station would be More local music, More deep cuts, More weird shit- and No Billie Eilish. "Out with the old, in with the new."
On one of the old DJ's good-bye posts, the new DJ tried to recruit him to the new station.
"Really? You're trying to poach me on my good-bye post?"
Mark makes a statement that the station will be committed to 'continuing the legacy of CD92.9' and will be using the same programming, the same music, the same DJ's.
Randy says 'the fuck it will, that wasn't the deal' and files a C&D. The DJ's are allowed to work for the new station if they so please, but the new station is not going to inherit shit. They cannot use the same programming, their staff, or any of the thousands of recordings they've use in the past 30 years. Any branding or attempt to brand as similar to CD92.9 is a breach of contract.
A facebook group formed around the support of CD 92.9. How to help, how to get their online stream onto your phone, upcoming events, sponsors to support, and a healthy amount of bitching. Admittedly, some of the posts were REAL stretches- like... I'm sorry darling, I know you want it to happen, but you are NOT going to get them on copyright infringement because their red X logo looks kind of like a similar red X logo from a radio station in Milwaukee.
CD92.9 goes down, 93X goes up.
He does play some more uncommon music, sure. But he doesn't announce who the artist is so its kind of like... what's the point in that? If you just play a local band, but we don't know who the local band is, how are we going to go to their concerts? He'd also talk smack about some bands and its like... don't? You're a public face now.
And then there's the radio edits, which he chose not to play on occasion, so the radio was full of f-bombs. FCC violation.
And as a DJ, simply not charismatic. Like I realize he's not Blorbo from my radio, but like I said- DJing is a skill.
So I just didn't listen. It wasn't worth my time to try. I found a different, less cool station to listen to in the car and I listened to the stream at home.
The mood of the facebook group shifted more towards support for the sponsors, events planned around 92.9, news about who is leaving and who is staying and we just kind of let 93X exist.
The promise of 'no Billie Eilish' fell through pretty quickly. Their music selection dropped to the usual 'alternative music' packet of Imagine Dragons and Twenty-One Pilots. And eventually...
They went off the air. After one month of airtime, it is now an oldies station.
93X DJ said 'well, congratulations you got what you wanted.' Which is half right. We wanted them to tank and our old station to succeed. We're still hopeful about the second part.
The Dispatch ran an article about the short-lived station. Ends with:

So just for like... summary-
Ya'll took over the station with a committed listener base, claimed that you'd be just continuing business as usual, tried to poach their talent, hired someone with no problem talking shit, and when your station failed...
... you want to blame a Facebook Group?
Are you a child?
Anyways, if you'd like to hear an alternative rock station in Columbus that's just doing their best, here's a link to the stream!
209 notes
·
View notes
Text
The Roommate Program (PT 2/?)

Finally part 2!! This one focus more on the reader/self insert!
Also I want to try writing the letters so you can get a feel of what being written instead of just getting vague descriptions!
I hope you enjoy it! 💛
Your first letter from your pen pal was…something else…to say the least. Paired with a prickly friendship bracelet. You felt like you opened Pandora's box with that first letter.
You sigh as you sit down in your office chair looking down at the blank sheet of paper nervously. What in the world do you write back? I mean, writing a letter about yourself is easy but continuing conversations is harder than it looks. What do you say now “Hey I heard you went to solitary confinement was it fun?” Like how you continue talking with him?!
Twirling the pen in your hands your wings twitch and flutter nervously. You joined the program because being a past patient at the Theraprism who managed to opt out of the recarnation ceremony praise the axolotl for that one. You thought it was nice to try to give back to them you know to show that redemption is worth the effort! You felt like you had a pleasant experience there or maybe because you were more cooperative than your peers.
But after the copious amount of interviews and several months of being on the waiting list.
You finally were met with a small envelope congratulating you on your approval into the program and your pen pal. You thought things were finally going well for a chance.
Until…you were brought to have a one-on-one conversation with THE Axolotl themselves you felt like maybe this wasn’t a good idea anymore…They wanted to talk about your pen pal, Bill Cipher. You were somewhat familiar with the name mostly being associated with the chaos he left in his wake.
He was a force to be reckoned with.
Was…
“He is someone who is quite..um…complex..” Look up from your teacup to glance at the other being across the table. The word “Complex” still feels like an understatement to you. The axolotl smiled down at your eyes laced with slight concern before continuing.
“I’ve read your file..” Shit. ”You seem to have been the star patient during your stay. Self-admitted leading to 500,000 years stay before you were released. The top storyteller during puppet hour.“
You can feel yourself getting hot with embarrassment as you sink into your seat. “Yeah, Dr.Oswald says he misses my shows…” You swirl around the remaining tea left within the cup. You don’t know what to say or why they brought you here to begin with. Did all the other participants go through this conversation as well?
“I already know why he joined the program. But I hope for a better outcome than another trip to Wellness Void and I think you can help me with that.”
Looking back down at the blank sheet of paper the pen feels more lighter in your hand now. Just breathe and relax if you mess up you can fix it later.
Dear Bill,
Sorry for my first letter being so plain I can honestly admit I’m a bit nervous about messing this up. I never knew how to talk to someone without it feeling awkward so this is a new step for me. As someone who used to be in the same position you’re in I feel like I can you some advice on how to make your stay less boring! Like, if you want to get out of group therapy it’s time to start taking advantage of art time!
Start doing big projects that take up time with this when art time is over you can ask to stay. But it’s important to say it so can present your piece to the next time group therapy session! Use this advice sparingly those counselors in there are nice but they ain’t dumb! Also if the vending machine is still in the cafeteria hold down on the C button it should give you an extra snack but it’s sadly randomized.
Well, I hope this letter finds you well and also thank you for the bracelet I hope to make you something special when I write to you again!
Sincerely,
██████
#gravity falls x reader#gravity falls#bill cipher x reader#self insert#s/o#the book of bill#x reader#bill cipher#bill ci the triangle guy#gf au#gravity falls au#the roommate program#TRMP AU#gravity falls x black reader#black!y/n#black y/n#black reader#black self ship#black self shipper
63 notes
·
View notes
Text
How to revert to the old version of Hogwarts Legacy (pre-Jan 2025 update).
Here are the instructions on how to revert to the old version of Hogwarts Legacy as well as some visual guides and help!
First, go download the PDF from this on Nexus mods (you will need this for some of the depot codes). There is also a video in the video tab as well! Keep the PDF file open as we go along.
Pre-Revert: 1. Make sure your game is updated to the latest version of Hogwarts Legacy. (The Jan 2025 update) 2. Make sure you are online on Steam & make sure it is running! 3. If you play with mods, make a copy of your mod folder so you can copy and paste it back later (If you play with UUE and have saved poses, I recommend doing the same with those as well)
On to the revert!
With this method we are going to be using the Steam Console in order for us to download the depot files we need without as many steps!
Open the steam console by pressing the windows button and R (win + r)
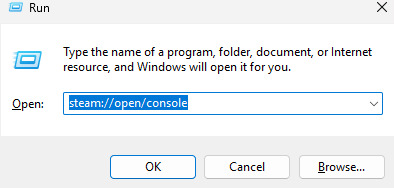
Something like this should pop up! And if steam://open/console is not already typed in, go ahead and type it in. (Again, make sure steam ((not hl, just steam)), is running). Then, hit enter.
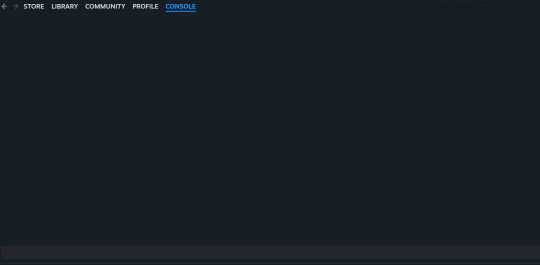
You should now see this (AKA the steam console)
2. Copy this code download_depot 990080 990081 5173511114843368548 from either here or the PDF you downloaded earlier. Then go to the steam console and copy and paste that there and hit enter.
For some, it doesn't show that its downloading but it is! For others, it will look like this!

!!! IMPORTANT NOTICE !!!
You must make sure that the number in parentheses is 67184 MB as that is the entire size of the game (you are redownloading an old version of the game here, after all) Anything less than that number is not the full game and you will need to restart the process over again!
Now, you wait. It took roughly about an 45 minutes to an hour for this to download completely for me. It may take longer for some so just be patient!
Once it is done downloading, it should say this.

3. This is where you will NEED the PDF. Next up we are going to put in the command for the region you are in. As of right now English, French, German, Spanish (Spain + Latin American), Italian, Japanese & Portuguese are available on the PDF. Choose whichever depot code suits you the best and copy it. I am using English.

This is what the english one looks like on the PDF but note that you should only copy this part!

^^^^
Again, copy and paste it into the steam console and most should see this. If you don't, dw it should still be downloading.

(Again, the number has to be 2184 mb)
And after that is finished you should be left with this.

4. This is where it gets slightly trickier, so pay close attention!
You should now be able to find a file under the name of: C:\Program Files (x86)\Steam\steamapps\content\app_990080\depot_99008X These are the files you want ^^^
Both depot files will be under the folder app_990080 that looks like this.

And this is how my depot files look (some have an x at the end and some do not.)

Open up a second file explorer (you can close steam now) and go find
C:\Program Files (x86)\Steam\steamapps\common\Hogwarts Legacy which should bring you to here.
Now delete all of those files (the date should match up with the day you updated, as you can see, I updated Feb 15th). Don't be scared, just delete all three!
Now go back to your other file explorer and click on app_990080 and then depot_99081 which will also look very similar! (but look to the very top at the directory to tell which one is different)

Copy all 3 of these files and move them over to the folder where you just deleted the three prior files that looked the same!
Now go back to app_990080 and click on depot_990082 (for some, their file might say depot_9900X). Then again, copy the phoenix file from there and put it where you put the other 3 files!
5. Now, you launch the game. If you have done this correctly, under your username on the "Hogwarts Legacy" screen, you should see something that says: Build Version: 1235957
If it says this, you've done it correctly, if not, you will have to start the process over again and try and see where you might have missed something. Now, close the game.
6. Lastly, go here C:\Program Files (x86)\Steam\steamapps and locate the file: appmanifest_990080.acf

Right click it, click on property's, and set to "Read only"
7. Verify this is working for you by starting up the game with your desired mods. I also suggest having a backup for your game just in case a patch comes out and you have to update again!
Thank you so much for reading and I hope this tutorial is informative and that you are able to revert back to your old game & play happily, fueling your little delusions like the rest of us. Please support & spread this post by liking and reblogging so that other people who are in need of a easy(ish) tutorial can have one!
Have a wonderful day! 💕
42 notes
·
View notes
Text
Subtitling AMVs! Make Plain and Karaoke Optional Captions for YouTube with Subtitle Edit, Aegisub, and YTSubConverter
This is a video I've wanted to make for a while. Though I'm in no way an expert—and suggestions and improvements are very welcome!—I was overjoyed when I learned that I did have the power to make optional karaoke captions, all with free tools, and I hope I can at least help others get started with them, too.
Programs used are Subtitle Edit, Aegisub, and YTSubConverter. I really recommend checking out YTSubConverter's page for more details about stylized captions on YouTube; it's very comprehensive. I'll also note that the kind of captions I make are merely scratching the surface of what's possible with YouTube captions—there's a lot more that the .ytt (YouTube Timed Text) file is capable of.
While focused on YouTube, subtitles created in Subtitle Edit and Aegisub can also be burned into the video or included as an optional subtitle track on the file itself. I use the free program HandBrake for this, a process I outlined briefly in the bottom "Compression" section of this post.
Songs used in the video are instrumental versions of "Lost & Found (The Midnight remix)" and "Los Angeles," both by The Midnight and both of which I've set AMVs to, so I thought it'd be fun to utilize the instrumentals in an AMV-subtitling video.
Timestamps
[00:00] Examples
[00:07] Overview
[00:28] Easy YouTube Captions
[01:08] Subtitling in Subtitle Edit
[02:44] Persnickety Timing (in DaVinci Resolve)
[03:01] Stylizing Subs in Subtitle Edit
[04:47] Karaoke Timing in Aegisub
[06:03] Additional Stylization
[06:41] Converting for YouTube with YTSubConverter
[07:08] Uploading to YouTube
[07:35] Adding Multiple Subs
Transcript under the cut!
Overview
This video will cover creating stylized and unstylized YouTube captions for AMVs. I'll outline both easy and persnickety methods of making basic captions for YouTube, how to use Subtitle Edit and Aegisub to stylize subs and time karaoke, and how to convert stylized subtitles for use on YouTube with YTSubConverter.
Easy YouTube Captions
Starting with easy YouTube captions, when uploading a video, there's an option to "Add subtitles" in the "Video elements" section. I can delete what's already there and press "Add" to add my own.
I'll hit "Upload file" and add a plain .txt without timing, just the song lyrics. It might take a moment, but YouTube will automatically sync the lyrics. And seems to do a pretty good job!
But YouTube also has options to edit and tweak the timings. That's really about it for this method!
Subtitling in Subtitle Edit
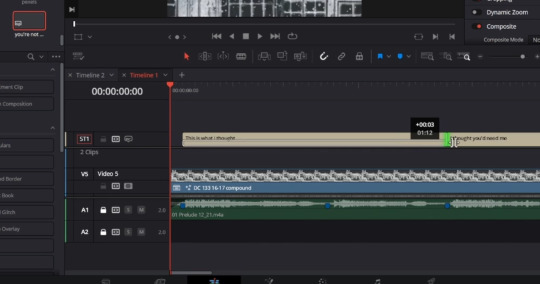
You can also make simple captions outside of YouTube. I like to use Subtitle Edit, a free program for timing and stylizing subs. In Subtitle Edit, I'll start by adjusting shortcuts to make timing easier.
I can do this by going to Options -> Settings -> Shortcuts. Scroll down to "Create/adjust"... And change the key for "Set start time" to Z. Make sure to hit "Update" so that the change sticks. Then, I'll change the key for "Set end and go to next" to C.
Now, I'm ready to sub. I go to File -> Import -> Plain text... And I paste in the song lyrics. I have them formatted so that one line is one subtitle. So, I have the "One line is one subtitle" option selected.
Then, I open my video by going to Video -> Open video file... And I click to add the waveform.
Time for timing. I first hit Z to start the first line. Then, I play the video and press C to end the line.
I continue this process, Z to start and C to end, for the whole video. When done, I can adjust the lines in the waveform to tweak the timing (if needed). I also like to eliminate gaps by going to Tools -> Bridge gaps between subtitles...
When satisfied, I can save the subs as a SubRip (.srt) file. .srt files are simple subtitle files with limited formatting. They can be directly added to YouTube; just select "With timing."
Persnickety Timing (in DaVinci Resolve)
But since AMVs are all about timing... And I clearly struggle with that method... I like to import the roughly timed .srt into a video editor. (I use the free DaVinci Resolve.) Then, I can adjust the subtitles to fit the markers I'd already created for the video.
And that's about it for simple AMV subs.
Stylizing Subs in Subtitle Edit
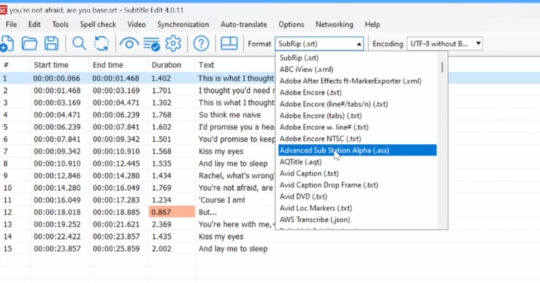
More elaborate subtitles can be achieved with another subtitle file type: Advanced Sub Station Alpha, .ass. (Yes, it's really called that.)
.ass files are capable of colors, fades, positioning, karaoke... And really a LOT more. The YTSubConverter page has a detailed breakdown, outlining .ass elements that can be utilized on YouTube.
I particularly like .ass files for their ability to create karaoke subtitles. To start styling for karaoke, I change the Format to .ass in Subtitle Edit.
Then, I can click the big "A" for "Advanced Sub Station Alpha Styles."
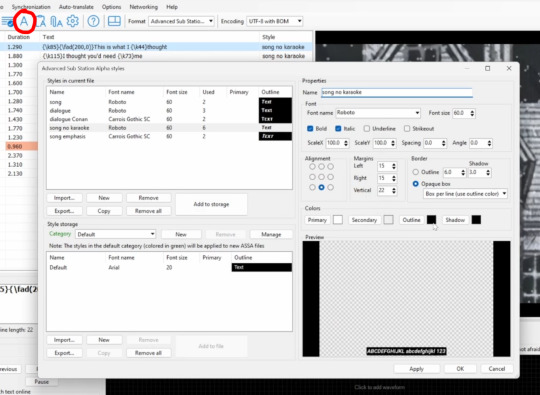
And adjust as desired. For this one, I imported and edited a previous AMV's .ass style. And deleted the original "Default."
For fonts, note that YouTube only allows seven fonts: Roboto (default), Carrois Gothic SC, Comic Sans MS, Courier New, Lucida Console, Monotype Corsiva, and Times New Roman.
Here, I set a "dialogue" style without the italics of the lyrics for the AMV's voice lines. For effect, I also created new styles for dialogue and lyrics with different fonts. I used both Outlines and Opaque boxes for different styles.
This video doesn't do it, but Alignment can be adjusted for different positions.
Note that for karaoke, the Primary color is the color AFTER the words are sung (white here). The Secondary color is the color BEFORE the words are sung. Here, Secondary is set to alpha for invisible words before being sung.
There are also Outline and Shadow options. I can now select the styles I want for each line. Highlight, right-click, go to "Set style," and select the desired style.
Karaoke Timing in Aegisub
Karaoke timing can be done in Aegisub. Aegisub is a free program with LOTS of ways to edit subtitles. In fact, subtitle styles can be set in Aegisub as well.
For karaoke creation, I'll start by opening my .ass file in Aegisub. I add the video by going to Video -> Open Video...
To apply karaoke, I press the "Toggle karaoke mode" button (the mic and music notes). Lyrics will be automatically cut up by word, but they won't be timed correctly. To fix this, I need to move the lines in the waveform. I can adjust the sliders on the side to maneuver.
To time, I click each area and hit SPACE to play it. I adjust the lines accordingly. When satisfied, I click the green checkmark.
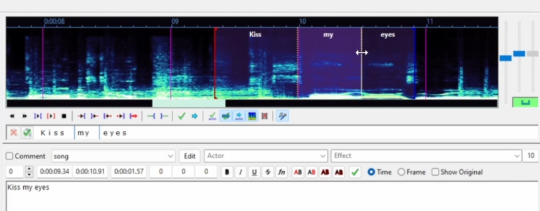
I repeat the process for all the lines where I want karaoke. It's a lot of rinse and repeat! But if I want the karaoke to appear by letter, after I've done the initial timing, I add more splits by clicking between letters and adjusting the lines in the waveform.
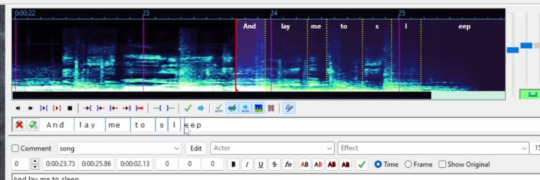
I can test each line individually by pressing the second play button.
Note that splits can also be deleted by clicking on them.
Additional Stylization
For any additional formatting, I return to Subtitle Edit. (Though it can also be done in Aegisub.)
I like to add fades by pasting the {\fad} tag at the start of a line. In parentheses next to the tag, there are two numbers separated by a comma. The first number is the fade-in value, and the second is the fade-out value.
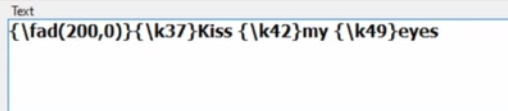
Here, I faded in and out 200 when there were gaps between the subtitles. And I adjusted some timing to accommodate the fades.
I also added a {\ytktGlitch} tag for a glitch effect. This effect only works on YouTube/Google Drive and won't preview elsewhere.
Converting for YouTube with YTSubConverter
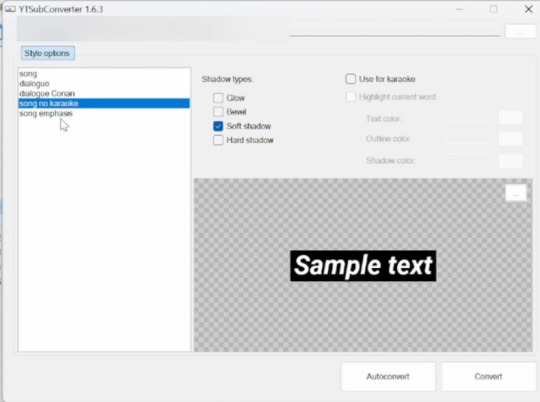
I now have a stylized .ass file prepared, but .ass files can't be uploaded to YouTube. So, I need to convert the .ass file to a .ytt (YouTube Timed Text) file. The free YTSubConverter does this easily and instantly!
I first open the .ass file in the program. I can adjust the style; I like Soft shadow. Then, I press "Convert," and that's it!
Uploading to YouTube
Uploading stylized subtitles to YouTube is similar to uploading unstylized ones. But there are a few things to note.
First, stylized subtitles WILL display funny in the preview. But if you hit "Done" and don't touch anything, it should work fine.

That said, one way to test .ytt files is to upload them to Google Drive. They can also be previewed by watching the YouTube upload before making it public.
Adding Multiple Subs
One other thing I like to do is add an unstylized subtitle track, too. For my unstylized subs, on a plain .srt. in Subtitle Edit, I add lyric music notes by highlighting, right-clicking, and selecting the note.
To upload multiple subtitles to YouTube, the video should be at least private or unlisted. Then, in the Subtitle tab, I can Rename my stylized track [by clicking the three dots for Options when hovering over the subtitle track in YouTube Studio]. This will allow me to add another subtitle file in the same language.
I go to "Add language" and add the unstylized file. I find I have to Publish and Unpublish several times to work properly.
And that's really it! Happy subtitling!
#video#eye strain#long post#amv#?#focused on subtitling amvs but of course these techniques can be used for other subtitling!#it's maybe a bit embarrassing to have this all laid out because i know i have methods that will make more experienced subtitlers cringe#(like copy-pasting tags)#but i hope this can at least be a starting point! making simple captions can be quite simple with tools now#and it's really fun to do more stylized ones!#i was seriously overjoyed when i learned i could make karaoke captions lol i was so excited#open to any questions or suggestions and etc.!#special thanks to hexfloog for the feedback!#this was a lot worse before and i wouldn't have fixed it without that feedback ^^;#amv talk
26 notes
·
View notes
Text
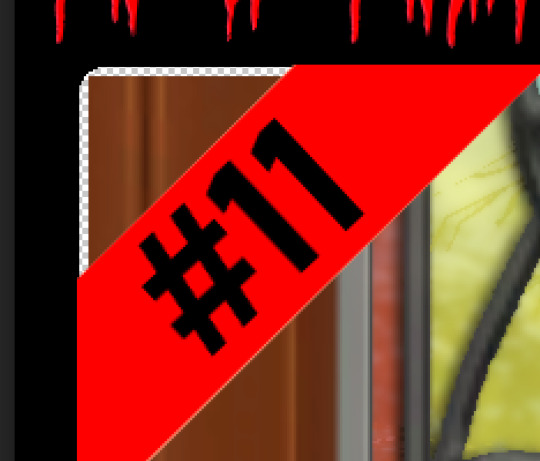
A Party To Die For Templates: SFS
So I may have got a tad overexcited about the Halloween CAS Challenge created by @la-llama-sims, and I made templates for every prompt. I wanted to share them on the off chance someone wanted to also do the challenge but maybe didn't have time to do much other than screenshots.
Tutorial below on how to make your own cards using the templates if you are unfamiliar with photo software, all you need is the template and a screenshot of your sim! Very little technical skill required to so feel free to jump in for Simblreen (the month of October on simblr). Remember to go to the original creator post to check out the prompts and the hashtag given for creations is #LLPTDF. Hope to see some of your creations next month, keep them for the spooky season 🎃👻🦇
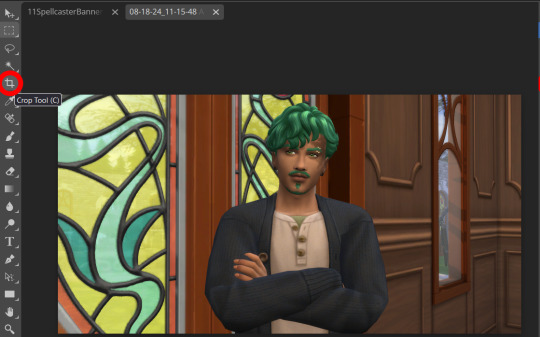
Strap in and follow along as I make Glenn here (he won't do the spellcaster prompt for Simblreen, it's dress up after all, but it makes sense for a demo)
Step one: Grab the zipped folder of templates on SFS HERE. Unzip the folder and put it somewhere easy to find in your documents, I have a tumblr specific folder my templates are normally sorted in.
Step two: Open your photo editing program of choice. I use paint.net which is old but for this demonstration I will use Photopea, the online free alternative to adobe. You will see the screen below
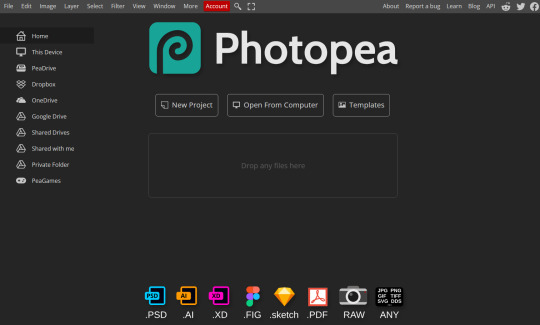
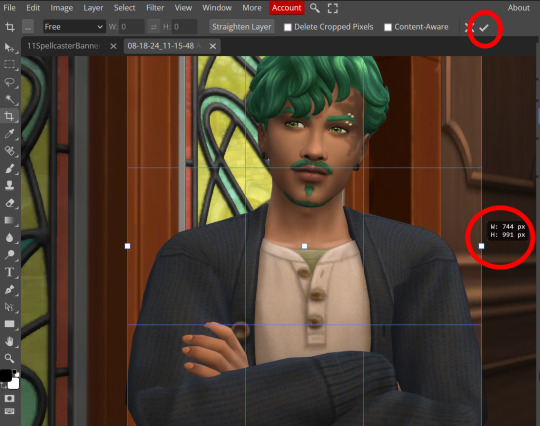
Step three: Click "Open From Computer" right in the middle under the main title. Find the screenshot you have taken that you would like to use and open it. Now the hole in my template is 744x991 but you can make it slightly bigger if you don't want to fuss as much with lining things up exactly. To resize image from the top bar (Image -> Image Size) We're going to use the crop tool when we have our picture.
Step four: Pull on the squares at the edges to change the size. If you need click View in the top bar and you can zoom in to allow finer selecting. When you have the right size click the tick and copy the image. Keyboard shortcuts are Ctrl+A to select all, then Ctrl+C to copy.
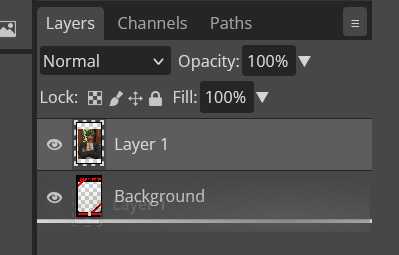
Step five: Open the template you want to use (File -> Open, from the top bar). Add a new layer using either the top bar (Layer -> New -> Layer) or the icons on the bottom right.
Step six: With the new layer selected paste the image, Ctrl+V.
Step seven: On the right of the screen you'll be able to see layer order. Drag the layer with your sim underneath the background layer. This is what will let you slot in your picture.
Step eight: Finishing touches! Unless you are super duper lucky your sim won't appear in the exact right place, you'll have to move them around using the move tool. For precision you'll need to zoom in and move your field of vision using the hand tool.

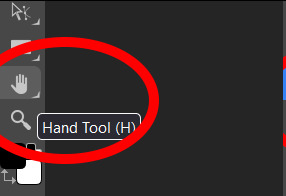
You'll know it's in the right place when you can no longer see any of the negative space behind it. I like to check both corners to make sure I've got it. This is where having a sim image slightly larger will make it easier.

If you like you can finish now. From the top bar File -> Export as -> PNG or JPG. The picture will save to your downloads folder. If you want to add your own text, keep reading, as I've left space at the bottom for your username, the sim name, and a profile pic or other logo. Or go ahead and crop it out, who needs extra hassle when there are cute CAS looks to be made?
Step nine: From the bar on the right select the large T to add some text, it will automatically spawn in a new layer. Scroll through text options and find one you like (the text style I used isn't in photopea so we will find another). Depending on the type of text you will likely need to play around with the size as well.
Step ten: Start typing. When you're done you can highlight what you have written and use that size box to adjust how big the text is. Select the move tool from the right to move your text where you want it. Repeat step nine if you want text on the other side. I've chosen to put my username on one side, and my sim's name on the other.
Step eleven: Logo time. Open a pre shrunk logo (I scaled my pride plumbobs down to 125x125) and copy. Back on the template add a new layer then paste your image (for some reason I had to copy twice before it would do the right thing, I don't have an explanation sorry). Then using the move tool and the hand tool get your image where you want it.

From the top bar File -> Export as -> PNG or JPG. Again it will have saved to your downloads folder.
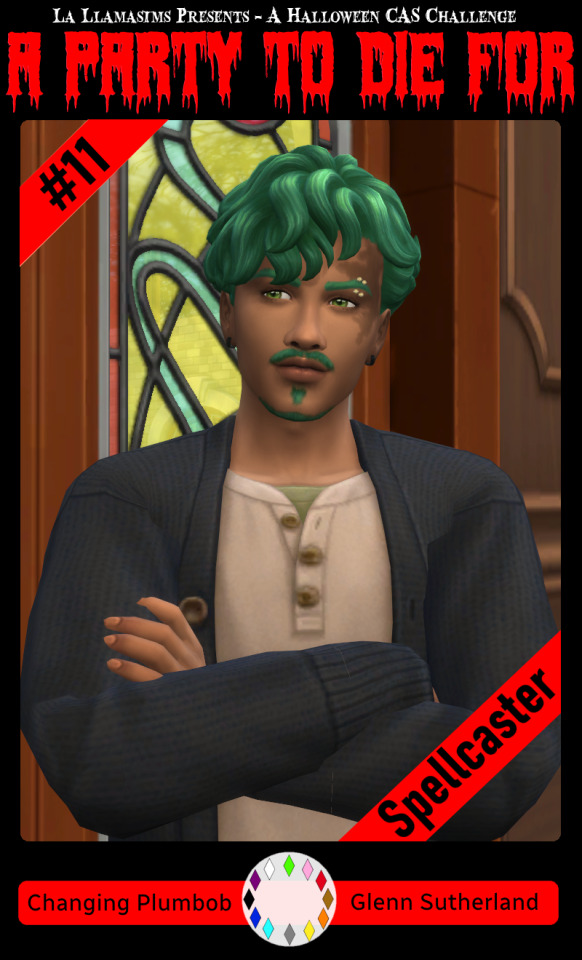
Voila, we have a Glenn card! Hopefully you have a your sim card. I spent hours doing up all the templates so feel free to fill them with your sims for the challenge. All I ask is that you don't claim templates as your own work or shove them behind a paywall because rude and the whole premise of Simblreen is free treats! Obviously you do NOT need the templates to participate in the challenge, the cards are just how I'll be presenting mine. Like CAS challenges the possibilities are most often only limited by your imagination.
#sims 4#the sims#simblr#my sims#ts4#active simblr#Enjoy my friends#I wanted all of us to be able to do Simblreen#Even if we don't have prior skills
53 notes
·
View notes
Text
Ok so I talked about this in tags of a post earlier but I need to talk about it properly
So a couple weeks ago I finally pulled the trigger, I dual booted Linux Mint on my laptop
It has less of my vital files on it then my pc, but I use it more for videos and general Internet stuff, so I would know if I liked it
Installing was scary but after a bit of trouble shooting with disabling bit locker it was easy, and let me be clear, that's a windows thing, because Microsoft really really doesn't want you to have freedom over your machine.
So I booted in
And like
I literally love it so much
I knew people talked about how much better Linux is and how it speeds up literally anything it's put on over windows, but like WOW
It doesn't take 2 minutes to boot up or shut down, my CPU doesn't idle at 25% for no reason, the search for files feature doesn't take 40 minutes only to show me Internet results instead of files, its wonderful.
The default theme is (in my opinion) pretty ugly, sorry whoever made it, it's just not for me.
But that's the great thing, you can literally customize this almost however you would like.
Maybe you shouldn't trust my opinion on what looks nice because I instantly installed a theme that replicated Windows 7
But I got bored of the default colors so I literally found the files where the home bar is saved and changed them to be more "minty"
That along with some CSS color editing gave me this:

You just can't do anything like this in Windows 10/11. You can change the color on windows but if I wanted, in Mint, I could completely change everything, centered icons on the taskbar, icons left justified on the taskbar, no taskbar, make it look like windows 95, it's all yours to do with whatever you want.
There are issues, I won't lie, the biggest one that will probably haunt Linux forever is compatibility.
Simply put most developers don't make native Linux versions of their software, you are lucky if there is a Mac version.
Lots and lots of Windows software CAN work on Linux through compatibility layers like Wine and Steam's Proton, but it's not 100%
My biggest problem is FL Studio and Clip Studio, neither of these I could get working with Wine or Proton so far. I'm hoping in the future I will find a way to make this work, or transition to their free and open source alternatives, but for now I'm stuck with a win 10 pc.
The other issue I've faced is that Linux seems to have a hard time recognizing and remembering my wired headphones. Like sometimes it just works, but most of the time it fails to do so.
My solution to this until I have time to troubleshoot more is to use my stupid headphone jack to USB C dongle that I bought for my stupid phone with no headphone jack.
Luckily it works fine and the type C port on my laptop literally doesn't get used otherwise.
All in all, I'm like excited to use a computer again. I used to only be excited for the programs it allowed me to use, but for the first time in a long time, the "magic" of the PC has returned for me.
Once I save up the money, my next PC will be Linux, Windows doesn't cut it anymore for me.
Ok now I'm going to kinda just talk about Linux for a bit, unrelated to my experience because my brain has been buzzing about this topic lately.
I get why guys who run Linux are so annoying about it now, because it's me now, I love this stupid OS and everyone has to hear about it.
And chances are, you've used Linux before already!
Linux is used in a ridiculous number of places because of its open source nature.
Most servers and other cloud computing systems are running Linux, many public terminals and screens run Linux, every supercomputer in the world runs Linux, if you were in the education system for the past 13~ years you might have used ChromeOS, which is built on Linux, if you have ever used an Android device you have used Linux.
It's never going to take over Windows as the go to operating system in the home, most people don't even know they could switch, and if they don't know that there's no way they are willing to put up with some of the headaches Linux brings.
Although I've spent way more time troubleshooting Windows issues then I have Linux ones so far, so maybe Microsoft stuffing so much bloated spyware into their system is starting to cause windows to rip at the seams, idk.
When I try to explain Linux to people who literally don't understand any of this I use a car metaphor
Windows is like a hatchback SUV, you buy it from a dealer and it mostly works for everyone good enough that they don't complain.
Linux is like a project vehicle in a lot of ways, the mechanic can tune it up exactly to the specifications they want, tear a bit out and put a diffrent one in, it requires some work under the engine but once that mechanic gets it the way they want it, it's incredible.
It's not a perfect metaphor but I think it gets the idea across.
Uh IDK how to finish this post, please try Linux if you can, changed my life.
#Long post about Linux ahead don't click read more if you don't want that#Linux#Linux mint#open source#Mantis thoughts
28 notes
·
View notes
Note
What software do you use to make your gifs?
as of right now i (zhuk) still draw and make gifs fully in Fire Alpaca! i'm slowly exploring Krita's capabilites for more complex animations tho.
i draw the initial frame + additional details sometimes on a normal canvas and then copy paste it into an animation one and continue working on it there. Then i usually forget to save the working file for the animation, so all the frames beyond the first one are gone forever if i accidentally close the program too early:') which is why i almost never fix mistakes in gifs
and here's Starr's answer (since i don't know which one of us you were asking):
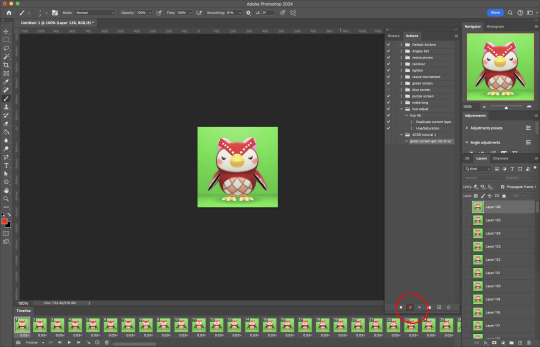
i now use krita animation mode, sorta, to organize the layers... but i draw them in a normal file first since its finnicky then i screenshot every single frame, then stitch it together w/ timing on ez. gif... and b/c bdubs gets noise consumed i do manual touch ups the reloop it... its a mess, but it works do not reccomend tho
35 notes
·
View notes
Text
Political prisoners distracted from economic study by harassment

April 21, 2025 Bakırköy Women's Closed Prison, B-6 Istanbul, Turkey
Dear Brother Adil,
I always feel a sense of embarrassment when writing to you. Over the past two years, my priority has been my university studies. Since it’s an associate degree program, it’s nearly completed. Because it's in the field of economics—a subject I had no prior understanding of—it has been extremely difficult, but I’m finishing it properly. I’ll be relieved in about a month. Normally, one wouldn’t spend so much time on a single course, but in prison, there’s always something that drains your energy. Especially here, things have been escalating wildly.
You may recall the letter I wrote a while ago. There was the torture of searches every other day, and the illegal shoe inspections... The searches have somewhat improved, but despite international conventions stating such measures should be used only when necessary or in cases of suspicion, the Enforcement Judge violated the law he is bound to uphold. I have now filed an objection in the High Criminal Court. In short, illegal shoe inspections continue. However, for now, the confiscations have stopped. They haven’t been seizing our belongings for some time.
Thank you for the support you gave to my letter. Apart from you, Ömer Faruk Gergerlioğlu has also reached out with eloquent expressions to the Director General of Prisons (C. General Manager) and the Minister of Justice in parliament, and he did not let the matter drop. I'm glad you exist. But the other letters I’ve written have been ignored. Not that it surprises us. If the country is in this condition, there must be a reason.
Only two of my letters received a response. The rest—those whose duty it is to handle these matters—are nowhere to be found. Especially since the Members of Parliament remain silent, our prison administration is now on the offensive again.
On Saturday, they drilled a hole into the corridor wall. The ward is two stories. The ground floor contains a common area, a sink, and six rooms. There are also two shower stalls. The upper floor has another six rooms and two more showers. A hole was opened at the end of the upstairs corridor in a way that allows a full view of the corridor and, directly across, the bathrooms. They want to install a camera there.
There is no justification for such perversion. Is there ever a valid excuse for voyeurism and depravity? Their "justification" is that they supposedly cannot see what we are doing inside. It’s hard to keep clean language under these circumstances. What could we possibly be doing inside? What do they do in their own homes? We have nothing but paper, pens, and books. At one point, they were practically living inside the ward. It was clear then that their goal was not search and security.
Now, they continue. I suspect they intend to riddle the ward with holes and install cameras to spy on us 24/7. Do you know what prison laws scream about? “Internal peace,” “productivity,” they chant. But in reality, it’s a practice of decay, corruption, manufacturing high-grade criminals, and creating sick individuals. It’s absurd, but we’re the ones trying to ensure that the laws are respected, while they create regulations that violate and contradict those laws. In legal hierarchy, regulations can never override laws, but that’s not how things are run here.
Once again, I’ve knocked on your door for a major problem we are facing. Even if I get exiled at the end of this process, I promise to write you short stories after finals, with the claim that they’ll be fantastic. For now, all my energy is poured into these writings.
Take care of yourself. Thank you for everything.
Meral Remziye Turmuş Bakırköy Women's Closed Prison B-6, Istanbul
11 notes
·
View notes
Text
Photoshop Meme Template Tutorial
I got bit by a bug to throw out a tutorial today because I had the time!
So for anyone who has found a neat little template online and wanted to use it - here's my attempt at explaining. This is assuming very little knowledge in these types of software. I will be using Clip Studio Paint as it's my preferred program, but anything with the ability to edit a .psd should have the same ability. (I will also add the inputs for Photopea as it is free and doesn't require any downloading.)
We'll be using this template by Ikara on Bluesky as our example.
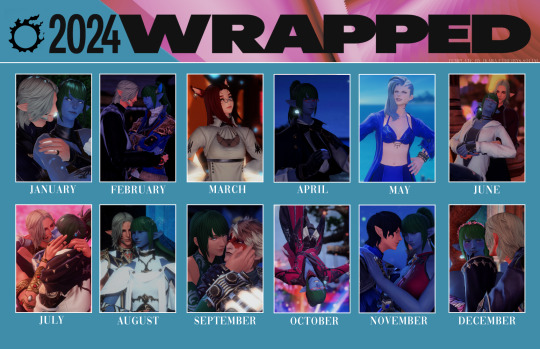
First off, open your file. (Drag the template from Downloads to the "Drop Any File Here" box. Then I would go "Views > Extras" and unclick that option.) The most useful part about .psd files for templates is the Layers. Every program that can edit a .psd should have a section of the screen that displays the layers. For the 2024 Wrapped, the layers are named "December" and "Layer 0". Everything under the "December" layer will be blocked by the non-transparent portions of that layer, and everything above "Layer 0" will be above the white.
So now we want to add some images. Open up your desired screenshot in any program and Copy>Paste (Ctrl+C and Ctrl+V) into your editing program. They should generate a new layer with only the image in it, but if it doesn't you can do Layer>New Layer to make a fresh one.

But, err... that's kinda too big to fit, isn't it? It is. So what we need to do is scale it down and possibly cut some of it out.

First, select your image layer and find a "Transform" or "Scale" tool. This is Edit>Free Transform (there is also "Transform" but I preferred free transform) in Photopea. There should be some options on the Scale section that are important. "Keep Aspect Ratio" is important to make sure that you don't squash or stretch your image. This is the set of chain links in Photopea. "Free Transform" also allows you to move the image into the right spot.


You can also use the numbers to scale it down from 100% to 50% or what ever your desired scale is (I liked 32-35% for Landscapes and 22-25% for Portraits for this template). Once it's to your liking, you can accept your transformation and move on. You can either delete the extraneous section of your image, or just leave it to be covered up by the other layers.

You will want to repeat this process until you have the template filled, making sure that each image is its own layer. This allows the most freedom when editing images if you want to go back and change anything. You can also use the layers to cover up other portions of different layers by moving it above or below each other.


If you have overlapping sections that can't be resolved with just layers, I would recommend deleting under the template rather than at the edge of the section because you might delete more than you wish. (I do not recommend using the "Crop" tool in Photopea as it effects your entire image rather than just your layer.) Use a Rectangle Select to pick the area you want deleted and hit "Delete" to do so.
So you've gotten all your images where you like them and cropped any overlapping bits, it's time to Export a new .png using File>Export as>PNG. "Export" creates a completely new image where "Save" just saves the image. You can Save the .psd for future use or if you feel like there may be a mistake that you aren't catching (which has definitely happened to me before) and then you have the ability to edit the entire thing again. A .png will not save the Layers, just all the visible stuff.
And that should be it! Feel free to ask any questions, it's entirely possible I didn't communicate something clearly or a tool works differently in the program you're using. I also included the .psd for the version I did so you can see behind the curtain. Happy memeing!
#tutorial#template memes#i hope i was clear#but goofing with memes and fandom stuff is how i learned these types of programs!#it's a good skill to have#there are also shortcuts in photopea and other programs you can use#but they vary program to program and i didn't want to mess with that
20 notes
·
View notes
Note
How DOES the C preprocessor create two generations of completely asinine programmers??
oh man hahah oh maaan. ok, this won't be very approachable.
i don't recall what point i was trying to make with the whole "two generations" part but ill take this opportunity to justifiably hate on the preprocessor, holy fuck the amount of damage it has caused on software is immeasurable, if you ever thought computer programmers were smart people on principle...
the cpp:


there are like forty preprocessor directives, and they all inject a truly mind-boggling amount of vicious design problems and have done so for longer than ive been alive. there really only ever needed to be one: #include , if only to save you the trouble of manually having to copy header files in full & paste them at the top of your code. and christ almighty, we couldn't even get that right. C (c89) has way, waaaay fewer keywords than any other language. theres like 30, and half of those aren't ever used, have no meaning or impact in the 21st century (shit like "register" and "auto"). and C programmers still fail to understand all of them properly, specifically "static" (used in a global context) which marks some symbol as inelligible to be touched externally (e.g. you can't use "extern" to access it). the whole fucking point of static is to make #include'd headers rational, to have a clear seperation between external, intended-to-be-accessed API symbols, and internal, opaque shit. nobody bothers. it's all there, out in the open, if you #include something, you get all of it, and brother, this is only the beginning, you also get all of its preprocessor garbage.
this is where the hell begins:
#if #else
hey, do these look familiar? we already fucking have if/else. do you know what is hard to understand? perfectly minimally written if/else logic, in long functions. do you know what is nearly impossible to understand? poorly written if/else rats nests (which is what you find 99% of the time). do you know what is completely impossible to understand? that same poorly-written procedural if/else rat's nest code that itself is is subject to another higher-order if/else logic.
it's important to remember that the cpp is a glorified search/replace. in all it's terrifying glory it fucking looks to be turing complete, hell, im sure the C++ preprocessor is turing complete, the irony of this shouldn't be lost on you. if you have some long if/else logic you're trying to understand, that itself is is subject to cpp #if/#else, the logical step would be to run the cpp and get the output pure C and work from there, do you know how to do that? you open the gcc or llvm/clang man page, and your tty session's mem usage quadruples. great job idiot. trying figuring out how to do that in the following eight thousand pages. and even if you do, you're going to be running the #includes, and your output "pure C" file (bereft of cpp logic) is going to be like 40k lines. lol.
the worst is yet to come:
#define #ifdef #ifndef (<- WTF) #undef you can define shit. you can define "anything". you can pick a name, whatever, and you can "define it". full stop. "#define foo". or, you can give it a value: "#define foo 1". and of course, you can define it as a function: "#define foo(x) return x". wow. xzibit would be proud. you dog, we heard you wanted to kill yourself, so we put a programming language in your programming language.
the function-defines are pretty lol purely in concept. when you find them in the wild, they will always look something like this:
#define foo(x,y) \ (((x << y)) * (x))
i've seen up to seven parens in a row. why? because since cpp is, again, just a fucking find&replace, you never think about operator precedence and that leads to hilarious antipaterns like the classic
#define min(x,y) a < b ? a : b
which will just stick "a < b ? a: b" ternary statement wherever min(.. is used. just raw text replacement. it never works. you always get bitten by operator precedence.
the absolute worst is just the bare defines:
#define NO_ASN1 #define POSIX_SUPPORTED #define NO_POSIX
etc. etc. how could this be worse? first of all, what the fuck are any of these things. did they exist before? they do now. what are they defined as? probably just "1" internally, but that isn't the point, the philosophy here is the problem. back in reality, in C, you can't just do something like "x = 0;" out of nowhere, because you've never declared x. you've never given it a type. similar, you can't read its value, you'll get a similar compiler error. but cpp macros just suddenly exist, until they suddenly don't. ifdef? ifndef? (if not defined). no matter what, every permutation of these will have a "valid answer" and will run without problem. let me demonstrate how this fucks things up.
do you remember "heartbleed" ? the "big" openssl vulnerability ? probably about a decade ago now. i'm choosing this one specifically, since, for some reason, it was the first in an annoying trend for vulns to be given catchy nicknames, slick websites, logos, cable news coverage, etc. even though it was only a moderate vulnerability in the grand scheme of things...
(holy shit, libssl has had huge numbers of remote root vulns in the past, which is way fucking worse, heartbleed only gave you a random sampling of a tiny bit of internal memory, only after heavy ticking -- and nowadays, god, some of the chinese bluetooth shit would make your eyeballs explode if you saw it; a popular bt RF PHY chip can be hijacked and somehow made to rewrite some uefi ROMs and even, i think, the microcode on some intel chips)
anyways, heartbleed, yeah, so it's a great example since you could blame it two-fold on the cpp. it involved a generic bounds-checking failure, buf underflow, standard shit, but that wasn't due to carelessness (don't get me wrong, libssl is some of the worst code in existence) but because the flawed cpp logic resulted in code that:
A.) was de-facto worthless in definition B.) a combination of code supporting ancient crap. i'm older than most of you, and heartbleed happened early in my undergrad. the related legacy support code in question hadn't been relevant since clinton was in office.
to summarize, it had to do with DTLS heartbeats. DTLS involves handling TLS (or SSLv3, as it was then, in the 90s) only over UDP. that is how old we're talking. and this code was compiled into libssl in the early 2010s -- when TLS had been the standard for a while. TLS (unlike SSLv3 & predecessors) runs over TCP only. having "DTLS heartbeat support in TLS does not make sense by definition. it is like drawing a triangle on a piece of paper whose angles don't add up to 180.
how the fuck did that happen? the preprocessor.
why the fuck was code from last century ending up compiled in? who else but!! the fucking preprocessor. some shit like:
#ifndef TCP_SUPPORT <some crap related to UDP heartbeats> #endif ... #ifndef NO_UDP_ONLY <some TCP specific crap> #endif
the header responsible for defining these macros wasn't included, so the answer to BOTH of these "if not defined" blocks is true! because they were never defined!! do you see?
you don't have to trust my worldview on this. have you ever tried to compile some code that uses autoconf/automake as a build system? do you know what every single person i've spoken to refers to these as? autohell, for automatic hell. autohell lives and dies on cpp macros, and you can see firsthand how well that works. almost all my C code has the following compile process:
"$ make". done. Makefile length: 20 lines.
the worst i've ever deviated was having a configure script (probably 40 lines) that had to be rune before make. what about autohell? jesus, these days most autohell-cursed code does all their shit in a huge meta-wrapper bash script (autogen.sh), but short of that, if you decode the forty fucking page INSTALL doc, you end up with:
$ automake (fails, some shit like "AUTOMAKE_1.13 or higher is required) $ autoconf (fails, some shit like "AUTOMCONF_1.12 or lower is required) $ aclocal (fails, ???) $ libtoolize (doesn't fail, but screws up the tree in a way that not even a `make clean` fixes $ ???????? (pull hair out, google) $ autoreconf -i (the magic word) $ ./configure (takes eighty minutes and generates GBs of intermediaries) $ make (runs in 2 seconds)
in conclusion: roflcopter
⎯⎯⎯⎯⎯⎯⎯⎯⎯⎯⎯⎯⎯⎯⎯⎯⎯⎯⎯⎯⎯⎯⎯⎯⎯⎯⎯⎯⎯⎯⎯⎯⎯⎯ disclaimer | private policy | unsubscribe
159 notes
·
View notes
Text
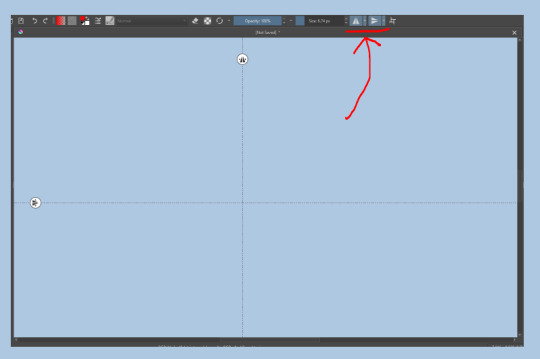
Krita tutorial the way I know it.
Basics: What is where.
Gimmicks.
Specific advice on specific tools.
Basics: What is where.

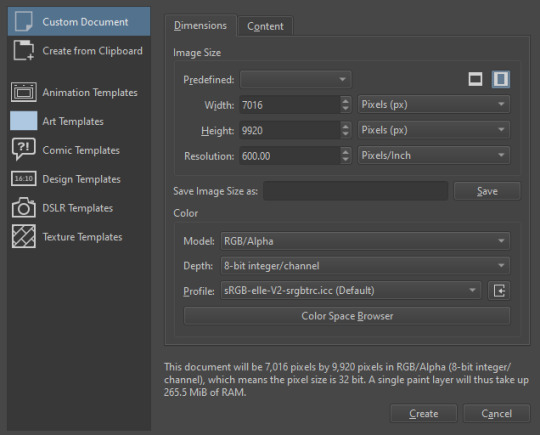
Upon opening the program this is what you're met with. First of all, must comment: The layout is HEAVILY editable so you can just drag menus anywhere you want, even leave them floating amidst the sheet you're drawing on.
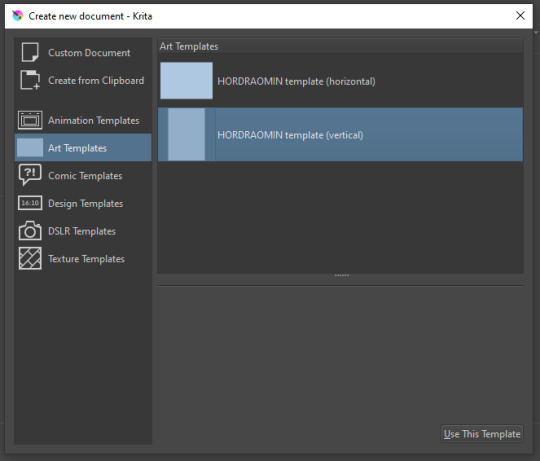
You can create custom art templates, I have two o'mine here as both have my signature background color.
As well, you can edit the custom document settings, as in what size you want it, what resolution, even the initial content of the image. As well you can create from clipboard: Just copy some image from your browser and Krita will recognize it (useful for making meme edits lol).

Now, once you have your file, I will show you what is where.
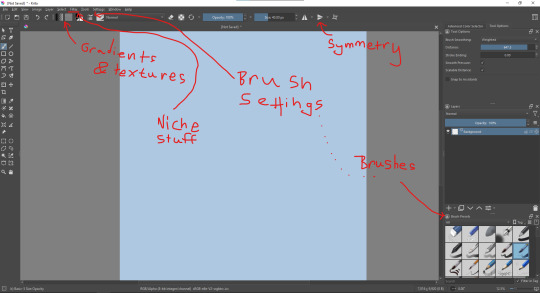
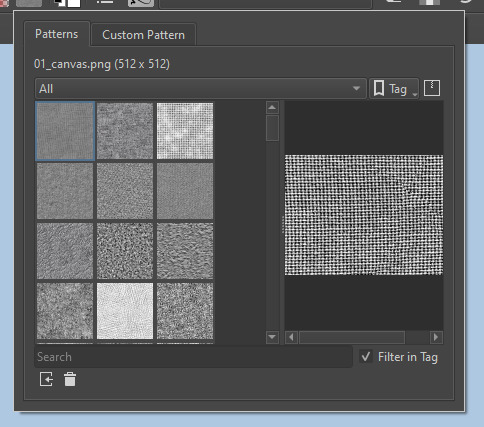
Brushes:
Brushes are easy to edit and there are tons of free bundles to download online. I myself only got one bundle, Jackpack (bit hard to find now due to original source being lost, it is still available but bit tricky to come by).
There. Are. Tons.

Some of these are my custom brushes for calligraphy in neography, you might even guess which ones. You can edit existing brushes, make new ones from the ones you've edited without changing the original, and all sorts of stuff (more below in the third chapter).
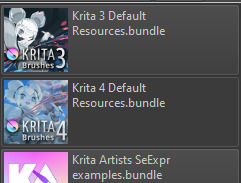
There are numerous packages of brushes once you enter Krita, but only one/two are available when you first open it. To unlock them all, click here:

And make sure all bundles are dark gray in color (example of both dark and light below).
Now Tools Options: those will pop up depending on what tool you're using.
Symmetry: Fun stuff. You can drag the lines depending on how you need them and then center them back to the center of the screen if needed.
Gradients and Textures also have their tools options, you can play with those to get the feeling what they can do (more in third chapter).

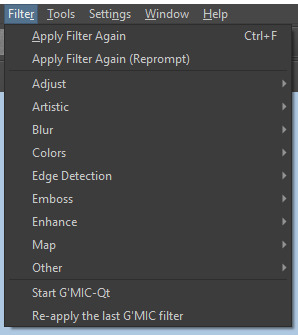
The Filters tab is useful too. Blurring, motion blurring, color mapping, artistic filters and all that: Quite fun.
Gimmicks.
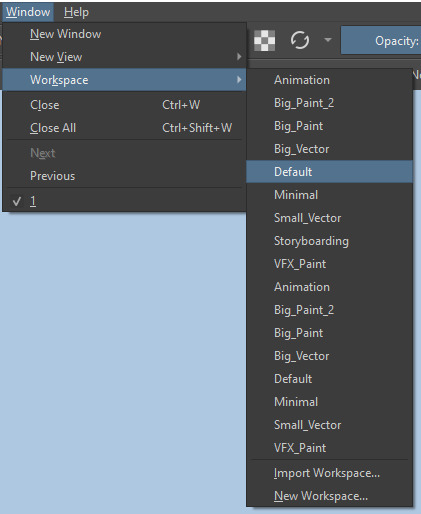
Krita allows you to customize your workspace freely. Floating menus, tabs, anything you want. It has quite many drivers at that-
To access the workspace templates, go to Window and choose Workspace.
Krita allows for copy-pasting any image onto the sheet. Though, for me it sometimes crashes if I accidentally copy-paste text into it without choosing the Text tool first.
The software allows for both raster and vector work. It is basically Photoshop sharpened to be used by artists primarily.
There are some interesting mechanics regarding the Eraser (default bind E).

You can use it with any brush, allowing for textured erasure/quick work. Good for sketching.
You can use it on gradients (given there's a transparent point on the gradient preset).
There's a Multibrush tool:

People say Krita is good for animation but my brain can't wrap around it yet honestly @~@.
The keybinds:
B - Brush tool.
E - Erase tool option.
M - Mirror (useful for checking accuracy from a new angle).
Ctrl - Color pick (when used with brush or other color-using tools).
Shift+L.Mouse+drag - Changes the size of the brush by dragging left and right.
Ctrl+E - Merge layer with the one below.
Ctrl+G - Group selected layers.
Ctrl+A - Select whole sheet.
Ctrl+Shift+A - Deselect everything.
F - Bucket tool.
G - Gradient tool.
Ctrl+S - Save document.
Ctrl+Shift+S - Save As document.
Ctrl+N - New document.
Ctrl+O - Open document (will be seen in a new tab on top of the sheet).
Ctrl+C - Copy selected layer or selection.
Ctrl+X - Cut selected layer or selection.
Ctrl+V - Paste copied/cut layer or selection.
Q - Multibrush tool.
R.Mouse - Interesting thing: Opens up a quick selector for brushes and colors you've already used in the piece.
1 - Zoom 100%.
2 - Zoom to fit the piece vertically.
3 - Zoom to fit the piece horizontally.
4, 5, 6 - Turn 15 degrees (4 and 6) or undo the turning whatsoever (5).
Ctrl+I - Negative filter applied to layer.
Ctrl+U - Color editing on the layer.
Ctrl+Y - Soft proofing mode (for color mistakes and stuff like that, mostly annoying for me tbh).
Ctrl+T - Transform selection/layer.
Ctrl+R - Square select tool.
Ctrl+J - Lasso select tool.
Honestly you can just hover your mouse over tools and see their shortcut binds, as well. Or edit them in Settings.
Specific advice on specific tools.
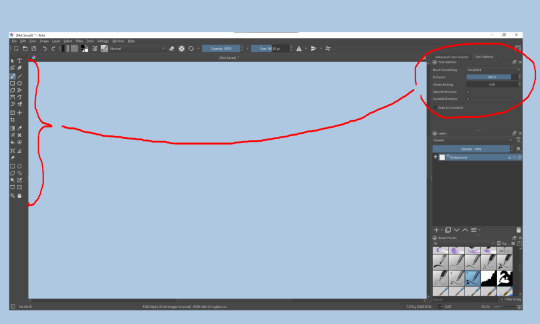
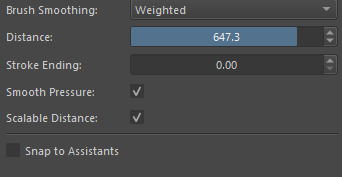
Brush:
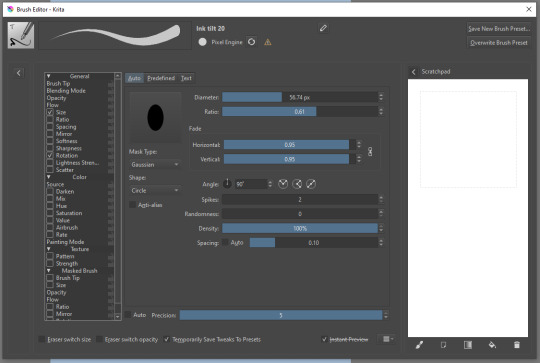
Brush editor is a great tool for making custom brushes, and it even has a sratchpad to test them out. Lots of settings, but no need to be afraid; Most of them you might never use on purpose.
Use Brush Smoothing for great and pretty lines in lining pieces or making calligraphy.
Gradient:
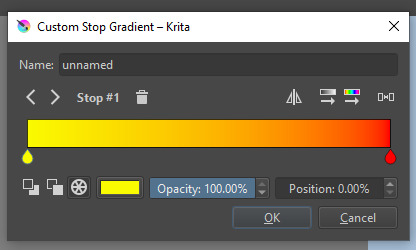
The four icons to the right top are:
Mirror gradient.
Arrange by lightness value.
Arrange by color value.
Space the stops evenly.
Click the gradient to add a new stop. The three things to the left are:
Make the stop use Primary Color.
Make the stop use Secondary Color.
Make the stop use a fixed color.
320 notes
·
View notes
Note
Hello! How are you dear? (I hope I can call you like that by the way🙃) I have a problem with some of your lots, your high school and your animal shelter, for some reason part of the walls disappear, I can build again without problem but I just wanna why this happens😊

(The walls are in full)
And also in the boat house (I don't know if is call like that sorry) in the second floor I have blue flashing I don't have my pc right now and I don't remember what object was.I am new in this so I hope the answer is not that obvious
Ps:I have all the CC that come with the lots and use clean installer
Ps 2:sorry if I am annoying or something, I really hope my English is ok
you're not annoying! i'm sorry for the confusion, do you have numenor's no cutaway walls? They are a custom wall that never gets minimized when you put the walls down, I use them a lot in my builds. I mention on the posts that you need them but its easy to miss because they don't come packaged with the lot, you have to be sure you install them separately!
they are a little trickier to install compared to normal cc because you have to install them a specific way. Numenor has a little utility called the Scriptorium that makes it much easier to install custom walls, stairs and fireplaces so I suggest using it to install the walls. If you play ultimate collection you might have a little trouble with the scriptorium installer, but I found some comments with tips for how to make it work in the modthesims thread!
On page 26 and 27 of the thread on modthesims people discuss some different techniques to get it to install correctly with ultimate collection:
one comment says: "For anyone having trouble using Scriptorium with the Ultimate Collection, it seems the simplest fix is to move the files to the Mansions and Gardens folder (SP9) of Fun With Pets instead of the Base folder in Double Deluxe.
In other words, first copying the Scriptorium folders from ’[Wherever you installed TS2]\The Sims 2 Ultimate Collection\Double Deluxe\Base\TSData\Res\Catalog\Scripts’ as well as the Scriptorium lights folder from ’…\The Sims 2 Ultimate Collection\Double Deluxe\Base\TSData\Res\Lights’. Then paste those folders into (for scripts) ’…\The Sims 2 Ultimate Collection\Fun with Pets\SP9\TSData\Res\Catalog\Scripts’ and (for lights) ’…\The Sims 2 Ultimate Collection\Fun with Pets\SP9\TSData\Res\Lights’
Make sure you paste it into the ‘SP9’ subfolder, not one of the others in 'Fun With Pets’.
You can make new shortcuts in your downloads folder if you like, or just remember to place any further ones in SP9 and not DD Base. I’d guess that the creators have moved on from this project and any updating would be unlikely, so this is the easiest workaround I’ve tried." --------------- and on the next page there is a tip for installing scriptorium for the sims 2 Legacy Collection: "Scriptorium typically wants the most recent pack's folders to use, which in UC's case is SP9--but we don't have that on Legacy. You're going to pop that series of folders and corresponding scripts into Base instead. (Filepath should look similar to C:\Program Files\EA Games\The Sims 2 Legacy\Base\TSData\Res\Catalog\Scripts)
Those folders and txt files want to go into this Scripts folder, but Scriptorium also dumps a few shortcut files--typically there to live in your downloads folder. For us, these are broken. Right click on each one, and change the "Target" and "Start In" boxes to where that file goes. (For instance, for me each one for Decks/Foundations goes to "C:\Program Files\EA Games\The Sims 2 Legacy\Base\TSData\Res\Catalog\Scripts\Scriptorium_Decks-Foundations-Pools"). You will need to do this separately for each shortcut and its corresponding folder.
From here, things should work. Download a Scriptorium-dependent file, and drag it to the corresponding shortcut. It should plop that into the folder and write a corresponding script as it normally would. Check it in game, and there you go." ----------
I hope that this helps and you can install the custom walls easily if you choose too! You might not run into problems either, some people find that the normal scriptorium install from the modthesims post works fine in ultimate collection. But hopefully if you have any problems those comments can help! as for the flashing blue in the houseboat, dang i'm sorry i don't know what it could be! I tested the lot in a cc free neighborhood and I didn't have any blue flashing. Only thing I can think of is that the bed is I believe from the sims 2 store asian fusion set, so in case that didn't package properly with the lot be sure you have the sims 2 store objects which you can download from garden of shadows. hope this helps! <3
14 notes
·
View notes
Text
someone sent in this ask and I spent literal hours putting together this tutorial but then it wouldn't let me post it and when I went back into my inbox the ask was gone?? good thing I copy and pasted it, so here it is in its own post
I'm not sure if this will work with programs other than photoshop, but this is how I do it. I know @shinobi-bacon has a tutorial here on how they do it which is pretty different from the way I do it, so if my tutorial is confusing maybe theirs will click with you better lmao. I stole the greenscreen idea from them anyway
SO FIRST, you want your villager on a green screen background. to do this, go to harv's island and use a custom pattern to make the walls and floors bright green. If the villager you're using has green in their design, you'll have to pick a different colour that isn't in their design, but for most villagers green is fine.
if your villager has every colour on them like pietro or stiches then rip you're gonna have to do some manual editing frame by frame. try to choose a colour that doesn't touch the edges of their silhouette too much in that case because it'll make life easier for you
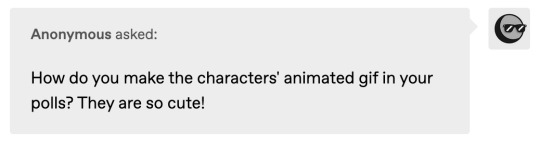
so once you have them in green purgatory, record them doing their emote or whatever. I just use the built-in screen record function that the switch has. press and hold this button to record the last 30 seconds that your switch displayed:

next send that video to your computer and trim off the start of the video so it starts right before a recognizable part of the animation. for this emote I cut it off right before the blink. if you have a slow computer, you'll probably want to trim the end off too so the video is only a little bit longer than one full animation loop
(you can use the video editing software of your preference, I just use quick time player Edit -> Trim)
okay time for photoshop. go File -> Import -> Video Frames to Layers
for "range to import" select "from beginning to end" (or you could skip the last step about trimming the video and select a range here, but I find it kind of finicky), and make sure "make frame animation" is checked
once imported, if it doesn't pop up on it's own, go Window -> Timeline to get your animation at the bottom

click through those frames at the bottom until you find an easily recognizable frame (I chose the first frame where her eyes are closed) and delete all the frames before it. in the layers panel, the layer from the frame you've selected should be the only one turned on. delete all the layers below it
now go through the frames to find the next identical frame. this is where the animation loops. delete that frame and all the frames after it, as well as all of their corresponding layers (note in the picture, frame 121 is selected, and it's exactly the same as the frame from the start of the animation)

hit the play button on the bottom left to double check that it loops properly
next, make sure both THE FIRST FRAME AND BOTTOM LAYER are selected, and crop and reduce the image to your desired size. you can do this step later if you want, it's just that doing it now will reduce the load on your computer and make it run a bit faster. just as long as the first frame and bottom layer are selected, you can do this at any time
SAVE HERE because if you mess up this next part it's a pain to fix, but it's easy to quit and start over if need be
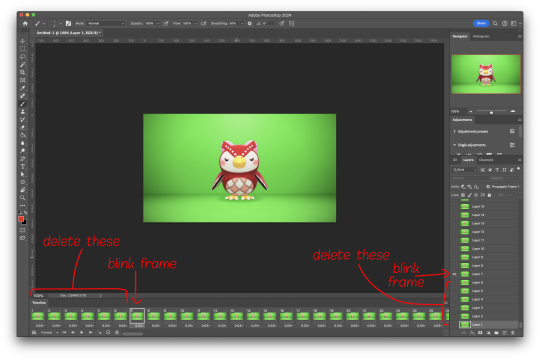
now it's time for my best friend the actions panel !! say hi actions panel !! (Window -> Actions). what the actions panel does is record your steps so you can quickly automate repetitive tasks.
in the actions panel, click the folder and name it whatever you want
then click the little plus and name that whatever you want and hit record. You'll see the dot turn red to indicate that your actions are now being recorded
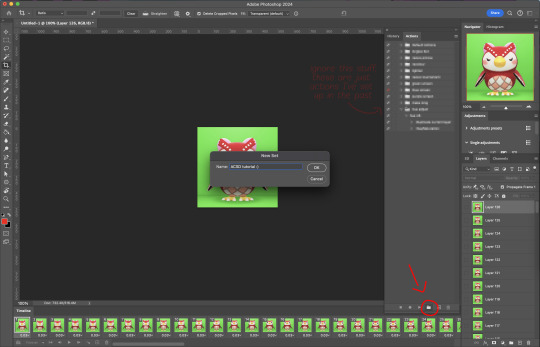
now with the BOTTOM LAYER AND FIRST FRAME selected (ignore that I have the wrong layer selected in the pictures, I fixed it after), go to Select -> Colour Range

click on a part of the canvas that would be green

shift+click on the rest of the green background and adjust the fuzziness until just the character's silhouette remains
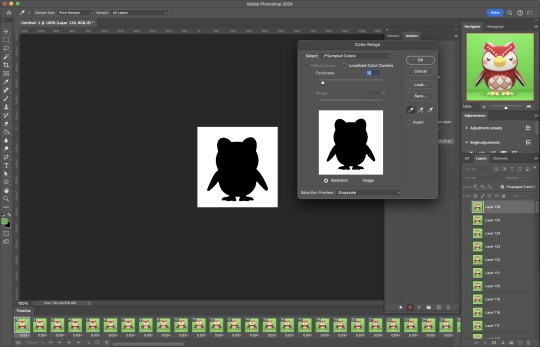
hit OK, now the background should be selected. go Select -> Inverse so that the character is selected, and click on layer mask.
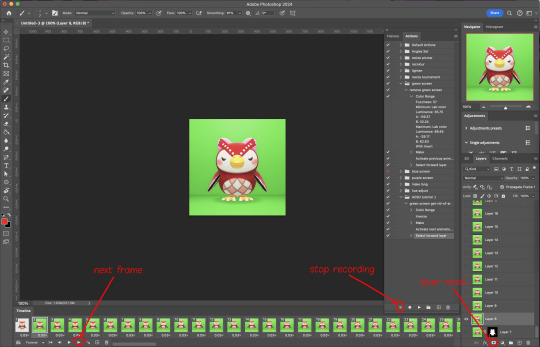
click the next frame button (you MUST click the button, not the actual frame. you need the recording to recognize "go to next frame" and not "select frame 2"),
then keyboard shortcut option + ] to select the next layer up (again, you MUST use the shortcut so it knows to move up one layer and not just "select layer 2"),
and then stop recording.
now just repeatedly click the play button and it will do all those steps we just did for each frame :)

this part is usually where it gets messed up for me. if it did something weird like duplicate the same frame or layer your animation over a static frame, just quit and reopen that save I told you to make earlier. the action recording you just made will still be there when you reopen photoshop, so just select the first frame and bottom layer and repeatedly hit play again. if it STILL doesn't work, you probably did something wrong
the recording is now saved in photoshop forever until you delete it, so you can reuse the recording for other gifs! but if they use a different colour background, you'll need to make a new recording (you can see I have separate ones for blue and purple screens). also if you were working with one of those colourful villagers and parts got masked out that shouldn't have been, you'll have to go frame by frame and manually fix them. that's why we masked out the background instead of deleting it.
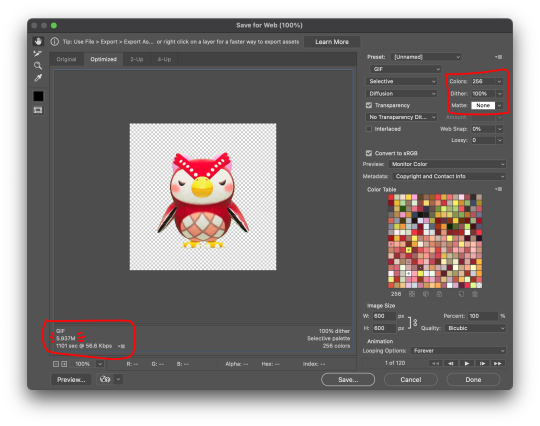
now it's time to make it into a gif! go File -> Export -> Save for Web. make sure Matte is set to "none" so you don't get those weird white flecks. colours and dither you want as high as they can go, but you can lower them if you need to make the file smaller (though I'd recommend resizing the image smaller first). the bottom left shows your file size. currently as of January 2024, tumblr allows gifs of up to 10MB
and there ya go! gif! :)

63 notes
·
View notes
Text
I want to mod Fields of Mistria dialogue!
Awesome! Making alterations to Fields of Mistria dialogue is a fairly simple process that requires basically no coding knowledge. Please note that this is a guide specifically for making alterations to existing dialogue. Adding new dialogue would require coding and I'm not familiar enough with Mistria's code to give advice on that.
Important Consideration:
The current state of Fields of Mistria dialogue modding involves making direct edits to/replacing game files. There isn't really a tool like SMAPI or Content Patcher available yet. This is important to remember for dialogue mods because all FOM dialogue is contained in a single .JSON file. This means that you cannot utilize multiple, individual dialogue mod files. This is where knowledge of how to make dialogue alterations is important even if you're downloading someone else's mod. If you want the effects of two different dialogue mods, unless they are made by the same modder and they provide a combination file themselves, you are going to need to go in and edit things yourself.
That out of the way, let's get started.
First, you need to find the game's Local Files. You can do this in the steam client by right-clicking the game title, hovering over Manage, and selecting Browse Local Files, as pictured:
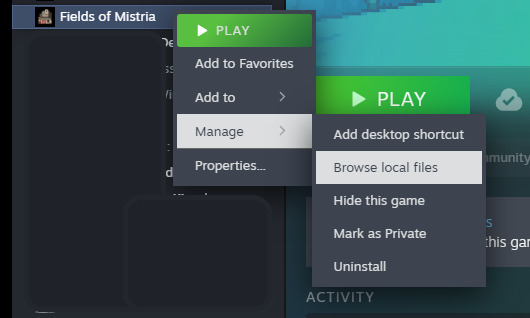
You should be taken to C:\Program Files (x86)\Steam\steamapps\common\Fields of Mistria in your file explorer, but your files could be stored elsewhere depending on your settings.
In the main directory, you should see a file named localization.json. Pictured:
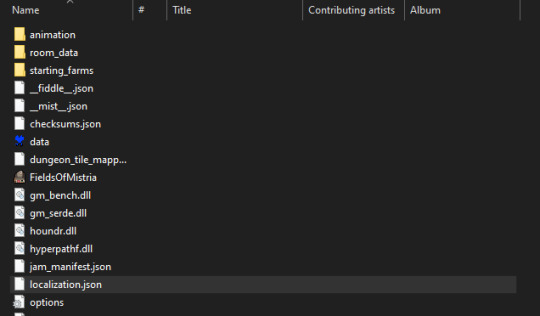
Copy that file and paste it to another location OUTSIDE OF THE LOCAL FILES, such as your documents folder, or even your desktop. I would recommend making two copies, and keeping one un-altered as a back-up, just in case. I would not advise directly tampering with the file in the local files, and having the editing copy outside of the local files is convenient for making quick edits in the middle of gameplay.
Okay, so how do you open a .json file for editing? I personally use Notepad++ and find its interface pretty user-friendly for this type of minimal editing, but people with more programming experience might have other suggestions.
So, we've installed Notepad++, and we open the .json. . . . . . ah.
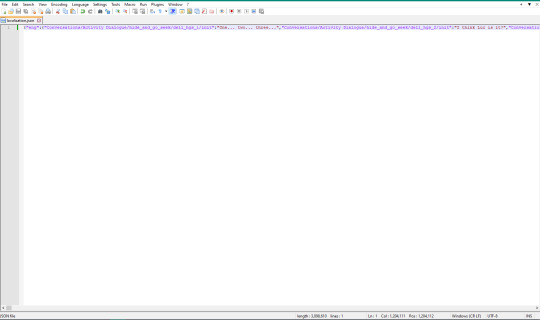
Yep, that's three-million+ characters on a single line. I don't know why it's like this. Possibly other interfaces may display it differently, but I only know Notepad++ so the best solution I have is this: select View from the menu, and click Word wrap. Pictured:

That makes it a bit more readable, but it is still every piece of dialogue in the game run together in a massive block of text. Very hard to manually locate the lines you want. This is where CTRL + F comes into play.
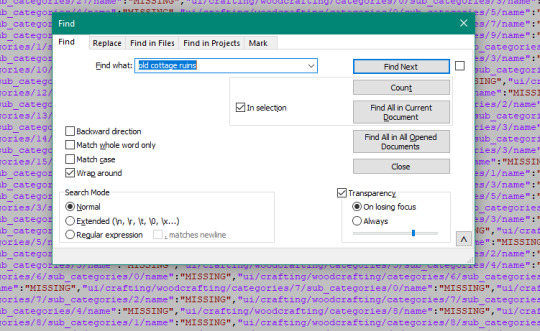
So the last time I used CTRL + F in this file, I was making an edit to my desktop copy of the file while I was playing, and knew exactly what line I was looking for, so I searched "old cottage ruins" to find it. But say I wasn't trying to edit a specific line, and wanted to go through and make general edits, such as changing a character's pronouns. I think the best practice, though it's still possible to miss lines this way, is to search the character's name. Pictured:

In most cases, a character will be named in dialogue to establish context before being referred to with a pronoun or gendered term. You will have to click through quite a bit of their own dialogue using this method though, as that will be tagged with their name.
Another important thing to consider is the order in which dialogue is entered in the .json. Let's go back to the cottage ruins.

Pictured: dialogue from Ryis' two-heart event. As you can see, it is not entered in order in the .json. So you may need to check before and after the dialogue you are editing to make sure you are hitting everything you need.
You can safely edit the red text in quotation marks, though I would avoid touching any of the "MISSING" text. The purple text is code and shouldn't be altered if you don't know what you're doing.
After you have saved the changes you want to make, you will need to copy your edited localization.JSON, and paste it into the local files, confirming that you want to replace the existing file. Again, I recommend making a back-up of the original file before doing this.
That being said, Mistria is in early-access, and when the game updates, your edited localization.JSON will be replaced by an updated file. So, any edits you made will have to be made manually again, to avoid saving over new content with your out-dated edit. Depending on how intensive your dialogue edit is, you may want to wait until Mistria is out of early access if you do not want to be constantly re-doing your edits.
I hope this was helpful!
19 notes
·
View notes