#Amped Extender Troubleshooting
Explore tagged Tumblr posts
Visit Tumblr Blog
Explore Tumblr blogs with no restrictions, modern design and the best experience.
Last Seen Tumblr Blogs


Fun Fact
The Tumblr office adopted Tommy, an 11-year-old Pomeranian.
Text
Quick Guide For Amped Extender Troubleshooting
To perform Amped extender troubleshooting, make sure the Amped extender is powered On. Moreover, ensure that your extender is plugged into a working wall outlet. Login to your extender and check for the latest firmware updates. If the updates are available, follow the on-screen instructions to fix any issues with your Amped wireless range extender.
0 notes
Text
Creating Immersive Pixel Art Displays for Live Events
Ever walked into a concert venue and felt like the visuals were alive—rippling in time with the beat or changing colors as the crowd moved? That’s the magic of an immersive pixel art display: a dynamic canvas built from thousands of little LED pixels that react, evolve, and invite interaction. In this post, we’ll explore how LED pixel displays are transforming pixel art live events, and how you can design an installation that feels both mesmerizing and meaningful.
What Is an LED Pixel Display?
An LED pixel display is made of individual light modules—think tiny RGB LEDs arranged in grids or strips. Each LED can change color and brightness independently, forming a pixel. When animated cohesively, these pixels form moving images, text, or abstract stories that dance across a stage or backdrop. For designers, the challenge is to turn static visuals into interactive pixel art that responds to sound cues, audience movement, or timecode, creating a fully immersive experience.

Why Pixel Art Displays Captivate Audiences
High Visual Impact Pixel arrays can render bold graphics and motion visuals that would be impossible with static sets.
Customization & Interactivity Integrate sensors or music triggers so the art reacts in real time—light pulses synced to bass drops, or waves that follow the crowd.
Versatility From linear LED strips to massive wall-mounted grids, pixel art displays can fit stages, domes, trusses—or even handheld gear.
Building Blocks of an Immersive Pixel Art Display
LED Pixel Modules & Pitch
Pixel pitch refers to the distance between center points of LEDs: smaller pitch (~4 mm) gives crisp, sharp images; larger pitches (>10 mm) are ideal for long-throw setups.
Choose modules rated for outdoor use (IP65+) for durability at outdoor live events or festivals.
Controllers & Protocols
Controllers drive animations via WS2812, SK6812, or DMX protocols. These bridge the gap between creative content and hardware. A reliable pixel controller can come from a reputable professional shop—ensuring quality performance and continued tech support.
Power & Signal Management
LEDs need steady power—usually 5 V or 12 V—so calculate amps per segment and add power injection points.
Extend signal using buffers or data repeaters to maintain sync across your entire display.
Designing the Content
Concept & Storyboarding
Start with a visual concept—synth-wave animation, audio-reactive waves, or VR-integrated graphics. Sketch storyboards and run test animations in software like TouchDesigner or Processing.

Mapping Your Grid
Accurate grid mapping—drawing each pixel's real-life position in your software setup—is critical. Even a small offset can skew the entire display.
Audio-Visual Integration
Link visuals to music using MIDI, OSC, or SMPTE timecode so the animation responds seamlessly to every beat, vocal cue, or lighting change.
Rigging & Setup Tips
Modular Structure Build your display from panels or strips that connect easily on-site. This makes installation smooth and maintenance easier.
Cable OrganizationLabel data and power lines. Use Velcro or cable ties to keep everything neat and trip hazards at bay.
Testing & CalibrationAlways do a full tech rehearsal. Look for dead or dim pixels, color shifts, or lag between triggers and playback.
Real-World Use Case
Take a mid-sized festival: festival-goers wear LED wristbands that light up with crowd cheers, while a massive pixel art wall echoes those patterns behind the stage. The result: a unified, reactive stage design that visually bonds the audience to the performance.
Best Practices for Success
Plan for failure: keep spare strips, controllers, and power supplies on hand.
Use compression-friendly content: looped animations or GIF-style visuals keep playback smooth.
Label everything: from IP addresses on networked controllers to physical cable runs, clarity speeds up setup and troubleshooting.
Document your setup: a labeled wiring diagram helps future iterations go faster and safer.
Final Thoughts
The future of pixel art live events is bright—literally. LED pixel displays let you build immersive, interactive shows that stand out and resonate deeply. Whether it’s a club, concert hall, or outdoor festival, these displays combine creative design with technical precision to deliver truly memorable experiences.
When you're ready to source your LED strips, controllers, and power gear, working with a reputable professional shop ensures hardware reliability and the kind of expert advice that helps you push creative boundaries—and deliver shows that truly shine.
With careful planning, thoughtful design, and thorough testing, you're on your way to creating spectacular pixel-powered experiences that wow crowds and elevate your production game.
#stage lighting#led wall display#led wall light#led lights#pro audio equipment#pro audio gear#audio video
0 notes
Text
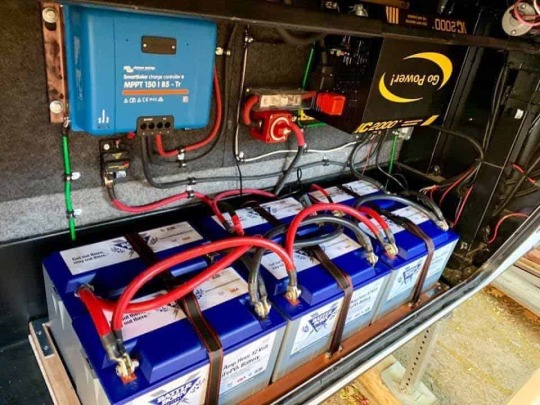
SQ04 100A Smart BMS – Optimized for Inverter-Based Lithium Systems
As the demand for reliable energy storage grows across homes, businesses, and mobile platforms, lithium battery systems have become a preferred choice thanks to their efficiency and compact form factor. But to get the best performance and lifespan out of any lithium battery—especially in inverter-based applications—a robust Battery Management System (BMS) is absolutely essential.

Enter the SQ04 100A Smart BMS – a purpose-built solution from Lithion Power, specifically designed for 4S (12V nominal) lithium battery packs used in inverter-driven systems.
⚡ What Is the SQ04 100A Smart BMS?
The SQ04 100A Smart BMS is a Battery Management System designed for 4-cell lithium battery configurations—either Li-ion (NMC) or LiFePO₄ chemistries. With a continuous discharge capacity of 100 amps, it is tailored to handle high current loads typically associated with power inverters, UPS systems, and DC backup solutions.
This BMS combines hardware-level safety, cell-level monitoring, and smart communication options—making it an intelligent, reliable core for any 12V lithium energy solution.
🔋 Key Features
✅ 4S (12V) Compatibility
The SQ04 supports 4 series-connected lithium cells, which is the standard configuration for most 12V battery systems. It works flawlessly with:
Solar-powered inverter setups
Home UPS systems
Telecom backup solutions
RV, caravan, and off-grid storage systems
💪 100A Continuous Discharge Rating
With a 100A continuous output, the SQ04 can support high-power devices like:
Pure sine wave inverters
Power tools
Air conditioners or large appliances (via inverter)
This makes it ideal for power-intensive setups that require reliable and sustained current draw.
🔒 Advanced Protection Mechanisms
The BMS includes:
Overcharge & over-discharge protection
Overcurrent & short circuit protection
Temperature-based cutoffs (high/low)
Passive balancing to maintain voltage uniformity
These features ensure safe operation under all conditions, extending battery life and protecting equipment.
📱 Smart Monitoring (Optional)
The SQ04 supports optional Bluetooth or UART modules, enabling:
Real-time cell monitoring
Pack status display (voltage, current, SOC)
Fault notifications
Cycle history and diagnostic logging
Compatible mobile apps and PC software allow users to tweak parameters and troubleshoot issues remotely.
🧰 Application Areas
The SQ04 100A BMS is purpose-built for inverter-driven battery systems, including:
🏠 Home Solar Inverter Batteries – Reliable energy storage for off-grid or backup needs
💼 Commercial UPS Systems – Protects battery packs in telecom and server rooms
🚐 Mobile Applications – Ideal for RVs, caravans, or mobile workstations
🔋 Portable Power Banks – For field engineers, camping, or emergency use
🛠 Installation & Integration
The SQ04 is compact and easy to install with clearly marked terminals and:
Pre-configured settings for 4S lithium chemistries
Built-in current and temperature sensors
Optional CAN/UART interface for inverter communication
This makes it a plug-and-play solution for OEMs and DIY users alike.
✅ Why Choose the SQ04 100A BMS?
Built for high-current inverter systems
Supports both Li-ion and LiFePO₄ chemistries
Offers real-time control and diagnostics
Manufactured by Lithion Power, trusted across India for rugged battery electronics
Ideal for both residential and industrial setups
🔚 Conclusion
The SQ04 100A Smart BMS is more than just a protection board—it's an intelligent guardian for your 12V lithium battery system, especially in inverter-based environments where stable power delivery and long-term reliability are crucial.
#bms#lithion#battery management system#lithium battery#batterymanagementsystem#lithion power#electricvehicle#ev#lithionpower#batman
1 note
·
View note
Text
Why Use VFDs for Swimming Pool Filtration System?
There are many facilities looking for ways to diminish unnecessary expenditures. Using VFDs is one of the most effective ways to decrease energy costs. These drives can be used in many applications including swimming pools.
VFDs are commonly used to adjust the speed of a pool pump. They can precisely match the pressure or flow requirements and help achieve energy savings. Let's explore how frequency drives can enhance the efficiency of swimming pool and filtration systems.
Without an AC Drive
Typically, a pool's filtration system is oversized to pump water even through a completely clogged filter. Without a VFD frequency drive, the pump operates at full speed continuously, which leads to a reduced lifespan for both the pool filter and the pumps, along with unnecessary power consumption. Furthermore, problems during motor start-up and shutdown can trigger power surges, which can be hazardous and accelerate motor wear and tear.
With an AC Drive
Implementing variable frequency drives in a swimming pool setup can significantly reduce electricity and maintenance costs. An adjustable frequency drive allows the pump motor to run at slower speeds, thereby consuming less electricity. Additionally, it can adjust the motor speed based on the pool's conditions. Ultimately, this extends the motor's lifespan without abrupt starts and stops, and it also enables efficient remote control, monitoring, and troubleshooting of the device.
The VFD can be programmed as an automatic PID controller, using a specified gallons per minute (GPM) set point entered into the keypad. It monitors the flow sensor and adjusts the pump's operation to maintain the desired flow rate. If the filter begins to accumulate debris, the AC drive automatically compensates by speeding up the pump to preserve the set point flow rate.
Benefits of AC Motor Drives
Typically, motors connected to AC drive panels operate at a constant speed. Allowing the flexibility to adjust motor speed provides numerous benefits, including:
Process Control: Monitoring process output to meet demand, coordinating different components of the main process for seamless transitions, and easily adjusting operations in response to changing requirements.
Reduced System Stress: Minimizing start-up currents facilitates the use of smaller fuses and power supplies, decreasing peak loads on the electrical network, and mitigating automatic shocks during start and stop actions.
Energy Efficiency: Significant electrical energy savings compared to traditional control methods are typical. In pump and fan applications, energy savings can range from 20% to 50%.
Additional Benefits of Using AC Drives in Swimming Pool Filtration Systems
Reduced Revolutions: AC drives enable motors and pumps to operate well below maximum revolutions compared to direct connections.
Lower Start-up Amps: This reduces amp draw during motor start-up, leading to lower demand charges and substantial savings on electricity bills.
Soft Start Functionality: This feature minimizes wear and tear on motors and couplings during start-up.
Extended Equipment Lifespan: Running at slower speeds prevents cavitation and prolongs the life of the equipment.
Conclusion
AC drives are gaining popularity in smaller applications, such as pool filtration systems, and present one of the best energy solutions for enhancing efficiency in these systems. To achieve the best quality for your pool filtration needs, consider seeking a reputable AC drives manufacturer.
0 notes
Text
Why Is My Amped Wireless Extender Not Working? Quick Fixes & Tips
If the Amped wireless extender not working, then, it is due to loose cable connections, power outage, extender, and router placed far away, improper configuration, technical glitches, etc. Further, to resolve this, fix the cable connection, ensure that there is an adequate power supply, position the extender, and router nearby, configure the device properly, power cycle, etc. For troubleshooting tips, approach us!

0 notes
Text
Everything You Need to Know About Choosing and Maintaining Your Boat Battery
When it comes to ensuring your boating experience is smooth and trouble-free, one component stands out as essential: the boat battery. This crucial piece of equipment powers everything from the engine to onboard electronics, making it indispensable for a successful voyage. In this comprehensive guide, we'll explore all aspects of the boat battery—from selecting the right one to maintaining and troubleshooting it.
Understanding the Importance of a Boat Battery
A boat battery is more than just a power source; it's the heartbeat of your vessel's electrical system. Whether you're using it to start your engine or to power navigational instruments, your boat battery must be reliable and well-maintained. Understanding how it works and why it's important will help you make informed decisions about battery selection and care.
Types of Boat Batteries
Choosing the correct boat battery begins with understanding the different types available. Each type has unique characteristics suited for various applications:
Lead-Acid Batteries
Lead-acid batteries are the most common type used in boats. They are reliable, affordable, and available in two main subtypes: starting and deep-cycle batteries. Starting batteries provide a quick burst of power to start the engine, while deep-cycle batteries are designed to provide a steady amount of power over a more extended period.
AGM (Absorbent Glass Mat) Batteries
AGM batteries are a type of lead-acid battery but with enhanced features. They use a fiberglass mat soaked in electrolyte, which makes them spill-proof and more durable. AGM batteries are ideal for boats as they offer better resistance to vibrations and can handle the demands of both starting and deep-cycle applications.
Gel Batteries
Gel batteries are another type of lead-acid battery that uses a silica-based gel to hold the electrolyte. They are highly resistant to leakage and can operate in a variety of temperatures. However, they are generally more expensive than AGM batteries.
Lithium-Ion Batteries
Lithium-ion batteries are gaining popularity in the boating world due to their lightweight design and high energy density. They last longer than traditional lead-acid batteries and offer faster charging times. Despite their higher cost, their benefits make them an excellent choice for modern boats.
Choosing the Right Boat Battery
Selecting the correct boat battery involves considering several factors to ensure compatibility and performance:
Battery Size and Type
Ensure the boat battery fits within the designated space in your vessel. Check the dimensions and mounting requirements to avoid issues with installation.
Power Requirements
Determine the power requirements of your boat's electrical system. Calculate the amp-hour (Ah) rating needed to support your engine and onboard electronics. The boat battery should provide sufficient power to meet these needs.
Climate and Usage
Consider the environment in which you'll be boating. Some batteries perform better in extreme temperatures or high humidity. For frequent use, opt for a battery designed for durability and long-term performance.
Maintenance Requirements
Different types of batteries require varying levels of maintenance. Choose a boat battery that matches your willingness to perform regular upkeep. AGM and gel batteries typically require less maintenance compared to traditional lead-acid batteries.
Installing Your Boat Battery
Proper installation is crucial for the performance and safety of your boat battery. Follow these steps to ensure a successful installation:
Preparation
Before installing your boat battery, make sure the boat is turned off and disconnected from any power sources. Gather all necessary tools, including wrenches, battery terminals, and mounting brackets.
Mounting the Battery
Place the battery in the designated compartment. Secure it using the provided brackets or straps to prevent movement while the boat is in motion. Ensure that the battery is level and adequately ventilated.
Connecting the Terminals
Connect the positive terminal of the boat battery to the positive cable and the negative terminal to the negative cable. Use corrosion-resistant connectors and ensure that the connections are tight and secure.
Testing
After installation, test the boat battery by turning on the boat's electrical systems. Check for any signs of improper connections or issues with the power supply.
Maintaining Your Boat Battery
Regular maintenance is critical to extending the lifespan of your boat battery and ensuring reliable performance:
Regular Inspections
Periodically check the boat battery for signs of corrosion, leakage, or damage. Clean the terminals and cables to prevent buildup that can affect performance.
Battery Charging
Keep the boat battery charged to avoid deep discharge. Use a battery charger designed for marine applications and prevent overcharging, which can damage the battery.
Storage
If storing your boat for an extended period, disconnect the boat battery and store it in a cool, dry place. This helps prevent the battery from discharging or deteriorating.
Water Levels
For lead-acid batteries, regularly check and maintain the water levels in each cell. Add distilled water if needed to keep the electrolyte at the proper level.
Troubleshooting Common Boat Battery Issues
Even with proper care, you might encounter issues with your boat battery. Here are some common problems and their solutions:
Battery Not Holding Charge
If your boat battery isn't charging, it could be due to a faulty battery or an issue with the charging system. Test the battery with a multimeter and consider replacing it if necessary.
Corrosion on Terminals
Corrosion can build up on the battery terminals, affecting connectivity. Clean the terminals with a mixture of baking soda and water, then apply a corrosion inhibitor.
Weak or No Power
If your boat's electrical systems are weak or not functioning, check the battery connections and ensure they are tight. Also, inspect the battery for any signs of damage or degradation.
Upgrading Your Boat Battery
If you're considering upgrading your boat battery, evaluate the benefits of newer technologies, such as lithium-ion batteries. While they require a higher initial investment, their long lifespan and superior performance can offer significant advantages over traditional batteries.
Conclusion
In summary, understanding the importance of a boat battery and selecting the right one can significantly impact your boating experience. By considering factors like battery type, power requirements, and maintenance, you can ensure that your boat battery provides reliable performance and longevity. Regular maintenance and proper installation are crucial to getting the most out of your battery and enjoying a trouble-free boating experience.
0 notes
Text
How to Hook Up RV Batteries in Parallel: Simple and Efficient Expert Guide
by Richard Gastmeier Parallel connection refers to an electrical circuit configuration where components are connected across the same voltage points. This setup means that the voltage is constant across all components, but the total current is the sum of the currents through each component..... Introduction Welcome to the ultimate guide on learning how to hook up RV batteries in parallel! If you plan to extend your off-grid adventures or simply want more energy storage for your travel trailer, understanding how to properly connect your batteries is essential. In this comprehensive article, we'll walk through everything you need to know to get this set up right, starting from the reasons you might want parallel connections, the materials and tools you'll need for the job, step-by-step instructions on how to do it, and finally some important safety tips and maintenance advice to ensure your setup serves you well over time. Introduction Understanding Series Connection Understanding Parallel ConnectionsBenefits of Parallel Connection Steps: How to Hook Up RV Batteries in ParallelGather necessary tools Identify positive and negative terminals Connect positive terminals together Connect negative terminals together Test the connection Safety PrecautionsImportance of safety gear Avoiding short circuits Troubleshooting Common IssuesChecking battery voltages Inspecting connections for loose wires Seeking professional help if needed How to Hook Up RV Batteries in Parallel: Summary Understanding Series Connection When connecting RV batteries in series, you are linking their positive terminals to negative terminals, resulting in an increased overall voltage. For instance, if you connect two 12-volt AGM batteries in series, the total voltage of the batteries together in series becomes 24 volts. 12-Volt batteries in series can be beneficial in scenarios where higher voltage is required for specific RV appliances or systems. However, it's crucial to carefully assess your RV's electrical system compatibility with the increased voltage. Wiring RV batteries in series should be part of a thoughtful design to ensure seamless integration and effective power management for your RV adventures. Understanding Parallel Connections Parallel connection refers to an electrical circuit configuration where components are connected across the same voltage points. This setup means that the voltage is constant across all components, but the total current is the sum of the currents through each component. In robotics and especially in recreational vehicles (RVs), parallel connection is important for managing the energy distribution from the power source, such as a battery bank, to various subsystems. Parallel wiring allows for multiple appliances and systems to operate independently without affecting each other's performance. It is common in RVs to use parallel connections for energy storage systems, to increase the available amp-hour capacity while keeping the voltage constant, which is crucial for ensuring the proper operation of onboard electronics and appliances. For instance, if an RV has multiple 12-volt batteries connected in parallel, the total output will still be 12 volts. Still, the capacity (amp-hours) will increase, allowing for longer use of appliances before the batteries need to be recharged. This is essential for RV owners who spend extended periods off-grid and require a reliable power supply. Moreover, solar panels are often connected in parallel to provide a consistent charge to the battery bank without over-voltage, which is important for the longevity of the rv battery and the system's safety. Overall, parallel connections are integral to the efficient design of an RV's electrical system, as they help in maintaining consistent voltage levels, providing flexibility in the power system's design, and ensuring that power is available to multiple systems simultaneously. Thus, it is imperative for any RV traveler to learn how to hook up RV batteries in parallel. Benefits of Parallel Connection The advantages of parallel wiring RV batteries over wiring them in series are numerous. They include increased amp-hour capacity, which translates to longer usage time for your devices and appliances, and redundancy, ensuring that if one battery fails, the system can still function with the remaining RV batteries. Parallel connection is a common practice for increasing the available amp-hour (Ah) capacity of the power storage system while maintaining the same voltage. This configuration involves connecting the positive terminals of two or more volt batteries and the negative terminals together. The primary benefit of a parallel connection is the increased total capacity, which directly translates to a longer power supply duration before needing recharging. This can be particularly advantageous for RV users who require more power for extended off-grid camping or for powering numerous or high-consumption devices. Another advantage of parallel battery configurations is redundancy. When two batteries are connected in parallel, if one fails, the other can still provide power, albeit at a reduced total capacity..... Read More... Read the full article
0 notes
Text
0 notes
Text
Common Issues and Solutions with Honda XR650L Battery Placement
The Honda XR650L is a powerhouse on and off the road, renowned for its durability and versatility. However, like any motorcycle, riders may encounter challenges with the stock battery placement. In this blog, we'll delve into common issues associated with honda xr650l battery relocation kit placement and explore effective solutions to enhance your riding experience.
1. Limited Access for Maintenance:
Issue: The XR650L's stock battery location can make routine maintenance tasks, such as checking battery terminals and fluid levels, a bit cumbersome.
Solution: Consider a battery relocation kit that repositions the battery for easier access. This not only simplifies maintenance but also allows for quick troubleshooting if issues arise.
2. Weight Distribution Concerns:
Issue: The XR650L, designed for both on and off-road adventures, benefits from optimal weight distribution. The stock battery placement might contribute to imbalance issues.
Solution: A battery relocation kit strategically redistributes weight, improving the bike's overall balance. This modification can enhance stability, especially during off-road escapades.
3. Exposure to Elements:
Issue: The standard battery placement leaves it vulnerable to the elements, particularly water and mud, increasing the risk of corrosion and electrical issues.
Solution: Invest in a battery relocation kit with protective casing or choose a kit that relocates the battery to a more sheltered area. This helps shield the battery from adverse weather conditions, extending its lifespan.
4. Aesthetic Preferences:
Issue: Some XR650L riders may find the stock battery placement visually unappealing, especially if they are pursuing a customized look for their bikes.
Solution: Opt for a relocation kit that not only resolves functional issues but also aligns with your aesthetic preferences. Many kits are designed to complement the bike's overall appearance, adding a touch of customization.
5. Limited Compatibility for Additional Accessories:
Issue: Adding accessories like aftermarket exhaust systems or larger fuel tanks can be challenging with the stock battery placement.
Solution: A battery relocation kit often creates additional space, allowing for more customization options. This flexibility can be crucial for riders who wish to personalize their XR650L with various add-ons.
6. Starting Issues in Extreme Conditions:
Issue: In extremely cold or hot conditions, the stock battery placement might contribute to starting issues due to temperature sensitivity.
Solution: Some relocation kits provide options for using larger batteries with higher cold cranking amps (CCA), ensuring reliable starts even in challenging weather conditions.
In conclusion, addressing common issues with Honda XR650L battery placement involves considering a battery relocation kit tailored to your specific needs. Whether it's improving access for maintenance, achieving better weight distribution, or enhancing the bike's aesthetics, these solutions contribute to an overall optimized riding experience. Explore the options available and find the battery placement solution that aligns with your XR650L adventure goals. Your bike will thank you with improved performance and reliability on every journey.
0 notes
Text
Travel Technician II USA zl120qmfdnya HVAC or Power

Job ID: zl120qmfdnya Full-time Onsite Role with Paid Relocation Major Project Technician II - Travel Technician Our client, a renowned industry player with a multitude of accolades, is currently seeking a skilled Major Project Technician II - Travel Technician. Join our dynamic team and play a crucial role in ensuring our clients receive top-notch services related to power generation and HVAC solutions. Why Choose Our Client? Here are some of the benefits: - Home-based opportunity available in various US cities with major airports, with up to 75% travel. - Competitive compensation with potential for additional rewards. - Generous travel allowance of $2.50 per hour. - 23/10 schedule for optimal work-life balance. - Annual bonus program to recognize and reward your contributions. - No-cost medical plan option available. - Comprehensive technical training programs, both in-person and virtual, covering various aspects including diesel, gas, compressed air, electrical, controls, oil-free air compressors, HVAC, microgrid & storage, and more. - Opportunities for career growth and tuition reimbursement. - Immerse yourself in a safety-focused culture working with cutting-edge technology. What the Role Entails: As a Major Project Technician II, you will be part of an elite technician team working on diverse projects ranging from large-scale events to supporting utility customers and participating in refinery turnaround teams. Key responsibilities include: - Installation, commissioning, service, and repair of generators, diesel engines, electrical distribution equipment, HVAC systems, and/or oil-free air (OFA) systems. - Commissioning for Major Projects and other complex initiatives. - Troubleshooting equipment failures, both on Major Projects and at service centers. - Utilizing mathematical formulas to calculate nominal and effective tonnage and/or kW requirements. - Reading and comprehending electrical schematics, wiring diagrams, and service manuals. - Maintaining a thorough knowledge of, practicing, and promoting safe working conditions in accordance with OSHA, EPA, and other regulations governing the safe operation of equipment. - Interface with a remote operations center to prevent failures, assist in designing proactive notification systems, and ensure compliance. Expertise and Qualifications: - Willingness to travel extensively, up to 75%, and be away for extended periods. - High school diploma/GED or equivalent. - 4-6 years of experience in power generators, commercial HVAC equipment, and/or oil-free air (OFA) compressors, encompassing inspections, maintenance, and repairs. - Certifications such as Electrical Generating System Association technician are advantageous. - Proficiency in using metering and instruments like multi-meters, amp meters, and hygrometers. - Possession of a valid Letter of Electrical Authorization for Aggreko. - Capability to obtain and maintain a TWIC card or valid DOT medical card based on customer requirements. - Valid driver’s license. - Ability to move or lift objects, typically less than 75 lbs. Screening Questions: - Are you open to travel up to 75%? - Upon receiving an offer, you will be subject to a background check and drug test. Do you have any concerns? - What equipment have you worked on? - Are you available to work on weekends? - Do you have any HVAC Certification? EPA Universal. - Are you familiar with working on Chillers? - How many years of experience do you have in the industry working on HVAC on the Industrial/Commercial side? Interview Steps: - Assessment test - Must complete within 45 minutes to an hour and score at least 70%. - Virtual interview - Conducted on Microsoft Teams. - On-site interview - At a facility. Read the full article
0 notes
Text
Enable Parental Controls on Amped Extender [Complete Guide]
Today, every kid can be seen holding a mobile device in hand. Well, it seems to rejoice that kids are now having access to technology and becoming more advanced. But, there comes risk with this happiness. You can’t stay with your kid every time in order to keep a check on what he/she does on the internet. Perhaps, they accidentally tap malicious content. To prevent that, an Amped wireless extender allows its users to enable parental control. With this feature enabled, one can check what their kid is doing over the internet or even block suspicious websites.
In this post, you will become acquainted with the entire process of enabling Parental Controls on your Amped WiFi range extender. So, read on and know how to limit your kid’s internet usage.
Steps to Enable Parental Controls on Amped Extender
Step 1: Power Up the Extender
Right off the bat, connect the power adapted of your Amped device to it and insert its plug into a wall socket near the host router. Press the Power button in order to switch on your range extender. However, take care that the socket being selected is not damaged. Otherwise, your extender won’t be able to get a consistent power supply which can further result in hardware damage to your device. Consider taking the help of UPS if you reside in an area suffering power outages.
Step 2: Connect Your Devices
The next step is all about creating connections. Connections between what? Your Amped extender and the main router. You have two options available at the hand in order to complete this step. Either pick an Ethernet cable or consider selecting a wireless source. The choice is all yours. But, do cross-check the connections twice as a weak connection between them can result in technical issues amidst the process of enabling parental controls.
Step 3: Pull Up an Internet Browser
Right after connecting your wireless devices, you need to access a web browser. It will be the platform on which you will access the Amped wireless setup wizard. So, switch on your computer and pull up your favorite internet browser. The choice of web browser depends on you, but do not forget the fact that you can’t access the login page of your range extender using an outdated web browser. In addition to this, the web browser should always run free of cache and cookies.
Step 4: Visit setup.ampedwireless.com
Time to access setup.ampedwireless.com! It is the extender’s default URL. To access it, go to the address field of the internet browser you’ve just pulled up. Thereafter, insert the web address and hit Enter. See to it that there are no typing mistakes in the web address. Apart from this, do not consider making the web address entrée into the search bar of the internet browser. Otherwise, you will get lost in the labyrinth of Amped extender login issues.
Step 5: Log in to Your Extender
Pressing Enter will open up the range extender’s login page for you. Here, you are required to key in the extender’s username and password. Thus, recall the login credentials you’ve assigned to your Amped device right after the setup process. Thereafter, enter them very carefully taking into account the fact that they are of case-sensitive nature. Moreover, avoid making no-brainer mistakes by entering the username into the passphrase field and vice-versa. And, yes, click Login after you’re done entering the login details.
Step 6: Enable Parental Controls
Has the dashboard of your Amped wireless range extender appeared before your eyes? Good! You’ve done a great job till now and are just one step farther from enabling parental controls on your device. Reaching there, select the Management option and look for the Access Control option. This will open up the Access Control window. Thereafter, select the kid’s device and the time period for which you want to allow internet access to him/her. For example, your kid spends at least half of the day at school. So, there is no need to enable parental controls during their school timings. Also, consider saving the settings you’ve made.
Sum Up
That’s all about enabling parental control features on your Amped extender and restricting your kid’s internet access to a few websites for a limited time. Hopefully, the steps shared in this post will help you enable the parental controls feature with ease. If yes, share your experience in the comment section.
#setup.ampedwireless.com#amped wireless extender setup#amped extender setup#amped extender login#amped login#Amped Wireless range extender#amped extender troubleshooting
0 notes
Text
Step By Step Process For Amped Extender Troubleshooting
Looking for the Amped extender troubleshooting? Here is the best guide for you. Firstly, ensure proper power and connection to the main router. Verify correct placement within the router's range for optimal signal strength. Reset the extender and reconnect to the network. Update firmware for potential bug fixes. Clear cache and cookies on connected devices. Double-check security settings and passwords. If problems persist, consult the user manual or contact our technical experts for help.
0 notes
Link
#amped extender setup#extender login#troubleshooting#setup.ampedwireless.com#Amped wireless range extender#Amped Extender
1 note
·
View note
Text
Amped Wireless Extender Troubleshooting Guide
Having trouble connecting your Amped Wireless Extender to your router? This Amped Wireless troubleshooting guide will assist you in resolving the problem.
But first, let's look at what issues are interfering with the Amped WiFi extender's ability to connect to the internet.
You will be able to easily perform an Amped wireless extender factory reset. This Amped wireless troubleshooting, also known as the Amped wireless extender reset procedure, will allow you to connect to the internet without difficulty. If performing an Amped wireless extender reset to factory default does not work for you, you can contact our skilled tech team to resolve any issues with the extender.
ampedlogin.com offers online support and information for amped wireless extender WiFi devices. However, we are not affiliated with any specific organisation or brand. The use of trademarks, brand names, or logos on the site should be regarded only as illustrative. Customers who approach us directly receive run-time assistance.
#wireless extender#amped wireless extender#extender factory reset#troubleshooting tips#extender login issues#http://setup.ampedwireless.com.
1 note
·
View note
Text
Amped Wireless Range Extender Not Working
If you have your Google search bar filled with the keyword ‘amped wireless range extender not working’ then try these troubleshooting tips here. Make sure that the wireless and security settings of your range extender are properly configured. Try moving your range extender closer to your home router. You should set the wireless channel of your Amped device in between 5 to 11. Make sure the wired connections between your extender and your computer system are securely connected. Try to restart the computer system, your router, and the Amped wifi extender. Try resetting the Amped device to the factory defaults and then reconfigure your extender. If you need more tips to fix the Amped wireless range extender not working error then try contacting our technical executives on our toll-free number. You can also do a live chat with our experts via an online chat window.
#amped router setup#amped wireless router#setup.ampedwireless.com#amped router login#amped setup#amped wireless setup
1 note
·
View note