#AppIDSVC
Explore tagged Tumblr posts
Visit Tumblr Blog
Explore Tumblr blogs with no restrictions, modern design and the best experience.
Last Seen Tumblr Blogs


Fun Fact
12.7% of mobile users access Tumblr.
Text
Fix unable to start the Application Identity Service
#AppIDSVC#Application Identity Service#AppLocker#AppLocker Service#Configure AppLocker Rules#Microsoft Windows#Windows#Windows 10#Windows 11#Windows Server#Windows Server 2012#Windows Server 2019#Windows Server 2022
1 note
·
View note
Photo
How to Fix KB5016691 Update Not Installing on Windows 11
Is the KB5016691 update not performing , installed, or downloaded on Home windows 11?
Windows released the update on 8/25/2022 (OS Create 22000.918).
The update resolved many issues and created good quality enhancements.
It fixed the issue similar to USB printing and an issue that prevents Home windows 11 SE from trusting some Microsoft Retail outlet applications.
It also preset a bug that induced Edge to end responding when you use IE mode.
In this information, you are going to learn how to take care of the set up/obtain problem for the KB5016691 update on Home windows 11.
Correct 1: Run the Update Troubleshooter Open the Home windows begin menu Options. System Troubleshoot Other troubleshooters. Home windows Update Operate Restart your Computer system. Take care of 2: Restart Windows Update and background intelligent transfer company Home windows research Providers. Windows update Startup type Computerized Apply Ok. Pick out “Restart the service” for “Windows Update”. Background intelligent transfer services Startup kind Automatic Use Alright. Select “Restart the service” for “Background smart transfer service”. Restart your Computer system. Repair 3: Use Home windows 11 Set up Assistant Go to https://www.microsoft.com/en-us/computer software-down load/windows11 . Simply click on “Download Now”. Operate the .exe file Acknowledge and install. Take care of 4: Use Microsoft Update Catalog Go to https://www.catalog.update.microsoft.com/Residence.aspx . Search for “KB5016691”. Obtain the Home windows 11 KB5016691 update. Restart your Pc. Take care of 5: Reset Windows Update elements Duplicate these and paste them into the Notepad app:
SC config trustedinstaller start=vehicle
web stop bits
net halt wuauserv
net stop msiserver
net quit cryptsvc
net quit appidsvc
Ren %Systemroot%SoftwareDistribution SoftwareDistribution.old
Ren %Systemroot%Technique32catroot2 catroot2.aged
regsvr32.exe /s atl.dll
regsvr32.exe /s urlmon.dll
regsvr32.exe /s mshtml.dll
netsh winsock reset
netsh winsock reset proxy
rundll32.exe pnpclean.dll,RunDLL_PnpClean /Drivers /MAXCLEAN
dism /Online /Cleanup-picture /ScanHealth
dism /On the net /Cleanup-impression /CheckHealth
dism /On line /Cleanup-image /RestoreHealth
dism /On the web /Cleanup-graphic /StartComponentCleanup
Sfc /ScanNow
net start out bits
web start wuauserv
internet start off msiserver
web start out cryptsvc
net begin appidsvc Conserve the file as “Wufix.bat” established the spot as desktop All Files Preserve.
Run the file as an administrator to restart all the Home windows update products and services and restart your Computer system.
Resolve 6: Use the Media Development Instrument Go to https://www.microsoft.com/en-us/software program-down load/windows11 . Simply click on “Download Now”. Observe the on-monitor instructions. Open up the downloaded file. Run the setup file. Comply with the on-screen directions and entire the set up system. More reading through How to Take care of Mistake Code 46 in Valorant
305+ Greatest Valorant Usernames
Valorant Procedure Specifications
https://socialwicked.com/how-to-fix-kb5016691-update-not-installing-on-windows-11/
0 notes
Text
How to Avoid Hiccups While Updating Windows
Sometimes, while updating the operating system, users may face certain hiccups. Often, due to poor internet connection, lack of space, or software issues, Windows updates get paused. Read on and apply the solutions mentioned below.
Use the Windows Updates Troubleshooter
Windows updates troubleshooter is an in-built tool of Windows that can recognize windows updates service and fix the available issues automatically.
Here are the steps to do:
Tap the Windows + I button on your keyboard to open the settings application on your device.
Select the “Updates and Security” option.
Click “Troubleshooter” that appears on the left side pane.
Click “Windows update and then select the “Run Troubleshooter” option.
Now you need to wait until the scan is complete; when scanning is complete, the issues will get fixed automatically.
Now restart your computer.
Clean the Downloads Folder
Here are the steps to follow:
Tap the Windows + R button on your keyboard to launch the Run command prompt.
In the run command-line, type “C:\\Windows\\SoftwareDistribution\\Download” and hit “OK” to open the directory.
Here you need to remove the entire content. Tap Ctrl + A to select the entire item and then tap the “Delete” button.
After the above process, restart your device and try to download needed updates.
Change Windows Update Settings
Here are the steps to follow:
Tap the Windows + I button on your keyboard to open the settings application on your device.
Select the “Updates and security” button in the settings option.
Select the “Advanced Option” link.
Here you need to uncheck “Give me updates for other Microsoft products when I update Windows” box.
Turn off Proxy Connection
Here are the steps to follow:
Tap on the “Connection” logo that appears near the Windows taskbar.
Click “Network & Internet settings” that appear at the bottom of the screen.
Locate “Proxy” on the left side pane and then click on it.
Slide the toggle near the “Automatically detect settings” to disable it.
Now launch the “Control panel” and then click “Internet Option.”
Launch the “connections” button and then click “LAN settings.”
You need to check the box near the “Use a proxy server for your LAN.”
Tap on the “Advanced” button and then delete everything into “Do not use a proxy server for addresses beginning with” field.
Select “OK” to save your change.
Reset Windows Updates Components
Here are the steps to follow:
Right-tap on the Windows button and then click “Command Prompt as Admin.”
Tap “OK” in the UAC popup on your display.
You need to enter the given command to stop BITS, Cryptographic, Windows Updates, and MSI Installer service, remember that you need to tap the “Enter” button every command:
net stop bits
net stop wuauserv
net stop appidsvc
net stop cryptsvc
Now you need to type “Del “%ALLUSERSPROFILE%\\Application Data\\Microsoft\\Network\\Downloader\\qmgr*.dat” command to delete qmgr*.dat files.”
After the above process, you need to copy and paste the “cd /d %windir%\\system32” command and then hit the “Enter” button to confirm your command.
To re-register Windows Updates files and BITS, you need to enter the commands and tap the “Enter” button every time.
Type “netsh winhttp netsh ” and Winsock reset proxy commands to reset Winsock, and tap the”Enter” button each time.
After the above process, restart BITS, Cryptographic, Windows Updates, and MSI Installer service by entering the command and hit “Enter” each time.
After the above process, restart your device.
I’m Anny. I’m a social media manager living in USA. I am a fan of technology, design, and music. I’m also interested in fitness and movies. You can attend my event with a click on the button above.
Source: How to Avoid Hiccups While Updating Windows
0 notes
Text
How to Fix Windows Update Error C80003F3 on Windows 10
https://ratinglr.com/how-to-fix-windows-update-error-c80003f3-on-windows-10/Windows updates error is one of the common errors that occur on your screen when you are trying to install new updates or starting a WU software program on your Windows 10 system. This issue may occur on your device due to re-registered in entire DLL updates or corrupted Windows updates. In this article, we will show you how you can fix Windows update error c80003f3 on Windows 10.
Use Windows Update Troubleshooter
Windows updates troubleshooter is an in-built feature of Windows 10. It is one of the easiest methods that you can use to fix Windows update error c80003f3 on Windows 10 operating system.
Here are the steps to follow:
Tap the Windows + I button on your keyboard to launch the settings on your screen.
Select “Updates & Security” button under settings.
Click “Troubleshooter.”
Now tap on the right-side panel, click “Windows updates” and then tap on “Run the troubleshooter” option.
Additionally: you can also use “Microsoft online troubleshooter” to fix this issue.
Now you need to restart your device.
Enable Windows Updates Services
Several users reported that they had fixed this issue by just turning on necessary Windows updates service that is not in working on their device.
To enable, here are the steps to follow:
First, you need to launch the Run command prompt.
When the command prompt open on your screen, you have to copy and paste given command and then hit “Enter’ button on your keyboard each time:
SC config trustedinstaller start=auto
SC config bits start=auto
SC config cryptsvc start=auto
Reset Windows Update Components
To fix windows update error c80003f3 on Windows 10, you need to reset the Windows updates components from default to manually. And then restart your Windows 10 operating system to check for improvements. If you are still facing this issue, then you need to follow another solution given below.
Run SFC And DISM Scan
Here are the steps on how to run the SFC8 scan:
Tap the Windows + R button on your keyboard to launch the Run command prompt as admin on your PC.
In the run command-line type “sfc/scannow” and hit “OK.”
After the process, SFC automatically starts the scanning procedure on your device.
After completing the process, reboot your operating system and then run “DISM” tool to repair damaged system files.
Tap the Windows + R button on your keyboard to launch the Run command prompt as admin on your PC.
In the run command-line enter the given command and then tap the “Enter” button on your keyboard each time:
Dism.exe /online /cleanup-image /scanhealth
Dism.exe /online /cleanup-image /restorehealth
After the above steps, you need to wait until the process is finished.
Re-Register Windows Updates System Files
To fix this issue, you need to re-register your Windows updates system.
Here are the steps to follow:
Tap the Windows + R button on your keyboard to launch the Run command prompt on your device.
In the run search box type “Notepad” and then press “Ctrl + shift+ Enter” button on your keyboard to open Notepad as administrator.
Tap on the “Yes” button to confirm your administrative privileges, when UAC prompts popup on your screen.
In the notepad search field you need to enter the given command and then hit “Enter” button each time:
net stop bits
net stop wuauserv
net stop appidsvc
net stop cryptsvc
Now tap on the “File menu and then click the “save as” button.
Alternatively: you can press the “Ctrl + shift + S” button on your keyboard to save your file.
Here you also need to select a location where you wish to save your file.
When the file is created, right-tap on the save files and then click “run as administrator” to enable next code.
After completing the process, you need to reboot your device.
source: https://ratinglr.com/how-to-fix-windows-update-error-c80003f3-on-windows-10/
0 notes
Link
Updates are crucial for any operating system. With every update, there are new advancements and features introduced, and most of the potential bugs are fixed. Also, every OS update strengthens the overall security of the environment. Microsoft Windows offers frequent updates to assure a better user experience. In general, most of the Windows updates go smoothly. But some users say that they experience Windows update 0x800705b4 error when they opt to get this update.
We will learn 6 easy methods to resolve the 0x800705b4 error in this guide. Follow any of the methods that you find easy if one of it doesn't work try the other.
Method #1 Use Windows Update Troubleshooter
For Windows update, 0x800705b4 error, think of the Windows Update Troubleshooter. It is a built-in tool that comes with your Windows 10 system so there shouldn’t be any doubt. Troubleshooters can identify the issue automatically and treat it accordingly.
Go to Settings > Update and Security > Troubleshoot > Windows Update.
Click on Run as troubleshooter

Click on ‘Next,’ and the troubleshooter will detect the issue as well as the solution.
Now, you should go back to Windows Update and see if the respective error is resolved.
Method #2 Reconfigure the updating settings of Windows to fix Windows Update 0x800705b4 Error
Windows update 0x800705b4 error may appear if there is something wrong with Windows Update. In that case, the solution would be to change the update settings and make it work. Here’s how to do it.
Go to Cortana once again and type the text ‘Windows Update‘. From the options it brings up, you should select the option called ‘Check for Updates.’
You will see another panel in this. You should find the option called ‘Advanced Options‘ in it and click on it.
Now, you should uncheck the option called “Receive for other Microsoft products when I update Windows.”

Now, you will see that the computer is prompting you to restart it. Just restart to apply these changes.
Now, you should go to Windows Update Settings for one last time and click on 'Check for Updates.' However, sometimes, you may have to do the same a couple of times. This process is required to get the updates done completely. After the computer gets all the updates installed, you will get a notification telling that the system is up to date.
Now, check the box that says, ‘Give me updates for other Microsoft products when I update Windows.’
Go to the option 'Check for Updates' once more. This time, the updates should be installed smoothly.
Method #3 Get rid of corrupted files to fix Windows Update 0x800705b4 error
Another option you can try is to delete the related files that are corrupted. Therefore, deleting these files might be the solution to fix Windows update 0x800705b4 error. Mentioned below are the steps to do so.
Go to the ‘Services‘ by searching for it in the search box.
Check for the Background Intelligent Transfer Service. Then, you should right-click on the same and choose ‘Stop.’

Thereafter, right-click on the option called ‘Windows Update‘ and select ‘Stop.’
Now, you should open Windows Explorer and navigate to C:\Windows\SoftwareDistribution.
Now, you will see several files within the folder. You will have to delete all of them.
That’s it. You may check if the update works now.
Method #4 Perform SFC and DISM Scans to Fix Windows Update 0x800705b4 Error
Windows update 0x800705b4 error can also appear due to corrupted files. To fix this issue, you will have to perform an SFC and DISM scans. Let’s see how to do it.
Press Windows key and X key at once on your keyboard. You should then choose the Command Prompt (Admin) option.
Many of the individuals are not that familiar with CMD (command prompt), however. But you can simply type the text ‘sfc/scannow‘ (without inverted commas).
Then, hit the Enter key on the keyboard so the computer will run it.
You should allow your computer to perform the scan and it will take some time. You will see a notification once the issue is resolved.
If the SFC scan doesn’t fix the issue, you should try the option DISM scan. In order to get it done, open the CMD once again. Then, type the path DISM /Online /Cleanup-Image /RestoreHealth. Hit enter to make the computer to run the command.
Method #5 Activate Windows Defender Service
There are some services that help to download the updates. Windows Defender Service is such a service. If such service doesn’t run, Windows update 0x800705b4 error will occur. The solution for that is to enable the same.
Open run command by hitting the Windows key and R key on the keyboard at once. Then, you should type services.msc and hit enter.

It will open up the ‘Services‘ window. Search for the option called ‘Windows Defender Antivirus Service‘ and ‘Windows Defender Firewall.’ Double-click on each of these options and check if they run currently.

If you don’t see those services are running, you should click on the ‘Start‘ button. Select ‘Automatic‘ from the ‘Startup Type.’
Click on ‘OK‘ to apply the settings.

Method #6 Perform a Windows Update components reset to fix Windows Update 0x800705b4 Error
Windows update 0x800705b4 Error can also occur due to a corrupted update as well. So, you may give it a try to reset the update components and see if the issue is resolved.
Go to the start menu and choose the command prompt as admin.
You should type the following commands in Command Prompt and hit enter.
onet stop bits onet stop wuauserv onet stop appidsvc onet stop cryptsvc.
This process will stop their respective services. Then, you will have to erase some files once it is done.
To do that you should enter the following command.
Del “%ALLUSERSPROFILE%\ApplicationData\Microsoft\Network\Downloader\qmgr*.dat”
Then, type in the following command as well.
cd /d %windir%\system32
You should now restart BITS files by entering the commands we have mentioned below.
oregsvr32.exe oleaut32.dll oregsvr32.exe ole32.dll oregsvr32.exe shell32.dll oregsvr32.exe initpki.dll oregsvr32.exe wuapi.dll oregsvr32.exe wuaueng.dll oregsvr32.exe wuaueng1.dll oregsvr32.exe wucltui.dll oregsvr32.exe wups.dll oregsvr32.exe wups2.dll oregsvr32.exe wuweb.dll oregsvr32.exe qmgr.dll oregsvr32.exe qmgrprxy.dll oregsvr32.exe wucltux.dll oregsvr32.exe muweb.dll oregsvr32.exe wuwebv.dll oregsvr32.exe atl.dll oregsvr32.exe urlmon.dll oregsvr32.exe mshtml.dll oregsvr32.exe shdocvw.dll oregsvr32.exe browseui.dll oregsvr32.exe jscript.dll oregsvr32.exe vbscript.dll oregsvr32.exe scrrun.dll oregsvr32.exe msxml.dll oregsvr32.exe msxml3.dll oregsvr32.exe msxml6.dll oregsvr32.exe actxprxy.dll oregsvr32.exe softpub.dll oregsvr32.exe wintrust.dll oregsvr32.exe dssenh.dll oregsvr32.exe rsaenh.dll oregsvr32.exe gpkcsp.dll oregsvr32.exe sccbase.dll oregsvr32.exe slbcsp.dll oregsvr32.exe cryptdlg.dll
Now, restart Winsock by entering netsh Winsock
Enter the following commands and start the commands that are stopped.
onet start bits onet start wuauserv onet start appidsvc onet start cryptsvc
Exit the command prompt and restart the computer.
[su_box title="More Like This" box_color="#000000" radius="5"]
How to Fix 0x80070032 Error in Windows 10 Easily
How to Fix 0x0000007f Blue Screen Error in Windows 10
How to Fix 0xC004f074 Error in Windows 10
How to Fix ERR_CERT_DATE_INVALID Error in Google Chrome
[/su_box]
via TechLatest
0 notes
Text
Windows Update Keeps Turning Off [Best Solution]
For personal computer and laptop windows update keep turning off occur sometime. So how to get rid of this bad intention we are going to discuss below in detail. Windows Update is also a fantastic way for consumers to keep system current and Windows Update may also resolve some bugs of their operating system. If windows update turning off then this post reveals how to repair this issue. We'll supply you with the solution step-by-step. Windows Update identifies your Microsoft service for your Windows 9x and Windows NT households of this operating system. These updates may offer various and important patches for your operating system. Windows Update is a fantastic means to keep the system current version. However, some Windows users are experiencing an issue that Windows Update keeps turning away. Windows Update turning off itself could be an annoying issue. The issue which Windows Update turned off alone may commonly be brought on by antivirus software and Windows Update service. The antivirus software can cause issues with different apps, therefore there's not any exclusion for Windows Update. Additionally, If Windows Update service isn't started correctly, the issue in which Windows Update keeps turning also may happen.
Causes of windows update turning off
The most probable cause for This Issue is: Antivirus: Antivirus programs are known to cause issues with different applications and Windows Update parts aren't any exception. This sometimes happens due to false positives or bizarre compatibility issues. There are particular antivirus applications that are well-known for causing issues such as these and the remedy is to just disable the antivirus application. Windows Update: Your Own Windows Update service may cause this issue too. This comprised update service not getting established properly or even a corrupt file from the Windows update folder. At least one of these triggers can readily be solved simply by restarting the Windows Update elements and creating some changes from the registry to add a registry key to place updates to the automobile.
How to fix the problem
There are many ways to fix the issue caused automatically. But here we are going to discuss most 3 solutions and by using these you fix that issue.
1. Disable Anti Virus or Firewall
If your antivirus is the principal offender, you must disable this program. Windows users have largely reported, Bit defender antivirus limits Windows update. Not just the Bit defender but also a different antivirus such as Avast, AVG can direct one to strike the barrier. Anyhow, you may want to eliminate a faulty antivirus, however, disabling it first is going to be a smart choice. If the issue gets fixed, you can choose whether to keep your antivirus or not. Then Windows Update Turning Off will be solved We've supplied the steps of Avast antivirus. Should you use another defense, do not worry. Steps are more or less the same, and each antivirus includes a disable option. Primarily, locate your antivirus icon in the system tray and right-click Next, Click the Avast Shield controller (select the choice Depending upon Your kind of antivirus) Now Choose the length - how Long you want to maintain your antivirus disabled If you perform these steps so, you must not confront the mistake again. If yet problem exists "Windows Update Turning Off" Perform a reboot in the long run and check Windows update turning off itself or not. Otherwise, then the problem was with your antivirus. You may uninstall it to get a permanent solution. If the issue persists, perform our following solution. In Windows 10 windows security is enough to do a better task than any custom antivirus software.
2. Changes in the registry if windows update turning off

Well, in case you've disabled the Windows upgrade from the Registry or Windows Services, then you want to stick to a number of the easy steps given below. Here we will add a new entry into the registry to repair the windows upgrade turned off' error message. Follow, a number of the easy steps provided below to create adjustments to the registry. First of all, click the Windows button and then choose' Command Prompt (Admin)' On the Command Prompt window, type in another command and hit Enter -- 'reg include"HKEY_LOCAL_MACHINE\SOFTWARE\Microsoft\Windows\CurrentVersion\WindowsUpdate\Auto Update" /v AUOptions /t REG_DWORD /d 0 /f' 3. Step 3 see the following commands 'sc-config wuauserv begin = auto' Make changes to the Registry That is it, you're finished! Now simply restart your pc to repair the windows upgrade turned off' pop-up telling.
3. Reset Win Components
This is the most useful method when windows update itself keep turning off. In the following steps, we will try to tell you a detailed command that really works. Make sure you are typing these commands as it is "exactly" written below. One dot (.) or any special character mistake will not execute your required result. We will also show you the pictorial representation of these commands for your ease and better understanding. I hope this method will fix the issue of Windows Update Turning Off.

First of press the Windows logo key from the keyboard Next, search for Command prompt and right click on CMD Once you find, right-click on it and select “Run as administrator” from the displayed screen Now type- “net stop bits” and press enter After that type “net stop wuauserv” and press the enter button Now keep every command and press enter after every entry “net stop appidsvc” “net stop cryptsvc” “Ren C:\Windows\SoftwareDistribution SoftwareDistribution.old” “Ren C:\Windows\System32\catroot2 Catroot2.old” “net start bits” “net start wuauserv” “net start appidsvc” “net start cryptsvc” At the end type dos command exit and go out from this cmd editor. I hope any of the above steps will resolve your issue of Windows Update Turning Off. If you have any questions and, or suggestion please don't hesitate to post then in the comments below. You may also like article Mobile internet not working on android phone Read the full article
0 notes
Text
[8 Solutions] Réparer l'Erreur 0x800701E3 Facilement

Plusieurs utilisateurs rencontrent l'erreur 0x800701E3 lorsqu'ils effectuent une opération sur un disque dur / une carte SD qui implique la copie ou le déplacement de fichiers sur un ordinateur Windows. Dans la plupart des cas, le problème se produit lorsque l'utilisateur tente de déplacer des fichiers d'un disque dur à un autre. D'autres utilisateurs signalent que le problème se produit lorsqu'ils essaient d'effacer l'installation de Windows 10 ou d'une version différente de Windows.
Raisons d'une erreur 0x800701E3
Le message d'erreur " La requête a échoué en raison d’une erreur matérielle de dispositif Fatal " apparaît lorsque l'utilisateur tente de copier ou d'envoyer des fichiers de l'ordinateur vers un disque dur externe. Et voici les principales raisons pour lesquelles cela se produit : Problèmes de câble. Il peut être endommagé ou mal connecté. Par conséquent, les données ne peuvent pas être transféré. Problèmes matériels sur un disque dur externe. Autres problèmes avec un disque dur externe. Le plus souvent, ces mauvais secteurs provoquent l'erreur "La requête a échoué en raison d’une erreur matérielle de dispositif Fatal" Réparer l’erreur : « Discord ne se Lance pas »
Comment corriger l'erreur de mise à niveau Windows 0x800701E3 ?
Pour corriger l'erreur de mise à niveau Windows 0x800701E3, vous pouvez essayer d'effectuer les étapes de résolutions ci-dessous. Veuillez vérifier si le problème est corrigé après chaque étape de dépannage. Si le problème persiste, vous pouvez passer à l'autre étape. IAstorDataSvc : Réparer L’utilisation élevée CPU Méthode 1. Vérifier ou changer la connexion USB avec le lecteur externe Très souvent, le problème est un port ou un câble endommagé. Par conséquent, essayez un autre port pour transférer les données entre votre ordinateur et un disque dur externe ou, si cela ne vous aide pas, cherchez un autre câble USB. Cette méthode est particulièrement bonne si votre disque dur externe est dans la position détectée/non détectée lorsque vous le connectez à l'ordinateur.

Câble USB Pour « Com Surrogate a Cessé de Fonctionner » Méthode 2. Mettre à jour les pilotes de disque externe USB Pour corriger "La requête a échoué en raison d’une erreur matérielle de dispositif Fatal ", vous pouvez mettre à jour le pilote. Les pilotes obsolètes entraînent des interruptions dans le fonctionnement du disque dur externe. Pour ce faire, procédez comme suit : Appuyez simultanément sur les touches Win + X, puis sélectionnez Gestionnaire de périphériques . Sélectionnez maintenant le lecteur externe souhaité et cliquez dessus avec le bouton droit de la souris. Dans la liste, sélectionnez Mettre à jour le pilote. Attendez jusqu'à ce que le processus soit terminé et vérifiez si le problème a disparu.

Mettre à jour le pilote de disque dur externe Résoudre « Bad System Config Info » Win 10 Méthode 3: Réinitialiser les composants de Windows Update. La réinitialisation des composants de Windows Update vous permet de supprimer les fichiers des dossiers SoftwareDistribution et Catroot2. Pour corriger l'erreur de mise à niveau 0x800701E3, il est nécessaire de supprimer tous les anciens fichiers de Windows Update. Pour effectuer l'opération, suivez les étapes de résolution ci-dessous. Cliquez sur le bouton Démarrer, tapez CMD dans la zone de recherche, lorsque l'invite de commande apparaît, cliquez avec le bouton droit de la souris et sélectionnez l'option Exécuter en tant qu'administrateur. Dans la ligne de commande, tapez les commandes suivantes et appuyez sur Entrée après chaque commande : net stop bits net stop wuauserv net stop appidsvc net stop cryptsvc

Arrêtez service Windows update Après avoir désactivé les services requis, vous devez supprimer certains fichiers du lecteur C dans un dossier. Naviguez jusqu'à l'emplacement C:\Windows\SoftwareDistribution et supprimez tous les fichiers présents dans ce dossier. Pour ce faire, dans la ligne de commande, tapez la commande suivante et appuyez sur Entrée : Del "%ALLUSERSPROFILE%\ApplicationData\Microsof\Network\Downloader\qmgr*.dat"

supprimer les fichier du dossier SoftwareDistribution Après cela, tapez la commande ci-dessous et appuyez sur Entrée. cd /d %windir%\system32 Lancez ensuite ce "script batch", qui peut vous aider à résoudre les différents types de problèmes liés à Windows Update. Ce script peut être utilisé dans toutes les versions de Windows pour le Télécharger : https://www.bynarycodes.com/wp content/uploads_fre/2018/04/Batch-File-to-Reset Windows-Update_BCodes.zip redémarrez Winshock avec cette commande et appuyez sur ENTER : netsh winsock reset Après cela, vous devez redémarrer tous les services arrêtés. Pour ce faire, tapez chacune des commandes ci-dessous et appuyez sur Entrée. net start bits net start wuauserv net start appidsvc net start cryptsvc

démarrer composants Windows update Maintenant, fermez l'invite de commande, redémarrez votre ordinateur et essayez d'exécuter la configuration Windows. Ceci devrait résoudre l'erreur 0x800701E3 dans votre ordinateur. Si l'erreur persiste, suivez les autres étapes de résolution. PC a rencontré un problème et doit redémarrer Méthode 4 : Exécuter l'outil DISM pour corriger l'erreur 0x800701E3. L'outil Gestion et maintenance des images de déploiement est un outil qui est intégré dans les Windows et peut être utilisé pour entretenir une image Windows. Il corrige souvent de nombreux problèmes avec divers aspects de Windows et peut donc vous aider dans ce domaine également. Notez que c'est un outil très puissant et que faire une erreur lorsque vous l'exécutez peut causer des problèmes - donc soyez prudent. Suivez les étapes ci-dessous pour exécuter l'outil DISM sur votre ordinateur. Appuyez sur le logo Windows, dans la barre de recherche, tapez CMD . L'option Invite de commandes s'affiche. Faites un clic droit dessus et sélectionnez l'option Exécuter en tant qu'administrateur. Lorsque vous êtes sur votre Invite de commandes, tapez les commandes suivantes, puis appuyez sur Entrée sur votre clavier après chaque commande, afin de l'exécuter. Assurez-vous d'attendre que la première commande sera terminé de fonctionner avant de commencer avec la seconde. DISM.exe /Online /Cleanup-image /Scanhealth DISM.exe /Online /Cleanup-image /Restorehealth

dism attendez que la deuxième commande soit terminée et fermez l'invite de commandes en cliquant sur le X , ou en tapant exit et en appuyant sur Entré. Une fois que c'est fait, redémarrez votre ordinateur et essayez d'exécuter à nouveau l'installation de Windows. Espérons que l'installation fonctionne correctement sans l'erreur 0x800701E3. Si le problème persiste, vous pouvez passer aux étapes suivantes. 8 Méthodes pour Réparer l’Erreur 0x80070020 Méthode 5 : Exécuter l'analyse SFC (Vérificateur de fichiers système) L'exécution de l'analyse SFC pour recherche les fichiers corrompus dans l'ordinateur et les répare. Pour corriger l'erreur 0x800701E3 pendant la configuration de Windows, vous pouvez essayer d'exécuter le scan SFC. Pour exécuter le scan SFC, suivez les étapes ci-dessous : Appuyez sur la touche Windows pour ouvrir le menu Démarrer. Tapez l'invite de commande ou CMD dans le champ de recherche. Cliquez avec le bouton droit de la souris sur Invite de commandes. Sélectionnez Exécuter en tant qu'administrateur. Entrez le mot de passe si il est demandé. Tapez sfc /scannow sur l'invite de commande et appuyez sur Entrée. L'analyse prendra un certain temps. Ensuite, redémarrez votre ordinateur. essayez d'exécuter à nouveau la configuration de Windows et vérifiez si l'erreur 0x800701E3 a été résolu.

commande sfc / scannow Réparer « Windows Store ne s’ouvre Pas » Méthode 6 : Réparez le disque dur si les secteurs sont défectueux Les secteurs défectueux ou les erreurs dans le disque dur vous empêchent également d'effectuer la mise à niveau de Windows et de provoquer l'erreur 0x800701E3. Pour vérifier les secteurs défectueux du disque dur, vous pouvez essayer d'exécuter les étapes de résolution ci-dessous. Dans la zone de recherche, tapez CMD. Cliquez avec le bouton droit de la souris sur Invite de commandes et sélectionnez Exécuter en tant qu'administrateur. Dans l'invite de commandes, tapez chkdsk C: /f /r /x et appuyez sur Entrée. Les paramètres de cette commande sont : -L'option /f tentera de corriger toute erreur trouvée. -L'option /r localisera les secteurs défectueux et récupérera toutes les informations lisibles. -L'option /x forcera le volume que vous êtes sur le point de vérifier à être démonté avant que l'utilitaire commence l'analyse. Si le lecteur C : est utilisé, tapez Y pour lancer une recherche au prochain redémarrage de votre PC. Si c'est le cas, quittez l'Invite de commandes. et redémarrez l'ordinateur. L'analyse de la partie disque dur prendra un certain temps. Il recherchera les erreurs et les corrigera automatiquement. Espérons que la mise à niveau de Windows fonctionnera correctement cette fois-ci sans l'erreur 0x800701E3.

chkdsk C: /f /r /x Corriger l’Erreur 0xc1900107 Windows 10 Méthode 7 : Désactiver la fonction "Démarrage sécurisé" Certains utilisateurs concernés ont signalé que l'erreur 0x800701E3 ne se produisait plus lors d'une installation propre de Windows après avoir désactivé "" Démarrage sécurisé" de "UEFI/BOOT". "Démarrage sécurisé" est un standard de l'industrie qui a été développé par les plus grands fabricants de l'industrie des PC pour s'assurer que les PC utilisent exclusivement des logiciels d'Original (Original Equipment Manufacturers) (OEM). Toutefois, cette caractéristique de sécurité est connue pour créer des problèmes avec les médias d'installation créés en dehors des canaux officiels (en utilisant Rufus et autres logiciels similaires). Voici un guide rapide sur la désactivation de " Démarrage sécurisé " : Appuyez plusieurs fois sur la touche Setup après la mise sous tension de votre machine (pendant la séquence de démarrage initiale). Appuyez sur la touche BIOS pendant la procédure de démarrage. Remarque : La plupart du temps, la touche démarrage est visible à l'écran pendant l'écran initial. Mais vous pouvez également rechercher en ligne votre touche Setup particulière ou appuyer sur les touches typiquement utilisées à cet effet : touche Esc, touches F3, F8, F12, F1, F2, F3 ou touche Del. Une fois que vous accédez au menu du BIOS, recherchez un paramètre nommé "Secure boot" et réglez-le sur Désactivé. Le nom exact et l'emplacement seront différents d'un fabricant à l'autre, mais vous le trouverez généralement dans l'onglet Sécurité - vous le trouverez peut-être aussi dans l'onglet Boot ou Authentification.

désactiver Secure boot dans le BIOS Sauvegardez les modifications et quittez les paramètres de votre BIOS. Ensuite, vérifiez si vous obtenez toujours l'erreur 0x800701E3. Conclusion : Les étapes de résolution ci-dessus vous aident à corriger l'erreur de mise à niveau Windows 0x800701E3. J'espère que l'installation fonctionne sans message d'erreur. Si vous trouvez cet article utile, répondez dans les commentaires Read the full article
0 notes
Text
Windows Services complete list with ShortName and DisplayName

Here's a comprehensive list of most - if not all - Windows Service available nowadays on the major Windows operating systems - Windows 10, Windows Server 2016 and so on. The list shows the Display Name and the system's ShortName, which is the unique name used by the OS to locate and idenfity the service. The list should contain almost any known built-in service from both Windows and Windows Server: however, if you happen to find a missing one, feel free to write it in the comments section of this post, so that we'll be able to fill the gap! Display Name ShortName ActiveX Installer (AxInstSV) AxInstSV Adaptive Brightness SensrSvc Application Experience AeLookupSvc Application Host Helper Service AppHostSvc Application Identity AppIDSvc Application Information Appinfo Application Layer Gateway Service ALG Application Management AppMgmt ASP.NET State Service aspnet_state Background Intelligent Transfer Service BITS Base Filtering Engine BFE BitLocker Drive Encryption Service BDESVC Block Level Backup Engine Service wbengine Bluetooth Support Service bthserv BranchCache PeerDistSvc Certificate Propagation CertPropSvc Client for NFS NfsClnt CNG Key Isolation KeyIso COM+ Event System EventSystem COM+ System Application COMSysApp Computer Browser Browser Credential Manager VaultSvc Cryptographic Services CryptSvc DCOM Server Process Launcher DcomLaunch Desktop Window Manager Session Manager UxSms DHCP Client Dhcp Diagnostic Policy Service DPS Diagnostic Service Host WdiServiceHost Diagnostic System Host WdiSystemHost Disk Defragmenter defragsvc Distributed Link Tracking Client TrkWks Distributed Transaction Coordinator MSDTC DNS Client Dnscache Encrypting File System (EFS) EFS Extensible Authentication Protocol EapHost Fax Fax Function Discovery Provider Host fdPHost Function Discovery Resource Publication FDResPub Group Policy Client gpsvc Health Key and Certificate Management hkmsvc HomeGroup Listener HomeGroupListener HomeGroup Provider HomeGroupProvider Human Interface Device Access hidserv IIS Admin Service IISADMIN IKE and AuthIP IPsec Keying Modules IKEEXT Indexing Service CISVC Interactive Services Detection UI0Detect Internet Connection Sharing (ICS) SharedAccess IP Helper iphlpsvc IPsec Policy Agent PolicyAgent KtmRm for Distributed Transaction Coordinator KtmRm Link-Layer Topology Discovery Mapper lltdsvc LPD Service LPDSVC Media Center Extender Service Mcx2Svc Message Queuing MSMQ Message Queuing Triggers MSMQTriggers Microsoft .NET Framework NGEN v2.0.50727 clr_optimization_v2.0.50727 Microsoft FTP Service ftpsvc Microsoft iSCSI Initiator Service MSiSCSI Microsoft Software Shadow Copy Provider swprv Multimedia Class Scheduler MMCSS Net.Msmq Listener Adapter NetMsmqActivator Net.Pipe Listener Adapter NetPipeActivator Net.Tcp Listener Adapter NetTcpActivator Net.Tcp Port Sharing Service NetTcpPortSharing Netlogon Netlogon Network Access Protection Agent napagent Network Connections Netman Network List Service netprofm Network Location Awareness NlaSvc Network Store Interface Service nsi Offline Files CscService Parental Controls WPCSvc Peer Name Resolution Protocol PNRPsvc Peer Networking Grouping p2psvc Peer Networking Identity Manager p2pimsvc Performance Logs & Alerts pla Plug and Play PlugPlay PnP-X IP Bus Enumerator IPBusEnum PNRP Machine Name Publication Service PNRPAutoReg Portable Device Enumerator Service WPDBusEnum Power Power Print Spooler Spooler Problem Reports and Solutions Control Panel Support wercplsupport Program Compatibility Assistant Service PcaSvc Protected Storage ProtectedStorage Quality Windows Audio Video Experience QWAVE Remote Access Auto Connection Manager RasAuto Remote Access Connection Manager RasMan Remote Desktop Configuration SessionEnv Remote Desktop Services TermService Remote Desktop Services UserMode Port Redirector UmRdpService Remote Procedure Call (RPC) RpcSs Remote Procedure Call (RPC) Locator RpcLocator Remote Registry RemoteRegistry RIP Listener iprip Routing and Remote Access RemoteAccess RPC Endpoint Mapper RpcEptMapper SeaPort SeaPort Secondary Logon seclogon Secure Socket Tunneling Protocol Service SstpSvc Security Accounts Manager SamSs Security Center wscsvc Server LanmanServer Shell Hardware Detection ShellHWDetection Simple TCP/IP Services simptcp Smart Card SCardSvr Smart Card Removal Policy SCPolicySvc SNMP Service SNMP SNMP Trap SNMPTRAP Software Protection sppsvc SPP Notification Service sppuinotify SSDP Discovery SSDPSRV Storage Service StorSvc Superfetch SysMain System Event Notification Service SENS Tablet PC Input Service TabletInputService Task Scheduler Schedule TCP/IP NetBIOS Helper lmhosts Telephony TapiSrv Telnet TlntSvr Themes Themes Thread Ordering Server THREADORDER TPM Base Services TBS UPnP Device Host upnphost User Profile Service ProfSvc Virtual Disk vds Volume Shadow Copy VSS Web Management Service WMSVC WebClient WebClient Windows Audio AudioSrv Windows Audio Endpoint Builder AudioEndpointBuilder Windows Backup SDRSVC Windows Biometric Service WbioSrvc Windows CardSpace idsvc Windows Color System WcsPlugInService Windows Connect Now – Config Registrar wcncsvc Windows Defender WinDefend Windows Driver Foundation – User-mode Driver Framework wudfsvc Windows Error Reporting Service WerSvc Windows Event Collector Wecsvc Windows Event Log EventLog Windows Firewall MpsSvc Windows Font Cache Service FontCache Windows Image Acquisition (WIA) StiSvc Windows Installer msiserver Windows Live Family Safety fsssvc Windows Management Instrumentation Winmgmt Windows Media Center Receiver Service ehRecvr Windows Media Center Scheduler Service ehSched Windows Media Player Network Sharing Service WMPNetworkSvc Windows Modules Installer TrustedInstaller Windows Presentation Foundation Font Cache 3.0.0.0 FontCache3.0.0.0 Windows Process Activation Service WAS Windows Remote Management (WS-Management) WinRM Windows Search WSearch Windows Time W32Time Windows Update wuauserv WinHTTP Web Proxy Auto-Discovery Service WinHttpAutoProxySvc Wired AutoConfig dot3svc WLAN AutoConfig Wlansvc WMI Performance Adapter wmiApSrv Workstation LanmanWorkstation World Wide Web Publishing Service W3SVC WWAN AutoConfig WwanSvc Read the full article
0 notes
Text
How to Fix Windows 10 Language Pack Error 0x800f0954
Windows 10 Language packs are very convenient, but some of the users are complaining that they are facing the Language Pack error 0x800f0954 on their computers. In this article, you will get to know how to fix Windows 10 language pack error 0x800f0954.
Here’s how to fix Windows 10 language pack error 0x800f0954
· Changing Wi-Fi settings
1. Click on the text field given in the Search box.
2. Enter Wi-Fi settings to go to the wireless network.
3. Choose the name of the right connection.
4. Disable the metered connection by turning off the option.
5. You need to wait till you get the We’re installing new features text.
6. After that, press on it.
7. You need to wait till you get the install option.
8. Enable the metered Wi-Fi network.
· Editing Wuauserv settings
1. Click on the Windows and R keys together.
2. It is given on the system keyboard.
3. It will launch the run prompt box.
4. Enter regedit in the search bar.
5. Click on the Enter option.
6. It will open the Registry Editor menu.
7. After that, press on the Yes option.
8. Go to the location mentioned below:
HKEY_LOCAL_MACHINESOFTWAREPoliciesMicrosoftWind
9. Search for the registry button which is UseWUServer.
10.After that, start changing the value into 0.
11. Exit from the registry menu.
12. Press on the Start menu.
13. Click on the Search bar.
14. Enter cmd in the search bar.
15. Find, and you need to right-click on the cmd button.
16. It is located on the results.
17. After that, select the Run as administrator option.
18. Enter these commands which are mentioned below:
net stop bits
net stop appidsvc
ren C:WindowsSoftwareDistribution SoftwareDistribution.old
ren C:WindowsSystem32catroot2 catroot2.old
net start bits
net stop cryptsvc
net start appidsvc
net start cryptsvc
net start wuauserv
net stop wuauserv
19. Return to the Region and Language settings tab located on the computer.
20. You need to try to download the language pack which you are not able to install.
· Additionally:
1. Search for the UseWUServer option.
2. Press and start editing the DWORD value to the greater than 0.
3. By going to the cmd type, you need to go through the command mentioned below:
4. Net start wuauserv
5. Net stop wuauserv
6. Exit from the cmd menu.
7. Start the system again.
· Adding the pack manually
1. Press on the Start option.
2. Press on the Settings tab.
3. Select the Time and Language option.
4. Click on the Region and Language settings tab.
5. Click on the Add a Language option.
6. After that, select the folder as per your wish.
7. Go through the guidelines mentioned on the screen.
Jaxson Harry is a Microsoft Office expert and has been working in the technology industry since 2002. As a technical expert, Devin has written technical blogs, manuals, white papers, and reviews for many websites such as office.com/setup.
Source: Windows 10.
0 notes
Text
كيفية اصلاح مشاكل تحديث ويندوز windows 10 update
نعرض عليكم كيفية اصلاح وحل مشاكل فشل والتوقف المفاجئ لتحديث ويندوز 10 Windows Update المستمر وايقافه نهائيا و حل مشكلة عدم تحديث ويندوز 10 للتخلص من رسالة المنبثقة how to fix windows update error وهذا عبر تعطيل مكافح فيروسات و الجدار الناري و التعديل الى الرجيستري Registry و مكونات الويندوز

windows 10 update
إذا تحدثنا عن قائمة أفضل أنظمة تشغيل الخاصة بالكمبيوتر فانه دون شك فسيكون نظام Windows وخاصة بعد اصدار نظام التشغيل Windows 10 من شركة Microsoft , ومقارنةً بجميع أنظمة تشغيل سطح المكتب الأخرى ، يوفر نظام تشغيل Microsoft Windows للمستخدمين المزيد من الميزات والخيارات و تصحيحات للاخطاء الأمنية المحتملة وهذا عبر إصدار تحديثات دورية للنظام. توفر تحديثات Windows هذه غالبًا ميزات أمان أساسية وتحتوي على إصلاحات الأخطاء التي تشتد الحاجة إليها لتحقيق أداء سلس. لكن ربما في الآونة الأخيرة ، ادعى الكثير من مستخدمي Windows أنهم يواجهون مشكلة أثناء تحديث Windows. أبلغ مستخدمو نظام التشغيل Windows 10 أن تحديثات Windows يتم إيقاف تشغيلها تلقائيًا. يشاهد مستخدمو نظام التشغيل Windows 10 نافذة منبثقة للإعلام تخبرنا بأن تحديثات Windows قد تم إيقاف تشغيلها. يحدث هذا الشيء تلقائيًا لذلك إذا كنت تواجه نفس المشكلة فسنقدم لك بعضًا من أفضل الطرق لحل مشكلة Windows Update.
1- عبر تعطيل برنامج مكافحة الفيروسات وجدار الحماية
كما نعلم جميعًا ، تتعارض أدوات مكافحة الفيروسات وجدار الحماية أحيانًا مع برامج الجهات الخارجية. ليس فقط خدمات الجهات الخارجية ولكن بعض أدوات مكافحة الفيروسات وجدار الحماية أيضًا تمنع تثبيت تحديث Windows Update. لذلك ، إذا وجدت للتو أن "تحديث Windows قد تم إيقاف تشغيله" تلقائيًا بعد تثبيت أداة أمان جديدة ، فأنت بحاجة إلى تعطيله.

إذا كان لديك حل مكافحة الفيروسات لديك خيار جدار الحماية ، فأنت بحاجة إلى تعطيل ذلك أيضا. فقط افتح أدوات الأمان وتحقق من خيار جدار الحماية. تعطيله أو إضافة Windows Update إلى قائمة الاستبعاد. وبالمثل ، تحتاج إلى إضافة Windows Update إلى قائمة استثناءات مكافحة الفيروسات أيضًا.
اقرا ايضا: أداة قوية لتفعيل ويندوز 10 وجميع نسخ WINDOWS مدى الحياة 2019
2- اصلاح مشكل تحديث الويندوز عبر إجراء تغييرات على السجل Registry
إذا قمت بتعطيل تحديث Windows Update يدويًا من "Registry" أو "خدمات Windows Services" ، فأنت بحاجة إلى اتباع بعض الخطوات البسيطة المذكورة أدناه. سنقوم هنا بإضافة إدخال جديد إلى السجل لإصلاح رسالة الخطأ "Windows update turned off". اتبع بعض الخطوات البسيطة الموضحة أدناه لإجراء تغييرات على السجل Registry.
الخطوة 1. أولاً وقبل كل شيء ، انقر بزر الماوس الأيمن على زر Windows وحدد "موجه الأوامر (المسؤول) - Command Prompt (Admin) "

الخطوة 2. الآن في نافذة موجه الأوامر ، اكتب الأمر التالي واضغط على Enter -
reg add “HKEY_LOCAL_MACHINE\SOFTWARE\Microsoft\Windows\CurrentVersion\WindowsUpdate\Auto Update” /v AUOptions /t REG_DWORD /d 0 /f

الخطوة 3. الآن اكتب هذا الأمر واضغط على Enter -
sc config wuauserv start= auto

هذا كل شيء ، لقد انتهيت الآن ماعليك الا أعادة تشغيل الكمبيوتر لإصلاح مشكلة "Windows update turned off".
اقرا ايضا: تحميل برنامج SYSTIMIZER لحل مشكلات الكمبيوتر وعمل صيانة للويندوز مع التفعيل
3- اصلاح مشكل تحديث الويندوز عبر إعادة ضبط مكونات ويندوز Windows Components
حسنًا ، اتبع هذه الطريقة فقط إذا قمت بإيقاف تشغيل Windows update من خدمات Windows. نظرًا لأنك قمت بتعطيل المكونات المطلوبة للتحقق من Windows update ، فأنت بحاجة إلى إعادة تعيينها. اتبع بعض الخطوات البسيطة المذكورة أدناه لإعادة ضبط مكونات Windows.
الخطوة 1. أولاً وقبل كل شيء ، انقر بزر الماوس الأيمن على قائمة Windows Start (ابدأ) وحدد "Command Prompt (Admin)"
الخطوة 2. الآن على نافذة موجه الأوامر ،
اكتب : net stop bits

الخطوة 3. بعد ذلك
اكتب : net stop wuauserv واضغط على Enter.

الخطوة 4.
الآن اكتب : net stop appidsvc

الخطوة 5.
الآن اكتب الأمر التالي : net stop cryptsvc

الخطوة6.
اكتب التالي : Ren C:\Windows\SoftwareDistribution SoftwareDistribution.old

الخطوة7.
اكتب التالي : Ren C: \ Windows \ System32 \ catroot2 Catroot2.old

الخطوة8.
الآن اكتب : net start bits
الخطوة9.
الآن اكتب : net start wuauserv

الخطوة10.
اكتب التالي : net start appidsvc واضغط على enter.

الخطوة11.
اكتب التالي : net start cryptsvc

تحتاج إلى كتابة الأوامر التالية في موجه الأوامر لإعادة تعيين مكونات Windows. بمجرد الانتهاء من ذلك ، أعد تشغيل جهاز الكمبيوتر الخاص بك لإصلاح إشعار "تم إيقاف تشغيل تحديث Windows". - كانت هذه هي أفضل ثلاث طرق لإصلاح مشكلة "تم إيقاف تشغيل تحديث Windows" من Windows 10.
ارجوا ان تكون الخطوات قد افادتك .
from Blogger https://ift.tt/2M2gLLk via IFTTT
0 notes
Text
How to Fix 0x80070490 Windows Update Error?
Windows update is an integral way to keep your device optimized, but the process can land you in some trouble from time to time. One of the error codes you can face while Windows update is the 80070490 error code. Read through to know how you can fix the error on Windows 10.
Launch Windows Update Troubleshooter
In case the user wishes to launch Windows update troubleshooter, then they can pursue the mentioned instructions.
Go to the Windows Start button on the keyboard and input ‘troubleshoot’ into it.
You should click on the Troubleshoot option.
Then select the Windows Update option.
Navigate to Run the troubleshooter and click on it.
You have to pursue the on-screen steps to troubleshoot.
Now, reboot the system and check whether this has solved the error.
Launch the SFC Scan
In case the user wants to launch the SFC scan, then abide by the provided steps.
Navigate to the Windows Start button the keyboard and input the ‘cmd’ into it.
You should select the Command Prompt and right-click on it.
Select the ‘Run as administrator’.
You have to select the Yes if prompted to verify.
Go to the screen of command prompt and input the ‘sfc /scannow’ then hit the Enter key.
This will take some time for the SFC to put back the damaged PC files with new ones in case identifies whichever, so you have to wait.
Finally, reboot the system and check whether the 0x80070490 error has been fixed.
Launch DISM
In case the user wishes to launch DISM, then they can pursue the mentioned instructions.
Hold the Windows Start button on the keyboard and input the ‘cmd’ into it.
You should select the Command Prompt, and right-click on it then choose the Run as administrator.
Enter the pursuing command then hit the Enter key: DISM.exe /Online /Cleanup-image /Restorehealth.
You have to wait for a while for the entire procedure to complete.
Then enter the ‘sfc /scannow’ then hit the Enter key.
Now, reboot the system, run the update once more and check whether it works effectively this time.
Reset the Windows Update Components
In case the user wants to reset the Windows update components, then abide by the provided steps.
Hold the Windows Start logo button on the keyboard.
You should input the ‘cmd’ into it.
After that, reach the Command Prompt then right-click on it.
Select the Run as administrator.
Enter the pursuing commands then hit the Enter key after each one:
These commands will prevent the services that Windows Update needs to download and install updates.
You should reach the pursuing commands and copy, paste it then hit the Enter key after each one:
Enter these commands then hit the Enter key after each one to reboot the services you shut:
Now, look and view in case this has solved the 0x80070490 error code.
net stop bits
net stop wuauserv
net stop appidsvc
net stop cryptsvc
Ren %systemroot%\SoftwareDistribution SoftwareDistribution.old
Ren %systemroot%\system32\catroot2 catroot2.old
net start bits
net start wuauserv
net start appidsvc
net start cryptsvc
Source: https://baloffice.com/how-to-fix-0x80070490-windows-update-error/
0 notes
Text
How to Fix 0xc1900107 Windows 10 Update Error?
Windows bring OS updates routinely to maintain system security and performance. In the majority of the cases, the intentions pay off well; however, you can also face several error codes while updating Windows. 0xc1900107 is one such error code, and interestingly, it is no malware that causes the error. In fact, overriding security software can be the cause of the error. If you are also facing the error code, then reading through this article will be most beneficial for you.
Delete $WINDOWS.~BT Folder
If you would like to delete $WINDOWS.~BT folder, then abide by the given steps.
Hold the Start button and enter Folder Options.
Then choose once File EX/li>.
After launching the options of File Explorer, go to the View section.
You should tick the box of ‘Show hidden files, folders and drivers.’
Thereafter, shut this screen and enter the File Explorer.
You have to select the C Drive and locate the folder named $WINDOWS.~BT.
Now, rename or remove it.
Resetting Windows Update Objects through Command Prompt
Launch Command Prompt as Administrator.
After appearing the black screen, note the pursuing commands by pressing the Enter after everyone: net stop bits, net stop wuauserv, net stop appidsvc, net stop cryptsvc, ren %systemroot%\\SoftwareDistribution SoftwareDistribution.bak, ren %systemroot%\\system32\\catroot2 catroot2.bak, net start bits, net stop wuauserv, net stop appidsvc.
Now, shut the screen and reboot the system.
Perform SFC Scan via cmd
Launch Command Prompt as Administrator.
You should enter ‘sfc /scannow’ within the cmd screen.
Hit the Enter key on the keyboard.
You have to wait for the scan to wrap up.
Afterwards, restart the PC.
Perform Troubleshooting
Navigate to the Windows Search on your system.
You should locate the Troubleshooting option.
Then select the option ‘View All.’
Find the Windows Update troubleshooter.
Now, pursue the commands.
Hopefully, these results have guided you to repair the error on the Windows PC. When you have attempted every technique, and the issue still remains within the PC, you should get back to with trustworthy anti-virus and scan the full system to detect when there is a malicious source causing the error.
For more info go to :-https://miadavisdotblog.wordpress.com/2020/01/13/how-to-fix-0xc1900107-windows-10-update-error/
Mia Davis is a self-professed security expert; she has been making the people aware of the security threats. Her passion is to write about Cyber security, cryptography, malware, social engineering, internet, utility software and new media. She writes for McAfee products at mcafee.com/activate.
0 notes
Text
How To Fix Windows Update Error Code 0x80073712?
No doubt, Windows 10 has been carefully patched and polished, and yet some of its features leave a lot to be desired: for instance, Windows Update is still vulnerable and prone to error. Windows Update Error 0x80073712 is a clear example of this: the issue in question is a common concern for those who wish to keep their Win 10 up to date.
The Windows error code 0x80073712 means some file that is needed by your Windows Update is either missing or corrupt. The good news is, the problem in question does not imply that your precious OS is doomed to stagnation and consequent decay. Windows Update Error 0x80073712 is perfectly solvable: in fact, to get rid of it, you need nothing more than a bit of determination and the proven fixes below.
All systems go:
1. Scan Your PC For Malware
First and foremost, let’s exclude malware issues, since they are often to blame for persistent Windows Update errors. With that said, we recommend you to utilize your third-party antivirus software or the built-in Windows Defender tool to run a full system scan.
Here Is How To Use Windows Defender In Windows 10 For This Purpose:
Start -> Settings -> Update & Security -> Windows Defender
Open Windows Defender -> Select the Full option
Furthermore, you should know that the solutions above are not enough to keep your system 100 % safe and secure. With this in mind, add an extra layer of protection. For example, consider using Auslogics Anti-Malware: this intuitive and reliable tool will sweep out all types of malicious entities and help to keep hostile software at bay.
2. Run Windows Update Troubleshooter
Second, you should make use of Windows Update Troubleshooter. This built-in Microsoft solution is designed to automatically find and fix update issues in your OS.
Here is how you can run this tool in Windows 10:
Press Windows logo key and X simultaneously -> Click on Control Panel
Select Category -> Choose Large or Small icons
Select Troubleshooting -> In the left pane, click on View all
Locate Windows Update -> Select it -> Windows Update Troubleshooter will open -> Follow the on-screen prompts to resolve your problem
Restart your PC for the changes to take effect and see if you can use Windows Update now
3. Run The DISM And SFC Tools To Repair Your System Files
If the solutions above have been to no avail, your Windows files might be damaged or missing. So, the next logical step is to run the Deployment Image Servicing and Management (DISM) solution and then make use of System File Checker (SFC).
You Can Do That In Windows 10 By Taking The Following Steps:
Press Windows logo key + S to open Search -> Type CMD into it
Select Command Prompt from the list -> Right-click on it and choose to run it as administrator to open an elevated command prompt
You might be asked for confirmation or your administrator credentials -> Provide everything that is needed to proceed
Type ‘DISM.exe /Online /Cleanup-image /Restorehealth’ (no quotes) into your command prompt and hit Enter -> The scan may take a while, so be patient -> It goes without saying that you are not supposed to abort the process
Now it is time to use the System File Checker tool: input the ‘sfc /scannow’ command (no quotes) and hit Enter -> Wait until you get the all-clear to proceed
You will receive a report on the scan -> Depending on the message, take appropriate action
4. Rename SoftwareDistribution Folder
This is another reportedly effective fix for Windows Update Error 0x80073712. To perform the trick, make use of the guide below:
Open your elevated command prompt (see the previous method to figure out how)
Input these commands, hitting Enter after each: net stop wuauserv net stop cryptSvc net stop bits net stop msiserver rename c:\windows\SoftwareDistribution softwaredistribution.old net start wuauserv net start cryptSvc net start bits net start msiserver exit
Restart the PC and check if your problem has gone.
5. Restart Windows Update Services
No Luck So Far? Do Not Worry, Since Restarting Your Windows Update Services May Help:
Press Windows logo key and R simultaneously to open Run -> Input services.msc -> Then press Enter
Search for the Windows Update service -> Check its status
If it is not indicated, right-click on the service and select Start to force start your Windows Update
If you see an error, locate the Startup Type option and set it to Automatic
Now you should reboot your computer and see if your Windows Update is OK
6. Reset Your Windows Update Components
The point is, some of your Windows Update components may be having issues. This means that you should reset them manually to get rid of the annoying update error 0x80073712:
Open your elevated command prompt and input the following commands. Make sure to hit Enter after each: net stop bits net stop wuauserv net stop appidsvc net stop cryptsvc Del “%ALLUSERSPROFILE%\Application Data\Microsoft\Network\Downloader\qmgr*.dat” cd /d %windir%\system32 regsvr32.exe atl.dll regsvr32.exe urlmon.dll regsvr32.exe mshtml.dll regsvr32.exe shdocvw.dll regsvr32.exe browseui.dll regsvr32.exe jscript.dll regsvr32.exe vbscript.dll regsvr32.exe scrrun.dll regsvr32.exe msxml.dll regsvr32.exe msxml3.dll regsvr32.exe msxml6.dll regsvr32.exe actxprxy.dll regsvr32.exe softpub.dll regsvr32.exe wintrust.dll regsvr32.exe dssenh.dll regsvr32.exe rsaenh.dll regsvr32.exe gpkcsp.dll regsvr32.exe sccbase.dll regsvr32.exe slbcsp.dll regsvr32.exe cryptdlg.dll regsvr32.exe oleaut32.dll regsvr32.exe ole32.dll regsvr32.exe shell32.dll regsvr32.exe initpki.dll regsvr32.exe wuapi.dll regsvr32.exe wuaueng.dll regsvr32.exe wuaueng1.dll regsvr32.exe wucltui.dll regsvr32.exe wups.dll regsvr32.exe wups2.dll regsvr32.exe wuweb.dll regsvr32.exe qmgr.dll regsvr32.exe qmgrprxy.dll regsvr32.exe wucltux.dll regsvr32.exe muweb.dll regsvr32.exe wuwebv.dll netsh winsock reset netsh winhttp reset proxy net start bits net start wuauserv net start appidsvc net start cryptsvc
Close your command prompt and go to the Microsoft Support website. Download the latest Windows Update agent from there and install it on your computer, following the on-screen prompts. Finally, restart your PC and see if this method worked for you.
7. Fix Your Registry Issues
If you still encounter the error code 0x80073712 on your Windows 10, you should consider checking the registry – it may be corrupt or damaged, so you might need to modify it. We do not recommend that you do that manually, as even a misplaced comma or letter can actually kill your system. Obviously, you need a trustworthy tool to rely on in this regard, and 100 % free Auslogics Registry Cleaner is ready to give you its helping hand. It will get your registry back on track in no time without running the risk of damaging your Windows. Your PC’s safety should always come first, full stop.
Call On Our Technical Support Phone Number for fix Windows Update Error Code 0x80073712 by Errorcode Expert USA +1 (800) 808-1781 Right Now to Get Instant Help
0 notes
Text
New Post has been published on Peter Bowey Computer Solutions Blog
New Post has been published on https://www.peterboweycomputersolutions.com.au/blog/repair-reset-troubleshoot-windows-update-errors-in-windows-10
Repair, Reset & Troubleshoot Windows Update errors in Windows 10
The Windows 10 Update service enables the operating system to download and install the latest updates, along with bug fixes, security patches, and drivers. The Update Service is also the mechanism to obtain new features and offer Insider preview builds for testers. The update process has been expanded and improved for Windows 10, but it is not always problem-free, perhaps more so when it comes to system integrity, security and new patches.
When problems with updates occur, often with a specific error messages, it may be because of not being able to connect to the Microsoft update servers, or the Windows Update agent related services have stopped running, or there is a problem with the update cache, or other important components are corrupted. It is in these type of situations that you need reset the Windows Update components. Read on.
This post outlines the steps to reset the Windows Update components by using the “Windows Update Troubleshooter” utility and, if needed, actions via the Command Prompt, to manually fix Windows Update issues and restore the update process for security patches, drivers, and other features. Only use the Command Prompt options as the last recovery option. First, do the following; 1) Use the Microsoft Troubleshooter Tool, 2) Try to install the most recent update manually, 3) Check for the latest Service Stack Update, and 4) (if necessary) repair system files.
Reset Windows Update using the Troubleshooter tool
Microsoft provides a “Windows Update Troubleshooter” utility that can often repair a damaged Windows Update component.
Download and run the Windows Update Troubleshooter from Microsoft (you can choose a specific download for Windows 7 & 8, or Windows 10).
Select Windows Update and then click Next.
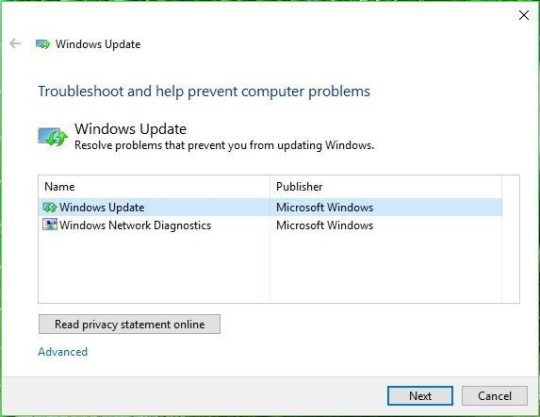

Microsoft Windows Update Troubleshooter Tool
If you are prompted, select the Try troubleshooting as an administrator option and click Next again.
Allow time for troubleshooter to attempt to resolve any problems and choose Close.
Run the tool again, and this time choose Windows Networking Diagnostics.
Allow time for troubleshooter to attempt to resolve any problems and choose Close.
Finally, perform a restart of the computer.
Now you can attempt to update Windows 10 and see if the issues are resolved.
Perform a manual update installation
Try downloading and installing the latest Windows 10 update available manually. The steps are:
Using a web browser Head visit the Windows 10 update history website.

Microsoft Windows 10 Update History Web Site
On the left and top side of the site page, find and choose the latest update for your version of Windows 10 and note the KB####### number of an update.
To find your Windows Version from Settings > System > About. The version number is under the Windows Specifications.
With your web browser visit the Microsoft Update Catalog website.
Microsoft Windows Catalog Site
Enter in the Search field the KB####### number of the update you require.
Download the required update matching the type of Windows 10 that you’re running (either 32-bit (x86) or 64-bit (x64)).
Double-click the downloaded KB####### file to allow the the update to begin the install process.
Next, re-start your computer.
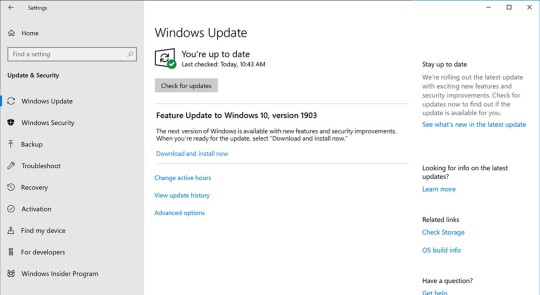
Now you should have the latest selected update installed. The manual update should clear the original problem with automatic Windows Update. Now run Check for updates in the Windows Settings >�� Update & Security page (choose “Check for updates“).
Install the latest Servicing Stack Update for Windows
The “servicing stack” is the code that installs other operating system updates. Having the latest servicing stack update is a prerequisite to reliably installing the latest quality updates and feature updates.
To check that your computer has the most Servicing Stack Update installed:
Open Settings > System > About.
In the field “System type” see if the computer is running the 32-bit or 64-bit version of Windows 10.

Windows 10 Settings System About
With your web browser visit this Microsoft Update Catalog website.
Select and download the most recent Servicing Stack Update for the KB4090914 update matching your system type (32-bit (x86) or 64-bit (x64)).
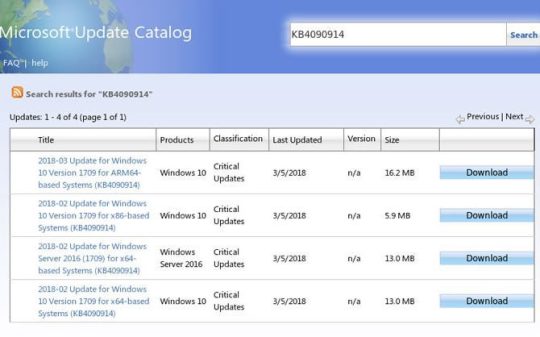
Microsoft Windows Catalog Update KB4090914
Double-click the downloaded KB####### file to allow the the update to begin the install process.
Next, re-start your computer.
Now run Check for updates in the Windows Settings > Update & Security page (choose “Check for updates“).
Repair corrupted system files that effect Windows Update
Windows Update can fail if any system file component of the update feature is corrupted. The steps to remedy this:
Do a right mouse click over Start.
Choose Windows PowerShell(Admin) (basically an elevated Command Prompt).
Enter the following DISM command to begin a repair of corrupted system files:
dism.exe /Online /Cleanup-image /Restorehealth
Enter the following SFC command to begin a repair of corrupted system files:
sfc /scannow
After completing the above two steps, you can now check for updates to see if the problem has been resolved.
Use command prompt to reset Windows Update components
The following steps are used to reset the Windows Update components at the Command Prompt.
Do a right mouse click over Start. Choose Windows PowerShell(Admin) (basically an elevated Command Prompt)
The command below will stop the Background Intelligent Transfer Service (BITS), Windows Update service, and Cryptographic service. Use Enter after each command:
net stop bits net stop wuauserv net stop appidsvc net stop cryptsvc
You should see the message that each service has stopped successfully. If not, try to repeat the above commands for success.
Windows 10 command stop BITS, Windows Update and Cryptographic Service
Now enter following command to remove all the qmgr*.dat files created by BITS from your computer:
Del "%ALLUSERSPROFILE%\Application Data\Microsoft\Network\Downloader\*.*"
Enter Y to confirm the removal.
Enter the following commands to totally clear the current Windows Update cache:
rmdir %systemroot%\SoftwareDistribution /S /Q rmdir %systemroot%\system32\catroot2 /S /Q
The /S switch is used to delete the specified directory and all sub-directories. The /Q switch means to delete directories quietly without user confirmation.
If you see a message “The process cannot access the file because it is being used by another process.”, then you can repeat the above steps, as one of the services may have restarted automatically.
Now we will reset the BITS service and the Windows Update services to their default state.
Enter the following commands followed by Enter:
sc.exe sdset bits D:(A;;CCLCSWRPWPDTLOCRRC;;;SY)(A;;CCDCLCSWRPWPDTLOCRSDRCWDWO;;;BA)(A;;CCLCSWLOCRRC;;;AU)(A;;CCLCSWRPWPDTLOCRRC;;;PU) sc.exe sdset wuauserv D:(A;;CCLCSWRPWPDTLOCRRC;;;SY)(A;;CCDCLCSWRPWPDTLOCRSDRCWDWO;;;BA)(A;;CCLCSWLOCRRC;;;AU)(A;;CCLCSWRPWPDTLOCRRC;;;PU)
Now we will access the System32 folder:
cd /d %windir%\system32
In the steps below we are register all the corresponding BITS and Windows Update DLL files as ‘default’ components in the Windows Registry. Use Enter after each line:
regsvr32.exe /s atl.dll regsvr32.exe /s urlmon.dll regsvr32.exe /s mshtml.dll regsvr32.exe /s shdocvw.dll regsvr32.exe /s browseui.dll regsvr32.exe /s jscript.dll regsvr32.exe /s vbscript.dll regsvr32.exe /s scrrun.dll regsvr32.exe /s msxml.dll regsvr32.exe /s msxml3.dll regsvr32.exe /s msxml6.dll regsvr32.exe /s actxprxy.dll regsvr32.exe /s softpub.dll regsvr32.exe /s wintrust.dll regsvr32.exe /s dssenh.dll regsvr32.exe /s rsaenh.dll regsvr32.exe /s gpkcsp.dll regsvr32.exe /s sccbase.dll regsvr32.exe /s slbcsp.dll regsvr32.exe /s cryptdlg.dll regsvr32.exe /s oleaut32.dll regsvr32.exe /s ole32.dll regsvr32.exe /s shell32.dll regsvr32.exe /s initpki.dll regsvr32.exe /s wuapi.dll regsvr32.exe /s wuaueng.dll regsvr32.exe /s wuaueng1.dll regsvr32.exe /s wucltui.dll regsvr32.exe /s wups.dll regsvr32.exe /s wups2.dll regsvr32.exe /s wuweb.dll regsvr32.exe /s qmgr.dll regsvr32.exe /s qmgrprxy.dll regsvr32.exe /s wucltux.dll regsvr32.exe /s muweb.dll regsvr32.exe /s wuwebv.dll
With regsvr32 the use of the /s switch will silently register the above .DLL files as command components in the registry. Basically, any additional messages are suppressed by the switch.
Now we will reset the network configurations that might have been a problem.
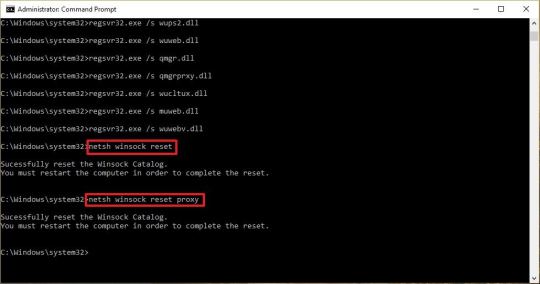
Enter the following commands, followed by Enter on each line:
netsh winsock reset netsh winsock reset proxy
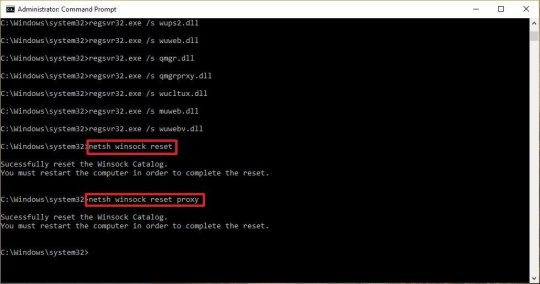
Windows 10 Reset Windows Catalog
Now we can restart the BITS service, followed by the Windows Update service, and finally the Cryptographic service.
Enter the following commands, followed by Enter on each line:
net start bits net start wuauserv net start appidsvc net start cryptsvc
Now re-start the computer.
The Windows Update components have been fully reset and now you can try to check for updates. In the Windows Settings > Update & Security page (choose “Check for updates“).
Manage when automatic updates can reboot your computer
The automatic updates in Windows 10 are never meant to be disabled (only a registry ‘hack’ or policy editor can do that; it is also bad for security), however we can manage the time window for when the system may reboot after any automatic updates (a lot of Windows updates required a system reboot). This means we can manage the restart period to not interfere with our work needs and schedule a time when it is more convenient. The steps to manage this:
Go to Windows Settings > Update & Security page (choose “Check for updates“)
Now select the “Windows Update” near the the top of the list on the left-hand side. Now, choose “Change active hours” underneath “Check for updates“.
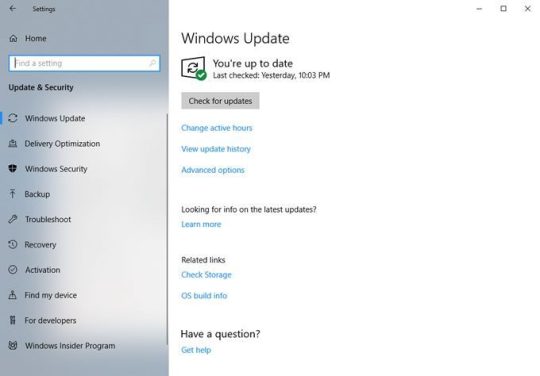
Windows Settings Update & Security Windows Update
Windows Settings Update & Security Windows Update
You will now see a window called “Active hours“, here you can set a start and end time for when you prefer that restarts can occur. This does NOT change when updates are installed, but only the time windows when automatic restarts are permitted. Once you have select your preferred times, select “Save“.

Windows Settings Update change Active Hours
If an update is already scheduled, you can select “Restart options” from the Windows Update settings page and choose a custom re-start time. You can also select the preferred time and day for restarts.
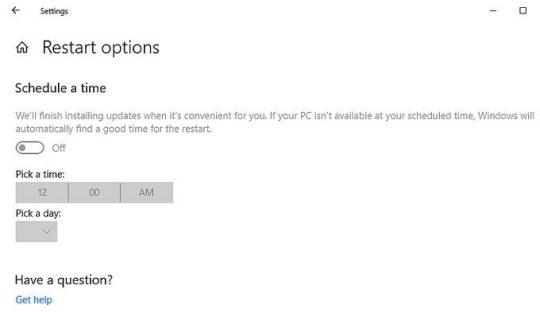
Windows Settings Update Restart Options
Finally, we can defer (hold-off) system upgrades for a period of time (grace), or pause them temporarily. There are separate settings for major updates, and for quality updates such as security updates.
To defer upgrades, select “Advanced options” on the main Windows Update page. Use the drop-down lists to decide how many days you want to defer them for.
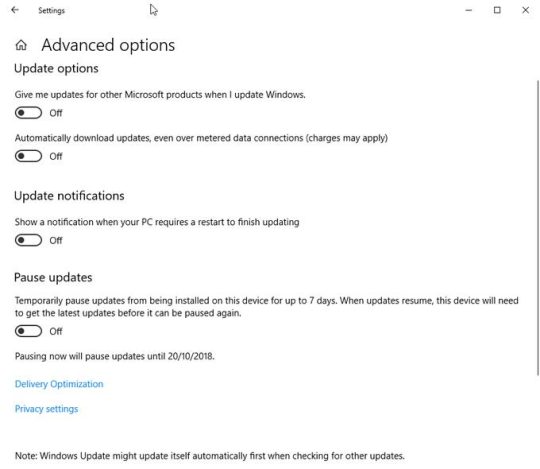
Windows Settings Update Advanaced Options
Use this menu to make any other adjustments on the way updates are applied,which can include whether they are automatic or manually triggered along with the option to pause them entirely.
Common Windows Update failed error codes
A failed update will usually give an error code (reason).
Some of the more typical error codes seen are:
0x80073712 A file needed by Windows Update is likely damaged or missing. 0x800F0923 May indicate that a driver or other software on your computer isn’t compatible with the upgrade to Windows 10. For info about how to fix this problem, contact Microsoft support. 0x80200056 Usually means that the upgrade process was interrupted because you accidentally restarted your PC or signed out. Try upgrading again and make sure your computer remains on. 0x800F0922
Usually means a failure connecting to the Windows Update servers. The error could also mean there is not enough free space in the System Reserved partition.
0xC1900208 – 0x4000C Typically indicates that an incompatible app installed on your computer is blocking the upgrade process from completing.
0xC1900200 – 0x20008
0xC1900202 – 0x20008
This may signify that your computer does not meet the minimum requirements to download or install or upgrade to Windows 10.
0x80070070 – 0x50011
0x80070070 – 0x50012
0x80070070 – 0x60000
Usually means that your computer does not have enough space available for the install. Free some space on the drive and try again.
Also refer to Microsoft’s reference on Windows 10 upgrade and installation errors
0 notes
Text
[6 Solutions] Réparer l'Erreur 0x8024a105 Windows Update

La mise à jour de Windows 10 rencontre parfois des erreurs comme (0x8024a105). Elle est principalement due à des fichiers système mal configurés dans votre système d'exploitation. Maintenant, les différentes raisons derrière le problème peuvent être : Une installation incomplète. une désinstallation incomplète. Une suppression incorrecte d'applications ou de matériel. Une attaque par un virus ou un arrêt incorrect

0x8024a105
Comment résoudre les problèmes liés à l'erreur 0x8024a105 ?
Solution 1: redémarrez votre PC La solution la plus simple consiste à redémarrer votre ordinateur. Il arrive souvent que le redémarrage de votre ordinateur puisse corriger toute les problèmes associés. Un autre moyen simple consiste à modifier votre connexion Internet. Vous pouvez remplacer votre connexion sans fil par une connexion câblée ou inversement. Cela corrigera également toute erreur en dehors du redémarrage.

redémarrer ordinateur Solution 2: Lancez la Résolution des problèmes: Un autre moyen simple consiste à exécuter la résolution des problèmes Windows Update, comme suggéré par justuto. Ceci est un outil intégré qui peut aider à résoudre les erreurs. Pour l'exécuter, procédez comme suit: Accédez au menu Démarrer en cliquant sur l'icône Windows située dans le coin inférieur gauche de l'écran de votre ordinateur. Après cela, tapez “Résolution des problèmes” et appuyez sur Entrée. Dans cette fenêtre, cliquez sur «Windows Update», puis sur «Exécuter l'utilitaire».

Attendez la fin du processus de résolution, puis vérifiez s'elle est corrigée. Si vous rencontrez des problèmes avec votre ordinateur, essayez plutôt Advanced SystemCare (outil pour d'optimisation rapide et efficace de votre ordinateur ). CNET le décrit comme un «Swiss Army Knife of a PC utility». Une fois que vous l'avez téléchargé, vous obtenez une suite d'outils d'optimisation, notamment un programme de désinstallation, des correctifs de registre en un clic, des défragmenteurs, etc.

Advanced SystemCare Voir aussi: 8 Méthodes pour Réparer 0xc000012f – Win 10 Solution 3: Modifiez vos paramètres UAC Une autre méthode consiste à modifier les paramètres du contrôle de compte d'utilisateur. Parfois, elle se produit lorsqu'il y a un problème dans le contrôle de compte d'utilisateur, en particulier lorsque le compte connecté ne dispose d'aucune autorisation. Vous pouvez résoudre le problème en modifiant les autorisations des paramètres UAC en procédant comme suit: Appuyez simultanément sur les touches Windows et R, puis tapez «netplwiz» pour ouvrir la fenêtre Comptes d'utilisateurs. Dans l'onglet Utilisateur, choisissez le compte d'utilisateur que vous utilisez et cliquez sur «Propriétés». Dans la fenêtre Propriétés, cliquez sur “Appartenance au groupe” et choisissez “Administrateur”. Cliquez sur «Appliquer» pour enregistrer toutes les modifications. Redémarrez votre ordinateur et connectez-vous avec le même compte d'utilisateur. Essayez de mettre à jour votre système et vérifiez s'elle persiste toujours.

paramètres compte d'utilisateur Solution 4: utilisez l'outil DISM La présence de fichiers corrompus est l’une des causes de 0x8024a105. L'exécution d'un outil DISM est un moyen efficace. Voici comment vous pouvez le faire: Appuyez sur la touche Windows et X. Dans le menu, sélectionnez l'invite de commande (Admin), puis appuyez sur Entrée. Tapez la commande ci-dessous et appuyez sur Entrée: DISM/Online /Cleanup-image /Checkhealth

dism online L'outil commencera à analyser les fichiers et, espérons que cela aide. Redémarrez le système et vérifiez. Solution 5: Démarrage Minimal pour résoudre l'erreur 0x8024a105 Une autre alternative pour la corriger consiste à effectuer un démarrage minimal sur votre ordinateur. Pour ce faire, suivez les procédures ci-dessous: Ouvrez la boîte de dialogue Exécuter en appuyant sur la “touche Windows + R”. Tapez «msconfig», puis appuyez sur Entrée. Dans la Configuration du Système, sélectionnez et cliquez sur l'onglet “Services”. Cochez la case juste à côté de “Masquer tous les services Microsoft” puis cliquez sur “Désactiver tout”.

masquer service Microsoft Allez dans l'onglet «Démarrage» et cliquez sur «Ouvrir le Gestionnaire des Tâches». Sélectionnez tous les éléments de démarrage et cliquez sur «Désactiver».

désactiver éléments gestionnaire taches Fermez le «Gestionnaire des Tâches». Répétez les étapes 1 à 3 et revenez à l'onglet «Démarrage», puis cliquez sur «Ok». Redémarrez votre ordinateur et vérifiez a nouveau. Voir aussi: Réparer « DPC_WATCHDOG_VIOLATION » Facilement Solution 6: réinitialisez vos composants Windows Update: Une erreur 0x8024a105 apparaîtra également sur votre mise à jour lorsque vos composants Windows Update sont corrompus. En réinitialisant ces composants, il sera résolu. Voici comment faire: Dans le coin inférieur gauche de votre moniteur, cliquez sur l'cône Windows et tapez «cmd». Une fois que l'invite de commande apparaît, cliquez dessus avec le bouton droit de la souris, puis sélectionnez «Exécuter en tant qu'administrateur». Dans l'invite de commande, tapez les commandes suivantes ci-dessous et appuyez sur Entrée après avoir tapé chaque commande: net stop bits net stop wuauserv net stop appidsvc net stop cryptsvc Remarque: Les commandes ci-dessus arrêteront tous les services nécessaires au téléchargement et à l'installation des mises à jour. Après cela, tapez les lignes suivantes une par une. Ren %systemroot%\SoftwareDistribution SoftwareDistribution.old Ren %systemroot%\system32\catroot2 catroot2.old Remarque: Ces deux commandes renommeront les dossiers Softwaredistribution et Catroot2, les dossiers utilisés par Win Update pour stocker des données et des fichiers temporaires. Une fois qu'ils auront été renommés, le système détectera que les dossiers sont manquants et en créera donc de nouveaux. Une fois qu'il y a de nouveaux dossiers, Win Update peut maintenant éviter les problèmes des anciens dossiers et ainsi résoudre l'erreur. Répétez l'étape 2 pour réactiver les services que vous avez précédemment désactivés. Une fois que vous avez terminé, vérifiez.

Redémarrer composants Read the full article
0 notes
Text
[5 Solutions] Réparer le Code d'erreur 0x8007000d Facilement
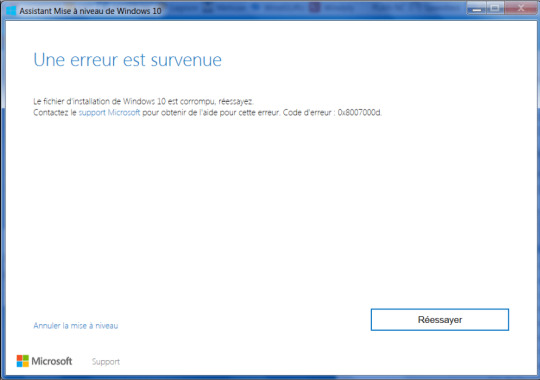
L'erreur 0x8007000d est l'une des erreurs de mise à jour que vous pouvez rencontrer lors de la mise à niveau vers Windows 10. Elle peut également apparaître lors de l'activation du système d'exploitation. Elle empêche d'utiliser le nouveau système d'exploitation et peut rendre les utilisateurs fous, car elle surgit de nulle part et semble irréversible. Néanmoins, il existe des méthodes pour la corriger, que nous présentons ci-dessous.

erreur 0x8007000d
Quelles sont les causes du code 0x8007000d ?
Presque tous les problèmes de Windows peuvent être liés à des fichiers corrompus ou manquants, ce qui entrave tout processus et cause l'erreur. Dans ce cas, l'erreur est due à des fichiers système Windows endommagés à cause de la disparition ou de la corruption de fichiers Windows à cause desquels la mise à jour ou l'activation de Windows ne peut pas progresser. Cette erreur peut s'expliquer par les raisons suivantes : Mauvaise installation Désinstallation incomplète Suppression incorrecte d'applications ou de matériel Arrêt incorrect de votre systèmes Windows Attaque de logiciels malveillants ou de virus
Les solutions pour résoudre le code d'erreur 0x8007000d ?
Solution 1 : Exécuter la résolution des problèmes de mise à jour de Windows Lancez le Dépannage de mise à jour de Windows, c'est un utilitaire intégré qui corrige Les erreurs Windows . Essayez-le et vérifiez si ça marche ou non; Ouvrez le menu Démarrer et ; tapez Résolution des problèmes Windows; appuyez sur Entrée. Et choisissez Windows update , puis essayez d'exécuter le dépannage de Windows Update Après le scan complet, vérifier si le code d'erreur 0x8007000d est corrigé ou non, si non, alors suit la deuxième solution :

résolution problèmes update Voir aussi: Réparer l’Erreur Esrv.exe Facilement (3 Solutions) Solution 2 : Exécuter le Scan SFC Eh bien, si la solution ci-dessus ne fonctionne pas pour vous, il est recommandé d'exécuter le scan SFC le vérificateur des fichiers système. Cela vous aidera à réparer les fichiers système corrompus qui pourraient causer le code d'erreur 0x8007000d. Suivez les étapes pour ce faire : Dans la barre de recherche, tapez CMD Cliquez ensuite avec le bouton droit de la souris sur ce fichier et ; choisissez Exécuter en tant qu'administrateur Tapez les commandes ci-dessous et ; appuyez sur Entrée après chaque ligne : WSReset.exe dism /online /cleanup-image /restorehealth dism /online /cleanup-image /StartComponentCleanup sfc /scannow -Et enfin, redémarrez l'ordinateur
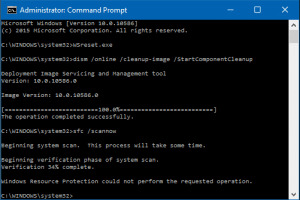
WSReset.exe Solution 3 : Effacer le dossier SoftwareDistribution Essayez d'effacer le dossier SoftwareDistribution, il s'agit d'une solution de travail qui aide de nombreuses personnes à corriger le code d'erreur 0x8007000d. Appuyez sur Win+R et ; tapez services.msc > ; appuyez sur Entrée. Cliquez avec le bouton droit de la souris sur Service Windows Update > et sélectionnez Arrêter.

arrêter Windows update Allez dans le répertoire Windows\SoftwareDistribution et supprimez son contenu Sinon, vous pouvez renommer le dossier en \Windows\SoftwareDistributionOld
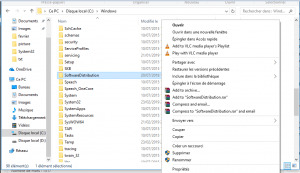
renommer SoftwareDistribution Démarrez le service de mise à jour Service Windows Update et ; réessayez la mise à jour. J'espère que cela vous aidera à corriger l'erreur de mise à jour Windows 0x8007000d. Solution 4 : utilisation de l'éditeur de stratégie de groupe Appuyer sur la touche Win+R > ; entrer gpedit.msc > Entrer. Sélectionnez Configuration de l'ordinateur puis ; Modèles d'administration Sélectionnez Système et ; double-cliquez sur Spécifier des paramètres pour l'installation des composants facultatifs et la réparation de composants Sélectionnez Activé et choisissez ; Contactez Windows Update directement pour télécharger le contenu de réparation au lieu de windows server update services (WSUS) Cliquez sur OK et; Redémarrer la mise à jour J'espère que cela vous aidera à corriger le code d'erreur 0x8007000d dans Windows 10/8/7.
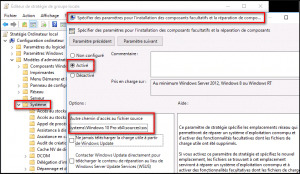
Spécifier des paramètres-pour l'installation des composants facultatifs Voir aussi: Réparer l’Erreur 0x8024a105 Windows Update Solution 5 : Réinitialiser manuellement la mise à jour de Windows Composants Essayez de réinitialiser les composants de mise à jour de Windows, cela vous aide à résoudre des divers problèmes. Suivez les étapes pour ce faire : Appuyez sur Windows + X ; et sélectionnez Invite de commandes (Admin) Puis dans l'invite de commandes ; tapez les commandes ci-dessous et ; appuyez sur Entrée après chacun. Remarque : Soyez prudent lors de la saisie de chaque commande, car une petite erreur peut causer un grand problème. net stop bits net stop wuauserv net stop appidsvc net stop cryptsvc
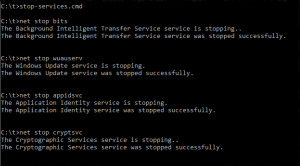
arrêter composants Windows update Après cela, effacez le fichier qmgr*.dat, vous pouvez également le faire à partir de l'invite de commande en suivant la commande suivante ;n'oubliez pas de cliquez sur Entrez pour l'exécuter. Del “%ALLUSERSPROFILE%\Application Data\Microsoft\Network\Downloader\qmgr*.dat
effacer qmgr*.dat Dans l'invite de commandes, tapez une autre commande pour aller dans le dossier System32, et ici vous devez réenregistrer les fichiers BITS et les fichiers de Windows Update: Taper cd /d %windir%\system32, et ; appuyez sur Entrée pour l'exécuter.

dossier système 32 Tapez les commandes suivantes et appuyez sur Entrée après chaque commande, pour réinitialiser les fichiers BITS et les fichiers Windows Update. regsvr32.exe atl.dll regsvr32.exe urlmon.dll regsvr32.exe mshtml.dll regsvr32.exe shdocvw.dll regsvr32.exe browseui.dll regsvr32.exe jscript.dll regsvr32.exe vbscript.dll regsvr32.exe scrrun.dll regsvr32.exe msxml.dll regsvr32.exe msxml3.dll regsvr32.exe msxml6.dll regsvr32.exe actxprxy.dll regsvr32.exe softpub.dll regsvr32.exe wintrust.dll regsvr32.exe dssenh.dll regsvr32.exe rsaenh.dll regsvr32.exe gpkcsp.dll regsvr32.exe sccbase.dll regsvr32.exe slbcsp.dll regsvr32.exe cryptdlg.dll regsvr32.exe oleaut32.dll regsvr32.exe ole32.dll regsvr32.exe shell32.dll regsvr32.exe initpki.dll regsvr32.exe wuapi.dll regsvr32.exe wuaueng.dll regsvr32.exe wuaueng1.dll regsvr32.exe wucltui.dll regsvr32.exe wups.dll regsvr32.exe wups2.dll regsvr32.exe wuweb.dll regsvr32.exe qmgr.dll.exe regsvr32.exe qmgrprxy.dll regsvr32.exe wucltux.dll regsvr32.exe muweb.dll regsvr32.exe wuwebv.dll Ensuite, dans l'invite de commandes ; tapez netsh winsock reset et exécutez-le ; pour réinitialiser Winsock.

netsh winsock reset pour réinitialiser Proxy ; tapez netsh win http reset proxy

netsh winhttp reset proxy Et redémarrez les services que vous avez arrêtés initialement, avec les commandes suivantes et appuyez sur Entrée après chaque commande net start bits net start wuauserv net start appidsvc net start cryptsvc

démarrer composants Windows update Enfin, redémarrez votre système Windows J'espère que cela fonctionnera pour vous pour corriger l'erreur de mise à jour Windows 0x8007000d. Mais si l'erreur persiste, il est recommandé de scanner votre système avec l'outil de réparation automatique, cela pourra vous aidez à corriger le problème. Read the full article
0 notes