#Best Media File Converter For Mac
Explore tagged Tumblr posts
Visit Tumblr Blog
Explore Tumblr blogs with no restrictions, modern design and the best experience.
Last Seen Tumblr Blogs


Fun Fact
There were a total of 171.5 billion posts on Tumblr in 2019.
Text

COLORING + SHARPENING TUTORIAL
someone asked for a coloring tutorial and my sharpening settings, so here it is! there are also a few tips to achieve more HQ gifs. :)
tutorial under the cut!
FOR HIGH-QUALITY GIFS
FILE SIZES
it doesn’t matter what your sharpening settings are if the file you’re using to gif is too low quality, so i tend to look for the best that i can get when downloading stuff.
usually, movies (+2h) look better if they’re 5GB or more, while an episode (40 min/1h) can look good with even 1GB. the minimum definition i try to find is 1080p, but i gif with 2160p (4k) when available. unfortunately, not every computer can handle 4k, but don’t worry, you can gif with 1080p files just fine if they are big enough. contrary to popular belief, size does matter! which means sometimes a bigger 1080p file is better than a smaller 2160p one, for example.
SCREENCAPPING METHOD
this can too influence the quality of your gifs. as a gifmaker, i’ve tried it all: video frames to layers, directly opening video clips, loading files into stack, and i’ve finally settled down with opening screencaps as an image sequence. with bigger files, it doesn’t matter much what technique you use, but i’ve noticed with smaller files you can do wonders if you screencap (either by loading files into stack or opening as an image sequence) instead of using video clips. for example, this gif’s original video file was only 4GB (so smaller than i’ve usually go for), if you can believe it!

here’s a tutorial for setting up and screencapping with MPV, the media player i use to screencap. again, you can keep using video clips for bigger files, but you’ll find this useful when dealing with dire causes. i don't file loads into stack, though, like the video does. i open as an image sequence (open > screencap folder > select any image > click the image sequence button). just select OK for the speed. this will open your screencaps as a video clip (blue bar) in timeline mode (i'm a timeline gifmaker, i don't know about you). you will need this action pack to convert the clip into frames if you're a frames gifmaker. i suggest you convert them into frames even if you're a timeline gifmaker, just convert them into a timeline again at the end. that way you can delete the screencaps right away, otherwise you will delete the screencaps and get a static image as a "gif".

ATTENTION if you’re a Mac Sonoma user, MPV won’t be an option for you unless you downgrade your system. that is, if you have an Intel chip. if you have M1 Max chip (or even a better one), here’s a fix for MPV you can try while keeping that MacOS, because nowadays MPV is skipping frames in its latest build. or you can use MPlayer instead for less hassle. here are two tutorials for setting and using MPlayer. Windows users are fine, you can use MPV without trouble.
FOR EVEN MORE QUALITY
ADD NOISE
here’s a tutorial for adding noise as a way to achieve more HQ gifs if your original material is too low quality.
REDUCE NOISE WITH CAMERA RAW
instead of adding noise, you can reduce it, especially if your gif is very noisy as it is.
the path is filter > camera raw > detail > nose reduction. i do this before sharpening, but only my video file isn't great to begin with. because it’s a smart filter, you can reduce or increase its opacity by clicking the bars next to its name in the layers panel.
TOPAZ AI
i use Topaz Photo AI to increase the quality of my screencaps when i need to. it’s paid software, but there are… ways to find it for free, usually on t0rrent websites. if someone’s interested, i can make a tutorial solely about it in the future.
SHARPENING SETTINGS
here are my sharpening settings (filter > sharpen > smart sharpen). i sharpen things twice: 500% 0.4px + 10% 10px. here's an action for it, for more convenience. here's a tutorial on how to use Photoshop actions. for animated stuff, i use this action pack.

COLORING
here’s the gif i'm gonna use as a base. it’s already sharpened like the way i always do it.

LIGHTNING THE SHOTS
half of the secret of a good coloring is good lightning. i always useCurves (layers > new adjustment layer > curves) and Brightness & Contrast (layers > new adjustment layer > brightness & contrast). the settings depend on the scene you’re giffing, but i always try make my gifs bright and with high contrast to make the colors pop.
CURVES
besides lighting your scene, the Curves adjustment layer has four automatic options that will color-correct it for you. it’s not always perfect and it doesn’t mean you won’t need to do further coloring, but it’s a great start. it’s a lifesaver for most ridiculously yellow scenes. look at the difference! this gif uses the 3rd automatic option (the screenshot below isn't mine btw so that's why the fourth option is the chosen one), from top to bottom. what automatic option you need to choose depends on the gif.


sometimes i like to tweak my Curves layer. not everybody does that, it’s not that necessary and if you’re not careful, it can screw your gif up. to modify your layer by hand, you will need to click and drag points of that straight line in the position you desire. this is the concept behind it:

basically, the lower part of the line handles the shadows, while the upper part handles the highlights of the image. if you pull a highlight point up, the image’s highlights will be brighter. if you pull it down, it will make them darker. same thing for the shadow points. you should play with it to get a grasp of it, that’s what i did when i first started giffing.
BRIGHTNESS & CONTRAST
then i added a bit of brightness and contrast.

CHANNEL MIXER
the scene looked a bit too yellow, so i used the Channel Mixer (layer > new adjustment layer > channel mixer) adjustment layer. here’s a tutorial of how it works. not every scene needs the Channel Mixer layer though, i mostly use it to remove heavy overall tints. in this particular case, the Curves layer got rid of most of the yellow, but i wanted the gif to be just a bit more blue so the Channel Mixer tweaks are very minimal.

SELECTIVE COLOR
now, this adjustment layer i always use: Selective Color (layer > new adjustment layer > selective color). this is THE adjustment layer to me, alongside the Curves one. this is how it works:

ie, you can separately edit a color this way, giving it tints. for this gif, i wanted to make the colors more vibrant. to achieve that, i edited the selected colors this way:

for the reds, i added even more red in them by moving the first slider to the right, making the color more vibrant. for his hat to have a more warm tint, i added yellow to the reds (third slider, moving it to the right). finally, to make the reds stronger, i moved the last slider to the right (more black).
for the yellows, i made them brighter by adding white to them, thus making the tile wall and Paddington more bright as well.
for the cyans and the blues, i just added the maximum (+100) of black that i could.
i wanted for Paddington's nose to be brighter, so i added more white to the whites.
lastly, i added depth to the blacks by increasing their own blackness.
you should always play with the Selective Colors sliders for a bit, before deciding what you want or need. with time, you will automatically know what to change to correct the color grading. it all takes practice!
HUE/SATURATION
i don’t know if you noticed, but there are some green spots on the blue wall behind Paddington. to correct that, i added a Hue/Saturation adjustment layer (layer > new adjustment layer > hue/saturation) and made the saturation of the greens 0%, making that unwanted green disappear from the background.

while the green spots on the wall are specific for this gif, i use hue/saturation a lot to tweak, well, hue and saturation. sometimes someone’s skin is too yellow, i made it redder by tweaking the reds and the yellows, or vice-versa. the hue bar follows the rainbow bar, so the maximum settings (+100 and -100) give the selected color to change its hue to something more red or pink (the rainbow extremities). changing hue can give pretty whacky results, like turning someone’s skin tone to green, so you will need to play with it to get the hang of it. you can also tweak the opacity of your hue/saturation layer to further improve your gif’s coloring. i didn’t do it in this case, the opacity is still 100%. the reds and the blues had their saturation increased to make them pop just a bit more, without affecting the other colors.
COLOR BALANCE
the highlights of the gif still had a green tint to it due to the automatic correction of the Curves layer, so i used Color Balance. this is how it works: instead of giving specific colors some tints, you can give them to the shadows, highlights, and mid-tones. if your shadows are too blue, you counterbalance them with the opposite color, yellow. same thing with the cyan-red and magenta-green pairings. in my case, i added a bit of magenta.


B&W GRADIENT MAP
now, if this gif was a dish, it’s time for the salt and pepper. i always add a Gradient Map (layer > new adjustment layer > gradient map) (black to white gradient) with the Soft Light blending mode, thus giving my shadows more depth without messing with the mid-tones and highlights. it also doesn’t “deep fry” (you know those memes?) the gif too much by adding even more contrast. usually, the opacity of the layer is between 30% to 70%, it all depends on the gif. it always does wonders, though!

COLOR FILTER
finally, i like to add Color Filters (layer > new adjustment layer > color filter) to my gifs. it’s very handy when giving different scenes for the same minimalistic set because it makes them kind of match despite having completely different colors. in this gif’s case, i added a “deep blue” filter, opacity 50% density 25. you can change the density and the opacity of the layer for further editing, again, it all depends on the gif.

VIBRANCE
if i feel like it, i add a vibrance layer (layer > new adjustment layer > vibrance) to make the colors pop. this can ruin your coloring sometimes, especially when regarding skin color, so be careful. i didn't do it in this gif because i felt i didn't need it.
TA-DA! 🥳
AN OTHER EXAMPLE
the color grading of the original scene it’s pretty good as it is, to be honest. let’s see a worse scenario, a VERY yellow one:


no channel mixer this time because the automatic curves option dealt with the yellowness, but you can see it made the gif too green. i needed to correct that with the following adjustment layers:
curves (automatic option) (gif 2) >> same curves layer (tweaks) (gif 3) >> brightness & contrast (gif 4) >> hue/saturation (tweaked cyan+blue+green) >> selective color >> color balance (gif 5) >> b&w gradient map >> (sepia) filter >> vibrance (gif 6)
i added a hue/saturation layer to remove the blues & greens before my selective color layer because i thought that was more urgent than tweaking the tint of all colors. color balance (gif 4) was the real hero here, though, by removing the green tint. the selective color layer was meant to make the red pop more than anything else, because the rest looked pretty good, especially her skin tone (despite the green tint). you can notice that tweaking the curves layer (small gif 3) also helped A LOT with the green problem.
tl;dr 😵💫😵💫😵💫
here's a list of my go-to's while coloring and lightning gifs. it's not a rule, just a guide. there are gifs in which i don't use all these adjustment layers, or use them in a different order. it all depends!
1. curves (automatic option + tweaks) 2. brightness & contrast 3. channel mixer 4. selective color 5. hue/saturation 6. color balance 7. b&w gradient map 8. color filter 9. vibrance
i'll suggest that you study each adjustment layer listed for more info, either with other Tumblr tutorials or YouTube ones. the YouTube ones focus on images, but you can translate what they teach to gif making very easily. you can ask me to further explain any adjustment layer, too! i was brief to keep this short (which i kinda failed lol).
feel free to ask me for clarification or something else about gifmaking wise, i always like to help. ❤️
#*#*tutorials#gifmaker tag#resources#resource: tutorials#ps help#uservivaldi#tuserjen#userrin#userelio#useralien#userzaynab#userchibi#userbuckleys#usertj#userbess#tuserlucie#useraljoscha#userdavid#usershreyu#usernolan#userhallie#userisaiah#tusergio#tusergeo#userjesslynn
796 notes
·
View notes
Note
Hello. 🥺I hope you can still remember me! 😂 would you mind provide me the specific tutorial on how to make these HQ gifs especially this post: https://www.tumblr.com/sinnersmovie/781373995991826432/the-pitt-2025-created-by-r-scott?source=share ? 🥺 the quality is really nice! I have the problem of gif making, the thing is that I have followed many tutorials on how to make HQ gifs but it always turn out differently even tho I follow every step.. I am too confused. Literally, so desperate to fix the problem 😭 not sure what did I do wrong..
yes, hi!!! so, for this gifset from the pitt, i can walk you through my process on capturing footage and coloring, but if what you're struggling with is quality, the most important part is the file and definition of the footage you're working with.
i personally almost exclusively use 1080p footage with a decent file size. a file can be HD and still vary in size from a couple hundred megabytes to several gigabytes. this will also depend on the length of the episodes (half-hour episodes vs. an hour-plus). since we're talking specifically about my gifs of the pitt, my DLs of the episodes are all in the 2-3.5gb range, give or take.
i know there are gifmakers that swear by 4k footage and i certainly won't deny that gifs made from 4k files are stunning, but i've already spent a lot of money on external hard drives and don't have the space to spare for the frankly massive sizes of 4k movies and tv. besides, most 1080p quality gifs turn out perfectly well!
below the cut, i'll show you how i capture, gif, and color scenes from the pitt like this:

note: this tutorial is beginner-oriented!
step 1a: once you obtain your file (this is not a piracy tutorial lmao, but if you google "piracy reddit" you can find a lot of reputable suggestions for sites to peruse), it's time to screencap or clip the scene(s) you want to gif. i would say that, from what i've seen, most gifmakers use screencaps, but i highly prefer taking short video clips (which i keep and usually label for future use/reference), so i'll be showing you that version. if you would prefer to screencap, please check the "beginner tutorials" tag on my resource blog @gifmakerresource
step 1b. i only use windows pcs, so i can't give any specialized info regarding macs, just as a disclaimer. i use the program VLC Media Player, both for clipping scenes and as my regular media player on both my laptop and my desktop. to initially set up vlc's recording capabilities, i used this website (please just ignore all their annoying advertising for movavi).
step 1c. now that vlc is set up to record footage played through it, i open my video clip (ctrl+o) and navigate to the scene i ultimately want to gif. i typically recommend recording an extra 5-10 seconds before and after the clip, especially if you need to convert the clip afterwards.
step 1d (optional). depending on the file format of your episode, you may need to convert the clips you take before photoshop will accept them. for example, a vast majority of the files i download are mkv files, but photoshop works best with mp4 files. for this, i use another program called HandBrake. once downloaded, i add whatever file(s) i need to convert, select the appropriate preset (which is almost always "Super HQ 1080p30 Surround" to maintain as much of the original quality as possible). you can select where the converted files automatically save for organization purposes, just like with vlc.
step 2. now that we have the clip we want to turn into a gif, it's time to bring it into photoshop. to do so, select file -> import video frames to layers. once you select your video clip, photoshop will pop up with a little media player with a few controls. here's what that looks like:

the box on the left that i've highlighted is what you'll adjust depending on whether you want to load in the entire clip or a specific range of the clip. with the way i clip scenes, i have quite literally NEVER used "from beginning to end." instead, i use the toggles on either side of the progress bar (circled in red) to select a specific range. you don't have to be overly precise with this as you can always delete extra frames, so i'll navigate using those little arrows until i roughly have the shot i want to turn into one gif and click okay. i would not recommend checking "limit to every x frames" because while this can help with file size, it will make your gif appear choppy. make sure "make frame animation" is checked.
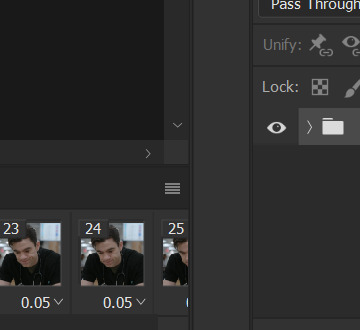
this is what photoshop looks like after clicking OK:

across the bottom are the frames. make sure that "forever" is selected at the bottom left rather than once or three times. this makes sure that wherever you post your gif, it will play continuously. the 0.04 below each frame is the frame rate -- at this setting, each frame plays for four tenths of a second. this might vary depending on your source material, but i HIGHLY recommend using 0.05-0.06. we're not going to worry about that yet, though, so don't bother changing it right now.
over on the right under "layers" are, you guessed it, each frame's corresponding layer. now, i could go more in-depth on this, but i don't gif using frame animation. i used to a very long time ago (over ten years ago), but i use a series of actions to convert to timeline animation. before doing that, however, i execute a couple more steps first.
step 3 (optional). i may be a slob irl, but i'm extremely organized and neat on my computers, so the first thing i do is use an action i created to select all the layers and put them into a group. to manually do this, you can either click on the first (or last) layer and then click on the last (or first) while holding down shift OR you can go to select -> all layers OR you can use the keyboard shortcut alt+ctrl+a. i just turned this process into an action to save time.
step 4 (optional). delete any excess frames. because i don't bother with being extremely precise with photoshop's media player, i usually have to trim off extra frames at the beginning and/or end of my gif. to delete frames, select the first frame and either hold down control and click each one or hold down shift and click the last one to select everything in between. once the frames you want to delete are selected, click the little trashcan below the frames (near the left side just before the horizontal scrollbar).
note: to watch your gif at any time, simply press the spacebar. press it again to pause.
step 5. while everyone's process is different, i prefer to crop my gif to its final proportions here. there's nothing wrong with doing it later, but sharpening and coloring can take longer at larger dimensions. the width of a single gif in a row on tumblr needs to be 540px. two gifs in a row are both 268px wide. three gifs in a row are 177px, thus making tumblr's gutters (the small transparent spaces separating gifs) 4px.
step 6. this is when i sharpen my gif and convert it to timeline animation. when it comes to sharpening, i think everyone probably does it a little differently. here's how i sharpen my gifs (which i turned into an action to save time) and here's the sharpening tutorials tag on my resource blog. as with most things gifmaking-related, i recommend trial and error. try different things until you find what you like! once again, to save time, i turned that sharpening tutorial (and its base sharpening) and the timeline conversion into a single action.
to convert your gif from frame animation to timeline, you need to select all your layers and all your frames and select "convert to video timeline" from the menu after clicking these three lines:
this is what i have once i've run my action to sharpen and convert:

you can adjust how zoomed in your timeline is with the slider at the bottom and if you're having issues with playback (though especially with larger/longer gifs, it always takes a while to load before playing smoothly) click the gear icon near the top of this screenshot and make sure it's set to 100% and to loop playback.

(group 2 is my vivid sharpening per the tutorial i linked, so if you don't use that, yours won't look exactly like this.)
step 7. time for my favorite part: coloring! now, i'd recommend taking a look at coloring tutorials as every show and every movie is going to be different. even separate scenes in the same episode can have totally different lighting. i have a bad good habit of saving just about every psd (photoshop file that contains all coloring adjustment layers), so there are times where i can just reuse a coloring i've already made rather than having to color each gifset from scratch, but you might be surprised just how much i DO color from scratch.
in several of my other gif tutorials, i explain and go step-by-step through my entire coloring process and why i use the adjustment layers i use, but as i said, what works for one scene may not work for another, so the best thing i can recommend is to familiarize yourself with commonly-utilized adjustment layers. play around with them, see what each one does, and over time, you'll be able to recognize which ones to use and when to use them. the adjustment layers i use are brightness/contrast, curves, selective color, channel mixer, gradient map, vibrance, hue/saturation, photo filter, levels, and exposure. the bolded ones are the ones i use on almost every single coloring.
on the navigation page on my resource blog, you can find a lot of tutorials that are specific to one or more types of adjustment layers and i encourage you to check those out as well as explore the navigation page itself.
here's an overview of my coloring for the pitt:

and here's a visualization for you of what each layer does:


(top to bottom, left to right) no coloring, brightness/contrast, adding curves, adding selective color 1 (black, neutrals, and white), adding selective color 2 (blue and cyan), adding gradient map (b&w set to 25%), fully colored, without vivid sharpening, and a comparison of the original to the full-coloring.
step 8. it's time to save! i HIGHLY recommend using this save action from @anyataylorjoy as it's a total lifesaver. if you save your gif right from here, photoshop will automatically set your frame rate to 0.07. while i used to gif at 0.07, i cannot believe how slow and choppy that looks now. all of my gifs are now 0.05, which is what this action does in part. without this action, you'd have to save your gif here and then open that file, change your frame rate, and re-save.
once this action has finished running, you go to file -> export -> save for web (legacy). here are my save settings, which do make a difference:

just remember, to be uploaded to tumblr, a single gif must be below 10mb in size. # of frames, #of colors, and dimensions all play a big part in the size of your gif. here's the finished gif at 540px:

to sum up, what's most important when trying to make high-quality gifs is the quality of your footage. generally, the larger the file size the better, but you do not have to use 4k instead of 1080p. and a 3gb 1080p file will likely look higher quality than a 300mb 1080p file. sharpening and coloring go into it, yes, but they're probably not going to make or break your gif.
as always, if you have additional questions or need clarification on any part of this tutorial, please let me know! i don't believe in gatekeeping and will always help to the best of my ability (it just might take me a few days).
29 notes
·
View notes
Note
hi so i’ve been wondering how you make ur gifs? i’ve been meaning to for a while and i figured there’s no better person to ask than the one that inspired me 🥹 if you’re open to giving tips or starter suggestions, my messages are open 💞
hi!!!!! and plssss tysm ur too kind!!!!!
i keep it pretty basic bc i dont have a lot of time (this is why everyone should rb the people who make really beautiful sets bc think of the time theyre giving us <33) but main tips for basic editing:
use photoshop and 1080p. (i also use 2160p but its depends on ur computer. it could wash out, which requires a lot of color correcting. when starting out, 1080p is going to be better). for 1080p, if the size is under 1.5gb, its probably lost quality during compression so keep the file size in mind.
mpv is the go to for screencapping and im sure there are tutorials that explain exactly how bc its a little technical ur first time. if u have a mac that becomes even more complicated. ive known other gifmakers who just screen record instead bc of that and honestly i cant really tell the difference most of the time 💀 so choose whichever works for u!
cropping - everyone has their own preference. the closer to 16:9 the easier it'll be to keep the quality intact. so if u have media thats older and mb only 720p, u might consider using that ratio. default width for tumblr is 540px
ALWAYS SHARPEN!!!!!! this is the most important step. for a while i couldn't upload sharpened gifs and it was the worst moments of my editing life. after u crop the gif and set the frame time (usually 0.05), convert to a video timeline and convert all your frames into a smart object. thats when u can use the smart sharpen filter. my settings are usually 500%, 0.4, 0%, remove gaussian blur. then i do another smart sharpen at 20%, 20.0, 0%. you'll want to experiment with this bc it depends
coloring is hard to give advice on bc it really depends on what the source media is. if u dont have ps experience i would go here and there are so many amazing creators who have posted help for people learning to color!! and then u can figure out what method u like best from there :)
those are the main things i use when making gifs. but i also want to tell anyone who asks for tips that sometimes the quality of a tv ep or movie is just bad!!! or the coloring isnt completely fixable because they used some weird filter and thats okay!!!!! just have fun with it!!!!! i dont think 90% of tumblr really notices the small things that we do when making gifs and thats a relief <3
lmk if u have other questions and wishing u a great saturday!!!!
2 notes
·
View notes
Text
From raising pet to keeping an eye on what your friends are up to, Apps have come a long way. You can genuinely perceive them as great friends. They not only spare you from the horror of boring companies but also act like the daddy-rescuer many times. Of course life without Apps also existed, but with Apps, life is way cooler, way smarter and way better. But now with plethora of options coming handy in the Google store, what becomes challenging is to locate the correct app- the app that makes sense in your fast paced life and fits in it appropriately. The Android market is heavily crowded with Apps and of course getting to priorities as to which one you need foremost is crucial. Past three years saw some great Apps sweeping the market off its feet. Life without Google Maps, social media Apps, WhatsApp messenger, Skype, Viber, Goodreads, etc. now seem impossible. But then as it is with technology, you never know when it is the ultimate. Here’s presenting a list of top latest Android Apps which need immediate checking out: MSN Of course not new but heavily reworked and revisited, MSN is now power packed with awesome user compatibility and features. There cannot be a faster way to keep your friends in loop, stay in touch and in know. A flick of a finger and the App allows you with multiple user friendly privileges. The new avatar sports: Oh-so-wow HD wallpapers for your Android handheld Wallpaper controls- Normal/ No scroll/ Widescreen Uber cool tabs that bring new backgrounds and popular wallpapers within the snap of your finger Pixuru Scoring user rating 10, Pixuru is for you if you are passionate about high quality wall art. It intelligently uses your smartphone images and then convert them into the sketch or picture of your like. With this App, you can order your best Android image on canvas, metal, wood or print just from anywhere you are located in the world. Pixuru takes wall art to another level because each of its wall art is tailor fit for your requirement. Adding to all of it is the professionalism of the App. Pixuru does not disappoint you. BitTorrent Sync An addition of the Google world in July 2013, BitTorrent Sync is absolutely fantabulous. This new upgraded version allows you to sync unlimited number of files and folders of any size across all your trusted devices. Adding to that, this App gives you access to all your synced folders whenever, wherever. BitTorrent Sync also introduced a new mobile to mobile sharing feature which allows you to send your photos and videos to your friends smoothly. Now available for Windows, iOS, Linux, Mac and Android, go BitTorrent. Locket Interestingly different, Locket is an App that pays you for letting it display ads on your phone. It is for free and once downloaded, locket would flash ads on your home screen. You can open them with the swipe of your finger and yet not face any problem while unlocking your phone. Adding to that, you can earn more than hundred dollars a year just through the optimum use of this App. Mobile Number Locator If just knowing the name of the one calling you is not enough, Google World takes you another step high. Mobile Number Locator enables you to locate from which state/ Telecom operator someone is calling. It works absolutely fantastic without internet and is implemented with Google 3D maps. It can search any STD code form India with Auto complete suggestions and can help you to find ISD code from world. So basically with Mobile Number Locator, you have all useful codes in your pocket. WEMO As a child or even as an adult it must be often bothering as to why exactly do you need to do the extra walking in order to reach out to the switch board. Especially if it is a cold night and you need to turn of the light getting out of your quilt, you just know how excruciating that might be. Now you can turn electronics on or off from anywhere. With WeMo app controls- the WeMo Switch, WeMo Light Switch and WeMo Motion, you can control your room lightin Sparky Lock Screen
Unlike pattern, pin, touch, etc. Sparky Lock Screen is bound to change your perception towards Lock Screen forever. Made out of pure simplicity, the App is neatly crafted and very user friendly. Goggle World having developed some of the most creative and fantastic lock screens, Sparky is quite eye-catchy and attention gripping. Download it for few bucks and personalize to get a fantabulous security for your handheld. Multi Window Often times you must have struggled to access your necessary tab right from the home screen itself. It does get difficult when you need to go through layers of screens in order to reach the tab of your choice but do not worry now if you had not purchased that expensive handheld which would have offered you multi window. Now your smart phone is also Multi Window enabled. How? Download the App and have one click accessibility. Select apps which you want to use during enjoying other Apps and also have the freedom to customize various themes according to your mood and taste. SMS Collections If finding the right SMS in the right time has always been a task for you, SMS Collections is just what you need. With 75,000 SMS-es in it, now you can send the apt one apt the apt time to the person you want to. Categorised under sections like Anniversary Quotes, Birthday wishes, Adult jokes, Cool SMS, Flirty SMS, etc. SMS Collections is the answer for every occasion. All you need is working GPRS connection to send SMS. You can also share SMS via lots of social apps. Textrand Coming free, Textrand is the coolest way to text random people, make friends and stay in touch with them. Your username is your Textrand identity, and not your phone number, so you can keep complete control of your privacy. Swiftkey iOS as well as other smartphone Os has no ability to change the stock keyword except Android. It is the best feature considered among all. For this purpose, Swiftkey is the Android app that is use to replace the stock keyboard. It is one of the finest third party apps that is very responsive and accurate typing system. It is defined in such a way that it can understand the normally vocabulary that you use in your daily life. This app is also available in different languages rather than English and the app can be easily synced in all the Android devices. Tasker Tasker app has also a wide range of useful functions. This app allows you to perform a bunch of tasks simultaneously. For example once you plug in headphones in your mobile device then through this app, the music is automatically started. One more example is that during your working hours, this app can automatically power down your device or make it silent. You can also use this Tasker with a normal mobile phone but if you want to enable more features of this app then you should be a rooted smartphone. ES File Explorer ES File Explorer is basically an app that is used to view the file menu in the smartphone. This app allows you to navigate the files and folders of your phones. You can perform and execute different operations such as cut, copy, paste and delete files with the help of this app. According to the developers, it is the most ample file management app that is highly trusted by the users worldwide. Friday: Automated Journal This app works as a recorder that records whatever you are doing in your life. When you use it then it records all the things around you do. For example the locations in which you are currently present or go somewhere, the people you contact, the music you listen, the posts you share on social networks, etc. The benefit is that you can check anytime that what specific task you performed. So, smartphone users widely use this app to know about the details of tasks they perform on daily basis. Airdroid Airdroid is basically considered as a remote desktop app for Android devices. It provides you the access to your Android phone from your PC. By using this app, you can wirelessly transfer any file/folder from your phone to the computer or from computer to your phone.
Even you can install and uninstall different apps right from the browsers. Through Airdroid, you can also eliminate the data from your phone in such a case that you lost it. This is a guest article contributed by Ajeet Sharma & Jeff Marlon. Ajit Sharma who works for IndianCoupons.com - a coupon & online shopping site provide android apps, mobile discount coupons for online shoppers. Jeff Marlon is a Digital Marketing Analyst in Coder Avenue, a leading IT company that offers mobile, web and desktop software solutions. With over 7 years of experience in digital marketing, Jeff is serving the worldwide clients through extensive iPhone/iPad/Android/Windows/Facebook Application Development, Game Development as well as software solutions such as ERP, CMS, MAC and many more. Click here to know more about Coder Avenue or join our Facebook page.
0 notes
Link
0 notes
Text
How to Convert AVI to MOV Effortlessly
Some types of video files aren't changing as quickly as the devices that play them. Even though AVI has been a popular file since the 1990s, it doesn't work well with macOS and Apple apps. That's why you may be looking for a solution to change AVI to MOV without losing quality or wasting your time. The good news is that there are dedicated programs to help you with the issue. We've put together three handy solutions that you can use for this purpose. Each of them works well for its own purpose. So keep reading and pick a program that works well for you.

#1 — Movavi Video Converter
Movavi Video Converter is a top choice for those looking to convert videos with zero stress or hassle. When using the tool, you will hardly have any questions on how to convert AVI to MOV — the process is straightforward. The software has been an excellent helper for both personal and work-related tasks. Fast processing, a wealth of configuration options, and an easy-to-navigate interface are its win-win features.
To convert AVI to MOV with Movavi Video Converter, follow these steps:
Download and install software — Visit the Movavi website and download the appropriate version of the program for your Windows or Mac computer. Install the software by following the on-screen instructions.
Add your AVI files — Launch Movavi Video Converter. Hit “Add Media” and select “Add Video,” or simply drag and drop your AVI assets into the program window. You can add multiple videos for batch conversion.
Select MOV as the output format — In the formats menu, choose MOV as your desired output format. You can also adjust settings such as bitrate, resolution (including HD and 4K), and codec if needed.
Choose the output folder — Click the “Save to” button to specify where the converted files will be saved.
Convert the files — Click the “Convert” button to start the conversion process. Once finished, your MOV files will be saved in the chosen folder.
You can also use Movavi’s online converter for smaller files: just upload your AVI, select MOV as the format, and download the result when ready. This process ensures high-quality, compatible MOV files ready for playback or editing, especially on Apple devices and software.
#2 — AnyMP4 Video Converter Ultimate
If you are using a high-end camera or editing movies in 4K, then quality is really crucial. This is where AnyMP4 Video Converter Ultimate comes in handy. Designed with compatibility for latest video technologies and a focus on preserving maximum quality, this tool is strong.
To convert AVI to MOV with AnyMP4 Video Converter Ultimate, follow these steps:
Download and install — Download AnyMP4 Video Converter Ultimate from the official website and install it on your PC.
Upload the target AVI files — Launch the program. Click the “Add Files” button to deliver your AVI videos to the program.
Pick MOV as output format — Click the format icon next to your imported AVI file. In the format list, select MOV as the output format. You can also adjust video resolution, encoder, and quality as per your needs.
Set output folder — Choose where you want to save the converted files by setting the output folder.
Convert — Click the “Convert All” button to convert files without a watermark. The process is quick, and your MOV files will be ready in seconds.
Follow these steps to ensure fast, high-quality conversion from AVI to MOV. It is suitable for playback or editing on a wide range of devices and platforms
#3 — EaseUS VideoKit
Some people don't work with video every day. If you are one of those who only need to change an AVI file once for it to work on an iPhone or in iMovie, EaseUS VideoKit is the best tool for you. It is simple, flexible, and easy to use.
To convert AVI to MOV with EaseUS VideoKit, follow these steps:
Download and install EaseUS VideoKit — Get the software from the official EaseUS website and install it on your personal computer.
Add AVI files — Launch EaseUS VideoKit. Click “Choose Files,” drag your AVI files into the interface, or use the + button to add them.
Select MOV as output format — Click on “Settings” or the format option next to your file. Choose MOV as the target format. The program will also give you an option to customize video quality, resolution, encoder, frame rate, and bitrate.
Set output folder — Choose the destination folder for your converted files.
Enable high-speed conversion — If needed, enable the high-speed conversion option for faster processing.
Start conversion — Click “Convert” to initiate the process. The software will convert your AVI files to MOV quickly, maintaining the original quality.
This workflow makes converting AVI to MOV with EaseUS VideoKit simple and efficient. It is suitable for both beginners and advanced users.
Choose Your Preferred Solution
Have a batch of files to convert? Not sure what solution to use? Now, you have a list of options to consider. Do not waste your time researching the market. Jump on the video conversion task right away!
0 notes
Text
Mastering Image Editing, Compression, and Customization on Your iPhone

Today, images are a vital part of everyday life in a digital structure. Social media posts are filled with images or even personal memories that often talk about them, all of which depend on images. However, effective management and personalization become inevitable with the diverse content that continues to be created, edited, and stored. Whether converting an image file to JPEG format, creating fantastic collages, compressing an image without losing quality, or changing your Google background, available tools and techniques are up to the task. This article will discuss these topics in detail, providing practical solutions, tips, and recommendations.
Let's get into specifics of accomplishing these tasks, especially with tools like PhotoCut, the best app for simplifying the photo editing and collage-making process for iPhone users.
Create hilarious caricature images with PhotoCut’s Caricature Maker.
1. Ways to Convert Images to JPEG Format

Converting images to JPEG is one of the simplest things anyone can do. The basic aim of this is to save file space, facilitate web sharing, or keep the file size minimal. Of all available formats, one usually chooses JPEG for conversion into a smaller file size. It has become one of the popular file formats because of its quality-file size balance.
Methods to Convert Images to JPEG
Using Built-in iPhone Features
If you have a photo on the iPhone that is in a different format, like PNG or TIFF, the easiest way to convert it to JPEG is simply to open the built-in Photos app. When sharing an image, either via email, messages, or any other applications, the iPhone converts automatically most formats into JPEG at the time of sending.
Open the photo, tap the share icon, and select a destination like "Mail" or "Messages." The photo will automatically be converted to JPEG.
Using Third-Party Apps
Many apps on the App Store convert images to JPEG format. Such applications include PhotoCut, JPEG/PNG Image File Converter, and The Image Converter. With PhotoCut, for instance, converting your images to JPEG is a walk in the park thanks to its user-friendly interface and the quality it gives during transformation.
Online Conversion Tools
Several websites enable you to upload and turn your images into JPEGs. Consider iLoveIMG, Online Convert, and Convertio; this is a useful option if you have a computer and require a fast format change.
Using Editing Software (PC or Mac)
For very controlled image conversions, you can use Adobe Photoshop or GIMP on your computer. Open the image in the software and then select "Save As" or "Export" and choose JPEG as the output format.
2. Ways to Make Collages on an iPhone

Collages are a brilliant way to use many photos to make a piece of art for sharing on social media, sending invitations, or personal projects. If you want to make impressive collages on your iPhone, here are some ways to do it:
Methods to Create Collages
Using PhotoCut for Collages
PhotoCut is a great tool for collage-making, making collages very easy for users. With advanced features, it allows you to cut out parts of images, combine several pictures at once, and add any text and stickers. Making a collage would entail:
Open the PhotoCut app; choose a layout or template that suits your design.
Choose your desired photos, including them on the canvas.
Resize, rotate, or crop images when necessary.
Anything else to finalise: text, background, etc.
Save or share through social media.
Using Canva
Another beautiful app to make different kinds of collage templates. The drag-and-drop feature lets you quickly upload pictures, apply filters, and arrange them to either a grid layout or a custom design.
Using Adobe Spark Post
Adobe Spark Post features templates as well as design elements to create fantastic collages. You can customize layouts, add text, and change colors. The app also has lots of stock photos and graphics to enhance your collage.
Using Pic Collage
Pic Collage is yet another super-easy, cool collage-making app. It lets you add stickers, text, and backgrounds, either in freeform collage creation or pre-made templates.
Edit your name on birthday cake photos with PhotoCut’s Birthday Cake Name Generator.
3. Ways to Compress Images Without Quality Loss

Compression of images is a very important step in reducing the size of the file for ease of upload or saving storage space. Just as importantly, lossless image compression is important for professional or personal photos that need to maintain high clarity.
Methods to Compress Images Without Losing Quality
Using PhotoCut for Compression
PhotoCut not only lets you convert and edit images but also provides an option to reduce image size without compromising on quality. With the inbuilt optimization feature, choose from a list of output quality levels and leave the app to automatically compress the photo.
Just open the image, adjust the compression level, and then save it in any format of your liking.
Using Image Optimization Apps
Apps to compress images directly on the iPhone include JPEG Optimizer, Image Size, and Compress Photos & Pictures. They generally provide sliders or preset options that help reach the goal of managing file size with acceptable image quality.
JPEG Optimizer, for instance, enables you to choose various levels of quality while saving; this helps you in cutting down the file size considerably without sacrificing too much detail.
Online Compression Tools
Before uploading to Twitter, before sending over Email, websites like TinyPNG and Compressor.io are great for just uploading images and downloading compressed versions. This is suitable for users wanting to compress images before uploading them to websites or sending them by Email.
Manual Compression in Photoshop or Lightroom
Photo editing programs such as Adobe Photoshop or Lightroom provide more control over the compression process. Both solutions have export options to limit images to a predetermined size and apply the compression method that will cause the least possible loss of visual quality.
See yourself as the opposite gender for fun with PhotoCut’s AI Gender Swapper.
4. Ways to Add Multiple Photos to Your Instagram Story

Instagram Stories can also be used in the real-time sharing of moments. Adding multiple photos into a single Instagram Story can boost the engagement level of the content, especially during specific events, products, or even personal experiences.
Methods to Add Multiple Photos to Your Instagram Story
Using Instagram's Built-In Features
Open Instagram and swipe right into the Stories interface.
Click on the photo icon to upload a picture.
Then, on the same Story, tap the "Sticker" icon (the square smiley face) and open up the "Gallery" sticker to add more photos to one Story. This allows you to choose several photos and add them to the same Story.
You can move, resize, or rotate each image to fit the Story layout.
Using PhotoCut for Creating Collages
Another simple procedure to use multiple images on an Instagram Story is by creating a collage with PhotoCut. Once you have placed your preferred pictures into one template or freeform style, save that collage and upload that to your story as one post.
Using Layout by Instagram
This application by Instagram needs no introduction. Layout is an independent app from the company that allows you to create collages and post them directly to your Stories. You will find multiple grid options that let you arrange as many as 9 images in a single post.
Using Canva or Adobe Spark
Both Canva and Adobe Spark provide templates specially designed for Instagram Stories. Upload your photos, arrange them the way they should be laid out, and customize their design. Once you are done, export your collage and post it directly to Instagram.
Turn your photos into line drawings using PhotoCut’s AI Image Outliner.
5. Ways to Change Your Google Background

Google offers a simple yet effective way to give an individual touch to your life, changing the background images on your Google homepage. Personal touches and matching the present theme would be a simple, enjoyable process as you change the entire Google background.
Methods to Change Your Google Background
Using the Google Home Page Customization Feature
In the bottom right corner, you can find a link that says, "Change Background Image."
This is a selection from Google among many images offered for you to select as your picture to upload.
You can either select a file from your computer or select a background from your Google Photos account.
Using Google Themes
Google Chrome offers several themes that take personalization a step further since they change the look of not just the Google homepage but also that of the entire Chrome browser interface. The Chrome Web Store is loaded with countless themes that you may find, select, and apply directly to your browser.
Using Google Photos
If you would prefer your background image derived from a photo that suits your stylistic fancy, you would probably upload it by using Google Photos. You can use one of your best photos and upload it to your Google homepage to give it that personal touch.
Conclusion
There are many ways to improve and inspire the digital persona, whether converting images into JPEGs, making collages, compressing images, sharing multiple photos on Instagram Stories, or changing the appearance of Google backgrounds. Tools such as PhotoCut, Canva, Layout, and others never fail to help users efficiently do these tasks without wasting precious time while getting better results. This way, one can express creativity and personalize images or the digital surroundings to suit one's taste.
Frame your photos online using PhotoCut’s vast collections of gorgeous borders and frames.
FAQs
Q1. What is "lossy" compression, and how does it relate to JPEG?
Ans. Lossy compression is an algorithm that eliminates data in the compression phase, thus causing smaller file sizes to be created, but can also cause some image quality loss. The effect is more pronounced at higher compression levels. JPEG uses lossy compression.
Q2. How do I control the quality of the JPEG conversion?
Ans. When saving as JPEG, most programs offer a "quality" setting (usually a slider or percentage). Higher quality settings result in less compression and better image quality, but larger file sizes. Experiment to find a balance between acceptable quality and desired file size.
Q3. What features should I look for in a collage app?
Ans. Consider these features:
Framework: Different frameworks exist for different arrangements for different images.
Basic Editing Tools: Basic editing capabilities such as cropping, adjusting brightness-contrast, and applying filters.
Customization Options: Change background, borders, and add text or stickers.
User Friendly: You will find an easy-to-navigate interface that makes collage designing simple and intuitive.
Resolution: Inquire about the output resolution so that your collages turn out sharp. High Resolution will do.
Q4. Are there any good free collage apps?
Ans. Yes! Canva, PicCollage, and Instagram's Layout app are good free options that provide quite a list of features. Do note that a watermark or some limitations may apply, which could be removed by upgrading to a paid version.
Q5. Is it possible to compress images without any quality loss?
Ans. Yes, using lossless compression techniques. However, keep in mind that lossless compression typically results in smaller file size reductions compared to lossy methods (like JPEG).
Q6. What image formats use lossless compression?
Ans. Common lossless includes:
PNG (Portable Network Graphics): Best for hard-edged images, text, and graphics; most used for screenshots and logos.
GIF (Graphics Interchange Format): Supports animations, while being lossless for images with a limited palette (256 colors).
TIFF (Tagged Image File Format): Highly versatile format, sometimes in archival or professional photography settings; can also be lossy.
Q7. Can I add videos along with photos in the same Story slide?
Ans. Yes, you can typically combine photos and videos using the sticker or collage methods described above.
Q8. How do I change the background color or image behind my photos in the Story?
Ans. One does so by solid-drawing the background in the Instagram Story editor. Alternatively, set a background photo or video first, after which additional photos are added as stickers on top.
Q9. How do I change the background in Gmail?
Ans. Follow the steps:
Open Gmail: Type gmail.com in the web browser.
Log In (if necessary): Ensure you log into your Google account.
Click Gear Icon: Find the gear "Settings" icon on the top right half of the screen.
Click See all settings: Options will show in the Settings window; select that.
Select Theme Tab: Locate and select theming options.
Select a preset theme: Either select among Gmail's preset theme options, or upload your image.
For Themes: Select a theme and click "Save".
For Custom Image: Click on the "My Photos" box to upload your picture and follow the prompts to adjust your image.
Save: Click "Save" to apply your selected theme or image.
Q10. The "Change Background" option is not appearing on my Google homepage. Why?
Ans. Several reasons:
You are not signed in: To personalize the homepage, you need to be signed in to your Google account.
Browser extensions: Some browser extensions tend to affect the Google Functions. Please try to switch off all your extensions gradually, and see if that solves the problem.
Google Workspace account: The administrator may restrict you from changing the Google homepage background if you are using a Google Workspace (formerly G Suite) account for work or school.
Outdated browser: Update your web browser to the latest version.
0 notes
Text
How to Convert HEIC to JPG?
What is HEIC Format?
HEIC (High-Efficiency Image Coding) is Apple's inbuilt image format for iPhones and iPads and other apple products
Why Convert HEIC to JPG?
Universal Compatibility – JPG is supported on all devices like windows, android, mac and online platforms.
Easier Editing – JPG works with all photo editing softwares like Adobe photoshop.
Web & Social Media Uploads – Many websites do not support HEIC.
Sharing Made Easy – JPG is easier to share via email and messaging apps.
How to Convert HEIC to JPG Online (Quick & Free)
The fastest way to convert HEIC to JPG is by using an online converter like heictojpgconvert.com.
Steps to Convert HEIC to JPG Online:
Go to heictojpgconvert.com.
Click on "Upload HEIC Files” button.
Select your HEIC images from your windows, android, MAC.
Click "Convert" button to start the JPG conversion process.
Download the JPG images once the conversion is complete.
Advantages of Using an Online Converter:
✅ No software installation required. ✅ Works on all devices without compatibility issue (Windows, Mac, Android, iPhone). ✅ Free and fast conversion on your devise. ✅ Bulk conversion of HEIC files also available.
How to Convert HEIC to JPG on Windows (Without Software)
Windows 10 & 11 allow you to open and convert HEIC files without additional software using heictojpgconvert.com
How to Convert HEIC to JPG on Mac
Mac users can convert HEIC images using the heictojpgconvert.com.
How to Convert HEIC to JPG on iPhone
iphone allow you to open and convert HEIC files without additional software using heictojpgconvert.com
How to Convert HEIC to JPG on Android
Android doesn’t support HEIC natively, but you can convert HEIC images using heictojpgconvert.com
Online Converter – Use heictojpgconvert.com for quick conversion.
Convert HEIC to JPG Using Photoshop
Photoshop does not support HEIC by default, but you can convert HEIC to JPG using without additional software using heictojpgconvert.com
Frequently Asked Questions (FAQs)
1. Can I convert multiple HEIC files to JPG at once batch conversion?
Yes, you can use heictojpgconvert.com to convert multiple HEIC images in bulk or batch conversion.
2. Is HEIC better than JPG?
HEIC offers better quality with smaller file sizes, but JPG is more compatible with all devices and online platforms.
3. Does converting HEIC to JPG reduce image quality?
A slight quality reduction may happen, but a high-quality converter like heictojpgconvert.com ensures minimal loss.
4. Can I convert HEIC to JPG without software?
Yes, use online tools like heictojpgconvert.com
5. Is HEIC to JPG conversion free?
Yes, you can convert HEIC to JPG for free using online software heictojpgconvert.com .
6. Can I open HEIC files on Windows?
Yes, convert heic file to jpg or png and can open it on windows
7. Why do iPhones use HEIC instead of JPG?
HEIC saves storage by compressing images efficiently with high quality.
9. Do social media sites support HEIC images?
Most social media platforms do not support HEIC. Convert heic to JPG on heictojpgconvert.com before uploading.
10. What is the best online HEIC to JPG converter?
heictojpgconvert.com offers fast, free, and high-quality HEIC to JPG conversion software.
Conclusion
Converting HEIC to JPG on heictojpgconvert.com ensures your images are compatible with all devices and online platforms. Whether you use an online tool, built-in Windows/Mac features, or Photoshop, the process is simple. For quick and free conversion, visit heictojpgconvert.com.

1 note
·
View note
Text
How to Convert HEIC to JPG Without Losing Quality: Best Solutions
How to Convert HEIC to JPG Without Losing Quality: Best Solutions
Description:
Learn how to convert HEIC to JPG without compromising image quality. Discover the best HEIC to JPG converter, including HitPaw Video Converter, for fast and high-quality conversions.
Part 1: Understanding HEIC and JPG Formats
HEIC (High-Efficiency Image Coding) is a modern image format introduced by Apple to provide better compression while maintaining high image quality. This format allows users to store more images in less space without sacrificing clarity. However, HEIC files are not widely supported across different devices and platforms, so many users need to convert HEIC to JPG.
JPG, a universally accepted image format, is compatible with almost all devices and software. By converting HEIC files to JPG, users can easily view, edit, and share their images without compatibility issues. To efficiently convert HEIC to JPG, using a reliable tool like HitPaw Video Converter is highly recommended.
Additionally, JPG images are widely used in professional settings, including web design, social media, and graphic editing. Many online platforms and photo-editing software support only JPG files, making it necessary to convert HEIC to JPG for a seamless workflow. HitPaw Video Converter ensures that the process is smooth and does not compromise image quality.
Part 2: Best HEIC to JPG Converter – HitPaw Univd
When searching for the best HEIC to JPG converter, HitPaw Video Converter stands out due to its high-quality conversion process and user-friendly interface. Here’s why HitPaw Video Converter is the top choice:
Lossless Conversion: Ensures that the image quality remains intact when converting HEIC to JPG.
Batch Processing: Converts multiple HEIC images to JPG at once, saving time and effort.
Fast Processing Speed: Quick conversion without delays or quality loss.
User-Friendly Interface: A simple and intuitive design makes it easy for anyone to use.
Cross-Platform Support: Works on both Windows and Mac, making it a versatile solution.
No Internet Required: Unlike online converters, HitPaw Video Converter allows offline conversion, ensuring privacy and security.
For those looking for a reliable HEIC to JPG converter, the HitPaw Video Converter provides the perfect balance of efficiency and quality. It is designed for both beginners and professionals who need a straightforward yet powerful tool for image conversion.
Part 3: Step-by-Step Guide on How to Convert HEIC to JPG
If you’re wondering how to convert HEIC to JPG, follow this simple step-by-step guide using HitPaw Video Converter:
Download and Install HitPaw Video Converter: Visit the official website and install the software on your device.
Open the Converter and Upload HEIC Files: Launch the program and import your HEIC images.
Select JPG as the Output Format: Choose JPG as the target format to ensure compatibility.
Start the Conversion Process: Click on the convert button, and within seconds, your HEIC images will be converted to high-quality JPG files.
Save and Use Your JPG Images: Once the conversion is complete, save the files to your preferred location.
By following these steps, you can quickly learn how to convert HEIC to JPG with minimal effort. HitPaw Video Converter also provides additional settings, allowing users to adjust resolution, quality, and output preferences.
Part 4: Comparing HEIC Convert to JPG Methods
HEIC Convert to JPG
There are several ways to achieve HEIC conversion to JPG, including online tools and built-in software features. Here’s a comparison of the different methods:
Online Converters: While convenient, they often come with file size limitations, privacy concerns, and potential quality loss. Additionally, many require a stable internet connection, which may not always be available.
Manual Conversion (Mac & Windows): Mac users can use the Preview app, and Windows users can use the Photos app, but these methods do not support batch conversion. Moreover, they may not always provide optimal quality.
HitPaw Video Converter: The most efficient method for HEIC conversion to JPG, offering lossless conversion, batch processing, and fast speeds. It is ideal for users who want a seamless experience without any restrictions.
For users who need a reliable, high-quality, and secure method for HEIC conversion to JPG, HitPaw Video Converter is the best option. Its advanced features ensure that image quality is maintained, even when processing multiple files at once.
Additional Features of HitPaw Univd
Apart from being a great HEIC to JPG converter, HitPaw Video Converter offers several other features that make it a comprehensive media tool:
Supports Multiple Image Formats: Apart from HEIC to JPG, it can convert images to PNG, BMP, and other popular formats.
Built-in Editing Tools: Allows minor adjustments such as cropping, resizing, and format customization.
Safe and Secure: Unlike online converters, it keeps your files private and does not upload them to a server.
These additional functionalities make the HitPaw Video Converter more than just a HEIC to JPG converter, ensuring that users get the best value from their software.
Conclusion
Using a professional HEIC to JPG converter is essential for maintaining image quality and ensuring compatibility across all devices. While there are multiple ways to convert HEIC to JPG, HitPaw Video Converter offers the best balance of speed, quality, and ease of use.
If you're looking for a fast and efficient way to convert HEIC to JPG, try HitPaw Video Converter today! With its batch processing capabilities, lossless conversion, and user-friendly interface, it is the best solution for all your image conversion needs.
Download HitPaw Univd Now and Experience Hassle-Free HEIC to JPG Conversion!
1 note
·
View note
Text
🎥 How to Play MKV Files on Mac: 3 Effortless Methods You Need to Know!
✨ Struggling with MKV playback on your Mac? You're not alone! Macs don’t natively support MKV files, but here’s the good news: you can fix it quickly with these 3 easy methods! 🖥️
💡 Method 1: Use a Dedicated MKV Player 🚀 Our Top Picks: 1️⃣ VLC Media Player – Free, reliable, and supports almost every format. 2️⃣ Elmedia Player – Sleek design with AirPlay features. 3️⃣ IINA Player – Made for macOS with modern vibes.
👉 Pro Tip: Drag and drop your MKV file into any of these players for instant playback!
💡 Method 2: Convert MKV to Mac-Friendly Formats 🍏 Convert MKV to MP4 or MOV using tools like: ⚙️ HandBrake – Free and beginner-friendly. ⚙️ Any Video Converter – Fast with high-quality output. ⚙️ CloudConvert – No downloads needed, works right in your browser!
💡 Method 3: Enhance QuickTime Player with Plugins 🌟 Install codec plugins like Perian to expand QuickTime’s compatibility. ⚠️ Heads up: Perian may not work on macOS Catalina or newer versions.
🔑 Why Choose These Methods? MKV files are awesome for their flexibility, but QuickTime isn’t built to handle them. With these methods, you can easily: ✅ Play your videos without interruption. ✅ Avoid complicated setups. ✅ Enhance your Mac’s playback experience.
🌟 Bonus Tips for Smooth Playback:
Keep your media player updated! 🛠️
Optimize Mac performance by closing unnecessary apps. ⚡
Check your MKV file for corruption—it might not be your player’s fault! 📂
💬 Which method works best for you? Share your experience in the comments or reblog this post to help others struggling with MKV playback!
0 notes
Text
Raise Your Video Game: Turn Your Home Movies into 4K Wonders with iFoto's Free Video Enhancer
Hey there, fellow video enthusiasts! Ever find yourself staring at a grainy, low-quality video, wishing you could bring it back to life? Well, you're not alone. Whether it's a cherished family moment or a nostalgic trip down memory lane, poor video quality can be a real buzzkill. But fear not! I've got some exciting news that's about to revolutionize the way you view and share your digital memories.
Are you ready to convert your everyday videos into high-def masterpieces? With iFoto's Free Video Enhancer, it's easier than you think to upscale your videos to stunning 4K resolutions at 30FPS and beyond. Yes, you heard that right—without any quality loss. Let's explore into how you can make your home movies shine like they were shot yesterday.
First things first, what exactly is the Free Video Enhancer, and how does it work? It's an AI-powered tool that analyzes your video and intelligently upscales it to a higher resolution, all while maintaining the original quality. No more pixelated nightmares! So, how do you get your hands on this magical tool? Let's walk through the process together.
Step 1: Download and Install iFoto
The first step is to download and install the iFoto software on your computer. It's available for both Windows and Mac, so there's no need to worry about compatibility issues. Once installed, open the program and you're ready to roll.
Step 2: Import Your Videos
Now it's time to import the videos you want to enhance. Simply drag and drop them into the iFoto interface or click the 'Import Videos' button. You can process multiple videos at once, so go ahead and load up your collection.
Step 3: Select the Output Settings
Next, choose your desired output settings. For the best results, select the '4K resolution at 30FPS' option. If you're feeling adventurous, you can also experiment with other resolution settings. Just remember, the higher the resolution, the larger the file size will be.
Step 4: Boost Your Videos
Once you've set your preferences, click the 'Boost' button. iFoto's AI will get to work, analyzing and upscaling your videos. This process can take a few minutes, depending on the length and number of videos you're enhancing. Patience, my friend, patience.
Step 5: Save and Share
After the magic is done, your videos will be saved in the enhanced format. You can now share them with friends, family, or even post them on social media to showcase your newfound video prowess. Your digital memories will be the envy of all your peers!
So, there you have it—your guide to converting your everyday videos into high-def masterpieces with iFoto's Free Video Enhancer. It's time to breathe new life into your cherished memories and watch them come to life in stunning clarity. Are you ready to explore in and give it a try? I know I am!
0 notes
Text
Exploring macOS: Hidden Features Every MacBook Pro Owner Should Know
MacBook Pro users often rely on their devices for productivity, creativity, and entertainment. While macOS is known for its user-friendly interface, it also houses a variety of lesser-known features that can significantly enhance your experience. From time-saving shortcuts to advanced customisation options, here’s a guide to hidden macOS features every MacBook Pro owner should explore.
1. Quick Look for Instant File Previews
Quick Look allows you to preview files without opening them in their respective apps. Simply select a file in Finder and press the spacebar. This works for images, PDFs, and even videos. You can navigate through multiple files using arrow keys while Quick Look is active.
How to Maximise It:
For more functionality, use Quick Look to add annotations to PDFs or trim video clips without launching Preview or iMovie.
2. Split View for Multitasking
Working on multiple tasks? Split View lets you use two apps side by side, boosting productivity. To activate it, click and hold the green full-screen button in the top-left corner of a window, then drag it to one side of the screen. Choose another app for the opposite side.
Why It’s Handy:
Ideal for comparing documents, referencing research while writing, or attending a video call alongside note-taking.
3. Spotlight Calculator and Conversions
Spotlight is more than just a search tool. Press Cmd + Space to open Spotlight, and you can perform quick calculations or unit conversions. For instance, type “50 GBP to USD” or “10 kg to pounds” for instant results.
Bonus Tip:
Spotlight can also search for specific file types or locations using terms like “kind” or “folder.”
4. Customisable Hot Corners
Hot Corners transform your screen corners into triggers for specific actions. Go to System Settings > Desktop & Dock > Hot Corners. Assign functions like starting a screensaver, locking your screen, or displaying your desktop.
Best Uses:
Set up Hot Corners for quick privacy during work or rapid access to mission-critical files.
5. Text Replacement for Faster Typing
If you frequently type the same phrases, macOS has a built-in text replacement feature. Navigate to System Settings > Keyboard > Text. Add shortcuts like “omw” to expand into “On my way!” or “sig” for your email signature.
Pro Tip:
Combine this with customised keyboard shortcuts for seamless writing across applications.
6. Universal Clipboard for Seamless Copy-Pasting
Copy text or images on your iPhone or iPad and paste them directly onto your MacBook Pro. Universal Clipboard works across devices signed into the same Apple ID with Bluetooth and WiFi enabled.
How It Enhances Workflow:
Perfect for transferring content quickly without emailing or using cloud services.
7. Automator for Task Automation
Automator helps you automate repetitive tasks, such as renaming large batches of files or converting image formats. Open Automator from the Applications folder, choose a workflow type, and drag the desired actions into the workflow panel.
Examples of Use:
Set up a workflow to resize images for specific project needs or create custom alerts for calendar events.
8. Screen Time for Mac
Screen Time isn’t just for mobile devices. On macOS, it helps monitor your app usage and set limits to avoid distractions. Find it in System Settings > Screen Time.
Stay Focused:
Create App Limits to restrict time on social media or set Downtime for uninterrupted work sessions.
9. Safari Reader Mode
For a distraction-free reading experience, Safari’s Reader Mode strips away ads and clutter from web articles. When you’re on a compatible webpage, click the Reader button in the address bar or press Cmd + Shift + R.
Additional Perks:
Customise Reader Mode by changing the text size, background colour, or font to suit your preferences.
10. Secure Notes with Passwords
The Notes app lets you lock sensitive information. Select a note, click the Lock button in the toolbar, and set a password. This ensures that private information stays protected.
Best Practice:
Use this for storing personal details, secure project notes, or financial information.
Final Thoughts
These hidden macOS features can transform your MacBook Pro experience, making your workflow more efficient and your tasks more manageable. Whether you’re a creative professional or a business user, mastering these tools can help you unlock the full potential of your device.
For those considering upgrading their setup temporarily or for specific projects, a MacBook Pro rental is an excellent way to experience the latest macOS features without committing to a purchase.
0 notes
Text
Now a day each and every Camera companies are in a race to provide a better camera for awesome pictures in low light and fine touch but still all cameras are not providing such a photo of yours which you can say Wow. But we can make our photos look wow with some best Photo editing software. Not only photographers but a different kind of firms also use editing software for rendering, modeling, and simulation technique for DRDO and ISRO like organization. 2D and 3D design for car design and auto car cover Design Company. Even many professional photographers were using software to make their pictures look like the real existing image. Today here I am sharing with you most of the top software in photo editing which will make your pictures more beautiful enjoyable with your friends on social media. In fact, a web designer or UI developer also use photo editing software to create a design for Android apps, website, iOS app etc. Website Builder reviews inform us that Hyundai had an increase of requests by up to 62% once they started using high-quality pictures. This just emphasizes the need to have high-quality images from the right editing software. Below are the best photos editing software? 1. Adobe Photoshop Adobe Photoshop is a type of software which is used to play with photos or in another way, we can say that it is used to do something with the picture. Adobe Photoshop CC, Adobe Photoshop CS6 is some of its versions which make your image real and existing image. It can run on various platforms of windows operating and Mac operating system. Features Adobe Photoshop has some unique features which make your photo live and real. It edits your Easter image in multiple layers. It has a feature which can mask your image. Various color combinations option is available in Adobe Photoshop. It can resize your image to any size easily. It supports various graphics file formats. This Adobe Photoshop application is used by many professionals Photographer. It can run on various platforms of windows and other operating systems. 2. Google Nik Google Nik is a Google supporting application through which you can play with an image. Here you are able to change or modify not a single image but at a time you can modify multiple images. Here various plugin and tools are available for editing image. It’s very popular enhancement application for photo editing. It supports iOS and Android app. Features It has its own unique feature that Applies Film-era camera, lens & film situation to digital images. It has a Package of filters that comes with many effects like HDR effect, etc. It can maintain Noise Reduction in images and videos It has a specialized program for processing HDR pictures. You can share your image with anyone very easily. It can convert the image into a Black and white format easily. Its best feature is Color Control with an advanced function to change the contrast and saturation. 3. Pixel Mator Pixel Mator is photo editing software of MacOs. It made up a combination of open source and Mac technology. It has a transparent head on display which helps the user to work for image easily. It uses Core Image and Open Gl technology. Features It provides open source platform for Mac OS user for editing images. It also supports various graphics file format. It works on layer based image also. There are more than 40 tools for general editing image like selecting, navigating, coloring, retouching, painting etc. It has 16 coloring tool for coloring image. It has 50 above filters options. It provides full facilities for converting an image format file. It has also such a feature insight through which you can take pictures from an app. 4. Paint .net Paint.net is Microsoft Windows image editing software which provides full facilities to edit image like professionals. It supports window platform. It works on .NET Framework platform. This replaces simple paint from Microsoft Windows. Because simple paint does not include features like layer transparency etc.
Features It has very interesting and simple User Interface for a common and new user so that user can use it without any help. paint.net supports many layer blend modes, layer transparency and reordering of layers with drag-and-drop. It has such feature in which you can open multiple images and you can also edit multiple images at a time. It supports various file formats. It supports 22 languages in which it appears. One of the best features is that if a new version comes, it automatically updates. It has extensibility in which it can add another plugin also to support different feature for editing. 5. GIMP GIMP is multi-platform for photo editing software, which provides a user a multi-platform to edit an image. It is used in the manipulation of various image tasks like retouching, selecting, composition image etc. It provides facilities from a simple editor to an expert or professional editor. It can be used to convert various file formats for editing. Features Supports a wide range of file formats, including GIF, JPEG, PNG, XPM, TIFF, TGA, MPEG, PS, PDF, PCX, BMP and many others Supports various plugins. It also supports various tool for retouching layering etc. Its full support layer and transparency Its full support alpha channel pixel for pixel support image. It also supports various undo-redo option. Its transparency effect supports rotate and flip. 6. PixLR PixLR is cloud-based image editing software which provides online facilities for editing image it has a collection of various editing tools. It is browser extension editing software for photo sharing services. It has both UI simple and professional photo editor. It may be available on all system PCs and smartphones or tablets and using a tablet. Features It is an online free image editing software It is available for smartphones and tablets and pc. It is one of best editing software It has many tools for editing image like selecting retouching layering etc. It has its special features that you can access it from a web browser. It is based on cloud computing It has three powerful tools like layer, navigator, and history. 7. Snapseed Snapseed is one of best photo editor software. This software is produced by Google. It was bought by Google a few years ago. This is powerful photo editing software of today's generation. It provides editing on the raw photo which catches the eye of a photographer .It is simple but very deceptively light and powerful photo editor software for Android and iOS. It is a little bit costlier in comparison to other editing software. Features It uses swiping gesture for selecting different effect and enhancement. It automatically adjusts color and contrast. It has unique feature of saving history of user work It also creates and saves filter combination by using the default filter and editing. It has various tools like Grunge, Vintage, center, focus lens etc. Through this software, a user can share their picture on social media easily and directly. It supports all types of file format. It has new filter feature with clear user interface 8. Photo Mate R3 Photo Mate is new among all editing software but rendering engine for editing both raw and jpg file. It can edit a photo with very fine major tools like contrast, shadow, highlights and even exposure. With its rendering engine feature, it can defeat all other software. Features It provides very easier and more intuitive interface to the user. It has new editing effect spit toning. It can make your image unique. It has a very fine sharpening effect. It also has a Dehaze feature which allows you to control the amount of removing haze from landscape or telephoto to shots and restore color. It has very extended watermark feature. It has a feature to create virtual copies of your editing image. 9. Filter Storm Neue Filter storm Neue is a brand new photo editing software. Which provide a power of classic Filterstorm.
Through which it is much faster and easier to use. It is a universal app for all iPhone and iPad. It provides all photo editing tools. Features It provides powerful masking tool for photo editing. It can export PNG file. It has a feature of channel mixer It has ability for determining file size It has the ability to alter different types of color It supports all types of file format Photojournalist will enjoy features like FTP and IPTC metadata. 10. Enlight Introduction: This software brings layer features which can edit multiple images at one time this is a unique feature of this software. Many versions of this software launched but Enlight works awesome in editing. This software is based on Apple and IOS configuration. It has various new features through which image can be edited easily.It allows user to keep multiple images into a single file. Features This support both IOS configuration and Apple. It is based on mobile and desktop pc on both it can use freely It has a panel of control for adjusting time contrast and the detail inside an image. It also pre-loaded with a number of extras for photo editing including fonts graphics and presents. It provides full-on creativity on mobile With the layer feature, it provides user multiple images into single file for editing It has blending transparency features also. 11. Corel PaintShop Pro Corel PaintShop Pro is the best photo editor which gives users an advantage of easy and fast edits with very high-end outcomes. It allows you to learn the menus and toolbars quickly in regardless of your skill level. It puts its users at an advantage over the other software users by offering easy importing, exporting, sharing, organizing and finally a help and support for all your queries. Corel spearheads all the other photo editors. Lastly, using this program is fun accompanied by excellent value. Corel on average costs $79.99 and at the same time given the gold award. Get the right version here 12. Adobe Photoshop Elements It has powerful editing tools that suit the users of any skill levels. It has three editing modes which include Guided, Expert and Quick Edit. It allows you to upload your images to social media sites directly which provides for Flicker, Twitter, and Facebook. Adobe Photoshop Elements keeps advancing as you do and it is the best for the beginners who want to improve their skills quickly. On average the cost of this software is $69.99 and is available here. 13. CyberLink's Photo Director CyberLink's Photo Director is an excellent program that best suits beginners since it has many and necessary tools. It also organized in a simple way for the beginners to find, use and learn about the tools. However, PSD files which allow the user to save his separate files of his projects, are not compatible with this software. Finally, it also lacks vector graphics tools. CyberLink's costs $44.99 14. Zoner Photo Studio Zoner Photo Studio which is available at zoner is organized in sections of a different kind to enable access the feature and means you are in need of without overwhelming options. This program comes with very many helpful tools to help learn both advanced and easy editing ploy. It is also suitable for beginners and the intermediate consumers who want to improve and being permitted to work in layers. 15. ACD See Pro It is a photo viewer, organizer and image editor that was developed by ACD that is used through the following operating systems macOS, iOS, and windows. It offers several photo editing tools such as shape tools, selection tools and drawing and painting tools. It also has automatic edit options that correct and then adjust your photo. The software cannot construct HDR images and panoramic pictures. The software usually shows the EXIF information of your image. Beginners and professional photographers can both use this program with ease. You can get the trial or paid version. 16. Affinity Photo It best suits the advanced image editors who are looking for a cheaper program accompanied by no subscription.
It correctly serves this kind of users as well as supporting PSD, RAW, and files with high resolution. It is designed to help experienced and advanced users in transition to using it. The interface has some minor changes that make the editing process simple. Affinity Photo does not have a photo organizer who makes it the only reason to rank it so low in this comparison. However, it is possible to purchase an Affinity Photo from the website accompanied by another image organizing software. 17. Xara Photo & Graphic Designer Xara Photo & Graphic Designer has a powerful enhancement, and image editing features to enhance photo editing and vector illustration tools. It is a program that comes with high-end feature tools which are very simple to use having a favorable money value. Some of the photo tools it has include magic erase, photo healing, color select, photo effects and finally panorama. However, in regardless of the graphic, image requirements as well as skills level you have, it is a very friendly interface. . 18. Paint.Net It is commonly known for its simplicity. It is also easy and a quick to operate it when editing photos. Over the years many advanced image editing tool such as undo history, layers, a ton of filters and zoom filters to enhance recomposing of photos. If your computer or phone is underpowered, this is the best choice to think of, download it from the website. 19. Photo Pos Pro It not that well known but is a quality photo editor enriched with advanced photo-enhancing tools. It has a smart interface which is more accessible with all its content arranged consistently and logically. It also has a brush to erase unnecessary blemishes and supports batch editing to enable you to save time when you refine the folder of photos. The software is fairly priced at the website. 20. PhotoScape PhotoScape has a wealth of features such as photo merging and splitting, raw conversion, function to print graph or lined papers and finally creating an animated GIF. It is one of the esoteric interfaces among the others but with fewer features. It is most common for the novice users. With that said get the correct version at the website. Conclusion Choosing which photo editing software to use is a tough decision to make. Among all these programs their web-based and free applications as well as programs you can install on your phone or computer. Whether you are a professional photographer or a beginner in this software, there is software that can suit your needs and skill level. Some of the factors that you need to consider are your editing plans, tools that you require, file formats that fit your skills level, and finally the system of your computer or phone run the photo editing software. Article Updates Updated on December 2017 - Added more photo editors including online ones.
0 notes
Text
Types of Atem Mini Switchers

Are you looking to uplift your live streaming or video production game? Blackmagic Design's ATEM Mini series offers a range of dynamic and functional switchers to cater to different needs. In this blog, we'll inquire into the four primary types of ATEM Mini switchers, their key features, and help you determine the best fit for your project. Buy your ATEM Mini from AWPRO and enjoy the best deals in the market! Blackmagic Design has transformed live creation with its ATEM Mini series, contributing compact and economical solutions for creators of all levels. Let's prospect the four main models:
Blackmagic Design ATEM Mini Pro HDMI Live Stream Switcher
This model is a popular choice for beginners and professionals alike. It blisters Stream video up to 1080p HD, allowing you Simultaneous USB recording. With built-in hardware streaming, you can directly stream to platforms like YouTube, Facebook, and Twitch without needing additional equipment. Other key features include recording to USB disks, a USB webcam output, an audio mixer, 2D DVE, transitions, green screen chroma key, and 20 stills for titles.
Key Features:
Same rear panel as ATEM Mini with added buttons and software features
Stream video up to 1080p HD
Quick stream, on-air and record buttons
Hardware encoder so there’s no need for additional streaming software
Control and configure timecode, stream status
Full support and control features for BMPCC 6K and 4K cameras
Simultaneous USB recording
Integration with Multi Dock for live hard drive switching
Customize advanced settings with XML files
Software multiview with program previews, graphics, record status, on air status, audio meters
Program preview input and output buttons
Tally light control for BMPCC 6K/4K cameras
Automatic timecode sync for all cameras
The ATEM Mini Pro price in Dubai prices may vary depending on the retailer and any ongoing promotions. Buy your ATEM Mini Pro HDMI Live Stream Switcher from AWPRO and get the best deal.

Blackmagic Design ATEM Mini Pro ISO
Building upon the ATEM Mini Pro, this model adds a crucial feature: independent recording of all video inputs. This is ideal for post-production workflows as it provides separate clean feeds for each camera. It's perfect for creating multi-camera productions with precise editing control.
Key Features:
Features miniaturized control panel based design.
Built in support for recording each input as a separate ISO file.
Saves DaVinci Resolve project file for 1 click editing of live production.
Supports connecting up to 4 cameras or computers.
Live streaming via Ethernet supported on ATEM Mini Pro.
USB output operates as a webcam and supports all video software.
Automatically convert and re-syncs all HDMI inputs.
Includes free ATEM Software Control for Mac and Windows.
Internal media for 20 RGBA graphics for titles, opening plates and logos.
Includes ATEM Advanced Chroma Key for green/blue screen work.
Multiview allows monitoring of all cameras on ATEM Mini Pro.
Audio mixer supports limiter, compressor, 6 band EQ and more!
The ATEM Mini Pro ISO price in Dubai is generally higher than the standard ATEM Mini Pro due to its additional features. Experience the power of independent recording with the Blackmagic Design ATEM Mini Pro ISO, available at the best price on AWPRO.

Blackmagic Design ATEM Mini Extreme
For those demanding more inputs and advanced features, the ATEM Mini Extreme is the answer. It offers 8 HDMI inputs, 16-way multiview, 4 ATEM Advanced Chroma Keyers, SuperSource with 4 extra DVE's, 2 HDMI outputs, and 2 USB ports. This model is designed for professional-level productions requiring multiple cameras, advanced effects, and complex workflows.
Key Features:
8-Channel HDMI Live Streaming Switcher
Supports up to 1080p60
RTMP Streaming via Ethernet or USB-C
Record Program Out
11-Input, 2-Channel Audio Mixer
Input Frame Rate and Format Converter
Re-Sync on All HDMI Inputs
HD Multiview Output with up to 16 Views
Local and Software Switching
4 x Upstream, 2 x Downstream Keyers
The ATEM Mini Extreme price in Dubai is significantly higher due to its advanced features. Upgrade your production with the Blackmagic Design ATEM Mini Extreme. Visit AWPRO for the best deals.

Blackmagic Design ATEM Mini Extreme ISO
Combining the power of the ATEM Mini Extreme with independent recording capabilities, this model is the ultimate choice for high-end productions that demand both flexibility and quality.
Key Features:
8-Channel HDMI Live Streaming Switcher
Supports up to 1080p60
RTMP Streaming via Ethernet or USB-C
Record Program Out and Individual Inputs
11-Input, 2-Channel Audio Mixer
Input Frame Rate and Format Converter
Re-Sync on All HDMI Inputs
HD Multiview Output with up to 16 Views
Local and Software Switching
4 x Upstream, 2 x Downstream Keyers
The ATEM Mini Extreme ISO price in Dubai is the highest among the ATEM Mini models due to its combination of features. Get your hands on the Blackmagic Design ATEM Mini Extreme ISO and enjoy the best of both worlds. Visit AWPRO for unbeatable prices.

Choosing the Right ATEM Mini
Selecting the ideal ATEM Mini depends on your specific requirements:
Number of inputs: Determine how many cameras or devices you need to connect.
Streaming and recording needs: Consider whether you require direct streaming, recording to USB, or independent recording of each input.
Advanced features: Assess if you need features like multiview, advanced chroma keyers, or SuperSource.
Remember, AWPRO offers the best prices on all ATEM Mini models. Visit our website to explore our range and find the perfect switcher for your needs. Buy Atem Mini online in Dubai at your very trusted store AWPRO.
Conclusion
Blackmagic Design's ATEM Mini series offers an impressive range of options to suit various video production needs. By understanding the key differences between the models, you can make an informed decision and unlock the full potential of your live productions. Choose AWPRO as your trusted partner for all your ATEM Mini needs. Best Atem Mini Controllers are available at AWPRO
0 notes
Text
Radiant DICOM Viewer 2023.3.3 Crack + Serial Number 2024 [64-Bit]

Radiant DICOM Viewer 2023.3.3 Crack In medical field this software makes the extra ordinary service for the user. With this open and display studies from the different way like, radiography, mammograph etc. Now you can get software to this our site free crack for one year enjoy it.
RadiAnt DICOM Viewer full cracked is a very smart and powerful PACS DICOM viewer for medical images designed to provides you with a unique experience. This software is good and powerful. Its natural interface and unrivaled execution, you’ll never think back. The images can be exported as JPEG, bitmap or a video tutorial (WMV). After opening this kind of image you may use an easy scaling, you can modify the lighting and other variables, there are prepared options of the visualization home window for computed tomography, it will help you to turn the image to the required degree, you can find a good pen for sketching by hand. Get the real one and enjoy the fast and secure connection with this software. Now you are medical images design in a perfect way.
RadiAnt DICOM Viewer License Key Latest Version 2024:
This RadiAnt DICOM Viewer Serial Key a standard user interface with modern visuals that allows users to access all important application that save and search images, scale all elements in the model, and manipulate images and other its uses. Furthermore, if we need new tools that are faster than old program and can also be used added to CD and DVD media. It can be used to provide users with a familiar experience. Also, This program can run tow ways one on Microsoft Windows and second Mac OS.
RadiAnt DICOM Viewer Activation Code Key program has very fast and runs on Windows from CD or DVD media without requiring any installation. Also, When open an image type you have a simple formula, brightness and other settings you can change. In addition, Image display options are also possible in this software. You Can Keep using main window brightness easily. Furthermore, DICOM viewers help convert images to the desired level, which can be achieved with a large data.

Key Features:
RadiAnt DICOM Viewer Activation Key basic program allows you to add transitions and negative methods to DICOM files.
Also, You can easily find files in folders.
It Easily view files in order.
Folders help users upload relevant images.
You can create separate files and folders for patients. You can see it quickly.
Perform a full scan in this program.
All information is protected with program.
Access data whenever you want with just a few clicks.
Split mode allows you to view more than 20 slides simultaneously.
Users can search DICOM files and applications with high efficiency.
You can combine different types of values in a single document.
Length, Ellipse and Angle can be applied to DICOM images.
You can also specify files.
In addition, Users can customize the presentation of medical images.
Mainly used by medical students and doctors.
RadiAnt DICOM Viewer License Key:
7ERYV-M845U-FT747-EFHFI-RRUNC
SKFWT-35TXD-5WETD-FTMVL-SU8Y7
8CS8W-ERICN-KSHR7-CTE5Q-DTWEU
FHCML-S9TYE-HR9EJ-UWR8J-SCEI8
IH7FI-DJWCM-KSDGU-TR7EC-T3T6X
RUMQS-DHUEU-RDCIR-TESDF-QE5TF
53TSW-ESFDW-TYDYM-VRU93-DFRY9
EJDFC-MISE8-R3GUF-EYR7F-TTQFQ
Requirements:
Windows 7, 8, 8.1 or 10 (64-bit).
Mac OS X 10.10 or later (64-bit).
Ubuntu 16.04 or later (64-bit).
At least 2 GB of RAM.
At least 2 GHz processor.
OpenGL 2.0-capable graphics card with 512 MB of VRAM or more.
What’s New?
All previous display issues have been fixed in this software.
This option makes it easier to take a mammography image in the best way.
This may cause problems in supporting DICOM-based health data.
Technical techniques in this process is also available.
How to Install RadiAnt DICOM Viewer Crack?
If you are already using the old version, immediately uninstall it.
Download RadiAnt DICOM Viewer Crack with IDM.
Temporarily turn off your Windows firewall (you can turn on Windows real-time protection after the installation).
Now, you need to extract the downloaded file with WinRAR
Run the setup file.
Click “Next” to start the installation.
After installation, don’t run the software.
Then, copy the crack files and paste them into the installation directory.
#RadiantDICOMViewerSerialNumber2024#RadiantDICOMViewerActivationCode#RadiantDICOMViewerTorrent#RadiantDICOMViewerKeygen#RadiantDICOMViewerCrackMac#RadiantDICOMViewerFullCrackgoogledrive
0 notes
Text
Simple Ways to Convert Images to JPEG Format

Since pictures now dominate commerce, entertainment, and communication in our computer and internet-driven world, JPEG (Joint Photographic Experts Group) is one of the most popular image file formats, providing a delicate balance between file size and quality. Converting your photos to JPEG format is the first step whether you're posting them to websites, making content for social media, or arranging your collection of photos. Thankfully, there are simple methods for converting photographs to JPEG format. This tutorial will walk you through the process on Windows, macOS, and online tools like PhotoCut. You can also rotate your photos and convert them into JPEG.
What is JPEG Format?
JPEG or JPG is one of the usual file formats used to embed digital images, especially those used in photographs. Being widely popular because of its lossy compression method, files tend to be compressed or reduced without much loss of quality, making it good for image compression that makes it possible to easily share them. However, the compression ratio can be adjusted in a way to balance file size with visual quality; thus, JPEG is best suited for digital photography and the internet.
The Joint Photographic Experts Group created JPEG, hence the name and its compression algorithm. Depending on settings, JPEG can shrink files by a 10:1 ratio with minimal perceptible degradation. This makes JPEG a perfect option for content meant to appear online, where fast loading and low bandwidth are factors. You can create art using PhotoCut’s AI and convert it into JPEG.
Why Convert Images to JPEG?
Converting images to JPEG format can be essential for various reasons:
Compatibility: Most websites and applications require images in JPEG format. JPEG is cross-platform supported and across different devices; hence your images will easily be viewed by any person with no compatibility issues.
File Size: The lossy compression in JPEG helps in reducing the file size; hence easier upload and storing of images. Smaller file sizes make it easy to upload photos online or share on social media quickly.
Quality preservation: JPEG with a slight tuning will preserve quality well when reducing the size of files. It is best to use JPEG for digital photo file format.
Internet Usage: JPEG is the de facto image format for the web. From online galleries to social media and e-commerce, most platforms support and optimize images in this format.
How to Convert an Image to JPEG in Windows
If running usage of the Windows operating system comes with Windows 10/11, one of the simplest ways to convert is via Microsoft Paint. This basic tool provided by Windows allows quick changes in file format. You can change the background of a photo and convert it into JPEG.
Step-by-Step Guide for Converting Images to JPEG in Windows
Find the folder holding the image file in File Explorer and right-click an image file. Then from the Open With option, choose Paint from the list of options to open it.
Open the picture in Paint and click on File located in the top left corner of your screen. From there, select save as> JPEG picture. It makes it possible to save as a JPEG file.
The dialog box that appears on the screen will give you the option to choose where you want to save your newly created JPEG file. You may also change the name of the file at this stage if you wish. In the Save as type column, choose JPEG as the format, then press the Save button.
How to Convert an Image to JPEG in macOS
On a Mac, you can use Preview, an application integrated with the operating system, to view and edit images. You can also quickly convert image files to JPEG format using it. You can remove watermarks from photos and convert them into JPEG.
Step-by-Step Guide for Converting Images to JPEG in macOS
Open the file you want to save using Preview. If the file does not open on its own by default, then, double-click on the file.
Open the image in Preview. Click at the top of the window on the File menu and in the dropdown list select Export.
A dialog box will pop up, showing you export options. In the Format dropdown, select JPEG. The Quality slider allows you to control the file size of the image. More quality translates into more size, and less quality makes the file smaller, although it may lose its crispness.
Choose the preferred quality, and then tap the Save icon to save your new JPEG file. Depending on how you configure this option, the saved file will go into the same directory as your source image.
How to Convert an Image to JPEG Using PhotoCut
For those who like the option of going online, PhotoCut provides an easy-to-use free website for converting images into JPEG format. This method is very useful when you want to convert several files or do not like the use of desktop applications. You can enlarge your images using PhotoCut and convert them into JPEG.
Step-by-Step Guide for Converting Images to JPEG with PhotoCut
On the front page of PhotoCut’s website, click Convert to JPEG Now.
Click on the Upload Picture button, then you can browse the image file you want to convert into JPEG on your computer or drag and drop the file into the upload area.
Once the image is uploaded, you can resize it, and also adjust its quality to your liking. You can resize and edit PhotoCut so that the output JPEG image is suitable for your needs.
Once you have adjusted the parameters, click Convert. PhotoCut will then process the image and output it as a JPEG file. Once done, you will be able to download the JPEG file to your PC.
Additional Features with PhotoCut
Besides saving images as JPEG, PhotoCut provides you with many more tools to enhance your images:
Image Compression: Using PhotoCut's online image compressor, you may minimize the size of your JPEG pictures. Upload your photo, select original, low, medium, or high resolution, and then instantly compress it.
Background Remover: Do you want to remove the background of an image? PhotoCut's background removal tool makes it easy to remove backgrounds from your photos.
AI Image Generator: An AI photo generator capable of creating astonishing images from simple text prompts is offered by PhotoCut for the more experienced end.
How to Compress JPEG Images Using PhotoCut
PhotoCut's Bulk Image Compressor will be useful if you wish to compress your converted JPEG images. This feature compresses up to 50 images at once and thus saves time and effort.
Steps to Compress JPEG Images Using PhotoCut
Open PhotoCut’s online image compressor tool.
Upload the JPEG image you wish to compress. Choose several files or even select multiple images to compress together.
Choose a compression level of high, medium, or low; alternatively, you can select the original that maintains quality.
Hit Start and initiate the process for compressing your JPEGs. Upon completion of compressing the images, it is downloadable in its newly compressed state as a series of JPEG files.
JPEG Conversion and Other File Formats
PhotoCut can convert photographs to JPEG, PNG, PDF, and many more file types. This web-based application provides several applications for picture editing and converting.
Conclusion
Your photos will work on the majority of platforms, websites, and applications if you convert them to JPEG format. A few simple methods exist for converting your images to this format, regardless of whether you use Windows, macOS, or the web application PhotoCut. Follow easy instructions to convert and compress photos without a hassle, save time, and have all your images ready for upload online. And of course, do not forget the other features PhotoCut provides, like image compression, background removal, and AI-generated images, to make your pictures even better!
FAQs
Q1. What’s the difference between JPG and JPEG?
Ans. JPG and JPEG are the same format. The only reason is that, in earlier versions of Windows, they shortened the word JPEG to JPG due to the three-character limitation of file extensions. Both have the same compression algorithm and the same quality and size options for files.
Q2. Can I convert multiple images to JPEG at once?
Ans. Yes, you can! PhotoCut allows you to upload multiple photos in bulk and convert these multiple images to JPEG simultaneously with the help of its bulk image compressor, saving you much-needed time.
Q3. Is there a free tool for JPEG conversion?
Ans. Yes, the photo cut offers free online conversion where you can load the images, convert these into JPEG, and also compress them for free.
0 notes